

Add and manage storage clusters using NetApp Hybrid Cloud Control
 Suggest changes
You can add storage clusters to the management node assets inventory so that they can be managed using NetApp Hybrid Cloud Control (HCC). The first storage cluster added during system setup is the default authoritative storage cluster, but additional clusters can be added using HCC UI.
After a storage cluster is added, you can monitor cluster performance, change storage cluster credentials for the managed asset, or remove a storage cluster from the management node asset inventory if it no longer needs to be managed using HCC.
Starting with Element 12.2, you can use the maintenance mode feature options to enable and disable maintenance mode for your storage cluster nodes.
-
Cluster administrator permissions: You have permissions as administrator on the authoritative storage cluster. The authoritative cluster is the first cluster added to the management node inventory during system setup.
-
Element software: Your storage cluster version is running NetApp Element software 11.3 or later.
-
Management node: You have deployed a management node running version 11.3 or later.
-
Management services: You have updated your management services bundle to version 2.17 or later.
Add a storage cluster
You can add a storage cluster to the management node assets inventory using NetApp Hybrid Cloud Control. This allows you to manage and monitor the cluster using the HCC UI.
-
Log in to NetApp Hybrid Cloud Control by providing the authoritative storage cluster administrator credentials.
-
From the Dashboard, select the options menu on the top right and select Configure.
-
In the Storage Clusters pane, select Storage Cluster Details.
-
Select Add Storage Cluster.
-
Enter the following information:
-
Storage cluster management virtual IP address

Only remote storage clusters that are not currently managed by a management node can be added. -
Storage cluster user name and password
-
-
Select Add.
After you add the storage cluster, the cluster inventory can take up to 2 minutes to refresh and display the new addition. You might need to refresh the page in your browser to see the changes. -
If you are adding Element eSDS clusters, enter or upload your SSH private key and SSH user account.
Confirm storage cluster status
You can monitor the connection status of storage clusters assets using the NetApp Hybrid Cloud Control UI.
-
Log in to NetApp Hybrid Cloud Control by providing the authoritative storage cluster administrator credentials.
-
From the Dashboard, select the options menu on the top right and select Configure.
-
Review the status of storage clusters in the inventory.
-
From the Storage Clusters pane, select Storage Cluster Details for additional detail.
Edit storage cluster credentials
You can edit the storage cluster's administrator user name and password using the NetApp Hybrid Cloud Control UI.
-
Log in to NetApp Hybrid Cloud Control by providing the authoritative storage cluster administrator credentials.
-
From the Dashboard, select the options menu on the top right and select Configure.
-
In the Storage Clusters pane, select Storage Cluster Details.
-
Select the Actions menu for the cluster and select Edit Cluster Credentials.
-
Update the storage cluster user name and password.
-
Select Save.
Remove a storage cluster
Removing a storage cluster from NetApp Hybrid Cloud Control removes the cluster from the management node inventory. After you remove a storage cluster, the cluster can no longer be managed by HCC and you can access it only by navigating directly to its management IP address.

|
You cannot remove the authoritative cluster from the inventory. To determine the authoritative cluster, go to User Management > Users. The authoritative cluster is listed next to the heading Users. |
-
Log in to NetApp Hybrid Cloud Control by providing the authoritative storage cluster administrator credentials.
-
From the Dashboard, select the options menu on the top right and select Configure.
-
In the Storage Clusters pane, select Storage Cluster Details.
-
Select the Actions menu for the cluster and select Remove Storage Cluster.

Clicking Yes next removes the cluster from the installation. -
Select Yes.
Enable and disable maintenance mode
This maintenance mode feature options give you the capability to enable and disable maintenance mode for a storage cluster node.
-
Element software: Your storage cluster version is running NetApp Element software 12.2 or later.
-
Management node: You have deployed a management node running version 12.2 or later.
-
Management services: You have updated your management services bundle to version 2.19 or later.
-
You have access to log in at the administrator level.
Enable maintenance mode
You can use the following procedure to enable maintenance mode for a storage cluster node.
|
|
Only one node can be in maintenance mode at a time. |
-
Open the IP address of the management node in a web browser. For example:
https://<ManagementNodeIP>
-
Log in to NetApp Hybrid Cloud Control by providing the NetApp HCI storage cluster administrator credentials.
The maintenance mode feature options are disabled at the read-only level. -
In the left navigation blue box, select the NetApp HCI installation.
-
In the left navigation pane, select Nodes.
-
To view storage inventory information, select Storage.
-
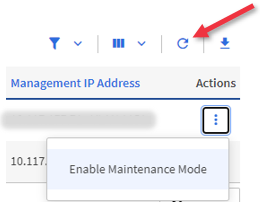
Enable maintenance mode on a storage node:
The storage nodes table is updated automatically every two minutes for non-user initiated actions. Before an action, to ensure that you have the most up-to-date status, you can refresh the nodes table by using the refresh icon located on the upper-right side of the nodes table.
-
Under Actions, select Enable Maintenance Mode.
While Maintenance Mode is being enabled, maintenance mode actions are unavailable for the selected node and all other nodes on the same cluster.
After Enabling Maintenance Mode completes, the Node Status column displays a wrench icon and the text "Maintenance Mode" for the node that is in maintenance mode.
-
Disable maintenance mode
After a node is successfully placed in maintenance mode, the Disable Maintenance Mode action is available for this node. Actions on the other nodes are unavailable until maintenance mode is disabled successfully on the node undergoing maintenance.
-
For the node under maintenance mode, under Actions, select Disable Maintenance Mode.
While Maintenance Mode is being disabled, maintenance mode actions are unavailable for the selected node and all other nodes on the same cluster.
After Disabling Maintenance Mode completes, the Node Status column displays Active.
When a node is in maintenance mode, it does not accept new data. As a result, it can take longer to disable maintenance mode because the node must sync its data back up before it can exit maintenance mode. The longer you spend in maintenance mode, the longer it can take to disable maintenance mode.
Troubleshoot
If you encounter errors when you are either enabling or disabling maintenance mode, a banner error displays at the top of the nodes table. For more information on the error, you can select the Show Details link that is provided on the banner to show what the API returns are.