

 Release Notes
Create and manage volumes by using NetApp Hybrid Cloud Control
 Suggest changes
You can create a volume and associate the volume with a given account. Associating a volume with an account gives the account access to the volume through the iSCSI initiators and CHAP credentials.
You can specify QoS settings for a volume during creation.
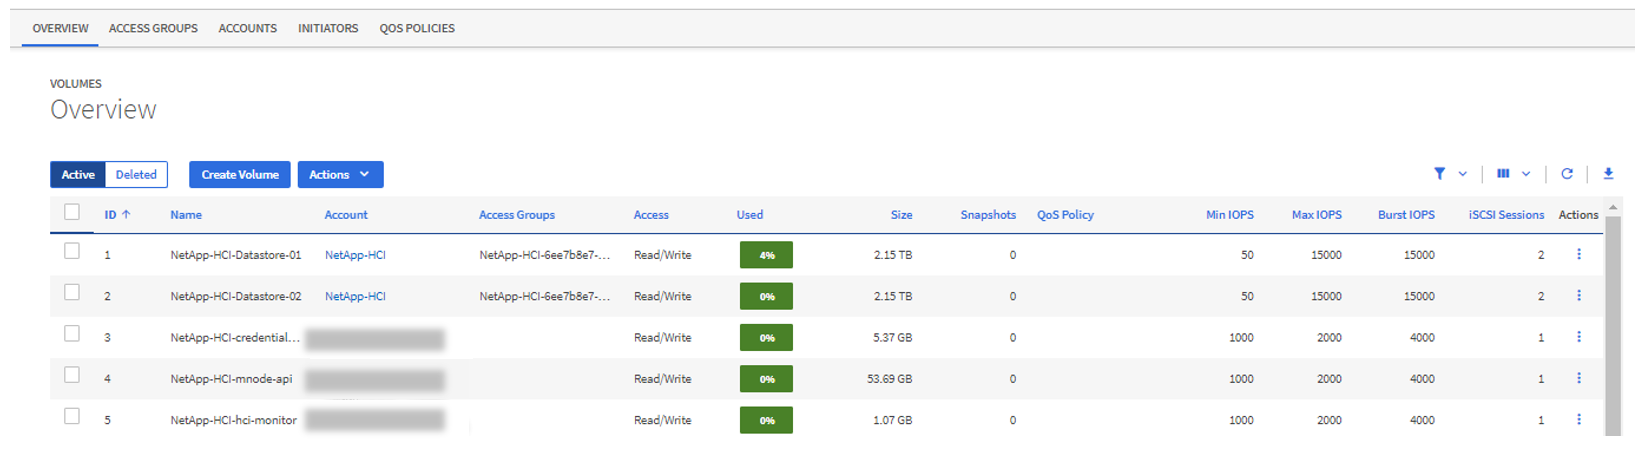
You can manage volumes in NetApp Hybrid Cloud Control in the following ways:
Create a volume
You can create a storage volume using NetApp Hybrid Cloud Control.
-
Log in to NetApp Hybrid Cloud Control by providing the NetApp HCI or Element storage cluster administrator credentials.
-
From the Dashboard, expand the name of your storage cluster on the left navigation menu.
-
Select Volumes > Overview tab.
-
Select Create Volume.
-
Enter a name for the new volume.
-
Enter the total size of the volume.

The default volume size selection is in GB. You can create volumes using sizes measured in GB or GiB:
1GB = 1 000 000 000 bytes
1GiB = 1 073 741 824 bytes -
Select a block size for the volume.
-
From the Account list, select the account that should have access to the volume.
If an account does not exist, click Create New Account, enter a new account name, and click Create Account. The account is created and associated with the new volume in the Account list.
If there are more than 50 accounts, the list does not appear. Begin typing and the auto-complete feature displays values for you to choose. -
To configure the Quality of Service for the volume, do one of the following:
-
Under Quality of Service Settings, set customized minimum, maximum, and burst values for IOPS or use the default QoS values.
-
Select an existing QoS policy by enabling the Assign Quality of Service Policy toggle and choosing an existing QoS policy from the resulting list.
-
Create and assign a new QoS policy by enabling the Assign Quality of Service Policy toggle and clicking Create New QoS Policy. In the resulting window, enter a name for the QoS policy and then enter QoS values. When finished, click Create Quality of Service Policy.
Volumes that have a Max or Burst IOPS value greater than 20,000 IOPS might require high queue depth or multiple sessions to achieve this level of IOPS on a single volume.
-
-
Click Create Volume.
Apply a QoS policy to a volume
You can apply a QoS policy to existing storage volumes by using NetApp Hybrid Cloud Control. If instead you need to set custom QoS values for a volume, you can Edit a volume. To create a new QoS policy, see Create and manage volume QoS policies.
-
Log in to NetApp Hybrid Cloud Control by providing the NetApp HCI or Element storage cluster administrator credentials.
-
From the Dashboard, expand the name of your storage cluster on the left navigation menu.
-
Select Volumes > Overview.
-
Select one or more volumes to associate with a QoS policy.
-
Click the Actions drop-down list at the top of the volumes table, and select Apply QoS Policy.
-
In the resulting window, select a QoS policy from the list and click Apply QoS Policy.
If you are using QoS policies on a volume, you can set custom QoS to remove the QoS policy affiliation with the volume. Custom QoS values override QoS policy values for volume QoS settings.
Edit a volume
Using NetApp Hybrid Cloud Control, you can edit volume attributes such as QoS values, volume size, and the unit of measurement by which byte values are calculated. You can also modify account access for replication usage or to restrict access to the volume.
You can resize a volume when there is sufficient space on the cluster under the following conditions:
-
Normal operating conditions.
-
Volume errors or failures are being reported.
-
The volume is being cloned.
-
The volume is being resynced.
-
Log in to NetApp Hybrid Cloud Control by providing the NetApp HCI or Element storage cluster administrator credentials.
-
From the Dashboard, expand the name of your storage cluster on the left navigation menu.
-
Select Volumes > Overview.
-
In the Actions column in the volumes table, expand the menu for the volume and select Edit.
-
Make changes as needed:
-
Change the total size of the volume.
You can increase, but not decrease, the size of the volume. You can only resize one volume in a single resizing operation. Garbage collection operations and software upgrades do not interrupt the resizing operation.
If you are adjusting volume size for replication, first increase the size of the volume assigned as the replication target. Then you can resize the source volume. The target volume can be greater or equal in size to the source volume, but it cannot be smaller.
The default volume size selection is in GB. You can create volumes using sizes measured in GB or GiB:
1GB = 1 000 000 000 bytes
1GiB = 1 073 741 824 bytes -
Select a different account access level:
-
Read Only
-
Read/Write
-
Locked
-
Replication Target
-
-
Select the account that should have access to the volume.
Begin typing and the auto-complete function displays possible values for you to choose.
If an account does not exist, click Create New Account, enter a new account name, and click Create. The account is created and associated with the existing volume.
-
Change the Quality of Service by doing one of the following:
-
Select an existing policy.
-
Under Custom Settings, set the minimum, maximum, and burst values for IOPS or use the default values.
If you are using QoS policies on a volume, you can set custom QoS to remove the QoS policy affiliation with the volume. Custom QoS will override QoS policy values for volume QoS settings. 
When you change IOPS values, you should increment in tens or hundreds. Input values require valid whole numbers. Configure volumes with an extremely high burst value. This enables the system to process occasional large block, sequential workloads more quickly, while still constraining the sustained IOPS for a volume.
-
-
-
Select Save.
Clone volumes
You can create a clone of a single storage volume or clone a group of volumes to make a point-in-time copy of the data. When you clone a volume, the system creates a snapshot of the volume and then creates a copy of the data referenced by the snapshot.
-
At least one cluster must be added and running.
-
At least one volume has been created.
-
A user account has been created.
-
Available unprovisioned space must be equal to or more than the volume size.
The cluster supports up to two running clone requests per volume at a time and up to 8 active volume clone operations at a time. Requests beyond these limits are queued for later processing.
Volume cloning is an asynchronous process, and the amount of time the process requires depends on the size of the volume you are cloning and the current cluster load.
|
|
Cloned volumes do not inherit volume access group membership from the source volume. |
-
Log in to NetApp Hybrid Cloud Control by providing the NetApp HCI or Element storage cluster administrator credentials.
-
From the Dashboard, expand the name of your storage cluster on the left navigation menu.
-
Select the Volumes > Overview tab.
-
Select each volume you want to clone.
-
Click the Actions drop-down list at the top of the volumes table, and select Clone.
-
In the resulting window, do the following:
-
Enter a volume name prefix (this is optional).
-
Choose the access type from the Access list.
-
Choose an account to associate with the new volume clone (by default, Copy from Volume is selected, which will use the same account that the original volume uses).
-
If an account does not exist, click Create New Account, enter a new account name, and click Create Account. The account is created and associated with the volume.
Use descriptive naming best practices. This is especially important if multiple clusters or vCenter Servers are used in your environment.
Increasing the volume size of a clone results in a new volume with additional free space at the end of the volume. Depending on how you use the volume, you may need to extend partitions or create new partitions in the free space to make use of it. -
Click Clone Volumes.
The time to complete a cloning operation is affected by volume size and current cluster load. Refresh the page if the cloned volume does not appear in the volume list.
-
Add volumes to a volume access group
You can add a single volume or a group of volumes to a volume access group.
-
Log in to NetApp Hybrid Cloud Control by providing the NetApp HCI or Element storage cluster administrator credentials.
-
From the Dashboard, expand the name of your storage cluster on the left navigation menu.
-
Select Volumes > Overview.
-
Select one or more volumes to associate with a volume access group.
-
Click the Actions drop-down list at the top of the volumes table, and select Add to Access Group.
-
In the resulting window, select a volume access group from the Volume Access Group list.
-
Click Add Volume.
Delete a volume
You can delete one or more volumes from an Element storage cluster.
The system does not immediately purge deleted volumes; they remain available for approximately eight hours. After eight hours, they are purged and no longer available. If you restore a volume before the system purges it, the volume comes back online and iSCSI connections are restored.
If a volume used to create a snapshot is deleted, its associated snapshots become inactive. When the deleted source volumes are purged, the associated inactive snapshots are also removed from the system.

|
Persistent volumes that are associated with management services are created and assigned to a new account during installation or upgrade. If you are using persistent volumes, do not modify or delete the volumes or their associated account. If you do delete these volumes, you could render your management node unusable. |
-
Log in to NetApp Hybrid Cloud Control by providing the NetApp HCI or Element storage cluster administrator credentials.
-
From the Dashboard, expand the name of your storage cluster on the left navigation menu.
-
Select Volumes > Overview.
-
Select one or more volumes to delete.
-
Click the Actions drop-down list at the top of the volumes table, and select Delete.
-
In the resulting window, confirm the action by clicking Yes.
Restore a deleted volume
After a storage volume is deleted, you can still restore it if you do so before eight hours after deletion.
The system does not immediately purge deleted volumes; they remain available for approximately eight hours. After eight hours, they are purged and no longer available. If you restore a volume before the system purges it, the volume comes back online and iSCSI connections are restored.
-
Log in to NetApp Hybrid Cloud Control by providing the NetApp HCI or Element storage cluster administrator credentials.
-
From the Dashboard, expand the name of your storage cluster on the left navigation menu.
-
Select Volumes > Overview.
-
Select Deleted.
-
In the Actions column of the Volumes table, expand the menu for the volume and select Restore.
-
Confirm the process by selecting Yes.
Purge a deleted volume
After storage volumes are deleted, they remain available for approximately eight hours. After eight hours, they are purged automatically and no longer available. If you do not want to wait for the eight hours, you can delete
-
Log in to NetApp Hybrid Cloud Control by providing the NetApp HCI or Element storage cluster administrator credentials.
-
From the Dashboard, expand the name of your storage cluster on the left navigation menu.
-
Select Volumes > Overview.
-
Select Deleted.
-
Select one or more volumes to purge.
-
Do one of the following:
-
If you selected multiple volumes, click the Purge quick filter at the top of the table.
-
If you selected a single volume, in the Actions column of the Volumes table, expand the menu for the volume and select Purge.
-
-
In the Actions column of the Volumes table, expand the menu for the volume and select Purge.
-
Confirm the process by selecting Yes.