

Replace H610C and H615C nodes
 Suggest changes
You should replace a chassis to repair compute node failures related to the CPU, the motherboard, or if it does not power on. If you have a faulty DIMM in your H610C compute node that runs NetApp HCI Bootstrap OS version 1.6 or later, you can replace the DIMM and do not have to replace the chassis. For H615C nodes, you need not replace the chassis if a DIMM fails; you can replace only the failed DIMM.

|
For H610C and H615C, the terms "node" and "chassis" are used interchangeably, because the node and chassis are not separate components. NetApp recommends using the NetApp Deployment Engine to add a replacement compute node. If you cannot proceed with using the NetApp Deployment Engine for ESXi installation, see the NetApp Knowledge Base article How to install ESXi on NetApp HCI compute node manually. |
-
You have verified that the node has failed.
-
You have a replacement chassis.
To order a replacement, you should contact NetApp Support. -
You have an electrostatic discharge (ESD) wristband, or you have taken other antistatic protection.
-
You have labeled each cable that is connected to the chassis.
Alarms in the VMware vSphere Web Client alert you when a host fails. You must match the serial number of the failed host from the VMware vSphere Web Client with the serial number on the sticker at the back of the node.
Step 1: Prepare to replace the node
Before you replace the node, you should migrate the virtual machines (VMs) hosted on the node to an available host, and remove the node from the cluster. You should record details about the node, such as the serial number and networking information. Migrating the VMs and recording the node details also applies in the case of component failures where the node is still online and functioning, for example, a dual inline memory module (DIMM) failure.
-
In the VMware vSphere Web Client, perform the steps to migrate the VMs to another available host.
See the VMware documentation for the migration steps. -
Select the failed node, and select Monitor > Hardware Status > Sensors.
-
Make a note of the serial number of the failed node. The following screenshot is only an example:
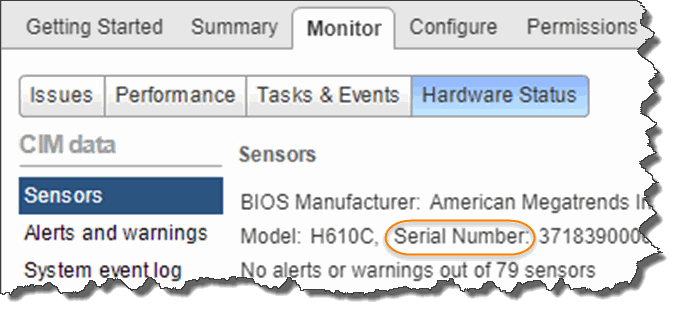
You need the serial number to identify the chassis by matching the number that you noted with the serial number on the sticker at the back of the node.
-
Right-click the failed node and select Connection > Disconnect.
-
Select Yes to confirm the action.
-
Right-click the failed node and select Remove from Inventory.
-
Click Yes to confirm the action.
Step 2: Replace the node
After you remove the failed node from the cluster, you can remove the failed chassis, and install the replacement chassis.
|
|
Ensure that you have antistatic protection before you perform the steps here. |
-
Unpack the new chassis, and set it on a level surface.
Keep the packaging material for when you return the failed chassis to NetApp. -
Label each cable that is inserted at the back of the chassis that you are going to remove.
After you install the new chassis, you must insert the cables back into the original ports. -
Disconnect all the cables from the back of the chassis.
-
Remove the chassis by unscrewing the thumbscrews on the mounting ears.
You must package and return the failed chassis to NetApp. -
Slide the replacement chassis on to the rails.

Ensure that you do not use excessive force when sliding the chassis on to the rails. -
Only for H615C. Remove the DIMMs from the failed chassis and insert these DIMMs in the replacement chassis.
You should replace the DIMMs in the same slots they were removed from in the failed node. -
Remove the two power supply units on either side of the failed chassis and insert them in the replacement chassis.
-
Reconnect the cables to the ports from which you originally disconnected them.
The labels you had added on the cables when you disconnected them will help guide you.
If the airflow vents at the rear of the chassis are blocked by cables or labels, it can lead to premature component failures due to overheating.
Do not force the cables into the ports; you might damage the cables, ports, or both. -
Power on the chassis.
Step 3: Add the node to the cluster
You should configure NetApp HCI to use the new compute node.
-
The vSphere instance NetApp HCI is using has vSphere Enterprise Plus licensing if you are adding the node to a deployment with Virtual Distributed Switches.
-
None of the vCenter or vSphere instances in use with NetApp HCI have expired licenses.
-
You have free and unused IPv4 addresses on the same network segment as existing nodes (the new node must be installed on the same network as existing nodes of its type).
-
You have the vCenter administrator account credentials ready.
-
Open the IP address of the management node in a web browser. For example:
https://<ManagementNodeIP>
-
Log in to NetApp Hybrid Cloud Control by providing the NetApp HCI storage cluster administrator credentials.
-
In the Expand Installation pane, select Expand.
The browser opens the NetApp Deployment Engine.
-
Log in to the NetApp Deployment Engine by providing the local NetApp HCI storage cluster administrator credentials.
You cannot log in using Lightweight Directory Access Protocol credentials. -
On the Welcome page, select Yes.
-
On the End User License page, perform the following actions:
-
Read the VMware End User License Agreement.
-
If you accept the terms, select I accept at the end of the agreement text.
-
-
Click Continue.
-
On the vCenter page, perform the following steps:
-
Enter a FQDN or IP address and administrator credentials for the vCenter instance associated with your NetApp HCI installation.
-
Select Continue.
-
Select an existing vSphere datacenter to which to add the new compute nodes, or select Create New Datacenter to add the new compute nodes to a new datacenter.
If you select Create New Datacenter, the Cluster field is automatically populated. -
If you selected an existing datacenter, select a vSphere cluster with which the new compute nodes should be associated.
If the NetApp HCI cannot recognize the network settings of the cluster you have selected for expansion, ensure that the vmkernel and vmnic mapping for the management, storage and vMotion networks are set to the deployment defaults. -
Select Continue.
-
-
On the ESXi Credentials page, enter an ESXi root password for the compute node or nodes you are adding.
You should use the same password that was created during the initial NetApp HCI deployment. -
Select Continue.
-
If you created a new vSphere datacenter cluster, on the Network Topology page, select a network topology to match the new compute nodes you are adding.
You can only select the two-cable option if your compute nodes are using the two-cable topology and the existing NetApp HCI deployment is configured with VLAN IDs. -
On the Available Inventory page, select the node to add to the existing NetApp HCI installation.

For some compute nodes, you might need to enable EVC at the highest level your vCenter version supports before you can add them to your installation. You should use the vSphere client to enable EVC for these compute nodes. After you enable it, refresh the Inventory page and try adding the compute nodes again. -
Select Continue.
-
Optional: If you created a new vSphere datacenter cluster, on the Network Settings page, import network information from an existing NetApp HCI deployment by selecting the Copy Setting from an Existing Cluster checkbox.
This populates the default gateway and subnet information for each network. -
On the Network Settings page, some of the network information has been detected from the initial deployment. Each new compute node is listed by serial number, and you should assign new network information to it. For each new compute node, perform the following steps:
-
If NetApp HCI detected a naming prefix, copy it from the Detected Naming Prefix field, and insert it as the prefix for the new unique hostname you add in the Hostname field.
-
In the Management IP Address field, enter a management IP address for the compute node that is within the management network subnet.
-
In the vMotion IP Address field, enter a vMotion IP address for the compute node that is within the vMotion network subnet.
-
In the iSCSI A - IP Address field, enter an IP address for the first iSCSI port of the compute node that is within the iSCSI network subnet.
-
In the iSCSI B - IP Address field, enter an IP address for the second iSCSI port of the compute node that is within the iSCSI network subnet.
-
-
Select Continue.
-
On the Review page in the Network Settings section, the new node is shown in bold text. If you need to make changes to information in any section, perform the following steps:
-
Select Edit for that section.
-
When finished making changes, select Continue on any subsequent pages to return to the Review page.
-
-
Optional: If you do not want to send cluster statistics and support information to NetApp-hosted SolidFire Active IQ servers, clear the final checkbox.
This disables real-time health and diagnostic monitoring for NetApp HCI. Disabling this feature removes the ability for NetApp to proactively support and monitor NetApp HCI to detect and resolve problems before production is affected. -
Select Add Nodes.
You can monitor the progress while NetApp HCI adds and configures the resources. -
Optional: Verify that any new compute nodes are visible in vCenter.
Step 4: Install the GPU drivers
Compute nodes with NVIDIA graphics processing units (GPUs), like the H610C node, need the NVIDIA software drivers installed in VMware ESXi so that they can take advantage of the increased processing power. To install the GPU drivers, the compute node must have a GPU card.
-
Open a browser and browse to the NVIDIA licensing portal at the following URL:
https://nvid.nvidia.com/dashboard/ -
Download the driver package version to your computer, depending on your environment.
The following example shows the driver package version for vSphere 6.0, 6.5, and 6.7:
vSphere version Driver package vSphere 6.0
NVIDIA-GRID-vSphere-6.0-390.94-390.96-392.05.zip
vSphere 6.5
NVIDIA-GRID-vSphere-6.5-410.92-410.91-412.16.zip
vSphere 6.7
NVIDIA-GRID-vSphere-6.7-410.92-410.91-412.16.zip
-
Extract the driver package on your computer.
The resulting .VIB file is the uncompressed driver file. -
Copy the .VIB driver file from your computer to ESXi running on the compute node. The Secure Copy Protocol (SCP) utility is readily available in most Linux distributions, or available as a downloadable utility for all versions of Windows.
The following example shows the commands for ESXi 6.0, 6.5, and 6.7. The commands assume that the driver is located in the $HOME/NVIDIA/ESX6.x/ directory on the management host:
Option Description ESXi 6.0
scp $HOME/NVIDIA/ESX6.0/NVIDIA**.vib root@<ESXi_IP_ADDR>:/.
ESXi 6.5
scp $HOME/NVIDIA/ESX6.5/NVIDIA**.vib root@<ESXi_IP_ADDR>:/.
ESXi 6.7
scp $HOME/NVIDIA/ESX6.7/NVIDIA**.vib root@<ESXi_IP_ADDR>:/.
-
Use the following steps to log in as root to the ESXi host and install the NVIDIA vGPU manager in ESXi.
-
Run the following command to log in to the ESXi host as the root user:
ssh root@<ESXi_IP_ADDRESS> -
Run the following command to verify that no NVIDIA GPU drivers are currently installed:
nvidia-smi
This command should return the messagenvidia-smi: not found. -
Run the following commands to enable maintenance mode on the host and install the NVIDIA vGPU Manager from the VIB file:
esxcli system maintenanceMode set --enable true
esxcli software vib install -v /NVIDIA**.vib
You should see the messageOperation finished successfully. -
Run the following command and verify that all eight GPU drivers are listed in the command output:
nvidia-smi -
Run the following command to verify that the NVIDIA vGPU package was installed and loaded correctly:
vmkload_mod -l | grep nvidia
The command should return output similar to the following:nvidia 816 13808 -
Run the following commands to exit maintenance mode and reboot the host:
esxcli system maintenanceMode set –enable false
reboot -f
-
-
Repeat steps 4-6 for any other newly deployed compute nodes with NVIDIA GPUs.
-
Perform the following tasks using the instructions in the NVIDIA documentation site:
-
Install the NVIDIA license server.
-
Configure the virtual machine guests for NVIDIA vGPU software.
-
If you are using vGPU-enabled desktops in a virtual desktop infrastructure (VDI) context, configure VMware Horizon View for NVIDIA vGPU software.
-