

Manage LUNs with ONTAP System Manager
 Suggest changes
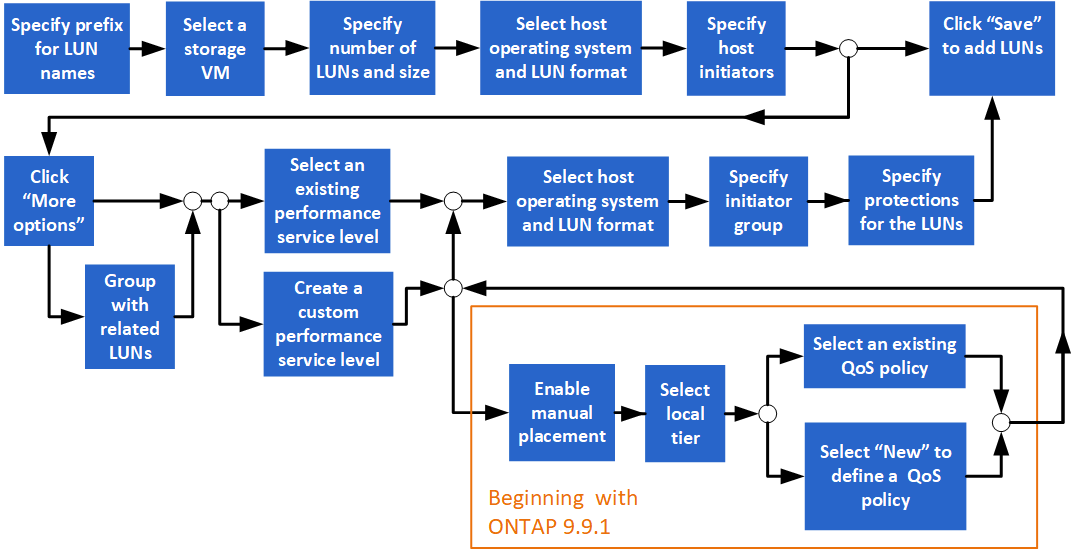
You can create LUNs and add them to an existing storage VM that is configured with the SAN protocol. You can also group LUNs or rename them.
Add LUNs
A storage VM that is configured for SAN service should exist in the cluster.
-
Go to Storage > LUNs.
-
Click
 .
. -
Specify a prefix that will be used at the start of each LUN name. (If you are creating only one LUN, enter the LUN name.)
-
Select a storage VM from the pull-down list.
Only storage VMs that are configured for the SAN protocol are listed. If only one storage VM that is configured for the SAN protocol is available, then the Storage VM field is not displayed.
-
Indicate how many LUNs you want to create and the size of each LUN.
-
Select the host operating system and LUN format from the pull-down lists.
-
Enter the host initiators, and separate them with commas.
-
Perform one of the following actions:
Click this button…
To perform this action…
Save
The LUNs are created with the specifications you entered. System defaults are used for other specifications. No additional steps are required.
More Options
Proceed to Step 9 to define additional specifications for the LUNs.
-
The LUN prefix is already shown if you previously entered it, but you can modify it. Otherwise, enter the prefix.
-
Select a storage VM from the pull-down list.
Only storage VMs that are configured for the SAN protocol are listed. If only one storage VM that is configured for the SAN protocol is available, then the Storage VM field is not displayed.
-
Determine how you want the LUNs to be grouped:
When you make this choice…
This occurs…
Group with related LUNs
The LUNs will be grouped together with related LUNs on an existing volume on the storage VM.
No selection
The LUNs will be grouped together on a volume called "container".
-
In the Storage and Optimization section, specify the following values:
-
The number and capacity of the LUNs are already shown if you previously entered them, but you can modify them. Otherwise, enter the values.
-
In the Performance Service Level field, select a service level:
When you select this service level…
This occurs…
An existing service level, such as "Extreme", "Performance", or "Value".
Only the service levels that are valid for the system platform (AFF, FAS, or others) are displayed.
A local tier is automatically chosen. Proceed to Step 13.
Custom
Proceed to Step 12c to define a new service level.
-
Beginning with ONTAP 9.9.1, you can use System Manager to manually select the local tier on which you want to place the LUNs you are creating (if you have selected the "Custom" service level).
When you make this choice…
You perform these steps…
Manual placement
Manual placement is enabled. Proceed to Step 12d to complete the process.
No selection
Manual selection is not enabled. The local tier is automatically selected. Proceed to Step 13.
-
Select a QoS policy.
Select "Existing" to choose from a list of existing policies, or select "New" to enter the specifications of a new policy.
-
-
In the Host Information section, the host operating system and LUN format are already shown, but you can modify them.
-
Under Host Mapping, select the type of initiators for the LUNs:
-
Existing initiator group: Select an initiator group for the list that displays.
-
New initiator group using existing initiator groups: Specify the name of the new group, and select the group or groups that you want to use to create the new group.
-
Host initiators: Specify a name from the new initiator group, and click +Add Initiator to add initiators to the group.
-
-
In the Protection section, specify the protections for the LUNs.
If you select Enable SnapMirror (Local or Remote), then specify the protection policy and settings for the destination cluster from the pull-down lists.
-
Click Save.
The LUNs are created and added to the cluster and storage VM.

You can also save the specifications of these LUNs to an Ansible Playbook. For more details, go to Use Ansible Playbooks to add or edit volumes or LUNs.
Rename a LUN
You can rename a LUN from the overview page.
-
In System Manager, click LUNs.
-
Click
 next to the name of the LUN you want to rename, then modify the LUN name.
 -
Click Save.