

Dualité des données pour les data scientists et autres applications
 Suggérer des modifications
Les données sont disponibles dans NFS et accessibles depuis S3 depuis AWS SageMaker.
Exigences technologiques
Vous avez besoin de NetApp BlueXP, NetApp Cloud Volumes ONTAP et AWS SageMaker Notebooks pour le cas d'utilisation de la dualité des données.
Configuration logicielle requise
Le tableau suivant répertorie les composants logiciels nécessaires à la mise en œuvre du cas d’utilisation.
| Logiciels | Quantité |
|---|---|
BlueXP |
1 |
NetApp Cloud Volumes ONTAP |
1 |
Bloc-notes AWS SageMaker |
1 |
Procédures de déploiement
Le déploiement de la solution de dualité des données implique les tâches suivantes :
-
Connecteur BlueXP
-
NetApp Cloud Volumes ONTAP
-
Données pour l'apprentissage automatique
-
AWS SageMaker
-
Apprentissage automatique validé à partir de Jupyter Notebooks
Connecteur BlueXP
Dans cette validation, nous avons utilisé AWS. Il est également applicable à Azure et Google Cloud. Pour créer un connecteur BlueXP dans AWS, procédez comme suit :
-
Nous avons utilisé les informations d'identification basées sur mcarl-marketplace-subscription dans BlueXP.
-
Choisissez la région adaptée à votre environnement (par exemple, us-east-1 [N. Virginia]) et sélectionnez la méthode d'authentification (par exemple, Assumer le rôle ou les clés AWS). Dans cette validation, nous utilisons des clés AWS.
-
Fournissez le nom du connecteur et créez un rôle.
-
Fournissez les détails du réseau tels que le VPC, le sous-réseau ou la paire de clés, selon que vous avez besoin ou non d'une IP publique.
-
Fournissez les détails du groupe de sécurité, tels que l'accès HTTP, HTTPS ou SSH à partir du type de source, tels que les informations sur n'importe quel emplacement et la plage IP.
-
Révisez et créez le connecteur BlueXP .
-
Vérifiez que l'état de l'instance BlueXP EC2 est en cours d'exécution dans la console AWS et vérifiez l'adresse IP dans l'onglet Réseau.
-
Connectez-vous à l'interface utilisateur du connecteur à partir du portail BlueXP ou vous pouvez utiliser l'adresse IP pour accéder à partir du navigateur.
NetApp Cloud Volumes ONTAP
Pour créer une instance Cloud Volumes ONTAP dans BlueXP, procédez comme suit :
-
Créez un nouvel environnement de travail, sélectionnez le fournisseur de cloud et sélectionnez le type d'instance Cloud Volumes ONTAP (par exemple, single-CVO, HA ou Amazon FSx ONTAP pour ONTAP).
-
Fournissez des détails tels que le nom et les informations d’identification du cluster Cloud Volumes ONTAP . Dans cette validation, nous avons créé une instance Cloud Volumes ONTAP appelée
svm_sagemaker_cvo_sn1. -
Sélectionnez les services nécessaires pour Cloud Volumes ONTAP. Dans cette validation, nous choisissons de surveiller uniquement, nous avons donc désactivé Data Sense & Compliance et Backup to Cloud Services.
-
Dans la section Emplacement et connectivité, sélectionnez la région AWS, le VPC, le sous-réseau, le groupe de sécurité, la méthode d'authentification SSH et un mot de passe ou une paire de clés.
-
Choisissez la méthode de chargement. Nous avons utilisé Professionnel pour cette validation.
-
Vous pouvez choisir un package préconfiguré, tel que POC et petites charges de travail, Charges de travail de production de données de base de données et d'application, DR rentable ou Charges de travail de production les plus performantes. Dans cette validation, nous choisissons Poc et Petites charges de travail.
-
Créez un volume avec une taille spécifique, des protocoles autorisés et des options d’exportation. Dans cette validation, nous avons créé un volume appelé
vol1. -
Choisissez un type de disque de profil et une politique de hiérarchisation. Dans cette validation, nous avons désactivé Efficacité du stockage et SSD à usage général – Performances dynamiques.
-
Enfin, examinez et créez l’instance Cloud Volumes ONTAP . Attendez ensuite 15 à 20 minutes pour que BlueXP crée l’environnement de travail Cloud Volumes ONTAP .
-
Configurez les paramètres suivants pour activer le protocole Duality. Le protocole Duality (NFS/S3) est pris en charge à partir d' ONTAP 9. 12.1 et versions ultérieures.
-
Dans cette validation, nous avons créé un SVM appelé
svm_sagemaker_cvo_sn1et le volumevol1. -
Vérifiez que le SVM prend en charge les protocoles NFS et S3. Sinon, modifiez le SVM pour les prendre en charge.
sagemaker_cvo_sn1::> vserver show -vserver svm_sagemaker_cvo_sn1
                                    Vserver: svm_sagemaker_cvo_sn1
                               Vserver Type: data
                            Vserver Subtype: default
                               Vserver UUID: 911065dd-a8bc-11ed-bc24-e1c0f00ad86b
                                Root Volume: svm_sagemaker_cvo_sn1_root
                                  Aggregate: aggr1
                                 NIS Domain: -
                 Root Volume Security Style: unix
                                LDAP Client: -
               Default Volume Language Code: C.UTF-8
                            Snapshot Policy: default
                              Data Services: data-cifs, data-flexcache,
                                             data-iscsi, data-nfs,
                                             data-nvme-tcp
                                    Comment:
                               Quota Policy: default
                List of Aggregates Assigned: aggr1
 Limit on Maximum Number of Volumes allowed: unlimited
                        Vserver Admin State: running
                  Vserver Operational State: running
   Vserver Operational State Stopped Reason: -
                          Allowed Protocols: nfs, cifs, fcp, iscsi, ndmp, s3
                       Disallowed Protocols: nvme
            Is Vserver with Infinite Volume: false
                           QoS Policy Group: -
                        Caching Policy Name: -
                                Config Lock: false
                               IPspace Name: Default
                         Foreground Process: -
                    Logical Space Reporting: true
                  Logical Space Enforcement: false
Default Anti_ransomware State of the Vserver's Volumes: disabled
            Enable Analytics on New Volumes: false
    Enable Activity Tracking on New Volumes: false

sagemaker_cvo_sn1::>
-
-
Créez et installez un certificat CA si nécessaire.
-
Créez une politique de données de service.
sagemaker_cvo_sn1::*> network interface service-policy create -vserver svm_sagemaker_cvo_sn1 -policy sagemaker_s3_nfs_policy -services data-core,data-s3-server,data-nfs,data-flexcache sagemaker_cvo_sn1::*> network interface create -vserver svm_sagemaker_cvo_sn1 -lif svm_sagemaker_cvo_sn1_s3_lif -service-policy sagemaker_s3_nfs_policy -home-node sagemaker_cvo_sn1-01 -address 172.30.10.41 -netmask 255.255.255.192 Warning: The configured failover-group has no valid failover targets for the LIF's failover-policy. To view the failover targets for a LIF, use the "network interface show -failover" command. sagemaker_cvo_sn1::*> sagemaker_cvo_sn1::*> network interface show Logical Status Network Current Current Is Vserver Interface Admin/Oper Address/Mask Node Port Home ----------- ---------- ---------- ------------------ ------------- ------- ---- sagemaker_cvo_sn1 cluster-mgmt up/up 172.30.10.40/26 sagemaker_cvo_sn1-01 e0a true intercluster up/up 172.30.10.48/26 sagemaker_cvo_sn1-01 e0a true sagemaker_cvo_sn1-01_mgmt1 up/up 172.30.10.58/26 sagemaker_cvo_sn1-01 e0a true svm_sagemaker_cvo_sn1 svm_sagemaker_cvo_sn1_data_lif up/up 172.30.10.23/26 sagemaker_cvo_sn1-01 e0a true svm_sagemaker_cvo_sn1_mgmt_lif up/up 172.30.10.32/26 sagemaker_cvo_sn1-01 e0a true svm_sagemaker_cvo_sn1_s3_lif up/up 172.30.10.41/26 sagemaker_cvo_sn1-01 e0a true 6 entries were displayed. sagemaker_cvo_sn1::*> sagemaker_cvo_sn1::*> vserver object-store-server create -vserver svm_sagemaker_cvo_sn1 -is-http-enabled true -object-store-server svm_sagemaker_cvo_s3_sn1 -is-https-enabled false sagemaker_cvo_sn1::*> vserver object-store-server show Vserver: svm_sagemaker_cvo_sn1 Object Store Server Name: svm_sagemaker_cvo_s3_sn1 Administrative State: up HTTP Enabled: true Listener Port For HTTP: 80 HTTPS Enabled: false Secure Listener Port For HTTPS: 443 Certificate for HTTPS Connections: - Default UNIX User: pcuser Default Windows User: - Comment: sagemaker_cvo_sn1::*> -
Vérifiez les détails agrégés.
sagemaker_cvo_sn1::*> aggr show Aggregate Size Available Used% State #Vols Nodes RAID Status --------- -------- --------- ----- ------- ------ ---------------- ------------ aggr0_sagemaker_cvo_sn1_01 124.0GB 50.88GB 59% online 1 sagemaker_cvo_ raid0, sn1-01 normal aggr1 907.1GB 904.9GB 0% online 2 sagemaker_cvo_ raid0, sn1-01 normal 2 entries were displayed. sagemaker_cvo_sn1::*> -
Créez un utilisateur et un groupe.
sagemaker_cvo_sn1::*> vserver object-store-server user create -vserver svm_sagemaker_cvo_sn1 -user s3user sagemaker_cvo_sn1::*> vserver object-store-server user show Vserver User ID Access Key Secret Key ----------- --------------- --------- ------------------- ------------------- svm_sagemaker_cvo_sn1 root 0 - - Comment: Root User svm_sagemaker_cvo_sn1 s3user 1 0ZNAX21JW5Q8AP80CQ2E PpLs4gA9K0_2gPhuykkp014gBjcC9Rbi3QDX_6rr 2 entries were displayed. sagemaker_cvo_sn1::*> sagemaker_cvo_sn1::*> vserver object-store-server group create -name s3group -users s3user -comment "" sagemaker_cvo_sn1::*> sagemaker_cvo_sn1::*> vserver object-store-server group delete -gid 1 -vserver svm_sagemaker_cvo_sn1 sagemaker_cvo_sn1::*> vserver object-store-server group create -name s3group -users s3user -comment "" -policies FullAccess sagemaker_cvo_sn1::*> -
Créez un bucket sur le volume NFS.
sagemaker_cvo_sn1::*> vserver object-store-server bucket create -bucket ontapbucket1 -type nas -comment "" -vserver svm_sagemaker_cvo_sn1 -nas-path /vol1
sagemaker_cvo_sn1::*> vserver object-store-server bucket show
Vserver     Bucket          Type     Volume            Size       Encryption Role       NAS Path
----------- --------------- -------- ----------------- ---------- ---------- ---------- ----------
svm_sagemaker_cvo_sn1
            ontapbucket1    nas      vol1              -          false      -          /vol1
sagemaker_cvo_sn1::*>
AWS SageMaker
Pour créer un bloc-notes AWS à partir d'AWS SageMaker, procédez comme suit :
-
Assurez-vous que l'utilisateur qui crée l'instance Notebook dispose d'une stratégie IAM AmazonSageMakerFullAccess ou fait partie d'un groupe existant disposant des droits AmazonSageMakerFullAccess. Dans cette validation, l'utilisateur fait partie d'un groupe existant.
-
Fournissez les informations suivantes :
-
Nom de l'instance du bloc-notes.
-
Type d'instance.
-
Identifiant de la plateforme.
-
Sélectionnez le rôle IAM disposant des droits AmazonSageMakerFullAccess.
-
Accès root – activer.
-
Clé de cryptage - Ne sélectionnez aucun cryptage personnalisé.
-
Conservez les options par défaut restantes.
-
-
Dans cette validation, les détails de l'instance SageMaker sont les suivants :
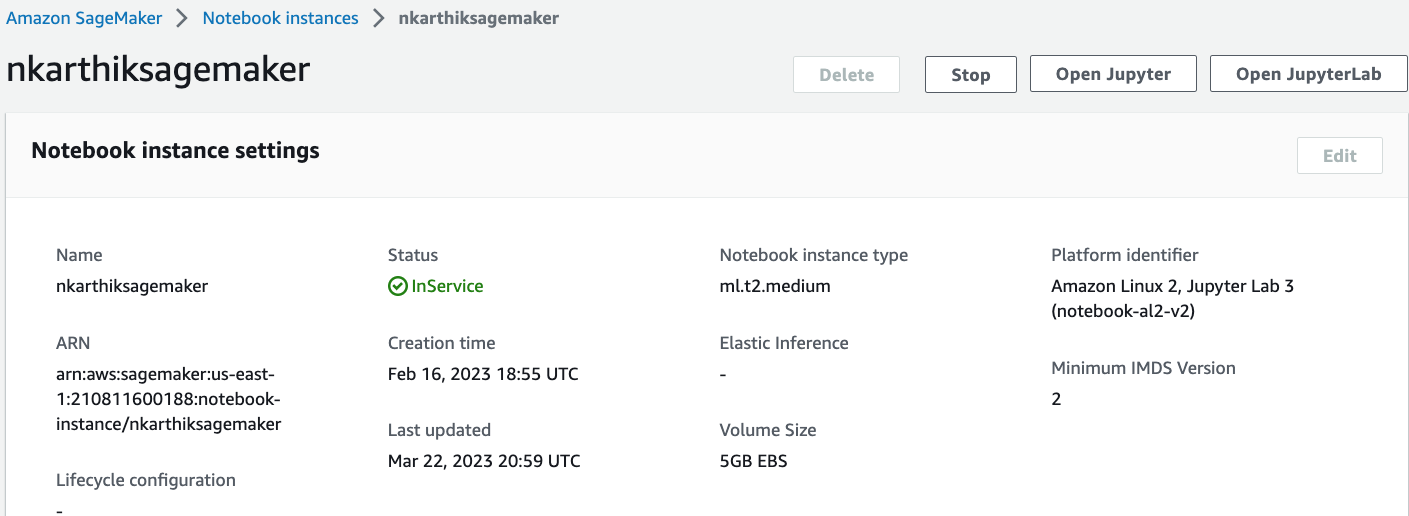
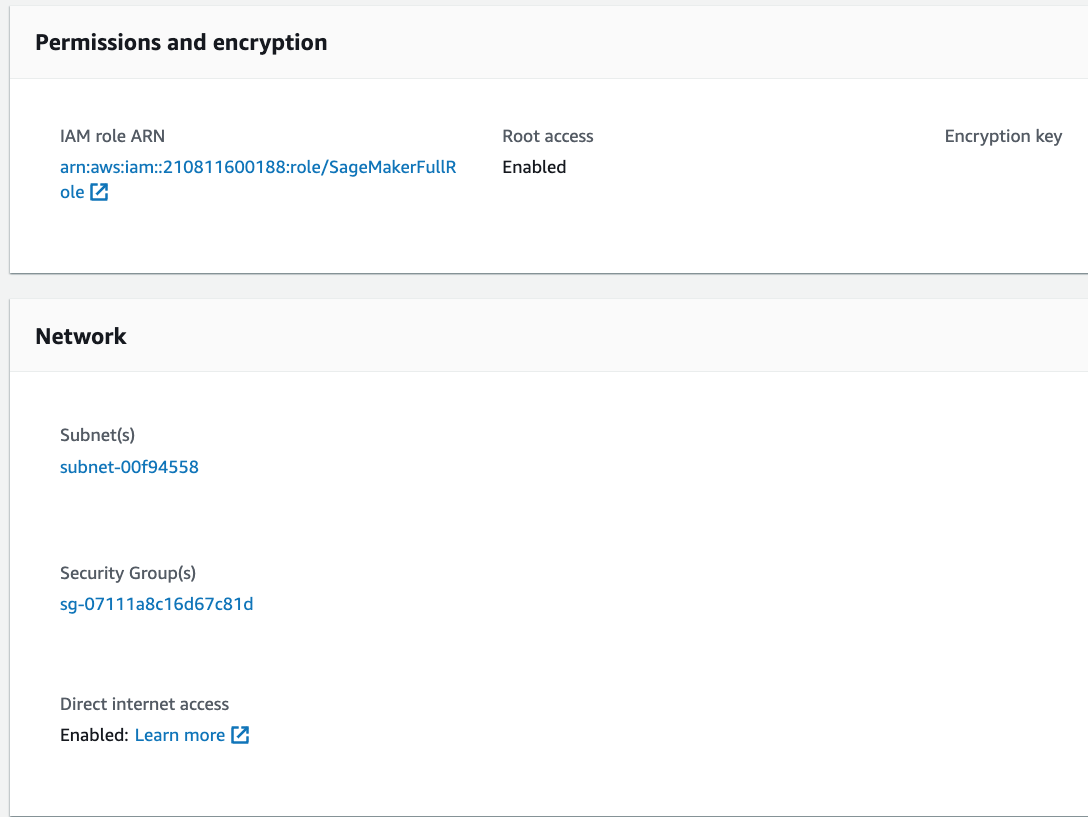
-
Démarrez le bloc-notes AWS.
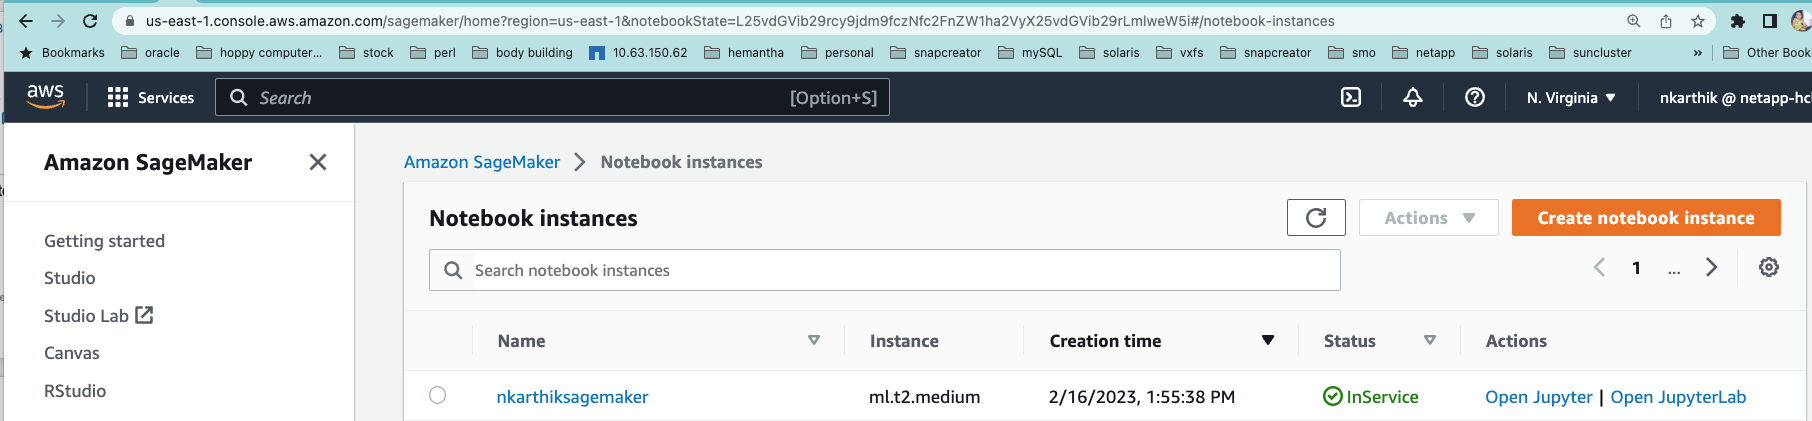
-
Ouvrez le laboratoire Jupyter.
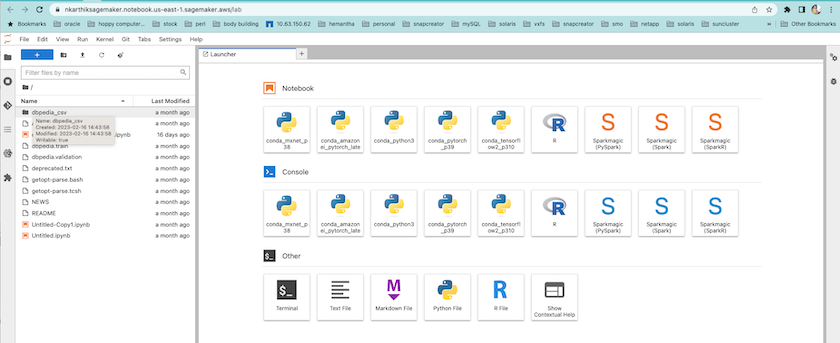
-
Connectez-vous au terminal et montez le volume Cloud Volumes ONTAP .
sh-4.2$ sudo mkdir /vol1; sudo mount -t nfs 172.30.10.41:/vol1 /vol1
sh-4.2$ df -h
Filesystem          Size  Used Avail Use% Mounted on
devtmpfs            2.0G     0  2.0G   0% /dev
tmpfs               2.0G     0  2.0G   0% /dev/shm
tmpfs               2.0G  624K  2.0G   1% /run
tmpfs               2.0G     0  2.0G   0% /sys/fs/cgroup
/dev/xvda1          140G  114G   27G  82% /
/dev/xvdf           4.8G   72K  4.6G   1% /home/ec2-user/SageMaker
tmpfs               393M     0  393M   0% /run/user/1001
tmpfs               393M     0  393M   0% /run/user/1002
tmpfs               393M     0  393M   0% /run/user/1000
172.30.10.41:/vol1  973M  189M  785M  20% /vol1
sh-4.2$
-
Vérifiez le bucket créé sur le volume Cloud Volumes ONTAP à l’aide des commandes AWS CLI.
sh-4.2$ aws configure --profile netapp
AWS Access Key ID [None]: 0ZNAX21JW5Q8AP80CQ2E
AWS Secret Access Key [None]: PpLs4gA9K0_2gPhuykkp014gBjcC9Rbi3QDX_6rr
Default region name [None]: us-east-1
Default output format [None]:
sh-4.2$

sh-4.2$ aws s3 ls --profile netapp --endpoint-url
2023-02-10 17:59:48 ontapbucket1

sh-4.2$ aws s3 ls --profile netapp --endpoint-url  s3://ontapbucket1/


2023-02-10 18:46:44       4747 1
2023-02-10 18:48:32         96 setup.cfg

sh-4.2$
Données pour l'apprentissage automatique
Dans cette validation, nous avons utilisé un ensemble de données de DBpedia, un effort communautaire participatif, pour extraire du contenu structuré à partir des informations créées dans divers projets Wikimedia.
-
Téléchargez les données depuis l’emplacement GitHub de DBpedia et extrayez-les. Utilisez le même terminal que celui utilisé dans la section précédente.
sh-4.2$ wget
--2023-02-14 23:12:11--
Resolving github.com (github.com)... 140.82.113.3
Connecting to github.com (github.com)|140.82.113.3|:443... connected.
HTTP request sent, awaiting response... 302 Found
Location:  [following]
--2023-02-14 23:12:11--
Resolving raw.githubusercontent.com (raw.githubusercontent.com)... 185.199.109.133, 185.199.110.133, 185.199.111.133, ...
Connecting to raw.githubusercontent.com (raw.githubusercontent.com)|185.199.109.133|:443... connected.
HTTP request sent, awaiting response... 200 OK
Length: 68431223 (65M) [application/octet-stream]
Saving to: 'dbpedia_csv.tar.gz'

100%[==============================================================================================================================================================>] 68,431,223  56.2MB/s   in 1.2s

2023-02-14 23:12:13 (56.2 MB/s) - 'dbpedia_csv.tar.gz' saved [68431223/68431223]

sh-4.2$ tar -zxvf dbpedia_csv.tar.gz
dbpedia_csv/
dbpedia_csv/test.csv
dbpedia_csv/classes.txt
dbpedia_csv/train.csv
dbpedia_csv/readme.txt
sh-4.2$
-
Copiez les données vers l’emplacement Cloud Volumes ONTAP et vérifiez-les à partir du compartiment S3 à l’aide de l’AWS CLI.
sh-4.2$ df -h Filesystem Size Used Avail Use% Mounted on devtmpfs 2.0G 0 2.0G 0% /dev tmpfs 2.0G 0 2.0G 0% /dev/shm tmpfs 2.0G 628K 2.0G 1% /run tmpfs 2.0G 0 2.0G 0% /sys/fs/cgroup /dev/xvda1 140G 114G 27G 82% / /dev/xvdf 4.8G 52K 4.6G 1% /home/ec2-user/SageMaker tmpfs 393M 0 393M 0% /run/user/1002 tmpfs 393M 0 393M 0% /run/user/1001 tmpfs 393M 0 393M 0% /run/user/1000 172.30.10.41:/vol1 973M 384K 973M 1% /vol1 sh-4.2$ pwd /home/ec2-user sh-4.2$ cp -ra dbpedia_csv /vol1 sh-4.2$ aws s3 ls --profile netapp --endpoint-url s3://ontapbucket1/ PRE dbpedia_csv/ 2023-02-10 18:46:44 4747 1 2023-02-10 18:48:32 96 setup.cfg sh-4.2$ -
Effectuez une validation de base pour vous assurer que la fonctionnalité de lecture/écriture fonctionne sur le bucket S3.
sh-4.2$ aws s3 cp  --profile netapp --endpoint-url  /usr/share/doc/util-linux-2.30.2 s3://ontapbucket1/ --recursive
upload: ../../../usr/share/doc/util-linux-2.30.2/deprecated.txt to s3://ontapbucket1/deprecated.txt
upload: ../../../usr/share/doc/util-linux-2.30.2/getopt-parse.bash to s3://ontapbucket1/getopt-parse.bash
upload: ../../../usr/share/doc/util-linux-2.30.2/README to s3://ontapbucket1/README
upload: ../../../usr/share/doc/util-linux-2.30.2/getopt-parse.tcsh to s3://ontapbucket1/getopt-parse.tcsh
upload: ../../../usr/share/doc/util-linux-2.30.2/AUTHORS to s3://ontapbucket1/AUTHORS
upload: ../../../usr/share/doc/util-linux-2.30.2/NEWS to s3://ontapbucket1/NEWS
sh-4.2$ aws s3 ls --profile netapp --endpoint-url  s3://ontapbucket1/s3://ontapbucket1/

An error occurred (InternalError) when calling the ListObjectsV2 operation: We encountered an internal error. Please try again.
sh-4.2$ aws s3 ls --profile netapp --endpoint-url  s3://ontapbucket1/
                           PRE dbpedia_csv/
2023-02-16 19:19:27      26774 AUTHORS
2023-02-16 19:19:27      72727 NEWS
2023-02-16 19:19:27       4493 README
2023-02-16 19:19:27       2825 deprecated.txt
2023-02-16 19:19:27       1590 getopt-parse.bash
2023-02-16 19:19:27       2245 getopt-parse.tcsh
sh-4.2$ ls -ltr /vol1
total 132
drwxrwxr-x 2 ec2-user ec2-user  4096 Mar 29  2015 dbpedia_csv
-rw-r--r-- 1 nobody   nobody    2245 Apr 10 17:37 getopt-parse.tcsh
-rw-r--r-- 1 nobody   nobody    2825 Apr 10 17:37 deprecated.txt
-rw-r--r-- 1 nobody   nobody    4493 Apr 10 17:37 README
-rw-r--r-- 1 nobody   nobody    1590 Apr 10 17:37 getopt-parse.bash
-rw-r--r-- 1 nobody   nobody   26774 Apr 10 17:37 AUTHORS
-rw-r--r-- 1 nobody   nobody   72727 Apr 10 17:37 NEWS
sh-4.2$ ls -ltr /vol1/dbpedia_csv/
total 192104
-rw------- 1 ec2-user ec2-user 174148970 Mar 28  2015 train.csv
-rw------- 1 ec2-user ec2-user  21775285 Mar 28  2015 test.csv
-rw------- 1 ec2-user ec2-user       146 Mar 28  2015 classes.txt
-rw-rw-r-- 1 ec2-user ec2-user      1758 Mar 29  2015 readme.txt
sh-4.2$ chmod -R 777 /vol1/dbpedia_csv
sh-4.2$ ls -ltr /vol1/dbpedia_csv/
total 192104
-rwxrwxrwx 1 ec2-user ec2-user 174148970 Mar 28  2015 train.csv
-rwxrwxrwx 1 ec2-user ec2-user  21775285 Mar 28  2015 test.csv
-rwxrwxrwx 1 ec2-user ec2-user       146 Mar 28  2015 classes.txt
-rwxrwxrwx 1 ec2-user ec2-user      1758 Mar 29  2015 readme.txt
sh-4.2$ aws s3 cp --profile netapp --endpoint-url http://172.30.2.248/ s3://ontapbucket1/ /tmp --recursive
download: s3://ontapbucket1/AUTHORS to ../../tmp/AUTHORS
download: s3://ontapbucket1/README to ../../tmp/README
download: s3://ontapbucket1/NEWS to ../../tmp/NEWS
download: s3://ontapbucket1/dbpedia_csv/classes.txt to ../../tmp/dbpedia_csv/classes.txt
download: s3://ontapbucket1/dbpedia_csv/readme.txt to ../../tmp/dbpedia_csv/readme.txt
download: s3://ontapbucket1/deprecated.txt to ../../tmp/deprecated.txt
download: s3://ontapbucket1/getopt-parse.bash to ../../tmp/getopt-parse.bash
download: s3://ontapbucket1/getopt-parse.tcsh to ../../tmp/getopt-parse.tcsh
download: s3://ontapbucket1/dbpedia_csv/test.csv to ../../tmp/dbpedia_csv/test.csv
download: s3://ontapbucket1/dbpedia_csv/train.csv to ../../tmp/dbpedia_csv/train.csv
sh-4.2$
sh-4.2$ aws s3 ls --profile netapp --endpoint-url  s3://ontapbucket1/
                           PRE dbpedia_csv/
2023-02-16 19:19:27      26774 AUTHORS
2023-02-16 19:19:27      72727 NEWS
2023-02-16 19:19:27       4493 README
2023-02-16 19:19:27       2825 deprecated.txt
2023-02-16 19:19:27       1590 getopt-parse.bash
2023-02-16 19:19:27       2245 getopt-parse.tcsh
sh-4.2$
Valider l'apprentissage automatique à partir des notebooks Jupyter
La validation suivante fournit la création, l'entraînement et le déploiement de modèles d'apprentissage automatique via la classification de texte en utilisant l'exemple SageMaker BlazingText ci-dessous :
-
Installez les packages boto3 et SageMaker.
In [1]: pip install --upgrade boto3 sagemaker
Sortir:
Looking in indexes: https://pypi.org/simple, https://pip.repos.neuron.amazo naws.com Requirement already satisfied: boto3 in /home/ec2-user/anaconda3/envs/pytho n3/lib/python3.10/site-packages (1.26.44) Collecting boto3 Downloading boto3-1.26.72-py3-none-any.whl (132 kB) ━━━━━━━━━━━━━━━━━━━━━━━━━━━━━━━━━━━━━━ 132.7/132.7 kB 14.6 MB/s eta 0: 00:00 Requirement already satisfied: sagemaker in /home/ec2-user/anaconda3/envs/p ython3/lib/python3.10/site-packages (2.127.0) Collecting sagemaker Downloading sagemaker-2.132.0.tar.gz (668 kB) ━━━━━━━━━━━━━━━━━━━━━━━━━━━━━━━━━━━━━━ 668.0/668.0 kB 12.3 MB/s eta 0: 00:0000:01 Preparing metadata (setup.py) ... done Collecting botocore<1.30.0,>=1.29.72 Downloading botocore-1.29.72-py3-none-any.whl (10.4 MB) ━━━━━━━━━━━━━━━━━━━━━━━━━━━━━━━━━━━━━━━━ 10.4/10.4 MB 44.3 MB/s eta 0: 00:0000:010:01 Requirement already satisfied: s3transfer<0.7.0,>=0.6.0 in /home/ec2-user/a naconda3/envs/python3/lib/python3.10/site-packages (from boto3) (0.6.0) Requirement already satisfied: jmespath<2.0.0,>=0.7.1 in /home/ec2-user/ana conda3/envs/python3/lib/python3.10/site-packages (from boto3) (0.10.0) Requirement already satisfied: attrs<23,>=20.3.0 in /home/ec2-user/anaconda 3/envs/python3/lib/python3.10/site-packages (from sagemaker) (22.1.0) Requirement already satisfied: google-pasta in /home/ec2-user/anaconda3/env s/python3/lib/python3.10/site-packages (from sagemaker) (0.2.0) Requirement already satisfied: numpy<2.0,>=1.9.0 in /home/ec2-user/anaconda 3/envs/python3/lib/python3.10/site-packages (from sagemaker) (1.22.4) Requirement already satisfied: protobuf<4.0,>=3.1 in /home/ec2-user/anacond a3/envs/python3/lib/python3.10/site-packages (from sagemaker) (3.20.3) Requirement already satisfied: protobuf3-to-dict<1.0,>=0.1.5 in /home/ec2-u ser/anaconda3/envs/python3/lib/python3.10/site-packages (from sagemaker) (0.1.5) Requirement already satisfied: smdebug_rulesconfig==1.0.1 in /home/ec2-use r/anaconda3/envs/python3/lib/python3.10/site-packages (from sagemaker) (1. 0.1) Requirement already satisfied: importlib-metadata<5.0,>=1.4.0 in /home/ec2user/anaconda3/envs/python3/lib/python3.10/site-packages (from sagemaker) (4.13.0) Requirement already satisfied: packaging>=20.0 in /home/ec2-user/anaconda3/ envs/python3/lib/python3.10/site-packages (from sagemaker) (21.3) Requirement already satisfied: pandas in /home/ec2-user/anaconda3/envs/pyth on3/lib/python3.10/site-packages (from sagemaker) (1.5.1) Requirement already satisfied: pathos in /home/ec2-user/anaconda3/envs/pyth on3/lib/python3.10/site-packages (from sagemaker) (0.3.0) Requirement already satisfied: schema in /home/ec2-user/anaconda3/envs/pyth on3/lib/python3.10/site-packages (from sagemaker) (0.7.5) Requirement already satisfied: python-dateutil<3.0.0,>=2.1 in /home/ec2-use r/anaconda3/envs/python3/lib/python3.10/site-packages (from botocore<1.30. 0,>=1.29.72->boto3) (2.8.2) Requirement already satisfied: urllib3<1.27,>=1.25.4 in /home/ec2-user/anac onda3/envs/python3/lib/python3.10/site-packages (from botocore<1.30.0,>=1.2 9.72->boto3) (1.26.8) Requirement already satisfied: zipp>=0.5 in /home/ec2-user/anaconda3/envs/p ython3/lib/python3.10/site-packages (from importlib-metadata<5.0,>=1.4.0->s agemaker) (3.10.0) Requirement already satisfied: pyparsing!=3.0.5,>=2.0.2 in /home/ec2-user/a naconda3/envs/python3/lib/python3.10/site-packages (from packaging>=20.0->s agemaker) (3.0.9) Requirement already satisfied: six in /home/ec2-user/anaconda3/envs/python 3/lib/python3.10/site-packages (from protobuf3-to-dict<1.0,>=0.1.5->sagemak er) (1.16.0) Requirement already satisfied: pytz>=2020.1 in /home/ec2-user/anaconda3/env s/python3/lib/python3.10/site-packages (from pandas->sagemaker) (2022.5) Requirement already satisfied: ppft>=1.7.6.6 in /home/ec2-user/anaconda3/en vs/python3/lib/python3.10/site-packages (from pathos->sagemaker) (1.7.6.6) Requirement already satisfied: multiprocess>=0.70.14 in /home/ec2-user/anac onda3/envs/python3/lib/python3.10/site-packages (from pathos->sagemaker) (0.70.14) Requirement already satisfied: dill>=0.3.6 in /home/ec2-user/anaconda3/env s/python3/lib/python3.10/site-packages (from pathos->sagemaker) (0.3.6) Requirement already satisfied: pox>=0.3.2 in /home/ec2-user/anaconda3/envs/ python3/lib/python3.10/site-packages (from pathos->sagemaker) (0.3.2) Requirement already satisfied: contextlib2>=0.5.5 in /home/ec2-user/anacond a3/envs/python3/lib/python3.10/site-packages (from schema->sagemaker) (21. 6.0) Building wheels for collected packages: sagemaker Building wheel for sagemaker (setup.py) ... done Created wheel for sagemaker: filename=sagemaker-2.132.0-py2.py3-none-any. whl size=905449 sha256=f6100a5dc95627f2e2a49824e38f0481459a27805ee19b5a06ec 83db0252fd41 Stored in directory: /home/ec2-user/.cache/pip/wheels/60/41/b6/482e7ab096 520df034fbf2dddd244a1d7ba0681b27ef45aa61 Successfully built sagemaker Installing collected packages: botocore, boto3, sagemaker Attempting uninstall: botocore Found existing installation: botocore 1.24.19 Uninstalling botocore-1.24.19: Successfully uninstalled botocore-1.24.19 Attempting uninstall: boto3 Found existing installation: boto3 1.26.44 Uninstalling boto3-1.26.44: Successfully uninstalled boto3-1.26.44 Attempting uninstall: sagemaker Found existing installation: sagemaker 2.127.0 Uninstalling sagemaker-2.127.0: Successfully uninstalled sagemaker-2.127.0 ERROR: pip's dependency resolver does not currently take into account all t he packages that are installed. This behaviour is the source of the followi ng dependency conflicts. awscli 1.27.44 requires botocore==1.29.44, but you have botocore 1.29.72 wh ich is incompatible. aiobotocore 2.0.1 requires botocore<1.22.9,>=1.22.8, but you have botocore 1.29.72 which is incompatible. Successfully installed boto3-1.26.72 botocore-1.29.72 sagemaker-2.132.0 Note: you may need to restart the kernel to use updated packages. -
Dans l'étape suivante, les données(
dbpedia_csv) est téléchargé depuis le bucket s3ontapbucket1à une instance Jupyter Notebook utilisée dans l'apprentissage automatique.In [2]: import sagemaker In [3]: from sagemaker import get_execution_role In [4]: import json import boto3 sess = sagemaker.Session() role = get_execution_role() print(role) bucket = "ontapbucket1" print(bucket) sess.s3_client = boto3.client('s3',region_name='',aws_access_key_id = '0ZNAX21JW5Q8AP80CQ2E', aws_secret_access_key = 'PpLs4gA9K0_2gPhuykkp014gBjcC9Rbi3QDX_6rr', use_ssl = False, endpoint_url = 'http://172.30.10.41', config=boto3.session.Config(signature_version='s3v4', s3={'addressing_style':'path'}) ) sess.s3_resource = boto3.resource('s3',region_name='',aws_access_key_id = '0ZNAX21JW5Q8AP80CQ2E', aws_secret_access_key = 'PpLs4gA9K0_2gPhuykkp014gBjcC9Rbi3QDX_6rr', use_ssl = False, endpoint_url = 'http://172.30.10.41', config=boto3.session.Config(signature_version='s3v4', s3={'addressing_style':'path'}) ) prefix = "blazingtext/supervised" import os my_bucket = sess.s3_resource.Bucket(bucket) my_bucket = sess.s3_resource.Bucket(bucket) #os.mkdir('dbpedia_csv') for s3_object in my_bucket.objects.all(): filename = s3_object.key # print(filename) # print(s3_object.key) my_bucket.download_file(s3_object.key, filename) -
Le code suivant crée le mappage des indices entiers vers les étiquettes de classe qui sont utilisées pour récupérer le nom de classe réel pendant l'inférence.
index_to_label = {}
with open("dbpedia_csv/classes.txt") as f:
    for i,label in enumerate(f.readlines()):
        index_to_label[str(i + 1)] = label.strip()
La sortie répertorie les fichiers et les dossiers dans le
ontapbucket1bucket qui sont utilisés comme données pour la validation de l'apprentissage automatique AWS SageMaker.arn:aws:iam::210811600188:role/SageMakerFullRole ontapbucket1 AUTHORS AUTHORS NEWS NEWS README README dbpedia_csv/classes.txt dbpedia_csv/classes.txt dbpedia_csv/readme.txt dbpedia_csv/readme.txt dbpedia_csv/test.csv dbpedia_csv/test.csv dbpedia_csv/train.csv dbpedia_csv/train.csv deprecated.txt deprecated.txt getopt-parse.bash getopt-parse.bash getopt-parse.tcsh getopt-parse.tcsh In [5]: ls AUTHORS deprecated.txt getopt-parse.tcsh NEWS Untitled.ipynb dbpedia_csv/ getopt-parse.bash lost+found/ README In [6]: ls -l dbpedia_csv total 191344 -rw-rw-r-- 1 ec2-user ec2-user 146 Feb 16 19:43 classes.txt -rw-rw-r-- 1 ec2-user ec2-user 1758 Feb 16 19:43 readme.txt -rw-rw-r-- 1 ec2-user ec2-user 21775285 Feb 16 19:43 test.csv -rw-rw-r-- 1 ec2-user ec2-user 174148970 Feb 16 19:43 train.csv
-
Démarrez la phase de prétraitement des données pour prétraiter les données de formation dans un format de texte tokenisé et séparé par des espaces qui peut être consommé par l'algorithme BlazingText et la bibliothèque nltk pour tokeniser les phrases d'entrée de l'ensemble de données DBPedia. Téléchargez le tokenizer nltk et d'autres bibliothèques. Le
transform_instanceappliqué à chaque instance de données en parallèle utilise le module multitraitement Python.ln [7]: from random import shuffle import multiprocessing from multiprocessing import Pool import csv import nltk nltk.download("punkt") def transform_instance(row): cur_row = [] label ="__label__" + index_to_label [row[0]] # Prefix the index-ed label with __label__ cur_row.append (label) cur_row.extend(nltk.word_tokenize(row[1].lower ())) cur_row.extend(nltk.word_tokenize(row[2].lower ())) return cur_row def preprocess(input_file, output_file, keep=1): all_rows = [] with open(input_file,"r") as csvinfile: csv_reader = csv.reader(csvinfile, delimiter=",") for row in csv_reader: all_rows.append(row) shuffle(all_rows) all_rows = all_rows[: int(keep * len(all_rows))] pool = Pool(processes=multiprocessing.cpu_count()) transformed_rows = pool.map(transform_instance, all_rows) pool.close() pool. join() with open(output_file, "w") as csvoutfile: csv_writer = csv.writer (csvoutfile, delimiter=" ", lineterminator="\n") csv_writer.writerows (transformed_rows) # Preparing the training dataset # since preprocessing the whole dataset might take a couple of minutes, # we keep 20% of the training dataset for this demo. # Set keep to 1 if you want to use the complete dataset preprocess("dbpedia_csv/train.csv","dbpedia.train", keep=0.2) # Preparing the validation dataset preprocess("dbpedia_csv/test.csv","dbpedia.validation") sess = sagemaker.Session() role = get_execution_role() print (role) # This is the role that sageMaker would use to leverage Aws resources (S3, Cloudwatch) on your behalf bucket = sess.default_bucket() # Replace with your own bucket name if needed print("default Bucket::: ") print(bucket)Sortir:
[nltk_data] Downloading package punkt to /home/ec2-user/nltk_data...
[nltk_data]   Package punkt is already up-to-date!
arn:aws:iam::210811600188:role/SageMakerFullRole default Bucket::: sagemaker-us-east-1-210811600188
-
Téléchargez l'ensemble de données formaté et de formation sur S3 afin qu'il puisse être utilisé par SageMaker pour exécuter des tâches de formation. Téléchargez ensuite deux fichiers dans le bucket et préfixez l'emplacement à l'aide du SDK Python.
ln [8]: %%time
train_channel = prefix + "/train"
validation_channel = prefix + "/validation"
sess.upload_data(path="dbpedia.train", bucket=bucket, key_prefix=train_channel)
sess.upload_data(path="dbpedia.validation", bucket=bucket, key_prefix=validation_channel)
s3_train_data = "s3://{}/{}".format(bucket, train_channel)
s3_validation_data = "s3://{}/{}".format(bucket, validation_channel)
Sortir:
CPU times: user 546 ms, sys: 163 ms, total: 709 ms
Wall time: 1.32 s
-
Configurez un emplacement de sortie sur S3 où l'artefact du modèle est chargé afin que les artefacts puissent être la sortie du travail de formation de l'algorithme. Créer un
sageMaker.estimator.Estimatorobjet pour lancer le travail de formation.In [9]: s3_output_location = "s3://{}/{}/output".format(bucket, prefix) In [10]: region_name = boto3.Session().region_name In [11]: container = sagemaker.amazon.amazon_estimator.get_image_uri(region_name, "blazingtext","latest") print("Using SageMaker BlazingText container: {} ({})".format(container, region_name))Sortir:
The method get_image_uri has been renamed in sagemaker>=2.
See: https://sagemaker.readthedocs.io/en/stable/v2.html for details.
Defaulting to the only supported framework/algorithm version: 1. Ignoring f ramework/algorithm version: latest.
Using SageMaker BlazingText container: 811284229777.dkr.ecr.us-east-1.amazo naws.com/blazingtext:1 (us-east-1)
-
Définir le SageMaker
Estrimatoravec des configurations de ressources et des hyperparamètres pour former la classification de texte sur l'ensemble de données DBPedia en utilisant le mode supervisé sur une instance c4.4xlarge.In [12]: bt_model = sagemaker.estimator.Estimator( container, role, instance_count=1, instance_type="ml.c4.4xlarge", volume_size=30, max_run=360000, input_mode="File", output_path=s3_output_location, hyperparameters={ "mode": "supervised", "epochs": 1, "min_count": 2, "learning_rate": 0.05, "vector_dim": 10, "early_stopping": True, "patience": 4, "min_epochs": 5, "word_ngrams": 2, }, ) -
Préparez une poignée de main entre les canaux de données et l’algorithme. Pour ce faire, créez le
sagemaker.session.s3_inputobjets des canaux de données et les conserver dans un dictionnaire pour que l'algorithme les consomme.ln [13]: train_data = sagemaker.inputs.TrainingInput( s3_train_data, distribution="FullyReplicated", content_type="text/plain", s3_data_type="S3Prefix", ) validation_data = sagemaker.inputs.TrainingInput( s3_validation_data, distribution="FullyReplicated", content_type="text/plain", s3_data_type="S3Prefix", ) data_channels = {"train": train_data, "validation": validation_data} -
Une fois le travail terminé, un message « Travail terminé » s'affiche. Le modèle formé peut être trouvé dans le bucket S3 qui a été configuré comme
output_pathdans l'estimateur.ln [14]: bt_model.fit(inputs=data_channels, logs=True)
Sortir:
INFO:sagemaker:Creating training-job with name: blazingtext-2023-02-16-20-3
7-30-748
2023-02-16 20:37:30 Starting - Starting the training job......
2023-02-16 20:38:09 Starting - Preparing the instances for training......
2023-02-16 20:39:24 Downloading - Downloading input data
2023-02-16 20:39:24 Training - Training image download completed. Training in progress... Arguments: train
[02/16/2023 20:39:41 WARNING 140279908747072] Loggers have already been set up. [02/16/2023 20:39:41 WARNING 140279908747072] Loggers have already been set up.
[02/16/2023 20:39:41 INFO 140279908747072] nvidia-smi took: 0.0251793861389
16016 secs to identify 0 gpus
[02/16/2023 20:39:41 INFO 140279908747072] Running single machine CPU Blazi ngText training using supervised mode.
Number of CPU sockets found in instance is  1
[02/16/2023 20:39:41 INFO 140279908747072] Processing /opt/ml/input/data/tr ain/dbpedia.train . File size: 35.0693244934082 MB
[02/16/2023 20:39:41 INFO 140279908747072] Processing /opt/ml/input/data/va lidation/dbpedia.validation . File size: 21.887572288513184 MB
Read 6M words
Number of words:  149301
Loading validation data from /opt/ml/input/data/validation/dbpedia.validati on
Loaded validation data.
-------------- End of epoch: 1 ##### Alpha: 0.0000  Progress: 100.00%  Million Words/sec: 10.39 ##### Training finished.
Average throughput in Million words/sec: 10.39
Total training time in seconds: 0.60
#train_accuracy: 0.7223
Number of train examples: 112000
#validation_accuracy: 0.7205
Number of validation examples: 70000
2023-02-16 20:39:55 Uploading - Uploading generated training model
2023-02-16 20:40:11 Completed - Training job completed
Training seconds: 68
Billable seconds: 68
-
Une fois la formation terminée, déployez le modèle formé en tant que point de terminaison hébergé en temps réel Amazon SageMaker pour effectuer des prédictions.
In [15]: from sagemaker.serializers import JSONSerializer
 text_classifier = bt_model.deploy(
     initial_instance_count=1, instance_type="ml.m4.xlarge", serializer=JSONS
)
Sortir:
INFO:sagemaker:Creating model with name: blazingtext-2023-02-16-20-41-33-10
0
INFO:sagemaker:Creating endpoint-config with name blazingtext-2023-02-16-20
-41-33-100
INFO:sagemaker:Creating endpoint with name blazingtext-2023-02-16-20-41-33-
100
-------!
In [16]: sentences = [
    "Convair was an american aircraft manufacturing company which later expanded into rockets and spacecraft.",
       "Berwick secondary college is situated in the outer melbourne metropolitan suburb of berwick .",
]
# using the same nltk tokenizer that we used during data preparation for training
tokenized_sentences = [" ".join(nltk.word_tokenize(sent)) for sent in sentences]
payload = {"instances": tokenized_sentences} response = text_classifier.predict(payload)
predictions = json.loads(response)
print(json.dumps(predictions, indent=2))
[ { "label": [ "__label__Artist" ], "prob": [ 0.4090951681137085 ] }, { "label": [ "__label__EducationalInstitution" ], "prob": [ 0.49466073513031006 ] } ] -
Par défaut, le modèle renvoie une prédiction avec la probabilité la plus élevée. Pour récupérer le haut
kprédictions, ensemblekdans le fichier de configuration.In [17]: payload = {"instances": tokenized_sentences, "configuration": {"k": 2}} response = text_classifier.predict(payload) predictions = json.loads(response) print(json.dumps(predictions, indent=2))[ { "label": [ "__label__Artist", "__label__MeanOfTransportation" ], "prob": [ 0.4090951681137085, 0.26930734515190125 ] }, { "label": [ "__label__EducationalInstitution", "__label__Building" ], "prob": [ 0.49466073513031006, 0.15817692875862122 ] } ] -
Supprimez le point de terminaison avant de fermer le bloc-notes.
In [18]: sess.delete_endpoint(text_classifier.endpoint)
WARNING:sagemaker.deprecations:The endpoint attribute has been renamed in s agemaker>=2.
See: https://sagemaker.readthedocs.io/en/stable/v2.html for details.
INFO:sagemaker:Deleting endpoint with name: blazingtext-2023-02-16-20-41-33
-100