

Configurare le interfacce di rete SR-IOV per SAP HANA su SUSE KVM
 Suggerisci modifiche
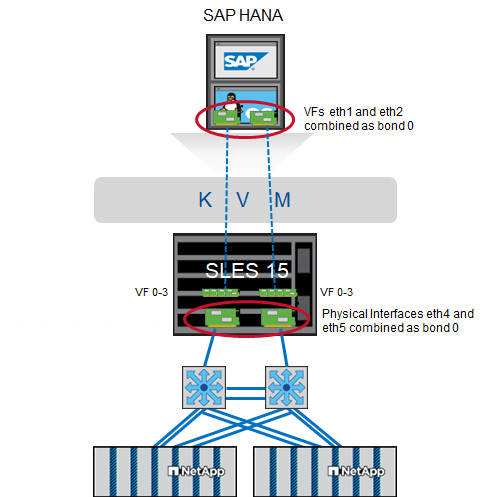
Configura le interfacce di rete SR-IOV su SUSE KVM per SAP HANA. Configura le funzioni virtuali (VF), assegnale alle VM e configura connessioni di rete ridondanti per prestazioni ottimali e accesso allo storage. Anche la rete bridged è supportata.
Passaggio 1: configurazione di SR-IOV
Abilitare e configurare la funzionalità SR-IOV nel firmware dell'adattatore per consentire la creazione di funzioni virtuali.
Questa procedura si basa su "Portale di supporto aziendale NVIDIA | Come configurare SR-IOV per ConnectX-4/ConnectX-5/ConnectX-6 con KVM (Ethernet)" . La guida SUSE SAP HANA KVM descrive questa operazione in base a una scheda di rete INTEL.
Si consiglia di utilizzare connessioni Ethernet ridondanti combinando due porte fisiche come trunk/bond. Anche le porte virtuali (VF) assegnate alla VM devono essere raggruppate all'interno della VM.
Assicurarsi che siano soddisfatti i seguenti prerequisiti:
-
KVM è installato
-
SR-IOV è abilitato nel BIOS del server
-
Il passthrough PCI è abilitato aggiungendo “intel_iommu=on” e “iommu=pt” come opzione nel bootloader
-
I driver MLNX_OFED più recenti sono installati sugli host KVM e sulle VM.

|
Ogni VF assegnato a una VM richiede almeno una larghezza di banda di 10 Gbit/s. Non creare e assegnare più di due VF per una porta fisica da 25 GbE. |
-
Eseguire MFT (Mellanox Firmware Tools):
# mst start
Starting MST (Mellanox Software Tools) driver set
Loading MST PCI module – Success
Loading MST PCI configuration module – Success
Create devices
Unloading MST PCI module (unused) – Success
-
Individuare il dispositivo:
# mst status
MST modules:
------------
MST PCI module is not loaded
MST PCI configuration module loaded

MST devices:

------------

/dev/mst/mt4125_pciconf0 - PCI configuration cycles access.
domain:bus:dev.fn=0000:ab:00.0 addr.reg=88 data.reg=92 cr_bar.gw_offset=-1

Chip revision is: 00
-
Controllare lo stato del dispositivo:
mlxconfig -d /dev/mst/mt4125_pciconf0 q |grep -e SRIOV_EN -e NUM_OF_VFS
NUM_OF_VFS 8
SRIOV_EN True(1)_
-
Se necessario, abilitare SR-IOV:
mlxconfig -d /dev/mst/mt4125_pciconf0 set SRIOV_EN=1
-
Imposta il numero massimo di VF:
mlxconfig -d /dev/mst/mt4125_pciconf0 set NUM_OF_VFS=4
-
Riavviare il server se è necessario abilitare la funzionalità o se è stata modificata la quantità massima di VF.
Passaggio 2: creare le interfacce virtuali
Creare funzioni virtuali (VF) sulle porte di rete fisiche per abilitare la funzionalità SR-IOV. In questa fase vengono creati quattro VF per porta fisica.
-
Trova il dispositivo:
# ibstat

CA 'mlx5_0'
CA type: MT4125
Number of ports: 1
Firmware version: 22.36.1010
Hardware version: 0
Node GUID: 0xa088c20300a6f6fc
System image GUID: 0xa088c20300a6f6fc
Port 1:
State: Active
Physical state: LinkUp
Rate: 100
Base lid: 0
LMC: 0
SM lid: 0
Capability mask: 0x00010000
Port GUID: 0xa288c2fffea6f6fd
Link layer: Ethernet
CA 'mlx5_1'
CA type: MT4125
Number of ports: 1
Firmware version: 22.36.1010
Hardware version: 0
Node GUID: 0xa088c20300a6f6fd
System image GUID: 0xa088c20300a6f6fc
Port 1:
State: Active
Physical state: LinkUp
Rate: 100
Base lid: 0
LMC: 0
SM lid: 0
Capability mask: 0x00010000
Port GUID: 0xa288c2fffea6f6fd
Link layer: Ethernet
Se è stato creato un legame, l'output sarà simile al seguente:
# ibstat
CA 'mlx5_bond_0'
CA type: MT4125
Number of ports: 1
Firmware version: 22.36.1010
Hardware version: 0
Node GUID: 0xa088c20300a6f6fc
System image GUID: 0xa088c20300a6f6fc
Port 1:
State: Active
Physical state: LinkUp
Rate: 100
Base lid: 0
LMC: 0
SM lid: 0
Capability mask: 0x00010000
Port GUID: 0xa288c2fffea6f6fc
Link layer: Ethernet
#:/etc/sysconfig/network # cat /sys/class/infiniband/mlx5_bond_0/device/
aerdevcorrectable iommugroup/ resetmethod
aerdevfatal irq resource
aerdevnonfatal link/ resource0
arienabled localcpulist resource0wc
brokenparitystatus localcpus revision
class maxlinkspeed rom
config maxlinkwidth sriovdriversautoprobe
consistentdmamaskbits mlx5_core.eth.0/ sriovnumvfs
urrentlinkspeed mlx5_core.rdma.0/ sriovoffset
currentlinkwidth modalias sriovstride
d3coldallowed msibus sriovtotalvfs
device msiirqs/ sriovvfdevice
dmamaskbits net/ sriovvftotalmsix
driver/ numanode subsystem/
driveroverride pools subsystemdevice
enable power/ subsystemvendor
firmwarenode/ powerstate uevent
infiniband/ ptp/ vendor
infinibandmad/ remove vpd
infinibandverbs/ rescan
iommu/ reset
# ibdev2netdev
mlx5_0 port 1 ==> eth4 (Up)
mlx5_1 port 1 ==> eth5 (Up)
-
Ottieni il totale dei VF consentiti e configurati nel firmware:
# cat /sys/class/net/eth4/device/sriov_totalvfs
4
# cat /sys/class/net/eth5/device/sriov_totalvfs
4
-
Ottieni il numero attuale di VF su questo dispositivo:
# cat /sys/class/infiniband/mlx5_0/device/sriov_numvfs
0
# cat /sys/class/infiniband/mlx5_1/device/sriov_numvfs
0
-
Impostare il numero desiderato di VF:
# echo 4 > /sys/class/infiniband/mlx5_0/device/sriov_numvfs
# echo 4 > /sys/class/infiniband/mlx5_1/device/sriov_numvfs
Se hai già configurato un legame utilizzando queste due porte, il primo comando deve essere eseguito sul legame:
# echo 4 > /sys/class/infiniband/mlx5_bond_0/device/sriov_numvfs
-
Controllare il bus PCI:
# lspci -D | grep Mellanox

0000:ab:00.0 Ethernet controller: Mellanox Technologies MT2892 Family [ConnectX-6 Dx]
0000:ab:00.1 Ethernet controller: Mellanox Technologies MT2892 Family [ConnectX-6 Dx]
0000:ab:00.2 Ethernet controller: Mellanox Technologies ConnectX Family mlx5Gen Virtual Function
0000:ab:00.3 Ethernet controller: Mellanox Technologies ConnectX Family mlx5Gen Virtual Function
0000:ab:00.4 Ethernet controller: Mellanox Technologies ConnectX Family mlx5Gen Virtual Function
0000:ab:00.5 Ethernet controller: Mellanox Technologies ConnectX Family mlx5Gen Virtual Function
0000:ab:01.2 Ethernet controller: Mellanox Technologies ConnectX Family mlx5Gen Virtual Function
0000:ab:01.3 Ethernet controller: Mellanox Technologies ConnectX Family mlx5Gen Virtual Function
0000:ab:01.4 Ethernet controller: Mellanox Technologies ConnectX Family mlx5Gen Virtual Function
0000:ab:01.5 Ethernet controller: Mellanox Technologies ConnectX Family mlx5Gen Virtual Function
# ibdev2netdev -v

0000:ab:00.0 mlx5_0 (MT4125 - 51TF3A5000XV3) Mellanox ConnectX-6 Dx 100GbE QSFP56 2-port PCIe 4 Ethernet Adapter fw 22.36.1010 port 1 (ACTIVE) ==> eth4 (Up)
0000:ab:00.1 mlx5_1 (MT4125 - 51TF3A5000XV3) Mellanox ConnectX-6 Dx 100GbE QSFP56 2-port PCIe 4 Ethernet Adapter fw 22.36.1010 port 1 (ACTIVE) ==> eth6 (Up)
0000:ab:00.2 mlx523 (MT4126 - NA) fw 22.36.1010 port 1 (DOWN ) ==> eth6 (Down)
0000:ab:00.3 mlx5_3 (MT4126 - NA) fw 22.36.1010 port 1 (DOWN ) ==> eth7 (Down)
0000:ab:00.4 mlx5_4 (MT4126 - NA) fw 22.36.1010 port 1 (DOWN ) ==> eth8 (Down)
0000:ab:00.5 mlx5_5 (MT4126 - NA) fw 22.36.1010 port 1 (DOWN ) ==> eth9 (Down)
0000:ab:01.2 mlx5_6 (MT4126 - NA) fw 22.36.1010 port 1 (DOWN ) ==> eth10 (Down)
0000:ab:01.3 mlx5_7 (MT4126 - NA) fw 22.36.1010 port 1 (DOWN ) ==> eth11 (Down)
0000:ab:01.4 mlx5_8 (MT4126 - NA) fw 22.36.1010 port 1 (DOWN ) ==> eth12 (Down)
0000:ab:01.5 mlx5_9 (MT4126 - NA) fw 22.36.1010 port 1 (DOWN ) ==> eth13 (Down)
-
Controllare la configurazione VF tramite lo strumento IP:
# ip link show
…
6: eth4: <BROADCAST,MULTICAST,SLAVE,UP,LOWER_UP> mtu 9000 qdisc mq master bond0 state UP mode DEFAULT group default qlen 1000

link/ether a0:88:c2:a6:f6:fd brd ff:ff:ff:ff:ff:ff permaddr a0:88:c2:a6:f6:fc
vf 0 link/ether 00:00:00:00:00:00 brd ff:ff:ff:ff:ff:ff, spoof checking off, link-state auto, trust off, query_rss off
vf 1 link/ether 00:00:00:00:00:00 brd ff:ff:ff:ff:ff:ff, spoof checking off, link-state auto, trust off, query_rss off
vf 2 link/ether 00:00:00:00:00:00 brd ff:ff:ff:ff:ff:ff, spoof checking off, link-state auto, trust off, query_rss off
vf 3 link/ether 00:00:00:00:00:00 brd ff:ff:ff:ff:ff:ff, spoof checking off, link-state auto, trust off, query_rss off

altname enp171s0f0np0
altname ens3f0np0

7: eth5: <BROADCAST,MULTICAST,SLAVE,UP,LOWER_UP> mtu 9000 qdisc mq master bond0 state UP mode DEFAULT group default qlen 1000

link/ether a0:88:c2:a6:f6:fd brd ff:ff:ff:ff:ff:ff
vf 0 link/ether 00:00:00:00:00:00 brd ff:ff:ff:ff:ff:ff, spoof checking off, link-state auto, trust off, query_rss off
vf 1 link/ether 00:00:00:00:00:00 brd ff:ff:ff:ff:ff:ff, spoof checking off, link-state auto, trust off, query_rss off
vf 2 link/ether 00:00:00:00:00:00 brd ff:ff:ff:ff:ff:ff, spoof checking off, link-state auto, trust off, query_rss off
vf 3 link/ether 00:00:00:00:00:00 brd ff:ff:ff:ff:ff:ff, spoof checking off, link-state auto, trust off, query_rss off

altname enp171s0f1np1
altname ens3f1np1
…
Passaggio 3: abilitare i VF durante l'avvio
Configurare le impostazioni VF in modo che rimangano invariate anche dopo il riavvio del sistema creando servizi systemd e script di avvio.
-
Crea un file di unità systemd
/etc/systemd/system/after.localcon il seguente contenuto:[Unit] Description=/etc/init.d/after.local Compatibility After=libvirtd.service Requires=libvirtd.service [Service] Type=oneshot ExecStart=/etc/init.d/after.local RemainAfterExit=true [Install] WantedBy=multi-user.target
-
Creare lo script /etc/init.d/after.local:
#! /bin/sh
#
#
# ...
echo 4 > /sys/class/infiniband/mlx5_bond_0/device/sriov_numvfs
echo 4 > /sys/class/infiniband/mlx5_1/device/sriov_numvfs
-
Assicurarsi che il file possa essere eseguito:
# cd /etc/init.d/
# chmod 750 after.local
Passaggio 4: assegnare le interfacce virtuali alla VM
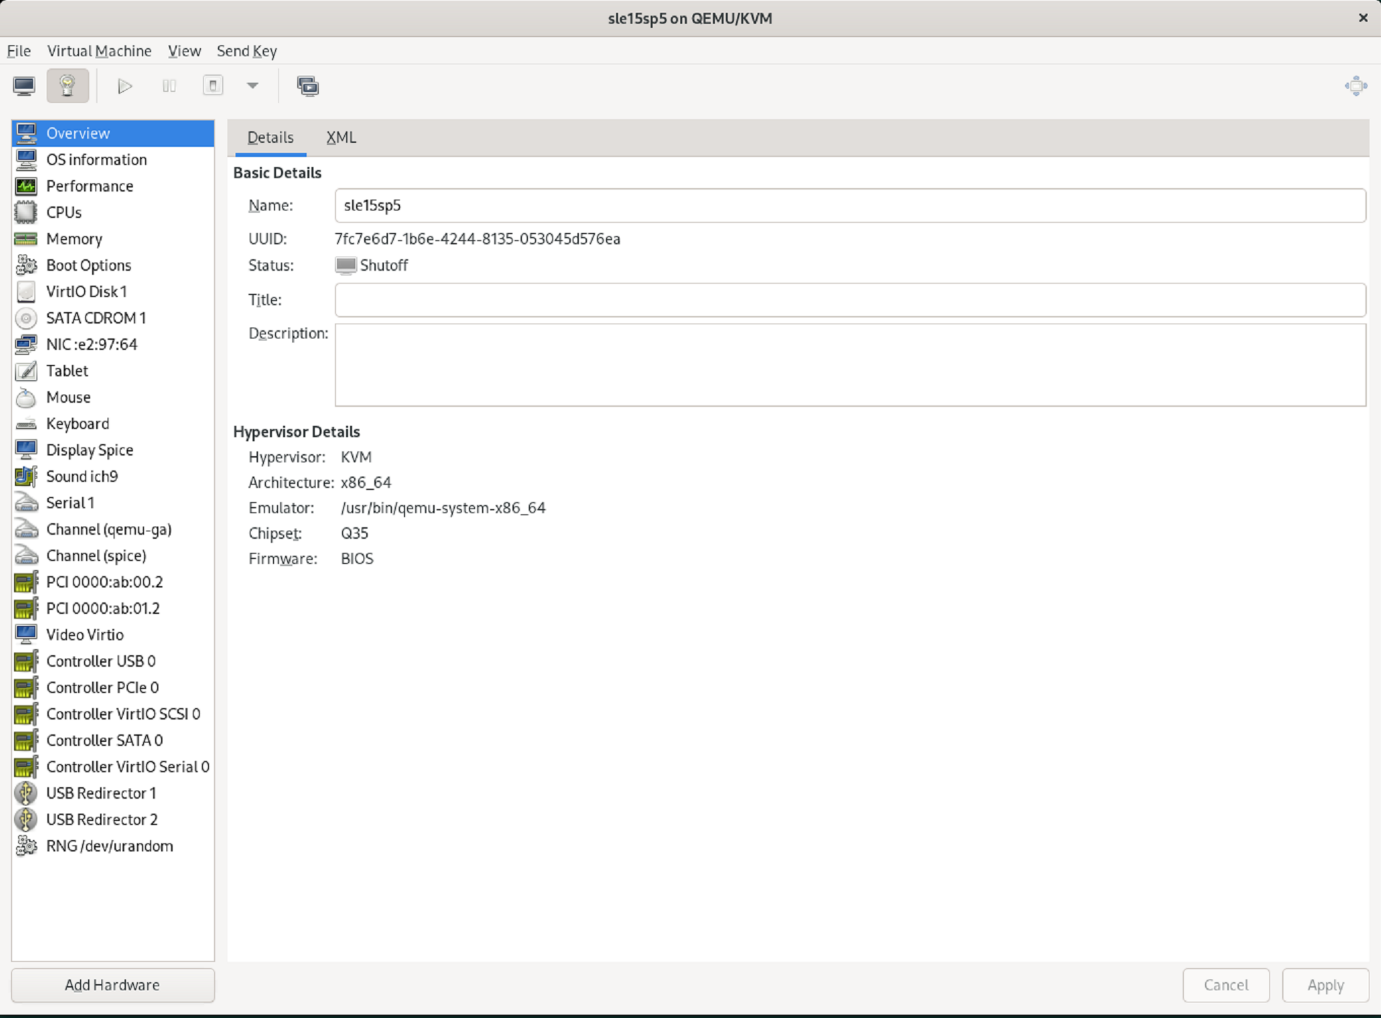
Assegnare le funzioni virtuali create alla VM SAP HANA come dispositivi host PCI utilizzando virt-manager
-
Avviare virt-manager.

-
Aprire la VM desiderata.

-
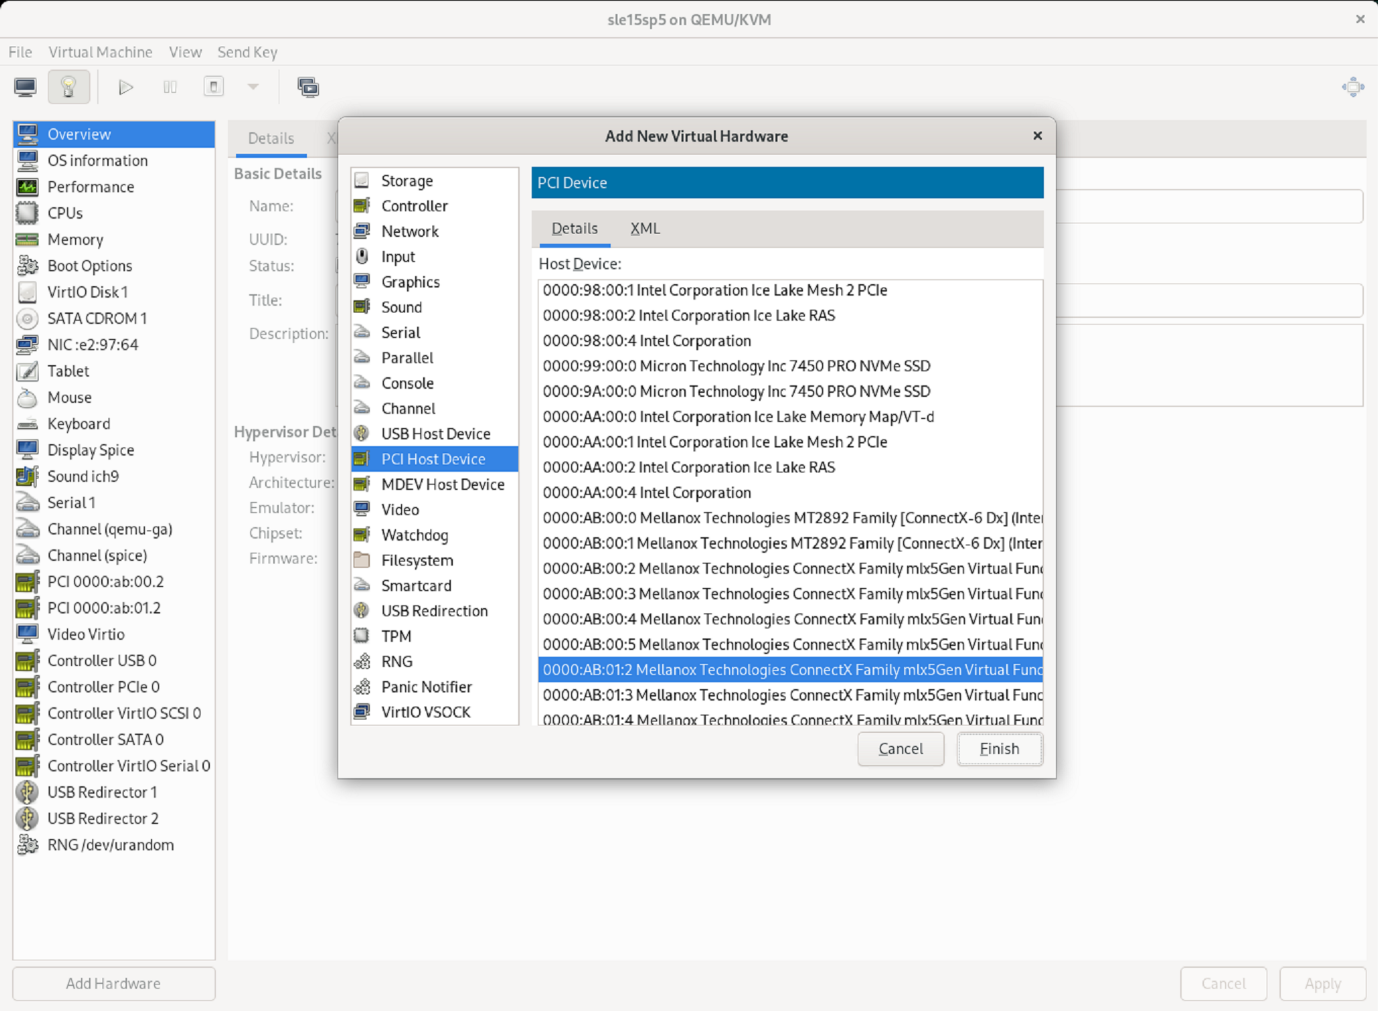
Selezionare Aggiungi hardware. +
-
Selezionare la scheda di rete virtuale desiderata dalla prima porta fisica nell'elenco dei dispositivi host PCI e premere Fine.
In questo esempio 0000.AB:00:2 - 0000.AB:00:4 appartengono alla prima porta fisica e 0000.AB:01:2 - 0000.AB:01:4 appartengono alla seconda porta fisica.

-
Selezionare la porta NIC virtuale successiva dall'elenco dei dispositivi host PCI, utilizzare una porta virtuale dalla seconda porta fisica e selezionare Fine.
-
Successivamente le interfacce virtuali vengono assegnate alla VM e la VM può essere avviata. +

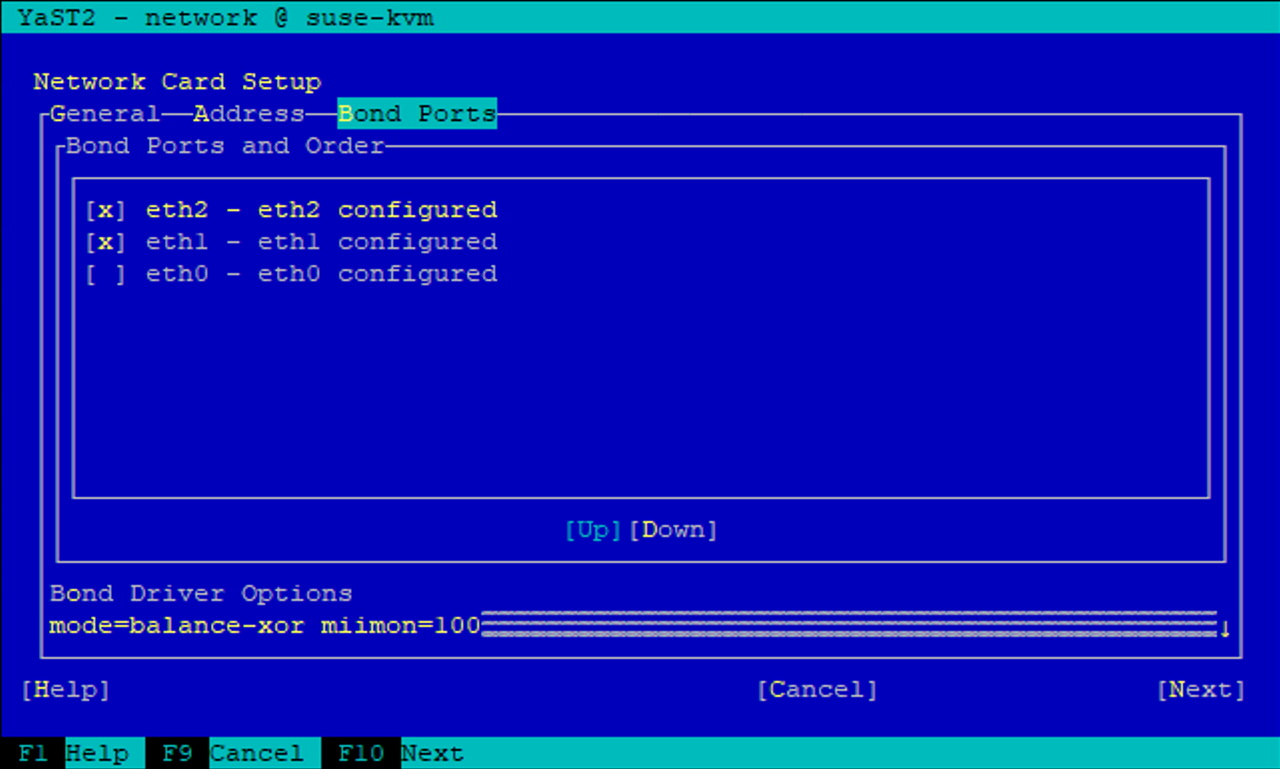
Passaggio 5: configurare le interfacce di rete all'interno della VM
Accedere alla VM e configurare i due VF come bond. Scegliere la modalità 0 o la modalità 2. Non utilizzare LACP poiché LACP può essere utilizzato solo su porte fisiche. La figura seguente mostra una configurazione in modalità 2 utilizzando YAST.
Cosa succederà ora?
Dopo aver configurato le interfacce di rete SR-IOV,"configurare la rete Fibre Channel" se FCP deve essere utilizzato come protocollo di archiviazione.