

이전 Cisco 스위치에서 Cisco Nexus 9336C-FX2 및 9336C-FX2-T 스위치로 마이그레이션
 변경 제안
변경 제안
기존 Cisco 클러스터 스위치에서 Cisco Nexus 9336C-FX2 및 9336C-FX2-T 클러스터 네트워크 스위치로 중단 없는 마이그레이션을 수행할 수 있습니다.
검토 요구 사항
다음 사항을 확인하세요.
-
올바른 스위치가 마이그레이션되었는지 확인하기 위해 스위치 일련번호를 확인했습니다.
-
Nexus 9336C-FX2 스위치의 일부 포트는 10GbE 또는 40GbE에서 실행되도록 구성되어 있습니다.
-
노드에서 Nexus 9336C-FX2 클러스터 스위치로의 10GbE 및 40GbE 연결은 계획, 마이그레이션 및 문서화되었습니다.
-
클러스터가 완벽하게 작동합니다(로그에 오류나 이와 유사한 문제가 없어야 함).
-
Cisco Nexus 9336C-FX2 스위치의 초기 사용자 정의가 완료되어 다음이 가능해졌습니다.
-
9336C-FX2 스위치는 최신 권장 버전의 소프트웨어를 실행하고 있습니다.
-
LIF를 새 스위치로 마이그레이션하기 전에 참조 구성 파일(RCF)이 모든 새 스위치에 완전히 적용되었는지 확인하세요.
-
네트워크 트래픽을 전환하기 전에 두 스위치의 실행 및 시작 구성을 확인하세요.
-
DNS, NTP, SMTP, SNMP, SSH 등 모든 사이트 사용자 정의는 새 스위치에서 구성됩니다.
-
-
스위치 호환성 표에 액세스할 수 있습니다. "Cisco 이더넷 스위치" 지원되는 ONTAP, NX-OS 및 RCF 버전에 대한 페이지입니다.
-
Cisco 스위치 업그레이드 및 다운그레이드 절차에 대한 Cisco 웹 사이트에서 제공되는 적절한 소프트웨어 및 업그레이드 가이드를 검토했습니다. "Cisco Nexus 9000 시리즈 스위치 지원" 페이지.

|
AFF A800 또는 AFF C800 시스템에서 e0a 및 e1a 클러스터 포트의 포트 속도를 변경하는 경우 속도 변환 후 잘못된 패킷이 수신되는 것을 볼 수 있습니다. 보다 "버그 1570339" 그리고 지식 기반 문서 "40GbE에서 100GbE로 변환 후 T6 포트에서 CRC 오류 발생" 지침을 위해. |
스위치 마이그레이션
이 절차의 예에서는 두 개의 노드를 사용합니다. 이러한 노드는 두 개의 10GbE 클러스터 상호 연결 포트 e0a 및 e0b를 사용합니다. 를 참조하십시오 "Hardware Universe" 플랫폼에서 올바른 클러스터 포트를 확인하세요. 보다 "HWU에 없는 추가 정보 중 장비를 설치하는 데 필요한 정보는 무엇입니까?" 스위치 설치 요구 사항에 대한 자세한 내용은 다음을 참조하십시오.
|
|
명령 출력은 ONTAP 릴리스에 따라 달라질 수 있습니다. |
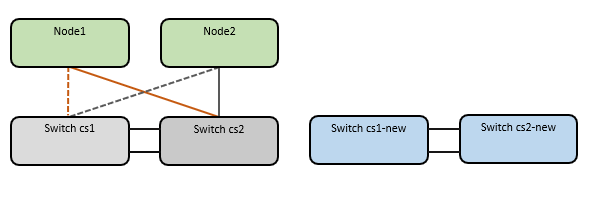
이 절차의 예에서는 다음 스위치 및 노드 명명법을 사용합니다.
-
기존 Cisco 스위치 두 개의 이름은 *cs1*과 *cs2*입니다.
-
새로운 Nexus 9336C-FX2 클러스터 스위치는 cs1-new 및 *cs2-new*입니다.
-
노드 이름은 *node1*과 *node2*입니다.
-
클러스터 LIF 이름은 노드 1의 경우 node1_clus1 및 node1_clus2*이고, 노드 2의 경우 *node2_clus1 및 *node2_clus2*입니다.
-
cluster1::>* 프롬프트는 클러스터의 이름을 나타냅니다.
이 과정에서 다음 예를 참조하세요.
이 절차에는 ONTAP 명령과 다음 두 가지를 모두 사용해야 합니다. "Nexus 9000 시리즈 스위치" 명령; 달리 지정되지 않는 한 ONTAP 명령이 사용됩니다.
이 절차는 다음 시나리오를 다룹니다.
-
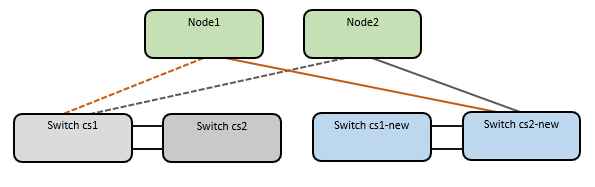
Switch cs2는 먼저 switch cs2-new로 교체됩니다.
-
클러스터 노드의 포트를 종료합니다. 클러스터 불안정성을 방지하려면 모든 포트를 동시에 종료해야 합니다.
-
모든 클러스터 LIF는 새로운 스위치 cs2-new로 장애 조치됩니다.
-
-
그런 다음 노드와 cs2 사이의 케이블 연결을 cs2에서 분리하고 cs2-new에 다시 연결합니다.
-
-
스위치 cs1은 스위치 cs1-new로 대체됩니다.
-
클러스터 노드의 포트를 종료합니다. 클러스터 불안정성을 방지하려면 모든 포트를 동시에 종료해야 합니다.
-
모든 클러스터 LIF는 새로운 스위치 cs1-new로 장애 조치됩니다.
-
-
그런 다음 노드와 cs1 간의 케이블 연결을 cs1에서 분리하고 cs1-new에 다시 연결합니다.
-
|
|
이 절차 중에는 작동 중인 ISL(스위치 간 링크)이 필요하지 않습니다. 이는 RCF 버전 변경으로 인해 ISL 연결에 일시적으로 영향을 미칠 수 있기 때문에 설계된 기능입니다. 중단 없는 클러스터 운영을 보장하기 위해 다음 절차에서는 대상 스위치에서 단계를 수행하는 동안 모든 클러스터 LIF를 운영 파트너 스위치로 장애 조치합니다. |
1단계: 마이그레이션 준비
-
이 클러스터에서 AutoSupport 활성화된 경우 AutoSupport 메시지를 호출하여 자동 케이스 생성을 억제합니다.
system node autosupport invoke -node * -type all -message MAINT=xh여기서 _x_는 유지 관리 기간(시간)입니다.
AutoSupport 메시지는 기술 지원팀에 이 유지 관리 작업을 알려 유지 관리 기간 동안 자동 케이스 생성이 억제되도록 합니다. -
계속할지 묻는 메시지가 나타나면 *y*를 입력하여 권한 수준을 고급으로 변경합니다.
set -privilege advanced고급 프롬프트(*>)가 나타납니다.
2단계: 포트 및 케이블 구성
-
새 스위치에서 cs1-new와 cs2-new 스위치 사이에 ISL이 케이블로 연결되어 있고 정상인지 확인하세요.
show port-channel summary예를 보여주세요
cs1-new# show port-channel summary Flags: D - Down P - Up in port-channel (members) I - Individual H - Hot-standby (LACP only) s - Suspended r - Module-removed b - BFD Session Wait S - Switched R - Routed U - Up (port-channel) p - Up in delay-lacp mode (member) M - Not in use. Min-links not met -------------------------------------------------------------------------------- Group Port- Type Protocol Member Ports Channel -------------------------------------------------------------------------------- 1 Po1(SU) Eth LACP Eth1/35(P) Eth1/36(P) cs2-new# show port-channel summary Flags: D - Down P - Up in port-channel (members) I - Individual H - Hot-standby (LACP only) s - Suspended r - Module-removed b - BFD Session Wait S - Switched R - Routed U - Up (port-channel) p - Up in delay-lacp mode (member) M - Not in use. Min-links not met -------------------------------------------------------------------------------- Group Port- Type Protocol Member Ports Channel -------------------------------------------------------------------------------- 1 Po1(SU) Eth LACP Eth1/35(P) Eth1/36(P) -
기존 클러스터 스위치에 연결된 각 노드의 클러스터 포트를 표시합니다.
network device-discovery show예를 보여주세요
cluster1::*> network device-discovery show -protocol cdp Node/ Local Discovered Protocol Port Device (LLDP: ChassisID) Interface Platform ----------- ------ ------------------------- ---------------- ---------------- node1 /cdp e0a cs1 Ethernet1/1 N5K-C5596UP e0b cs2 Ethernet1/2 N5K-C5596UP node2 /cdp e0a cs1 Ethernet1/1 N5K-C5596UP e0b cs2 Ethernet1/2 N5K-C5596UP -
각 클러스터 포트의 관리 또는 운영 상태를 확인합니다.
-
모든 클러스터 포트가 정상 상태로 작동하는지 확인하세요.
network port show -ipspace Cluster예를 보여주세요
cluster1::*> network port show -ipspace Cluster Node: node1 Ignore Speed(Mbps) Health Health Port IPspace Broadcast Domain Link MTU Admin/Oper Status Status --------- ------------ ---------------- ---- ---- ----------- -------- ------ e0a Cluster Cluster up 9000 auto/10000 healthy false e0b Cluster Cluster up 9000 auto/10000 healthy false Node: node2 Ignore Speed(Mbps) Health Health Port IPspace Broadcast Domain Link MTU Admin/Oper Status Status --------- ------------ ---------------- ---- ---- ----------- -------- ------ e0a Cluster Cluster up 9000 auto/10000 healthy false e0b Cluster Cluster up 9000 auto/10000 healthy false -
모든 클러스터 인터페이스(LIF)가 홈 포트에 있는지 확인하세요.
network interface show -vserver Cluster예를 보여주세요
cluster1::*> network interface show -vserver Cluster Logical Status Network Current Current Is Vserver Interface Admin/Oper Address/Mask Node Port Home ----------- ----------- ---------- ------------------ ----------- ------- ---- Cluster node1_clus1 up/up 169.254.209.69/16 node1 e0a true node1_clus2 up/up 169.254.49.125/16 node1 e0b true node2_clus1 up/up 169.254.47.194/16 node2 e0a true node2_clus2 up/up 169.254.19.183/16 node2 e0b true -
클러스터가 두 클러스터 스위치에 대한 정보를 모두 표시하는지 확인합니다.
system cluster-switch show -is-monitoring-enabled-operational true
예를 보여주세요
cluster1::*> system cluster-switch show -is-monitoring-enabled-operational true Switch Type Address Model --------------------------- ------------------ ---------------- --------------- cs1 cluster-network 10.233.205.92 N5K-C5596UP Serial Number: FOXXXXXXXGS Is Monitored: true Reason: None Software Version: Cisco Nexus Operating System (NX-OS) Software, Version 9.3(4) Version Source: CDP cs2 cluster-network 10.233.205.93 N5K-C5596UP Serial Number: FOXXXXXXXGD Is Monitored: true Reason: None Software Version: Cisco Nexus Operating System (NX-OS) Software, Version 9.3(4) Version Source: CDP -
-
이 절차에 대해 자동 복귀를 비활성화하면 클러스터 LIF가 자동으로 홈 포트로 돌아가지 않습니다. 그들은 현재 항구에 남아서 항구가 계속 운영되도록 노력합니다.
network interface modify -vserver Cluster -lif * -auto-revert false
자동 복귀를 비활성화하면 나중에 스위치 포트가 종료될 때만 ONTAP 클러스터 LIF를 장애 조치합니다. -
클러스터 스위치 cs2에서 클러스터 LIF를 장애 조치하기 위해 모든 노드의 클러스터 포트에 연결된 포트를 종료합니다.
cs2# configure
cs2(config)# interface eth1/1-1/2
cs2(config-if-range)# shutdown
cs2(config-if-range)# exit
cs2(config)# exit
cs2#
-
클러스터 LIF가 클러스터 스위치 cs1에 호스팅된 포트로 장애 조치되었는지 확인합니다. 몇 초 정도 걸릴 수 있습니다.
network interface show -vserver Cluster예를 보여주세요
cluster1::*> network interface show -vserver Cluster Logical Status Network Current Current Is Vserver Interface Admin/Oper Address/Mask Node Port Home ----------- ------------- ---------- ------------------ ---------- ------- ---- Cluster node1_clus1 up/up 169.254.3.4/16 node1 e0a true node1_clus2 up/up 169.254.3.5/16 node1 e0a false node2_clus1 up/up 169.254.3.8/16 node2 e0a true node2_clus2 up/up 169.254.3.9/16 node2 e0a false -
클러스터가 정상인지 확인하세요.
cluster show예를 보여주세요
cluster1::*> cluster show
Node       Health  Eligibility   Epsilon
---------- ------- ------------- -------
node1      true    true          false
node2      true    true          false
-
클러스터 LIF가 스위치 cs1로 장애 조치되었고 클러스터가 정상인 경우 다음으로 이동합니다.단계. 10 . 일부 클러스터 LIF가 정상적이지 않거나 클러스터가 정상적이지 않은 경우 다음과 같이 스위치 cs2에 대한 연결을 롤백할 수 있습니다.
-
모든 노드의 클러스터 포트에 연결된 포트를 불러옵니다.
cs2# configure
cs2(config)# interface eth1/1-1/2
cs2(config-if-range)# no shutdown
cs2(config-if-range)# exit
cs2(config)# exit
cs2#
-
클러스터 LIF가 클러스터 스위치 cs1에 호스팅된 포트로 장애 조치되었는지 확인합니다. 몇 초 정도 걸릴 수 있습니다.
network interface show -vserver Cluster예를 보여주세요
cluster1::*> network interface show -vserver Cluster Logical Status Network Current Current Is Vserver Interface Admin/Oper Address/Mask Node Port Home ----------- ------------- ---------- ------------------ ---------- ------- ---- Cluster node1_clus1 up/up 169.254.3.4/16 node1 e0a true node1_clus2 up/up 169.254.3.5/16 node1 e0a false node2_clus1 up/up 169.254.3.8/16 node2 e0a true node2_clus2 up/up 169.254.3.9/16 node2 e0a false -
클러스터가 정상인지 확인하세요.
cluster show
예를 보여주세요
cluster1::*> cluster show
Node       Health  Eligibility   Epsilon
---------- ------- ------------- -------
node1      true    true          false
node2      true    true          false
-
-
LIF 및 클러스터 상태를 복구한 후 프로세스를 다시 시작하세요.단계. 4 .
-
모든 클러스터 노드 연결 케이블을 기존 cs2 스위치에서 새 cs2-new 스위치로 이동합니다.
클러스터 노드 연결 케이블이 cs2-new 스위치로 이동되었습니다
-
cs2-new로 이동된 네트워크 연결의 상태를 확인하세요:
network port show -ipspace Cluster예를 보여주세요
cluster1::*> network port show -ipspace Cluster

Node: node1
                                                                       Ignore
                                                  Speed(Mbps) Health   Health
Port      IPspace      Broadcast Domain Link MTU  Admin/Oper  Status   Status
--------- ------------ ---------------- ---- ---- ----------- -------- ------
e0a       Cluster      Cluster          up   9000  auto/10000 healthy  false
e0b       Cluster      Cluster          up   9000  auto/10000 healthy  false

Node: node2
                                                                       Ignore
                                                  Speed(Mbps) Health   Health
Port      IPspace      Broadcast Domain Link MTU  Admin/Oper  Status   Status
--------- ------------ ---------------- ---- ---- ----------- -------- ------
e0a       Cluster      Cluster          up   9000  auto/10000 healthy  false
e0b       Cluster      Cluster          up   9000  auto/10000 healthy  false
이동된 모든 클러스터 포트는 작동 중이어야 합니다.
-
클러스터 포트에서 이웃 정보를 확인하세요.
network device-discovery show -protocol cdp예를 보여주세요
cluster1::*> network device-discovery show -protocol cdp

Node/       Local  Discovered
Protocol    Port   Device (LLDP: ChassisID)  Interface      Platform
----------- ------ ------------------------- -------------  --------------
node1      /cdp
            e0a    cs1                       Ethernet1/1    N5K-C5596UP
            e0b    cs2-new                   Ethernet1/1/1  N9K-C9336C-FX2

node2      /cdp
            e0a    cs1                       Ethernet1/2    N5K-C5596UP
            e0b    cs2-new                   Ethernet1/1/2  N9K-C9336C-FX2
이동된 클러스터 포트가 cs2-new 스위치를 이웃으로 인식하는지 확인합니다.
-
switch cs2-new의 관점에서 스위치 포트 연결을 확인하세요.
cs2-new# show interface brief
cs2-new# show cdp neighbors
-
클러스터 스위치 cs1에서 클러스터 LIF에 대한 장애 조치를 취하기 위해 모든 노드의 클러스터 포트에 연결된 포트를 종료합니다.
cs1# configure
cs1(config)# interface eth1/1-1/2
cs1(config-if-range)# shutdown
cs1(config-if-range)# exit
cs1(config)# exit
cs1#
모든 클러스터 LIF는 cs2-new 스위치로 장애 조치됩니다.
-
클러스터 LIF가 스위치 cs2-new에 호스팅된 포트로 장애 조치되었는지 확인합니다. 몇 초 정도 걸릴 수 있습니다.
network interface show -vserver Cluster예를 보여주세요
cluster1::*> network interface show -vserver Cluster Logical Status Network Current Current Is Vserver Interfac Admin/Oper Address/Mask Node Port Home ----------- ------------ ---------- ------------------ ----------- ------- ---- Cluster node1_clus1 up/up 169.254.3.4/16 node1 e0b false node1_clus2 up/up 169.254.3.5/16 node1 e0b true node2_clus1 up/up 169.254.3.8/16 node2 e0b false node2_clus2 up/up 169.254.3.9/16 node2 e0b true -
클러스터가 정상인지 확인하세요.
cluster show예를 보여주세요
cluster1::*> cluster show
Node       Health  Eligibility   Epsilon
---------- ------- ------------- -------
node1      true    true          false
node2      true    true          false
-
클러스터 노드 연결 케이블을 cs1에서 새로운 cs1-new 스위치로 옮깁니다.
클러스터 노드 연결 케이블이 cs1-new 스위치로 이동되었습니다

-
cs1-new로 이동된 네트워크 연결의 상태를 확인하세요.
network port show -ipspace Cluster예를 보여주세요
cluster1::*> network port show -ipspace Cluster

Node: node1
                                                                       Ignore
                                                  Speed(Mbps) Health   Health
Port      IPspace      Broadcast Domain Link MTU  Admin/Oper  Status   Status
--------- ------------ ---------------- ---- ---- ----------- -------- ------
e0a       Cluster      Cluster          up   9000  auto/10000 healthy  false
e0b       Cluster      Cluster          up   9000  auto/10000 healthy  false

Node: node2
                                                                       Ignore
                                                  Speed(Mbps) Health   Health
Port      IPspace      Broadcast Domain Link MTU  Admin/Oper  Status   Status
--------- ------------ ---------------- ---- ---- ----------- -------- ------
e0a       Cluster      Cluster          up   9000  auto/10000 healthy  false
e0b       Cluster      Cluster          up   9000  auto/10000 healthy  false
이동된 모든 클러스터 포트는 작동 중이어야 합니다.
-
클러스터 포트에서 이웃 정보를 확인하세요.
network device-discovery show예를 보여주세요
cluster1::*> network device-discovery show -protocol cdp
Node/       Local  Discovered
Protocol    Port   Device (LLDP: ChassisID)  Interface       Platform
----------- ------ ------------------------- --------------  --------------
node1      /cdp
            e0a    cs1-new                   Ethernet1/1/1   N9K-C9336C-FX2
            e0b    cs2-new                   Ethernet1/1/2   N9K-C9336C-FX2

node2      /cdp
            e0a    cs1-new                   Ethernet1/1/1   N9K-C9336C-FX2
            e0b    cs2-new                   Ethernet1/1/2   N9K-C9336C-FX2
이동된 클러스터 포트가 cs1-new 스위치를 이웃으로 인식하는지 확인합니다.
-
스위치 cs1-new의 관점에서 스위치 포트 연결을 확인하세요.
cs1-new# show interface brief
cs1-new# show cdp neighbors
-
cs1-new와 cs2-new 사이의 ISL이 여전히 작동하는지 확인하세요.
show port-channel summary예를 보여주세요
cs1-new# show port-channel summary
Flags:  D - Down        P - Up in port-channel (members)
        I - Individual  H - Hot-standby (LACP only)
        s - Suspended   r - Module-removed
        b - BFD Session Wait
        S - Switched    R - Routed
        U - Up (port-channel)
        p - Up in delay-lacp mode (member)
        M - Not in use. Min-links not met
--------------------------------------------------------------------------------
Group Port-       Type     Protocol  Member Ports
      Channel
--------------------------------------------------------------------------------
1     Po1(SU)     Eth      LACP      Eth1/35(P)   Eth1/36(P)

cs2-new# show port-channel summary
Flags:  D - Down        P - Up in port-channel (members)
        I - Individual  H - Hot-standby (LACP only)
        s - Suspended   r - Module-removed
        b - BFD Session Wait
        S - Switched    R - Routed
        U - Up (port-channel)
        p - Up in delay-lacp mode (member)
        M - Not in use. Min-links not met
--------------------------------------------------------------------------------
Group Port-       Type     Protocol  Member Ports
      Channel
--------------------------------------------------------------------------------
1     Po1(SU)     Eth      LACP      Eth1/35(P)   Eth1/36(P)
3단계: 구성 확인
-
클러스터 LIF에서 자동 되돌리기를 활성화합니다.
network interface modify -vserver Cluster -lif * -auto-revert true -
스위치 cs2에서 모든 클러스터 포트를 종료하고 다시 시작하여 홈 포트에 없는 모든 클러스터 LIF의 자동 복귀를 트리거합니다.
cs2> enable
cs2# configure
cs2(config)# interface eth1/1-1/2
cs2(config-if-range)# shutdown

(Wait for 5-10 seconds before re-enabling the ports)

cs2(config-if-range)# no shutdown

(After executing the no shutdown command, the nodes detect the change and begin to auto-revert the cluster LIFs to their home ports)

cs2(config-if-range)# exit
cs2(config)# exit
cs2#
-
클러스터 LIF가 홈 포트로 되돌아갔는지 확인하세요(1분 정도 걸릴 수 있음).
network interface show -vserver Cluster클러스터 LIF 중 홈 포트로 복귀되지 않은 것이 있으면 수동으로 복귀시킵니다. LIF를 소유한 로컬 노드의 각 노드 관리 LIF 또는 SP/ BMC 시스템 콘솔에 연결해야 합니다.
network interface revert -vserver Cluster -lif * -
클러스터가 정상인지 확인하세요.
cluster show -
원격 클러스터 인터페이스의 연결성을 확인하세요.
당신은 사용할 수 있습니다 network interface check cluster-connectivity 클러스터 연결에 대한 접근성 검사를 시작한 다음 세부 정보를 표시하는 명령:
network interface check cluster-connectivity start`그리고 `network interface check cluster-connectivity show
cluster1::*> network interface check cluster-connectivity start
|
|
실행하기 전에 몇 초 동안 기다리십시오. show 세부 정보를 표시하는 명령입니다.
|
cluster1::*> network interface check cluster-connectivity show
                                  Source          Destination       Packet
Node   Date                       LIF             LIF               Loss
------ -------------------------- --------------- ----------------- -----------
node1
       3/5/2022 19:21:18 -06:00   node1_clus2      node2_clus1      none
       3/5/2022 19:21:20 -06:00   node1_clus2      node2_clus2      none

node2
       3/5/2022 19:21:18 -06:00   node2_clus2      node1_clus1      none
       3/5/2022 19:21:20 -06:00   node2_clus2      node1_clus2      none
모든 ONTAP 릴리스의 경우 다음을 사용할 수도 있습니다. cluster ping-cluster -node <name> 연결성을 확인하는 명령:
cluster ping-cluster -node <name>
cluster1::*> cluster ping-cluster -node node2
Host is node2
Getting addresses from network interface table...
Cluster node1_clus1 169.254.209.69 node1     e0a
Cluster node1_clus2 169.254.49.125 node1     e0b
Cluster node2_clus1 169.254.47.194 node2     e0a
Cluster node2_clus2 169.254.19.183 node2     e0b
Local = 169.254.47.194 169.254.19.183
Remote = 169.254.209.69 169.254.49.125
Cluster Vserver Id = 4294967293
Ping status:

Basic connectivity succeeds on 4 path(s)
Basic connectivity fails on 0 path(s)
................
Detected 9000 byte MTU on 4 path(s):
    Local 169.254.19.183 to Remote 169.254.209.69
    Local 169.254.19.183 to Remote 169.254.49.125
    Local 169.254.47.194 to Remote 169.254.209.69
    Local 169.254.47.194 to Remote 169.254.49.125
Larger than PMTU communication succeeds on 4 path(s)
RPC status:
2 paths up, 0 paths down (tcp check)
2 paths up, 0 paths down (udp check)
스위치를 마이그레이션한 후에는 다음을 수행할 수 있습니다."스위치 상태 모니터링 구성" .