

Migrate volumes using SnapMirror to Cloud Resync in NetApp Backup and Recovery
 Suggest changes
The SnapMirror to Cloud Resync feature in NetApp Backup and Recovery streamlines data protection and continuity during volume migrations in NetApp environments. When a volume is migrated using SnapMirror Logical Replication (LRSE) from one on-premises NetApp deployment to another, or to a cloud-based solution such as Cloud Volumes ONTAP, SnapMirror to Cloud Resync ensures that existing cloud backups remain intact and operational.
This feature removes the need for a re-baseline process and lets backups continue after migration. This feature is valuable in workload migration scenarios, supporting both FlexVols and FlexGroups, and is available starting with ONTAP version 9.16.1.

|
This feature is available starting with NetApp Backup and Recovery version 4.0.3 released May 2025. |
SnapMirror to Cloud Resync maintains backup continuity across environments, making it easier to manage data in hybrid and multi-cloud setups.
|
|
To switch to and from NetApp Backup and Recovery workloads, refer to Switch to different NetApp Backup and Recovery workloads. |
Ensure that these prerequisites have been met:
-
The destination ONTAP cluster must be running ONTAP version 9.16.1 or later.
-
The old source ONTAP cluster must be protected using NetApp Backup and Recovery.
-
The SnapMirror to Cloud Resync feature is available starting with NetApp Backup and Recovery version 4.0.3 released May 2025.
-
Ensure that the latest backup in the object storage is the common snapshot across the old source, the new source, and the object store. Do not use a common snapshot that is older than the latest snapshot backed up to the object store.
-
Both the snapshot and SnapMirror policies used on the older ONTAP cluster must be created on the new ONTAP cluster before starting the resync operation. If you use any policy in the resync process, you must also create that policy. The Resync operation does not create policies.
-
Ensure that the SnapMirror policy that is applied to the migration volume SnapMirror relationship includes the same label that the cloud relationship uses. To avoid issues, use the policy that governs an exact mirror of the volume and all snapshots.
|
|
SnapMirror to Cloud Resync after migrations using SVM-Migrate, SVM-DR, or Head Swap methods are not currently supported. |
How NetApp Backup and Recovery SnapMirror to Cloud Resync works
If you complete a technical refresh or migrate volumes from one ONTAP cluster to another, it's important that your backups continue to work without interruption. NetApp Backup and Recovery SnapMirror to Cloud Resync helps with this by ensuring that your cloud backups stay consistent even after a volume migration.
Here's an example:
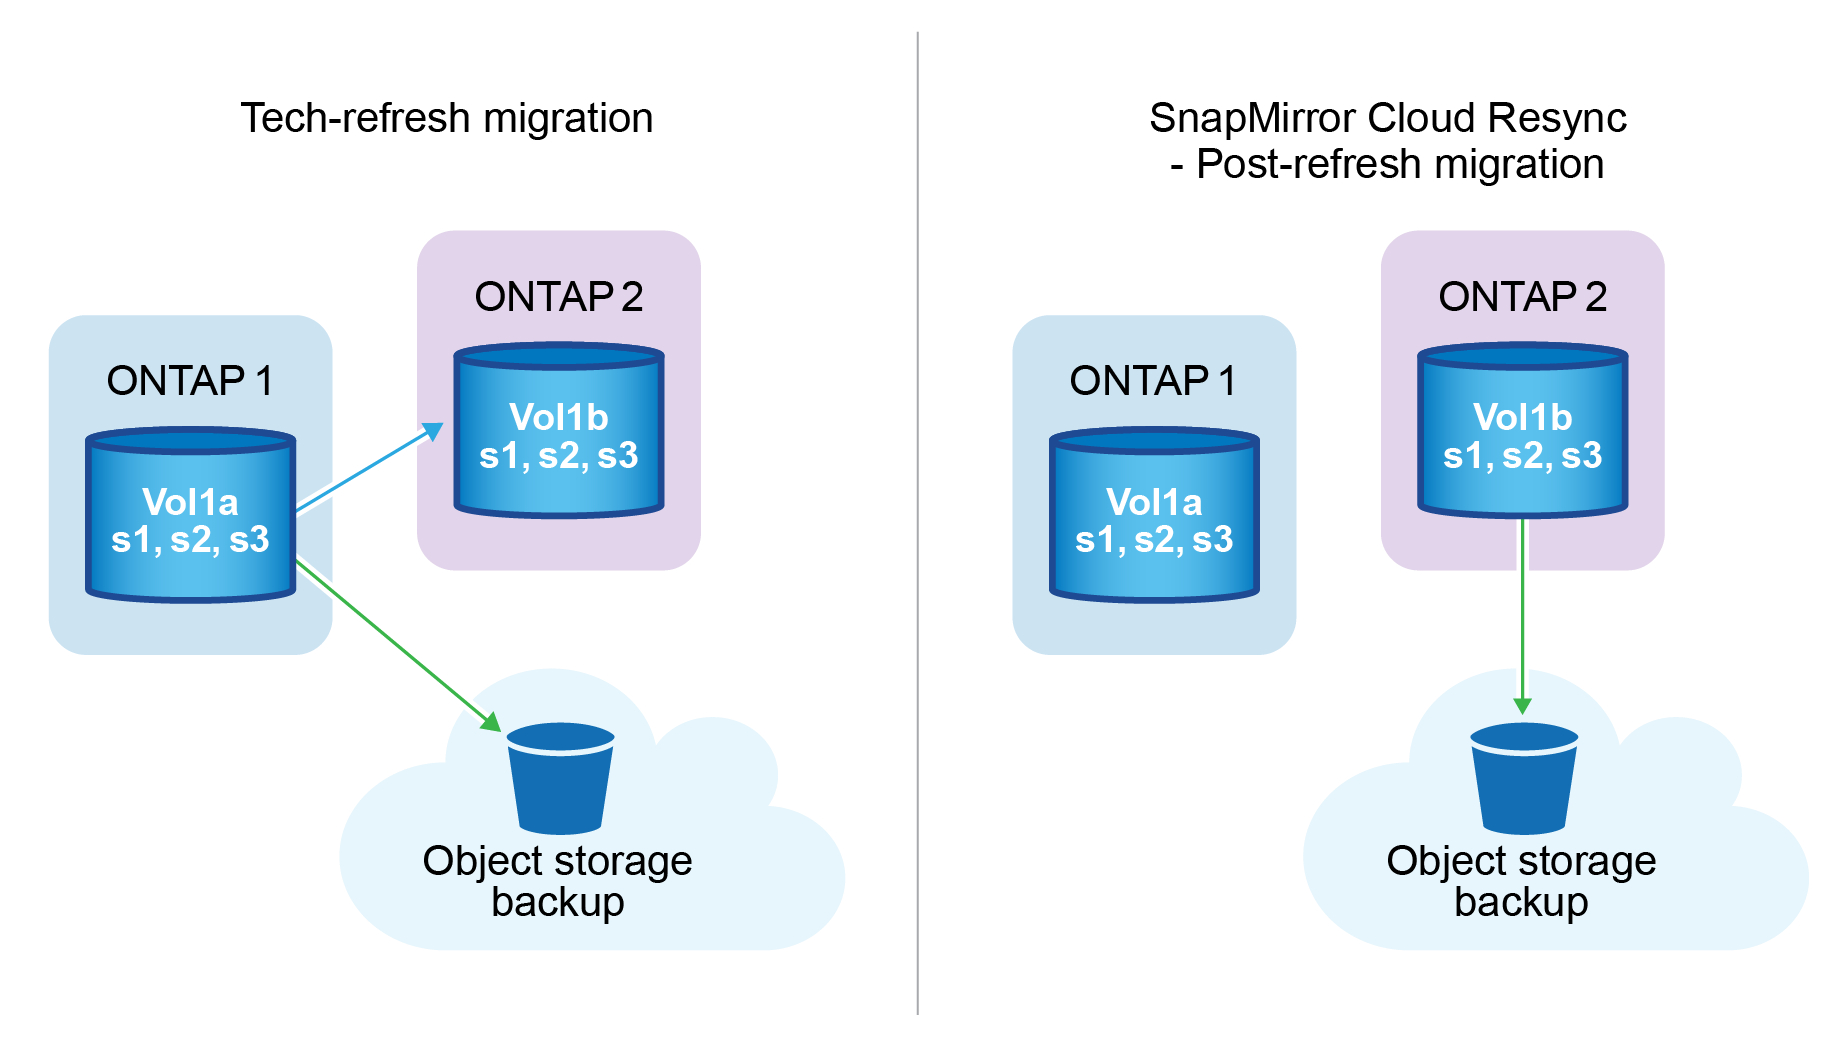
Imagine you have an on-premises volume called Vol1a. This volume has three snapshots: S1, S2, and S3. These snapshots are restore points. Vol1 is backed up to the cloud using SnapMirror to Cloud (SM-C), but only S1 and S2 are in the object store.
Now, you want to migrate Vol1 to another ONTAP cluster. To do this, you create a SnapMirror Logical Replication (LRSE) relationship to a new cloud volume called Vol1b. This transfers all three snapshots—S1, S2, and S3—from Vol1a to Vol1b.
After the migration is complete, you have the following setup:
-
The original SM-C relationship (Vol1a → Object store) is deleted.
-
The LRSE relationship (Vol1a → Vol1b) is also deleted.
-
Vol1b is now your active volume.
At this point, you want to continue backing up Vol1b to the same cloud endpoint. But instead of starting a full backup from scratch (which would take time and resources), you use SnapMirror to Cloud Resync.
Here's how the resync works:
-
The system checks for a common snapshot between Vol1a and Object store. In this case, both have S2.
-
Because of this shared snapshot, the system needs to transfer only the incremental changes between S2 and S3.
This means only the new data added after S2 is sent to object store, not the entire volume.
This process prevents duplicate backups, saves bandwidth, and keeps backups running after migration.
Procedure notes
-
Migrations and tech refreshes are not performed using NetApp Backup and Recovery. They should be carried out by a professional services team or a qualified storage administrator.
-
A NetApp migration team creates the SnapMirror relationship between the source and destination ONTAP clusters to help move volumes.
-
Ensure that the migration during a tech refresh is based on SnapMirror-based migration.
How to migrate volumes using SnapMirror to Cloud Resync
Migrating volumes using SnapMirror to Cloud Resync involves the following major steps, each described in more detail below:
-
Follow a pre-migration checklist: Before starting the migration, a NetApp Tech Refresh team ensures the following prerequisites are met to avoid data loss and ensure a smooth migration process.
-
Follow a post-migration checklist: After the migration, a NetApp Tech Refresh team ensures the following steps are completed to establish protection and prepare for the resync.
-
Perform a SnapMirror to Cloud Resync: After the migration, a NetApp Tech Refresh team performs a SnapMirror to Cloud Resync operation to resume cloud backups from the newly migrated volumes.

Follow a pre-migration checklist
Before migration, the NetApp Tech Refresh team checks these prerequisites to prevent data loss and ensure a smooth process.
-
Ensure all volumes that are to be migrated are protected using NetApp Backup and Recovery.
-
Record volume instance UUIDs. Write down the Instance UUIDs of all volumes before starting the migration. These identifiers are crucial for mapping and resync operations later.
-
Take a final snapshot of each volume to preserve the latest state, before deleting any SnapMirror relationships.
-
Document SnapMirror policies. Record the SnapMirror policy currently attached to each volume's relationship. This will be needed later during the SnapMirror to Cloud Resync process.
-
Delete the SnapMirror Cloud relationships with the object store.
-
Create a standard SnapMirror relationship with the new ONTAP cluster to migrate the volume to the new target ONTAP cluster.
Follow a post-migration checklist
After the migration, a NetApp Tech Refresh team ensures the following steps are completed to establish protection and prepare for the resync.
-
Record new volume instance UUIDs of all migrated volumes in the destination ONTAP cluster.
-
Confirm that all required SnapMirror policies that were available in the old ONTAP cluster are correctly configured in the new ONTAP cluster.
-
Add the new ONTAP cluster as a system in the Console Systems page.
The volume instance UUID should be used, not the volume ID. The volume instance UUID is a unique identifier that remains consistent across migrations, while the volume ID may change after migration.
Perform a SnapMirror to Cloud Resync
After the migration, a NetApp Tech Refresh team performs a SnapMirror to Cloud Resync operation to resume cloud backups from the newly migrated volumes.
-
Add the new ONTAP cluster as a system in the Console Systems page.
-
Look at the NetApp Backup and Recovery Volumes page to ensure that the old source system details are available.
-
From the NetApp Backup and Recovery Volumes page, select Backup Settings.
-
Within the Backup Settings page, select View all.
-
From the Actions … menu to the right of the new source, select Resync backup.
-
-
In the Resync system page, do the following:
-
New source system: Enter the new ONTAP cluster where the volumes have been migrated.
-
Existing Target Object Store: Select the target object store that contains the backups from the old source system.
-
-
Select Download CSV Template to download the Resync Details Excel sheet. Use this sheet to enter the details of the volumes to be migrated. In the CSV file, enter the following details:
-
The old volume instance UUID from the source cluster
-
The new volume instance UUID from the destination cluster
-
The SnapMirror policy to be applied to the new relationship.
-
-
Select Upload under the Upload Volume Mapping Details to upload the completed CSV sheet into the NetApp Backup and Recovery UI.
The volume instance UUID should be used, not the volume ID. The volume instance UUID is a unique identifier that remains consistent across migrations, while the volume ID may change after migration. -
Enter provider and network configuration information required for the resync operation.
-
Select Submit to start the validation process.
NetApp Backup and Recovery validates that each volume selected for resync is the latest snapshot and has at least one common snapshot. This ensures that the volumes are ready for the SnapMirror to Cloud Resync operation.
-
Review validation results including the new source volume names and the resync status for each volume.
-
Check volume eligibility. The system checks if the volumes are eligible for resync. If a volume is not eligible, it means that it isn't the latest snapshot or no common snapshot was found.

To ensure that volumes remain eligible for the SnapMirror to Cloud Resync operation, take a final snapshot of each volume before deleting any SnapMirror relationships during the pre-migration phase. This preserves the latest state of the data. -
Select Resync to start the resync operation. The system uses the latest and common snapshot to transfer only the incremental changes, ensuring backup continuity.
-
Monitor the resync process in the Job Monitor page.