


Deploy the NetApp Console in restricted mode in AWS

 Suggest changes

 PDFs

Deploy the Console agent in restricted mode so that you can use the NetApp Console with limited outbound connectivity. To get started, install the Console agent, set up the Console by accessing the user interface that's running on the Console agent, and then provide the cloud permissions that you previously set up.
Install the Console agent from AWS Marketplace (Commercial or Gov Cloud) or manually on a Linux host.
Step 1: Prepare network access
Allow the following outbound endpoints so the Console agent can manage AWS resources and access NetApp Console services.
AWS endpoints
Allow these AWS service endpoints to manage AWS resources, including FSx for ONTAP.
| Endpoints | Purpose |
|---|---|
AWS services (amazonaws.com):
|
To manage AWS resources. The endpoint depends on your AWS region. Refer to AWS documentation for details |
Amazon FSx for NetApp ONTAP:
|
The web-based console contacts this endpoint to interact with the Workload Factory APIs to manage and operate FSx for ONTAP-based workloads. |
NetApp Console endpoints
Allow the shared endpoints for NetApp Support, Console features, and Console agent deployment and upgrades.
| Endpoints | Purpose |
|---|---|
|
To obtain licensing information and to send AutoSupport messages to NetApp Support. |
|
To update NetApp Support Site (NSS) credentials or to add new NSS credentials to the NetApp Console. |
|
To obtain licensing information and to send AutoSupport messages to NetApp Support as well as to receive software updates for Cloud Volumes ONTAP. |
|
To provide features and services within the NetApp Console. |
For non-Government regions, use the following endpoints:
For Government regions, use the following endpoint instead:
|
To obtain images for Console agent deployment and upgrades. |
For browser access and other networking requirements, see Prepare network access for restricted mode.
Step 2: Deploy the NetApp Console in restricted mode in AWS
How you deploy the Console agent depends on whether you are using the AWS Commercial Marketplace, the AWS Gov Marketplace, or a manual installation on a Linux host.
Install NetApp Console restricted mode from the AWS Commercial Marketplace
Have the following:
-
A VPC and subnet that meets networking requirements.
-
An IAM role with an attached policy that includes the required permissions for the Console agent.
-
Permissions to subscribe and unsubscribe from the AWS Marketplace for your IAM user.
-
An understanding of CPU and RAM requirements for the agent.
-
A key pair for the EC2 instance.
-
Go to the NetApp Console agent listing on the AWS Marketplace.
-
On the Marketplace page, select Continue to Subscribe.
-
To subscribe to the software, select Accept Terms.
The subscription process can take a few minutes.
-
After the subscription process is complete, select Continue to Configuration.
-
On the Configure this software page, ensure that you've selected the correct region and then select Continue to Launch.
-
On the Launch this software page, under Choose Action, select Launch through EC2 and then select Launch.
Use the EC2 Console to launch the instance and attach an IAM role. This is not possible with the Launch from Website action.
-
Follow the prompts to configure and deploy the instance:
-
Name and tags: Enter a name and tags for the instance.
-
Application and OS Images: Skip this section. The Console agent AMI is already selected.
-
Instance type: Depending on region availability, choose an instance type that meets RAM and CPU requirements (t3.2xlarge is preselected and recommended).
-
Key pair (login): Select the key pair that you want to use to securely connect to the instance.
-
Network settings: Edit the network settings as needed:
-
Choose the desired VPC and subnet.
-
Specify whether the instance should have a public IP address.
-
Specify security group settings that enable the required connection methods for the Console agent instance: SSH, HTTP, and HTTPS.
-
-
Configure storage: Keep the default size and disk type for the root volume.
If you want to enable Amazon EBS encryption on the root volume, select Advanced, expand Volume 1, select Encrypted, and then choose a KMS key.
-
Advanced details: Under IAM instance profile, choose the IAM role that includes the required permissions for the Console agent.
-
Summary: Review the summary and select Launch instance.
-
AWS launches the software with the specified settings. The Console agent deploys in approximately five minutes.
Set up the NetApp Console.
Install NetApp Console restricted mode from the AWS Gov Marketplace
Have the following:
-
A VPC and subnet that meets networking requirements.
-
An IAM role with an attached policy that includes the required permissions for the Console agent.
-
Permissions to subscribe and unsubscribe from the AWS Marketplace for your IAM user.
-
A key pair for the EC2 instance.
-
Go to the NetApp Console agent offering in the AWS Marketplace.
-
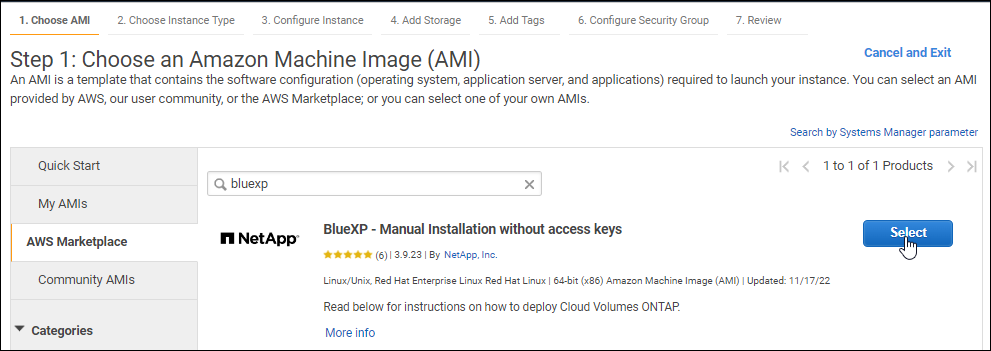
Open the EC2 service and select Launch instance.
-
Select AWS Marketplace.
-
Search for NetApp Console and select the offering.
-
Select Continue.
-
-
Follow the prompts to set up and start the instance:
-
Choose an Instance Type: Depending on region availability, choose one of the supported instance types (t3.2xlarge is recommended).
-
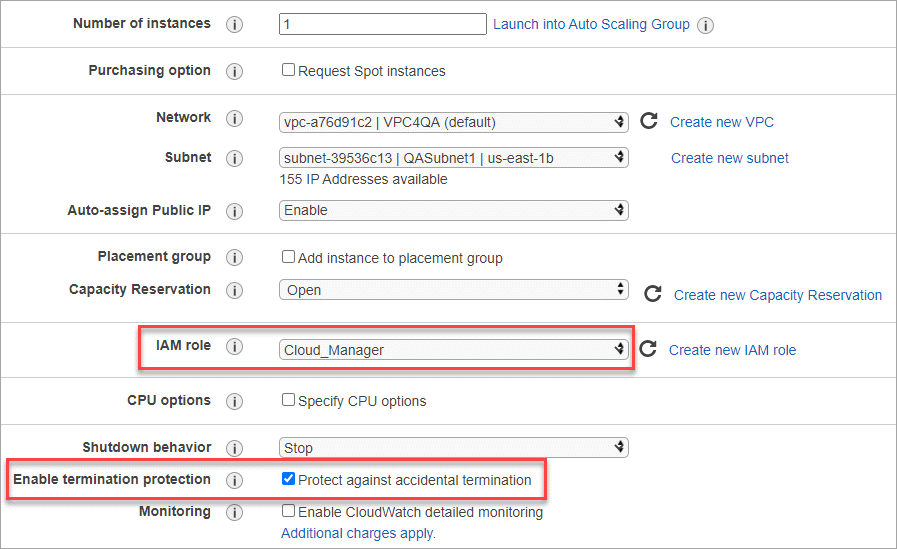
Configure Instance Details: Select a VPC and subnet, choose the IAM role that you created in step 1, enable termination protection (recommended), and choose any other configuration options that meet your requirements.
-
Add Storage: Keep the default storage options.
-
Add Tags: Enter tags for the instance, if desired.
-
Configure Security Group: Specify the required connection methods for the Console agent instance: SSH, HTTP, and HTTPS.
-
Review: Review your selections and select Launch.
-
AWS launches the software with the specified settings. The Console agent deploys in approximately five minutes.
Set up the Console.
Manually install the Console agent in AWS
For manual installation on an AWS host, see Manually install the Console agent in restricted mode.
Step 3: Set up NetApp Console
When you access the console for the first time, you are prompted to choose an organization for the Console agent and need to enable restricted mode.
The person who sets up the Console agent must log in to the Console using a login that doesn't already belong to a Console organization.
If your login is associated with another organization, you need to sign up with a new login. Otherwise, you do not see the option to enable restricted mode on the setup screen.
-
Open a web browser from a host that has a connection to the Console agent instance and enter the following URL of the Console agent you installed.
-
Sign up or log in to the NetApp Console.
-
After you're logged in, set up the Console:
-
Enter a name for the Console agent.
-
Enter a name for a new Console organization.
-
Select Are you running in a secured environment?
-
Select Enable restricted mode on this account.
Note that you can't change this setting after the account is created. You can't enable restricted mode later and you can't disable it later.
If you deployed the Console agent in a Government region, the checkbox is already enabled and can't be changed. This is because restricted mode is the only mode supported in Government regions.
-
Select Let's start.
-
The Console agent is now installed and set up with your Console organization. All users need to access the Console using the IP address of the Console agent instance.
Provide the Console with the permissions that you previously set up.
Step 4: Provide permissions to the Console agent
If you manually installed the Console agent in AWS, you need to give the permissions you set up earlier.
These steps don't apply if you deployed the Console agent from the AWS Marketplace because you chose the required IAM role during deployment.
You can provide the required permissions to the Console agent either by attaching an IAM role to the EC2 instance or by providing an AWS access key for an IAM user with the necessary permissions.
Attach the IAM role that you previously created to the EC2 instance where you installed the Console agent.
These steps apply only if you manually installed the Console agent in AWS. For AWS Marketplace deployments, you already associated the Console agent instance with an IAM role that includes the required permissions.
-
Go to the Amazon EC2 console.
-
Select Instances.
-
Select the Console agent instance.
-
Select Actions > Security > Modify IAM role.
-
Select the IAM role and select Update IAM role.
Provide the NetApp Console with the AWS access key for an IAM user that has the required permissions.
-
Select Administration > Credentials.
-
Select Organization credentials.
-
Select Add Credentials and follow the steps in the wizard.
-
Credentials Location: Select Amazon Web Services > Agent.
-
Define Credentials: Enter an AWS access key and secret key.
-
Marketplace Subscription: Associate a Marketplace subscription with these credentials by subscribing now or by selecting an existing subscription.
-
Review: Confirm the details about the new credentials and select Add.
-