

Restore VMware workloads with NetApp Backup and Recovery
 Suggest changes
Restore VMware workloads from snapshots, from a workload backup replicated to secondary storage, or from backups stored in object storage using NetApp Backup and Recovery.
You can restore workloads from different starting locations:
-
Restore from a primary location (local snapshot)
-
Restore from a replicated resource on secondary storage
-
Restore from an object storage backup
You can restore data to these points:
-
Restore to the original location: The VM is restored in the original location, to the same vCenter deployment, ESXi host, and datastore. The VM and all of its data is overwritten.
-
Restore to an alternate location: You can choose a different vCenter, ESXi host, or datastore as a restore target for the VM. This is useful for managing different copies of the same VM in different locations and states.
If ransomware protection is enabled for a backup file in object storage, you are asked to run an extra check before restoring. We recommend performing the scan.

|
You might pay extra fees to your cloud provider to access the backup file. |
How restoring workloads works
When you restore workloads, the following occurs:
-
When you restore a workload from a local snapshot or remote backup, NetApp Backup and Recovery overwrites the original VM if you restore to the original location, and creates a new resource if you restore to an alternate location.
-
When you restore from a replicated workload, you can restore the workload to the original on-premises ONTAP system or to a different on-premises ONTAP system.
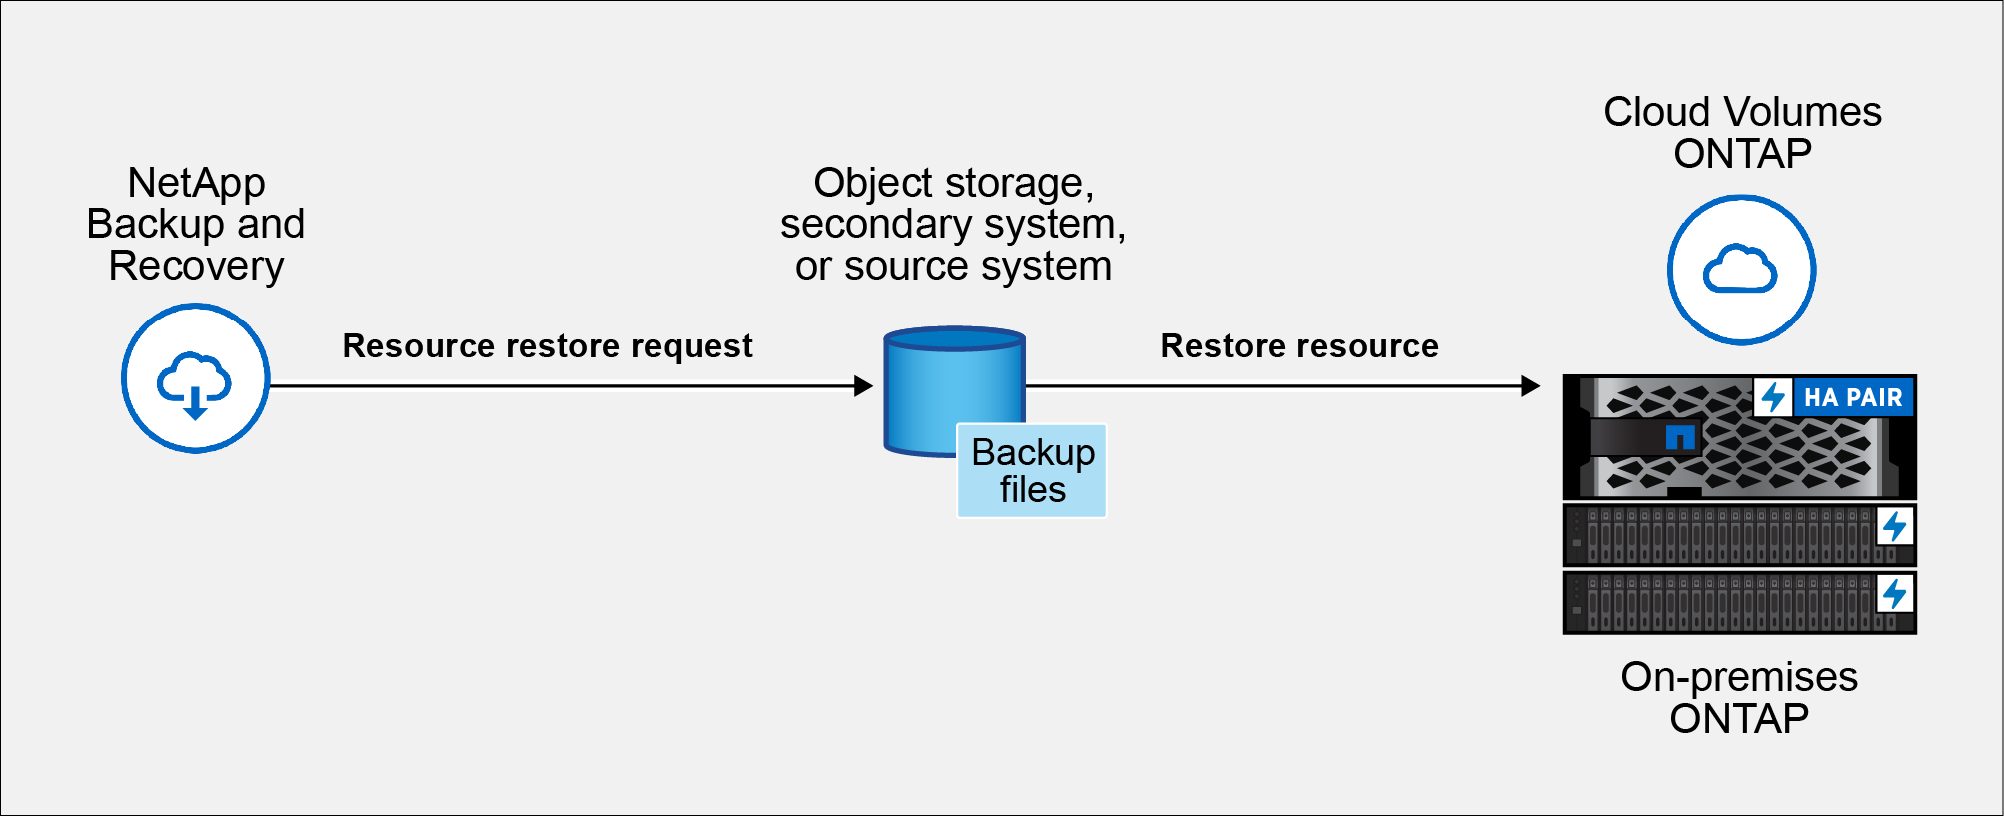
-
When you restore a backup from object storage, you can restore the data to the original system or to an on-premises ONTAP system.
From the Restore page (Search & Restore), you can restore a resource by searching for the snapshot with filters, even if you do not remember its exact name, location, or last known date.
Restore workload data from the Restore option (Search & Restore)
Restore VMware workloads using the Restore option. You can search for the snapshot by its name or by using filters.
Required NetApp Console role
Storage viewer, Backup and Recovery super admin, Backup and Recovery restore admin role. If you are protecting data stored on a Cloud Volumes ONTAP cluster, the Cloud Volumes ONTAP Admin role is also required. Learn about NetApp Console access roles for all services.
-
From the NetApp Backup and Recovery menu, select Restore.
-
From the drop-down list to the right of the name search field, select VMware.
-
Enter the name of the resource you want to restore or filter for the vCenter, datacenter, or datastore where the resource that you want to restore is located.
A list of virtual machines appears that match your search criteria.
-
Find the VM that you want to restore from in the list, and select the options menu button for that VM.
-
In the resulting menu, select Restore virtual machine.
A list of snapshots (restore points) created on that virtual machine appears. By default, the latest snapshots are shown for the time frame that you select in the Time frame dropdown.
For each snapshot, any illuminated icons in the Location column indicate the storage locations where the snapshot is available (primary, secondary, or object storage).
-
Enable the radio button for the snapshot you want to restore.
-
Select Next.
Snapshot location options appear.
-
Select the restore destination for the snapshot:
-
Local: Restores the snapshot from the local location.
-
Secondary: Restores the snapshot from a remote storage location.
-
Object store: Restores the snapshot from object storage.
If you choose secondary storage, select the destination location from the drop-down list.
-
-
Select Next to continue.
-
Choose the restore destination and settings:
Destination selection
When restoring to the original location, you cannot change the destination vCenter, ESXi host, datastore, or name of the VM. The original VM is overwritten with the restore operation.
-
Select the Original location pane.
-
Choose from the following options:
-
Pre-restore options section:
-
Prescript: Enable this option to automate additional tasks by running a custom script before the restore operation begins. Enter the full path for the script that should be run and any arguments that the script takes.
-
-
Post-restore options section:
-
Restart virtual machine: Enable this option to restart the virtual machine after the restore operation completes and after the post-restore script is applied.
-
Postscript: Enable this option to automate additional tasks by running a custom script after the restore is complete. Enter the full path for the script that should be run and any arguments that the script takes.
-
-
-
Select Restore.
When restoring to an alternate location, you can change the destination vCenter, ESXi host, datastore, and name of the VM to create a new copy of the VM in a different location or with a different name.
-
Select the Alternate location pane.
-
Enter the following information:
-
Destination settings section:
-
vCenter FQDN or IP address: Select the vCenter server where you want to restore the snapshot.
-
ESXi host: Select the host where you want to restore the snapshot.
-
Network: Select the network where you want to restore the snapshot.
-
Datastore: From the drop-down list, select the name of the datastore where you want to restore the snapshot.
-
Virtual machine name: Enter the name of the VM where you want to restore the snapshot. If the name matches a VM that already exists in the datastore, Backup and Recovery makes the name unique by appending a current timestamp.
-
-
Destination storage section (visible only when restoring from object store):
-
Change default storage location: Enable this option to restore an object store backup to a different storage VM in case the source storage location is unreachable or full. Choose a different cluster, storage VM, or aggregate to use.
-
-
Pre-restore options section:
-
Quick restore: Enable this option to instruct Backup and Recovery to only restore VM metadata (files, LUNs, and namespaces) from the object store. This makes volumes available faster than a full restore.
-
Prescript: Enable this option to automate additional tasks by running a custom script before the restore operation begins. Enter the full path for the script that should be run and any arguments that the script takes.
-
-
Post-restore options section:
-
Restart virtual machine: Enable this option to restart the virtual machine after the restore operation completes and after the post-restore script is applied.
-
Postscript: Enable this option to automate additional tasks by running a custom script after the restore is complete. Enter the full path for the script that should be run and any arguments that the script takes.
-
-
-
Select Restore.