

Configure the environment for a clean restore in NetApp Ransomware Resilience
 Suggest changes
NetApp Ransomware Resilience offers clean restores, which provide a guided recovery after ransomware attacks. To perform a clean restore, you must first create an isolated recovery environment (IRE), either on-premises or in a supported cloud environment. In the IRE, you create a clean room where Ransomware Resilience sequesters the workload to identify which files are clean and which are impacted by ransomware.
Required Console role
To perform this task, you need the Super admin or Ransomware Resilience admin role. Learn about Ransomware Resilience roles for NetApp Console.
Learn about clean restores
When you perform a clean restore, Ransomware Resilience guides you through multi-step process that optimizes recovery.
-
SETUP: To perform a clean restore, you must first create an IRE then select the workload to restore. Ransomware Resilience creates a clean room where all actions for the workload are taken.
-
ANALYSIS: In the clean room, Ransomware Resilience analyzes all snapshots to see if encryption is present. Clean restore determines a recovery map to determine the optimal recovery plan.
Once a restore point is discovered without impacted files, all earlier restore points are skipped. For example, if the ransomware event occurred on October 10, and a restore point was discovered on October 7 at 10:21 AM with no impacted files, all restore points prior to October 7 at 10:21 AM are skipped.
The analysis step also displays the number of files reviewed, denoting which are impacted and which are not.
-
PLAN: Choose the provided options for recovery:
-
Latest unimpacted restore point: the quickest restore point from the most recent unecrypted snapshot from before the attack
-
Least data loss: the most recent version of every unecrypted file from different snapshots
You can also view file histories in the planning step, to see when ransomware events impacted the files and how the recovery point relates in time to that event.
-
-
CLEANING: Ransomware Resilience removes malware from the recovery point. If any files can't be cleaned, they are excluded from the recovery and quarantined to a separate location.
-
RESTORE: Ransomware Resilience restores the clean data into the source environment.
-
END: Ransomware Resilience provides a detailed summary of the process and closes the clean room, releasing the resources provisioned during setup to eliminated future metered costs.
Supported configurations
-
You can only create one IRE per Ransomware Resilience account. Each IRE can have three clean rooms.
-
Clean restore is currently only supported for NAS file shares (NFS/CIFS).
-
You must restore a clean restore to the source environment.
-
You can create an IRE in the cloud or on-premises. Currently, the following configurations are supported:
Source Destination (IRE) Supported destination regions On-premises (AFF or FAS systems only)*
On-premises (VMware vCenter)
N/A
On-premises (AFF or FAS systems only)*
Cloud: AWS
-
US East 1
-
EU Central 1
Cloud: Cloud Volumes ONTAP with AWS*
Cloud: AWS
-
US East 1
-
EU Central 1
Cloud: Amazon FSx for NetApp ONTAP
Cloud: AWS
-
US East 1
-
EU Central 1
* You must be running ONTAP 9.11.1 or later.
-

|
Performing a clean restore in a cloud-based environment can incur additional compute charges from the cloud provider. For more information, see Cost and licensing. |
Considerations
-
You can only perform a clean restore for an encryption-based ransomware attack.
-
If the isolated recovery environment doesn't have capacity for a new operation, it's queued until there is availability.
-
You can monitor the status of active and queued clean restore operations at any time in the Ransomware Resilience Recovery dashboard.
-
-
When you initiate a clean restore, the original volume is unmounted, which can disrupt IO access.
Additional considerations for on-premises environments
If you're deploying an on-premises IRE, when a Windows VM is cloned for the recovery analysis in the clean restore, the cloned VM retains the same configuration as the source. This can cause conflicts:
-
Using the same security identifier (SID) results in authentication and security conflicts.
-
Using the same computer name (CN) causes network conflicts.
-
Using the same machine identity leads to licensing and activation issues.
To avoid these conflicts, Ransomware Resilience performs sysprep on the clone VM, which resets the SID, CN, and machine identity. Resetting these values ensures the clone VM operates as a unique and independent instance without interfering with the source VM.
Secondary sources
When you create the IRE, you have the option of adding a secondary source.
If the primary source is unavailable and you've configured a secondary source, the clean restore will be restored to the secondary source.
The clean restore process by default analyzes snapshots from the source environment. If either the source environment is unavailable or an unencrypted snapshot on the source is not available, clean restore analyzes snapshots on a secondary system if you have configured one.
Cost and licensing
Clean restore is offered as part of Ransomware Resilience. No additional license is required to perform a clean restore or create an IRE.
Enabling clean restore can incur third-party cloud provider charges. Depending on how you use the service, these charges can recur while the clean restore environments exist.
Third-party charges can include creation and deployment of compute instances and additional production storage capacity for cleaning and recovery. Consider the following examples:
-
When an IRE is deployed in AWS and you initiate the clean restore, two t3.medium AWS EC2 instances are deployed in the clean room within the IRE for cleaning encryption and malware.
-
In Cloud Volumes ONTAP, clean restore creates a clean room storage VM for metadata volumes and snapshot clones for analysis.
Prerequisites
Ensure you've completed the prerequisites for your chosen clean restore deployment type. Select the tab for your chosen IRE configuration.
|
|
When you create the IRE, you must add every system (primary or secondary) you want to use for analysis during the system selection step when you create the IRE. |
This diagram illustrates an example of the cloud-to-cloud clean restore configuration. Review the diagram and the resources that you need to configure before you can create the IRE.
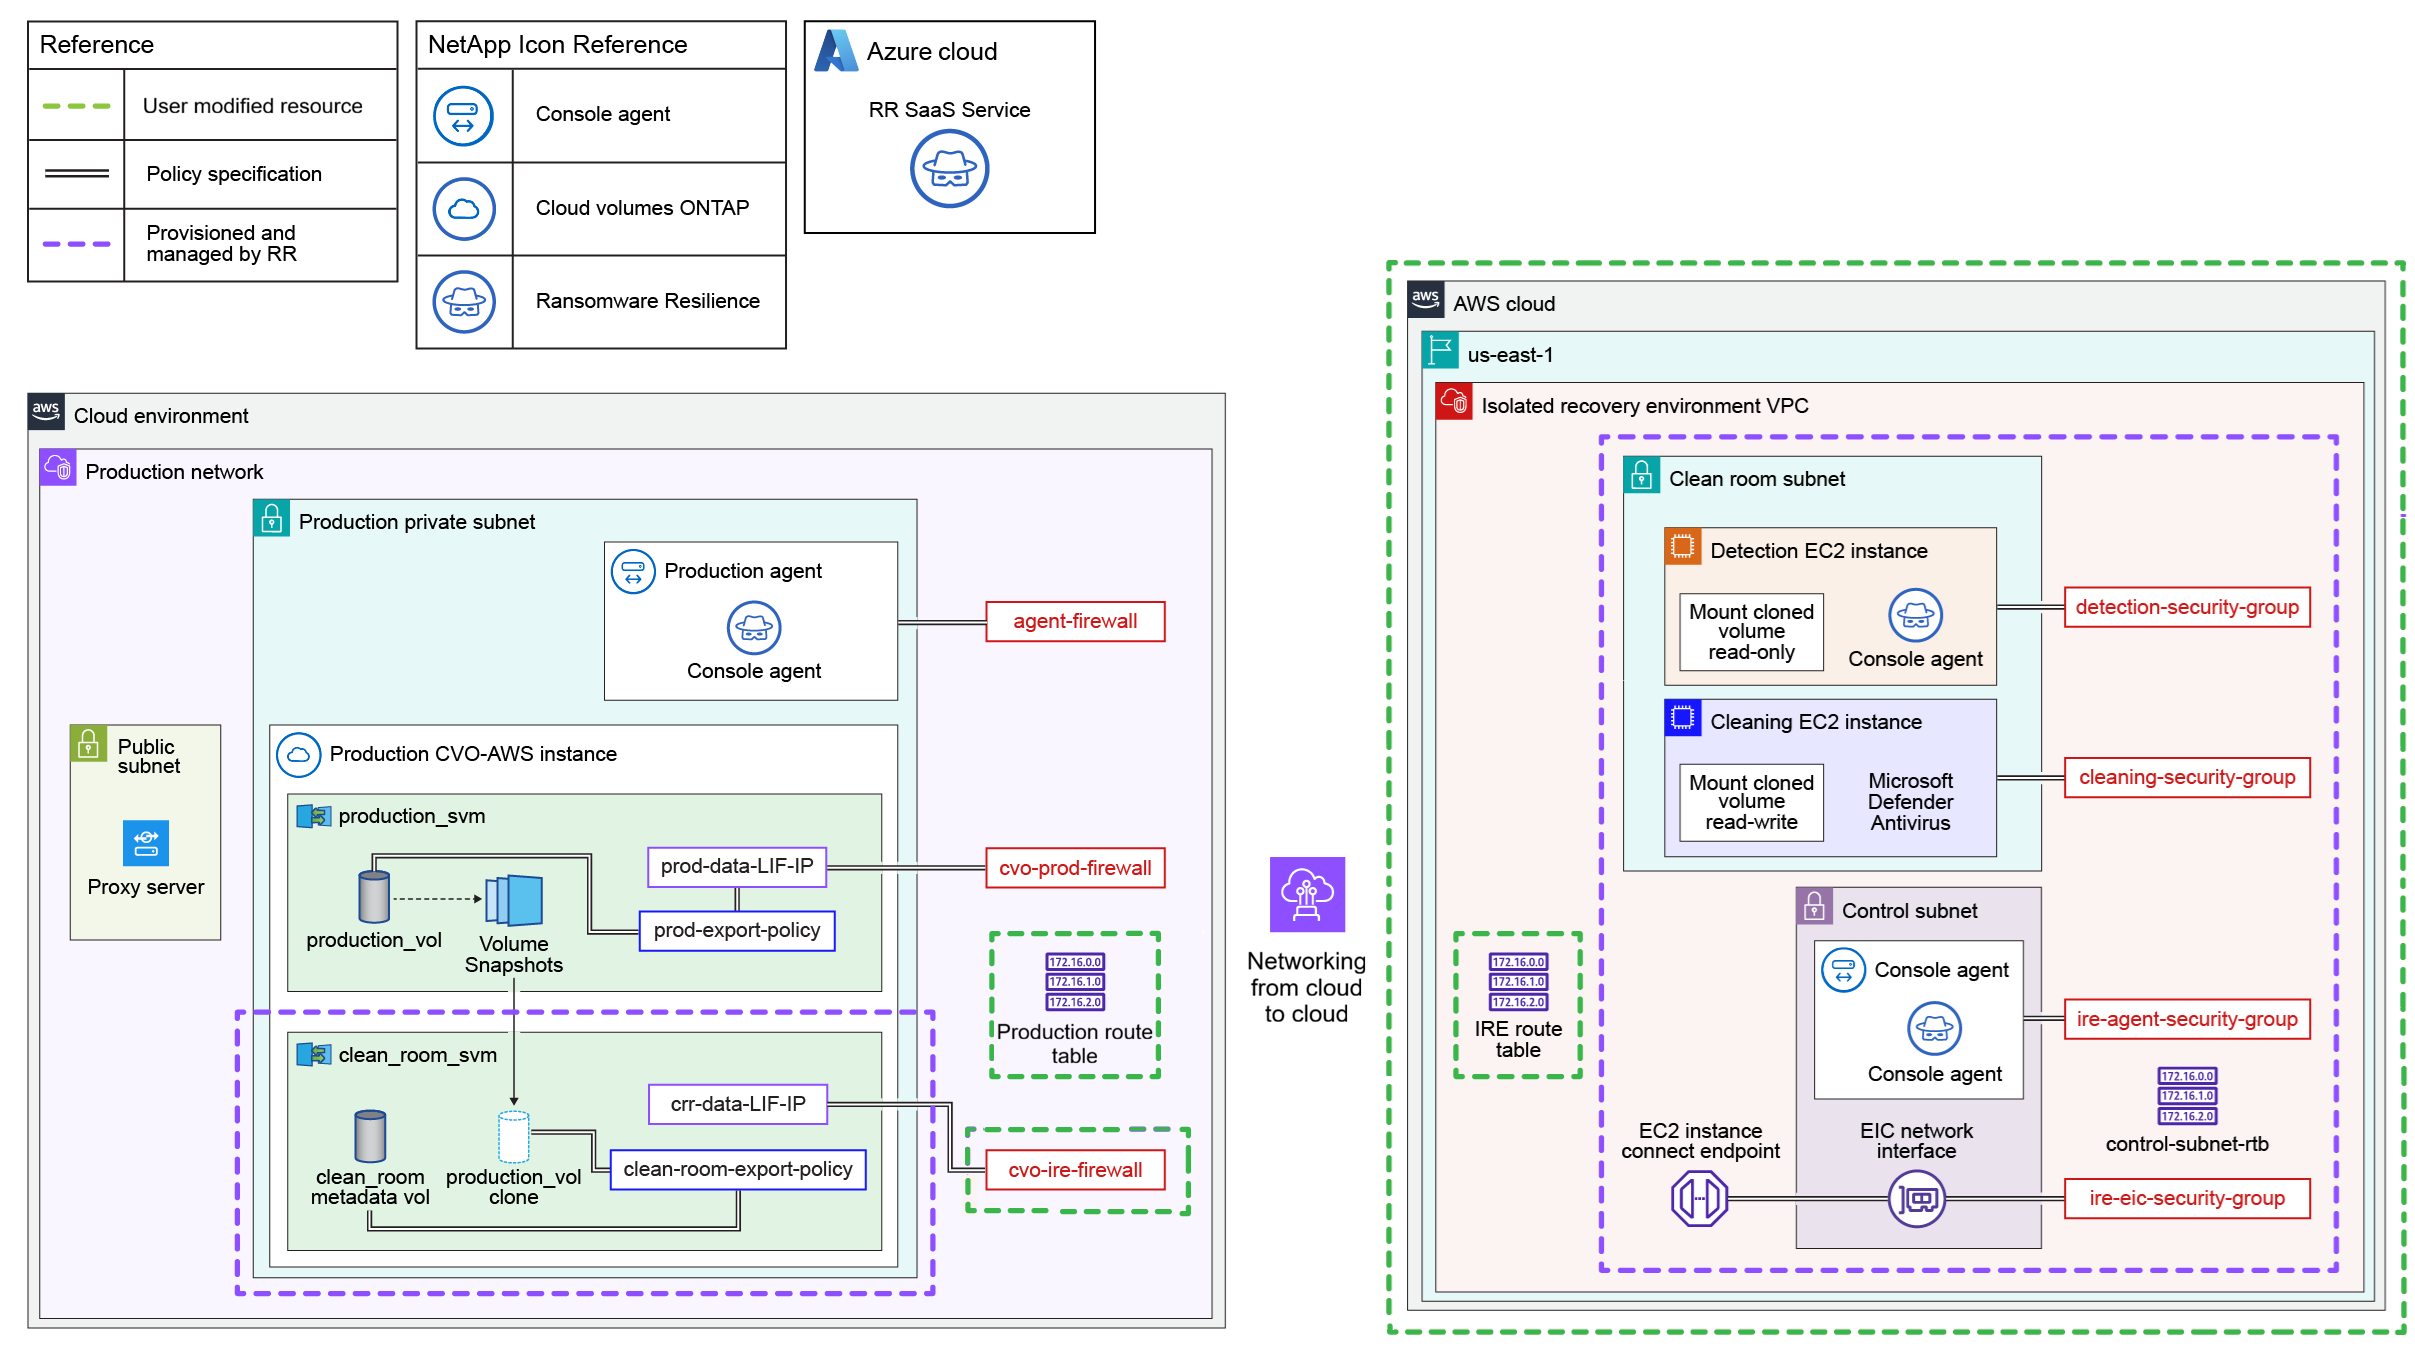
-
Provision the IP address for the clean room SVM data LIF. Make note of the IP address: you need this IP address during the IRE configuration process.
-
For Cloud Volumes ONTAP with AWS using a cloud-to-cloud clean restore, ensure the IP address is allocated to the Elastic Network Interface.
-
-
Allow routing from the SVM data LIF IP to the IRE.
|
|
If you're configuring an IRE with the source in Amazon FSx for NetApp ONTAP, skip this clean room SVM data LIF IP requirement. |
-
The production route table must allow traffic from the IRE subnet to the clean restore data LIF IP. You must add this route to the production route table.
Protocol Destination port Source Purpose TCP & UDP
2049
IRE VPC CIDR range
NFSv4 access from IRE
TCP & UDP
111
IRE VPC CIDR range
NFSv3 access from IRE
TCP & UDP
635
IRE VPC CIDR range
NFSv3 access from IRE
TCP & UDP
4045
IRE VPC CIDR range
NFSv3 access from IRE
TCP & UDP
4046
IRE VPC CIDR range
NFSv3 access from IRE
TCP & UDP
4049
IRE VPC CIDR range
NFSv3 access from IRE
-
You should create a separate firewall to manage ingress for the crr-data-LIF-IP. This firewall should allow NFSv3 and NFSv4 mounts from the IRE VPC CIDR range.
-
The IRE route table should be the main route table in the IRE VPC.
-
The IRE route table should allow routing to the clean restore data LIF IP address.
-
The IRE route table should also allow a route to public internet for the IRE agent to work.
-
For the IRE, provision a VPC within the IP address range of your production environment. The IP address should not conflict with any existing IP addresses.
-
The VPC should have a minimum capacity of 64 IP address (a /26 netmask).
-
The VPC must allow public internet access. Otherwise, the Console agent won't work
-
-
Ransomware Resilience needs the AWS access key and secret with correct IAM permissions to conduct the clean restore in an AWS environment. Create an IAM policy in AWS with the following permissions, then attach the policy to a newly created user. After you've created the user, generate the IAM credentials and supply it to the clean restore.
{
    "Version": "2012-10-17",
    "Statement": [
        {
            "Sid": "EC2IREFullAccess",
            "Effect": "Allow",
            "Action": "ec2:*",
            "Resource": "*",
            "Condition": {
                "StringLike": {
                    "aws:ResourceTag/rps::ire-name": "*"
                }
            }
        },
        {
            "Sid": "EC2CreateAccess",
            "Effect": "Allow",
            "Action": [
                "ec2:*"
            ],
            "Resource": "*"
        },
        {
            "Sid": "EC2ReadPermissions",
            "Effect": "Allow",
            "Action": [
                "ec2:Describe*"
            ],
            "Resource": "*"
        },
        {
            "Sid": "IAMFullAccess",
            "Effect": "Allow",
            "Action": "iam:*",
            "Resource": "*",
            "Condition": {
                "StringLike": {
                    "aws:ResourceTag/rps::ire-name": "*"
                }
            }
        },
        {
            "Sid": "S3FullAccessToIREStateBucketCreation",
            "Effect": "Allow",
            "Action": [
                "s3:CreateBucket"
            ],
            "Resource": "*"
        },
        {
            "Sid": "S3FullAccessToIREStateBucketObjects",
            "Effect": "Allow",
            "Action": [
                "s3:*"
            ],
            "Resource": "arn:aws:s3:::*-netapp-ire-state-bucket/*"
        },
        {
            "Sid": "S3FullAccessToIREStateBucket",
            "Effect": "Allow",
            "Action": [
                "s3:*"
            ],
            "Resource": "arn:aws:s3:::*-netapp-ire-state-bucket"
        }
    ]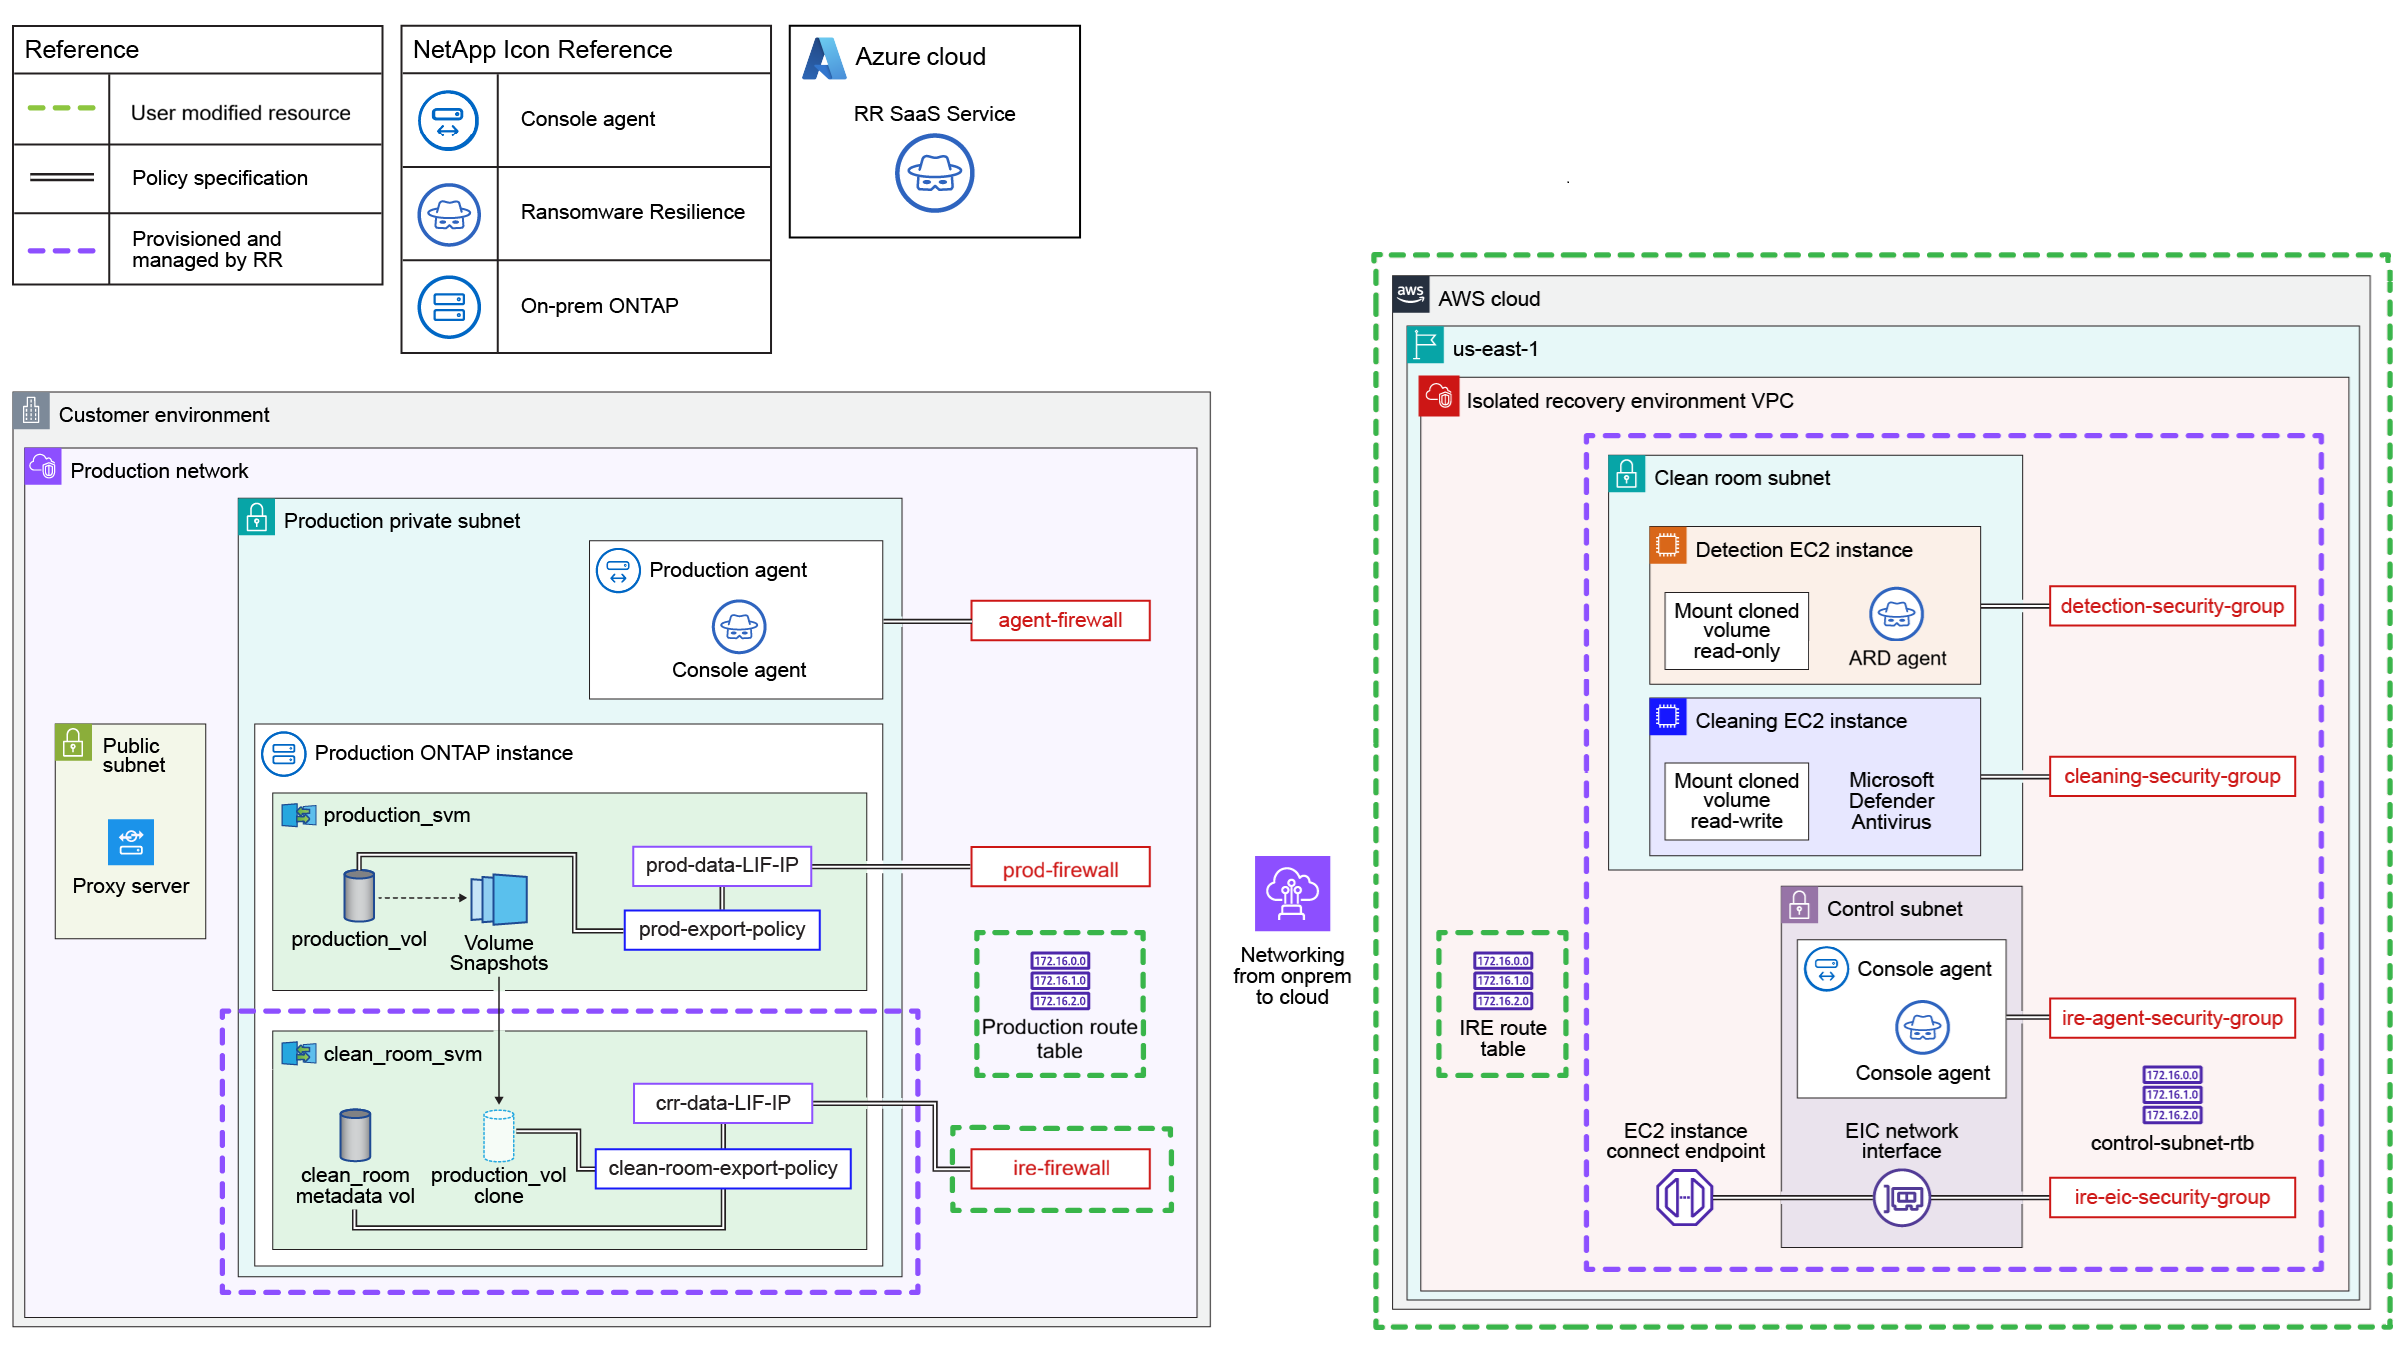
}This diagram illustrates an example of the on-premises-to-cloud clean restore configuration. Review the diagram and the resources that you need to configure before you can create the IRE.
-
Provision the IP address for the clean room SVM data LIF. Make note of the IP address: you need this IP address during the IRE configuration process.
-
For Cloud Volumes ONTAP with AWS using a cloud-to-cloud clean restore, ensure the IP address is allocated to the Elastic Network Interface.
-
-
Allow routing from the SVM data LIF IP to the IRE.
|
|
If you're configuring an IRE with the source in Amazon FSx for NetApp ONTAP, skip this clean room SVM data LIF IP requirement. |
-
The production route table must allow traffic from the IRE subnet to the clean restore data LIF IP. You must add this route to the production route table.
Protocol Destination port Source Purpose TCP & UDP
2049
IRE VPC CIDR range
NFSv4 access from IRE
TCP & UDP
111
IRE VPC CIDR range
NFSv3 access from IRE
TCP & UDP
635
IRE VPC CIDR range
NFSv3 access from IRE
TCP & UDP
4045
IRE VPC CIDR range
NFSv3 access from IRE
TCP & UDP
4046
IRE VPC CIDR range
NFSv3 access from IRE
TCP & UDP
4049
IRE VPC CIDR range
NFSv3 access from IRE
-
You should create a separate firewall to manage ingress for the crr-data-LIF-IP. This firewall should allow NFSv3 and NFSv4 mounts from the IRE VPC CIDR range.
-
The IRE route table should be the main route table in the IRE VPC.
-
The IRE route table should allow routing to the clean restore data LIF IP address.
-
The IRE route table should also allow a route to public internet for the IRE agent to work.
-
For the IRE, provision a VPC within the IP address range of your production environment. The IP address should not conflict with any existing IP addresses.
-
The VPC should have a minimum capacity of 64 IP address (a /26 netmask).
-
The VPC must allow public internet access. Otherwise, the Console agent won't work
-
-
Ransomware Resilience needs the AWS access key and secret with correct IAM permissions to conduct the clean restore in an AWS environment. Create an IAM policy in AWS with the following permissions, then attach the policy to a newly created user. After you've created the user, generate the IAM credentials and supply it to the clean restore.
{
    "Version": "2012-10-17",
    "Statement": [
        {
            "Sid": "EC2IREFullAccess",
            "Effect": "Allow",
            "Action": "ec2:*",
            "Resource": "*",
            "Condition": {
                "StringLike": {
                    "aws:ResourceTag/rps::ire-name": "*"
                }
            }
        },
        {
            "Sid": "EC2CreateAccess",
            "Effect": "Allow",
            "Action": [
                "ec2:*"
            ],
            "Resource": "*"
        },
        {
            "Sid": "EC2ReadPermissions",
            "Effect": "Allow",
            "Action": [
                "ec2:Describe*"
            ],
            "Resource": "*"
        },
        {
            "Sid": "IAMFullAccess",
            "Effect": "Allow",
            "Action": "iam:*",
            "Resource": "*",
            "Condition": {
                "StringLike": {
                    "aws:ResourceTag/rps::ire-name": "*"
                }
            }
        },
        {
            "Sid": "S3FullAccessToIREStateBucketCreation",
            "Effect": "Allow",
            "Action": [
                "s3:CreateBucket"
            ],
            "Resource": "*"
        },
        {
            "Sid": "S3FullAccessToIREStateBucketObjects",
            "Effect": "Allow",
            "Action": [
                "s3:*"
            ],
            "Resource": "arn:aws:s3:::*-netapp-ire-state-bucket/*"
        },
        {
            "Sid": "S3FullAccessToIREStateBucket",
            "Effect": "Allow",
            "Action": [
                "s3:*"
            ],
            "Resource": "arn:aws:s3:::*-netapp-ire-state-bucket"
        }
    ]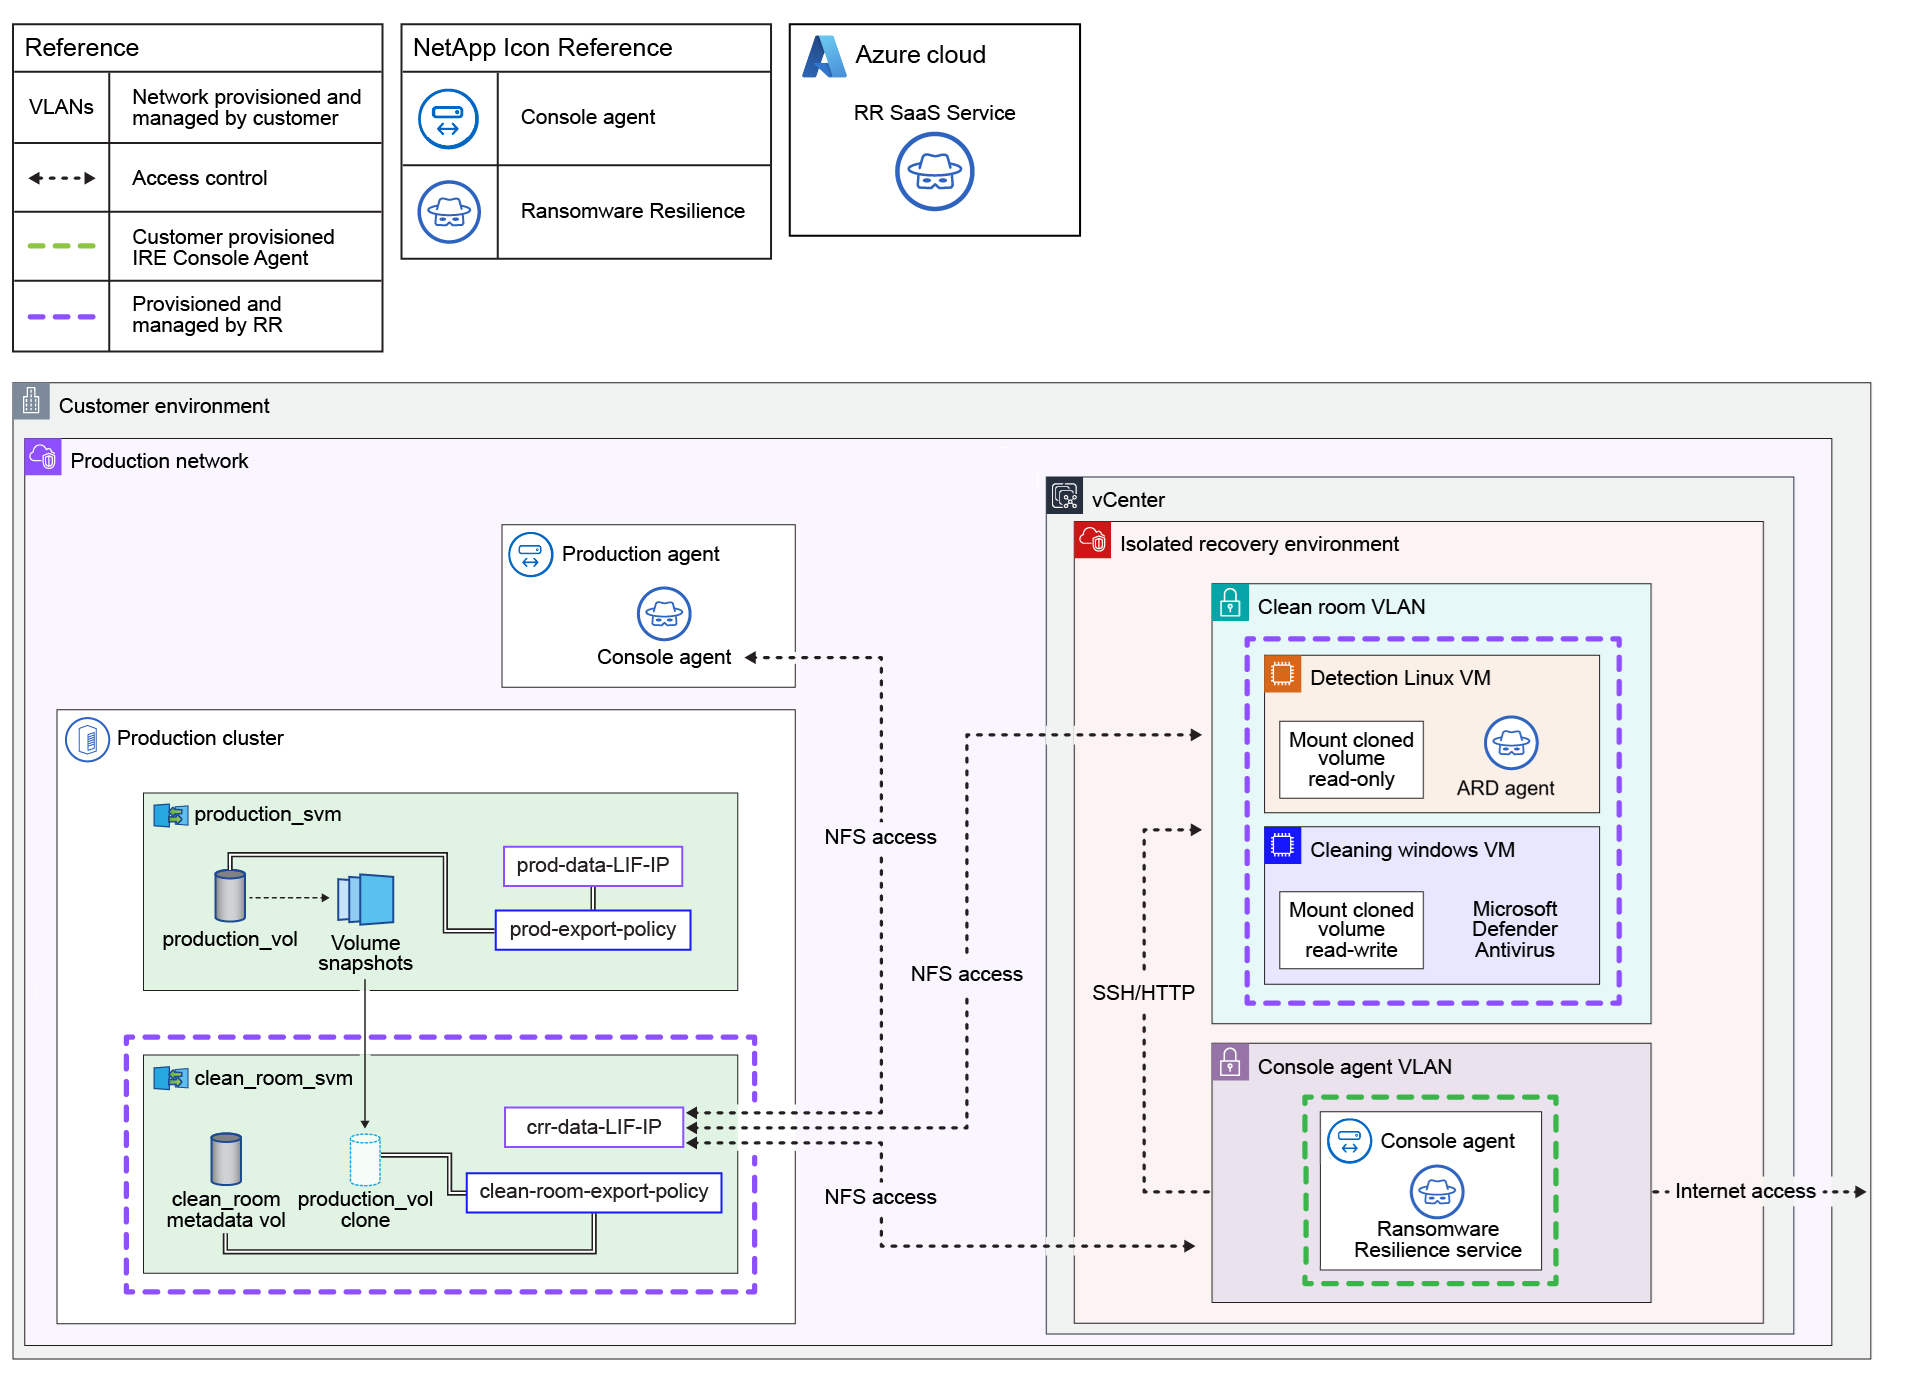
}This diagram illustrates an example of the on-premises to on-premises clean restore configuration. Review the diagram and the resources that you need to configure before you can create the IRE.
-
A storage virtual machine (SVM) is created in each of the systems you select to connect to the IRE for restoring workloads. You must provide a dedicated IP address for each system that is used as the data LIF of the clean room SVM.
-
The vCenter must be version 7.0 or later with at least one data center.
-
The ESXi host must be ESXi version 7.0 or later with at least one host that has sufficient CPU and memory resources available to clone the VMs.
-
The provided vCenter credentials must have permissions to discover resources and clone VMs.
-
During recovery in the clean restore, the base VM are cloned into a selected datacenter, placed on the chosen ESXi compute, mapped to the specified datastore, and attached to the designated network. When the VMs are cloned, they are configured to have 2 vCPUs and 4 GB RAM (for Linux or Windows VM) and the same amount of disk space as the base VMs. Each clean restore session uses two IP addresses from the given CIDR range.
-
You must provide a sufficient IP address range to accommodate multiple parallel clean room sessions. The IP addresses are released after the recovery has been completed.
-
The datastore should have sufficient free capacity to accommodate cloning VMs.
-
The IP address range must be specified in the CIDR format (for example, 100.100.0.0/24)
-
For Linux VMs:
-
The operating system must be Ubuntu Linux 20.04 or later.
-
The on-premises system must be powered on.
-
VMware Tools must be installed and running.
-
SSH must be enabled.
-
You must have installed nfs-common.
-
Docker version 20.x or greater must be installed and running.
-
You must have a minimum of 40 GB of free space.
-
-
For Windows VMs:
-
Windows VMs should have 20 GB of free space.
-
The OS should be Windows Server 2022 or 2025.
-
VMware Tools should be installed and running.
-
WinRM must be enabled.
-
The IP should be configured.
-
Ensure you have appropriate license to allow cloning of base VMs.
-
The VM must be powered on.
-
-
Configure the VLAN resources with the following access:
Resource Access Clean room SVM VLAN
NFS access to the:
* Production Console agent
* Console agent VLAN
* Clean room VLANConsole agent VLAN
-
NFS access to the clean room SVM VLAN
-
HTTP/SSH access to the clean room VLAN
Clean room VLAN
NFS access to clean room SVM VLAN
-
-
Deploy a dedicated NetApp Console agent for the IRE. The Console agent must be deployed in the destination vCenter with access to the clean room VLAN. For more information about the deployment process, see Deploy a Console agent on-premises.
Create an isolated recovery environment
Before conducting a clean restore, you must create an isolated recovery room.
The process for creating an isolated recovery room differs if the environment is in the cloud or on-premises. Ensure you follow the instructions for the correct location.
-
In Ransomware Resilience, select Settings.
-
In the Clean restore card, select Add to create the isolated recovery environment.
-
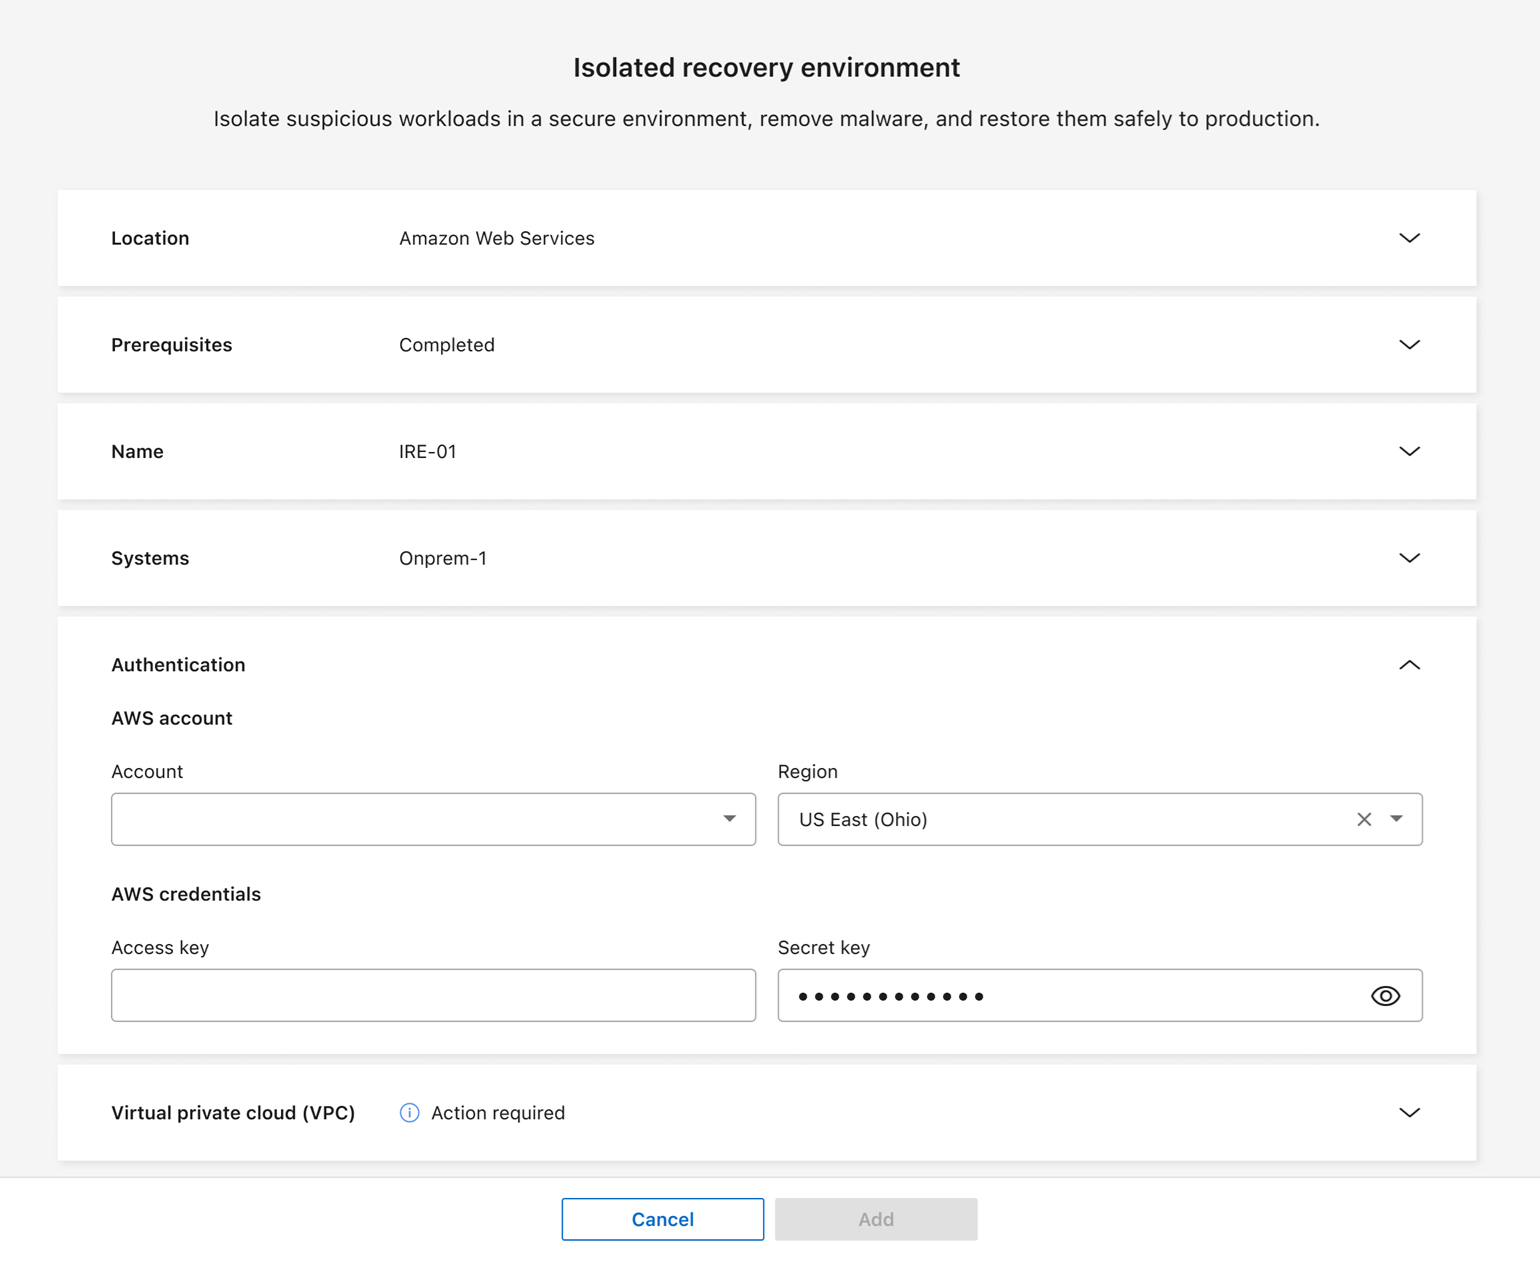
In the Type section, choose Cleaning only.
-
Expand the Name section. Enter a Name for the environment.
-
For a cloud-based IRE, select Amazon Web Services.
-
Expand the Systems section. Choose the systems you want to connect to the IRE. For each system you select, you must provide the storage VM's IP address, subnet mask, and gateway.
For IREs deployed to Amazon FSx for NetApp ONTAP, you don't need to provide this information. 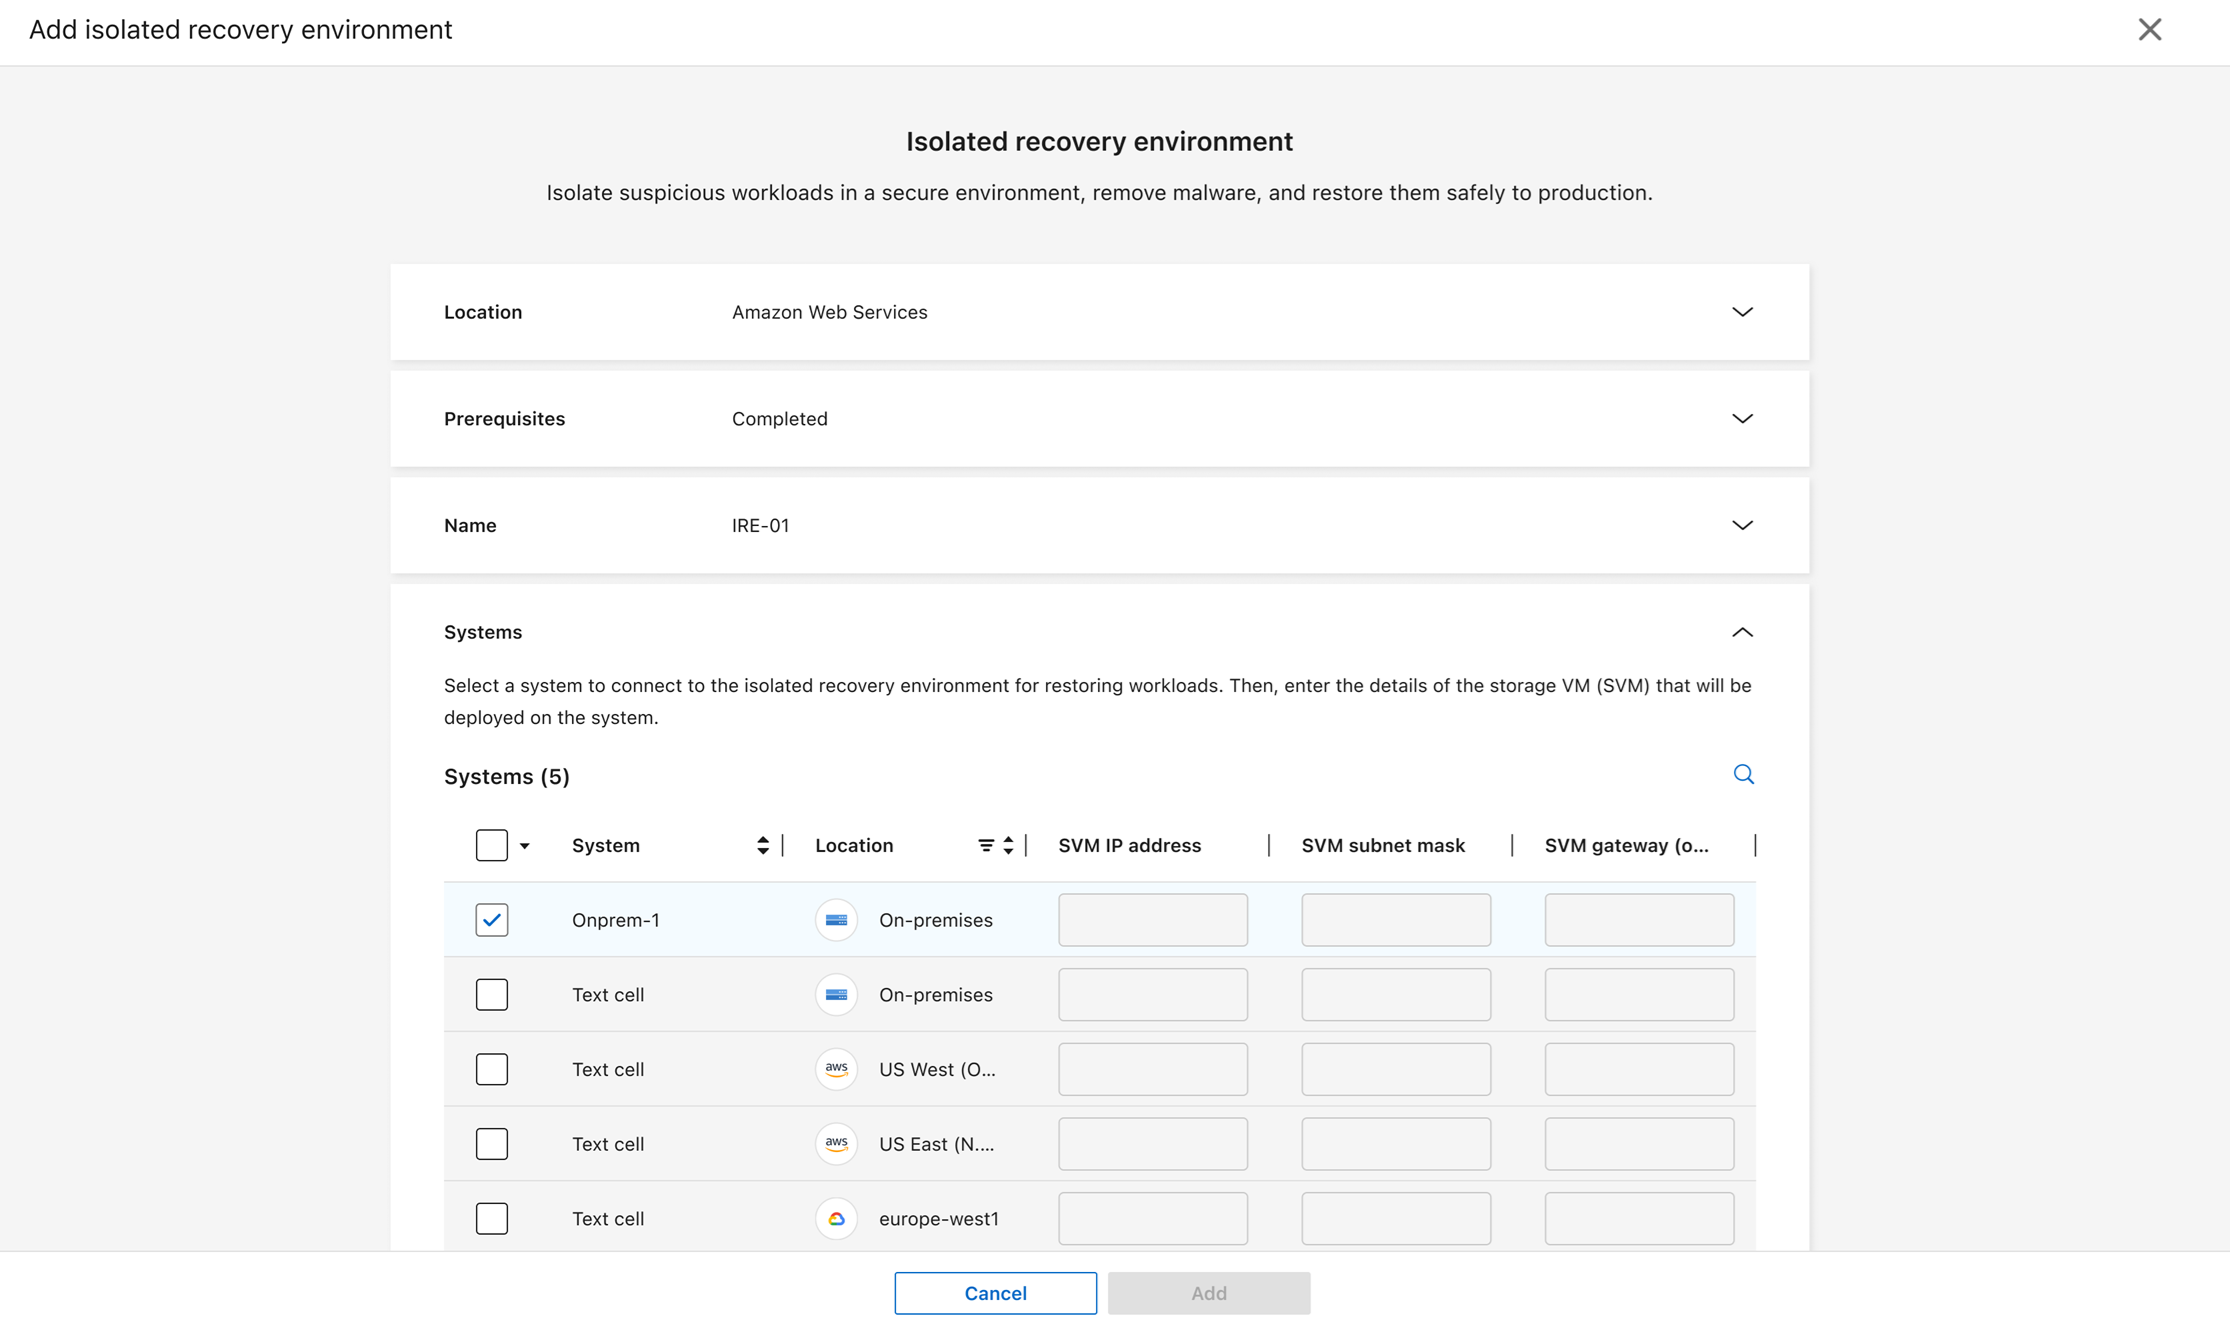
-
Expand the Authentication section.
-
Enter the cloud Account ID and select the Region for the account from the dropdown menu. You can only deploy an IRE in a supported region.
-
Enter the Access key and Secret key for the account.
-
-
Expand the Virtual private cloud (VPC) section. Enter the VPC ID where the IRE is to be deployed.
-
Select Add to create the IRE.
Ransomware Resilience tests the connection after you select add, which can take a few minutes. The IRE has been deployed successfully when its status displays as "deployed."
-
In Ransomware Resilience, select Settings.
-
In the Clean restores card, select Add if this is your first environment or Manage if you've already created one.
-
In the Type section, choose Cleaning only.
-
Expand the Name section. Assign a Name for the IRE.
-
For location, select On-premises.
-
Expand the Systems section. Choose the systems that you want to connect to the IRE. Assign a storage VM IP, subnet mask, and gateway for each system that has workloads to be recovered in the IRE.
Each system you select must have an assigned IP address. You can select primary or secondary systems. Secondary systems can be used for analysis and recovery if the primary system has no unencrypted snapshots or if it's unavailable.
-
Expand the Console agent section. Select the Console agent from the dropdown menu that's deployed in the IRE.
-
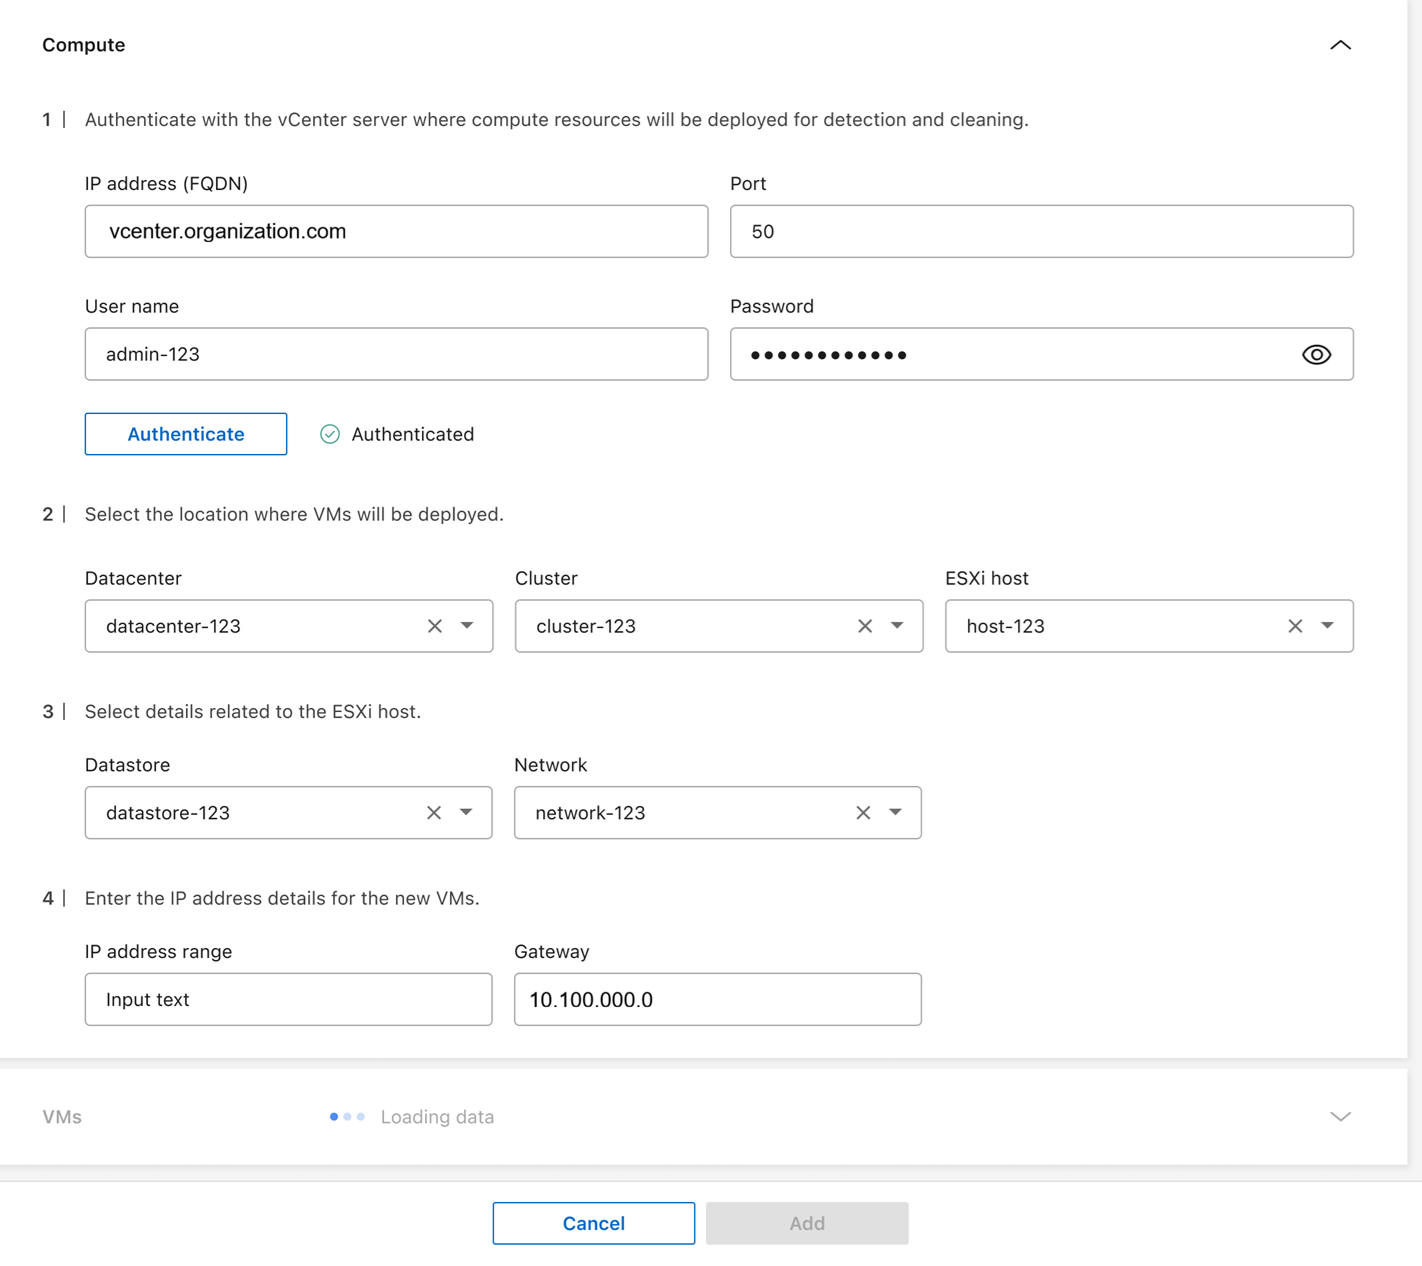
Expand the Compute section.
-
Provide the credentials to authenticate the vCenter server: IP address or full-qualified domain name (FQDN), Port, User name, and Password.
-
Select Authenticate to confirm the credentials. Wait until the UI confirms your credentials before proceeding.
-
Select the Datacenter and Cluster where the VMs will be deployed.
-
Select the Datastore and Network for the ESXi host.
-
Enter the IP address range in CIDR format (e.g. 10.0.0.1/24), Subnet mask, and Gateway for the VMs.
-
-
Expand the VMs section, which is populated based on your inputs in the Compute section.
-
For the Linux VM that Ransomware Resilience uses to scan for ransomware, select the VM from the dropdown menu then enter the User name and Password for the VM.
-
For the Windows VM that's used for scanning, select the VM from the dropdown menu then enter the User name and Password for the VM.
-
-
Select Add to create the IRE. Ransomware Resilience tests the connection after you select add; this process can take a few minutes. The IRE has been deployed successfully when its status displays as "deployed."
You can track the progress. In the settings tab, select Isolated recovery environments. The isolated recovery environments page displays the IRE and its status. Select View jobs for a breakdown of all jobs pertaining to that environment.
You can modify the systems in an IRE after it's created. In the settings tab, select Isolated recovery environments. Locate the IRE you want to edit, select the action menu … then Edit. Proceed to modify the systems. Select Save when complete.

|
If you need to change any details of the IRE, select Settings from the Ransomware Resilience sidebar, then, in the Clean restore card, select Manage. Select the action menu for the IRE then Edit to change the configuration. |
Delete an isolated recovery environment
You can't delete an IRE with an active restore operation; you can cancel the restore operation or wait until the restore completes then delete the IRE.

|
If you delete the IRE, it also delete the clean room SVM and the metadata volume. Once these assets have been deleted, you are no longer able to generate reports for the clean restore. |
-
Go to Settings.
-
In the Clean restore card, select Manage.
-
Identify the clean room you want to delete. Select the action menu (
…) for the IRE then Delete. -
In the dialog, select Delete to confirm the operation.