


Configure Microsoft Sentinel SIEM in NetApp Ransomware Resilience

 Suggest changes

 PDFs
PDFs
NetApp Ransomware Resilience provides native support for security information and event management (SIEM) with Microsoft Sentinel. By connecting Ransomware Resilience to Microsoft Sentinel, you can automatically send event data for threat analysis and detection to streamline ransomware protection and event management.
Configure Microsoft Sentinel for threat detection
Connecting Microsoft Sentinel requires performing certain steps in the Azure portal.
Enable Microsoft Sentinel
-
In Microsoft Sentinel, create a Log Analytics workspace.
-
Enable Microsoft Sentinel to use the Log Analytics workspace you created.
Create a custom role in Microsoft Sentinel
-
In the Azure portal, navigate to Subscription > Access control (IAM).
-
Create a custom role. For the Custom role name, enter "NetApp Ransomware Resilience Sentinel Configurator".
-
Copy the following JSON and paste it into the JSON tab, replacing
{subscription_id}with the Azure subscription ID where you will assign the role.{ "properties": { "roleName": "NetApp Ransomware Resilience Sentinel Configurator", "description": "", "assignableScopes": [ "/subscriptions/{subscription_id}" ], "permissions": [ { "actions": [ "Microsoft.Insights/dataCollectionEndpoints/write", "Microsoft.Insights/dataCollectionEndpoints/read", "Microsoft.OperationalInsights/workspaces/sharedKeys/action", "Microsoft.Insights/dataCollectionRules/write", "Microsoft.Insights/dataCollectionRules/read", "Microsoft.OperationalInsights/workspaces/tables/operationresults/read", "Microsoft.OperationalInsights/workspaces/tables/read", "Microsoft.OperationalInsights/workspaces/tables/write", "Microsoft.OperationalInsights/workspaces/read", "Microsoft.OperationalInsights/workspaces/write", "Microsoft.OperationalInsights/workspaces/listKeys/action", "Microsoft.Resources/subscriptions/read", "Microsoft.Resources/subscriptions/resourceGroups/read", "Microsoft.Resources/subscriptions/resourceGroups/write", "Microsoft.Resources/deployments/write", "Microsoft.Resources/deployments/read", "Microsoft.Resources/deployments/operationStatuses/read", "Microsoft.Resources/subscriptions/resourceGroups/deployments/write", "Microsoft.Resources/subscriptions/resourceGroups/deployments/read", "Microsoft.Resources/subscriptions/resourceGroups/deployments/operationStatuses/read", "Microsoft.Authorization/roleAssignments/read", "Microsoft.Authorization/roleAssignments/write", "Microsoft.Authorization/roleAssignments/delete", "Microsoft.Authorization/roleDefinitions/read", "Microsoft.Resources/deployments/operations/read", "Microsoft.Resources/deployments/read", "Microsoft.Resources/deployments/write", "Microsoft.Resources/resources/read", "Microsoft.Resources/subscriptions/operationresults/read", "Microsoft.Resources/subscriptions/resourceGroups/delete", "Microsoft.Resources/subscriptions/resourceGroups/read", "Microsoft.Resources/subscriptions/resourcegroups/resources/read", "Microsoft.Resources/subscriptions/resourceGroups/write", "Microsoft.Resources/subscriptions/resourcegroups/deployments/read", "Microsoft.Resources/subscriptions/resourcegroups/deployments/write", "Microsoft.Resources/subscriptions/resourcegroups/deployments/operations/read", "Microsoft.Resources/subscriptions/resourcegroups/deployments/operationstatuses/read", "Microsoft.Resources/subscriptions/locations/read", "Microsoft.SecurityInsights/alertRules/write", "Microsoft.SecurityInsights/alertRules/read", "Microsoft.SecurityInsights/alertRules/actions/write", "Microsoft.SecurityInsights/alertRules/actions/read", "Microsoft.OperationalInsights/workspaces/search/action", "Microsoft.OperationalInsights/workspaces/rules/read", "Microsoft.OperationalInsights/workspaces/sharedkeys/action", "Microsoft.OperationalInsights/workspaces/customfields/action", "Microsoft.OperationalInsights/workspaces/analytics/query/action", "Microsoft.OperationalInsights/workspaces/api/query/schema/read", "Microsoft.OperationalInsights/workspaces/datasources/read", "Microsoft.OperationalInsights/workspaces/metricDefinitions/read", "Microsoft.OperationalInsights/workspaces/schema/read", "Microsoft.OperationalInsights/workspaces/tables/query/read", "Microsoft.OperationalInsights/workspaces/providers/Microsoft.Insights/logDefinitions/read", "Microsoft.OperationalInsights/workspaces/sharedkeys/read", "Microsoft.OperationalInsights/workspaces/operations/read", "Microsoft.OperationalInsights/workspaces/query/read" ], "notActions": [], "dataActions": [], "notDataActions": [] } ] } } -
Review and save your settings.
Register Ransomware Resilience in Microsoft Entra ID
-
In the Azure portal, select Entra ID > Applications > App registrations.
-
For the Display name for the application, enter "NetApp ransomware resilience".
-
In the Supported account type field, select Accounts in this organizational directory only.
-
Select Review.
-
Select Register to save your settings.
After registration, the Microsoft Entra admin center displays the application Overview pane.
-
In the Azure portal, select Certificates & secrets > Client secrets > New client secret.
-
Add a description for your application secret.
-
Select an Expiration for the secret or specify a custom lifespan.

A client secret lifespan is limited to two years (24 months) or less. Microsoft recommends that you set an expiration value of less than 12 months. -
Select Add to create your secret.
-
Record the secret to use in a subsequent Authentication step. This is your only opportunity to view the secret; it is never displayed after you navigate away from the page.
Add roles in Azure and authenticate Microsoft Sentinel in Ransomware Resilience
For the Microsoft Sentinel SIEM, you can choose an automatic deployment where Ransomware Resilience deploys the resources based on permissions that you provide. Alternatively, you can perform a manual deployment where you deploy resources based on a provided ARM template. Both options require you to set permissions in the Azure portal then authenticate the connection in Ransomware Resilience, though the steps differ. Choose the workflow that best suits your needs.
-
In the Azure portal, select Subscription > Access control (IAM).
-
Select Add > Add role assignment.
-
For the Privileged administrator roles field, select the NetApp Ransomware Resilience Sentinel Configurator role you created earlier.
-
Select Next.
-
In the Assign access to field, select User, group, or service principal.
-
Select Select Members then NetApp Ransomware Resilience.
-
Select Next.
-
In the What user can do field, select Allow user to assign all roles except privileged administrator roles Owner, UAA, RBAC (Recommended).
-
Select Next.
-
Select Review and assign to assign the permissions.
-
In Ransomware Resilience, select Settings in the sidebar.
-
In the Settings page, select Connect in the SIEM connection tile then choose Microsoft Sentinel from the dropdown menu.
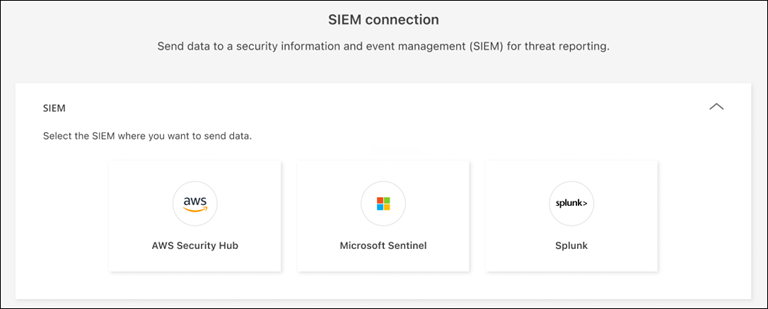
-
Choose Automatic as the deployment method.
-
Review the Prerequisites, Registration, and Permissions sections to ensure you've successfully completed each step.
-
Expand the Authentication section.
-
Enter the Directory (tenant) ID, Application (tenant) ID, and Client secret. Select Authenticate then wait until the UI confirms the credentials have been authenticated to proceed.
-
Choose the Subscription ID, Resource group, and Log Analytics workspace you want to send SIEM data to.
-
-
Select Connect to begin sending SIEM data.
-
In Ransomware Resilience, select Settings in the sidebar.
-
In the Settings page, select Connect in the SIEM connection tile then choose Microsoft Sentinel from the dropdown menu.
-
Choose Manual as the deployment method.
-
Review the Prerequisites, Registration, and ARM Template Deployment sections to ensure you've successfully completed each step.
-
Expand the ARM Template Deployments section.
-
Assign the Monitoring Metrics Publisher role.
-
In your Azure subscription, go to Access control (IAM).
-
Select Add role assignment.
-
Search for and select Monitoring Metrics Publisher.
-
Add the role assignment to the service principal of the application registration created in the Registration step.
-
Review + assign.
-
-
Return to Ransomware Resilience. Copy the JSON of the ARM template to create the Log Analytics custom table, Data Collection Endpoint (DCE), Data Collection Rule (DCR), and Sentinel analytics rules in your Azure environment.
-
In the Azure portal, search for Deploy a custom template.
-
Select Build your own template in the editor.
-
Paste the copied JSON into the editor. Select Save.
-
Enter the Workspace name, which is the name of your Log Analytics workspace. You can retrieve this from the workspace overview page in the Azure portal.
-
Select Review + create. Review the selections, then select Create to deploy.
-
After deployment, collect the following information for authentication in Ransomware Resilience:
-
Log Ingestion Endpoint: open the Data Collection Endpoint resource (
rps-alerts-dce) and copy the Logs Ingestion value shown on the overview page. -
DCR Immutable ID: open the Data Collection Rule resource (
rps-alerts-dcr) and copy the Immutable ID on the overview page.
-
-
Return to the Ransomware Resilience SIEM configuration window.
-
Expand the Authentication section.
-
Enter the Directory (tenant) ID, Application (tenant) ID, and Client secret. Select Authenticate, then wait until the UI confirms the credentials have been authenticated.
-
Enter the Log Ingestion Endpoint and DCR immutable ID you previously copied.
-
-
Select Connect to create the connection.