

Configure SQL Server Always On availability groups with Google Cloud NetApp Volumes
 Suggest changes
Configure SQL Server Always On availability groups on Google Compute Engine instances within a single subnet using Google Cloud NetApp Volumes iSCSI block storage. Learn how to set up compute instances, configure NetApp volumes, establish failover clustering, and deploy availability groups for high availability and disaster recovery.
Prerequisites
Before proceeding, complete the configuration prerequisite steps in the Google Cloud documentation:
Before you begin
Ensure you have completed the following requirements:
-
Google Cloud project with admin permissions for compute, network, IAM, and storage
-
VPC network with subnet for a region setup
-
Active Directory and DNS setup available in a region
-
Firewall rules configured to allow required ports
-
Familiarity with SQL Server Always On availability groups and failover clustering

|
New Google Cloud users might be eligible for free trial credits. |
Objectives
Configuring the SQL Server Always On availability group includes the following high-level tasks:
-
Set up Compute Engine instances and NetApp storage volumes
-
Set up SQL Server on both nodes
-
Set up Windows Server Failover Cluster
-
Set up cluster quorum with file share witness
-
Set up SQL Server availability groups
-
Set up Distributed Network Name (DNN) for listener access
Cost considerations
This tutorial uses billable components of Google Cloud, including Compute Engine instances and Google Cloud NetApp Volumes storage.
Use the Pricing Calculator to generate a cost estimate based on your compute and storage requirements. The example configuration uses N4-SKU compute instances and NetApp Flex service level storage for the SQL Server Always On availability group setup.
Configure domain accounts
Configure two accounts in Active Directory: one installation account (your admin account) and one service account for both SQL Server VMs.
For example, use the values in the following table for the accounts:
|
|
This example uses cvsdemo as the domain name. Replace cvsdemo with your actual domain name throughout this procedure.
|
| Account | VM | Full domain name | Description |
|---|---|---|---|
<your account> |
Both (sqlnode1 and sqlnode2) |
cvsdemo\DomainAdmin |
Admin account to sign in to either VM and configure the cluster and availability group |
sqlsvc |
Both (sqlnode1 and sqlnode2) |
cvsdemo\sqlsvc |
Service account for SQL Server and SQL Server Agent on both SQL Server VMs |
Create Compute Engine VMs for SQL Server
Create two Google Compute Engine VM instances with SQL Server 2022 Enterprise preinstalled on Windows Server 2025 to host the availability group replicas.
-
In the Google Cloud console, go to the Create an instance page.
Refer to the Google Cloud documentation for more information.
-
For Name, enter
sqlnode1. -
In the Machine configuration section:
-
Select General Purpose
-
In the Series list, select N4
-
In the Machine type list, select n4-highmem-8 (8 vCPU, 64 GB memory)
-
-
Select the region where you created your VPC (for example, region=us-west1, zone=us-west1-a).
-
In the Boot disk section, click Change:
-
On the Public images tab, in the Operating system list, select SQL Server on Windows Server.
-
In the Version list, select SQL Server 2022 Enterprise on Windows Server 2025 Datacenter.
-
In the Boot disk type list, select Hyperdisk Balanced.
-
In the Size (GB) field, enter 50 GB.
-
Click Select to save the boot disk configuration.
-
-
In the Networking section, edit the network interface to select the correct VPC and subnet. If you have only one VPC network, it will be selected by default.
-
On the network interface card, select gVNIC.
-
For Network service tier, select Premium for mission-critical workloads or Standard to optimize costs.
-
-
Click Create to create the VM.
-
Repeat these steps to create
sqlnode2.
Join servers to the domain
After creating the VMs, join them to the Active Directory domain and install the required Windows features for failover clustering and iSCSI connectivity.
-
Connect remotely to the virtual machine with the local administrator account.
-
In Server Manager, select Local Server.
-
Select the WORKGROUP link.
-
In the Computer Name section, select Change.
-
Select the Domain checkbox and enter your domain (for example,
cvsdemo.internal) in the text box. -
Click OK.
-
In the Windows Security dialog, specify the credentials for the default domain administrator account (for example,
cvsdemo\DomainAdmin). -
When you see the "Welcome to the cvsdemo.internal domain" message, click OK.
-
Click Close, then select Restart Now in the dialog.
-
After the server restarts, add the
sqlsvcaccount to the Administrators group.
|
|
Your SQL instance will run using the sqlsvc account, which is required for clustering and failover setup. |
Install required Windows features
Install Failover Clustering and MPIO on both SQL Server VMs using either Server Manager or PowerShell.
-
In Server Manager, select Manage > Add Roles and Features.
-
Select Role-based or feature-based installation and click Next.
-
Select your server and click Next.
-
On the Features page, select Failover Clustering and Multipath I/O.
-
Click Add Features when prompted to include management tools.
-
Complete the wizard and restart if prompted.
Run PowerShell as administrator and execute the following commands:
# Install Failover Clustering and tools
Install-WindowsFeature Failover-Clustering, RSAT-Clustering-PowerShell, RSAT-Clustering-CmdInterface -IncludeAllSubFeature -IncludeManagementTools

# Install/enable MPIO
Install-WindowsFeature -Name Multipath-IO
Enable-MSDSMAutomaticClaim -BusType "iSCSI"

# Install .NET and other SQL prerequisites (if not already installed)
Install-WindowsFeature NET-Framework-45-Core, NET-Framework-45-Features
Install-WindowsFeature RSAT-AD-PowerShell
Obtain iSCSI initiator names
Obtain the iSCSI qualified name (IQN) for each SQL Server VM to include in the host group using either the iSCSI Initiator GUI or PowerShell.
-
Press Win+R or use the Windows search bar to open
iscsicpl. -
In the iSCSI Initiator Properties dialog, go to the Configuration tab.
-
Copy the Initiator Name value and include it in the host group.
Example:
iqn.1991-05.com.microsoft:sqlnode1.cvsdemo.internal
Run the following command in PowerShell:
Get-InitiatorPort | Select-Object NodeAddressCreate NetApp block storage volumes
Create iSCSI block storage volumes using Google Cloud NetApp Volumes to provide high-performance, shared storage for SQL Server databases. This process includes creating a host group, storage pool, and individual volumes for data, logs, temp, and backup.
Create the host group
-
Create a host group containing the iSCSI initiators from both SQL nodes.
gcloud beta netapp host-groups create HOST_GROUP_NAME \
  --location=LOCATION \
  --type=ISCSI_INITIATOR \
  --hosts=HOSTS \
  --os-type=OS_TYPE \
  --description=DESCRIPTION
For more details, refer to Create a host group documentation.
-
Replace the following values:
-
HOST_GROUP_NAME: Name for the host group (for example,demosql) -
LOCATION: Region (for example,us-west1) -
HOSTS: Comma-separated list of IQNs from both sqlnode1 and sqlnode2Example:
iqn.1991-05.com.microsoft:sqlnode1.cvsdemo.internal,iqn.1991-05.com.microsoft:sqlnode2.cvsdemo.internal -
OS_TYPE: Operating system type (for example,WINDOWS) -
DESCRIPTION: Optional description for the host group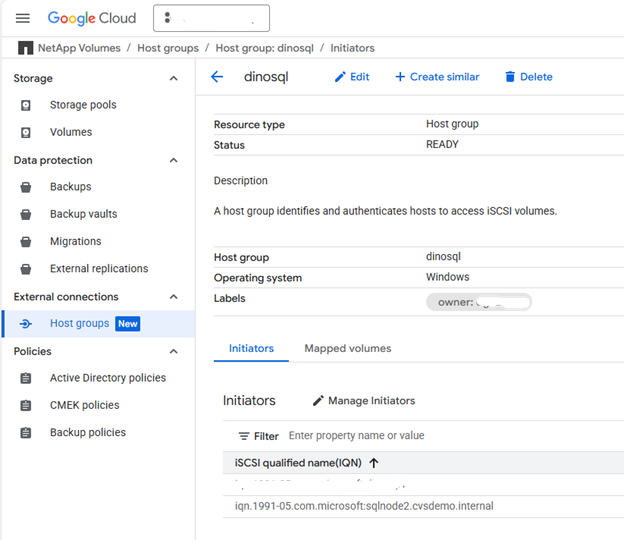
-
Create storage pool
-
Create a storage pool with appropriate capacity and performance.
gcloud netapp storage-pools create POOL_NAME \
  --project=PROJECT_ID \
  --location=LOCATION \
  --service-level=Flex \
  --type=Unified \
  --capacity=1024 \
  --total-throughput=64 \
  --total-iops=1024 \
  --network=name=VPC_NAME,psa-range=PSA_RANGE
For more details, refer to Create a storage pool documentation.
-
Replace the following values:
-
POOL_NAME: Name of the pool (for example,sqltest) -
PROJECT_ID: Your Google Cloud project name -
LOCATION: Same location as your compute instances (for example,us-west1-b) -
CAPACITY: Pool capacity in GiB (for example,1024) -
SERVICE_LEVEL: Service level (for example,Flex) -
VPC_NAME: Your VPC network name -
PSA_RANGE: Private Services Access range (for example,xx.xxx.xxx.0/20) -
THROUGHPUT: Optional throughput in MiBps (for example,64) -
IOPS: Optional IOPS (for example,1024)
-
Create volumes
-
Create volumes for data, logs, temp, and backup. Run the following command for each volume type:
gcloud beta netapp volumes create VOLUME_NAME \
  --project=PROJECT_ID \
  --location=LOCATION \
  --storage-pool=POOL_NAME \
  --capacity=CAPACITY \
  --protocols=ISCSI \
  --block-devices="name=VOLUME_NAME,host-groups=HOST_GROUP_PATH,os-type=WINDOWS" \
  --snapshot-directory=false
For more details, refer to Create a volume documentation.
-
Replace the following values:
-
VOLUME_NAME: Unique name for each volume (for example,node1data,node1log,node1temp,node1backup) -
PROJECT_ID: Your Google Cloud project name -
LOCATION: Same location as storage pool (for example,us-west1-b) -
POOL_NAME: Storage pool name (for example,sqltest) -
CAPACITY: Volume capacity in GiB (for example,200) -
HOST_GROUP_PATH: Full resource path to the host group (for example,projects/PROJECT_ID/locations/us-west1/hostGroups/demosql)
-

|
Multiple host groups can be specified with a # sign separating each host group. |
|
|
Repeat this step for each volume type: data, log, temp, and backup. |
Mount iSCSI volumes
Mount the non-shared iSCSI volumes on each SQL instance:
-
In the Google Cloud console, navigate to NetApp volumes > Volumes.
-
Select the volume created for the SQL instance (for example,
node1data). -
Copy both IP addresses for the iSCSI target (for example,
10.165.128.216and10.165.128.217). -
On sqlnode1, run
iscsicplor use PowerShell: -
Click the Discover tab, then Discover Portal.
-
Add each IP address obtained; leave the default port 3260.
"10.165.128.216","10.165.128.217" | % { New-IscsiTargetPortal -TargetPortalAddress $_ }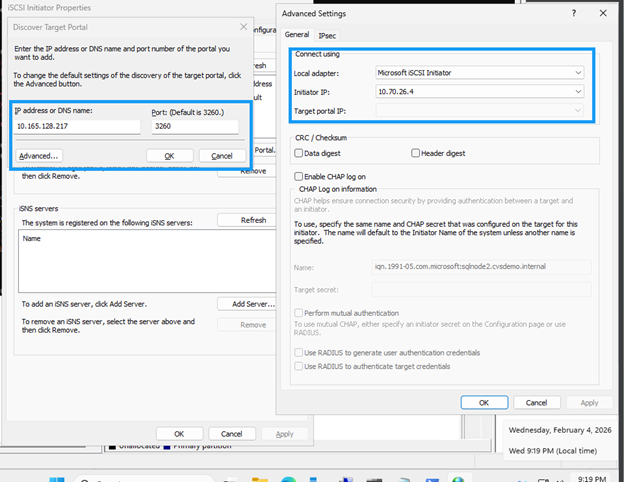
-
In the Connect to Target dialog, check Enable multi-path if using multipathing.
-
Click Advanced and select the target portal IP from the dropdown.
-
Click OK to connect.
-
Configure MPIO for iSCSI devices
-
Open MPIO from Control Panel or Server Manager.
-
Click the Discover Multi-Paths tab.
-
Check Add support for iSCSI devices and click Add.
-
Reboot if prompted.
-
Verify multipath configuration in Device Manager under Disk drives.
-
-
Initialize and format volumes
-
Launch Computer Management (
compmgmt.msc) and select Disk Management. -
Initialize, partition, and format each disk with 64K allocation unit:
Format-Volume -DriveLetter <DriveLetter> -FileSystem NTFS -NewFileSystemLabel <Label> -AllocationUnitSize 65536 -Confirm:$false -
Assign drive letters (for example, D: for Data, E: for Log, F: for Backup, G: for Temp).
-
Create the directory structure for SQL Server:
$paths = "D:\MSSQL\DATA","E:\MSSQL\Log","F:\MSSQL\Backup","G:\MSSQL\Temp"
$paths | % { New-Item -ItemType Directory -Path $_ -Force }
-
Configure SQL Server
Configure SQL Server on both nodes to use the domain service account, update default paths to use NetApp volumes, and move system databases to the new storage locations.
-
Update the SQL Server and SQL Server Agent services to run under the domain service account for cluster authentication and failover support.
-
On each SQL instance, open
services.msc. -
Update Log on as to
domain\sqlsvcfor SQL Server and SQL Server Agent services. -
Open SQL Server Management Studio (SSMS) and connect with your domain account.
If connection fails, launch SSMS as
<local computer>\Administrator. Ensure the Administrator account is enabled in Users & Groups with appropriate password.
-
-
Create the domain account logins with required permissions.
Replace CVSDEMOwith your actual domain name in the following SQL commands.USE [master] GO -- Create login for SQL service account CREATE LOGIN [CVSDEMO\sqlsvc] FROM WINDOWS WITH DEFAULT_DATABASE=[master], DEFAULT_LANGUAGE=[us_english] GO -- Add to sysadmin role ALTER SERVER ROLE [sysadmin] ADD MEMBER [CVSDEMO\sqlsvc] GO -- Create user in master and assign role USE [master] GO CREATE USER [CVSDEMO\sqlsvc] FOR LOGIN [CVSDEMO\sqlsvc] GO ALTER ROLE [db_owner] ADD MEMBER [CVSDEMO\sqlsvc] GO -- Repeat for model, msdb, and tempdb databases USE [model] GO CREATE USER [CVSDEMO\sqlsvc] FOR LOGIN [CVSDEMO\sqlsvc] GO ALTER ROLE [db_owner] ADD MEMBER [CVSDEMO\sqlsvc] GO USE [msdb] GO CREATE USER [CVSDEMO\sqlsvc] FOR LOGIN [CVSDEMO\sqlsvc] GO ALTER ROLE [db_owner] ADD MEMBER [CVSDEMO\sqlsvc] GO USE [tempdb] GO CREATE USER [CVSDEMO\sqlsvc] FOR LOGIN [CVSDEMO\sqlsvc] GO ALTER ROLE [db_owner] ADD MEMBER [CVSDEMO\sqlsvc] GO -
Update the default paths to use the NetApp volumes instead of the OS drive:
USE [master] GO EXEC xp_instance_regwrite N'HKEY_LOCAL_MACHINE', N'Software\Microsoft\MSSQLServer\MSSQLServer', N'BackupDirectory', REG_SZ, N'F:\MSSQL\Backup' GO EXEC xp_instance_regwrite N'HKEY_LOCAL_MACHINE', N'Software\Microsoft\MSSQLServer\MSSQLServer', N'DefaultData', REG_SZ, N'D:\MSSQL\DATA' GO EXEC xp_instance_regwrite N'HKEY_LOCAL_MACHINE', N'Software\Microsoft\MSSQLServer\MSSQLServer', N'DefaultLog', REG_SZ, N'E:\MSSQL\Log' GO -
Move the system databases (model, msdb, tempdb, and master) from the OS drive to the NetApp volumes for better performance and management.
-
Verify current paths:
-- Check current paths SELECT name, physical_name FROM sys.master_files WHERE database_id IN (DB_ID('model'), DB_ID('msdb')); -
Update to new locations:
-- Move model database ALTER DATABASE model MODIFY FILE (NAME = modeldev, FILENAME = 'D:\MSSQL\Data\model.mdf'); ALTER DATABASE model MODIFY FILE (NAME = modellog, FILENAME = 'E:\MSSQL\Log\modellog.ldf'); -- Move msdb database ALTER DATABASE msdb MODIFY FILE (NAME = MSDBData, FILENAME = 'D:\MSSQL\Data\MSDBData.mdf'); ALTER DATABASE msdb MODIFY FILE (NAME = MSDBLog, FILENAME = 'E:\MSSQL\Log\MSDBLog.ldf'); GO -
Stop SQL Server, manually move the files from the old location to the new paths, then restart SQL Server.
-
Move the tempdb database
USE master; GO -- Check current tempdb files SELECT name, physical_name FROM sys.master_files WHERE database_id = DB_ID('tempdb'); -- Change paths for tempdb ALTER DATABASE tempdb MODIFY FILE (NAME = tempdev, FILENAME = 'G:\MSSQL\Temp\tempdb.mdf'); ALTER DATABASE tempdb MODIFY FILE (NAME = templog, FILENAME = 'G:\MSSQL\Temp\templog.ldf'); GO -
Restart SQL Server for changes to take effect:
Restart-Service -Name "MSSQLSERVER" -Force
-
-
Move the master database
-
Open SQL Server Configuration Manager.
-
Navigate to SQL Server Services, right-click SQL Server (MSSQLSERVER), and select Properties.
-
Click the Startup Parameters tab.
-
In Existing parameters, locate the parameters starting with
-d,-e, and-l. -
Remove the old parameters and add new ones:
-dD:\MSSQL\Data\master.mdf
-lE:\MSSQL\Log\mastlog.ldf
-eE:\MSSQL\Log\ERRORLOG

-
Click OK.
-
-
Stop SQL Server service.
-
Manually move
master.mdfandmastlog.ldffrom the old location to the new paths. -
If you updated the error log path, move the
ERRORLOGfile as well. -
Start SQL Server service.
Set up failover cluster
Set up Windows Server Failover Clustering to provide high availability for SQL Server. For more details, refer to Windows Server Failover Clustering documentation.
Configure firewall rules
Open the required network ports on both SQL nodes to enable cluster communication, SQL Server connectivity, and availability group replication.
-
Open required ports on both SQL nodes for cluster communication.
Required ports include: UDP 3343, TCP 3343, TCP 1433, TCP 5022, TCP 135, TCP 445, TCP 49152-65535 (dynamic RPC).
-
Run the following checkpoint on both the servers to allow SQL Server and cluster communication through the firewall.
Adjust port numbers if you have custom configurations.
# Open firewall for SQL Server
netsh advfirewall firewall add rule name="Allow SQL Server" dir=in action=allow protocol=TCP localport=1433

# Open firewall for SQL Server replication
netsh advfirewall firewall add rule name="Allow SQL Server replication" dir=in action=allow protocol=TCP localport=5022
For detailed firewall requirements, refer to Windows Server service and network port requirements.
-
Run validation checks on both nodes before creating the cluster:
Test-Connection servername
Resolve-DnsName servername
Get-NetAdapterBinding -ComponentID ms_tcpip6
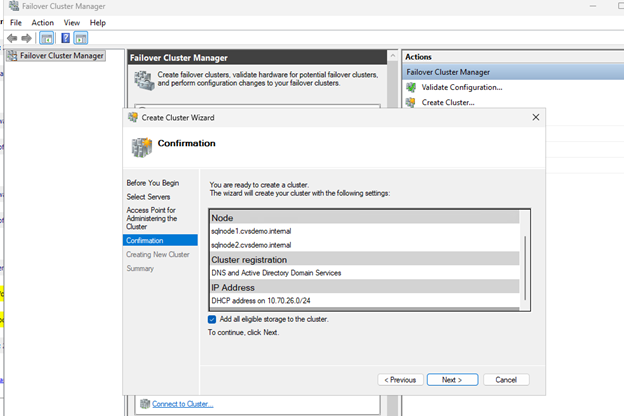
Create the failover cluster
Create a Windows Server Failover Cluster with both SQL Server nodes to enable high availability and automatic failover capabilities.
-
Run
cluadmin.mscor open Failover Cluster Manager from Server Manager.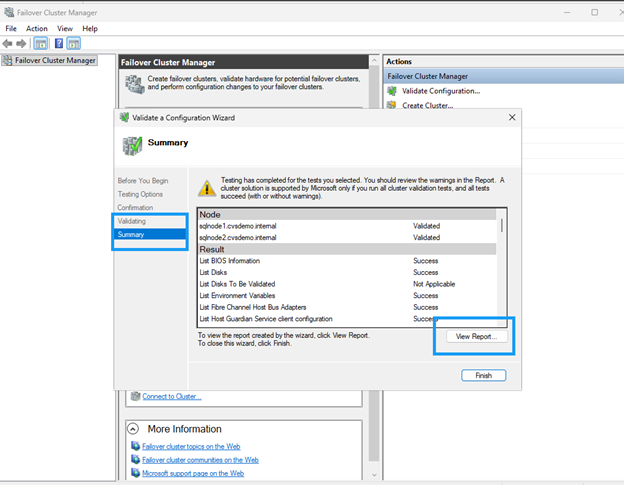
-
Select Create Cluster.
-
Add both SQL nodes (sqlnode1, sqlnode2).
-
Run validation tests and ensure all checks pass. Review and remediate any warnings before proceeding.
-
Provide a cluster name (for example,
sqlcluwest1). -
Complete the cluster creation.
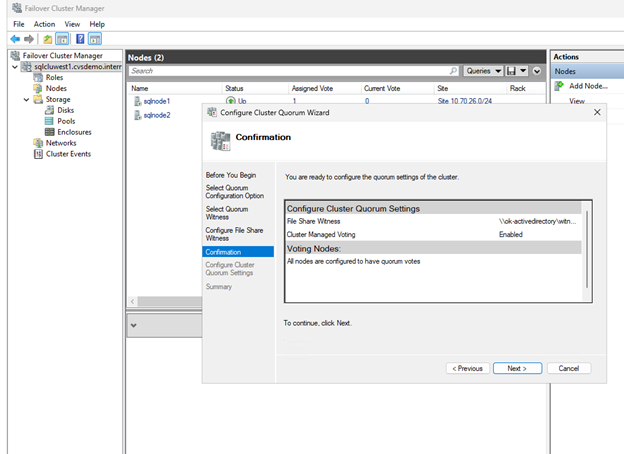
Configure cluster quorum with file share witness
Configure a file share witness to maintain quorum in a two-node cluster configuration. The witness provides an additional vote to prevent split-brain scenarios and ensure cluster availability.
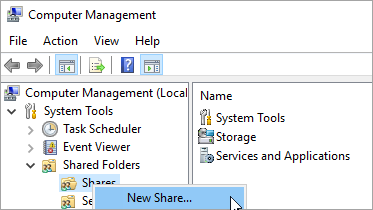
Create file share
Create a file share on a VM in a different zone or region that has network connectivity and is within the same Active Directory domain.
-
Connect to the file share witness server VM.
-
In Server Manager, select Tools > Computer Management.
-
Select Shared Folders, right-click Shares, and select New Share.
-
Use the Create a Shared Folder Wizard to create a share
\\servername\share. -
On the Folder Path page, select Browse.
-
Locate or create a path for the shared folder and then select Next.
-
On the Name, Description, and Settings page, verify the share name and path and then select Next.
-
On the Shared Folder Permissions page, select Customize permissions and click Custom
-
On the Customize Permissions dialog, select Add to add the cluster account.
Make sure that the account that's used to create the cluster (sqlcluwest1$) has full control.
-
Click OK to save permissions.
-
On the Shared Folder Permissions page, select Finish and then select Finish again.
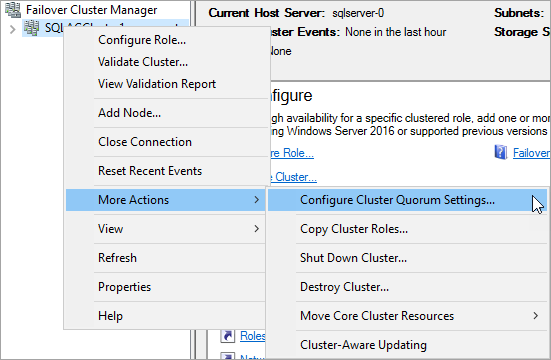
Configure quorum settings
Configure the cluster to use the file share witness for quorum voting.
-
In Failover Cluster Manager, right-click the cluster and select More Actions > Configure Cluster Quorum Settings.
-
In the Configure Cluster Quorum Wizard, click Next.
-
On the Select Quorum Configuration page, choose Select the quorum witness and click Next.
-
On the Select Quorum Witness page, select Configure a file share witness.
-
In the Configure File Share Witness page, select Configure a file share witness.
-
Enter the path to the share you created (for example,
\\servername\share) and click Next. -
Verify the settings on the Confirmation page and click Next.
-
Click Finish.
The cluster core resources are now configured with a file share witness.
Enable Always On availability groups
Enable Always On availability groups on both SQL Server VMs:
-
From the Start menu, open SQL Server Configuration Manager.
-
In the browser tree, select SQL Server Services.
-
Right-click SQL Server (MSSQLSERVER) and select Properties.
-
Select the Always On High Availability tab.
-
Check Enable Always On availability groups.
-
Click Apply, then restart the SQL Server service when prompted.
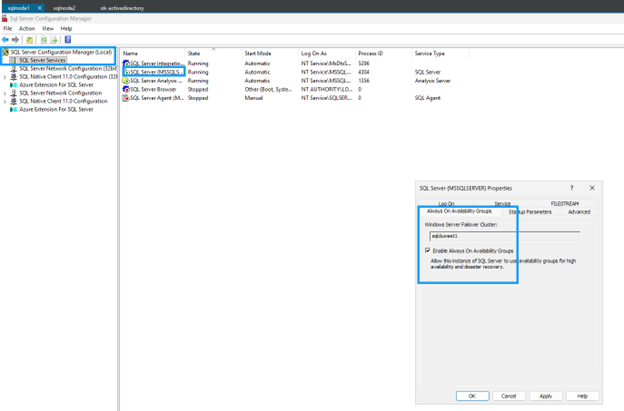
-
Repeat for the second SQL Server instance.
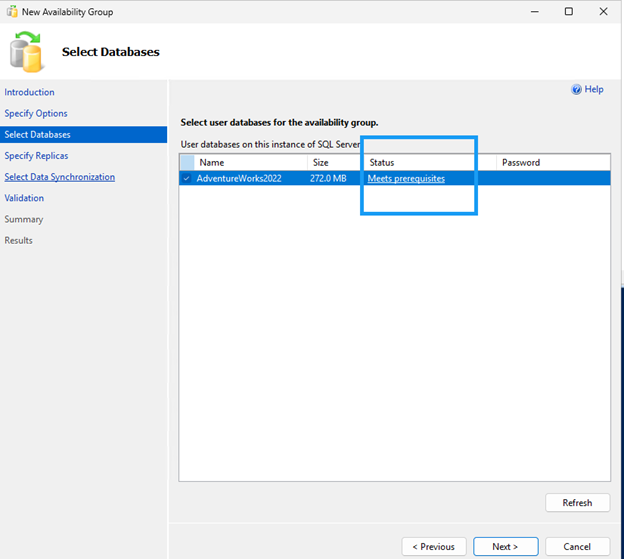
Create a database on the first SQL Server instance
Create a database on the first SQL Server instance.
-
Connect to the first SQL Server VM with a domain account that's a member of the sysadmin fixed server role.
-
Open SQL Server Management Studio and connect to the first SQL Server instance.
-
In Object Explorer, right-click Databases and select New Database.
-
Enter a database name (for example,
MyDB1) and click OK. -
Set the database recovery mode to Full:
ALTER DATABASE MyDB1 SET RECOVERY FULL;
GO
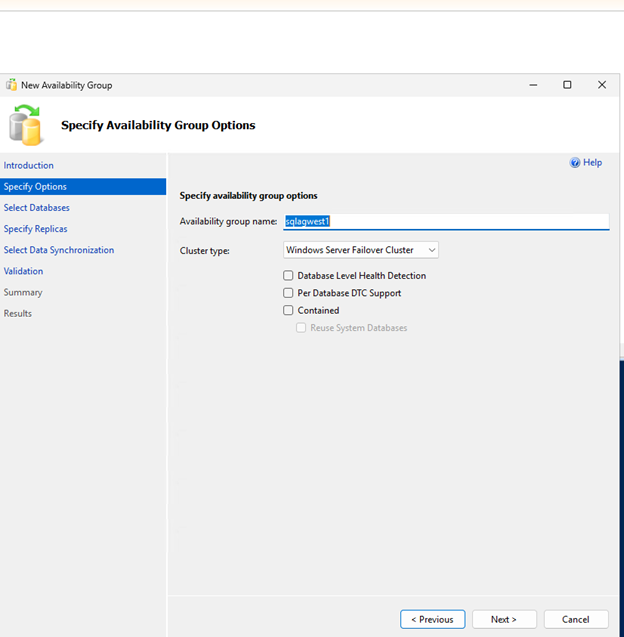
Create and configure availability group
Create an Always On availability group with synchronous commit and automatic failover to provide high availability for your SQL Server databases.
-
Take both a full backup and a transaction log backup of the database.
-- Full backup BACKUP DATABASE MyDB1 TO DISK = 'F:\MSSQL\Backup\MyDB1_Full.bak' WITH INIT, COMPRESSION; -- Transaction log backup BACKUP LOG MyDB1 TO DISK = 'F:\MSSQL\Backup\MyDB1_Log.trn' WITH INIT, COMPRESSION; -
Copy the backup files to the second SQL Server instance and restore them with NORECOVERY.
-- Restore full backup RESTORE DATABASE MyDB1 FROM DISK = 'F:\MSSQL\Backup\MyDB1_Full.bak' WITH NORECOVERY; -- Restore log backup RESTORE LOG MyDB1 FROM DISK = 'F:\MSSQL\Backup\MyDB1_Log.trn' WITH NORECOVERY; -
Create the availability group with synchronous commit and automatic failover and readable secondary replicas:
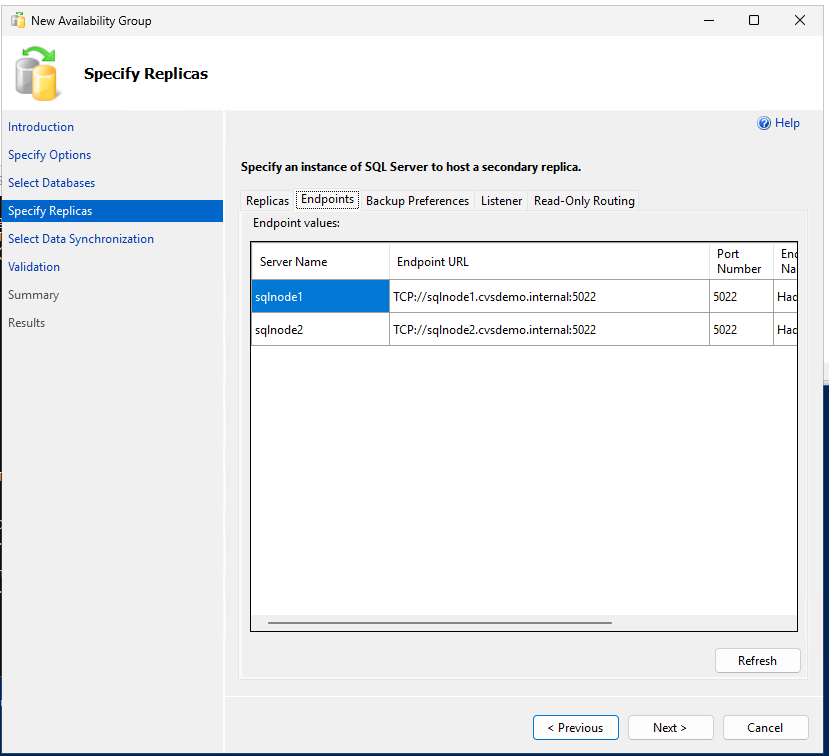
-- Run on primary replica CREATE AVAILABILITY GROUP sqlagwest1 WITH (AUTOMATED_BACKUP_PREFERENCE = SECONDARY) FOR DATABASE MyDB1 REPLICA ON N'SQLNODE1' WITH ( ENDPOINT_URL = N'TCP://sqlnode1.cvsdemo.internal:5022', AVAILABILITY_MODE = SYNCHRONOUS_COMMIT, FAILOVER_MODE = AUTOMATIC, SECONDARY_ROLE(ALLOW_CONNECTIONS = YES) ), N'SQLNODE2' WITH ( ENDPOINT_URL = N'TCP://sqlnode2.cvsdemo.internal:5022', AVAILABILITY_MODE = SYNCHRONOUS_COMMIT, FAILOVER_MODE = AUTOMATIC, SECONDARY_ROLE(ALLOW_CONNECTIONS = YES) ); GO -
Create the availability group using the Availability Group Wizard.

Ensure firewall port 5022 is allowed on both SQL nodes. 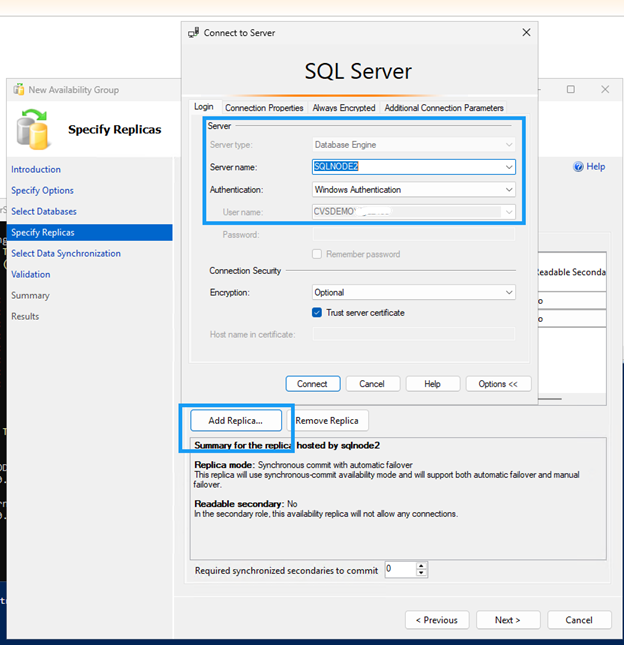

Create DNN listener resource
Create a Distributed Network Name (DNN) listener to route traffic to the appropriate clustered resource without requiring a load balancer.
Use PowerShell to create the DNN resource:
$Ag = "sqlagwest1"
$Dns = "AOAGDNN"
$Port = "1433"

# Add DNN resource
Add-ClusterResource -Name $Dns -ResourceType "Distributed Network Name" -Group $Ag

# Set DNN properties
Get-ClusterResource -Name $Dns | Set-ClusterParameter -Name DnsName -Value $Dns
Get-ClusterResource -Name $Dns | Set-ClusterParameter -Name Port -Value $Port

# Start DNN resource
Start-ClusterResource -Name $Dns

# Add dependency
$AagResource = Get-ClusterResource | Where-Object {$_.ResourceType -eq "SQL Server Availability Group" -and $_.OwnerGroup -eq $Ag}
Set-ClusterResourceDependency -Resource $AagResource -Dependency "[$Dns]"
Configure possible owners
By default, the cluster binds the DNN DNS name to all nodes. Exclude nodes not participating in the availability group:
-
In Failover Cluster Manager, locate the DNN resource.
-
Right-click the DNN resource and select Properties.
-
Clear the checkbox for any nodes that don't participate in the availability group.
-
Click OK to save settings.
Update application connection strings
Update connection strings to use the DNN listener name and include the MultiSubnetFailover=True parameter:
Server=AOAGDNN,1433;Database=MyDB1;MultiSubnetFailover=True;
|
|
If your client doesn't support the MultiSubnetFailover parameter, it isn't compatible with DNN. |
Test failover
Verify the availability group configuration and test failover to ensure automatic failover works correctly between nodes.
-
Run the following command on any replica to verify the availability group configuration.
Both replicas should show
SYNCHRONOUS_COMMITfor availability mode andAUTOMATICfor failover mode, which ensures zero data loss during automatic failover.SELECT ag.name AS AG_Name, ars.primary_replica FROM sys.dm_hadr_availability_group_states AS ars JOIN sys.availability_groups AS ag ON ag.group_id = ars.group_id; -- Check replica configuration SELECT replica_server_name, availability_mode_desc, failover_mode_desc FROM sys.availability_replicas WHERE group_id = (SELECT group_id FROM sys.availability_groups WHERE name = N'sqlagwest1');
-
Run the following command on the secondary node to initiate failover:
ALTER AVAILABILITY GROUP sqlagwest1 FAILOVER; GO -
Check that the connectivity target switched to the new primary:
--
SELECT @@SERVERNAME AS NowPrimary;
In SSMS, expand the availability group node, right-click Always On High Availability, and select Show Dashboard.
The dashboard should display both nodes with healthy status and confirm the failover.
Clean up resources
After completing the tutorial, delete the resources you created to avoid incurring additional charges:
-
Delete Compute Engine instances (sqlnode1, sqlnode2)
-
Delete Google Cloud NetApp Volumes (volumes, storage pools, host groups)
-
Delete VPC and networking resources if they were created specifically for this tutorial
-
Delete file share witness server if applicable
Refer to Google Cloud NetApp Volumes documentation and Google Compute Engine documentation for detailed steps on deleting resources.
Where to find additional information
For more information about SQL Server on Google Cloud with NetApp storage, review the following documentation: