Configure and verify NFS client access (Add an NFS volume to an NFS-enabled SVM)
 Suggest changes


When you are ready, you can give select clients access to the share by setting UNIX file permissions on a UNIX administration host and adding an export rule in System Manager. Then you should test that the affected users or groups can access the volume.
-
Decide which clients and users or groups will be given access to the share.
-
On a UNIX administration host, use the root user to set UNIX ownership and permissions on the volume.
-
In System Manager, add rules to the export policy to permit NFS clients to access the share.
-
Select the storage virtual machine (SVM), and click SVM Settings.
-
In the Policies pane, click Export Policies.
-
Select the export policy with the same name as the volume.
-
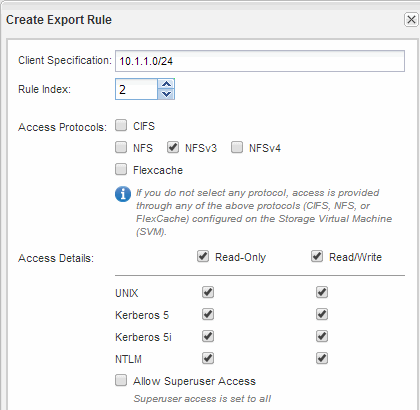
In the Export Rules tab, click Add, and specify a set of clients.
-
Select 2 for the Rule Index so that this rule executes after the rule that allows access to the administration host.
-
Select NFSv3.
-
Specify the access details that you want, and click OK.
You can give full read/write access to clients by typing the subnet
10.1.1.0/24as the Client Specification, and selecting all the access check boxes except Allow Superuser Access.
-
-
On a UNIX client, log in as one of the users who now has access to the volume, and verify that you can mount the volume and create a file.


