

Replace the boot media for automated boot recovery - AFF A800
 Suggest changes
The boot media in your AFF A800 system stores essential firmware and configuration data. The replacement process involves removing and opening the controller module, removing the impaired boot media, installing the replacement boot media in the controller module, and then reinstalling the controller module.
The automated boot media recovery process is supported only in ONTAP 9.17.1 and later. If your storage system is running an earlier version of ONTAP, use the manual boot recovery procedure.
The boot media is located inside the controller module under the air duct, and is accessed by removing the controller module from the system.
-
If you are not already grounded, properly ground yourself.
-
Ensure that all drives in the chassis are firmly seated against the midplane by using your thumbs to push each drive until you feel a positive stop.

-
Unplug the controller module power supplies from the source.
-
Release the power cable retainers, and then unplug the cables from the power supplies.
-
Loosen the hook and loop strap binding the cables to the cable management device, and then unplug the system cables and SFP and QSFP modules (if needed) from the controller module, keeping track of where the cables were connected.
Leave the cables in the cable management device so that when you reinstall the cable management device, the cables are organized.
-
Remove the cable management device from the controller module and set it aside.
-
Press down on both of the locking latches, and then rotate both latches downward at the same time.
The controller module moves slightly out of the chassis.
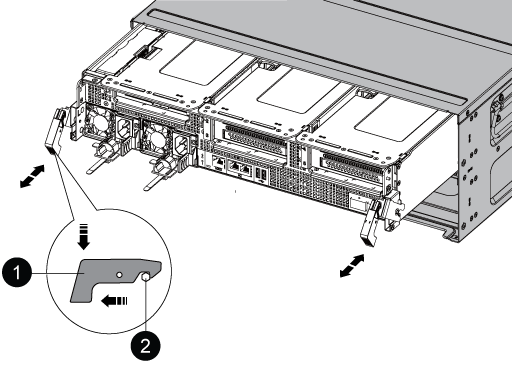

Locking latch

Locking pin
-
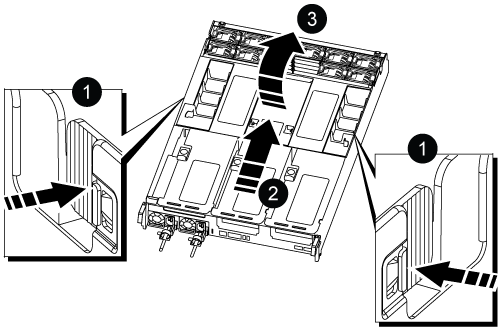
Slide the controller module out of the chassis.
Make sure that you support the bottom of the controller module as you slide it out of the chassis.
-
Place the controller module on a stable, flat surface, and then open the air duct:
-
Press in the locking tabs on the sides of the air duct toward the middle of the controller module.
-
Slide the air duct toward the fan modules, and then rotate it upward to its completely open position.
Air duct locking tabs
Slide air duct towards fan modules

Rotate air duct towards fan modules
-
-
Locate the boot media in the controller module and replace it:
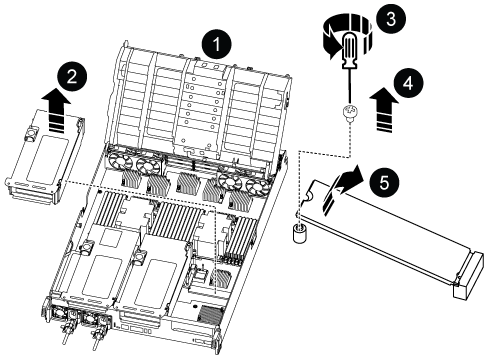
Air duct
Riser 3
Phillips #1 screwdriver

Boot media screw

Boot media
-
Using a #1 Phillips head screwdriver, remove the screw holding down the boot media and set the screw aside in a safe place.
-
Grasping the sides of the boot media, gently rotate the boot media up, and then pull the boot media straight out of the socket and set it aside.
-
-
Install the replacement boot media into the controller module:
-
Align the edges of the boot media with the socket housing, and then gently push it squarely into the socket.
-
Rotate the boot media down toward the motherboard.
-
Secure the boot media to the motherboard using the boot media screw.
Do not over-tighten the screw or you might damage the boot media.
-
-
Reinstall the riser into the controller module.
-
Close the air duct:
-
Rotate the air duct downward.
-
Slide the air duct toward the risers until it clicks into place.
-
-
Install the controller module:
-
Align the end of the controller module with the opening in the chassis, and then gently push the controller module half-way into the way into the system.
-
Recable the controller module, firmly push the cam handle to finish seating the controller module, push the cam handle to the closed position, and then tighten the thumbscrew.
The controller module begins to boot and stops at the LOADER prompt.
-
After physically replacing the impaired boot media, restore the ONTAP image from the partner node.