

Cable an NS224 shelf to your AFF A700 system
 Suggest changes
Cable your NS224 shelf to your AFF A700 system so that each shelf has two connections to each controller in the HA pair.
How you cable an NS224 shelf to an AFF A700 HA pair depends on the number of shelves you are hot-adding and the number of RoCE-capable port sets (one or two) you are using on the controllers.
If you are hot-adding the initial NS224 shelf (no NS224 shelf exists in your HA pair), you must install a core dump module (X9170A, NVMe 1TB SSD) in each controller to support core dumps (store core files).
How you cable an NS224 shelf to an AFF A700 HA pair depends on the number of shelves you are hot-adding and the number of RoCE-capable port sets (one or two) you are using on the controllers.
-
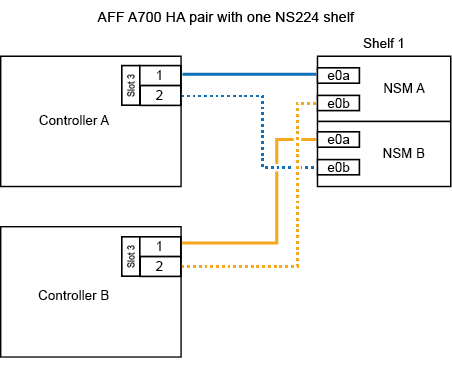
If you are hot-adding one shelf using one set of RoCE-capable ports (one RoCE capable I/O module) on each controller, and this is the only NS224 shelf in your HA pair, complete the following substeps.
Otherwise, go to the next step.

This step assumes that you installed the RoCE-capable I/O module in slot 3, instead of slot 7, on each controller. -
Cable shelf NSM A port e0a to controller A slot 3 port a.
-
Cable shelf NSM A port e0b to controller B slot 3 port b.
-
Cable shelf NSM B port e0a to controller B slot 3 port a.
-
Cable shelf NSM B port e0b to controller A slot 3 port b.
The following illustration shows cabling for one hot-added shelf using one RoCE-capable I/O module in each controller:
-
-
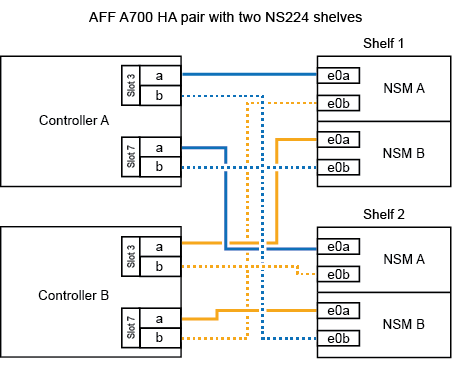
If you are hot-adding one or two shelves using two sets of RoCE-capable ports (two RoCE-capable I/O modules) in each controller, complete the applicable substeps.
Shelves Cabling Shelf 1
These substeps assume that you are beginning the cabling by cabling shelf port e0a to the RoCE-capable I/O module in slot 3, instead of slot 7. -
Cable NSM A port e0a to controller A slot 3 port a.
-
Cable NSM A port e0b to controller B slot 7 port b.
-
Cable NSM B port e0a to controller B slot 3 port a.
-
Cable NSM B port e0b to controller A slot 7 port b.
-
If you are hot-adding a second shelf, complete the “Shelf 2” substeps; otherwise, go to the next step.
Shelf 2
These substeps assume that you are beginning the cabling by cabling shelf port e0a to the RoCE-capable I/O module in slot 7, instead of slot 3 (which correlates with the cabling substeps for shelf 1). -
Cable NSM A port e0a to controller A slot 7 port a.
-
Cable NSM A port e0b to controller B slot 3 port b.
-
Cable NSM B port e0a to controller B slot 7 port a.
-
Cable NSM B port e0b to controller A slot 3 port b.
-
Go to the next step.
The following illustration shows cabling for the first and second hot-added shelves:
-
-
Verify that the hot-added shelf is cabled correctly using Active IQ Config Advisor.
If any cabling errors are generated, follow the corrective actions provided.
If you disabled automatic drive assignment as part of the preparation for this procedure, you need to manually assign drive ownership and then reenable automatic drive assignment, if needed. Go to Complete the hot-add.
Otherwise, you are done with the hot-add shelf procedure.