


Set up Cloud Volumes ONTAP to use a customer-managed key in AWS


 Suggest changes

 PDFs
PDFs
If you want to use Amazon Web Services (AWS) encryption with Cloud Volumes ONTAP, then you need to set up the AWS Key Management Service (KMS).
A Customer Master Key (CMK) can be managed by AWS or the customer. It can be in the same AWS account as the NetApp Console and Cloud Volumes ONTAP, or in a different AWS account (shared accounts). AWS enables key management only through the AWS Console. For more information, refer to AWS Key Management Service.
-
Ensure that you have information about the NetApp Console agent Identity and Access Management (IAM) roles for AWS.
-
Ensure that there's an active CMK.
Set up customer-managed KMS keys for a single account
When the Console agent and Cloud Volumes ONTAP are in the same AWS account, complete the following steps:
-
Grant S3 encryption permission to the IAM role for the Console agent. Add the
s3:PutEncryptionConfigurationaction to the IAM role policy:{ "Sid": "cvoServicePolicy", "Effect": "Allow", "Action": [ "s3:PutEncryptionConfiguration" ], "Resource": "*" } -
Enable access for the Console agent to the customer-managed encryption key (CMEK). Use one of the following methods on the AWS Console:
-
On the AWS Console, go to KMS > Customer managed keys and select your CMEK key.
-
On the Key users section, select Add.
-
Select your Console agent instance role, for example,
occm-role, and select Add. -
Save your changes.
-
On the AWS Console, go to KMS, and search for your key.
-
Select the Key policy tab and select Edit.
-
Search for the statement that enables access to the key
AllowUseOfTheKeyand append the Console agent role Amazon Resource Name (ARN) to thePrincipalarray. Replace the placeholders in the following example with your values:-
YOUR-ACCOUNT-ID: Your 12-digit AWS account ID -
YOUR-AGENT-ROLE-NAME: The name of the Console agent's IAM role{ "Sid": "AllowUseOfTheKey", "Effect": "Allow", "Principal": { "AWS": [ "arn:aws:iam::`YOUR-ACCOUNT-ID`:role/`YOUR-AGENT-ROLE-NAME`" ] }, "Action": [ "kms:Encrypt", "kms:Decrypt", "kms:ReEncrypt*", "kms:GenerateDataKey*", "kms:CreateGrant", "kms:DescribeKey", "kms:ListKeys" ], "Resource": "*" }
-
-
Save your changes.
Set up customer-managed KMS keys for shared accounts
When the Console agent runs in one AWS account (Account A) and Cloud Volumes ONTAP is deployed in another AWS account (Account B), complete all single-account steps first for Account A, and then complete these steps.
-
Add the
s3:PutEncryptionConfigurationaction to the assumed role for Account B. This is required because the FabricPool bucket encryption call runs under the assumed role for Account B. This permission covers enabling default encryption on the S3 bucket used for tiering.{ "Sid": "cvoServicePolicy", "Effect": "Allow", "Action": [ "s3:PutEncryptionConfiguration" ], "Resource": "*" } -
If the CMEK key is stored in Account B, the agent role for Account A needs direct access to use that key. The KMS key policy in Account B grants that cross-account access.
-
On the AWS Console for Account B, go to KMS > Customer managed keys and select the CMEK key used for Cloud Volumes ONTAP deployment.
-
Open the Key policy tab and select Edit.
-
Add a statement that grants the IAM role for Account A access to the key:
{
  "Sid": "Allow use of the key from the agent account",
  "Effect": "Allow",
  "Principal": {
    "AWS": "arn:aws:iam::ACCOUNT-A-ID:role/`YOUR-AGENT-ROLE-NAME`"
  },
  "Action": [
    "kms:Encrypt",
    "kms:Decrypt",
    "kms:ReEncrypt*",
    "kms:GenerateDataKey*",
    "kms:CreateGrant",
    "kms:DescribeKey",
    "kms:ListKeys",
    "kms:ListAliases"
  ],
  "Resource": "*"
}
The key policy for Account B controls whether the Console agent role for Account A can be trusted to use the key. This policy statement is required in addition to the IAM policy for Account A.
-
-
Update the IAM policy for the Console agent of Account A to allow KMS API calls on keys for Account B.
-
On the AWS Console for Account A, go to IAM > Roles and select the Console agent role, for example,
occm-roleorNetAppCloudManagerRole. -
Add or update the KMS permissions for Account B keys:
{
  "Version": "2012-10-17",
  "Statement": [
    {
      "Effect": "Allow",
      "Action": [
        "kms:List*",
        "kms:Describe*",
        "kms:Encrypt",
        "kms:Decrypt",
        "kms:ReEncrypt*",
        "kms:GenerateDataKey*",
        "kms:CreateGrant"
      ],
      "Resource": [
        "arn:aws:kms:*:ACCOUNT-B-ID:key/*",
        "arn:aws:kms:*:ACCOUNT-B-ID:alias/*"
      ]
    }
  ]
}
The key policy in Account B controls access to the key. The IAM policy in Account A allows the Console agent role to make KMS API calls. If either account is missing the configuration, AWS restricts access.
-
-
Add Account A as an allowed external AWS account on the CMEK in Account B.
-
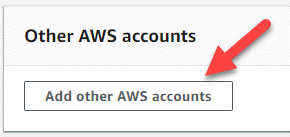
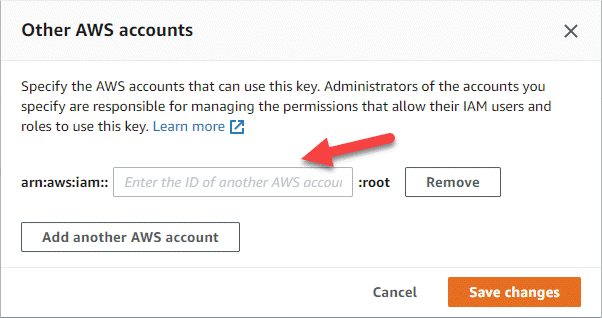
On the AWS KMS console for Account B, open the target KMS key and locate the Other AWS accounts section.
-
Select Add other AWS accounts and enter the AWS account ID for Account A.
-
-
Amazon documentation:
-
NetApp Console documentation: