Install into cabinet or rack (SG5800)
 Suggest changes


You install a set of rails in your cabinet or rack and then slide the appliance onto the rails. If you have an SG5860, install the drives after installing the appliance.
-
You have reviewed the Safety Notices document included in the box, and understand the precautions for moving and installing hardware.
-
You have the instructions packaged with the rail kit.
Install SG5812
Follow these steps to install an SG5812 appliance into a rack or cabinet.

|
Two people or a mechanized lift are required to safely move the SG5812. |

|
Install hardware from the bottom of the rack or cabinet or rack up to prevent the equipment from tipping over. |
-
Follow the instructions for the rail kit to install the rails.
-
Place the back of the appliance (the end with the connectors) on the rails.
-
Carefully slide the appliance all the way back into the cabinet or rack.
-
Secure the appliance to the cabinet or rack as directed in the rail kit instructions.
-
Attach the bezel to the front.
Install SG5860
Follow these steps to install an SG5860 appliance and any expansion shelves into a rack or cabinet.

|
Install hardware from the bottom of the rack or cabinet or rack up to prevent the equipment from tipping over. |

|
Four people or a mechanized lift are required to safely move an empty SG5860. |

|
To avoid damaging the hardware, never move an SG5860 if drives are installed. You must remove all drives before moving the shelf. |
-
Follow the instructions for the rail kit to install the rails in your cabinet or rack.
-
Prepare to move the appliance:
-
Remove the outer packing box.
-
Fold down the flaps on the inner box.
-
If you are lifting the SG5860 by hand, attach the four handles to the sides of the chassis.
You remove these handles as you slide the appliance onto the rails.
-
-
If your cabinet has square holes, install the cage nuts so that you can secure the front and rear of the shelf with screws.
-
Place the back of the appliance (the end with the connectors) on the rails.
-
Supporting the appliance from the bottom, slide it into the rack or cabinet.
Use the thumb latches to detach the handles as you slide the appliance in.
-
Secure the appliance to the front of the rack by inserting two screws in the first and third holes (counting down from the top) on each side.
-
Secure the appliance to the rear of the rack or cabinet with the brackets.
-
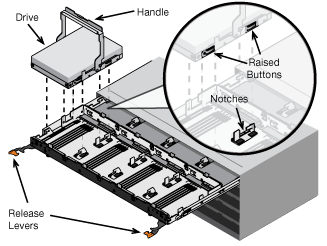
Install 12 drives in each of the five drive drawers.
You must install all 60 drives to ensure correct operation.
-
Put on the ESD wristband, and remove the drives from their packaging.
-
Release the levers on the top drive drawer, and slide the drawer out using the levers.
-
Raise the drive handle to vertical, and align the buttons on the drive with the notches on the drawer.

-
Pressing gently on the top of the drive, rotate the drive handle down until the drive snaps into place.
-
After installing the first 12 drives, slide the drawer back in by pushing on the center and closing both levers gently.
-
Repeat these steps for the other four drawers.
-
-
Attach the front bezel, if one was provided.


