

TR-4992:使用 NFS 在NetApp C 系列上簡化、自動化 Oracle 部署
 建議變更
建議變更
Allen Cao、Niyaz Mohamed, NetApp
此解決方案概述並詳細介紹了在NetApp AFF C 系列中透過 NFS 協定自動部署 Oracle 作為主資料庫儲存。 Oracle 資料庫部署為啟用了 dNFS 的容器資料庫。
目的
NetApp AFF C 系列是一種大容量快閃存儲,它使全快閃存儲對於統一存儲來說更易於存取且更經濟實惠。對於許多第 1 層或第 2 層 Oracle 資料庫工作負載而言,其效能已足夠。 AFF C 系列系統由NetApp ONTAP資料管理軟體提供支持,可提供業界領先的效率、卓越的靈活性、一流的資料服務和雲端集成,幫助您擴展 IT 基礎架構、簡化資料管理並降低儲存成本和功耗。
本文檔示範了使用 Ansible 自動化透過 NFS 掛載在NetApp C 系列中簡化 Oracle 資料庫的部署。 Oracle 資料庫部署在容器資料庫 (CDB) 和可插拔資料庫 (PDB) 配置中,並啟用 Oracle dNFS 協定以提高效能。此外,該解決方案還提供了在 C 系列儲存控制器上使用 NFS 協定設定儲存網路和儲存虛擬機器 (SVM) 的最佳實務。該解決方案還包括使用NetApp SnapCenter UI 工具快速備份、還原和克隆 Oracle 資料庫的資訊。
此解決方案適用於以下用例:
-
在NetApp C 系列儲存控制器上自動部署 Oracle 容器資料庫。
-
使用SnapCenter UI 工具在 C 系列上進行 Oracle 資料庫保護和複製。
對象
此解決方案適用於以下人群:
-
一位 DBA 想要在NetApp C 系列上部署 Oracle。
-
一位資料庫解決方案架構師想要在NetApp C 系列上測試 Oracle 工作負載。
-
一位儲存管理員想要在NetApp C 系列上部署和管理 Oracle 資料庫。
-
希望在NetApp C 系列上建立 Oracle 資料庫的應用程式擁有者。
解決方案測試和驗證環境
此解決方案的測試和驗證是在實驗室環境中進行的,可能與最終部署環境不符。請參閱[部署考慮的關鍵因素]了解更多。
架構
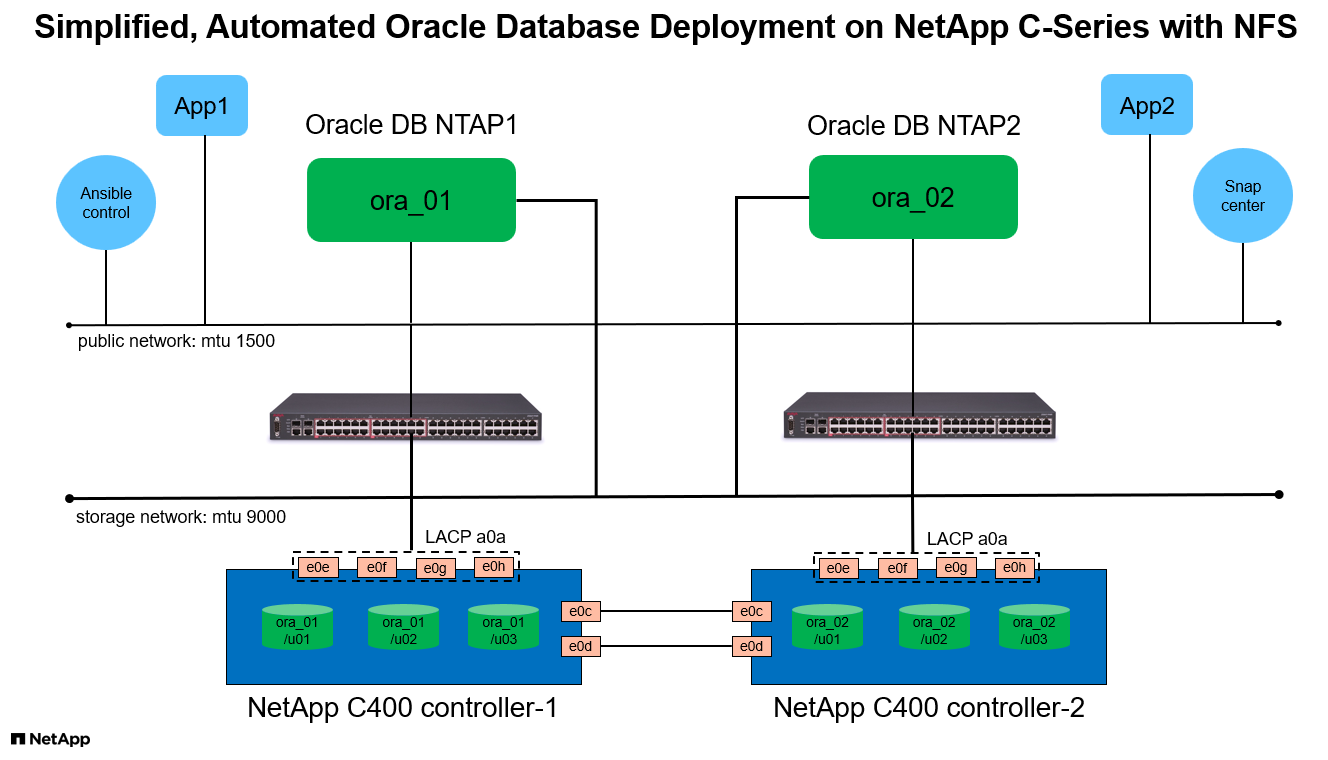
硬體和軟體組件
硬體 |
||
NetApp C系列 C400 |
ONTAP版本 9.13.1P3 |
兩個磁碟架/24 個磁碟,容量為 278 TiB |
資料庫伺服器虛擬機 |
4 個 vCPU,16GiB RAM |
兩個 Linux VM 實例用於並發部署 |
SnapCenter的虛擬機 |
4 個 vCPU,16GiB RAM |
一個 Windows VM 實例 |
軟體 |
||
紅帽Linux |
RHEL Linux 8.6(LVM)-x64 Gen2 |
部署 RedHat 訂閱進行測試 |
Windows 伺服器 |
2022 年資料中心 x64 Gen2 |
託管SnapCenter伺服器 |
Oracle 資料庫 |
版本 19.18 |
已套用RU補丁p34765931_190000_Linux-x86-64.zip |
Oracle OPatch |
版本 12.2.0.1.36 |
最新補丁 p6880880_190000_Linux-x86-64.zip |
SnapCenter伺服器 |
版本 5.0 |
工作小組部署 |
開啟 JDK |
版本 java-11-openjdk |
資料庫虛擬機器上的SnapCenter插件要求 |
NFS |
版本 3.0 |
已啟用 Oracle dNFS |
Ansible |
核心 2.16.2 |
Python 3.6.8 |
實驗室環境中的 Oracle 資料庫配置
伺服器 |
資料庫 |
資料庫儲存 |
ora_01 |
NTAP1(NTAP1_PDB1、NTAP1_PDB2、NTAP1_PDB3) |
/u01、/u02、/u03 NFS 在 C400 冊上掛載 |
ora_02 |
NTAP2(NTAP2_PDB1、NTAP2_PDB2、NTAP2_PDB3) |
/u01、/u02、/u03 NFS 在 C400 冊上掛載 |
部署考慮的關鍵因素
-
Oracle 資料庫儲存佈局。在此自動化 Oracle 部署中,我們預設為每個資料庫配置三個資料庫磁碟區來託管 Oracle 二進位檔案、資料和日誌。這些磁碟區透過 NFS 安裝在 Oracle DB 伺服器上,作為 /u01 - 二進位、/u02 - 資料、/u03 - 日誌。在 /u02 和 /u03 掛載點上配置雙控製檔以實現冗餘。
-
*多個資料庫伺服器部署。 *自動化解決方案可以在單一 Ansible 劇本運行中將 Oracle 容器資料庫部署到多個 DB 伺服器。無論資料庫伺服器的數量有多少,劇本的執行都保持不變。您可以透過使用不同的資料庫執行個體 ID(Oracle SID)重複部署將多個容器資料庫部署到單一 VM 執行個體。但要確保主機上有足夠的記憶體來支援部署的資料庫。
-
*dNFS 配置。 *透過使用 dNFS(自 Oracle 11g 起可用),在 DB VM 上執行的 Oracle 資料庫可以比本機 NFS 用戶端驅動更多的 I/O。自動化 Oracle 部署預設在 NFSv3 上配置 dNFS。
-
*C400 控制器對上的負載平衡。 *將 Oracle 資料庫磁碟區均勻地放置在 C400 控制器節點上,以平衡工作負載。控制器 1 上的 DB1、控制器 2 上的 DB2,依此類推。將 DB 磁碟區安裝到其本機 lif 位址。
-
*資料庫備份。 * NetApp提供了SnapCenter software套件,用於資料庫備份、復原和克隆,並具有使用者友好的 UI 介面。 NetApp建議實施這樣的管理工具,以實現快速(一分鐘內)快照備份、快速(幾分鐘內)資料庫復原和資料庫複製。
解決方案部署
以下部分提供了 Oracle 19c 自動部署的逐步流程以及部署後的 Oracle 資料庫保護和複製的資訊。
部署先決條件
Details
部署需要以下先決條件。
-
NetApp C 系列儲存控制器對已安裝、堆疊,並且已安裝並設定最新版本的ONTAP作業系統。必要時請參考本設定指南: "詳細指南 - AFF C400"
-
配置兩個 Linux VM 作為 Oracle DB 伺服器。有關環境設定的詳細信息,請參閱上一節中的架構圖。
-
配置 Windows 伺服器以運行最新版本的NetApp SnapCenter UI 工具。詳細資訊請參考以下連結:"安裝SnapCenter伺服器"
-
將 Linux VM 配置為 Ansible 控制器節點,並安裝最新版本的 Ansible 和 Git。詳細資訊請參考以下連結:"NetApp解決方案自動化入門"在第 -
Setup the Ansible Control Node for CLI deployments on RHEL / CentOS`或者。
`Setup the Ansible Control Node for CLI deployments on Ubuntu / Debian在 Ansible 控制器和資料庫虛擬機器之間啟用 ssh 公鑰/私鑰認證。
-
從 Ansible 控制器管理員使用者主目錄,複製一份用於 NFS 的NetApp Oracle 部署自動化工具包的副本。
git clone https://bitbucket.ngage.netapp.com/scm/ns-bb/na_oracle_deploy_nfs.git -
在 DB VM /tmp/archive 目錄上以 777 權限執行下列 Oracle 19c 安裝檔案階段。
installer_archives:
  - "LINUX.X64_193000_db_home.zip"
  - "p34765931_190000_Linux-x86-64.zip"
  - "p6880880_190000_Linux-x86-64.zip"
在 C 系列上為 Oracle 設定網路和 SVM
Details
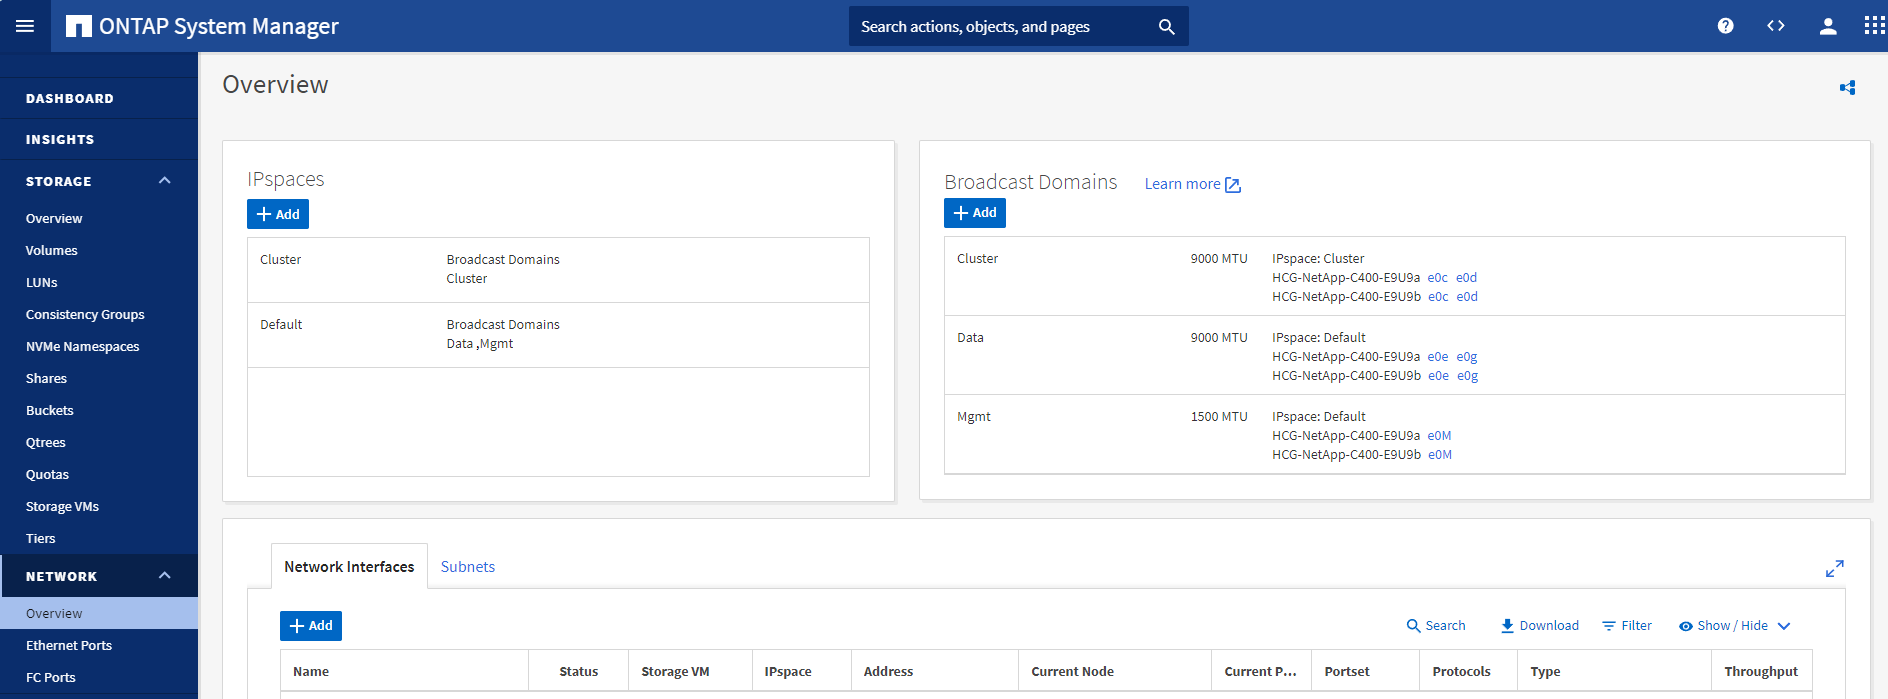
本部署指南部分介紹了使用ONTAP系統管理器 UI 在 C 系列控制器上為具有 NFS 協定的 Oracle 工作負載設定網路和儲存虛擬機器 (SVM) 的最佳實務。
-
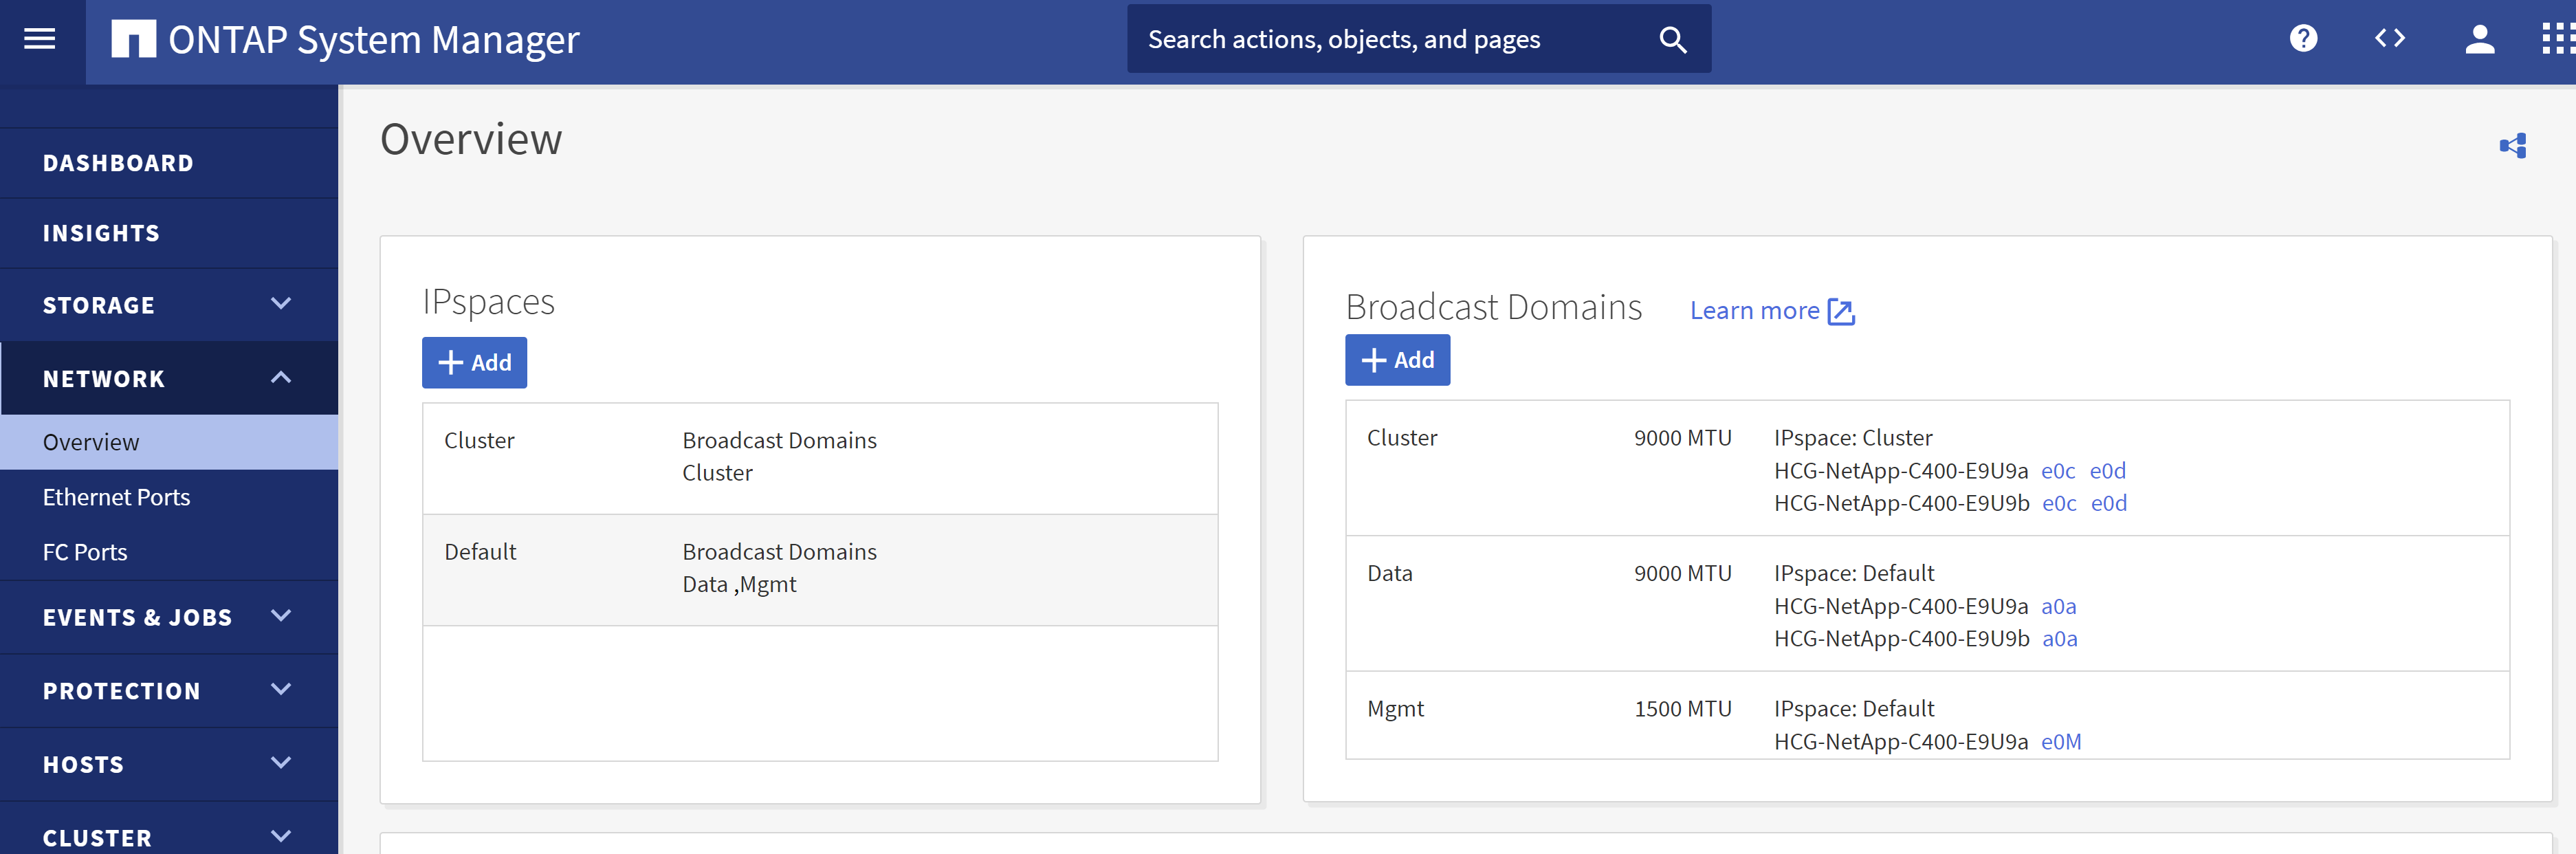
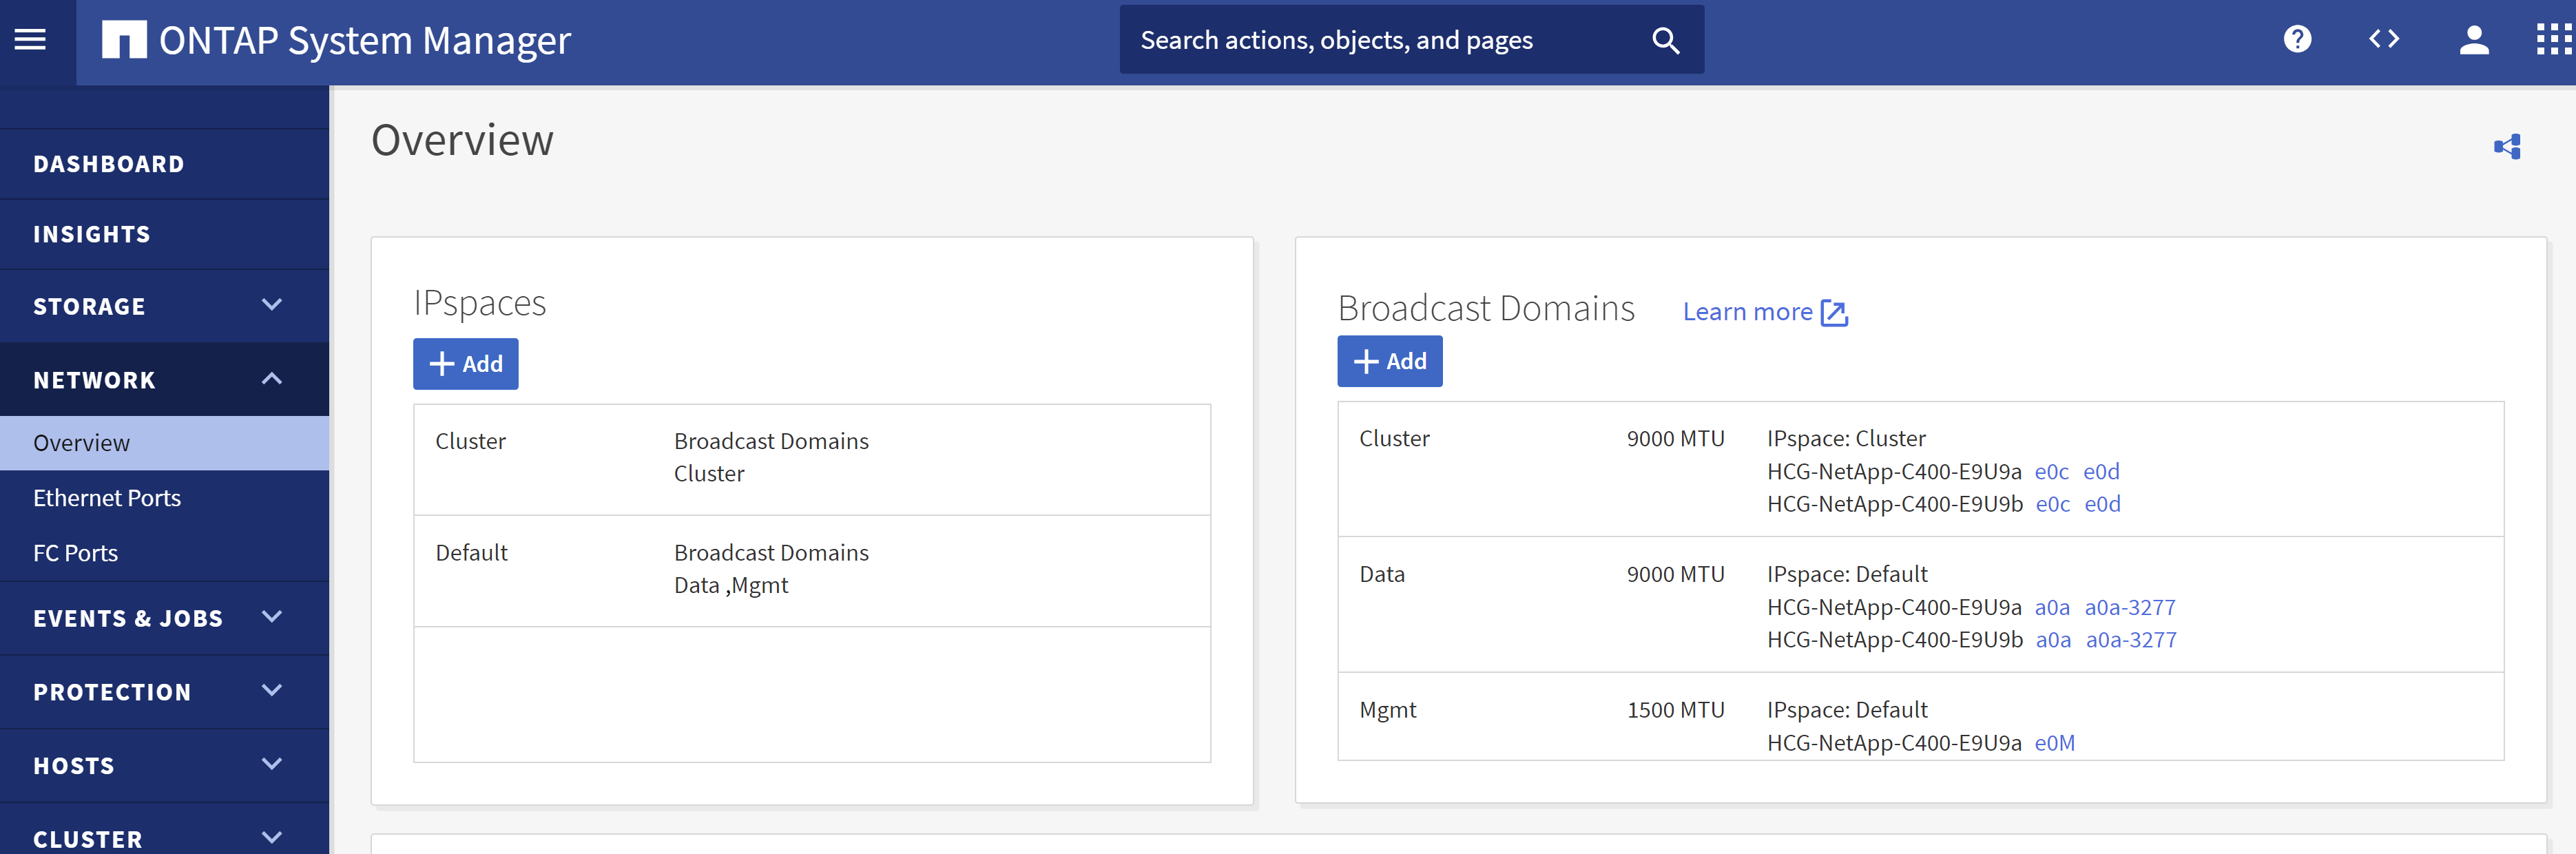
登入ONTAP系統管理員以檢查初始ONTAP叢集安裝後,廣播網域是否已設定並已正確指派給每個網域的乙太網路連接埠。一般情況下,應該有一個叢集的廣播域,一個管理的廣播域,以及一個資料等工作負載的廣播域。
-
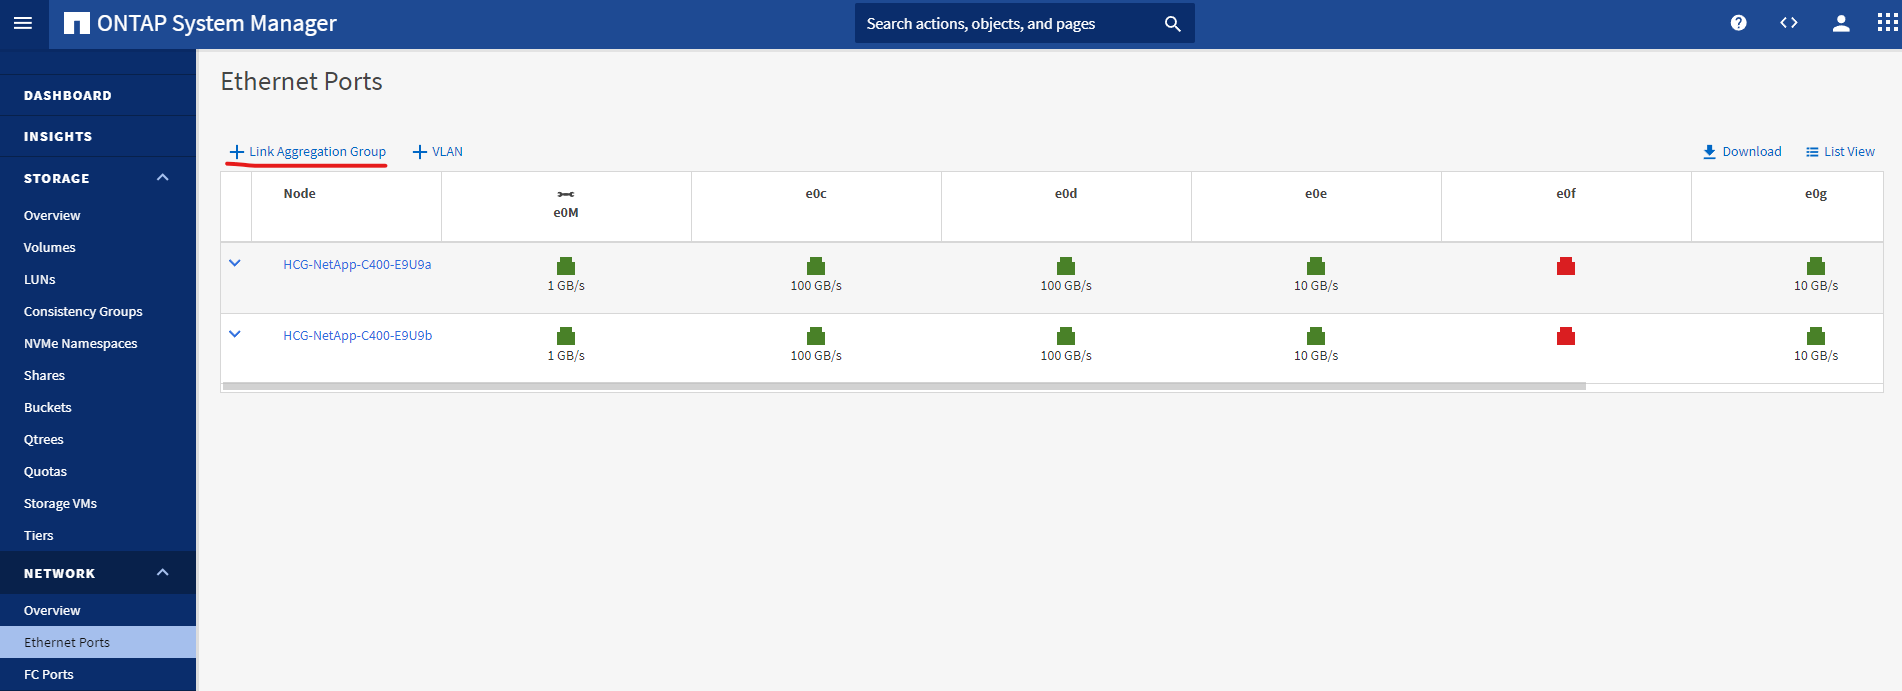
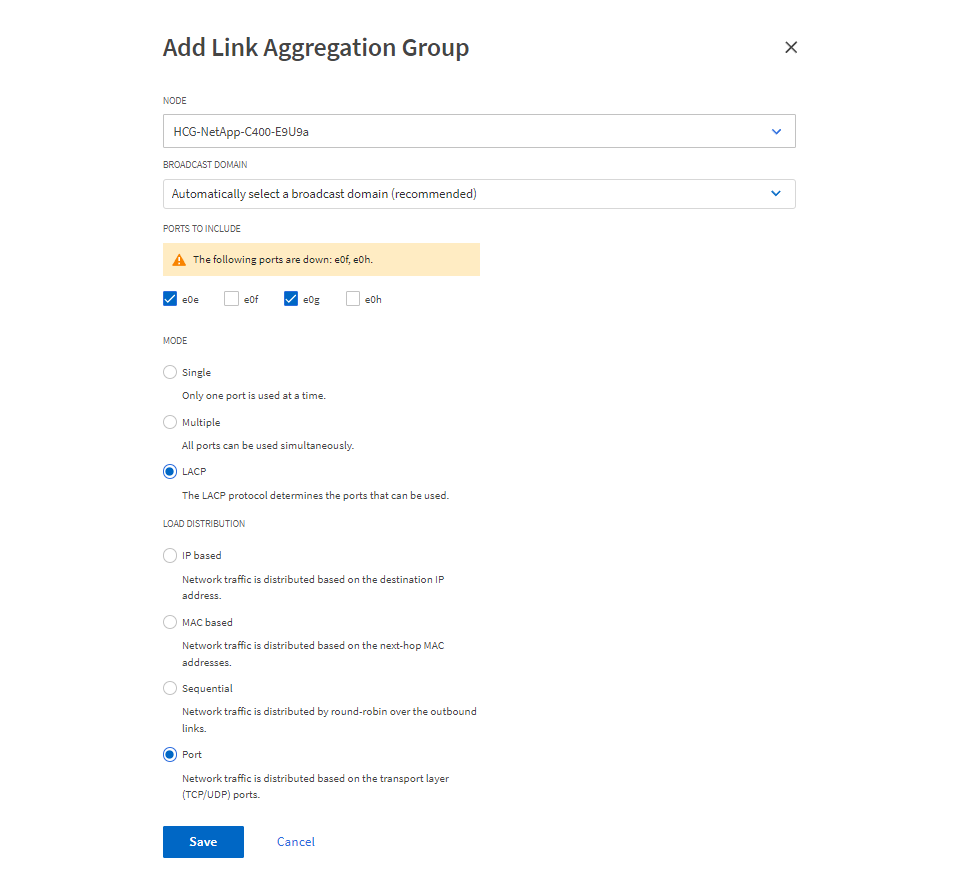
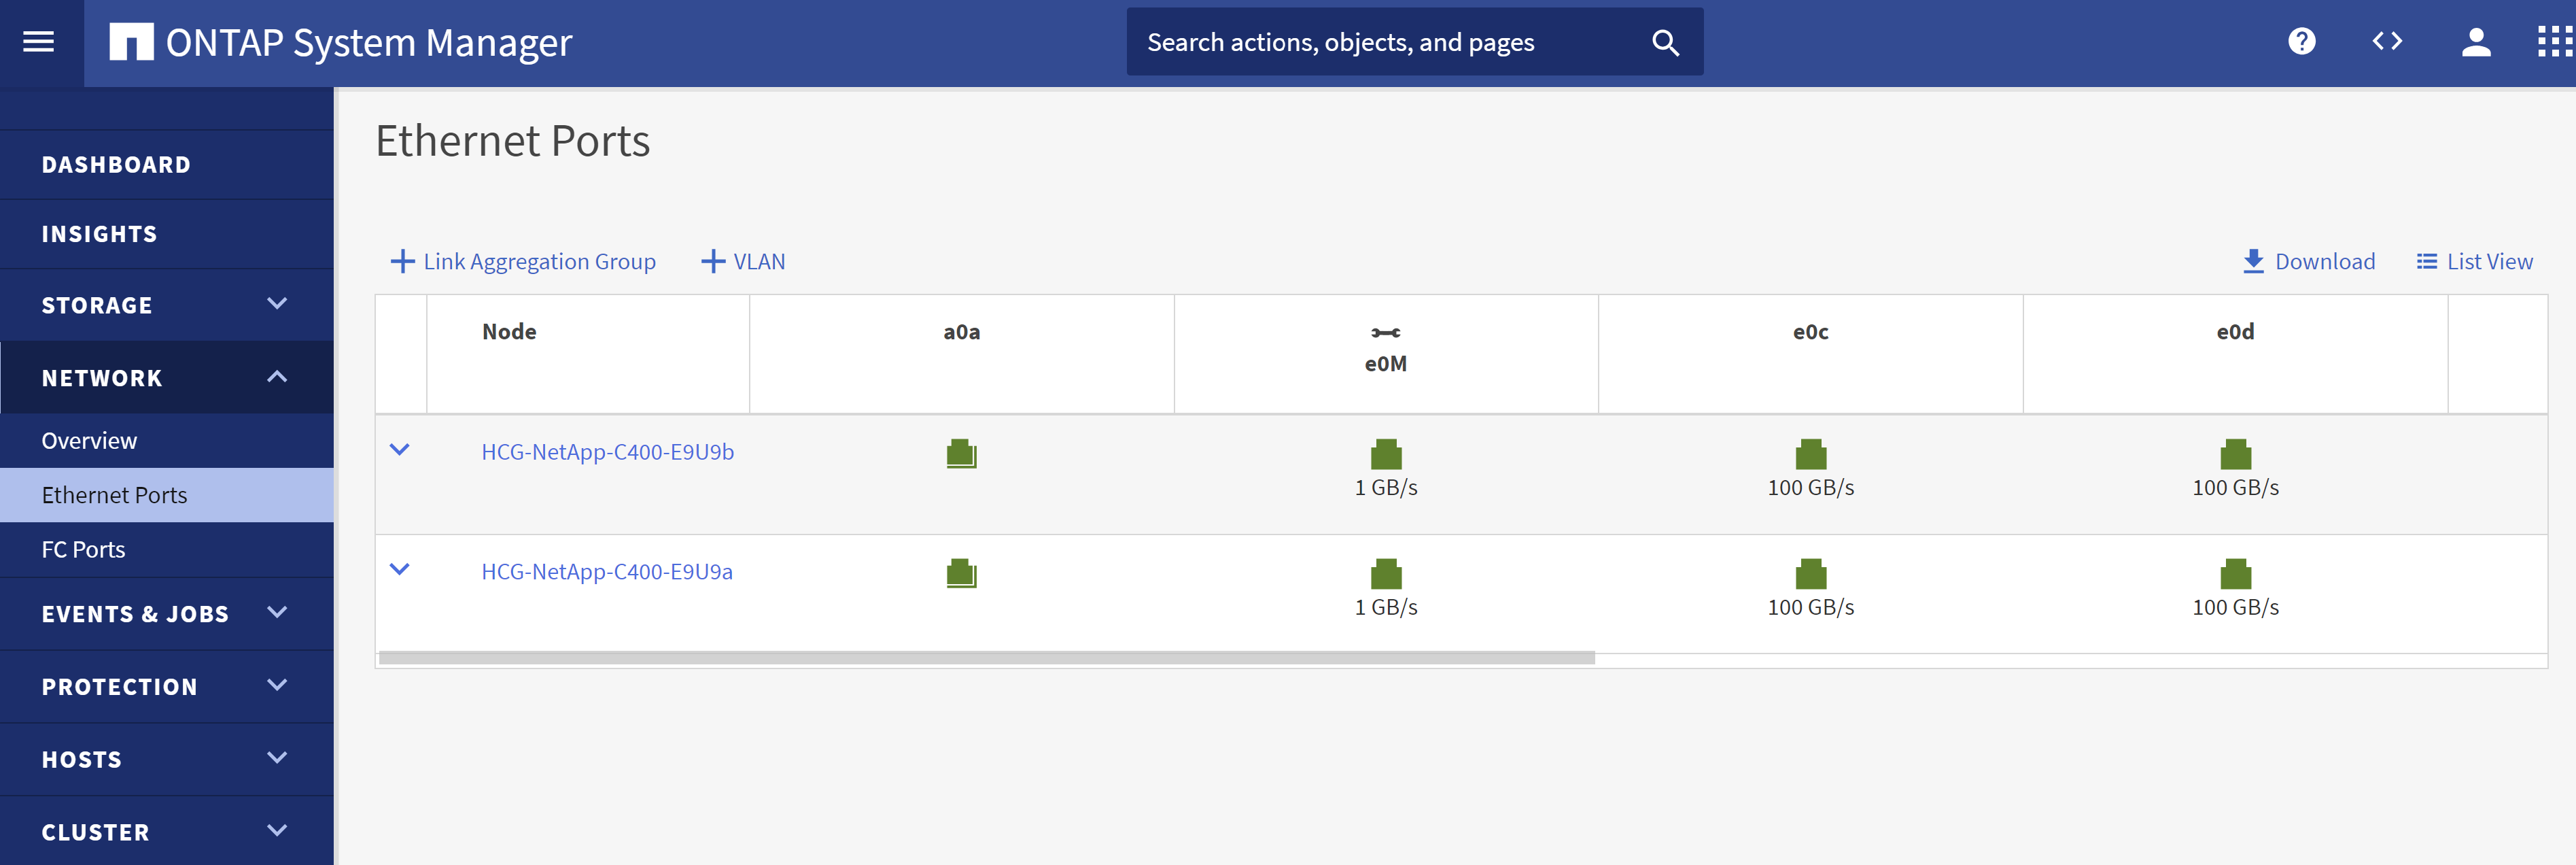
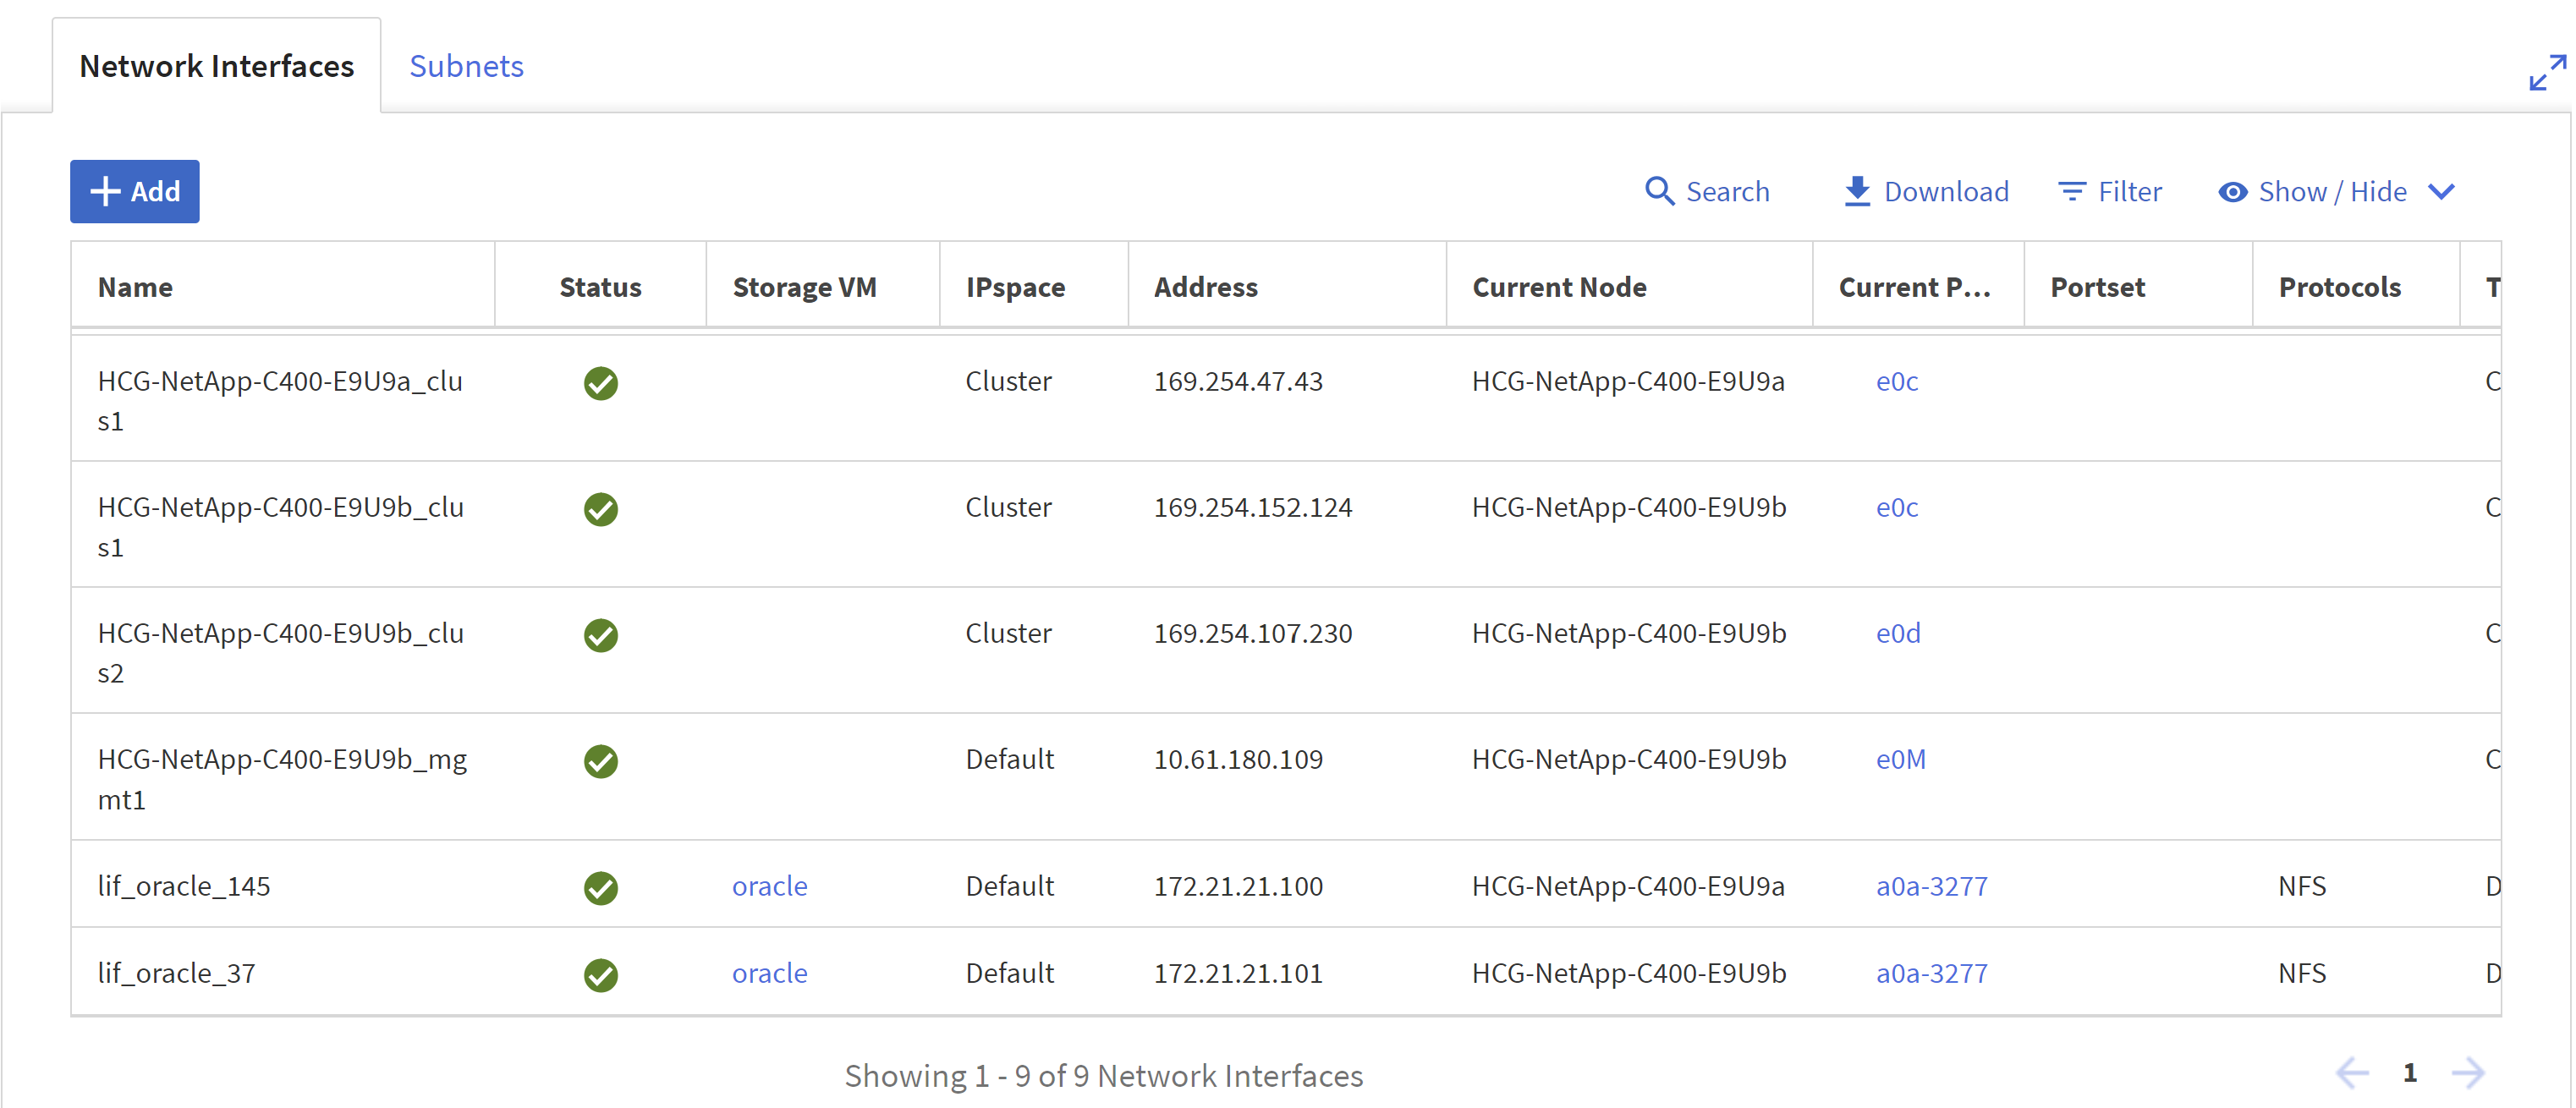
從網路 - 乙太網路端口,點擊 `Link Aggregate Group`建立LACP鏈路聚合組連接埠a0a,為聚合組連接埠中的成員連接埠之間提供負載平衡和故障切換。 C400 控制器上有 4 個資料連接埠 - e0e、e0f、e0g、e0h。
-
選擇群組中的乙太網路端口, `LACP`對於模式,以及 `Port`用於負載分配。
-
驗證 LACP 連接埠 a0a 已建立並廣播網域 `Data`現在正在 LACP 連接埠上運行。
-
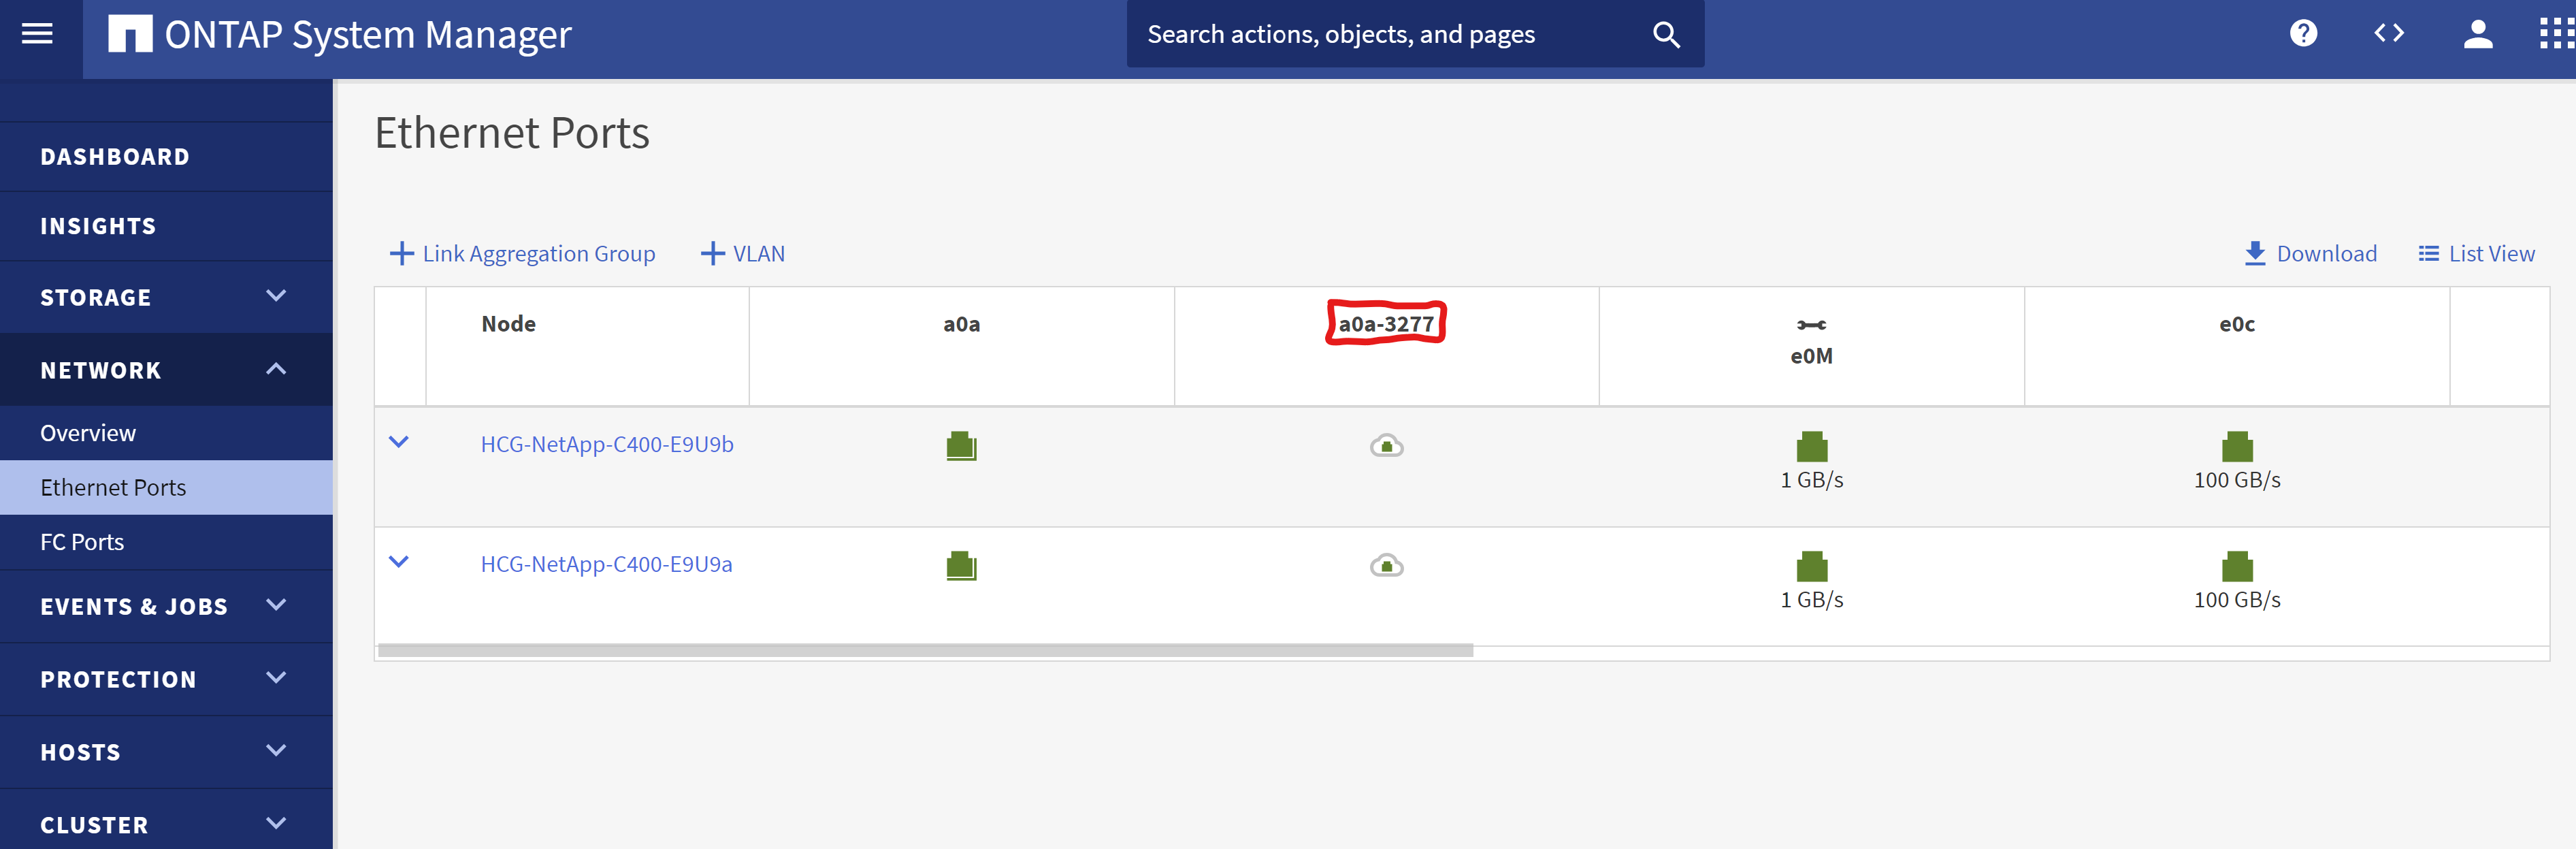
從
Ethernet Ports, 點選 `VLAN`在每個控制器節點上為 NFS 協定上的 Oracle 工作負載新增一個 VLAN。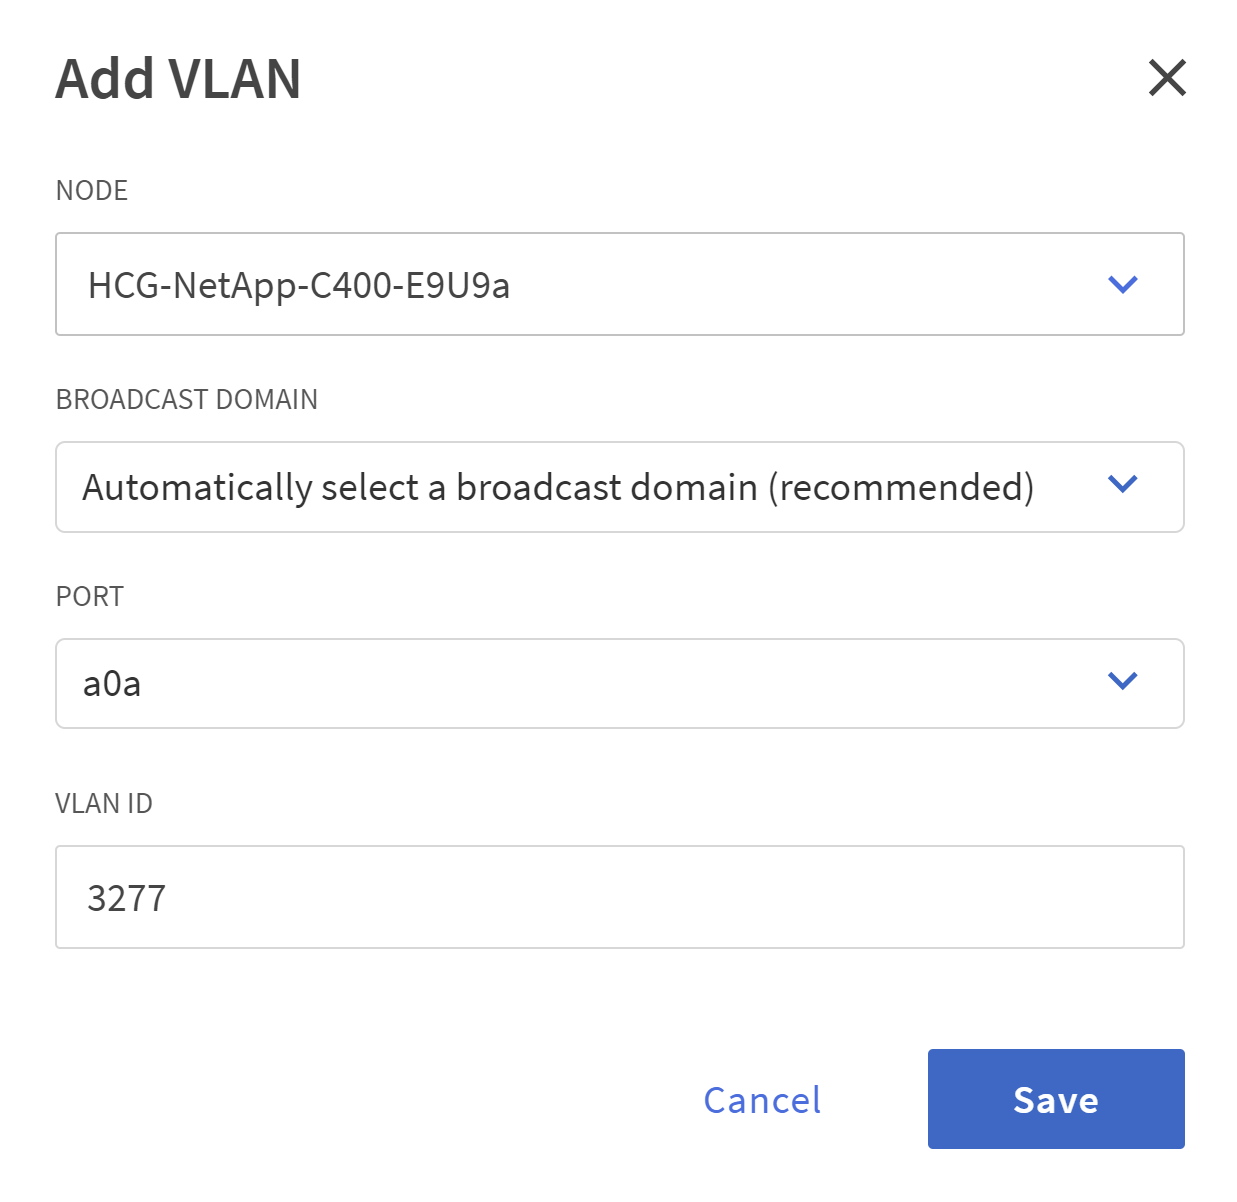
-
透過 ssh 從叢集管理 IP 登入 C 系列控制器,以驗證網路故障轉移群組是否配置正確。 ONTAP自動建立和管理故障轉移群組。
HCG-NetApp-C400-E9U9::> net int failover-groups show (network interface failover-groups show) Failover Vserver Group Targets ---------------- ---------------- -------------------------------------------- Cluster Cluster HCG-NetApp-C400-E9U9a:e0c, HCG-NetApp-C400-E9U9a:e0d, HCG-NetApp-C400-E9U9b:e0c, HCG-NetApp-C400-E9U9b:e0d HCG-NetApp-C400-E9U9 Data HCG-NetApp-C400-E9U9a:a0a, HCG-NetApp-C400-E9U9a:a0a-3277, HCG-NetApp-C400-E9U9b:a0a, HCG-NetApp-C400-E9U9b:a0a-3277 Mgmt HCG-NetApp-C400-E9U9a:e0M, HCG-NetApp-C400-E9U9b:e0M 3 entries were displayed. -
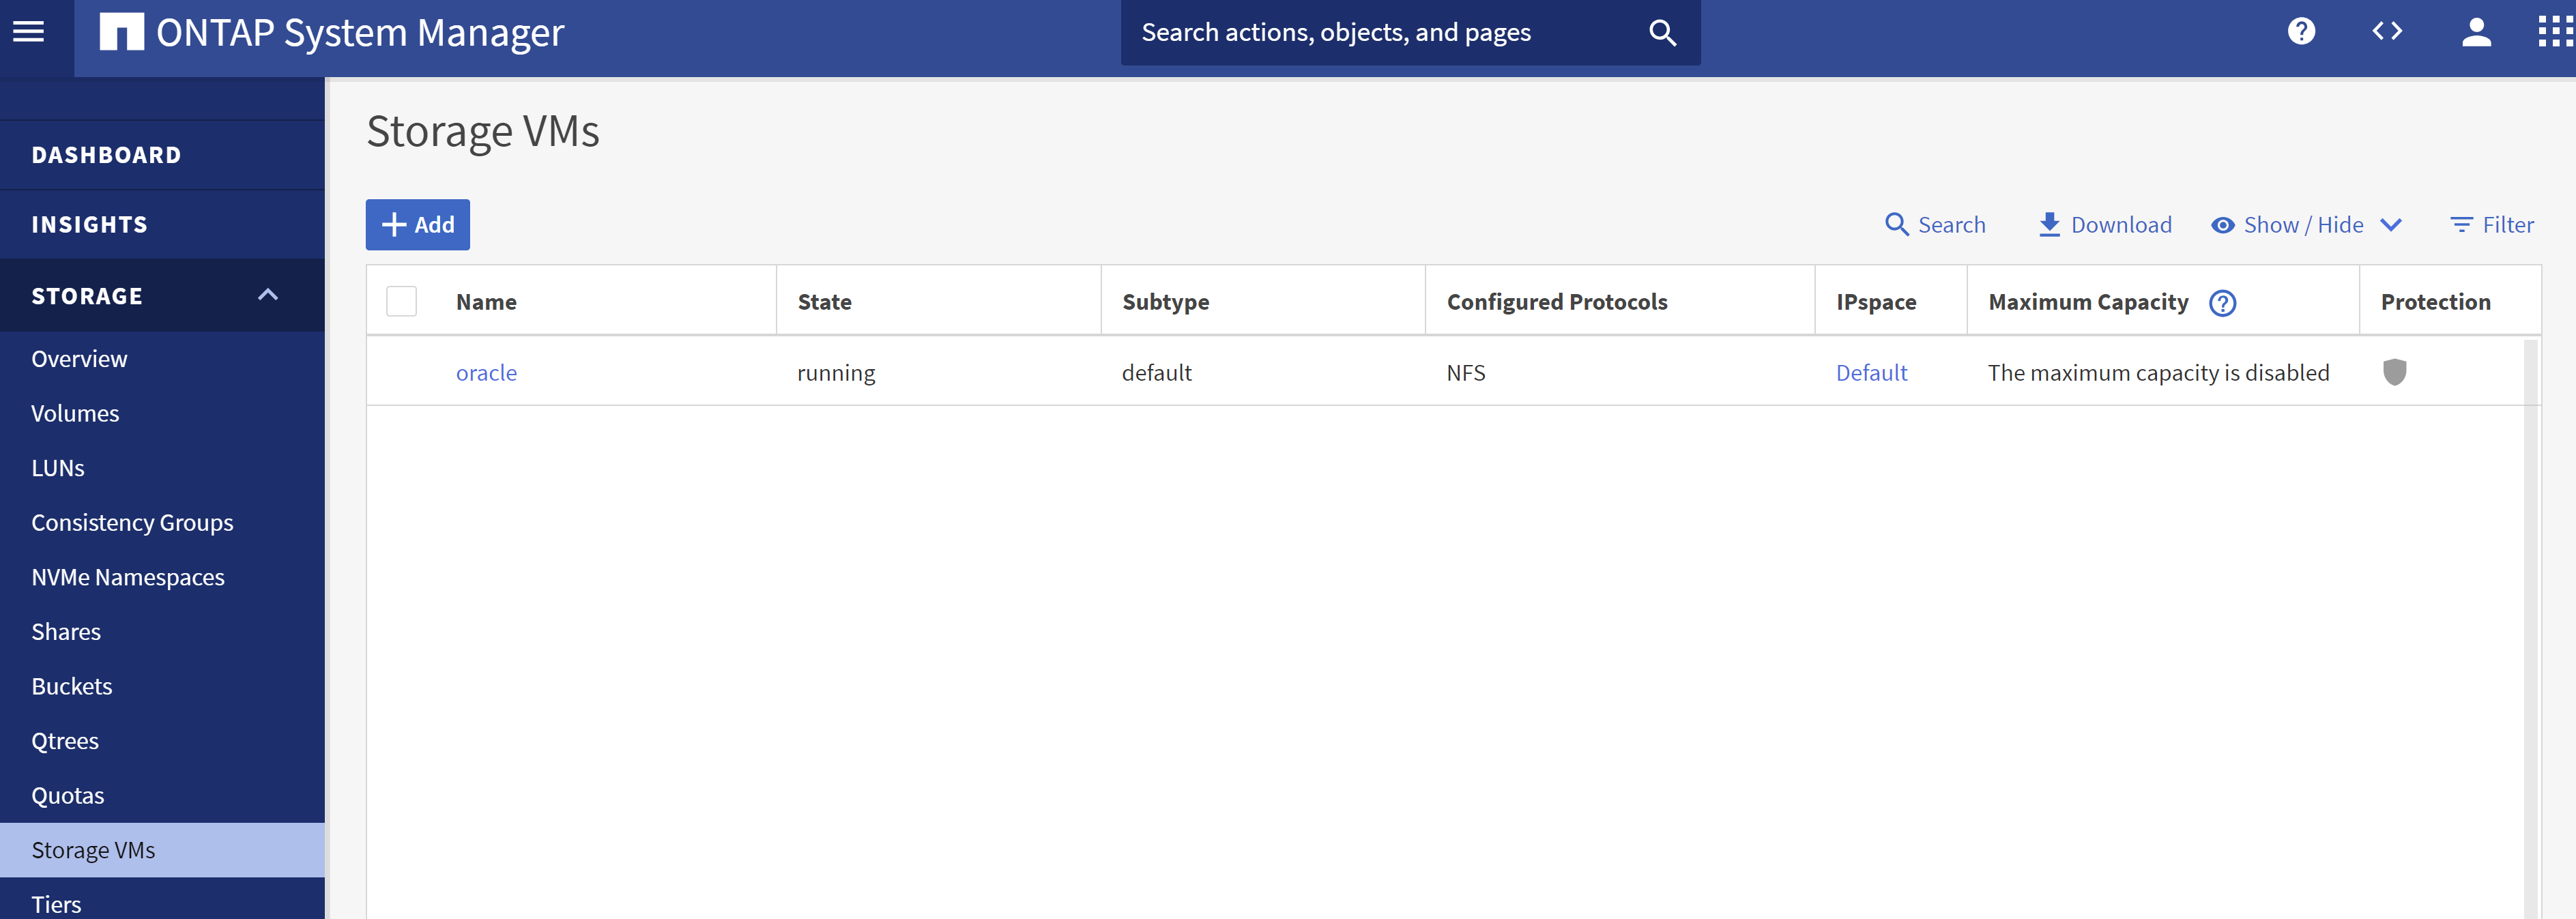
從
STORAGE - Storage VMs,按一下「+新增」為 Oracle 建立 SVM。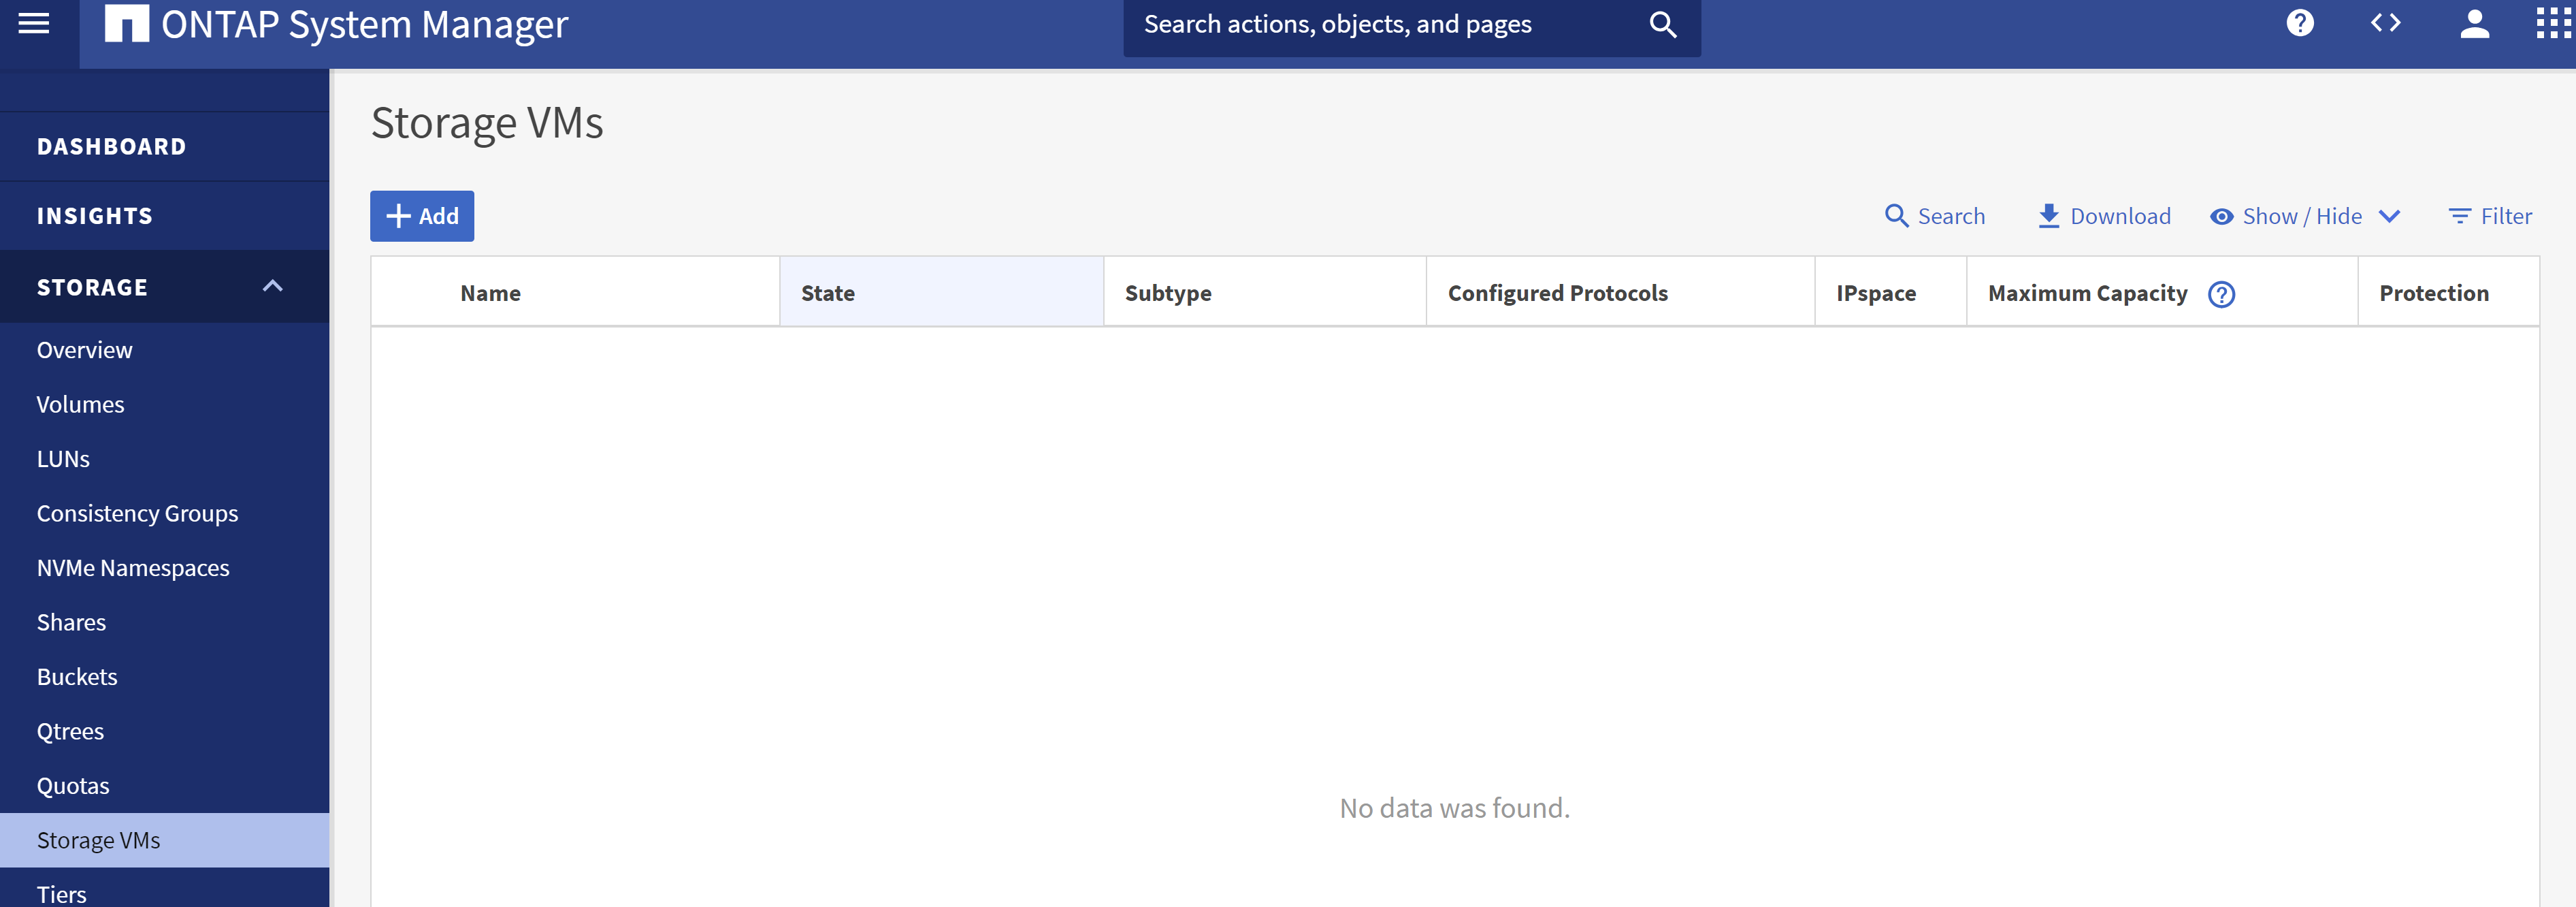
-
命名您的 Oracle SVM,檢查
Enable NFS`和 `Allow NFS client access。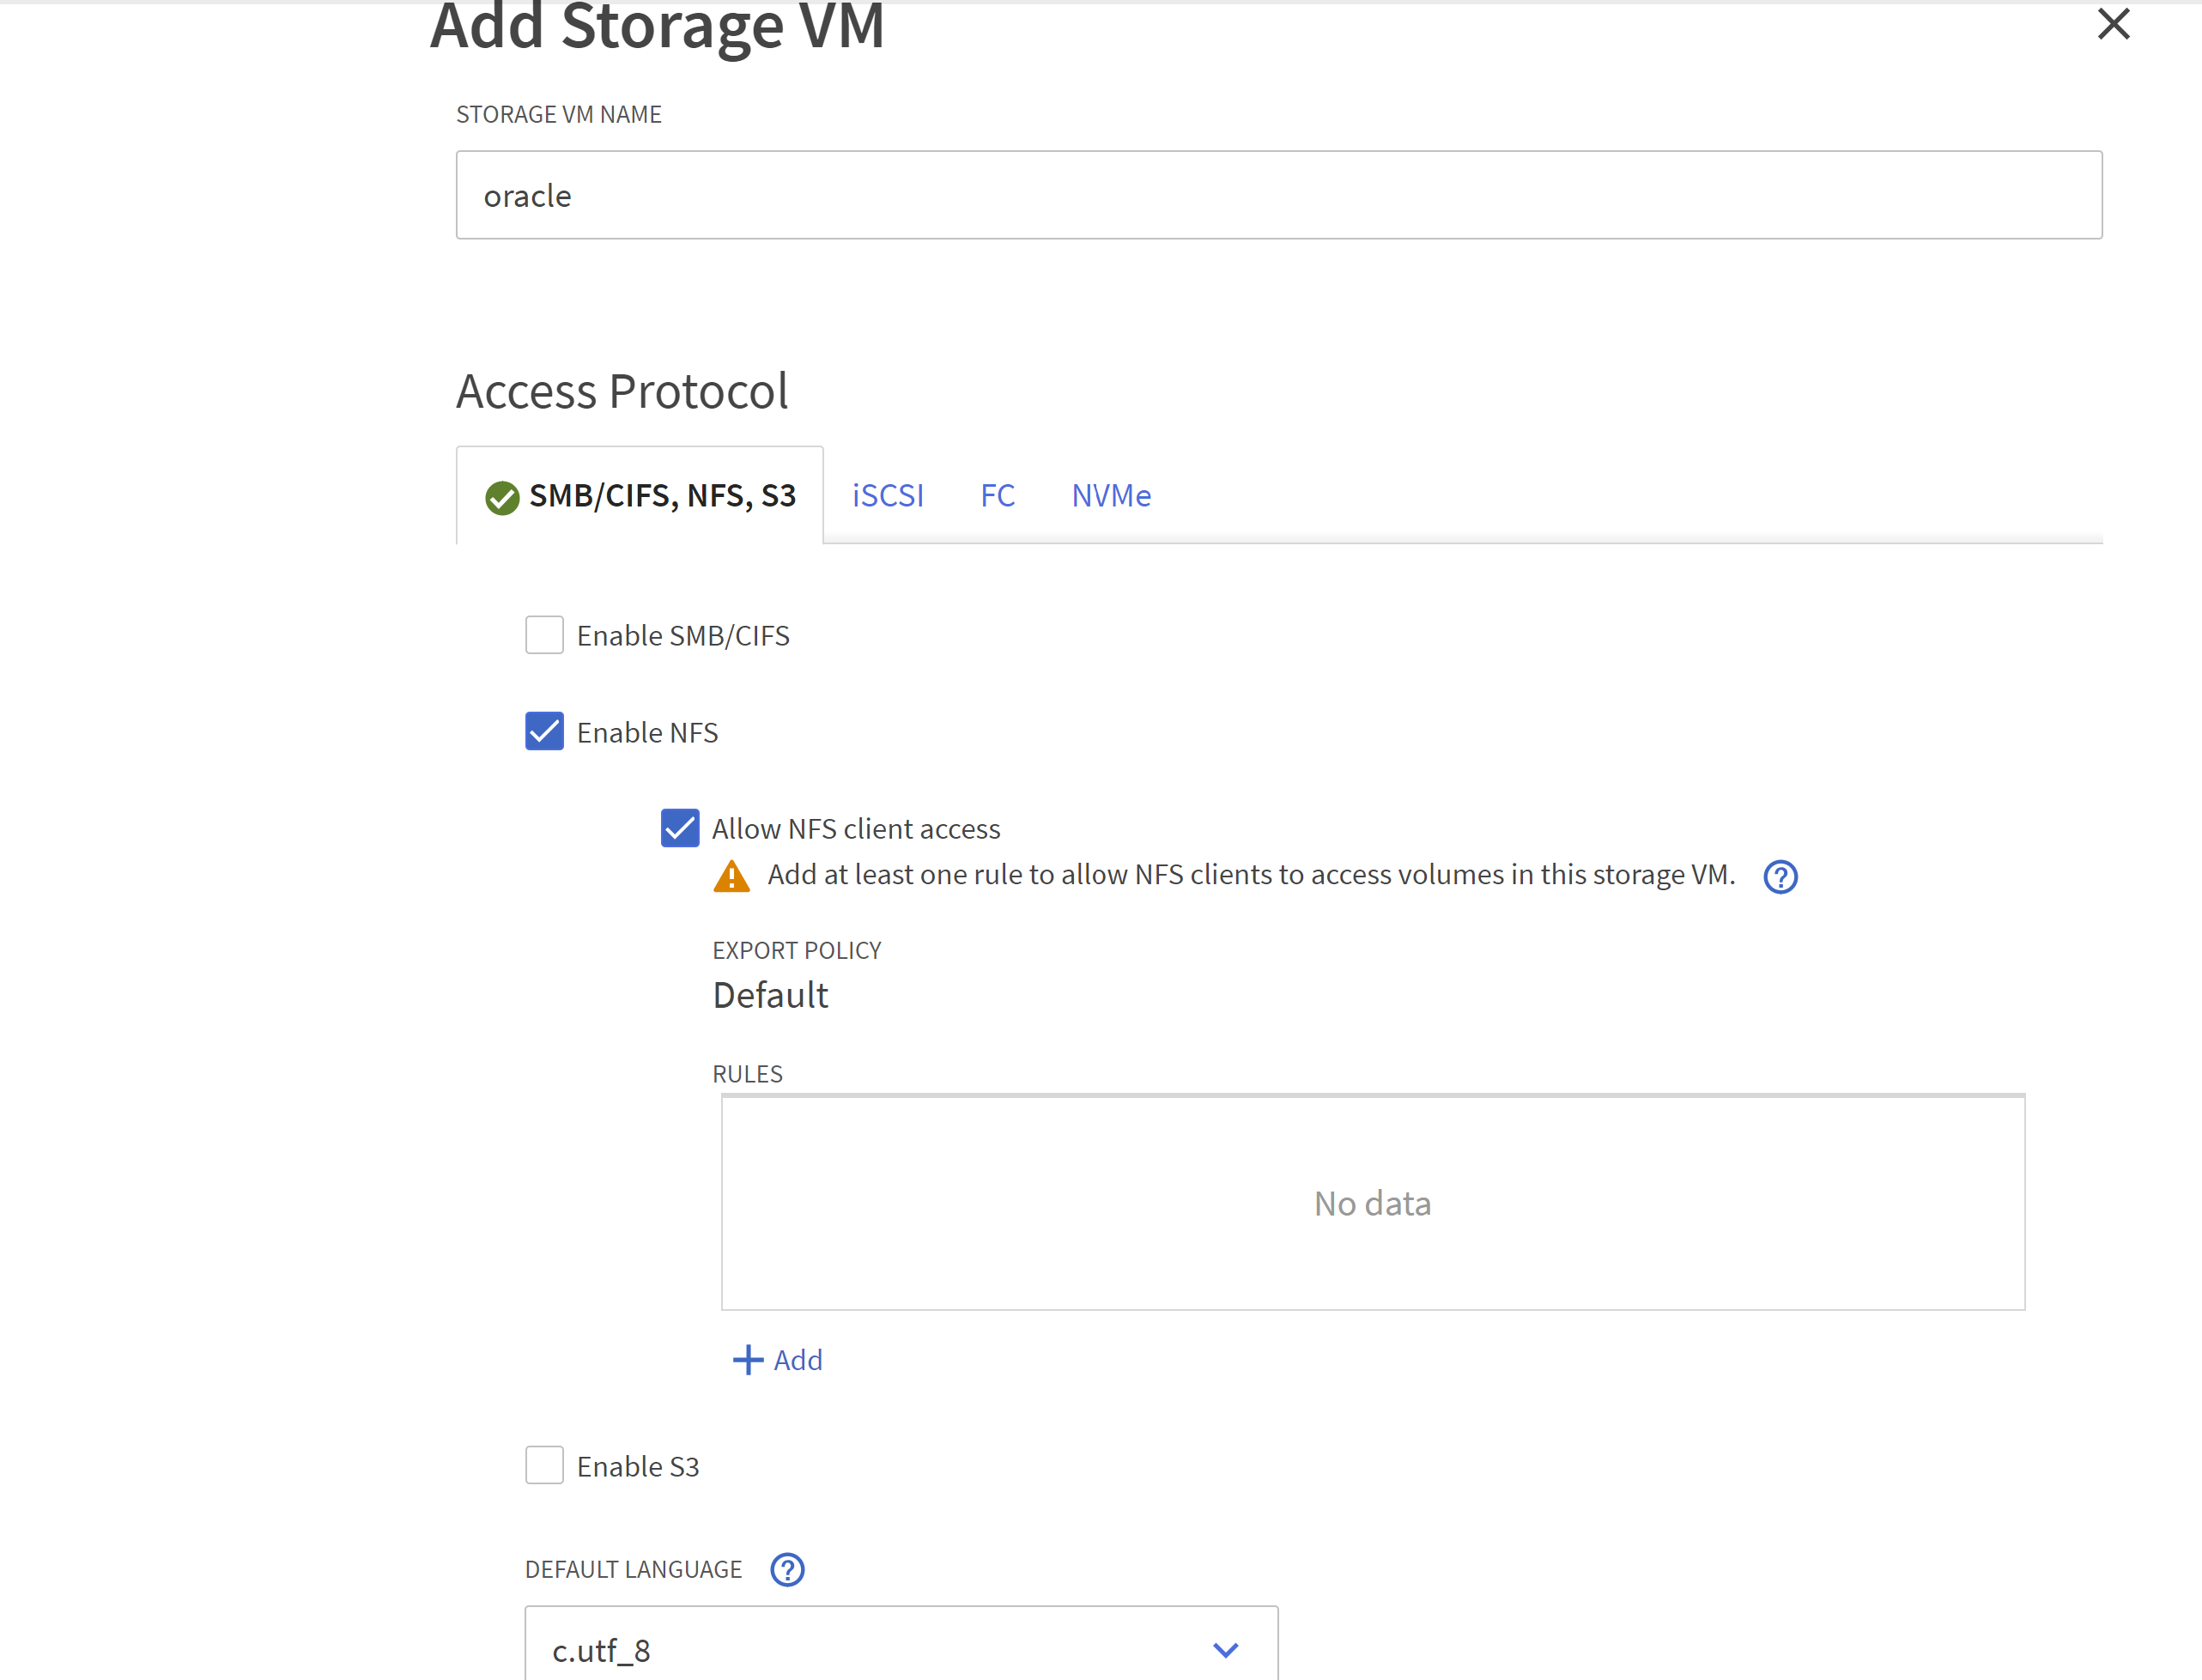
-
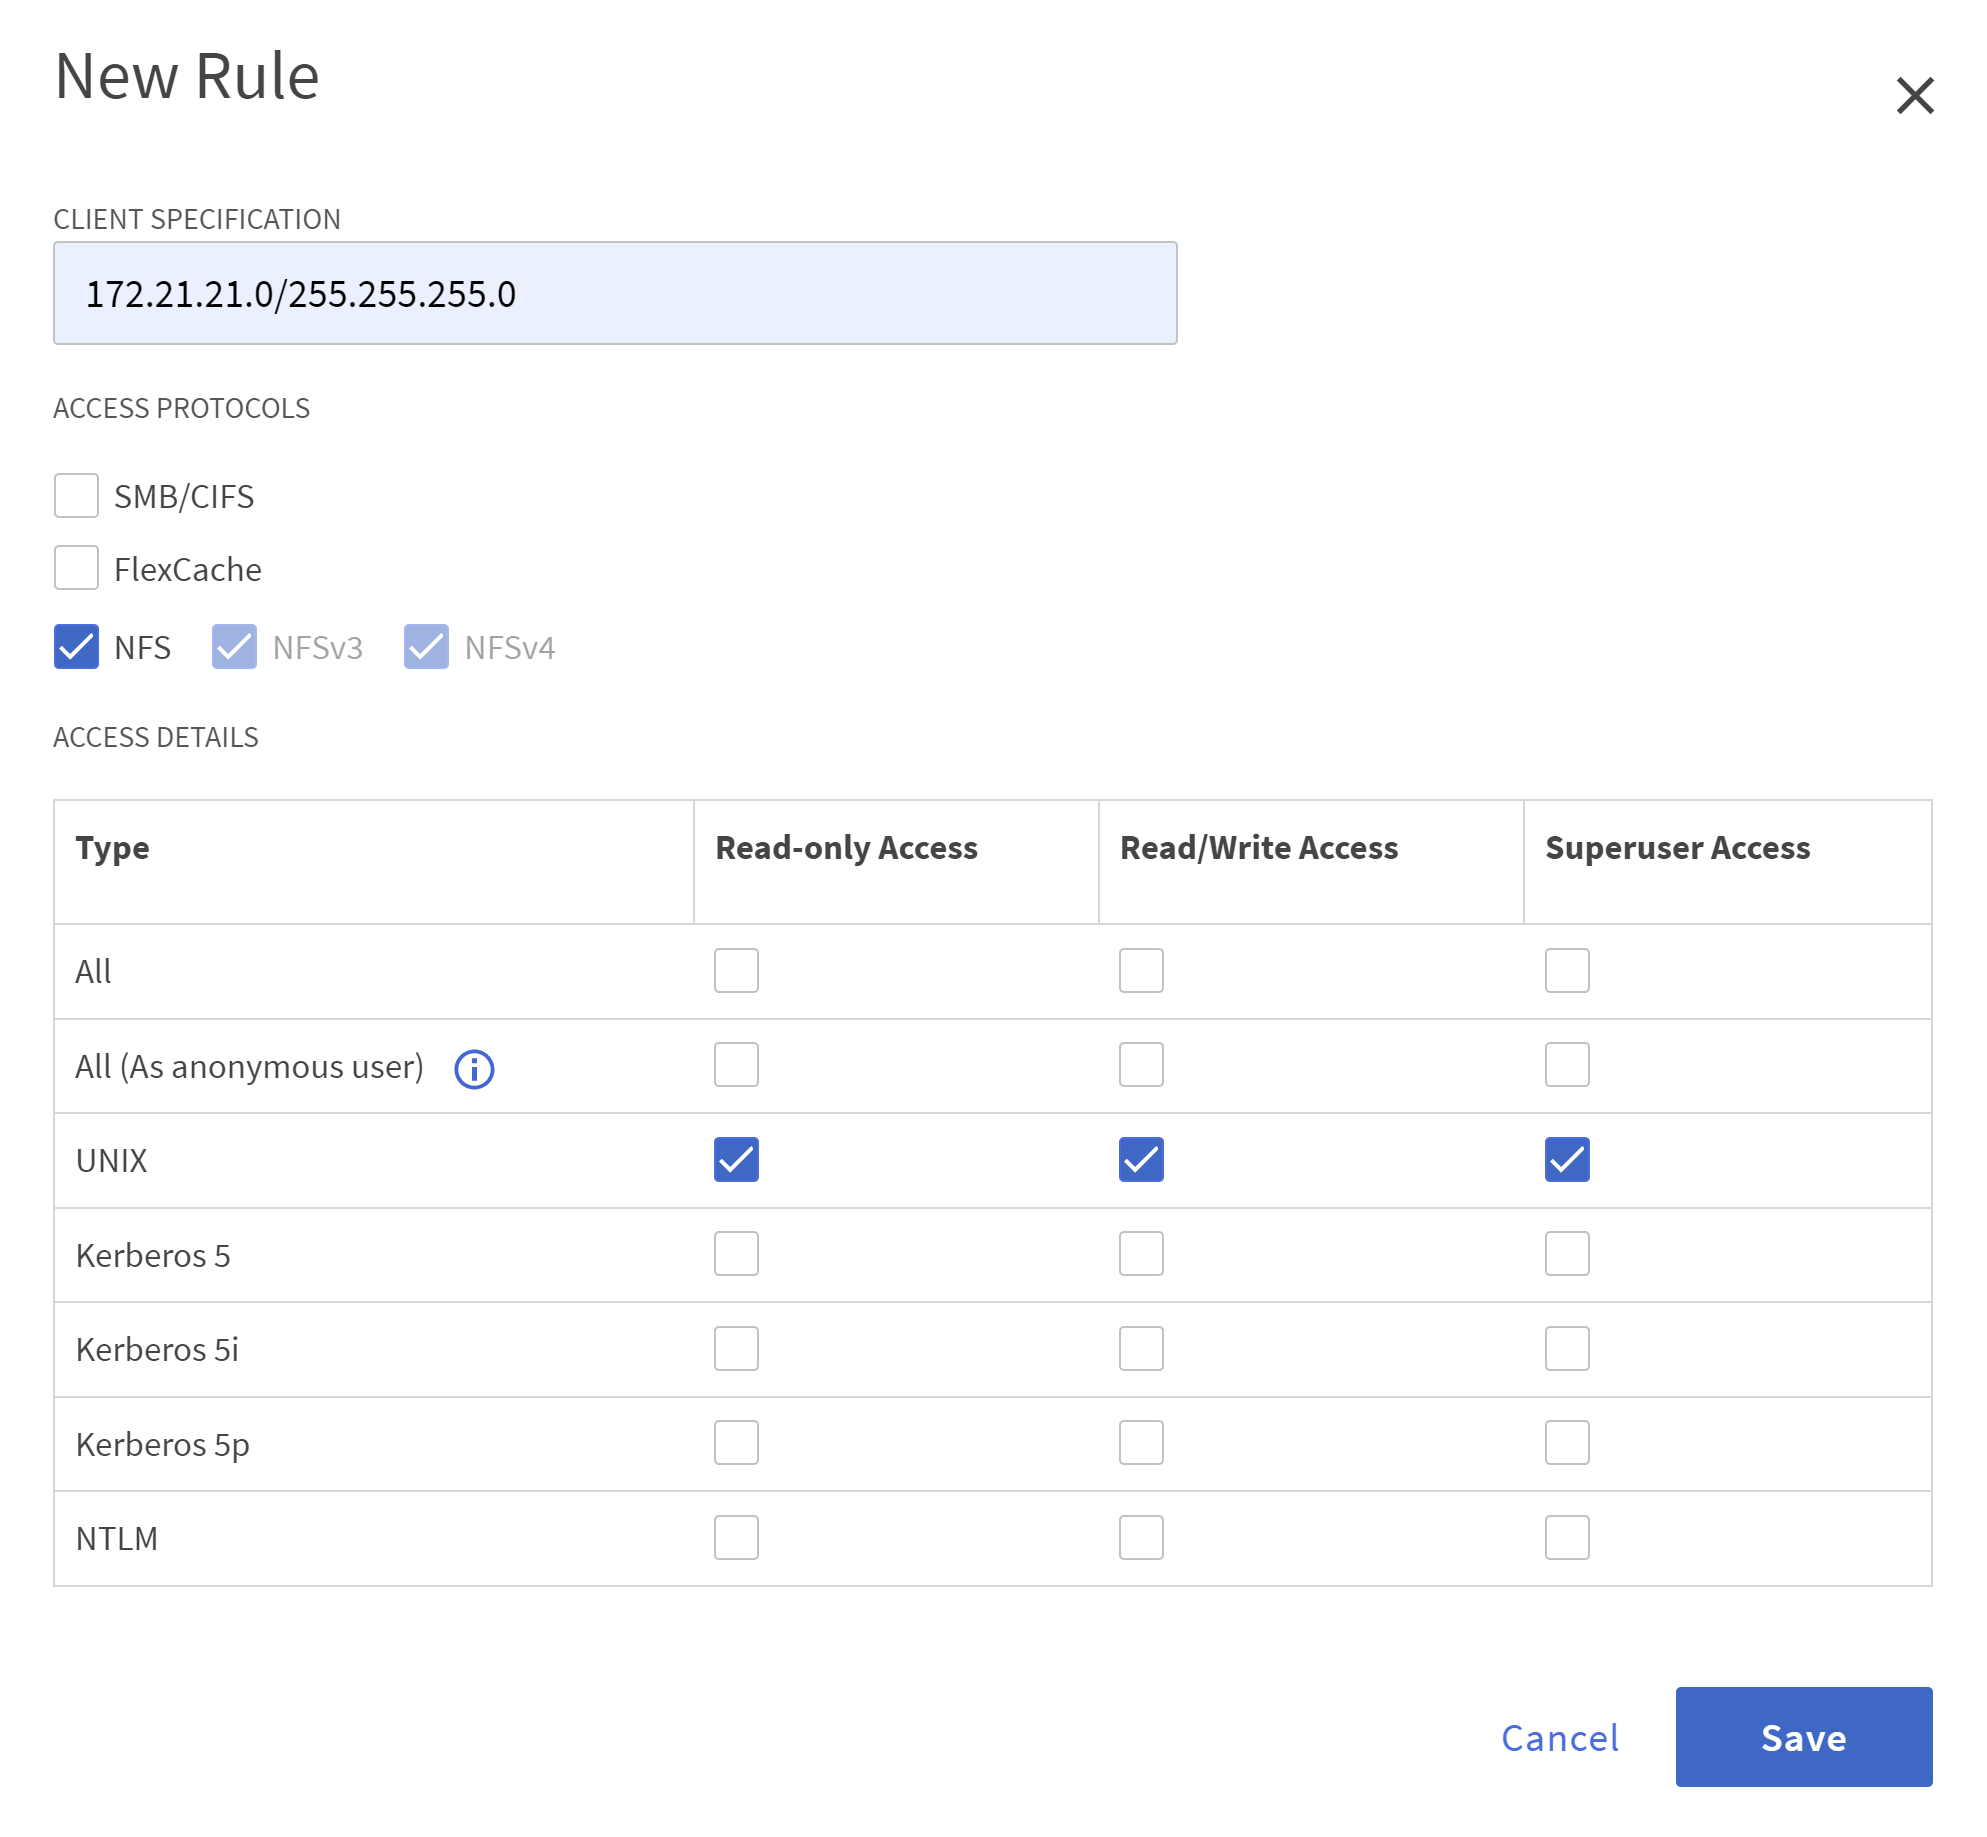
新增 NFS 導出策略 `Default`規則。
-
在
NETWORK INTERFACE,填入每個節點上用於 NFS lif 位址的 IP 位址。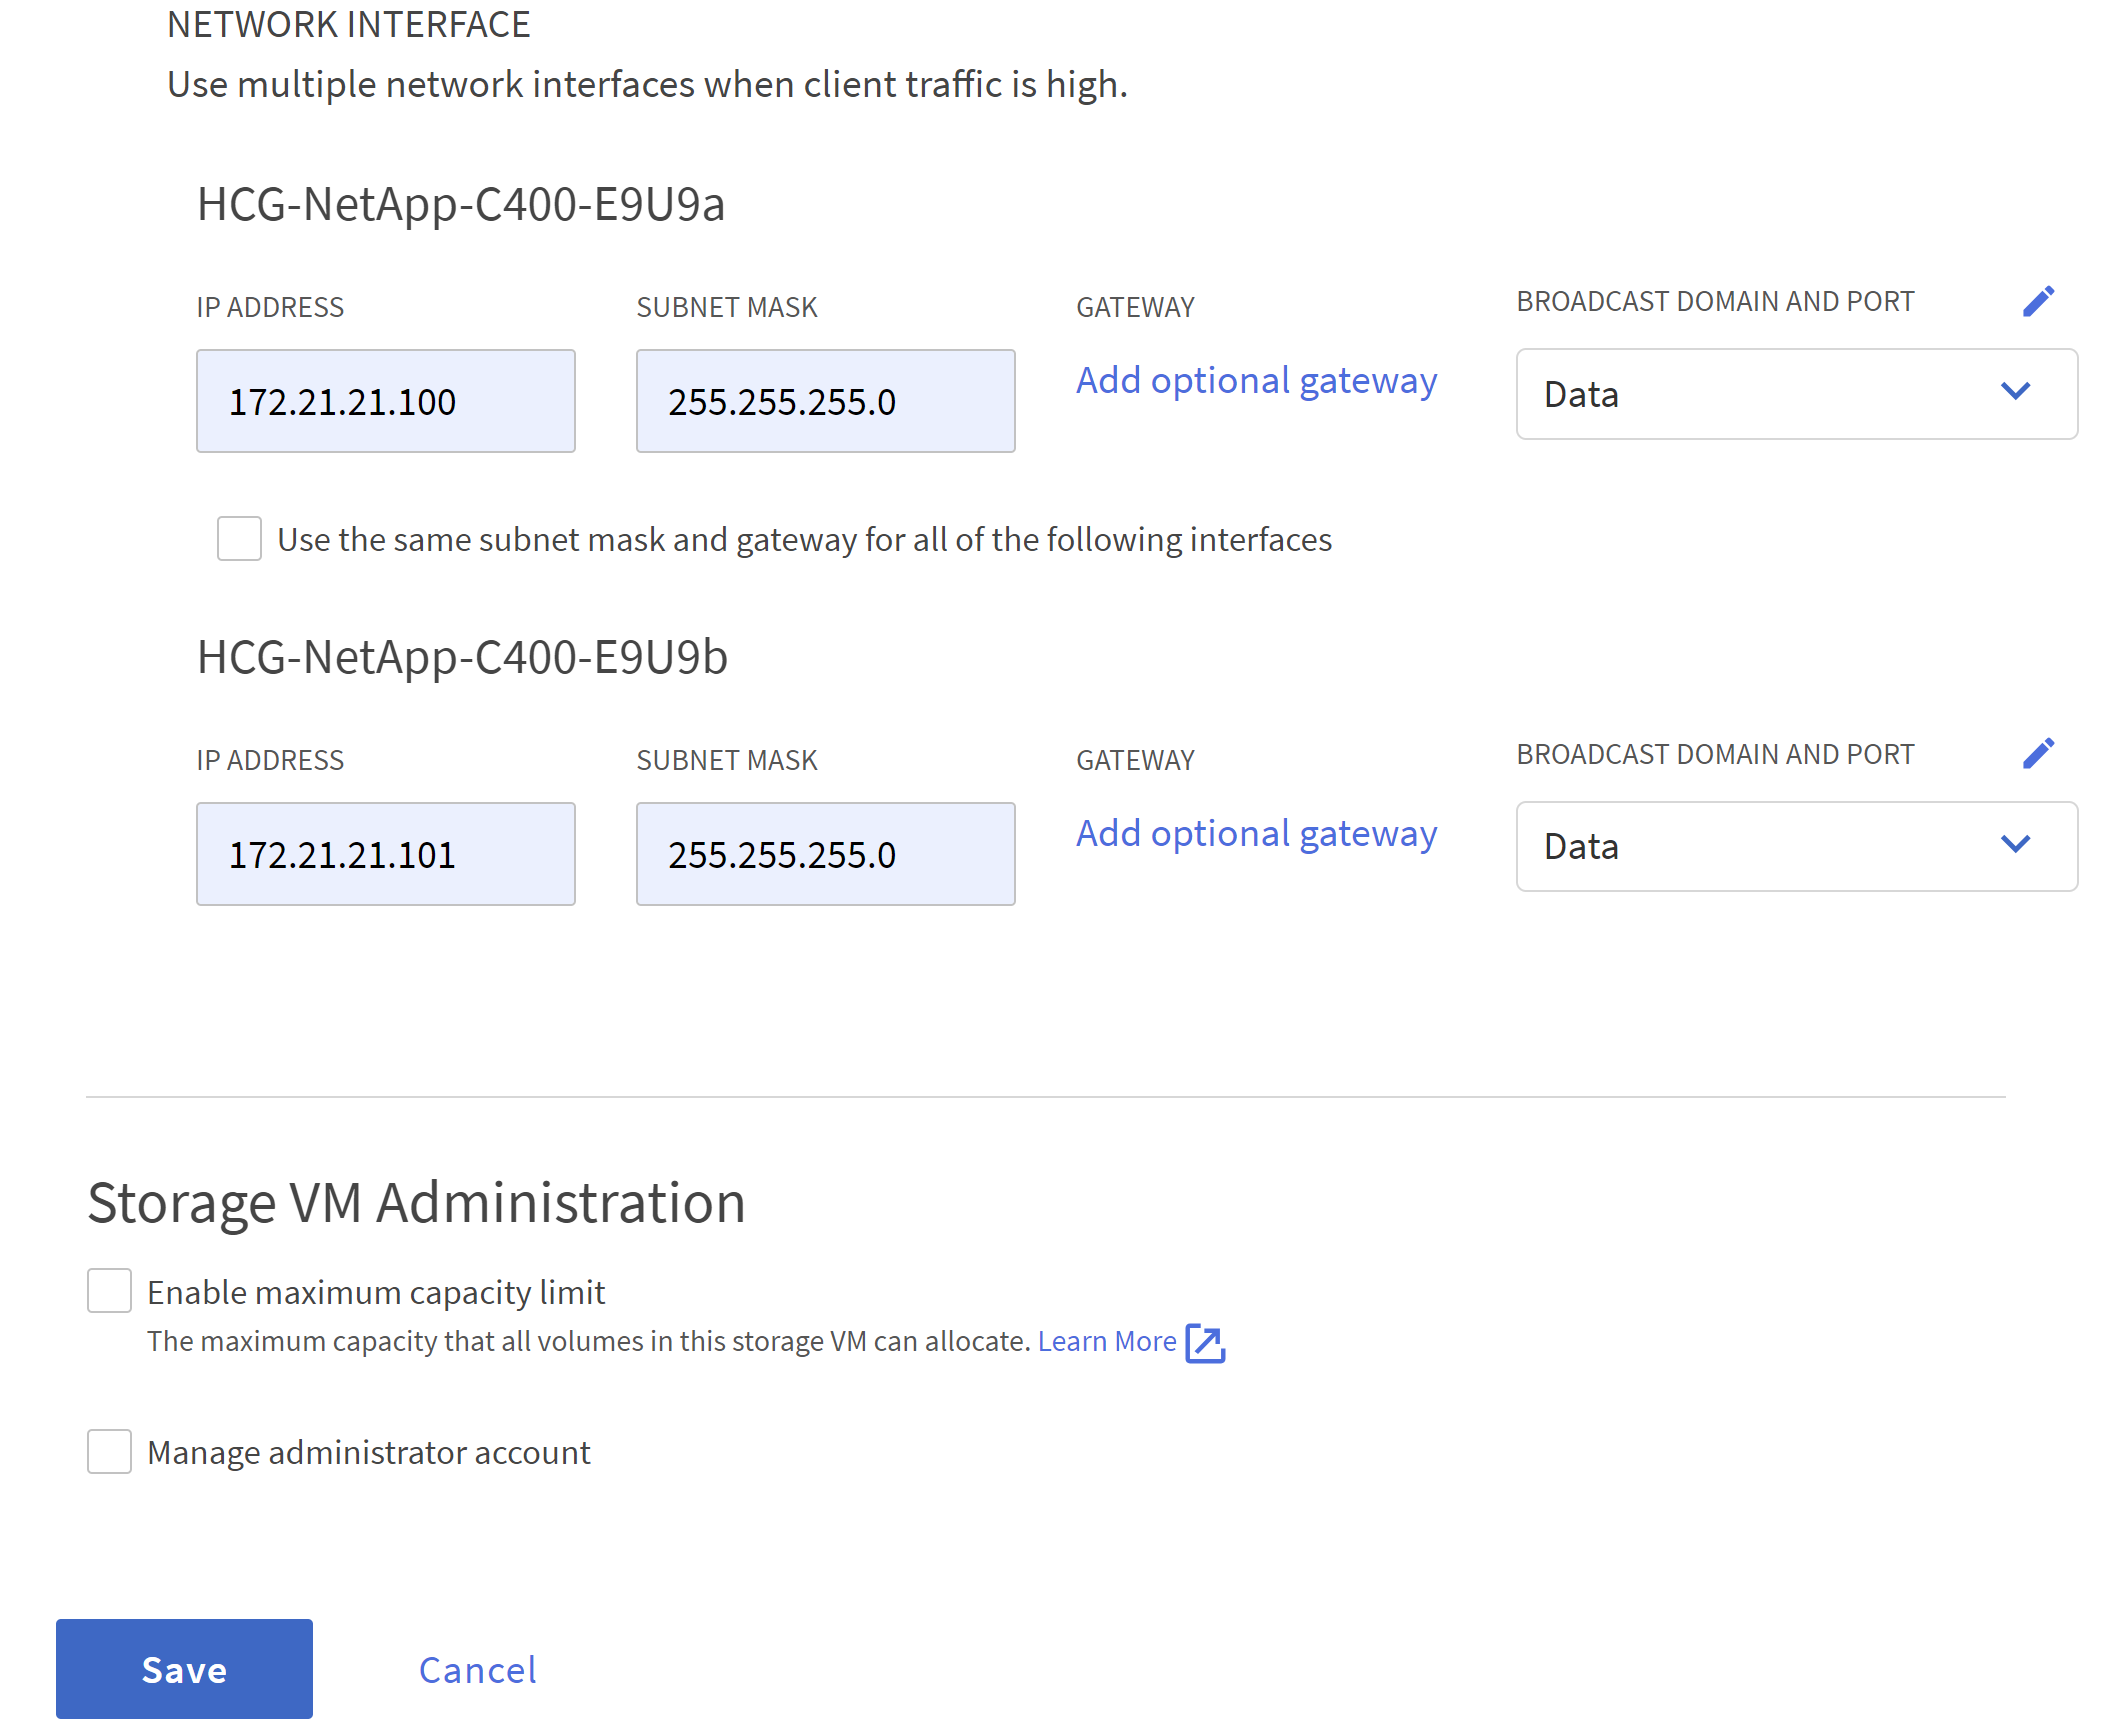
-
驗證 Oracle 的 SVM 是否啟動/正在運作以及 NFS lifs 狀態是否處於活動狀態。
-
從 `STORAGE-Volumes`選項卡為 Oracle 資料庫新增 NFS 磁碟區。
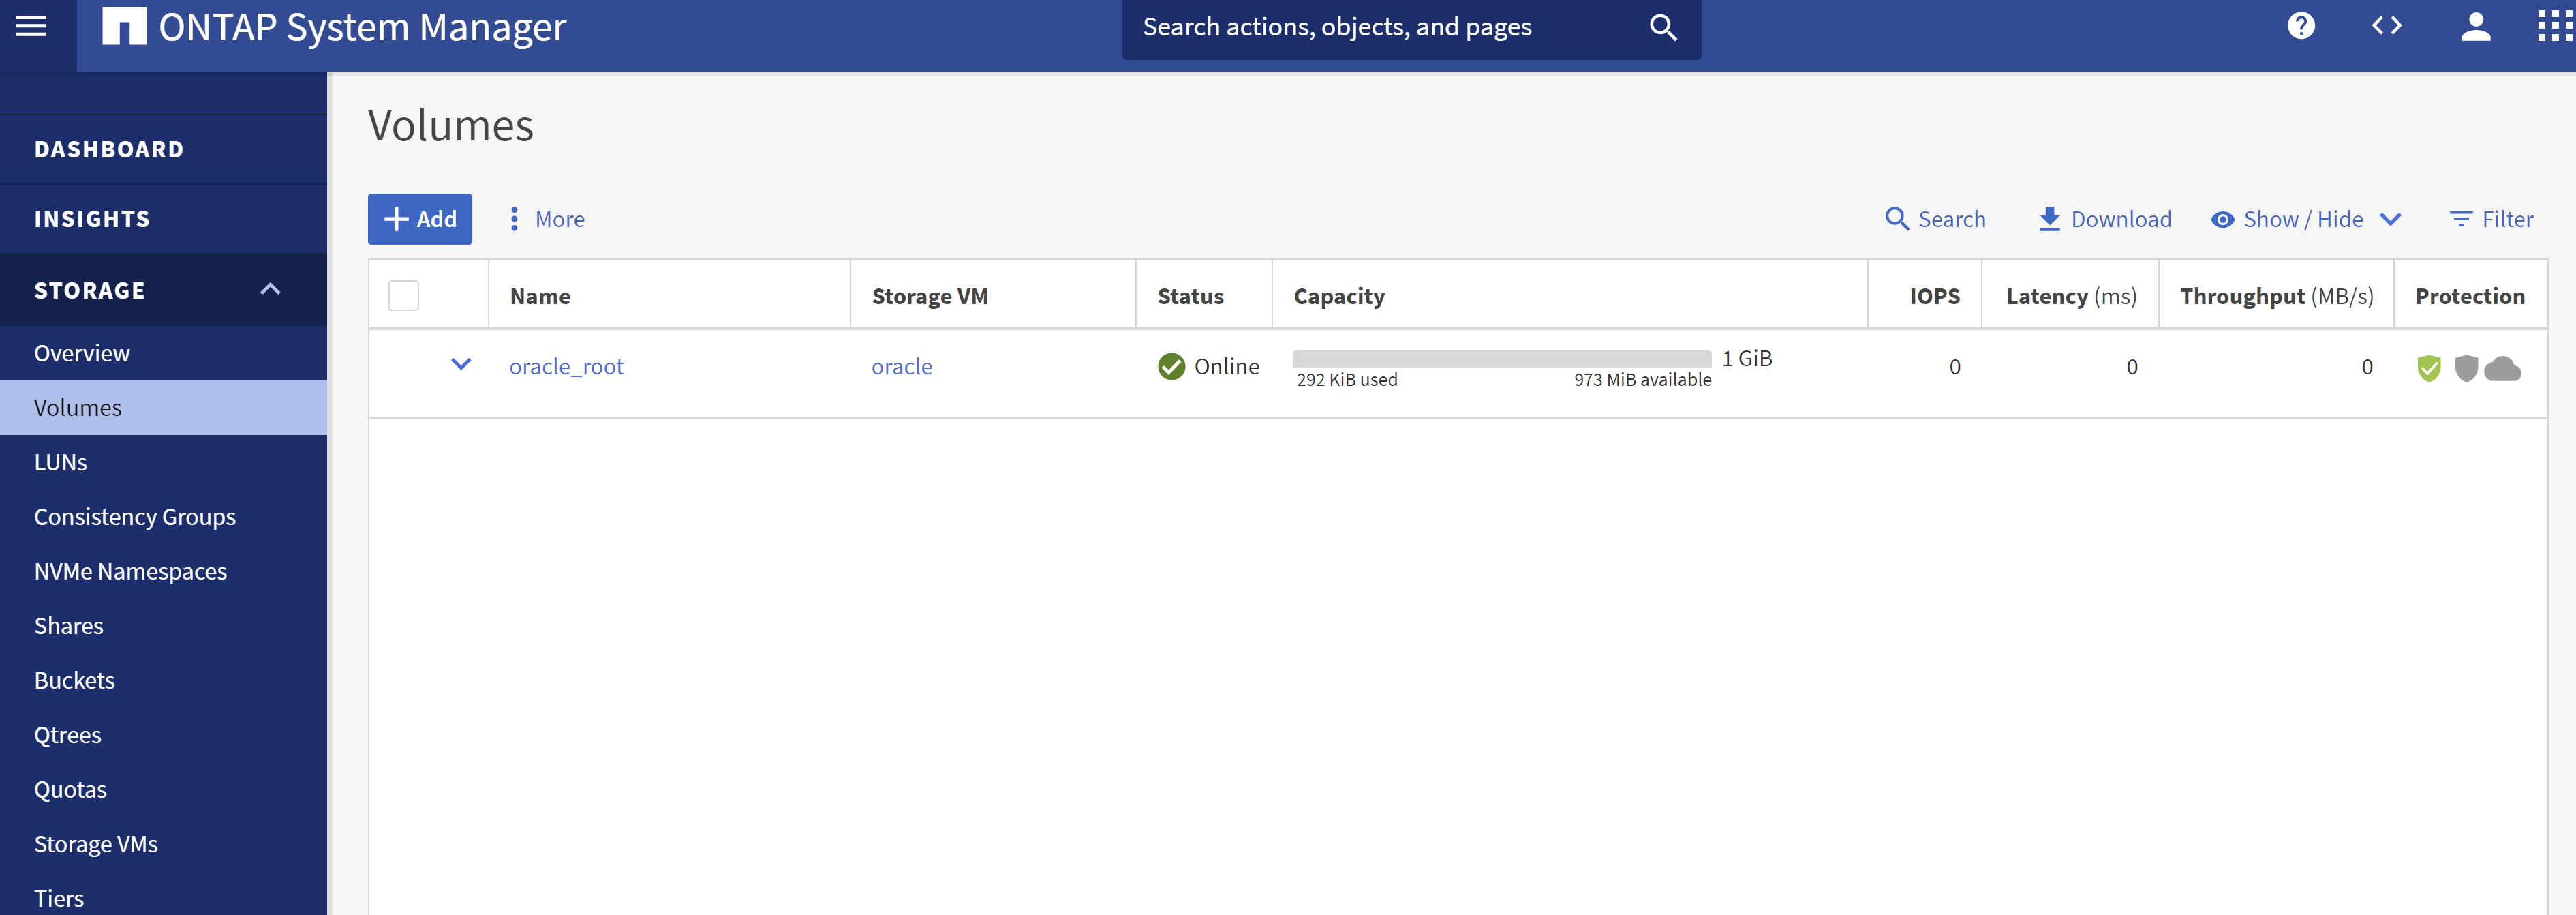
-
命名您的捲,分配容量和效能等級。
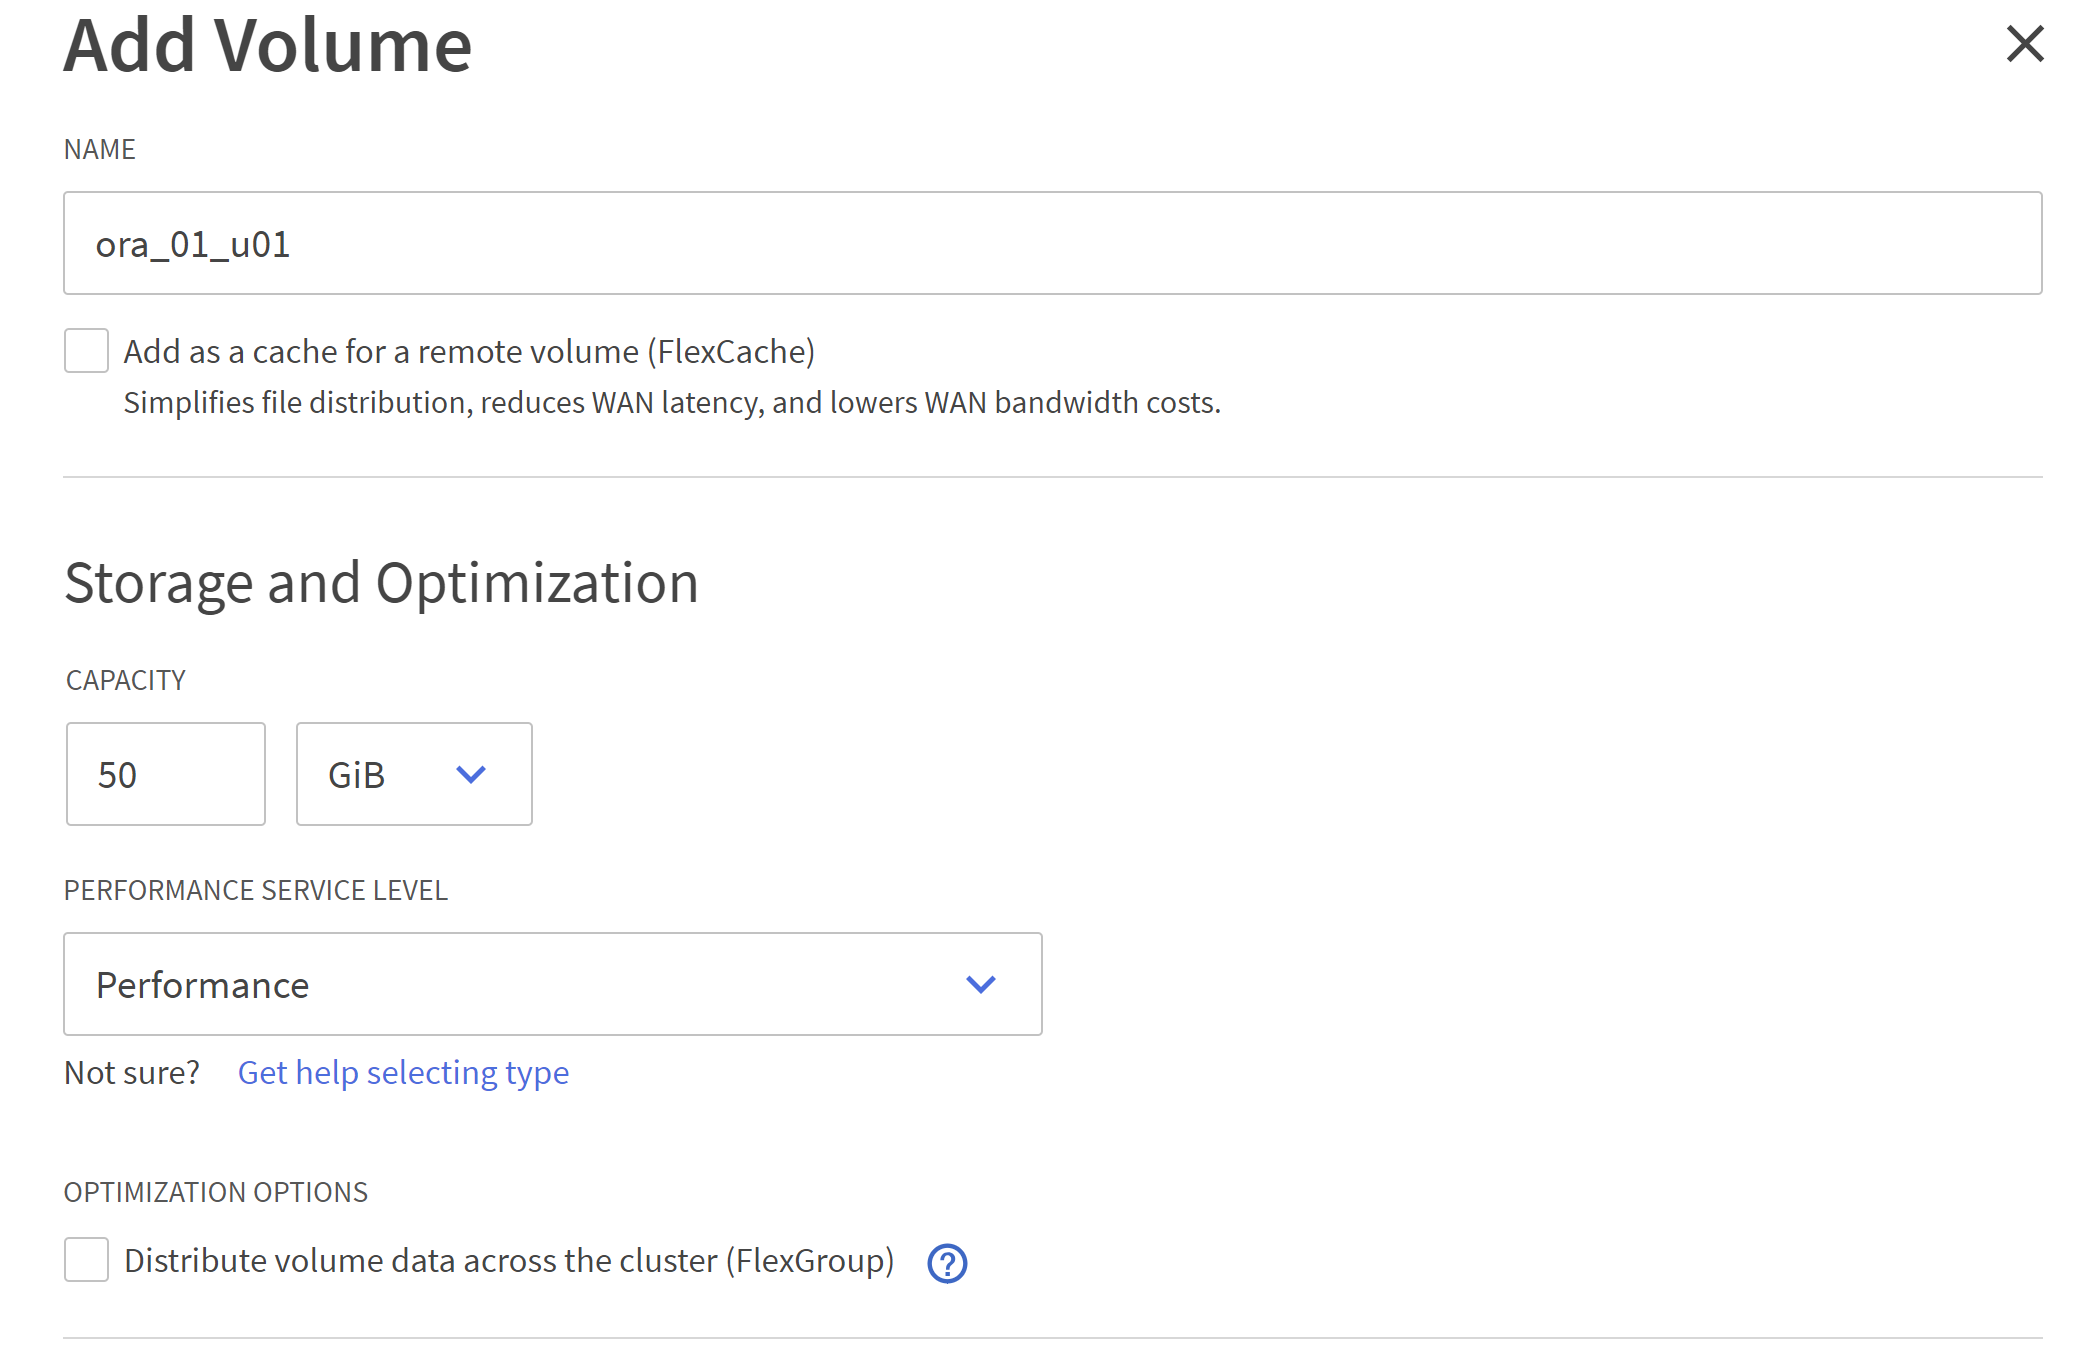
-
在
Access Permission,選擇上一步驟建立的預設策略。取消選取 `Enable Snapshot Copies`因為我們更喜歡使用SnapCenter來創建應用程式一致的快照。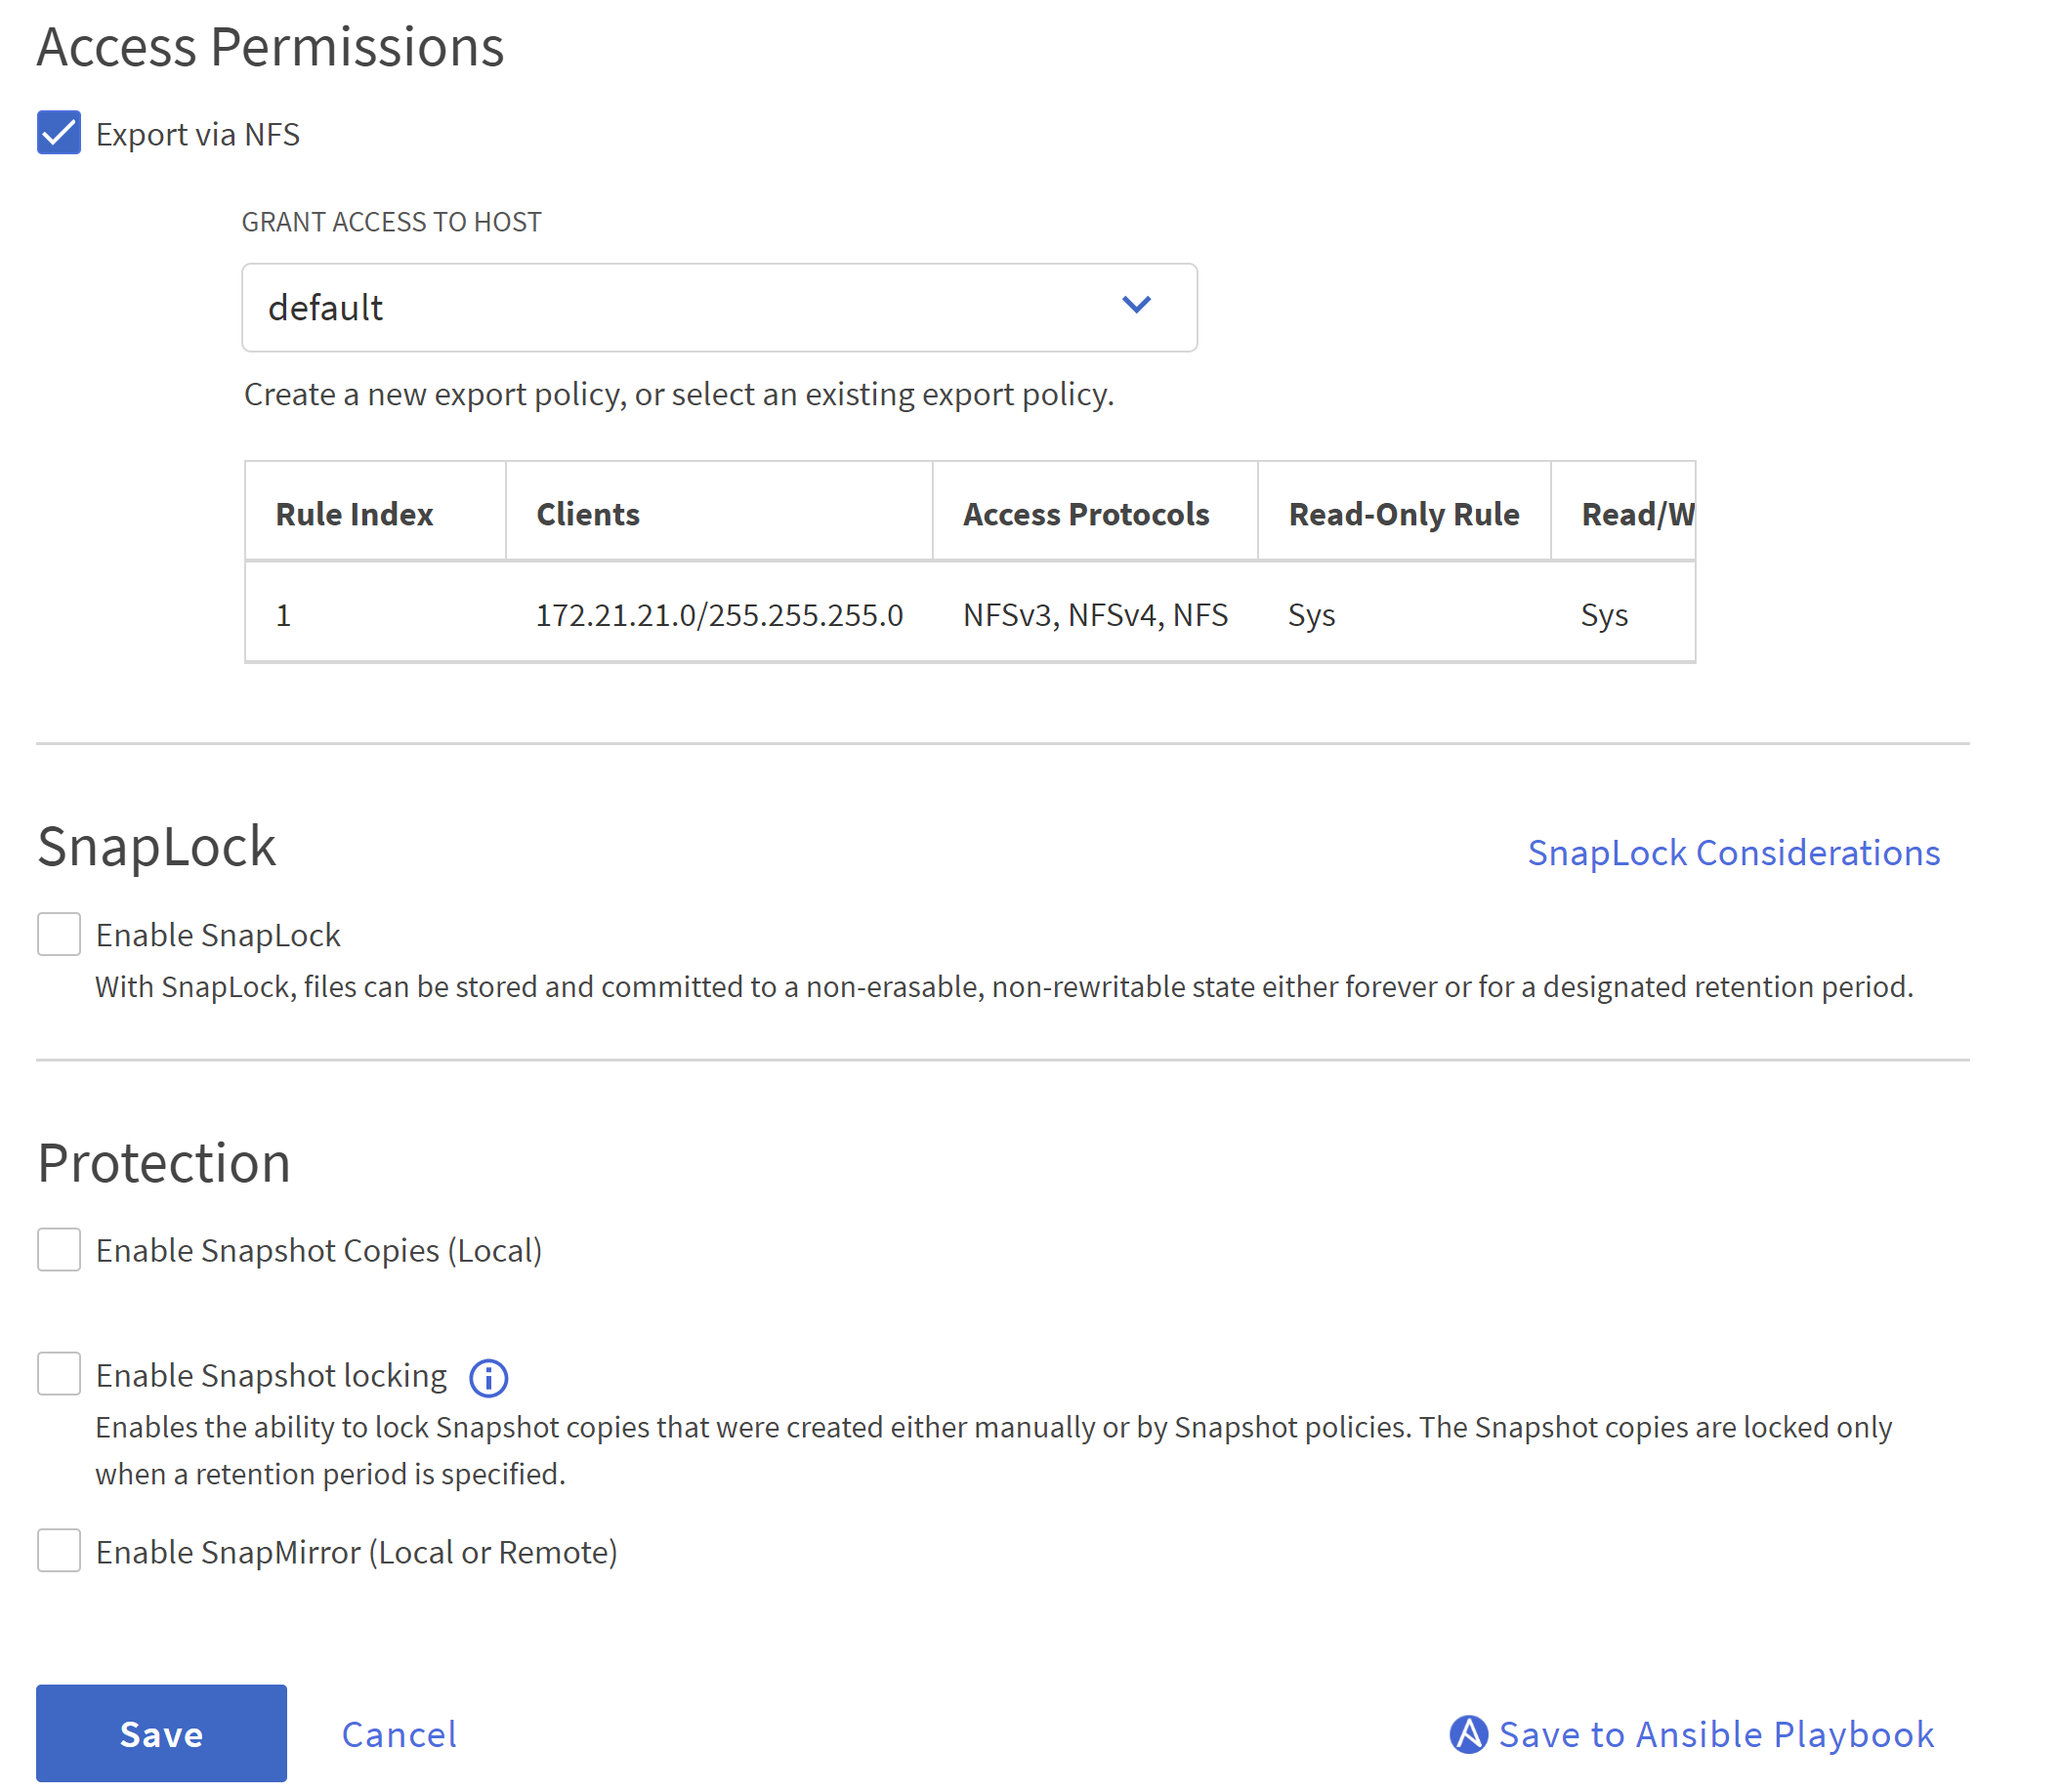
-
為每個 DB 伺服器建立三個 DB 磁碟區:server_name_u01 - 二進位、server_name_u02 - 資料、server_name_u03 - 日誌。
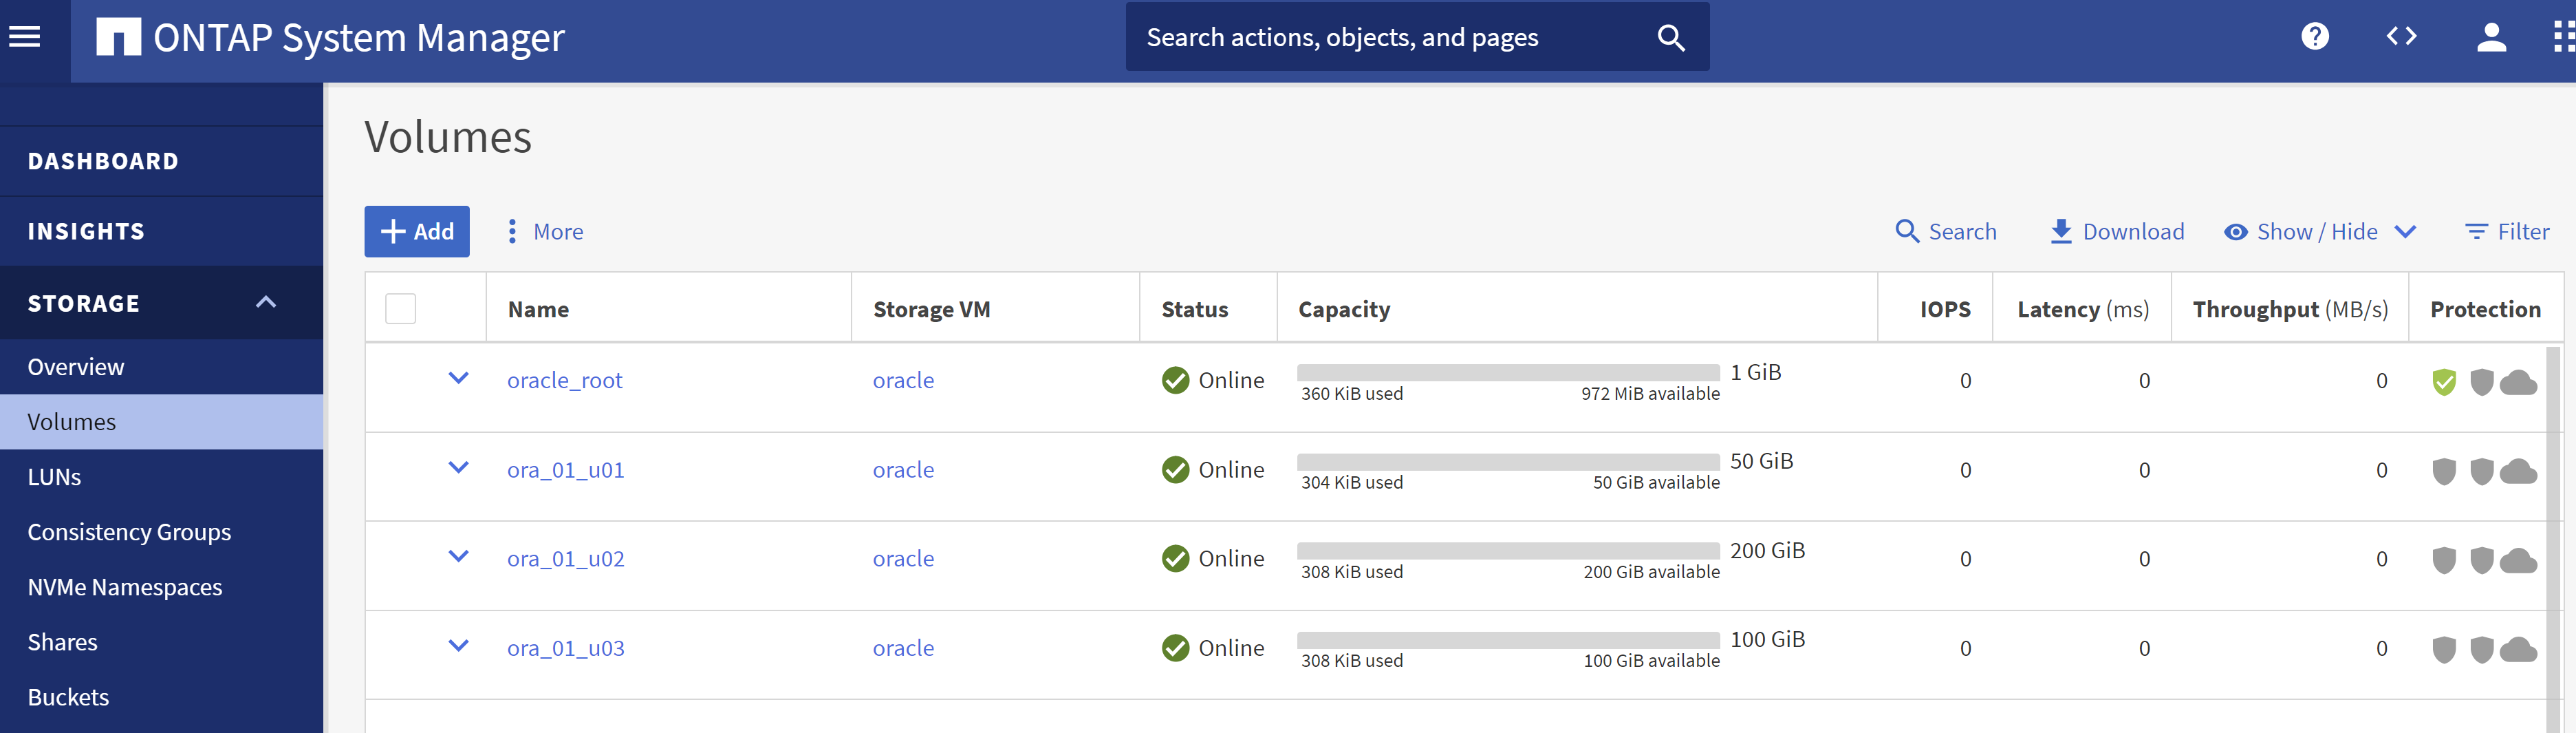

DB 磁碟區命名約定應嚴格遵循上述格式,以確保自動化正常運作。
這樣就完成了 Oracle 的 C 系列控制器配置。
自動化參數文件
Details
Ansible playbook 使用預先定義參數執行資料庫安裝和設定任務。對於此 Oracle 自動化解決方案,有三個使用者定義的參數檔案需要在劇本執行之前使用者輸入。
-
主機 - 定義自動化劇本運作的目標。
-
vars/vars.yml - 定義適用於所有目標的變數的全域變數檔案。
-
host_vars/host_name.yml - 定義僅適用於命名目標的變數的本機變數檔案。在我們的用例中,這些是 Oracle DB 伺服器。
除了這些使用者定義的變數文件之外,還有幾個預設變數文件,其中包含預設參數,除非必要,否則不需要更改。以下部分介紹如何設定使用者定義的變數檔。
參數檔案配置
Details
-
Ansible 目標 `hosts`文件配置:
# Enter Oracle servers names to be deployed one by one, follow by each Oracle server public IP address, and ssh private key of admin user for the server. [oracle] ora_01 ansible_host=10.61.180.21 ansible_ssh_private_key_file=ora_01.pem ora_02 ansible_host=10.61.180.23 ansible_ssh_private_key_file=ora_02.pem -
全球的 `vars/vars.yml`文件配置
###################################################################### ###### Oracle 19c deployment user configuration variables ###### ###### Consolidate all variables from ONTAP, linux and oracle ###### ###################################################################### ########################################### ### ONTAP env specific config variables ### ########################################### # Prerequisite to create three volumes in NetApp ONTAP storage from System Manager or cloud dashboard with following naming convention: # db_hostname_u01 - Oracle binary # db_hostname_u02 - Oracle data # db_hostname_u03 - Oracle redo # It is important to strictly follow the name convention or the automation will fail. ########################################### ### Linux env specific config variables ### ########################################### redhat_sub_username: XXXXXXXX redhat_sub_password: XXXXXXXX #################################################### ### DB env specific install and config variables ### #################################################### # Database domain name db_domain: solutions.netapp.com # Set initial password for all required Oracle passwords. Change them after installation. initial_pwd_all: XXXXXXXX -
本地資料庫伺服器 `host_vars/host_name.yml`配置如ora_01.yml,ora_02.yml…
# User configurable Oracle host specific parameters

# Enter container database SID. By default, a container DB is created with 3 PDBs within the CDB
oracle_sid: NTAP1

# Enter database shared memory size or SGA. CDB is created with SGA at 75% of memory_limit, MB. The grand total of SGA should not exceed 75% available RAM on node.
memory_limit: 8192

# Local NFS lif ip address to access database volumes
nfs_lif: 172.30.136.68
劇本執行
Details
自動化工具包中共有五個劇本。每個執行不同的任務區塊並服務於不同的目的。
0-all_playbook.yml - execute playbooks from 1-4 in one playbook run.
1-ansible_requirements.yml - set up Ansible controller with required libs and collections.
2-linux_config.yml - execute Linux kernel configuration on Oracle DB servers.
4-oracle_config.yml - install and configure Oracle on DB servers and create a container database.
5-destroy.yml - optional to undo the environment to dismantle all.
有三個選項可以使用以下命令運行劇本。
-
在一次組合運行中執行所有部署劇本。
ansible-playbook -i hosts 0-all_playbook.yml -u admin -e @vars/vars.yml -
依照 1-4 的數字序列逐一執行劇本。
ansible-playbook -i hosts 1-ansible_requirements.yml -u admin -e @vars/vars.ymlansible-playbook -i hosts 2-linux_config.yml -u admin -e @vars/vars.ymlansible-playbook -i hosts 4-oracle_config.yml -u admin -e @vars/vars.yml -
使用標籤執行 0-all_playbook.yml。
ansible-playbook -i hosts 0-all_playbook.yml -u admin -e @vars/vars.yml -t ansible_requirementsansible-playbook -i hosts 0-all_playbook.yml -u admin -e @vars/vars.yml -t linux_configansible-playbook -i hosts 0-all_playbook.yml -u admin -e @vars/vars.yml -t oracle_config -
撤銷環境
ansible-playbook -i hosts 5-destroy.yml -u admin -e @vars/vars.yml
執行後驗證
Details
劇本運行後,登入 Oracle DB 伺服器 VM 以驗證 Oracle 是否已安裝和配置,以及是否已成功建立容器資料庫。以下是 DB VM ora_01 或 ora_02 上的 Oracle 資料庫驗證的範例。
-
驗證 NFS 掛載
[admin@ora_01 ~]$ cat /etc/fstab

#
# /etc/fstab
# Created by anaconda on Wed Oct 18 19:43:31 2023
#
# Accessible filesystems, by reference, are maintained under '/dev/disk/'.
# See man pages fstab(5), findfs(8), mount(8) and/or blkid(8) for more info.
#
# After editing this file, run 'systemctl daemon-reload' to update systemd
# units generated from this file.
#
/dev/mapper/rhel-root   /                       xfs     defaults        0 0
UUID=aff942c4-b224-4b62-807d-6a5c22f7b623 /boot                   xfs     defaults        0 0
/dev/mapper/rhel-swap   none                    swap    defaults        0 0
/root/swapfile swap swap defaults 0 0
172.21.21.100:/ora_01_u01 /u01 nfs rw,bg,hard,vers=3,proto=tcp,timeo=600,rsize=65536,wsize=65536 0 0
172.21.21.100:/ora_01_u02 /u02 nfs rw,bg,hard,vers=3,proto=tcp,timeo=600,rsize=65536,wsize=65536 0 0
172.21.21.100:/ora_01_u03 /u03 nfs rw,bg,hard,vers=3,proto=tcp,timeo=600,rsize=65536,wsize=65536 0 0


[admin@ora_01 tmp]$ df -h
Filesystem                 Size  Used Avail Use% Mounted on
devtmpfs                   7.7G     0  7.7G   0% /dev
tmpfs                      7.8G     0  7.8G   0% /dev/shm
tmpfs                      7.8G   18M  7.8G   1% /run
tmpfs                      7.8G     0  7.8G   0% /sys/fs/cgroup
/dev/mapper/rhel-root       44G   28G   17G  62% /
/dev/sda1                 1014M  258M  757M  26% /boot
tmpfs                      1.6G   12K  1.6G   1% /run/user/42
tmpfs                      1.6G  4.0K  1.6G   1% /run/user/1000
172.21.21.100:/ora_01_u01   50G  8.7G   42G  18% /u01
172.21.21.100:/ora_01_u02  200G  384K  200G   1% /u02
172.21.21.100:/ora_01_u03  100G  320K  100G   1% /u03

[admin@ora_02 ~]$ df -h
Filesystem                 Size  Used Avail Use% Mounted on
devtmpfs                   7.7G     0  7.7G   0% /dev
tmpfs                      7.8G     0  7.8G   0% /dev/shm
tmpfs                      7.8G   18M  7.8G   1% /run
tmpfs                      7.8G     0  7.8G   0% /sys/fs/cgroup
/dev/mapper/rhel-root       44G   28G   17G  63% /
/dev/sda1                 1014M  258M  757M  26% /boot
tmpfs                      1.6G   12K  1.6G   1% /run/user/42
tmpfs                      1.6G  4.0K  1.6G   1% /run/user/1000
172.21.21.101:/ora_02_u01   50G  7.8G   43G  16% /u01
172.21.21.101:/ora_02_u02  200G  320K  200G   1% /u02
172.21.21.101:/ora_02_u03  100G  320K  100G   1% /u03
-
驗證 Oracle 偵聽器
[admin@ora_02 ~]$ sudo su
[root@ora_02 admin]# su - oracle
[oracle@ora_02 ~]$ lsnrctl status listener.ntap2

LSNRCTL for Linux: Version 19.0.0.0.0 - Production on 29-MAY-2024 12:13:30

Copyright (c) 1991, 2022, Oracle.  All rights reserved.

Connecting to (DESCRIPTION=(ADDRESS=(PROTOCOL=TCP)(HOST=ora_02.cie.netapp.com)(PORT=1521)))
STATUS of the LISTENER
------------------------
Alias                     LISTENER.NTAP2
Version                   TNSLSNR for Linux: Version 19.0.0.0.0 - Production
Start Date                23-MAY-2024 16:13:03
Uptime                    5 days 20 hr. 0 min. 26 sec
Trace Level               off
Security                  ON: Local OS Authentication
SNMP                      OFF
Listener Parameter File   /u01/app/oracle/product/19.0.0/NTAP2/network/admin/listener.ora
Listener Log File         /u01/app/oracle/diag/tnslsnr/ora_02/listener.ntap2/alert/log.xml
Listening Endpoints Summary...
  (DESCRIPTION=(ADDRESS=(PROTOCOL=tcp)(HOST=ora_02.cie.netapp.com)(PORT=1521)))
  (DESCRIPTION=(ADDRESS=(PROTOCOL=ipc)(KEY=EXTPROC1521)))
  (DESCRIPTION=(ADDRESS=(PROTOCOL=tcps)(HOST=ora_02.cie.netapp.com)(PORT=5500))(Security=(my_wallet_directory=/u01/app/oracle/product/19.0.0/NTAP2/admin/NTAP2/xdb_wallet))(Presentation=HTTP)(Session=RAW))
Services Summary...
Service "192551f1d7e65fc3e06308b43d0a63ae.solutions.netapp.com" has 1 instance(s).
  Instance "NTAP2", status READY, has 1 handler(s) for this service...
Service "1925529a43396002e06308b43d0a2d5a.solutions.netapp.com" has 1 instance(s).
  Instance "NTAP2", status READY, has 1 handler(s) for this service...
Service "1925530776b76049e06308b43d0a49c3.solutions.netapp.com" has 1 instance(s).
  Instance "NTAP2", status READY, has 1 handler(s) for this service...
Service "NTAP2.solutions.netapp.com" has 1 instance(s).
  Instance "NTAP2", status READY, has 1 handler(s) for this service...
Service "NTAP2XDB.solutions.netapp.com" has 1 instance(s).
  Instance "NTAP2", status READY, has 1 handler(s) for this service...
Service "ntap2_pdb1.solutions.netapp.com" has 1 instance(s).
  Instance "NTAP2", status READY, has 1 handler(s) for this service...
Service "ntap2_pdb2.solutions.netapp.com" has 1 instance(s).
  Instance "NTAP2", status READY, has 1 handler(s) for this service...
Service "ntap2_pdb3.solutions.netapp.com" has 1 instance(s).
  Instance "NTAP2", status READY, has 1 handler(s) for this service...
The command completed successfully
[oracle@ora_02 ~]$
-
驗證 Oracle 資料庫和 dNFS
[oracle@ora-01 ~]$ cat /etc/oratab # # This file is used by ORACLE utilities. It is created by root.sh # and updated by either Database Configuration Assistant while creating # a database or ASM Configuration Assistant while creating ASM instance. # A colon, ':', is used as the field terminator. A new line terminates # the entry. Lines beginning with a pound sign, '#', are comments. # # Entries are of the form: # $ORACLE_SID:$ORACLE_HOME:<N|Y>: # # The first and second fields are the system identifier and home # directory of the database respectively. The third field indicates # to the dbstart utility that the database should , "Y", or should not, # "N", be brought up at system boot time. # # Multiple entries with the same $ORACLE_SID are not allowed. # # NTAP1:/u01/app/oracle/product/19.0.0/NTAP1:Y [oracle@ora-01 ~]$ sqlplus / as sysdba SQL*Plus: Release 19.0.0.0.0 - Production on Thu Feb 1 16:37:51 2024 Version 19.18.0.0.0 Copyright (c) 1982, 2022, Oracle. All rights reserved. Connected to: Oracle Database 19c Enterprise Edition Release 19.0.0.0.0 - Production Version 19.18.0.0.0 SQL> select name, open_mode, log_mode from v$database; NAME OPEN_MODE LOG_MODE --------- -------------------- ------------ NTAP1 READ WRITE ARCHIVELOG SQL> show pdbs CON_ID CON_NAME OPEN MODE RESTRICTED ---------- ------------------------------ ---------- ---------- 2 PDB$SEED READ ONLY NO 3 NTAP1_PDB1 READ WRITE NO 4 NTAP1_PDB2 READ WRITE NO 5 NTAP1_PDB3 READ WRITE NO SQL> select name from v$datafile; NAME -------------------------------------------------------------------------------- /u02/oradata/NTAP1/system01.dbf /u02/oradata/NTAP1/sysaux01.dbf /u02/oradata/NTAP1/undotbs01.dbf /u02/oradata/NTAP1/pdbseed/system01.dbf /u02/oradata/NTAP1/pdbseed/sysaux01.dbf /u02/oradata/NTAP1/users01.dbf /u02/oradata/NTAP1/pdbseed/undotbs01.dbf /u02/oradata/NTAP1/NTAP1_pdb1/system01.dbf /u02/oradata/NTAP1/NTAP1_pdb1/sysaux01.dbf /u02/oradata/NTAP1/NTAP1_pdb1/undotbs01.dbf /u02/oradata/NTAP1/NTAP1_pdb1/users01.dbf NAME -------------------------------------------------------------------------------- /u02/oradata/NTAP1/NTAP1_pdb2/system01.dbf /u02/oradata/NTAP1/NTAP1_pdb2/sysaux01.dbf /u02/oradata/NTAP1/NTAP1_pdb2/undotbs01.dbf /u02/oradata/NTAP1/NTAP1_pdb2/users01.dbf /u02/oradata/NTAP1/NTAP1_pdb3/system01.dbf /u02/oradata/NTAP1/NTAP1_pdb3/sysaux01.dbf /u02/oradata/NTAP1/NTAP1_pdb3/undotbs01.dbf /u02/oradata/NTAP1/NTAP1_pdb3/users01.dbf 19 rows selected. SQL> select name from v$controlfile; NAME -------------------------------------------------------------------------------- /u02/oradata/NTAP1/control01.ctl /u03/orareco/NTAP1/control02.ctl SQL> select member from v$logfile; MEMBER -------------------------------------------------------------------------------- /u03/orareco/NTAP1/onlinelog/redo03.log /u03/orareco/NTAP1/onlinelog/redo02.log /u03/orareco/NTAP1/onlinelog/redo01.log SQL> select svrname, dirname from v$dnfs_servers; SVRNAME -------------------------------------------------------------------------------- DIRNAME -------------------------------------------------------------------------------- 172.21.21.100 /ora_01_u02 172.21.21.100 /ora_01_u03 172.21.21.100 /ora_01_u01 -
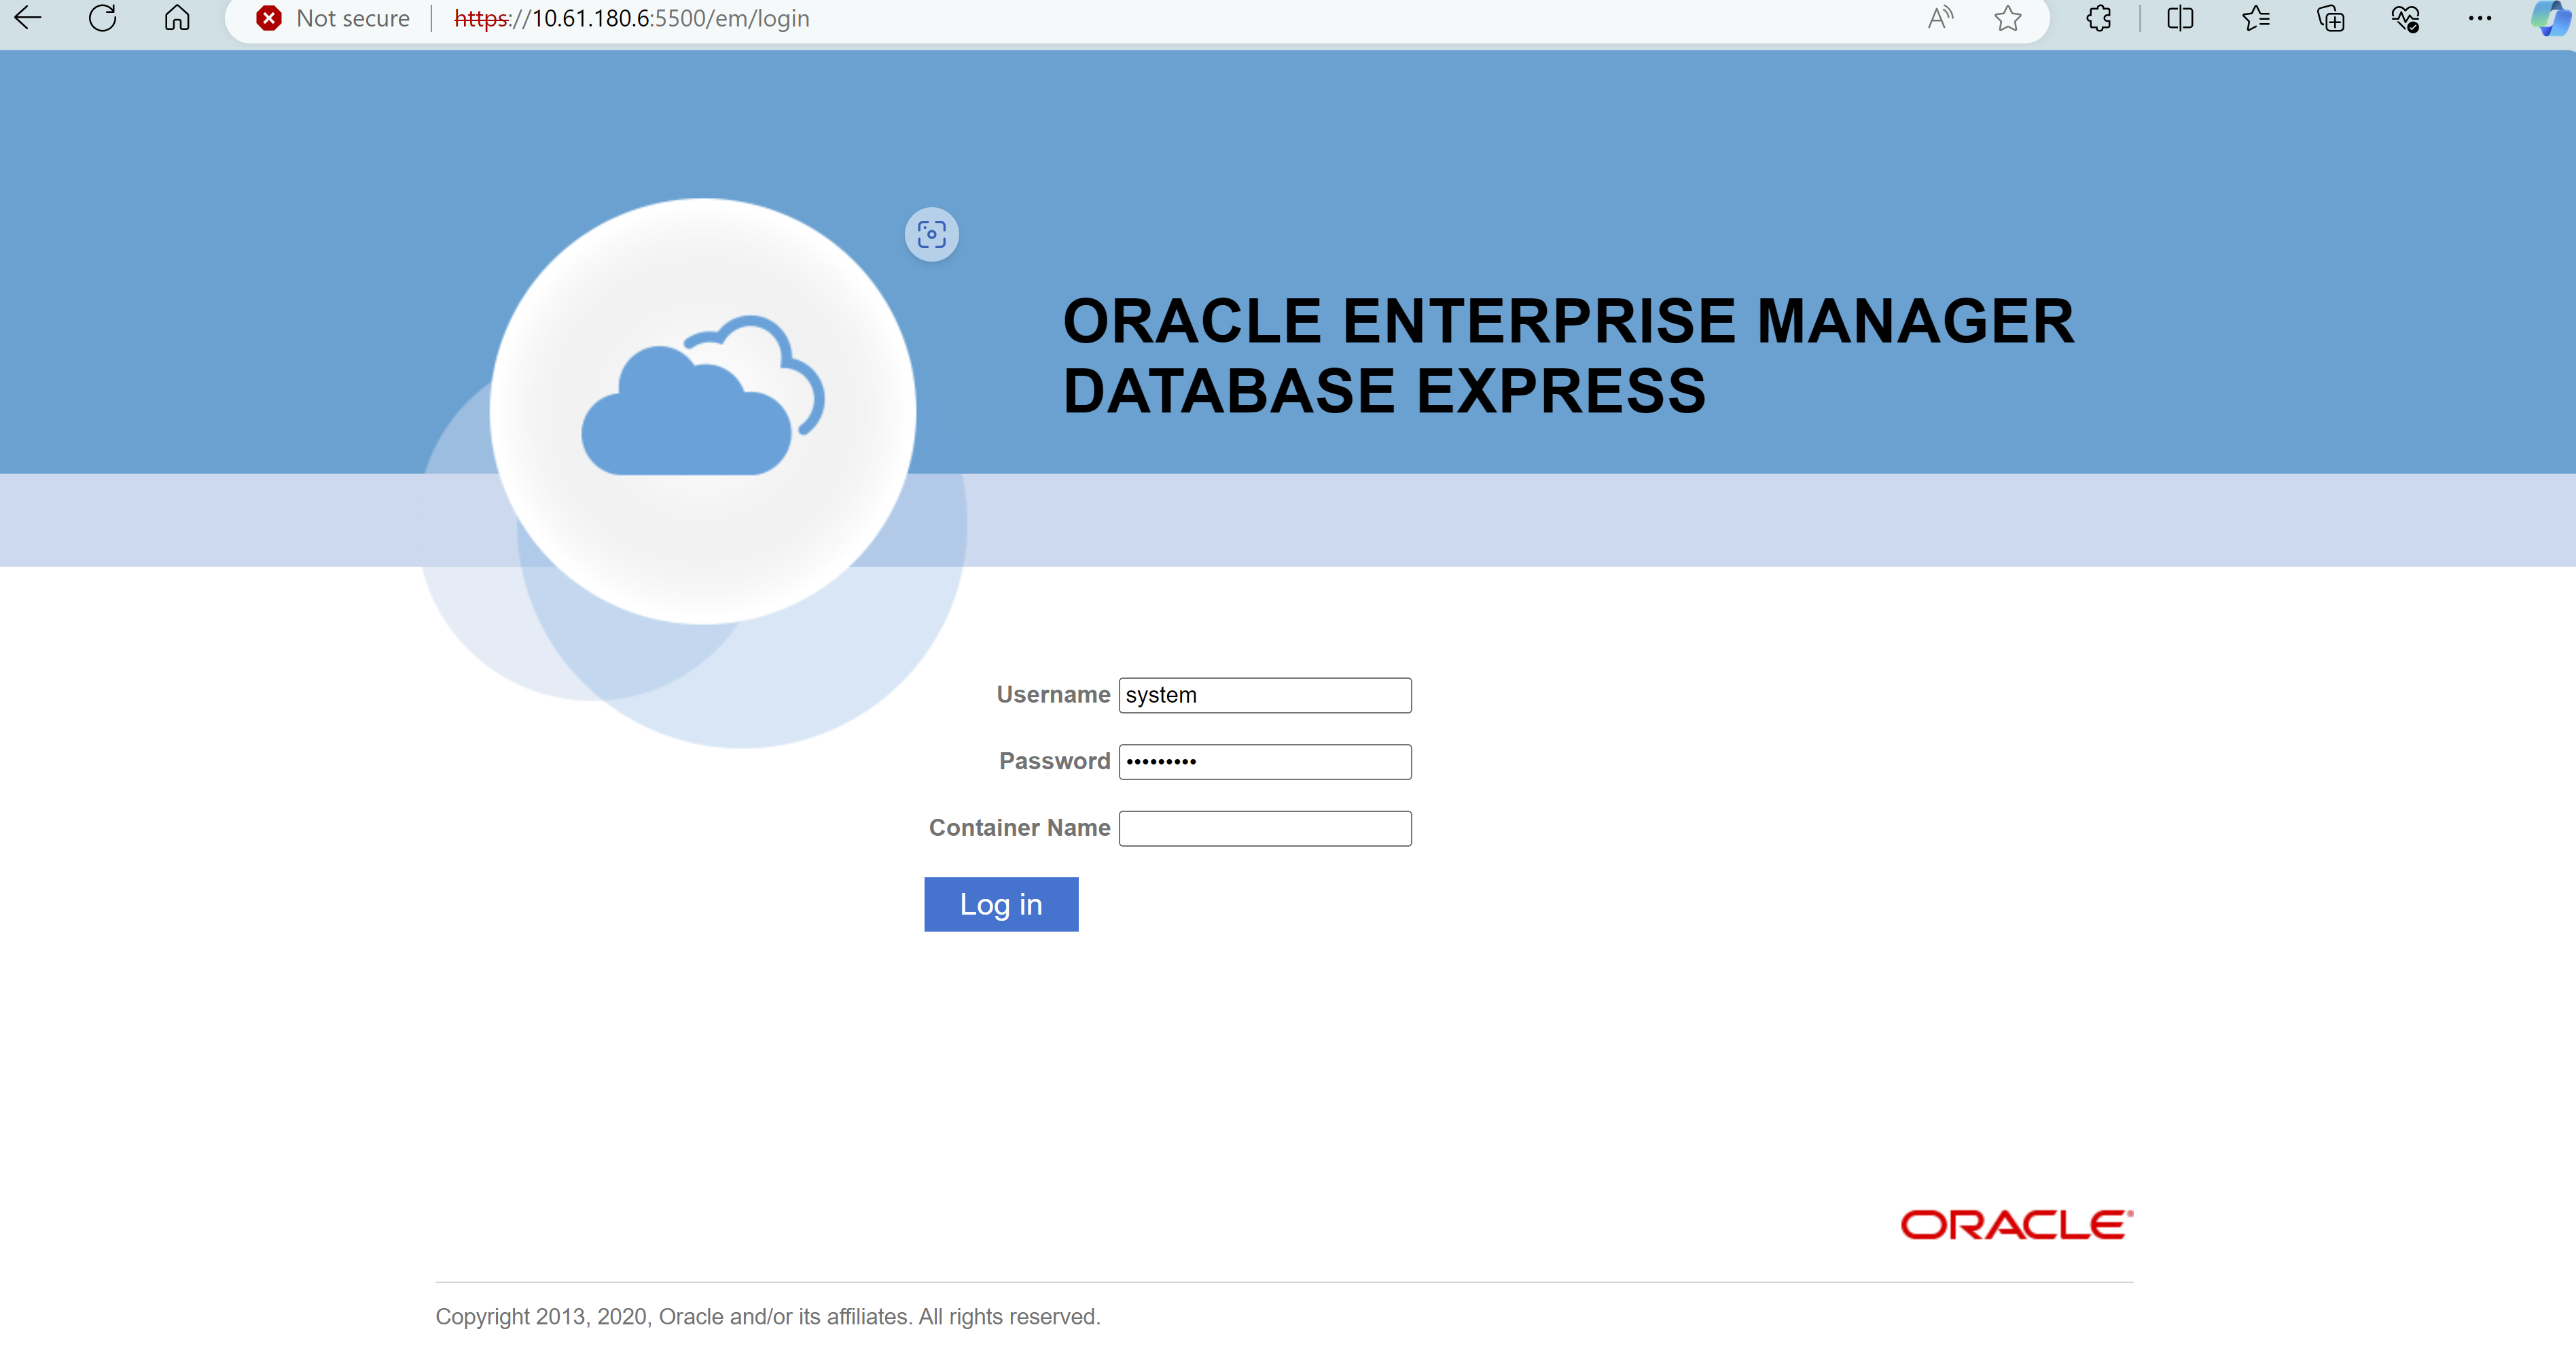
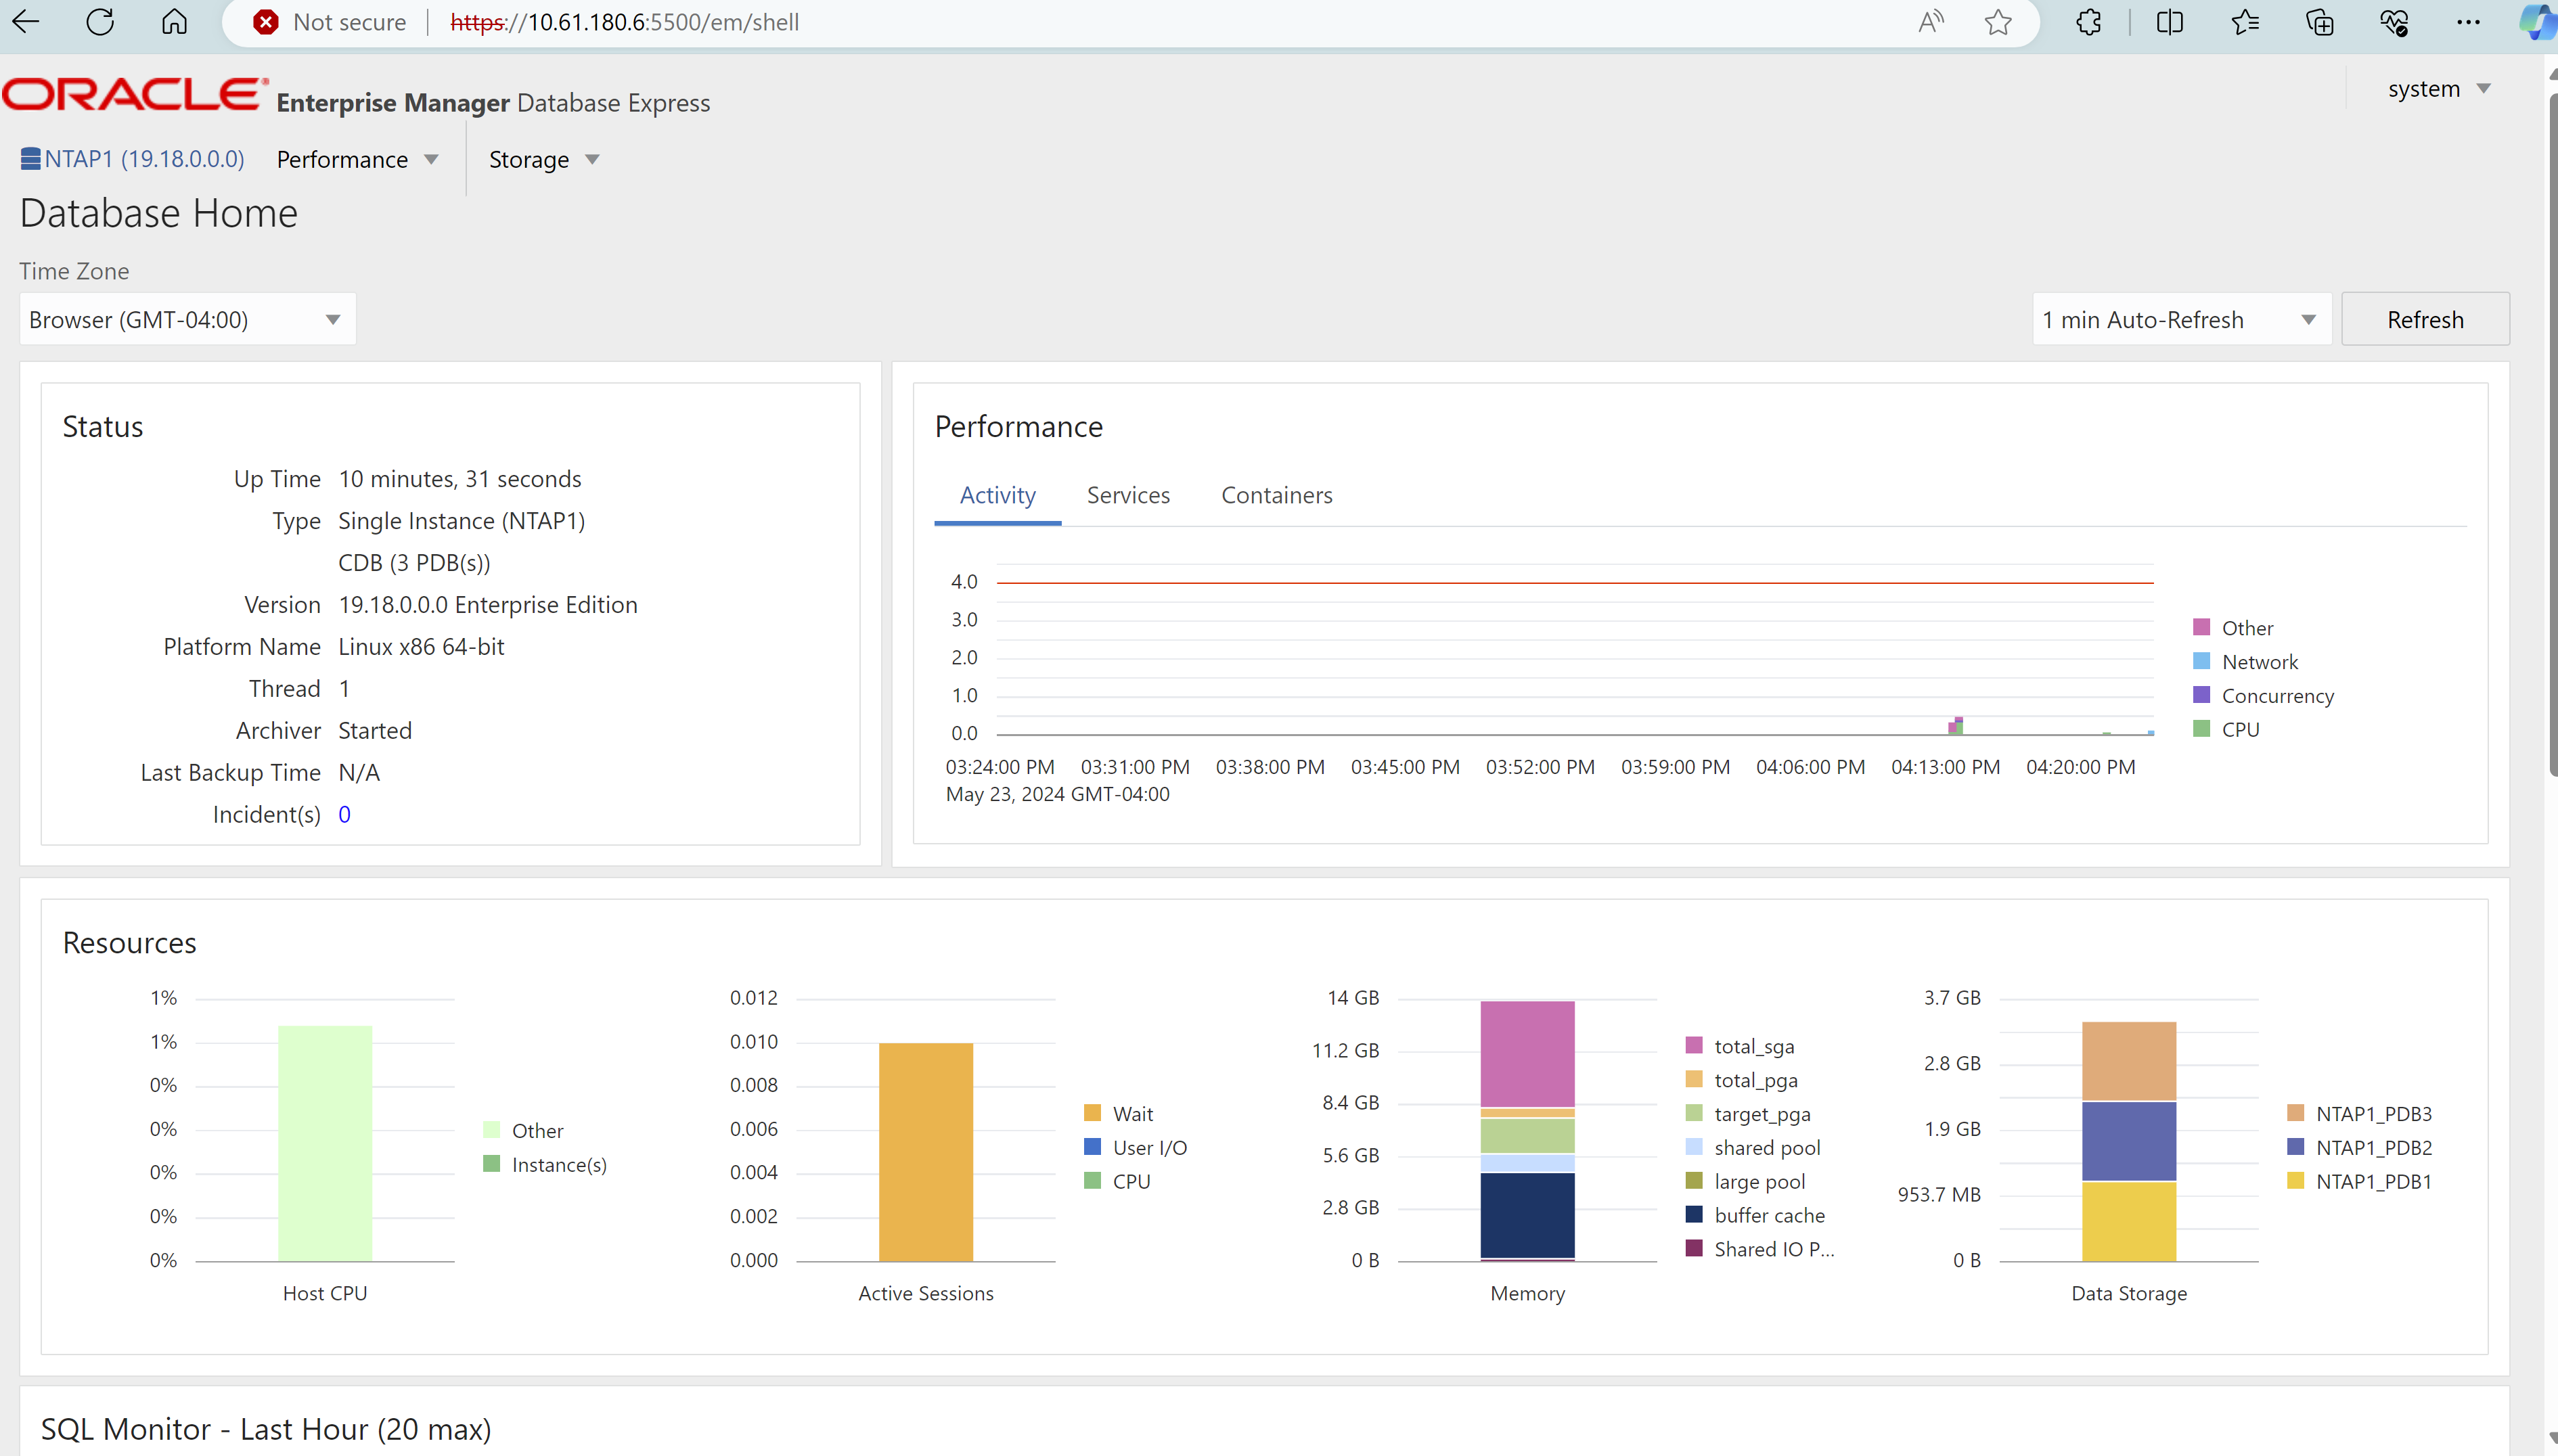
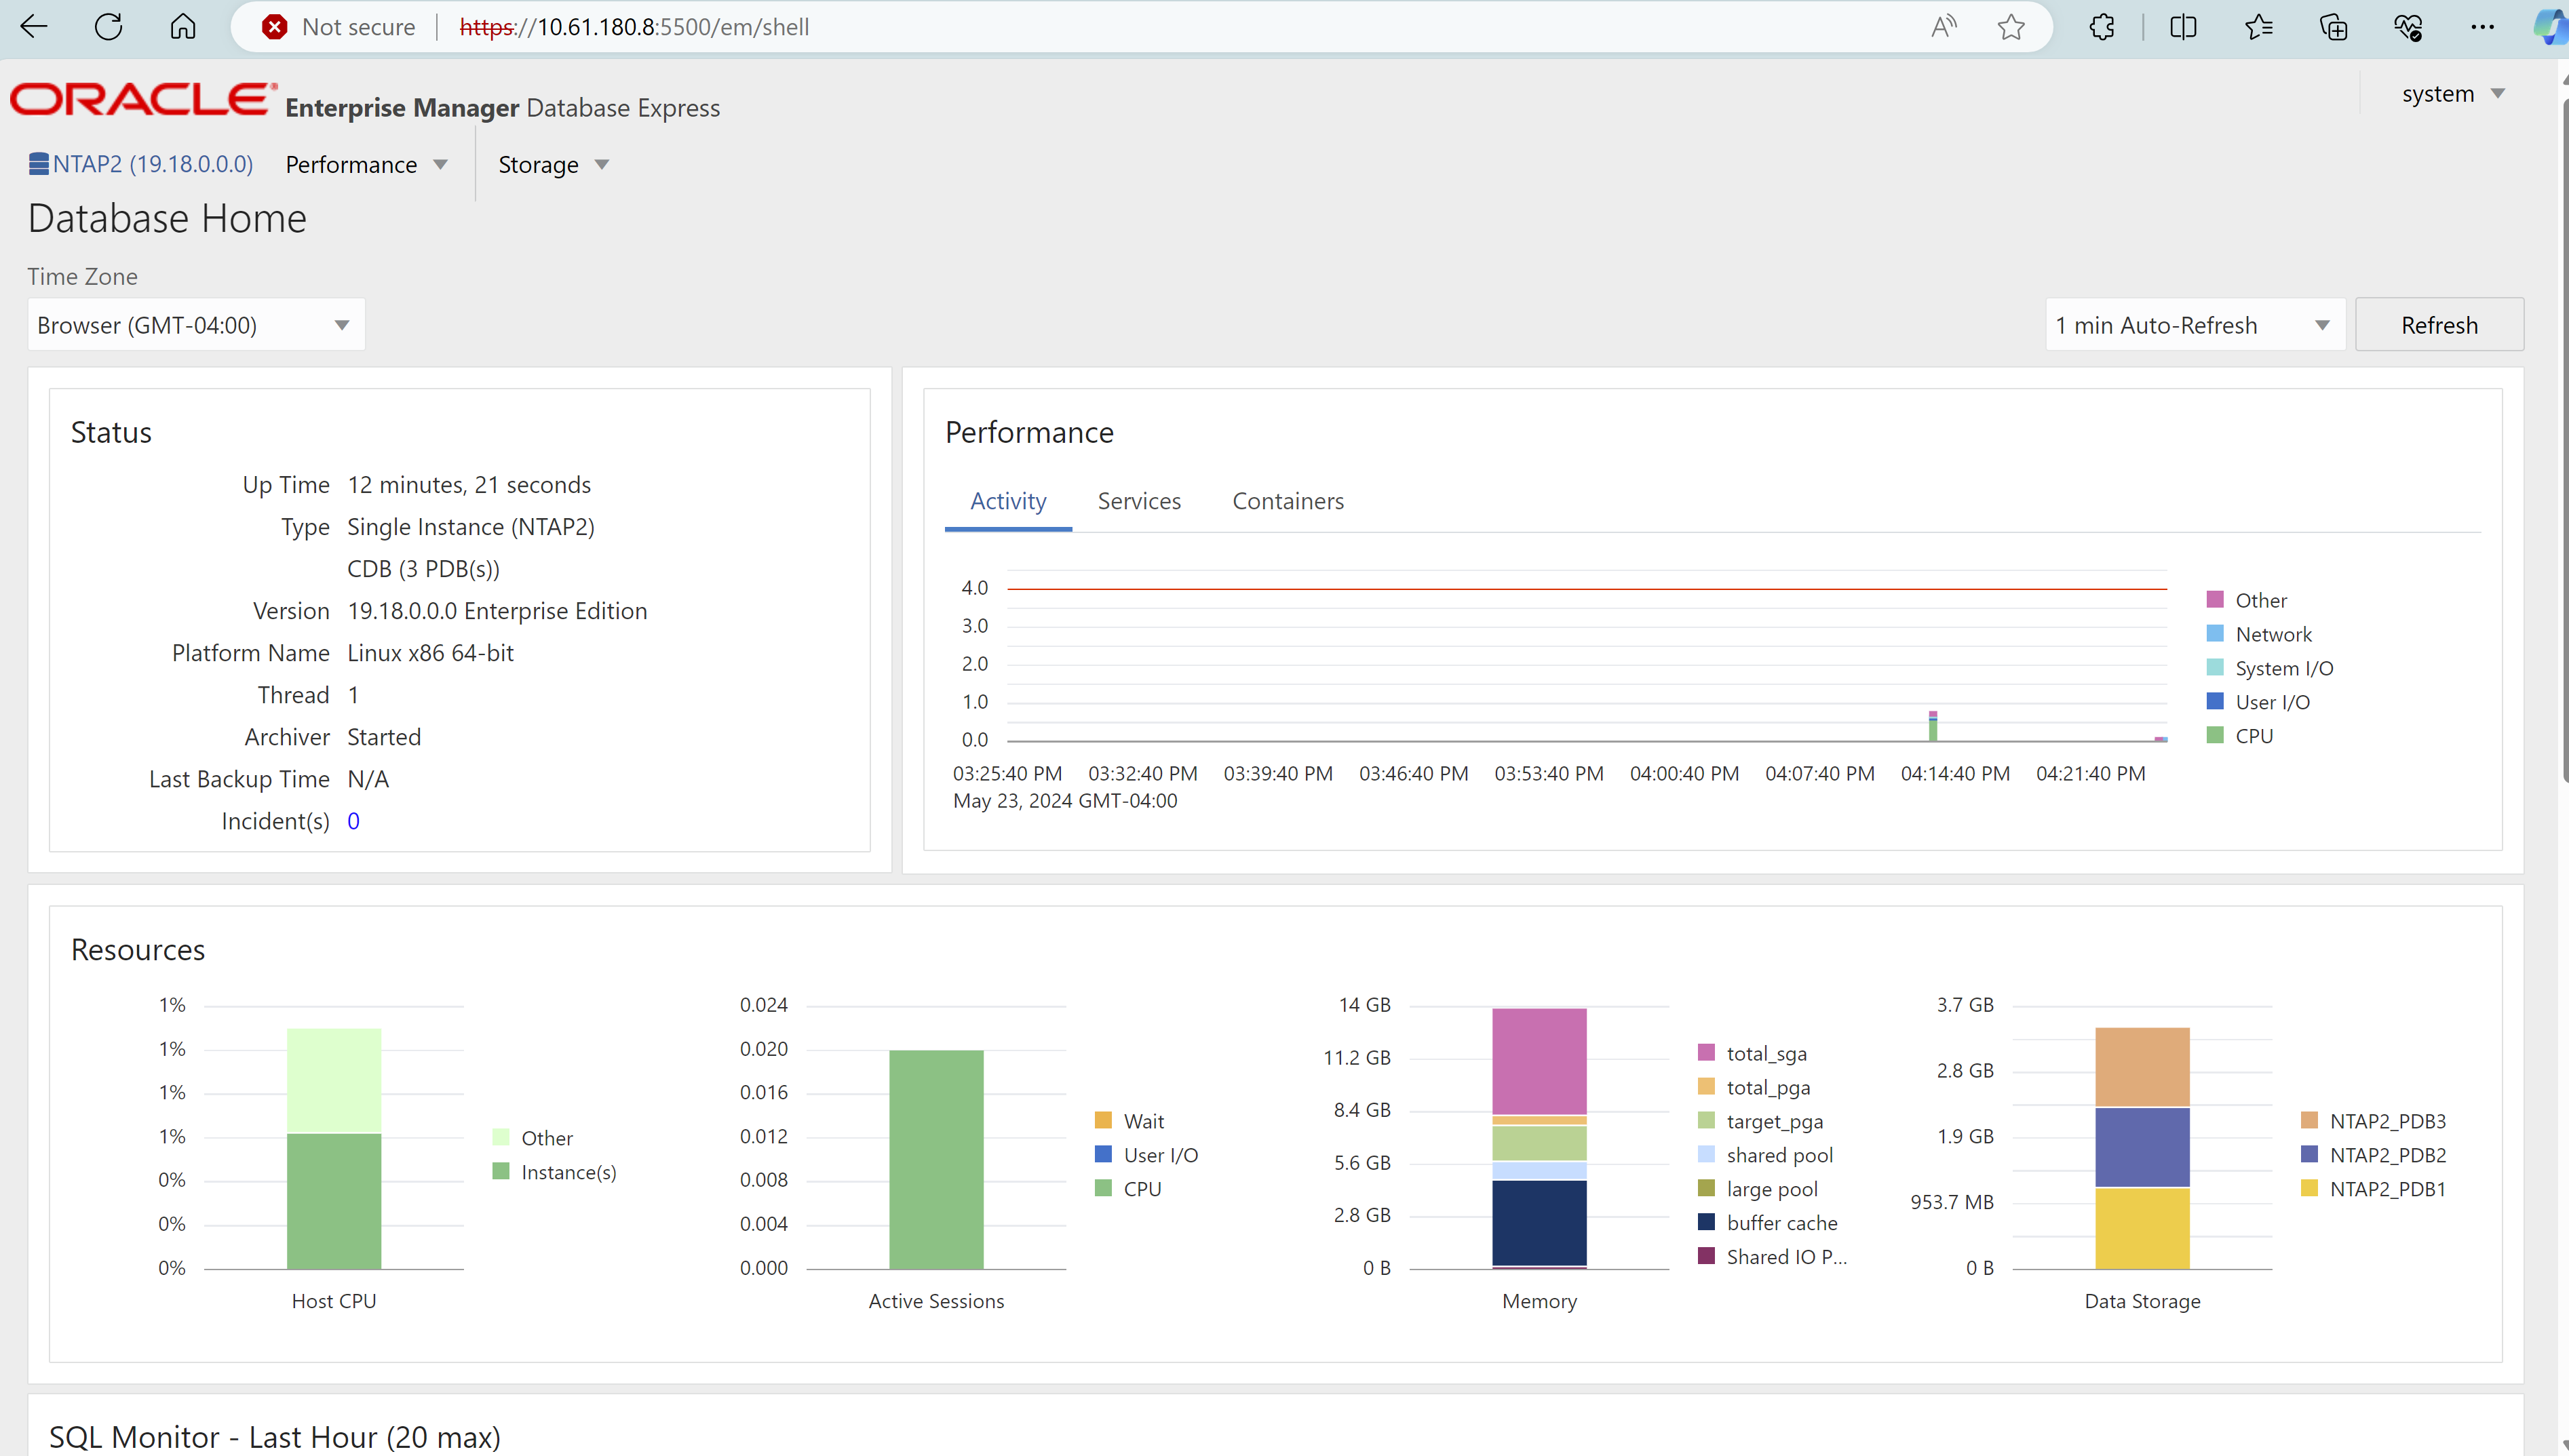
登入 Oracle Enterprise Manager Express 來驗證資料庫。
使用SnapCenter進行 Oracle 備份、復原和克隆
Details
NetApp建議使用SnapCenter UI 工具來管理部署在 C 系列中的 Oracle 資料庫。參考 TR-4979"VMware Cloud on AWS 中簡化的自主管理 Oracle,附有用戶端安裝的 FSx ONTAP"部分 `Oracle backup, restore, and clone with SnapCenter`有關設定SnapCenter和執行資料庫備份、復原和複製工作流程的詳細資訊。
在哪裡可以找到更多信息
要了解有關本文檔中描述的信息的更多信息,請查看以下文檔和/或網站: