

從較舊的Cisco交換器遷移到Cisco Nexus 9336C-FX2 和 9336C-FX2-T 交換機
 建議變更
建議變更
您可以從較舊的Cisco叢集交換器無中斷遷移到Cisco Nexus 9336C-FX2 和 9336C-FX2-T 叢集網路交換器。
審查要求
確保:
-
您已確認交換器序號,以確保遷移的是正確的交換器。
-
Nexus 9336C-FX2 交換器上的某些連接埠配置為以 10GbE 或 40GbE 運作。
-
節點到 Nexus 9336C-FX2 叢集交換器的 10GbE 和 40GbE 連線已規劃、遷移和記錄。
-
叢集運作正常(日誌中不應有任何錯誤或類似問題)。
-
Cisco Nexus 9336C-FX2 交換器的初始客製化工作已完成,具體如下:
-
9336C-FX2 交換器運作的是最新推薦版本的軟體。
-
在將 LIF 移轉到新交換器之前,請確認參考設定檔 (RCF) 已完全套用到所有新交換器。
-
在轉移網路流量之前,請檢查兩台交換器的運作設定和啟動設定。
-
任何網站定制,如 DNS、NTP、SMTP、SNMP 和 SSH,都在新交換器上進行設定。
-
-
您可以透過以下方式存取交換器相容性表: "Cisco乙太網路交換機"支援的ONTAP、NX-OS 和 RCF 版本頁面。
-
您已查閱Cisco網站上提供的有關Cisco交換器升級和降級步驟的相應軟體和升級指南。 "Cisco Nexus 9000 系列交換器支援"頁。

|
如果您變更AFF A800或AFF C800系統上 e0a 和 e1a 叢集連接埠的連接埠速度,您可能會觀察到速度轉換後接收到格式錯誤的套件。看 "漏洞編號 1570339"以及知識庫文章 "將 40GbE 轉換為 100GbE 後,T6 連接埠出現 CRC 錯誤"供參考。 |
遷移交換機
本流程中的範例使用了兩個節點。這些節點使用兩個 10GbE 叢集互連連接埠 e0a 和 e0b。參見 "Hardware Universe"驗證平台上的叢集連接埠是否正確。看 "安裝HWU中沒有的設備還需要哪些額外資訊?" 有關交換器安裝要求的詳細資訊。
|
|
命令輸出可能因ONTAP版本不同而有所差異。 |
本流程中的範例使用以下開關和節點命名規則:
-
現有的兩台Cisco交換器的名稱分別為 cs1 和 cs2。
-
新的 Nexus 9336C-FX2 叢集交換器是 cs1-new 和 cs2-new。
-
節點名稱分別為 node1 和 node2。
-
節點 1 的叢集 LIF 名稱稱為 node1_clus1 和 node1_clus2,節點 2 的叢集 LIF 名稱稱為 node2_clus1 和 node2_clus2。
-
cluster1::>* 提示符號指示叢集的名稱。
在此過程中,請參考以下範例:
該過程需要同時使用ONTAP命令和 "Nexus 9000系列交換機"命令;除非另有說明,否則使用ONTAP命令。
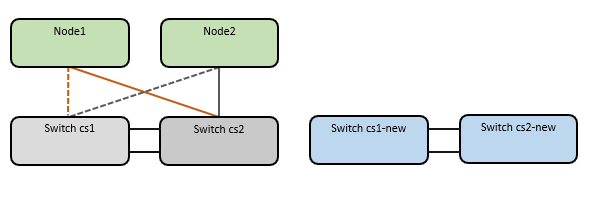
本流程涵蓋以下情況:
-
首先將交換器 cs2 替換為交換器 cs2-new。
-
關閉叢集節點的連接埠。為避免叢集不穩定,所有連接埠必須同時關閉。
-
所有群集 LIF 故障轉移到新交換器 cs2-new。
-
-
然後斷開節點與 cs2 之間的電纜與 cs2 的連接,並重新連接到 cs2-new。
-
-
交換器 cs1 被交換器 cs1-new 取代。
-
關閉叢集節點的連接埠。為避免叢集不穩定,所有連接埠必須同時關閉。
-
所有群集 LIF 故障轉移到新交換器 cs1-new。
-
-
然後斷開節點與 cs1 之間的電纜與 cs1 的連接,並重新連接到 cs1-new。
-
|
|
在此過程中不需要任何可操作的交換器間連結 (ISL)。這是設計使然,因為 RCF 版本的變更可能會暫時影響 ISL 連線。為確保叢集運作不會中斷,以下步驟會在目標交換器上執行步驟的同時,將所有叢集 LIF 故障轉移到運作夥伴交換器。 |
步驟 1:準備遷移
-
如果此叢集上啟用了AutoSupport ,則透過呼叫AutoSupport訊息來抑制自動建立案例:
system node autosupport invoke -node * -type all -message MAINT=xh其中 x 為維護視窗的持續時間(小時)。
AutoSupport訊息會通知技術支援此維護任務,以便在維護視窗期間抑制自動建立案例。 -
將權限級別變更為高級,並在提示繼續時輸入 y:
set -privilege advanced出現高階提示符號(*>)。
步驟二:設定埠和線纜
-
在新交換器上,確認交換器 cs1-new 和 cs2-new 之間的 ISL 線連接正常:
show port-channel summary顯示範例
cs1-new# show port-channel summary Flags: D - Down P - Up in port-channel (members) I - Individual H - Hot-standby (LACP only) s - Suspended r - Module-removed b - BFD Session Wait S - Switched R - Routed U - Up (port-channel) p - Up in delay-lacp mode (member) M - Not in use. Min-links not met -------------------------------------------------------------------------------- Group Port- Type Protocol Member Ports Channel -------------------------------------------------------------------------------- 1 Po1(SU) Eth LACP Eth1/35(P) Eth1/36(P) cs2-new# show port-channel summary Flags: D - Down P - Up in port-channel (members) I - Individual H - Hot-standby (LACP only) s - Suspended r - Module-removed b - BFD Session Wait S - Switched R - Routed U - Up (port-channel) p - Up in delay-lacp mode (member) M - Not in use. Min-links not met -------------------------------------------------------------------------------- Group Port- Type Protocol Member Ports Channel -------------------------------------------------------------------------------- 1 Po1(SU) Eth LACP Eth1/35(P) Eth1/36(P) -
顯示每個節點上連接到現有叢集交換器的叢集連接埠:
network device-discovery show顯示範例
cluster1::*> network device-discovery show -protocol cdp Node/ Local Discovered Protocol Port Device (LLDP: ChassisID) Interface Platform ----------- ------ ------------------------- ---------------- ---------------- node1 /cdp e0a cs1 Ethernet1/1 N5K-C5596UP e0b cs2 Ethernet1/2 N5K-C5596UP node2 /cdp e0a cs1 Ethernet1/1 N5K-C5596UP e0b cs2 Ethernet1/2 N5K-C5596UP -
確定每個叢集連接埠的管理或運作狀態。
-
確認叢集所有連接埠均已啟動且狀態正常:
network port show -ipspace Cluster顯示範例
cluster1::*> network port show -ipspace Cluster Node: node1 Ignore Speed(Mbps) Health Health Port IPspace Broadcast Domain Link MTU Admin/Oper Status Status --------- ------------ ---------------- ---- ---- ----------- -------- ------ e0a Cluster Cluster up 9000 auto/10000 healthy false e0b Cluster Cluster up 9000 auto/10000 healthy false Node: node2 Ignore Speed(Mbps) Health Health Port IPspace Broadcast Domain Link MTU Admin/Oper Status Status --------- ------------ ---------------- ---- ---- ----------- -------- ------ e0a Cluster Cluster up 9000 auto/10000 healthy false e0b Cluster Cluster up 9000 auto/10000 healthy false -
確認所有叢集介面(LIF)都已連接到其所屬連接埠:
network interface show -vserver Cluster顯示範例
cluster1::*> network interface show -vserver Cluster Logical Status Network Current Current Is Vserver Interface Admin/Oper Address/Mask Node Port Home ----------- ----------- ---------- ------------------ ----------- ------- ---- Cluster node1_clus1 up/up 169.254.209.69/16 node1 e0a true node1_clus2 up/up 169.254.49.125/16 node1 e0b true node2_clus1 up/up 169.254.47.194/16 node2 e0a true node2_clus2 up/up 169.254.19.183/16 node2 e0b true -
確認集群顯示兩個集群交換器的資訊:
system cluster-switch show -is-monitoring-enabled-operational true
顯示範例
cluster1::*> system cluster-switch show -is-monitoring-enabled-operational true Switch Type Address Model --------------------------- ------------------ ---------------- --------------- cs1 cluster-network 10.233.205.92 N5K-C5596UP Serial Number: FOXXXXXXXGS Is Monitored: true Reason: None Software Version: Cisco Nexus Operating System (NX-OS) Software, Version 9.3(4) Version Source: CDP cs2 cluster-network 10.233.205.93 N5K-C5596UP Serial Number: FOXXXXXXXGD Is Monitored: true Reason: None Software Version: Cisco Nexus Operating System (NX-OS) Software, Version 9.3(4) Version Source: CDP -
-
停用此程序的自動復原功能後,叢集 LIF 將不會自動移回其主連接埠。只要該港口繼續正常運營,他們就會繼續使用該港口。
network interface modify -vserver Cluster -lif * -auto-revert false
停用自動恢復功能可確保ONTAP僅在交換器連接埠稍後關閉時才發生故障轉移叢集 LIF。 -
在叢集交換器 cs2 上,關閉連接到*所有*節點叢集連接埠的端口,以便進行叢集 LIF 的故障轉移:
cs2# configure
cs2(config)# interface eth1/1-1/2
cs2(config-if-range)# shutdown
cs2(config-if-range)# exit
cs2(config)# exit
cs2#
-
驗證叢集 LIF 是否已故障轉移到叢集交換器 cs1 上託管的連接埠。這可能需要幾秒鐘。
network interface show -vserver Cluster顯示範例
cluster1::*> network interface show -vserver Cluster Logical Status Network Current Current Is Vserver Interface Admin/Oper Address/Mask Node Port Home ----------- ------------- ---------- ------------------ ---------- ------- ---- Cluster node1_clus1 up/up 169.254.3.4/16 node1 e0a true node1_clus2 up/up 169.254.3.5/16 node1 e0a false node2_clus1 up/up 169.254.3.8/16 node2 e0a true node2_clus2 up/up 169.254.3.9/16 node2 e0a false -
驗證叢集是否運作正常:
cluster show顯示範例
cluster1::*> cluster show
Node       Health  Eligibility   Epsilon
---------- ------- ------------- -------
node1      true    true          false
node2      true    true          false
-
如果叢集 LIF 已故障轉移到交換器 cs1 且叢集運作狀況良好,請前往步。10。如果某些群集 LIF 不正常或群集不正常,您可以如下回滾與交換器 cs2 的連接:
-
啟動連接到*所有*節點叢集連接埠的連接埠:
cs2# configure
cs2(config)# interface eth1/1-1/2
cs2(config-if-range)# no shutdown
cs2(config-if-range)# exit
cs2(config)# exit
cs2#
-
驗證叢集 LIF 是否已故障轉移到叢集交換器 cs1 上託管的連接埠。這可能需要幾秒鐘。
network interface show -vserver Cluster顯示範例
cluster1::*> network interface show -vserver Cluster Logical Status Network Current Current Is Vserver Interface Admin/Oper Address/Mask Node Port Home ----------- ------------- ---------- ------------------ ---------- ------- ---- Cluster node1_clus1 up/up 169.254.3.4/16 node1 e0a true node1_clus2 up/up 169.254.3.5/16 node1 e0a false node2_clus1 up/up 169.254.3.8/16 node2 e0a true node2_clus2 up/up 169.254.3.9/16 node2 e0a false -
驗證叢集是否運作正常:
cluster show
顯示範例
cluster1::*> cluster show
Node       Health  Eligibility   Epsilon
---------- ------- ------------- -------
node1      true    true          false
node2      true    true          false
-
-
恢復 LIF 和叢集健康狀況後,重新啟動流程。步。4 。
-
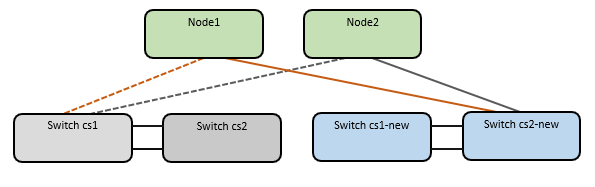
將所有叢集節點連接電纜從舊的 cs2 交換器移至新的 cs2-new 交換器。
叢集節點連接線已移至cs2-new交換器
-
確認遷移到 cs2-new 的網路連線是否正常:
network port show -ipspace Cluster顯示範例
cluster1::*> network port show -ipspace Cluster

Node: node1
                                                                       Ignore
                                                  Speed(Mbps) Health   Health
Port      IPspace      Broadcast Domain Link MTU  Admin/Oper  Status   Status
--------- ------------ ---------------- ---- ---- ----------- -------- ------
e0a       Cluster      Cluster          up   9000  auto/10000 healthy  false
e0b       Cluster      Cluster          up   9000  auto/10000 healthy  false

Node: node2
                                                                       Ignore
                                                  Speed(Mbps) Health   Health
Port      IPspace      Broadcast Domain Link MTU  Admin/Oper  Status   Status
--------- ------------ ---------------- ---- ---- ----------- -------- ------
e0a       Cluster      Cluster          up   9000  auto/10000 healthy  false
e0b       Cluster      Cluster          up   9000  auto/10000 healthy  false
所有已遷移的叢集連接埠都應該已啟用。
-
檢查叢集連接埠的鄰居資訊:
network device-discovery show -protocol cdp顯示範例
cluster1::*> network device-discovery show -protocol cdp

Node/       Local  Discovered
Protocol    Port   Device (LLDP: ChassisID)  Interface      Platform
----------- ------ ------------------------- -------------  --------------
node1      /cdp
            e0a    cs1                       Ethernet1/1    N5K-C5596UP
            e0b    cs2-new                   Ethernet1/1/1  N9K-C9336C-FX2

node2      /cdp
            e0a    cs1                       Ethernet1/2    N5K-C5596UP
            e0b    cs2-new                   Ethernet1/1/2  N9K-C9336C-FX2
確認遷移後的叢集連接埠是否將 cs2-new 交換器視為鄰居。
-
從交換器 cs2-new 的角度確認交換器連接埠連接:
cs2-new# show interface brief
cs2-new# show cdp neighbors
-
在叢集交換器 cs1 上,關閉連接到所有節點叢集連接埠的端口,以便叢集 LIF 進行故障轉移。
cs1# configure
cs1(config)# interface eth1/1-1/2
cs1(config-if-range)# shutdown
cs1(config-if-range)# exit
cs1(config)# exit
cs1#
所有群集 LIF 故障轉移到 cs2-new 交換器。
-
驗證叢集 LIF 是否已故障轉移到交換器 cs2-new 上託管的連接埠。這可能需要幾秒鐘:
network interface show -vserver Cluster顯示範例
cluster1::*> network interface show -vserver Cluster Logical Status Network Current Current Is Vserver Interfac Admin/Oper Address/Mask Node Port Home ----------- ------------ ---------- ------------------ ----------- ------- ---- Cluster node1_clus1 up/up 169.254.3.4/16 node1 e0b false node1_clus2 up/up 169.254.3.5/16 node1 e0b true node2_clus1 up/up 169.254.3.8/16 node2 e0b false node2_clus2 up/up 169.254.3.9/16 node2 e0b true -
驗證叢集是否運作正常:
cluster show顯示範例
cluster1::*> cluster show
Node       Health  Eligibility   Epsilon
---------- ------- ------------- -------
node1      true    true          false
node2      true    true          false
-
將叢集節點連接電纜從 cs1 移至新的 cs1-new 交換器。
叢集節點連接線纜已移至 cs1-new 交換器

-
確認遷移到 cs1-new 的網路連線的健康狀況:
network port show -ipspace Cluster顯示範例
cluster1::*> network port show -ipspace Cluster

Node: node1
                                                                       Ignore
                                                  Speed(Mbps) Health   Health
Port      IPspace      Broadcast Domain Link MTU  Admin/Oper  Status   Status
--------- ------------ ---------------- ---- ---- ----------- -------- ------
e0a       Cluster      Cluster          up   9000  auto/10000 healthy  false
e0b       Cluster      Cluster          up   9000  auto/10000 healthy  false

Node: node2
                                                                       Ignore
                                                  Speed(Mbps) Health   Health
Port      IPspace      Broadcast Domain Link MTU  Admin/Oper  Status   Status
--------- ------------ ---------------- ---- ---- ----------- -------- ------
e0a       Cluster      Cluster          up   9000  auto/10000 healthy  false
e0b       Cluster      Cluster          up   9000  auto/10000 healthy  false
所有已遷移的叢集連接埠都應該已啟用。
-
檢查叢集連接埠的鄰居資訊:
network device-discovery show顯示範例
cluster1::*> network device-discovery show -protocol cdp
Node/       Local  Discovered
Protocol    Port   Device (LLDP: ChassisID)  Interface       Platform
----------- ------ ------------------------- --------------  --------------
node1      /cdp
            e0a    cs1-new                   Ethernet1/1/1   N9K-C9336C-FX2
            e0b    cs2-new                   Ethernet1/1/2   N9K-C9336C-FX2

node2      /cdp
            e0a    cs1-new                   Ethernet1/1/1   N9K-C9336C-FX2
            e0b    cs2-new                   Ethernet1/1/2   N9K-C9336C-FX2
確認遷移後的叢集連接埠是否將 cs1-new 交換器視為鄰居。
-
從交換器 cs1-new 的角度確認交換器連接埠連接:
cs1-new# show interface brief
cs1-new# show cdp neighbors
-
驗證 cs1-new 和 cs2-new 之間的 ISL 是否仍正常運作:
show port-channel summary顯示範例
cs1-new# show port-channel summary
Flags:  D - Down        P - Up in port-channel (members)
        I - Individual  H - Hot-standby (LACP only)
        s - Suspended   r - Module-removed
        b - BFD Session Wait
        S - Switched    R - Routed
        U - Up (port-channel)
        p - Up in delay-lacp mode (member)
        M - Not in use. Min-links not met
--------------------------------------------------------------------------------
Group Port-       Type     Protocol  Member Ports
      Channel
--------------------------------------------------------------------------------
1     Po1(SU)     Eth      LACP      Eth1/35(P)   Eth1/36(P)

cs2-new# show port-channel summary
Flags:  D - Down        P - Up in port-channel (members)
        I - Individual  H - Hot-standby (LACP only)
        s - Suspended   r - Module-removed
        b - BFD Session Wait
        S - Switched    R - Routed
        U - Up (port-channel)
        p - Up in delay-lacp mode (member)
        M - Not in use. Min-links not met
--------------------------------------------------------------------------------
Group Port-       Type     Protocol  Member Ports
      Channel
--------------------------------------------------------------------------------
1     Po1(SU)     Eth      LACP      Eth1/35(P)   Eth1/36(P)
步驟 3:驗證配置
-
啟用叢集 LIF 的自動回滾功能。
network interface modify -vserver Cluster -lif * -auto-revert true -
在交換器 cs2 上,關閉並重新啟動所有叢集端口,以觸發所有不在它們所屬端口上的集群 LIF 的自動恢復。
cs2> enable
cs2# configure
cs2(config)# interface eth1/1-1/2
cs2(config-if-range)# shutdown

(Wait for 5-10 seconds before re-enabling the ports)

cs2(config-if-range)# no shutdown

(After executing the no shutdown command, the nodes detect the change and begin to auto-revert the cluster LIFs to their home ports)

cs2(config-if-range)# exit
cs2(config)# exit
cs2#
-
驗證叢集 LIF 是否已恢復到其原始連接埠(這可能需要一分鐘):
network interface show -vserver Cluster如果叢集中的任何 LIF 尚未恢復到其主端口,請手動將其復原。您必須連接到擁有該 LIF 的本機節點的每個節點管理 LIF 或SP/ BMC系統控制台:
network interface revert -vserver Cluster -lif * -
驗證叢集是否運作正常:
cluster show -
驗證遠端集群介面的連接性:
你可以使用 `network interface check cluster-connectivity`執行命令以啟動叢集連接性檢查,然後顯示詳細資訊:
network interface check cluster-connectivity start`和 `network interface check cluster-connectivity show
cluster1::*> network interface check cluster-connectivity start
|
|
運行前請等待幾秒鐘 `show`顯示詳細資訊的命令。 |
cluster1::*> network interface check cluster-connectivity show
                                  Source          Destination       Packet
Node   Date                       LIF             LIF               Loss
------ -------------------------- --------------- ----------------- -----------
node1
       3/5/2022 19:21:18 -06:00   node1_clus2      node2_clus1      none
       3/5/2022 19:21:20 -06:00   node1_clus2      node2_clus2      none

node2
       3/5/2022 19:21:18 -06:00   node2_clus2      node1_clus1      none
       3/5/2022 19:21:20 -06:00   node2_clus2      node1_clus2      none
對於所有ONTAP版本,您也可以使用 `cluster ping-cluster -node <name>`檢查連接性的命令:
cluster ping-cluster -node <name>
cluster1::*> cluster ping-cluster -node node2
Host is node2
Getting addresses from network interface table...
Cluster node1_clus1 169.254.209.69 node1     e0a
Cluster node1_clus2 169.254.49.125 node1     e0b
Cluster node2_clus1 169.254.47.194 node2     e0a
Cluster node2_clus2 169.254.19.183 node2     e0b
Local = 169.254.47.194 169.254.19.183
Remote = 169.254.209.69 169.254.49.125
Cluster Vserver Id = 4294967293
Ping status:

Basic connectivity succeeds on 4 path(s)
Basic connectivity fails on 0 path(s)
................
Detected 9000 byte MTU on 4 path(s):
    Local 169.254.19.183 to Remote 169.254.209.69
    Local 169.254.19.183 to Remote 169.254.49.125
    Local 169.254.47.194 to Remote 169.254.209.69
    Local 169.254.47.194 to Remote 169.254.49.125
Larger than PMTU communication succeeds on 4 path(s)
RPC status:
2 paths up, 0 paths down (tcp check)
2 paths up, 0 paths down (udp check)
交換器遷移完成後,您可以"配置交換器健康監控"。