

Replace DIMMs in compute nodes
 Suggest changes
You can replace a faulty dual inline memory module (DIMM) in NetApp HCI compute nodes instead of replacing the entire node.
-
Before starting this procedure, you should have contacted NetApp Support and received a replacement part. Support will be involved during the installation of the replacement. If you have not done so already, contact Support.
-
You have planned for system downtime, because you need to power down or cycle the node and boot the node to NetApp Safe Mode to access the terminal user interface (TUI).
This procedure applies to the following compute node models:
-
H410C nodes. An H410C node is inserted into a 2U NetApp HCI chassis.
-
H610C node. An H610C node is built into the chassis.
-
H615C node. An H615C node is built into the chassis.

H410C and H615C nodes include DIMMs from different vendors. Ensure that you do not mix DIMMs from different vendors in one chassis. 
The terms "chassis" and "node" are used interchangeably in the case of H610C and H615C, because the node and chassis are not separate components.
Here are the steps involved in replacing DIMMs in compute nodes:
Prepare to replace the DIMM
When issues with the DIMM occur, VMware ESXi displays alerts, such as Memory Configuration Error, Memory Uncorrectable ECC, Memory Transition to Critical, and Memory Critical Overtemperature. Even if the alerts disappear after a while, the hardware problem might persist. You should diagnose and address the faulty DIMM. You can get information about the faulty DIMM from vCenter Server. If you need more information than what is available from vCenter Server, you must run the hardware check in the TUI.
-
Identify the slot that logged the error as follows:
-
For H615C, do the following:
-
Log in to the BMC UI.
-
Select Logs & Reports > IPMI Event Log.
-
In the event log, find the memory error and identify the slot on which the error is logged.

-
-
For H410C, do the following:
-
Log in to the BMC UI.
-
Select Server Health > Health Event Log.
-
In the event log, find the memory error and identify the slot on which the error is logged.

-
-
-
Perform the steps to identify the DIMM manufacturer part number.
H410C and H615C nodes include DIMMs from different manufacturers. You should not mix different DIMM types in the same chassis. You should identify the manufacturer of the faulty DIMM and order a replacement of the same type. -
Log in to the BMC to launch the console on the node.
-
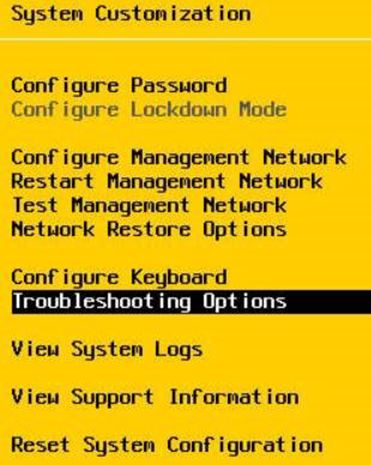
Press F2 on the keyboard to get to the Customize System/View Logs menu.
-
Enter the password when prompted.
The password should match what you configured in the NetApp Deployment Engine when you set up NetApp HCI. 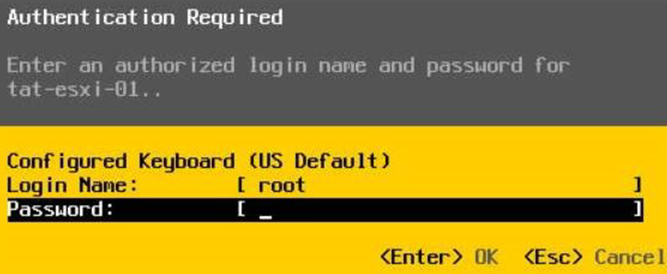
-
From the System Customization menu, press the down arrow to navigate to Troubleshooting Options, and press Enter.
-
From the Troubleshooting Mode Options menu, use the up or down arrow to enable ESXi shell and SSH, which are disabled by default.
-
Press the <Esc> key twice to exit Troubleshooting Options.
-
Run the
smbiosDumpcommand using one of the following options:Option Steps Option A
-
Connect to the ESXi host (compute node) using the IP address of the host and the root credentials that you defined.
-
Run the
smbiosDumpcommand.
See the following sample output:
`Memory Device:#30
Location: "P1-DIMMA1"
Bank: "P0_Node0_Channel0_Dimm0"
Manufacturer:"Samsung"
Serial: "38EB8380"
Asset Tag: "P1-DIMMA1_AssetTag (date:18/15)"
Part Number: "M393A4K40CB2-CTD"
Memory Array: #29
Form Factor: 0x09(DIMM)
Type: 0x1a (DDR4)
Type Detail: 0x0080 (Synchronous)
Data Width: 64 bits (+8 ECC bits)
Size: 32 GB`
Option B
-
Press Alt + F1 to enter shell, and log in to the node to run the command.
-
-
-
Contact NetApp Support for help with the next steps. NetApp Support requires the following information to process a part replacement:
-
Node serial number
-
Cluster name
-
System event log details from the BMC UI
-
Output from the
smbiosDumpcommand
-
Replace the DIMM from the chassis
Before you physically remove and replace the faulty DIMM in the chassis, ensure that you have performed all the preparatory steps.
|
|
DIMMs should be replaced in the same slots they were removed from. |
-
Access the node by logging in to vCenter Server.
-
Right-click the node that is reporting the error, and select the option to place the node in maintenance mode.
-
Migrate the virtual machines (VMs) to another available host.
See the VMware documentation for the migration steps. -
Power down the chassis or node.
For a H610C or H615C chassis, power down the chassis. For H410C nodes in a 2U, four-node chassis, power down only the node with the faulty DIMM. -
Remove the power cables and network cables, carefully slide the node or chassis out of the rack, and place it on a flat, antistatic surface.

Consider using twist ties for cables. -
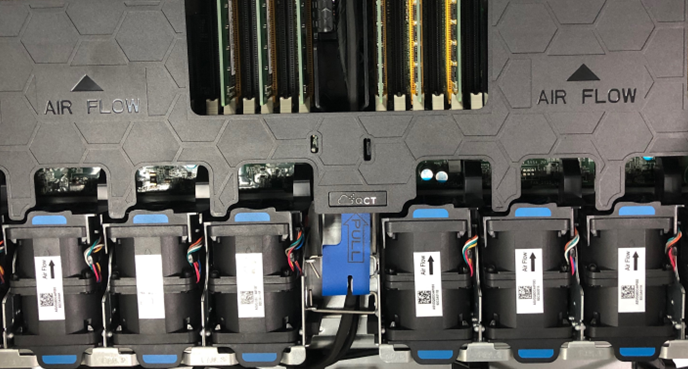
Put on antistatic protection before you open the chassis cover to replace the DIMM.
-
Perform the steps relevant to your node model:
Node model Steps H410C
-
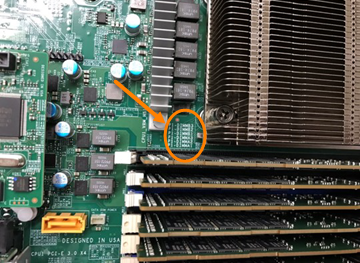
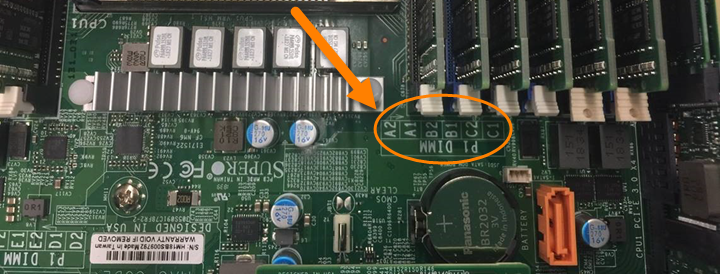
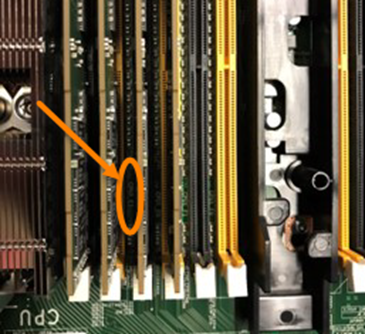
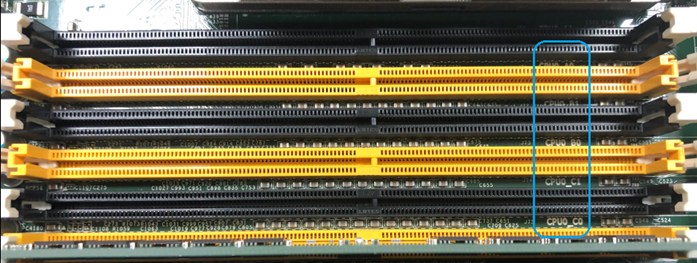
Find the failed DIMM by matching the slot number/ID you noted earlier with the numbering on the motherboard. Here are sample images showing the DIMM slot numbers on the motherboard:
-
Press the two retaining clips outward, and carefully pull the DIMM up. Here is a sample image showing the retaining clips:

-
Install the replacement DIMM correctly. When you insert the DIMM into the slot correctly, the two clips lock in place.
Ensure that you touch only the rear ends of the DIMM. If you press on other parts of the DIMM, it might result in damage to the hardware. -
Install the node in the NetApp HCI chassis, ensuring that the node clicks when you slide it into place.
H610C
-
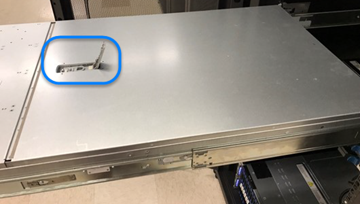
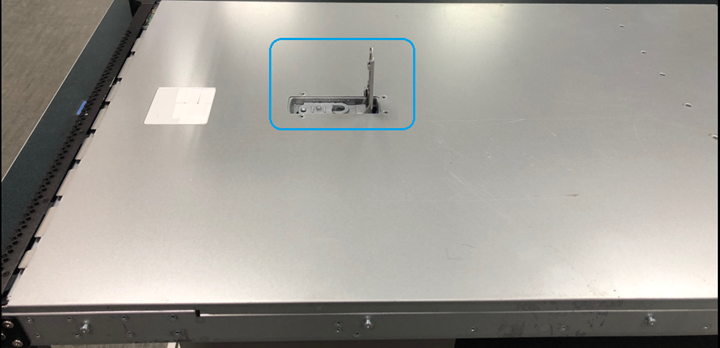
Lift the cover as shown in the following image:
-
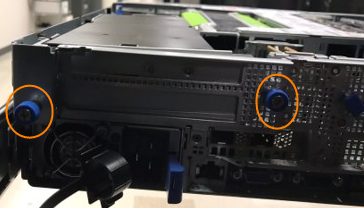
Loosen the four blue lock screws at the back of the node. Here is a sample image showing the location of two lock screws; you will find the other two on the other side of the node:
-
Remove both PCI card blanks.
-
Remove the GPU and the airflow cover.
-
Find the failed DIMM by matching the slot number/ID you noted earlier with the numbering on the motherboard. Here is a sample image showing the location of the DIMM slot numbers on the motherboard:
-
Press the two retaining clips outward, and carefully pull the DIMM up.
-
Install the replacement DIMM correctly. When you insert the DIMM into the slot correctly, the two clips lock in place.
Ensure that you touch only the rear ends of the DIMM. If you press on other parts of the DIMM, it might result in damage to the hardware. -
Replace all the components that you removed: GPU, airflow cover, and PCI blanks.
-
Tighten the lock screws.
-
Put the cover back on the node.
-
Install the H610C chassis in the rack, ensuring that the chassis clicks when you slide it into place.
H615C
-
Lift the cover as shown in the following image:
-
Remove the GPU (if your H615C node has GPU installed) and the airflow cover.
-
Find the failed DIMM by matching the slot number/ID you noted earlier with the numbering on the motherboard. Here is a sample image showing the location of the DIMM slot numbers on the motherboard:
-
Press the two retaining clips outward, and carefully pull the DIMM up.
-
Install the replacement DIMM correctly. When you insert the DIMM into the slot correctly, the two clips lock in place.
Ensure that you touch only the rear ends of the DIMM. If you press on other parts of the DIMM, it might result in damage to the hardware. -
Replace the airflow cover.
-
Put the cover back on the node.
-
Install the H610C chassis in the rack, ensuring that the chassis clicks when you slide it into place.
-
-
Insert the power cables and network cables.
Ensure that all the port lights turn on. -
Press the power button at the front of the node if it does not power on automatically when you install it.
-
After the node is displayed in vSphere, right-click the name and take the node out of maintenance mode.
-
Verify the hardware information as follows:
-
Log in to the baseboard management controller (BMC) UI.
-
Select System > Hardware Information, and check the DIMMs listed.
-
After the node returns to normal operation, in vCenter, check the Summary tab to ensure that the memory capacity is as expected.
|
|
If the DIMM is not installed correctly, the node will operate normally but with lower than expected memory capacity. |
|
|
After the DIMM replacement procedure, you can clear the warnings and errors on the Hardware Status tab in vCenter. You can do this if you want to erase the history of errors related to the hardware that you replaced. Learn more. |