

テスト手順
 変更を提案
変更を提案
このセクションでは、検証を完了するために必要なタスクについて説明します。
前提条件
このセクションで説明するタスクを実行するには、次のツールがインストールおよび構成された Linux または macOS ホストにアクセスできる必要があります。
-
Kubectl (既存の Kubernetes クラスターにアクセスできるように構成)
-
インストールと設定の手順については、 "ここをクリックしてください。" 。
-
-
Kubernetes 用NetApp DataOps ツールキット
-
インストール手順については、 "ここをクリックしてください。" 。
-
シナリオ1 – JupyterLabでのオンデマンド推論
-
AI/ML 推論ワークロード用の Kubernetes 名前空間を作成します。
$ kubectl create namespace inference
namespace/inference created
-
NetApp DataOps Toolkit を使用して、推論を実行するデータを保存するための永続ボリュームをプロビジョニングします。
$ netapp_dataops_k8s_cli.py create volume --namespace=inference --pvc-name=inference-data --size=50Gi
Creating PersistentVolumeClaim (PVC) 'inference-data' in namespace 'inference'.
PersistentVolumeClaim (PVC) 'inference-data' created. Waiting for Kubernetes to bind volume to PVC.
Volume successfully created and bound to PersistentVolumeClaim (PVC) 'inference-data' in namespace 'inference'.
-
NetApp DataOps Toolkit を使用して、新しい JupyterLab ワークスペースを作成します。前の手順で作成した永続ボリュームをマウントするには、 `--mount- pvc`オプション。必要に応じて、ワークスペースにNVIDIA GPUを割り当てます。 `-- nvidia-gpu`オプション。
次の例では、永続ボリューム
inference-data`JupyterLabワークスペースコンテナにマウントされます。 `/home/jovyan/data。公式のProject Jupyterコンテナイメージを使用する場合、/home/jovyanJupyterLab Web インターフェース内の最上位ディレクトリとして表示されます。$ netapp_dataops_k8s_cli.py create jupyterlab --namespace=inference --workspace-name=live-inference --size=50Gi --nvidia-gpu=2 --mount-pvc=inference-data:/home/jovyan/data Set workspace password (this password will be required in order to access the workspace): Re-enter password: Creating persistent volume for workspace... Creating PersistentVolumeClaim (PVC) 'ntap-dsutil-jupyterlab-live-inference' in namespace 'inference'. PersistentVolumeClaim (PVC) 'ntap-dsutil-jupyterlab-live-inference' created. Waiting for Kubernetes to bind volume to PVC. Volume successfully created and bound to PersistentVolumeClaim (PVC) 'ntap-dsutil-jupyterlab-live-inference' in namespace 'inference'. Creating Service 'ntap-dsutil-jupyterlab-live-inference' in namespace 'inference'. Service successfully created. Attaching Additional PVC: 'inference-data' at mount_path: '/home/jovyan/data'. Creating Deployment 'ntap-dsutil-jupyterlab-live-inference' in namespace 'inference'. Deployment 'ntap-dsutil-jupyterlab-live-inference' created. Waiting for Deployment 'ntap-dsutil-jupyterlab-live-inference' to reach Ready state. Deployment successfully created. Workspace successfully created. To access workspace, navigate to http://192.168.0.152:32721
-
出力に指定されたURLを使用してJupyterLabワークスペースにアクセスします。 `create jupyterlab`指示。データ ディレクトリは、ワークスペースにマウントされた永続ボリュームを表します。
-
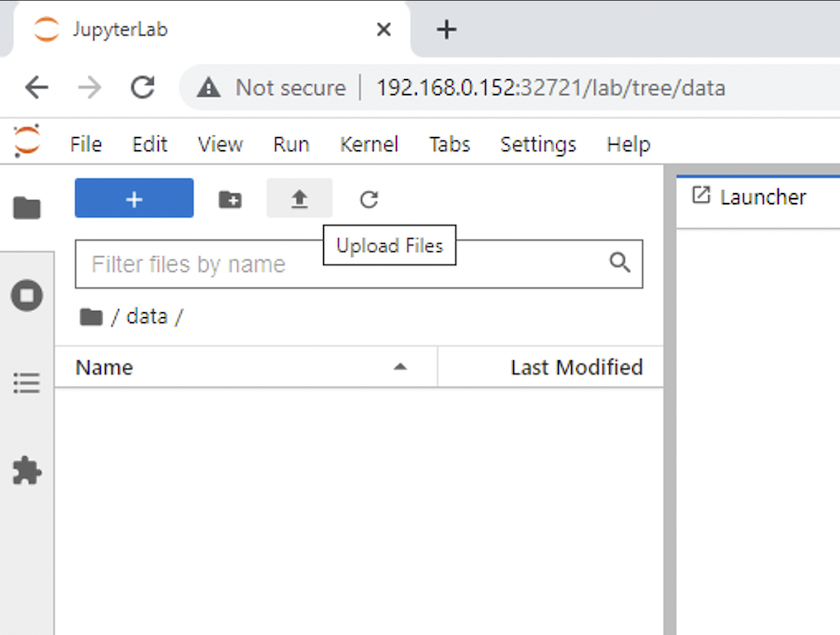
開く `data`ディレクトリを作成し、推論を実行するファイルをアップロードします。ファイルがデータ ディレクトリにアップロードされると、ワークスペースにマウントされた永続ボリュームに自動的に保存されます。ファイルをアップロードするには、次の画像に示すように、「ファイルのアップロード」アイコンをクリックします。
-
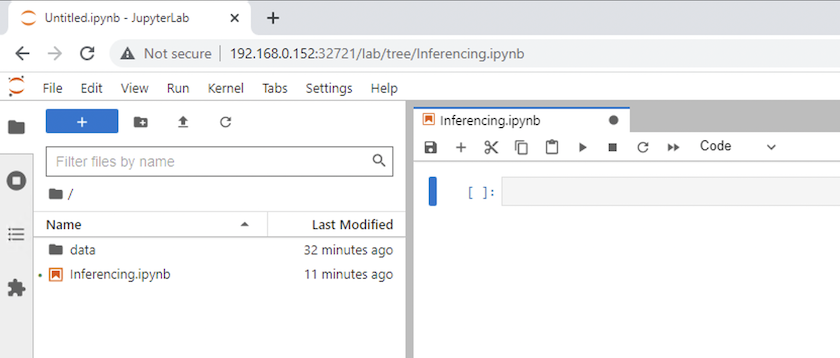
最上位ディレクトリに戻り、新しいノートブックを作成します。
-
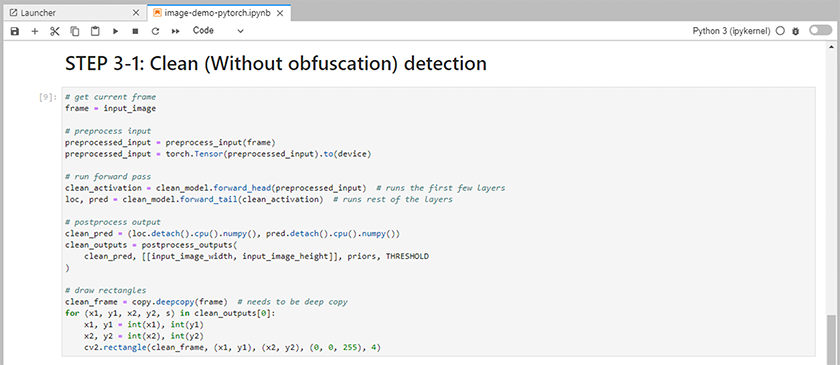
推論コードをノートブックに追加します。次の例は、画像検出ユースケースの推論コードを示しています。
-
推論コードに Protopia 難読化を追加します。 Protopia は顧客と直接連携してユースケース固有のドキュメントを提供しており、この技術レポートの範囲外です。次の例は、Protopia 難読化が追加された画像検出ユースケースの推論コードを示しています。
シナリオ2 – Kubernetesでのバッチ推論
-
AI/ML 推論ワークロード用の Kubernetes 名前空間を作成します。
$ kubectl create namespace inference
namespace/inference created
-
NetApp DataOps Toolkit を使用して、推論を実行するデータを保存するための永続ボリュームをプロビジョニングします。
$ netapp_dataops_k8s_cli.py create volume --namespace=inference --pvc-name=inference-data --size=50Gi
Creating PersistentVolumeClaim (PVC) 'inference-data' in namespace 'inference'.
PersistentVolumeClaim (PVC) 'inference-data' created. Waiting for Kubernetes to bind volume to PVC.
Volume successfully created and bound to PersistentVolumeClaim (PVC) 'inference-data' in namespace 'inference'.
-
新しい永続ボリュームに推論を実行するデータを入力します。
PVC にデータをロードする方法はいくつかあります。データが現在NetApp StorageGRIDやAmazon S3などのS3互換オブジェクトストレージプラットフォームに保存されている場合は、 "NetApp DataOps Toolkit S3 データムーバーの機能" 。もう1つの簡単な方法は、JupyterLabワークスペースを作成し、JupyterLabウェブインターフェースからファイルをアップロードすることです。これは、「シナリオ1 – JupyterLabでのオンデマンド推論 。"
-
バッチ推論タスク用の Kubernetes ジョブを作成します。次の例は、画像検出ユースケースのバッチ推論ジョブを示しています。このジョブは、画像セット内の各画像に対して推論を実行し、推論精度メトリックを stdout に書き込みます。
$ vi inference-job-raw.yaml apiVersion: batch/v1 kind: Job metadata: name: netapp-inference-raw namespace: inference spec: backoffLimit: 5 template: spec: volumes: - name: data persistentVolumeClaim: claimName: inference-data - name: dshm emptyDir: medium: Memory containers: - name: inference image: netapp-protopia-inference:latest imagePullPolicy: IfNotPresent command: ["python3", "run-accuracy-measurement.py", "--dataset", "/data/netapp-face-detection/FDDB"] resources: limits: nvidia.com/gpu: 2 volumeMounts: - mountPath: /data name: data - mountPath: /dev/shm name: dshm restartPolicy: Never $ kubectl create -f inference-job-raw.yaml job.batch/netapp-inference-raw created -
推論ジョブが正常に完了したことを確認します。
$ kubectl -n inference logs netapp-inference-raw-255sp
100%|██████████| 89/89 [00:52<00:00,  1.68it/s]
Reading Predictions : 100%|██████████| 10/10 [00:01<00:00,  6.23it/s]
Predicting ... : 100%|██████████| 10/10 [00:16<00:00,  1.64s/it]
==================== Results ====================
FDDB-fold-1 Val AP: 0.9491256561145955
FDDB-fold-2 Val AP: 0.9205024466101926
FDDB-fold-3 Val AP: 0.9253013871078468
FDDB-fold-4 Val AP: 0.9399781485863011
FDDB-fold-5 Val AP: 0.9504280149478732
FDDB-fold-6 Val AP: 0.9416473519339292
FDDB-fold-7 Val AP: 0.9241631566241117
FDDB-fold-8 Val AP: 0.9072663297546659
FDDB-fold-9 Val AP: 0.9339648715035469
FDDB-fold-10 Val AP: 0.9447707905560152
FDDB Dataset Average AP: 0.9337148153739079
=================================================
mAP: 0.9337148153739079
-
推論ジョブに Protopia 難読化を追加します。 Protopia から直接 Protopia 難読化を追加するためのユースケース固有の手順は、この技術レポートの範囲外です。次の例は、ALPHA 値 0.8 を使用して Protopia 難読化を追加した顔検出ユースケースのバッチ推論ジョブを示しています。このジョブは、画像セット内の各画像に対して推論を実行する前に Protopia 難読化を適用し、推論精度メトリックを標準出力に書き込みます。
この手順を ALPHA 値 0.05、0.1、0.2、0.4、0.6、0.8、0.9、0.95 に対して繰り返しました。結果は以下でご覧いただけます"推論精度の比較。"
$ vi inference-job-protopia-0.8.yaml apiVersion: batch/v1 kind: Job metadata: name: netapp-inference-protopia-0.8 namespace: inference spec: backoffLimit: 5 template: spec: volumes: - name: data persistentVolumeClaim: claimName: inference-data - name: dshm emptyDir: medium: Memory containers: - name: inference image: netapp-protopia-inference:latest imagePullPolicy: IfNotPresent env: - name: ALPHA value: "0.8" command: ["python3", "run-accuracy-measurement.py", "--dataset", "/data/netapp-face-detection/FDDB", "--alpha", "$(ALPHA)", "--noisy"] resources: limits: nvidia.com/gpu: 2 volumeMounts: - mountPath: /data name: data - mountPath: /dev/shm name: dshm restartPolicy: Never $ kubectl create -f inference-job-protopia-0.8.yaml job.batch/netapp-inference-protopia-0.8 created -
推論ジョブが正常に完了したことを確認します。
$ kubectl -n inference logs netapp-inference-protopia-0.8-b4dkz
100%|██████████| 89/89 [01:05<00:00,  1.37it/s]
Reading Predictions : 100%|██████████| 10/10 [00:02<00:00,  3.67it/s]
Predicting ... : 100%|██████████| 10/10 [00:22<00:00,  2.24s/it]
==================== Results ====================
FDDB-fold-1 Val AP: 0.8953066115834589
FDDB-fold-2 Val AP: 0.8819580264029936
FDDB-fold-3 Val AP: 0.8781107458462862
FDDB-fold-4 Val AP: 0.9085731346308461
FDDB-fold-5 Val AP: 0.9166445508275378
FDDB-fold-6 Val AP: 0.9101178994188819
FDDB-fold-7 Val AP: 0.8383443678423771
FDDB-fold-8 Val AP: 0.8476311547659464
FDDB-fold-9 Val AP: 0.8739624502111121
FDDB-fold-10 Val AP: 0.8905468076424851
FDDB Dataset Average AP: 0.8841195749171925
=================================================
mAP: 0.8841195749171925
シナリオ3 – NVIDIA Triton推論サーバー
-
AI/ML 推論ワークロード用の Kubernetes 名前空間を作成します。
$ kubectl create namespace inference
namespace/inference created
-
NetApp DataOps Toolkit を使用して、 NVIDIA Triton Inference Server のモデル リポジトリとして使用する永続ボリュームをプロビジョニングします。
$ netapp_dataops_k8s_cli.py create volume --namespace=inference --pvc-name=triton-model-repo --size=100Gi
Creating PersistentVolumeClaim (PVC) 'triton-model-repo' in namespace 'inference'.
PersistentVolumeClaim (PVC) 'triton-model-repo' created. Waiting for Kubernetes to bind volume to PVC.
Volume successfully created and bound to PersistentVolumeClaim (PVC) 'triton-model-repo' in namespace 'inference'.
-
モデルを新しい永続ボリュームに保存します。 "形式" NVIDIA Triton 推論サーバーによって認識されます。
PVC にデータをロードする方法はいくつかあります。簡単な方法は、JupyterLabワークスペースを作成し、JupyterLabウェブインターフェースからファイルをアップロードすることです。これは、「シナリオ1 – JupyterLabでのオンデマンド推論 。"
-
NetApp DataOps Toolkit を使用して、新しいNVIDIA Triton Inference Server インスタンスを展開します。
$ netapp_dataops_k8s_cli.py create triton-server --namespace=inference --server-name=netapp-inference --model-repo-pvc-name=triton-model-repo
Creating Service 'ntap-dsutil-triton-netapp-inference' in namespace 'inference'.
Service successfully created.
Creating Deployment 'ntap-dsutil-triton-netapp-inference' in namespace 'inference'.
Deployment 'ntap-dsutil-triton-netapp-inference' created.
Waiting for Deployment 'ntap-dsutil-triton-netapp-inference' to reach Ready state.
Deployment successfully created.
Server successfully created.
Server endpoints:
http: 192.168.0.152: 31208
grpc: 192.168.0.152: 32736
metrics: 192.168.0.152: 30009/metrics
-
Triton クライアント SDK を使用して推論タスクを実行します。次の Python コードの抜粋では、Triton Python クライアント SDK を使用して、顔検出ユースケースの推論タスクを実行します。この例では、Triton API を呼び出して推論用の画像を渡します。その後、Triton 推論サーバーはリクエストを受信し、モデルを呼び出し、推論出力を API 結果の一部として返します。
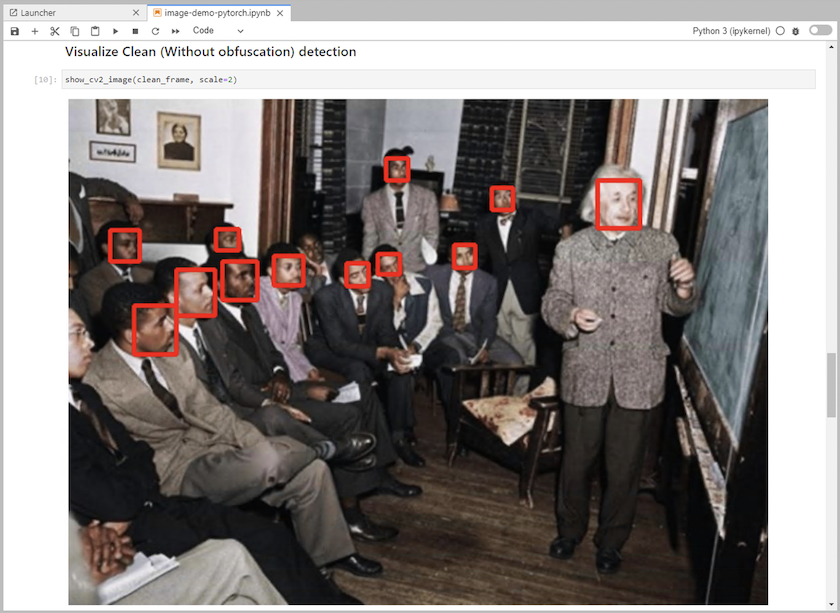
# get current frame frame = input_image # preprocess input preprocessed_input = preprocess_input(frame) preprocessed_input = torch.Tensor(preprocessed_input).to(device) # run forward pass clean_activation = clean_model_head(preprocessed_input) # runs the first few layers ###################################################################################### # pass clean image to Triton Inference Server API for inferencing # ###################################################################################### triton_client = httpclient.InferenceServerClient(url="192.168.0.152:31208", verbose=False) model_name = "face_detection_base" inputs = [] outputs = [] inputs.append(httpclient.InferInput("INPUT__0", [1, 128, 32, 32], "FP32")) inputs[0].set_data_from_numpy(clean_activation.detach().cpu().numpy(), binary_data=False) outputs.append(httpclient.InferRequestedOutput("OUTPUT__0", binary_data=False)) outputs.append(httpclient.InferRequestedOutput("OUTPUT__1", binary_data=False)) results = triton_client.infer( model_name, inputs, outputs=outputs, #query_params=query_params, headers=None, request_compression_algorithm=None, response_compression_algorithm=None) #print(results.get_response()) statistics = triton_client.get_inference_statistics(model_name=model_name, headers=None) print(statistics) if len(statistics["model_stats"]) != 1: print("FAILED: Inference Statistics") sys.exit(1) loc_numpy = results.as_numpy("OUTPUT__0") pred_numpy = results.as_numpy("OUTPUT__1") ###################################################################################### # postprocess output clean_pred = (loc_numpy, pred_numpy) clean_outputs = postprocess_outputs( clean_pred, [[input_image_width, input_image_height]], priors, THRESHOLD ) # draw rectangles clean_frame = copy.deepcopy(frame) # needs to be deep copy for (x1, y1, x2, y2, s) in clean_outputs[0]: x1, y1 = int(x1), int(y1) x2, y2 = int(x2), int(y2) cv2.rectangle(clean_frame, (x1, y1), (x2, y2), (0, 0, 255), 4) -
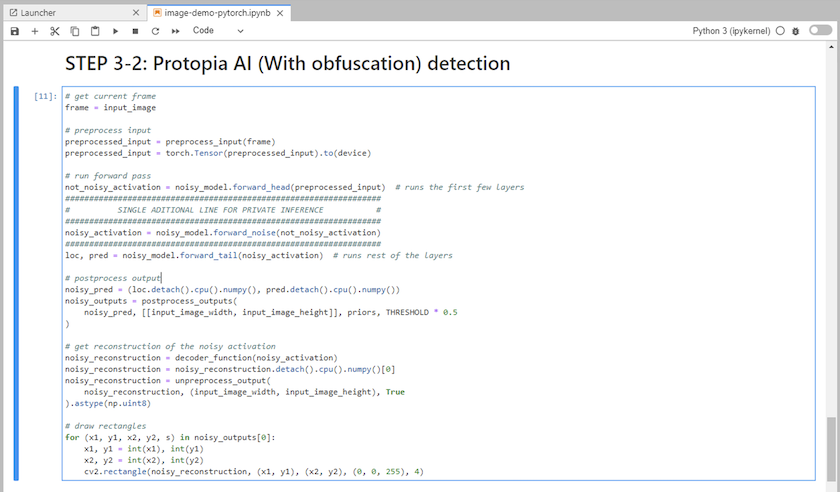
推論コードに Protopia 難読化を追加します。 Protopia から直接 Protopia 難読化を追加するためのユースケース固有の手順は見つかりますが、このプロセスはこの技術レポートの範囲外です。次の例は、前の手順 5 で示したものと同じ Python コードですが、Protopia の難読化が追加されています。
画像が Triton API に渡される前に、Protopia 難読化が画像に適用されることに注意してください。したがって、難読化されていないイメージはローカル マシンから外に出ることはありません。難読化された画像のみがネットワークを介して渡されます。このワークフローは、データが信頼できるゾーン内で収集されるが、推論のためにその信頼できるゾーンの外部に渡す必要があるユースケースに適用できます。 Protopia の難読化がなければ、機密データが信頼できるゾーンから出ることなく、このタイプのワークフローを実装することはできません。
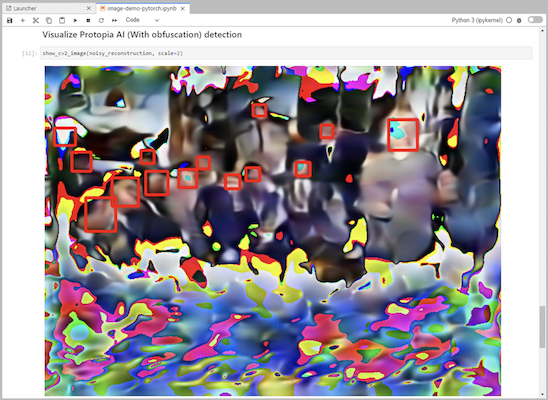
# get current frame
frame = input_image
# preprocess input
preprocessed_input = preprocess_input(frame)
preprocessed_input = torch.Tensor(preprocessed_input).to(device)
# run forward pass
not_noisy_activation = noisy_model_head(preprocessed_input)  # runs the first few layers
##################################################################
#          obfuscate image locally prior to inferencing          #
#          SINGLE ADITIONAL LINE FOR PRIVATE INFERENCE           #
##################################################################
noisy_activation = noisy_model_noise(not_noisy_activation)
##################################################################
###########################################################################################
#          pass obfuscated image to Triton Inference Server API for inferencing           #
###########################################################################################
triton_client = httpclient.InferenceServerClient(url="192.168.0.152:31208", verbose=False)
model_name = "face_detection_noisy"
inputs = []
outputs = []
inputs.append(httpclient.InferInput("INPUT__0", [1, 128, 32, 32], "FP32"))
inputs[0].set_data_from_numpy(noisy_activation.detach().cpu().numpy(), binary_data=False)
outputs.append(httpclient.InferRequestedOutput("OUTPUT__0", binary_data=False))
outputs.append(httpclient.InferRequestedOutput("OUTPUT__1", binary_data=False))
results = triton_client.infer(
    model_name,
    inputs,
    outputs=outputs,
    #query_params=query_params,
    headers=None,
    request_compression_algorithm=None,
    response_compression_algorithm=None)
#print(results.get_response())
statistics = triton_client.get_inference_statistics(model_name=model_name, headers=None)
print(statistics)
if len(statistics["model_stats"]) != 1:
    print("FAILED: Inference Statistics")
    sys.exit(1)

loc_numpy = results.as_numpy("OUTPUT__0")
pred_numpy = results.as_numpy("OUTPUT__1")
###########################################################################################

# postprocess output
noisy_pred = (loc_numpy, pred_numpy)
noisy_outputs = postprocess_outputs(
    noisy_pred, [[input_image_width, input_image_height]], priors, THRESHOLD * 0.5
)
# get reconstruction of the noisy activation
noisy_reconstruction = decoder_function(noisy_activation)
noisy_reconstruction = noisy_reconstruction.detach().cpu().numpy()[0]
noisy_reconstruction = unpreprocess_output(
    noisy_reconstruction, (input_image_width, input_image_height), True
).astype(np.uint8)
# draw rectangles
for (x1, y1, x2, y2, s) in noisy_outputs[0]:
    x1, y1 = int(x1), int(y1)
    x2, y2 = int(x2), int(y2)
    cv2.rectangle(noisy_reconstruction, (x1, y1), (x2, y2), (0, 0, 255), 4)