

SnapCenter 사용한 벡터 데이터베이스 보호
 변경 제안
변경 제안
이 섹션에서는 NetApp SnapCenter 사용하여 벡터 데이터베이스에 대한 데이터 보호를 제공하는 방법을 설명합니다.
NetApp SnapCenter 사용한 벡터 데이터베이스 보호.
예를 들어, 영화 제작 산업에서 고객은 종종 비디오 및 오디오 파일과 같은 중요한 내장 데이터를 보유하고 있습니다. 하드 드라이브 오류 등의 문제로 인해 이러한 데이터가 손실되면 운영에 상당한 영향을 미칠 수 있으며, 수백만 달러 규모의 사업이 위험에 처할 수도 있습니다. 우리는 귀중한 콘텐츠가 손실되어 상당한 중단과 재정적 손실을 초래하는 사례들을 경험했습니다. 따라서 이 필수 데이터의 보안과 무결성을 보장하는 것이 이 업계에서 가장 중요합니다. 이 섹션에서는 SnapCenter ONTAP 에 있는 벡터 데이터베이스 데이터와 Milvus 데이터를 어떻게 보호하는지 자세히 살펴보겠습니다. 이 예에서는 고객 데이터에 대해 NFS ONTAP 볼륨(vol1)에서 파생된 NAS 버킷(milvusdbvol1)을 활용했으며 Milvus 클러스터 구성 데이터에 대해 별도의 NFS 볼륨(vectordbpv)을 활용했습니다. 다음을 확인하십시오."여기" SnapCenter 백업 워크플로우용
-
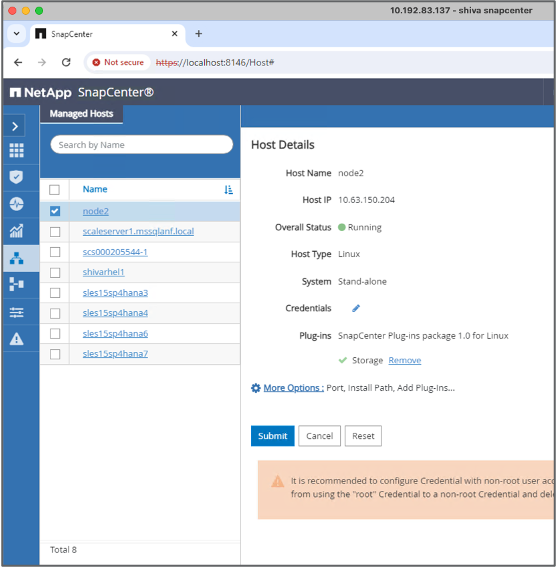
SnapCenter 명령을 실행하는 데 사용될 호스트를 설정합니다.
-
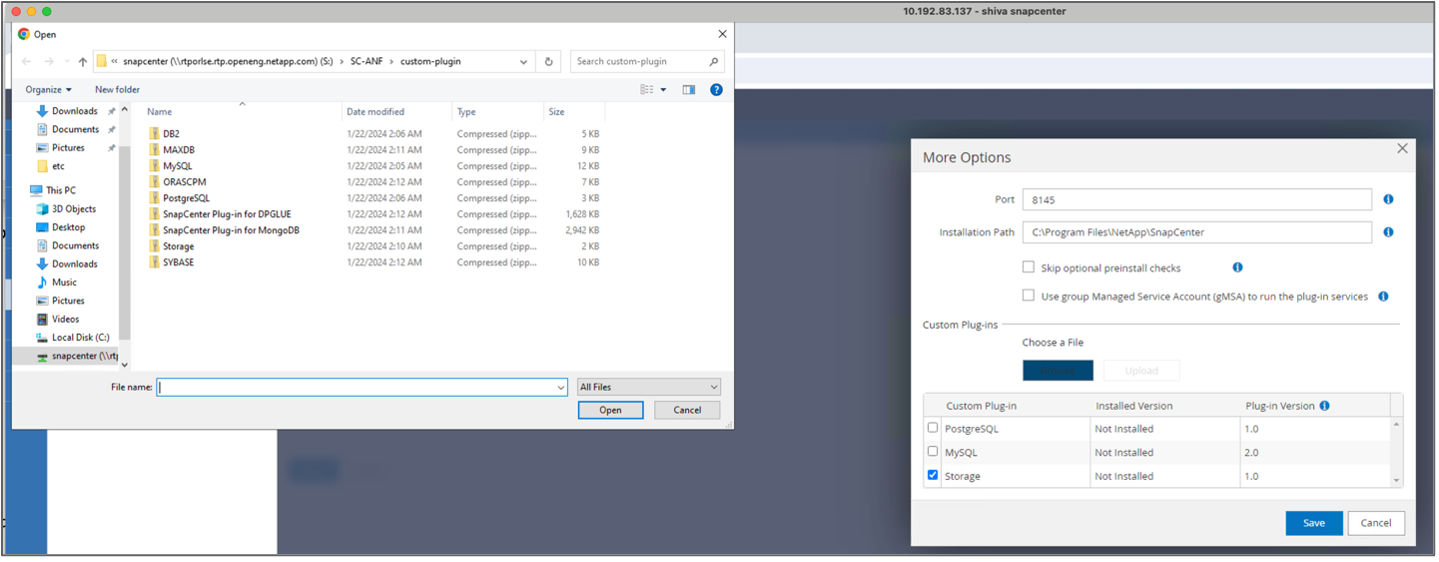
스토리지 플러그인을 설치하고 구성합니다. 추가된 호스트에서 "추가 옵션"을 선택하세요. 다운로드한 저장소 플러그인을 탐색하여 선택하세요."NetApp 자동화 스토어" . 플러그인을 설치하고 구성을 저장합니다.
-
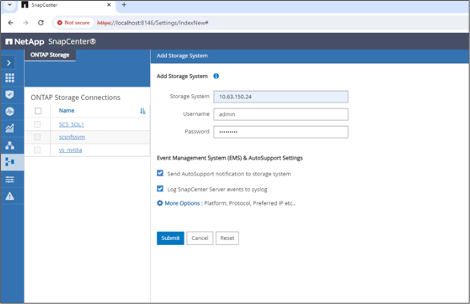
스토리지 시스템 및 볼륨 설정: "스토리지 시스템"에서 스토리지 시스템을 추가하고 SVM(스토리지 가상 머신)을 선택합니다. 이 예에서는 "vs_nvidia"를 선택했습니다.
-
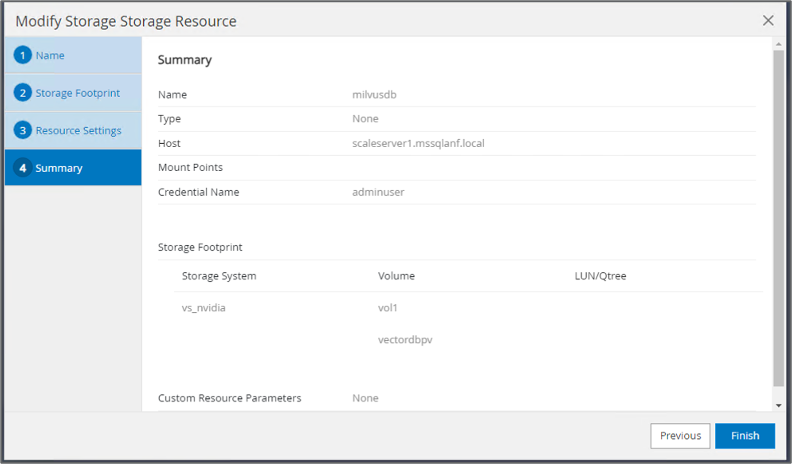
백업 정책과 사용자 정의 스냅샷 이름을 통합하여 벡터 데이터베이스에 대한 리소스를 설정합니다.
-
기본값으로 일관성 그룹 백업을 활성화하고 파일 시스템 일관성 없이 SnapCenter 활성화합니다.
-
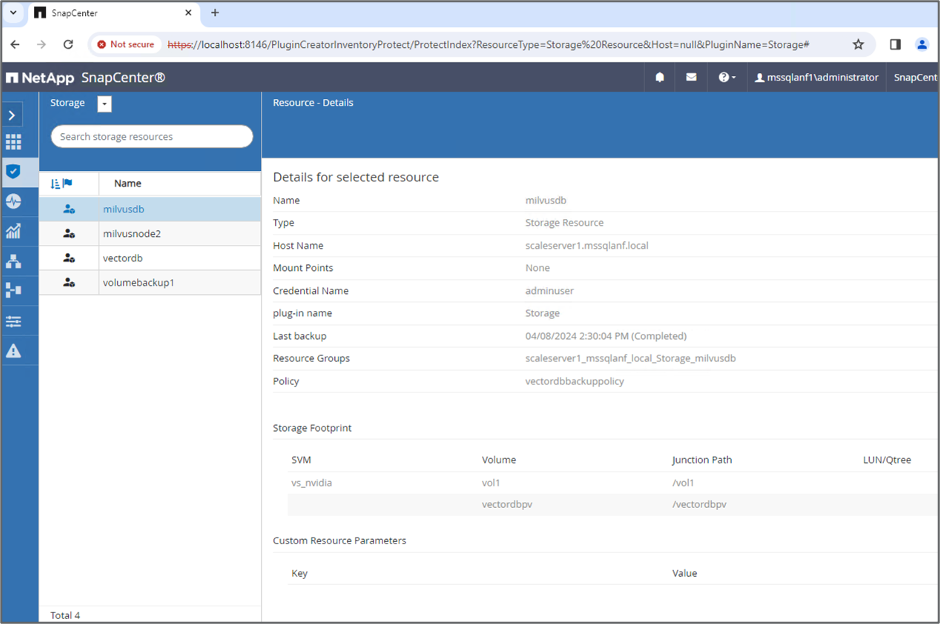
저장소 공간 섹션에서 벡터 데이터베이스 고객 데이터와 Milvus 클러스터 데이터와 연결된 볼륨을 선택합니다. 우리의 예에서는 "vol1"과 "vectordbpv"가 있습니다.
-
벡터 데이터베이스 보호에 대한 정책을 만들고 해당 정책을 사용하여 벡터 데이터베이스 리소스를 보호합니다.
-
-
Python 스크립트를 사용하여 S3 NAS 버킷에 데이터를 삽입합니다. 우리의 경우 Milvus가 제공한 백업 스크립트인 'prepare_data_netapp.py'를 수정하고 'sync' 명령을 실행하여 운영 체제에서 데이터를 플러시했습니다.
root@node2:~# python3 prepare_data_netapp.py === start connecting to Milvus === === Milvus host: localhost === Does collection hello_milvus_netapp_sc_test exist in Milvus: False === Create collection `hello_milvus_netapp_sc_test` === === Start inserting entities === Number of entities in hello_milvus_netapp_sc_test: 3000 === Create collection `hello_milvus_netapp_sc_test2` === Number of entities in hello_milvus_netapp_sc_test2: 6000 root@node2:~# for i in 2 3 4 5 6 ; do ssh node$i "hostname; sync; echo 'sync executed';" ; done node2 sync executed node3 sync executed node4 sync executed node5 sync executed node6 sync executed root@node2:~# -
S3 NAS 버킷의 데이터를 확인합니다. 예를 들어, 타임스탬프가 '2024-04-08 21:22'인 파일은 'prepare_data_netapp.py' 스크립트에 의해 생성되었습니다.
root@node2:~# aws s3 ls --profile ontaps3 s3://milvusdbvol1/ --recursive | grep '2024-04-08' <output content removed to save page space> 2024-04-08 21:18:14 5656 stats_log/448950615991000809/448950615991000810/448950615991001854/100/1 2024-04-08 21:18:12 5654 stats_log/448950615991000809/448950615991000810/448950615991001854/100/448950615990800869 2024-04-08 21:18:17 5656 stats_log/448950615991000809/448950615991000810/448950615991001872/100/1 2024-04-08 21:18:15 5654 stats_log/448950615991000809/448950615991000810/448950615991001872/100/448950615990800876 2024-04-08 21:22:46 5625 stats_log/448950615991003377/448950615991003378/448950615991003385/100/1 2024-04-08 21:22:45 5623 stats_log/448950615991003377/448950615991003378/448950615991003385/100/448950615990800899 2024-04-08 21:22:49 5656 stats_log/448950615991003408/448950615991003409/448950615991003416/100/1 2024-04-08 21:22:47 5654 stats_log/448950615991003408/448950615991003409/448950615991003416/100/448950615990800906 2024-04-08 21:22:52 5656 stats_log/448950615991003408/448950615991003409/448950615991003434/100/1 2024-04-08 21:22:50 5654 stats_log/448950615991003408/448950615991003409/448950615991003434/100/448950615990800913 root@node2:~# -
'milvusdb' 리소스의 일관성 그룹(CG) 스냅샷을 사용하여 백업을 시작합니다.
-
백업 기능을 테스트하기 위해 백업 프로세스 후에 새 테이블을 추가하거나 NFS(S3 NAS 버킷)에서 일부 데이터를 제거했습니다.
이 테스트에서는 백업 후 누군가가 새롭고 불필요하거나 부적절한 컬렉션을 만든 상황을 상상해 보세요. 이런 경우에는 새로운 컬렉션이 추가되기 전 상태로 벡터 데이터베이스를 되돌려야 합니다. 예를 들어, 'hello_milvus_netapp_sc_testnew' 및 'hello_milvus_netapp_sc_testnew2'와 같은 새로운 컬렉션이 삽입되었습니다.
root@node2:~# python3 prepare_data_netapp.py === start connecting to Milvus === === Milvus host: localhost === Does collection hello_milvus_netapp_sc_testnew exist in Milvus: False === Create collection `hello_milvus_netapp_sc_testnew` === === Start inserting entities === Number of entities in hello_milvus_netapp_sc_testnew: 3000 === Create collection `hello_milvus_netapp_sc_testnew2` === Number of entities in hello_milvus_netapp_sc_testnew2: 6000 root@node2:~# -
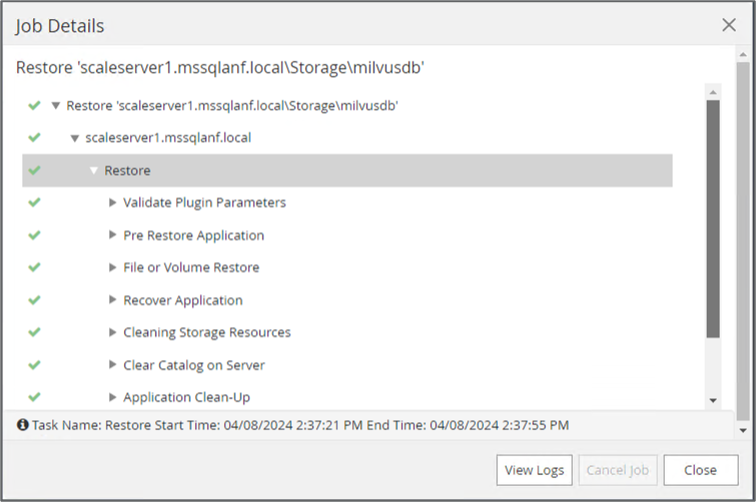
이전 스냅샷에서 S3 NAS 버킷의 전체 복원을 실행합니다.
-
Python 스크립트를 사용하여 'hello_milvus_netapp_sc_test' 및 'hello_milvus_netapp_sc_test2' 컬렉션의 데이터를 확인합니다.
root@node2:~# python3 verify_data_netapp.py === start connecting to Milvus === === Milvus host: localhost === Does collection hello_milvus_netapp_sc_test exist in Milvus: True {'auto_id': False, 'description': 'hello_milvus_netapp_sc_test', 'fields': [{'name': 'pk', 'description': '', 'type': <DataType.INT64: 5>, 'is_primary': True, 'auto_id': False}, {'name': 'random', 'description': '', 'type': <DataType.DOUBLE: 11>}, {'name': 'var', 'description': '', 'type': <DataType.VARCHAR: 21>, 'params': {'max_length': 65535}}, {'name': 'embeddings', 'description': '', 'type': <DataType.FLOAT_VECTOR: 101>, 'params': {'dim': 8}}]} Number of entities in Milvus: hello_milvus_netapp_sc_test : 3000 === Start Creating index IVF_FLAT === === Start loading === === Start searching based on vector similarity === hit: id: 2998, distance: 0.0, entity: {'random': 0.9728033590489911}, random field: 0.9728033590489911 hit: id: 1262, distance: 0.08883658051490784, entity: {'random': 0.2978858685751561}, random field: 0.2978858685751561 hit: id: 1265, distance: 0.09590047597885132, entity: {'random': 0.3042039939240304}, random field: 0.3042039939240304 hit: id: 2999, distance: 0.0, entity: {'random': 0.02316334456872482}, random field: 0.02316334456872482 hit: id: 1580, distance: 0.05628091096878052, entity: {'random': 0.3855988746044062}, random field: 0.3855988746044062 hit: id: 2377, distance: 0.08096685260534286, entity: {'random': 0.8745922204004368}, random field: 0.8745922204004368 search latency = 0.2832s === Start querying with `random > 0.5` === query result: -{'random': 0.6378742006852851, 'embeddings': [0.20963514, 0.39746657, 0.12019053, 0.6947492, 0.9535575, 0.5454552, 0.82360446, 0.21096309], 'pk': 0} search latency = 0.2257s === Start hybrid searching with `random > 0.5` === hit: id: 2998, distance: 0.0, entity: {'random': 0.9728033590489911}, random field: 0.9728033590489911 hit: id: 747, distance: 0.14606499671936035, entity: {'random': 0.5648774800635661}, random field: 0.5648774800635661 hit: id: 2527, distance: 0.1530652642250061, entity: {'random': 0.8928974315571507}, random field: 0.8928974315571507 hit: id: 2377, distance: 0.08096685260534286, entity: {'random': 0.8745922204004368}, random field: 0.8745922204004368 hit: id: 2034, distance: 0.20354536175727844, entity: {'random': 0.5526117606328499}, random field: 0.5526117606328499 hit: id: 958, distance: 0.21908017992973328, entity: {'random': 0.6647383716417955}, random field: 0.6647383716417955 search latency = 0.5480s Does collection hello_milvus_netapp_sc_test2 exist in Milvus: True {'auto_id': True, 'description': 'hello_milvus_netapp_sc_test2', 'fields': [{'name': 'pk', 'description': '', 'type': <DataType.INT64: 5>, 'is_primary': True, 'auto_id': True}, {'name': 'random', 'description': '', 'type': <DataType.DOUBLE: 11>}, {'name': 'var', 'description': '', 'type': <DataType.VARCHAR: 21>, 'params': {'max_length': 65535}}, {'name': 'embeddings', 'description': '', 'type': <DataType.FLOAT_VECTOR: 101>, 'params': {'dim': 8}}]} Number of entities in Milvus: hello_milvus_netapp_sc_test2 : 6000 === Start Creating index IVF_FLAT === === Start loading === === Start searching based on vector similarity === hit: id: 448950615990642008, distance: 0.07805602252483368, entity: {'random': 0.5326684390871348}, random field: 0.5326684390871348 hit: id: 448950615990645009, distance: 0.07805602252483368, entity: {'random': 0.5326684390871348}, random field: 0.5326684390871348 hit: id: 448950615990640618, distance: 0.13562293350696564, entity: {'random': 0.7864676926688837}, random field: 0.7864676926688837 hit: id: 448950615990642314, distance: 0.10414951294660568, entity: {'random': 0.2209597460821181}, random field: 0.2209597460821181 hit: id: 448950615990645315, distance: 0.10414951294660568, entity: {'random': 0.2209597460821181}, random field: 0.2209597460821181 hit: id: 448950615990640004, distance: 0.11571306735277176, entity: {'random': 0.7765521996186631}, random field: 0.7765521996186631 search latency = 0.2381s === Start querying with `random > 0.5` === query result: -{'embeddings': [0.15983285, 0.72214717, 0.7414838, 0.44471496, 0.50356466, 0.8750043, 0.316556, 0.7871702], 'pk': 448950615990639798, 'random': 0.7820620141382767} search latency = 0.3106s === Start hybrid searching with `random > 0.5` === hit: id: 448950615990642008, distance: 0.07805602252483368, entity: {'random': 0.5326684390871348}, random field: 0.5326684390871348 hit: id: 448950615990645009, distance: 0.07805602252483368, entity: {'random': 0.5326684390871348}, random field: 0.5326684390871348 hit: id: 448950615990640618, distance: 0.13562293350696564, entity: {'random': 0.7864676926688837}, random field: 0.7864676926688837 hit: id: 448950615990640004, distance: 0.11571306735277176, entity: {'random': 0.7765521996186631}, random field: 0.7765521996186631 hit: id: 448950615990643005, distance: 0.11571306735277176, entity: {'random': 0.7765521996186631}, random field: 0.7765521996186631 hit: id: 448950615990640402, distance: 0.13665105402469635, entity: {'random': 0.9742541034109935}, random field: 0.9742541034109935 search latency = 0.4906s root@node2:~# -
불필요하거나 부적절한 컬렉션이 더 이상 데이터베이스에 존재하지 않는지 확인하세요.
root@node2:~# python3 verify_data_netapp.py

=== start connecting to Milvus     ===


=== Milvus host: localhost         ===

Does collection hello_milvus_netapp_sc_testnew exist in Milvus: False
Traceback (most recent call last):
  File "/root/verify_data_netapp.py", line 37, in <module>
    recover_collection = Collection(recover_collection_name)
  File "/usr/local/lib/python3.10/dist-packages/pymilvus/orm/collection.py", line 137, in __init__
    raise SchemaNotReadyException(
pymilvus.exceptions.SchemaNotReadyException: <SchemaNotReadyException: (code=1, message=Collection 'hello_milvus_netapp_sc_testnew' not exist, or you can pass in schema to create one.)>
root@node2:~#
결론적으로, ONTAP 에 있는 벡터 데이터베이스 데이터와 Milvus 데이터를 보호하기 위해 NetApp의 SnapCenter 사용하면 고객에게 상당한 이점을 제공하며, 특히 영화 제작과 같이 데이터 무결성이 가장 중요한 산업의 고객에게 큰 이점을 제공합니다. SnapCenter는 일관된 백업을 생성하고 전체 데이터 복원을 수행할 수 있는 기능을 통해 내장된 비디오 및 오디오 파일과 같은 중요한 데이터가 하드 드라이브 오류나 기타 문제로 인한 손실로부터 보호됩니다. 이는 운영 중단을 방지할 뿐만 아니라 상당한 재정적 손실로부터도 보호해줍니다.
이 섹션에서는 호스트 설정, 스토리지 플러그인 설치 및 구성, 사용자 정의 스냅샷 이름을 사용하여 벡터 데이터베이스에 대한 리소스 생성을 포함하여 ONTAP 에 있는 데이터를 보호하기 위해 SnapCenter 구성하는 방법을 보여주었습니다. 또한 일관성 그룹 스냅샷을 사용하여 백업을 수행하고 S3 NAS 버킷의 데이터를 검증하는 방법도 보여드렸습니다.
더 나아가, 백업 후 불필요하거나 부적절한 컬렉션이 생성되는 시나리오를 시뮬레이션했습니다. 이런 경우 SnapCenter는 이전 스냅샷에서 전체 복원을 수행할 수 있는 기능을 통해 벡터 데이터베이스를 새 컬렉션을 추가하기 전 상태로 되돌릴 수 있으므로 데이터베이스의 무결성을 유지할 수 있습니다. 특정 시점으로 데이터를 복원하는 기능은 고객에게 매우 귀중하며, 데이터가 안전할 뿐만 아니라 올바르게 유지 관리되고 있다는 확신을 제공합니다. 따라서 NetApp의 SnapCenter 제품은 고객에게 데이터 보호 및 관리를 위한 견고하고 안정적인 솔루션을 제공합니다.