Trident Protect를 사용하여 OpenShift Container Platform의 컨테이너 앱 데이터 보호
 변경 제안
변경 제안
참조 문서의 이 섹션에서는 Trident Protect를 사용하여 Container Apps의 스냅샷 및 백업을 생성하는 방법에 대한 자세한 내용을 제공합니다. NetApp Trident Protect는 NetApp ONTAP 스토리지 시스템과 NetApp Trident CSI 스토리지 프로비저너를 기반으로 하는 스테이트풀 Kubernetes 애플리케이션의 기능과 가용성을 향상시키는 고급 애플리케이션 데이터 관리 기능을 제공합니다. Trident Protect는 애플리케이션 스냅샷 및 백업을 생성합니다. 즉, 영구 볼륨의 애플리케이션 데이터뿐만 아니라 애플리케이션 메타데이터에 대한 스냅샷 및 백업이 생성됩니다. Trident Protect에서 생성된 스냅샷 및 백업은 다음 객체 스토리지 중 하나에 저장하고 나중에 복원할 수 있습니다.
-
AWS S3
-
Azure Blob 저장소
-
구글 클라우드 스토리지
-
ONTAP S3
-
스토리지그리드
-
기타 S3 호환 스토리지
Trident Protect는 Kubernetes 모델의 역할 기반 액세스 제어(RBAC)를 사용합니다. 기본적으로 Trident Protect는 trident-protect라는 단일 시스템 네임스페이스와 해당 기본 서비스 계정을 제공합니다. 사용자 수가 많거나 특정 보안 요구 사항이 있는 조직의 경우 Trident Protect의 RBAC 기능을 활용하여 리소스 및 네임스페이스에 대한 액세스 제어를 더욱 세밀하게 제어할 수 있습니다.
Trident Protect의 RBAC에 대한 추가 정보는 "Trident Protect 문서"에서 확인할 수 있습니다.

|
클러스터 관리자는 기본 trident-protect 네임스페이스의 리소스에 액세스할 수 있으며 다른 모든 네임스페이스의 리소스에도 액세스할 수 있습니다. 사용자는 trident-protect 네임스페이스에서 스냅샷 및 백업 CR과 같은 애플리케이션 데이터 관리 사용자 정의 리소스(CR)를 생성할 수 없습니다. 가장 좋은 방법은 사용자가 애플리케이션 네임스페이스에서 해당 CR을 만드는 것입니다. |
Trident Protect는 설명서"여기"에 제공된 지침을 사용하여 설치할 수 있습니다. 이 섹션에서는 Trident Protect를 사용한 컨테이너 애플리케이션의 데이터 보호 및 애플리케이션 복원 워크플로를 보여줍니다. 1. 스냅샷 생성(필요 시 또는 예약) 2. 스냅샷에서 복원(동일 및 다른 네임스페이스로 복원) 3. 백업 생성 4. 백업에서 복원
필수 조건
애플리케이션의 스냅샷 및 백업을 생성하기 전에 Trident Protect에서 스냅샷과 백업을 저장할 오브젝트 스토리지를 구성해야 합니다. 이는 버킷 CR을 사용하여 수행됩니다. 관리자만 버킷 CR을 생성하고 구성할 수 있습니다. Trident Protect에서 버킷 CR은 AppVault라고 합니다. AppVault 오브젝트는 스토리지 버킷을 Kubernetes 워크플로에서 선언적으로 표현한 것입니다. AppVault CR에는 백업, 스냅샷, 복원 작업 및 SnapMirror 복제와 같은 보호 작업에 버킷을 사용하는 데 필요한 구성이 포함되어 있습니다.
이 예제에서는 ONTAP S3를 객체 스토리지로 사용하는 방법을 보여드리겠습니다. ONTAP S3용 AppVault CR을 생성하는 워크플로는 다음과 같습니다. 1. ONTAP 클러스터의 SVM에 S3 객체 스토어 서버를 생성합니다. 2. 객체 스토어 서버에 버킷을 생성합니다. 3. SVM에 S3 사용자를 생성합니다. 액세스 키와 시크릿 키는 안전한 곳에 보관하십시오. 4. OpenShift에서 ONTAP S3 자격 증명을 저장할 시크릿을 생성합니다. 5. ONTAP S3용 AppVault 객체를 생성합니다.
ONTAP S3용 Trident Protect AppVault 구성
ONTAP S3를 AppVault로 사용하여 Trident Protect를 구성하기 위한 샘플 YAML 파일
# alias tp='tridentctl-protect'

appvault-secret.yaml

apiVersion: v1
stringData:
  accessKeyID: "<access key id created for a user to access ONTAP S3 bucket>"
  secretAccessKey: "corresponding Secret Access Key"
#data:
# base 64 encoded values
#  accessKeyID: <base64 access key id created for a user to access ONTAP S3 bucket>
#  secretAccessKey: <base 64  Secret Access Key>
kind: Secret
metadata:
  name: appvault-secret
  namespace: trident-protect
type: Opaque

appvault.yaml

apiVersion: protect.trident.netapp.io/v1
kind: AppVault
metadata:
  name: ontap-s3-appvault
  namespace: trident-protect
spec:
  providerConfig:
    azure:
      accountName: ""
      bucketName: ""
      endpoint: ""
    gcp:
      bucketName: ""
      projectID: ""
    s3:
      bucketName: <bucket-name for storing the snapshots and backups>
      endpoint: <endpoint IP for S3>
      secure: "false"
      skipCertValidation: "true"
  providerCredentials:
    accessKeyID:
      valueFromSecret:
        key: accessKeyID
        name: appvault-secret
    secretAccessKey:
      valueFromSecret:
        key: secretAccessKey
        name: appvault-secret
  providerType: OntapS3

# oc create -f appvault-secret.yaml -n trident-protect
# oc create -f appvault.yaml -n trident-protect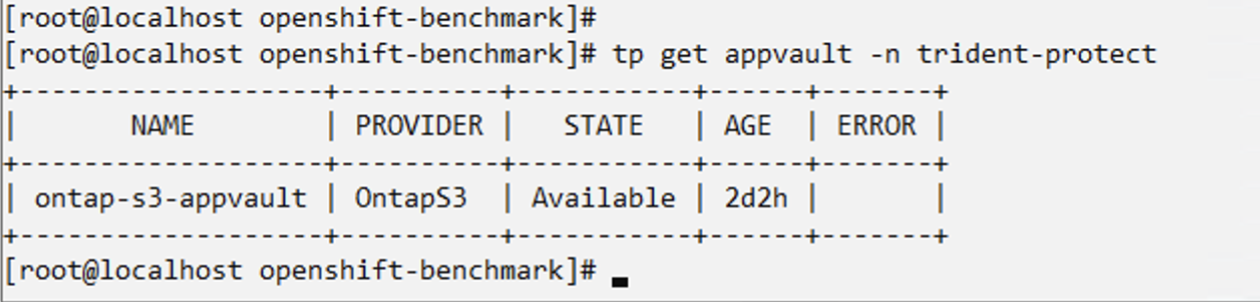
postgresql 앱 설치를 위한 샘플 yaml 파일
postgres.yaml
apiVersion: apps/v1
kind: Deployment
metadata:
name: postgres
spec:
replicas: 1
selector:
matchLabels:
app: postgres
template:
metadata:
labels:
app: postgres
spec:
containers:
- name: postgres
image: postgres:14
env:
- name: POSTGRES_USER
#value: "myuser"
value: "admin"
- name: POSTGRES_PASSWORD
#value: "mypassword"
value: "adminpass"
- name: POSTGRES_DB
value: "mydb"
- name: PGDATA
value: "/var/lib/postgresql/data/pgdata"
ports:
- containerPort: 5432
volumeMounts:
- name: postgres-storage
mountPath: /var/lib/postgresql/data
volumes:
- name: postgres-storage
persistentVolumeClaim:
claimName: postgres-pvc
---
apiVersion: v1
kind: PersistentVolumeClaim
metadata:
name: postgres-pvc
spec:
accessModes:
- ReadWriteOnce
resources:
requests:
storage: 5Gi
---
apiVersion: v1
kind: Service
metadata:
name: postgres
spec:
selector:
app: postgres
ports:
- protocol: TCP
port: 5432
targetPort: 5432
type: ClusterIP
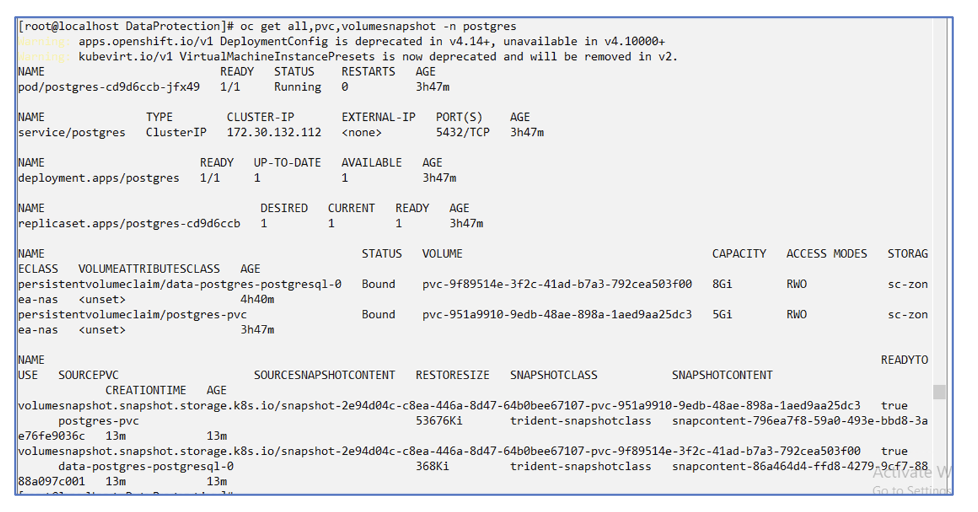
Now create the Trident Protect application CR for the postgres app. Include the objects in the namespace postgres and create it in the postgres namespace.
# tp create app postgres-app --namespaces postgres -n postgres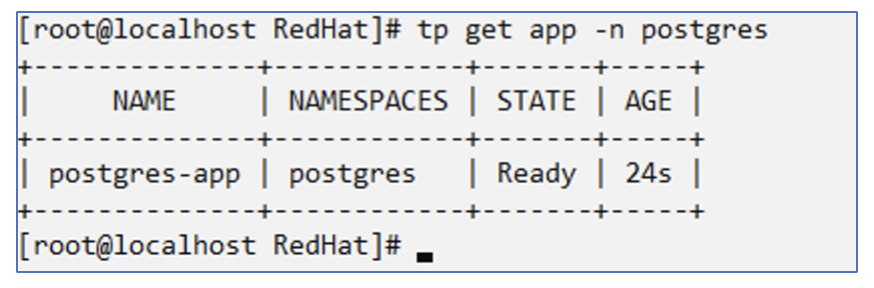
스냅샷 만들기
주문형 스냅샷 만들기
# tp create snapshot postgres-snap1 --app postgres-app --appvault ontap-s3-appvault -n postgres
Snapshot "postgres-snap1" created.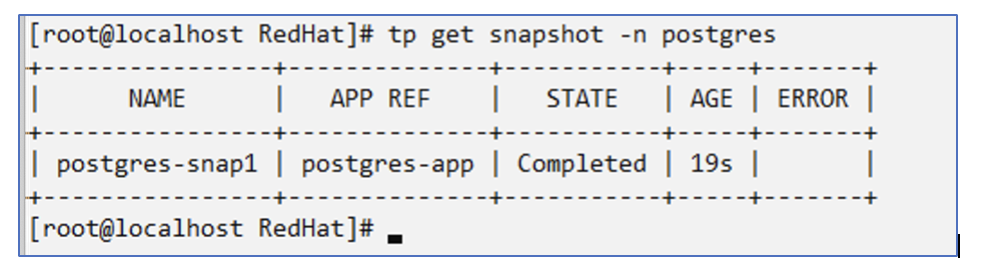
일정 만들기 다음 명령을 사용하면 매일 15:33에 스냅샷이 생성되고 두 개의 스냅샷과 백업이 보관됩니다.
# tp create schedule schedule1 --app postgres-app --appvault ontap-s3-appvault --backup-retention 2 --snapshot-retention 2 --granularity Daily --hour 15 --minute 33 --data-mover Restic -n postgres
Schedule "schedule1" created.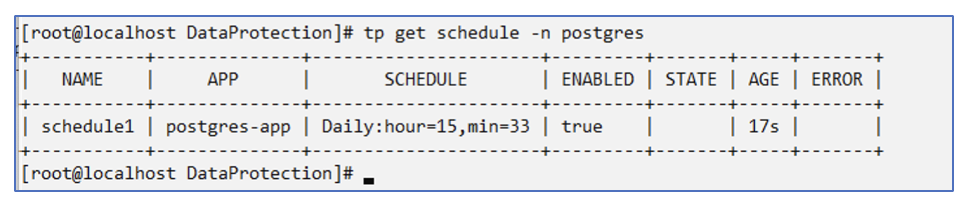
yaml을 사용하여 일정 만들기
# tp create schedule schedule2 --app postgres-app --appvault ontap-s3-appvault --backup-retention 2 --snapshot-retention 2 --granularity Daily --hour 15 --minute 33 --data-mover Restic -n postgres --dry-run > hourly-snapshotschedule.yaml

cat hourly-snapshotschedule.yaml

apiVersion: protect.trident.netapp.io/v1
kind: Schedule
metadata:
  creationTimestamp: null
  name: schedule2
  namespace: postgres
spec:
  appVaultRef: ontap-s3-appvault
  applicationRef: postgres-app
  backupRetention: "2"
  dataMover: Restic
  dayOfMonth: ""
  dayOfWeek: ""
  enabled: true
  granularity: Hourly
  #hour: "15"
  minute: "33"
  recurrenceRule: ""
  snapshotRetention: "2"
status: {}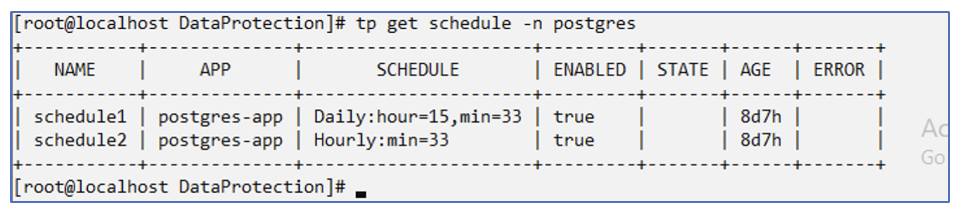
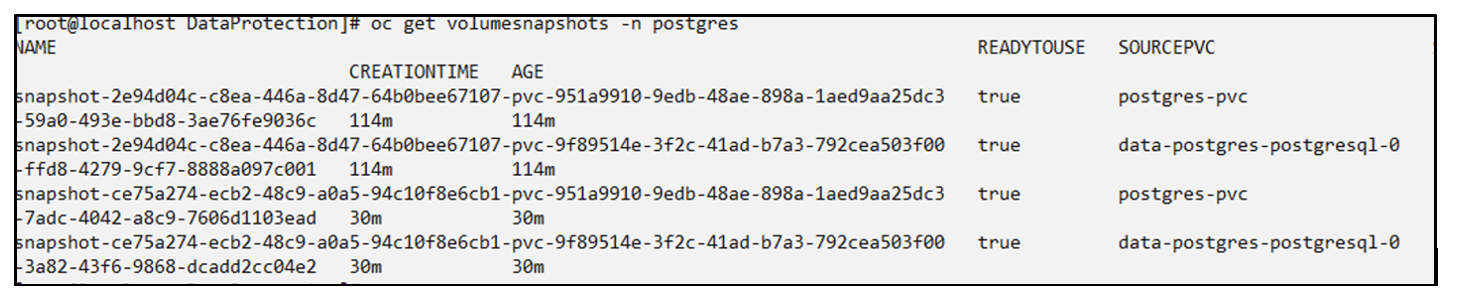
이 일정에 따라 생성된 스냅샷을 볼 수 있습니다.
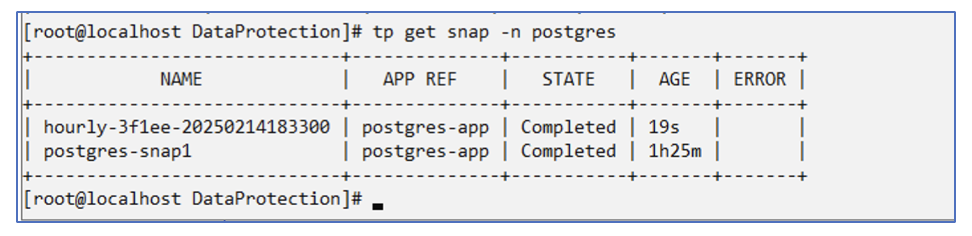
볼륨 스냅샷도 생성됩니다.
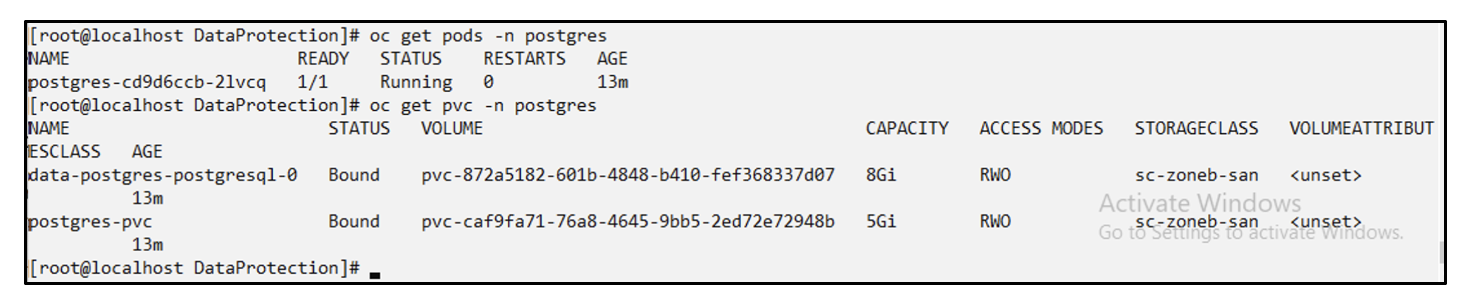
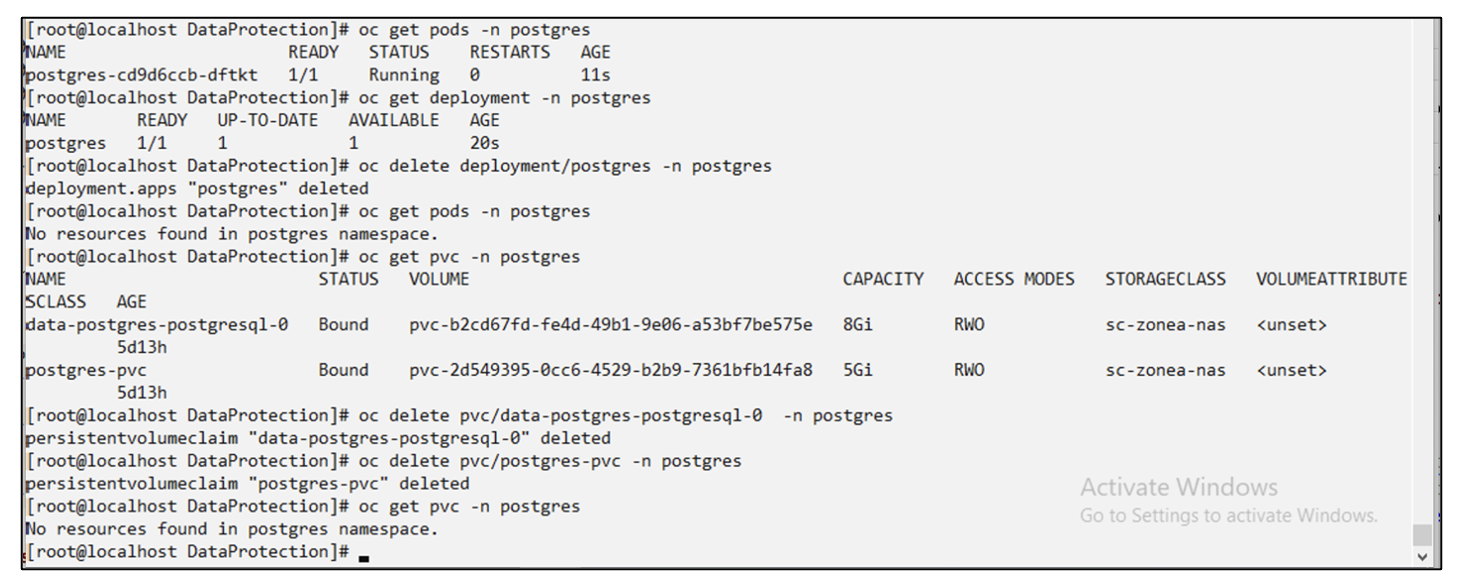
애플리케이션 손실을 시뮬레이션하기 위해 애플리케이션을 삭제합니다.
# oc delete deployment/postgres -n postgres
# oc get pod,pvc -n postgres
No resources found in postgres namespace.
스냅샷에서 동일한 네임스페이스로 복원
# tp create sir postgres-sir --snapshot postgres/hourly-3f1ee-20250214183300 -n postgres
SnapshotInplaceRestore "postgres-sir" created.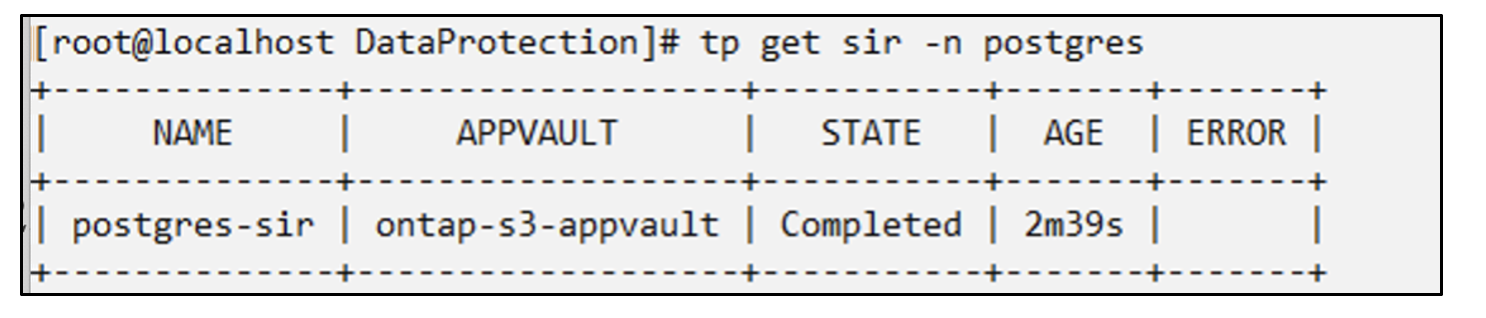
애플리케이션과 해당 PVC가 동일한 네임스페이스로 복원됩니다.

스냅샷에서 다른 네임스페이스로 복원
# tp create snapshotrestore postgres-restore --snapshot postgres/hourly-3f1ee-20250214183300 --namespace-mapping postgres:postgres-restore -n postgres-restore
SnapshotRestore "postgres-restore" created.
애플리케이션이 새로운 네임스페이스로 복원된 것을 볼 수 있습니다.

백업 만들기
주문형 백업 생성
# tp create backup postgres-backup1 --app postgres-app --appvault ontap-s3-appvault -n postgres
Backup "postgres-backup1" created.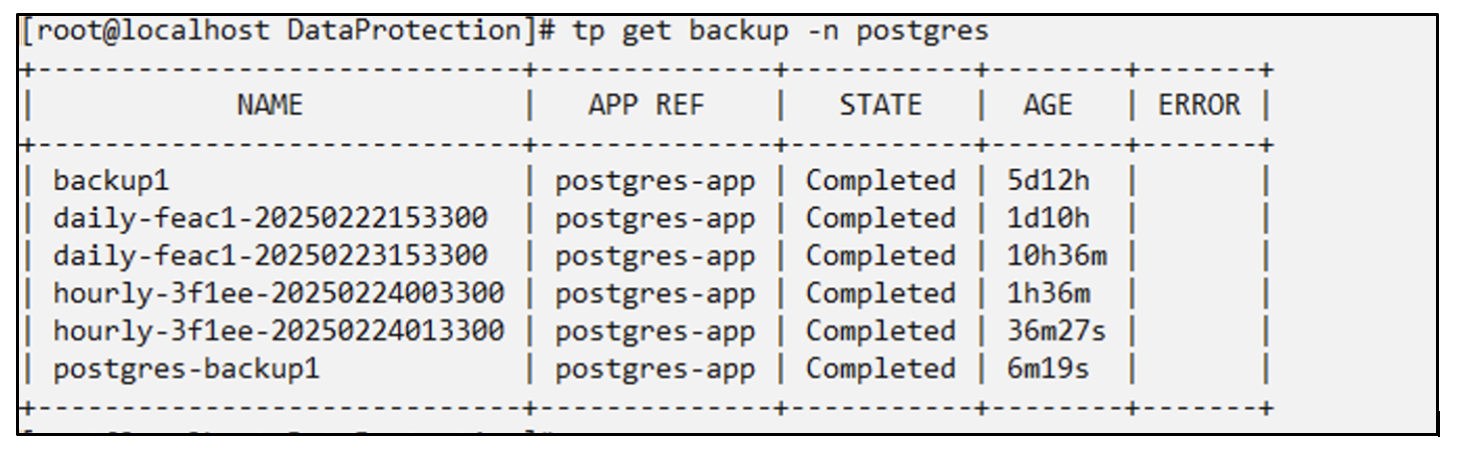
백업 일정 생성
위 목록의 일일 백업과 매시간 백업은 이전에 설정한 일정에 따라 생성됩니다.
# tp create schedule schedule1 --app postgres-app --appvault ontap-s3-appvault --backup-retention 2 --snapshot-retention 2 --granularity Daily --hour 15 --minute 33 --data-mover Restic -n postgres
Schedule "schedule1" created.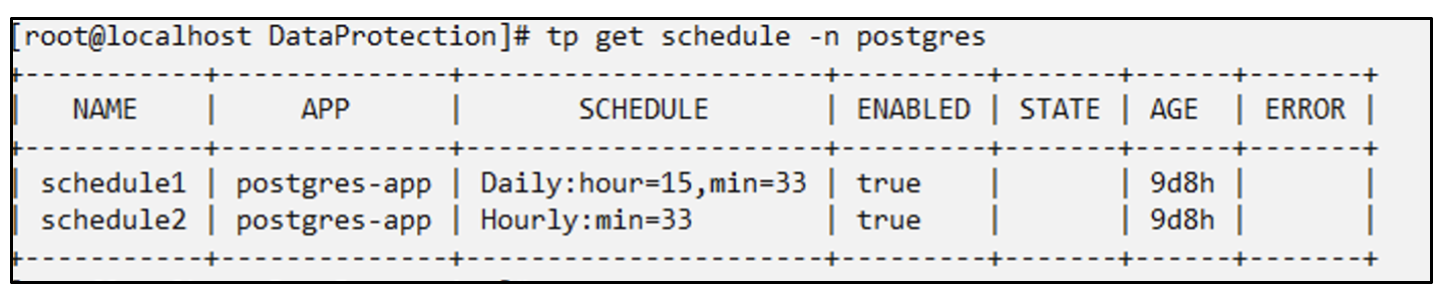
백업에서 복원
데이터 손실을 시뮬레이션하려면 애플리케이션과 PVC를 삭제하세요.
동일한 네임스페이스로 복원 #tp create bir postgres-bir --backup postgres/hourly-3f1ee-20250224023300 -n postgres BackupInplaceRestore "postgres-bir"이 생성되었습니다.
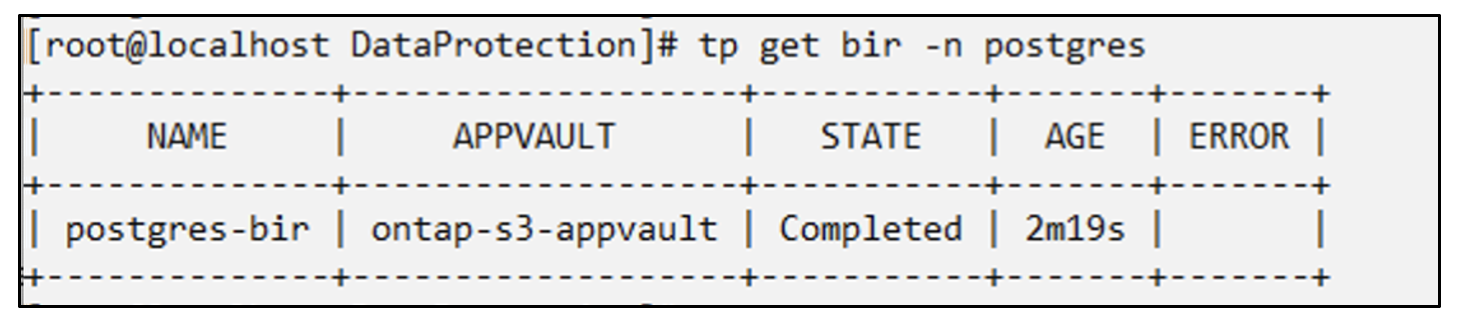
애플리케이션과 PVC는 동일한 네임스페이스에 복원됩니다.

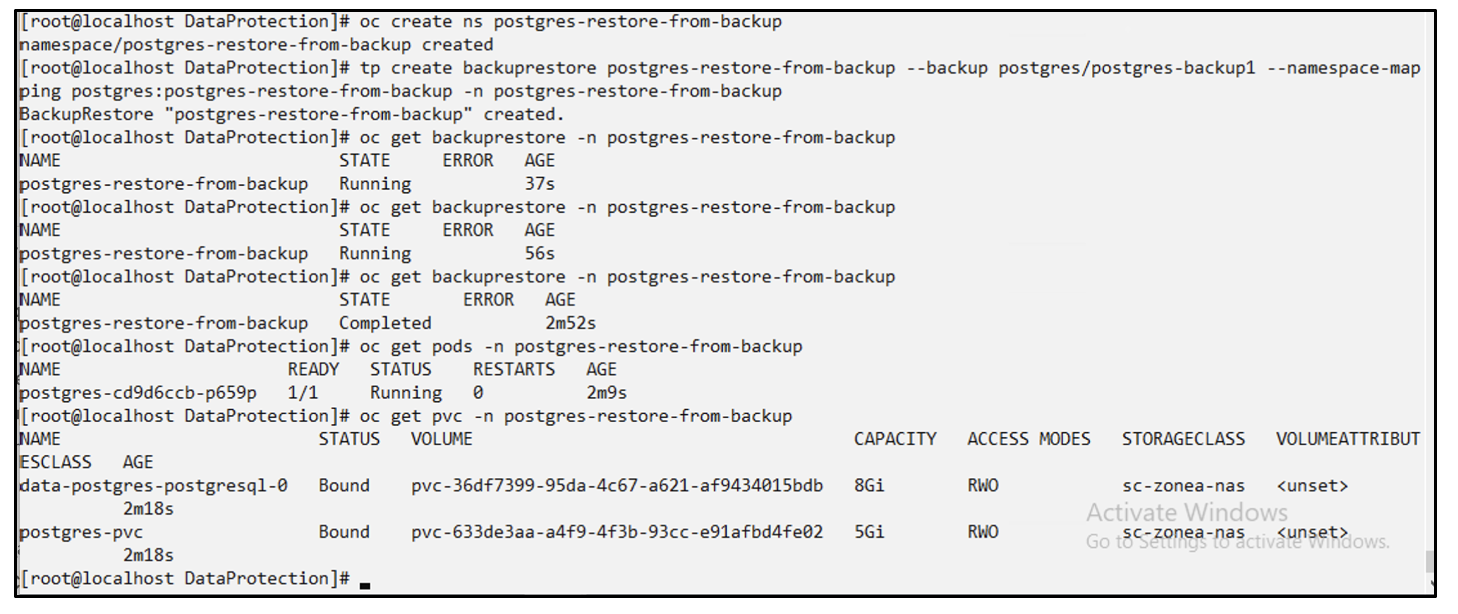
다른 네임스페이스로 복원 새로운 네임스페이스를 만듭니다. 백업에서 새 네임스페이스로 복원합니다.
애플리케이션 마이그레이션
애플리케이션을 다른 클러스터로 복제하거나 마이그레이션하려면(클러스터 간 복제 수행) 소스 클러스터에서 백업을 생성한 다음 다른 클러스터에 백업을 복원하십시오. 타겟 클러스터에 Trident Protect가 설치되어 있는지 확인하십시오.
소스 클러스터에서 아래 이미지에 표시된 단계를 수행합니다.
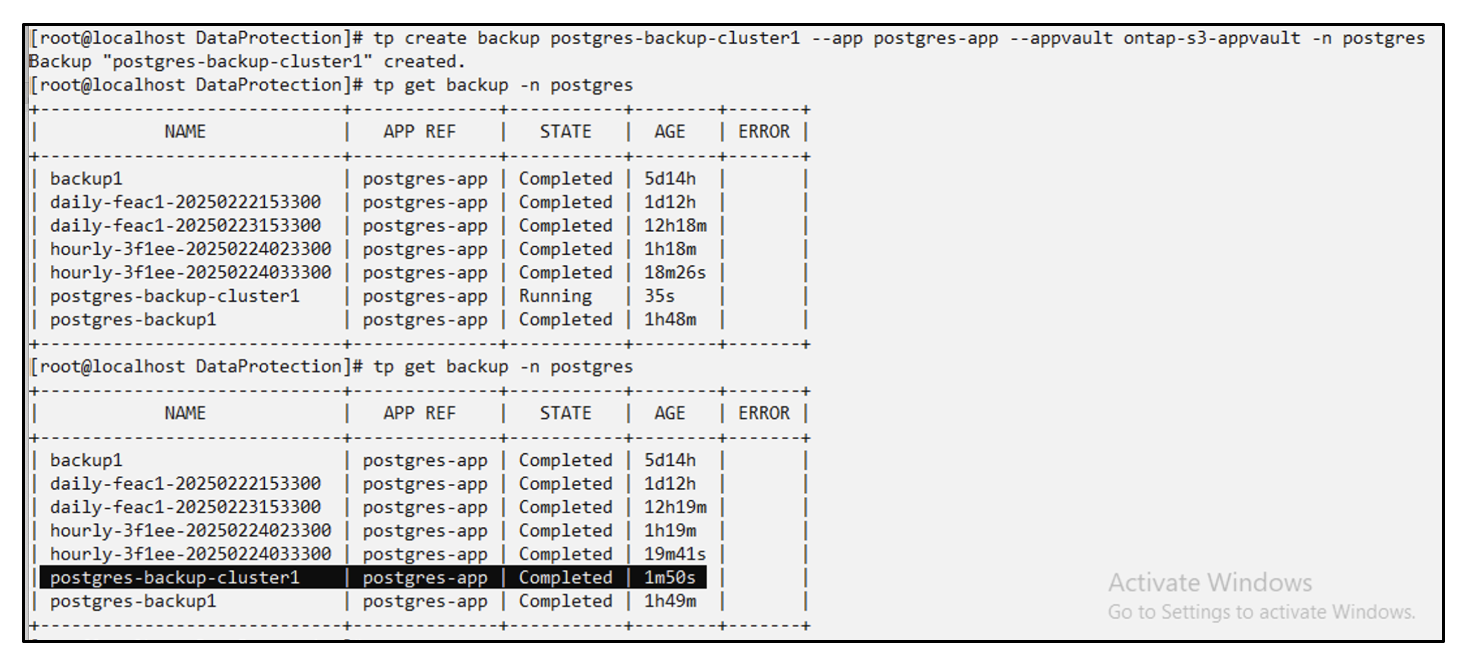
소스 클러스터에서 대상 클러스터로 컨텍스트를 전환합니다. 그런 다음 대상 클러스터 컨텍스트에서 AppVault에 액세스할 수 있는지 확인하고 대상 클러스터에서 AppVault 콘텐츠를 가져옵니다.
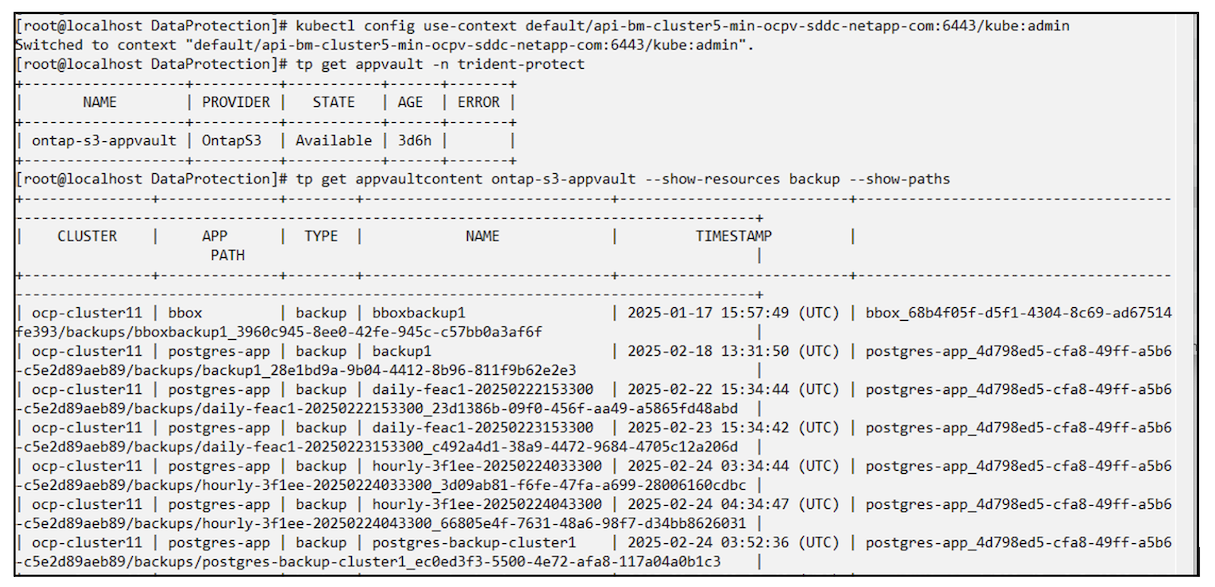
목록에서 백업 경로를 사용하고 아래 명령에 표시된 대로 backuprestore CR 객체를 만듭니다.
# tp create backuprestore backup-restore-cluster2 --namespace-mapping postgres:postgres --appvault ontap-s3-appvault --path postgres-app_4d798ed5-cfa8-49ff-a5b6-c5e2d89aeb89/backups/postgres-backup-cluster1_ec0ed3f3-5500-4e72-afa8-117a04a0b1c3 -n postgres
BackupRestore "backup-restore-cluster2" created.
이제 대상 클러스터에 애플리케이션 포드와 PVC가 생성된 것을 볼 수 있습니다.