
Create and mount volumes
 Suggest changes
BlueXP enables you to create cloud volumes based on your Cloud Volumes Service for Google Cloud subscription. After you create a volume, get the relevant mount commands so that you can mount the volume to a client.
Create volumes
You can create NFS or SMB volumes in a new or existing Cloud Volumes Service for Google Cloud account. Cloud volumes currently support NFSv3 and NFSv4.1 for Linux and UNIX clients, and SMB 3.x for Windows clients.
-
If you want to use SMB in Google Cloud, you must have set up DNS and Active Directory.
-
When planning to create an SMB volume, you must have a Windows Active Directory server available to which you can connect. You will enter this information when creating the volume. Also, make sure that the Admin user is able to create a machine account in the Organizational unit (OU) path specified.
-
Select the working environment and click Add New Volume.
-
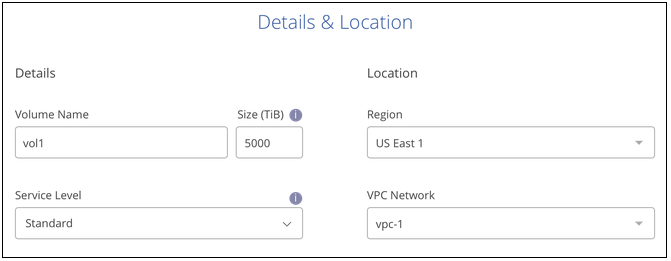
In the Details & Location page, enter details about the volume:
-
Enter a name for the volume.
-
Specify a size within the range of 1 TiB (1024 GiB) to 100 TiB.
-
Specify a service level: Standard, Premium, or Extreme.
-
Select the Google Cloud region.
-
Select the VPC Network from which the volume will be accessible. Note that the VPC cannot be changed or edited after the volume is created.
-
Click Continue.
-
-
In the Protocol page, select NFS or SMB and then define the details. Required entries for NFS and SMB are shown in separate sections below.
-
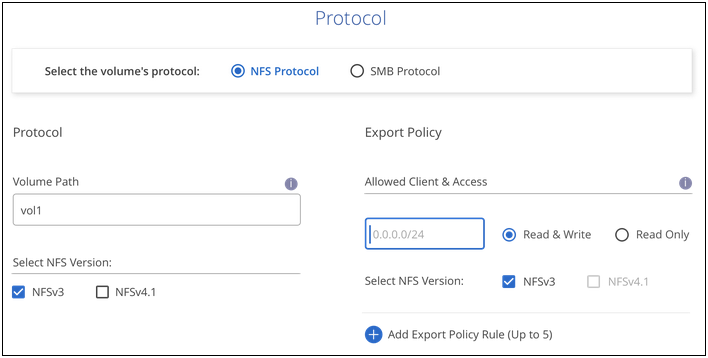
For NFS:
-
In the Volume Path field, specify the name of the volume export you will see when you mount the volume.
-
Select NFSv3, NFSv4.1, or both depending on your requirements.
-
Optionally, you can create an export policy to identify the clients that can access the volume. Specify the:
-
Allowed clients by using an IP address or Classless Inter-Domain Routing (CIDR).
-
Access rights as Read & Write or Read Only.
-
Access protocol (or protocols if the volume allows both NFSv3 and NFSv4.1 access) used for users.
-
Click + Add Export Policy Rule if you want to define additional export policy rules.
The following image shows the Volume page filled out for the NFS protocol:
-
-
-
For SMB:
-
In the Volume Path field, specify the name of the volume export you will see when you mount the volume and click Continue.
-
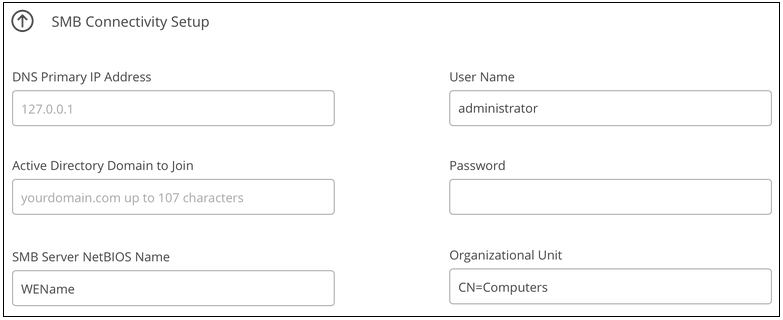
If Active Directory has been set up, you see the configuration. If it is the first volume being set up and no Active Directory has been set up, you can enable SMB session encryption in the SMB Connectivity Setup page:
Field Description DNS Primary IP Address
The IP addresses of the DNS servers that provide name resolution for the SMB server. Use a comma to separate the IP addresses when referencing multiple servers, for example, 172.31.25.223, 172.31.2.74..
Active Directory Domain to join
The FQDN of the Active Directory (AD) domain that you want the SMB server to join.
SMB Server NetBIOS name
A NetBIOS name for the SMB server that will be created.
Credentials authorized to join the domain
The name and password of a Windows account with sufficient privileges to add computers to the specified Organizational Unit (OU) within the AD domain.
Organizational Unit
The organizational unit within the AD domain to associate with the SMB server. The default is CN=Computers for connections to your own Windows Active Directory server.
The following image shows the Volume page filled out for the SMB protocol:
-
-
Click Continue.
-
If you want to create the volume based on a snapshot of an existing volume, select the snapshot from the Snapshot Name drop-down list. Otherwise just click Continue.
-
In the Snapshot Policy page, you can enable Cloud Volumes Service to create snapshot copies of your volumes based on a schedule. You can do this now by moving the selector to the right, or you can edit the volume later to define the snapshot policy.
Learn how to create a snapshot policy.
-
Click Add Volume.
The new volume is added to the working environment.
Continue with mounting the cloud volume.
Mount cloud volumes
Access mounting instructions from within BlueXP so you can mount the volume to a host.

|
Use the highlighted protocol/dialect supported by your client. |
-
Open the working environment.
-
Hover over the volume and click Mount the volume.
NFS and SMB volumes display mount instructions for that protocol.
-
Hover over the commands and copy them to your clipboard to make this process easier. Just add the destination directory/mount point at the end of the command.
NFS example:
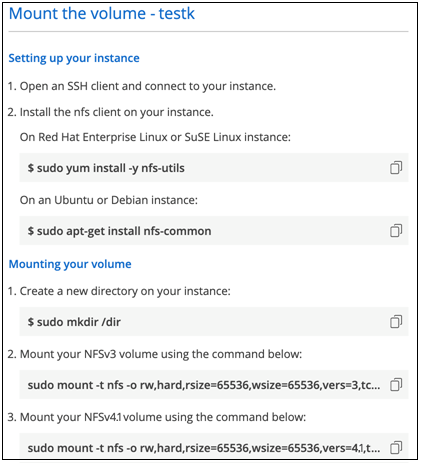
The maximum I/O size defined by the
rsizeandwsizeoptions is 1048576, however 65536 is the recommended default for most use cases.Note that Linux clients will default to NFSv4.1 unless the version is specified with the
vers=<nfs_version>option.SMB example:
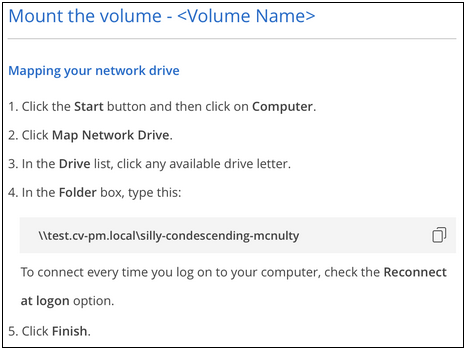
-
Map your network drive by following the mount instructions for your instance.
After completing the steps in the mount instructions, you have successfully mounted the cloud volume to your Google Cloud instance.