

Configuring Acquisition Units
 Suggest changes
Data Infrastructure Insights collects device data using one or more Acquisition Units installed on local servers. Each Acquisition Unit can host multiple Data Collectors, which send device metrics to Data Infrastructure Insights for analysis.
This topic describes how to add Acquisition Units and describes additional steps required when your environment uses a proxy.

|
For accurate audit and data reporting, it is strongly recommended to synchronize the time on the Acquisition Unit machine using Network Time Protocol (NTP) or Simple Network Time Protocol (SNTP). |
Read about Data Infrastructure Insights security here.
Adding a Linux Acquisition Unit
-
If your system is using a proxy, you must set the proxy environment variables before the acquisition unit is installed. For more information, see Setting proxy environment variables.
-
Log in as Administrator or Account Owner to your Data Infrastructure Insights environment.
-
Click Observability > Collectors > Acquisition Units > +Acquisition Unit
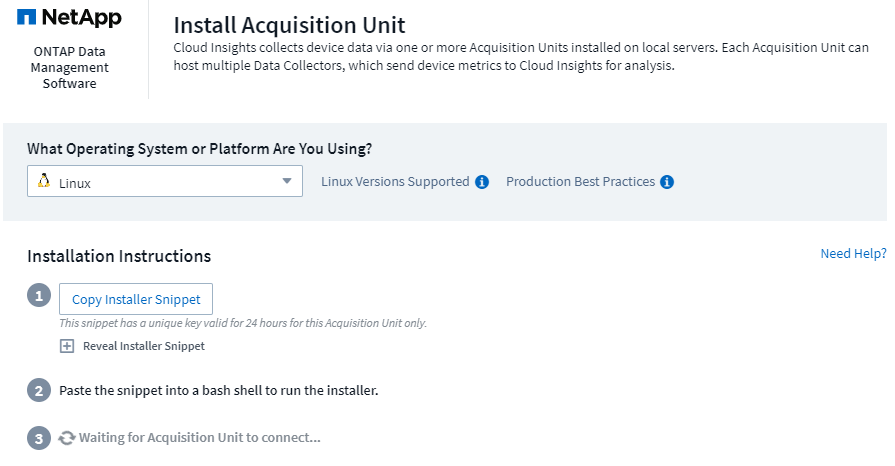
The system displays the Install Acquisition Unit dialog. Choose Linux.
-
Verify that the server or VM hosting the Acquisition Unit meets the recommended system requirements.
-
Verify that the server is running a supported version of Linux. Click OS Versions Supported (i) for a list of supported versions.
-
Copy the Installation command snippet in the dialog into a terminal window on the server or VM that will host the Acquisition unit.
-
Paste and execute the command in the Bash shell.
-
Click Observability > Collectors > Acquisition units to check the status of Acquisition Units.
-
You can access the Acquisition Unit logs at /var/log/netapp/cloudinsights/acq/acq.log
-
Use the following script to control the Acquisition Unit:
-
cloudinsights-service.sh (stop, start, restart, check the status)
-
-
Use the following script to uninstall the Acquisition Unit:
-
cloudinsights-uninstall.sh
-
Setting proxy environment variables
For environments that use a proxy, you must set the proxy environment variables before you add the Acquisition Unit. The instructions for configuring the proxy are provided on the Add Acquisition Unit dialog.
-
Click + in Have a Proxy Server?
-
Copy the commands to a text editor and set your proxy variables as needed.
Note: Be aware of restrictions on special characters in proxy username and password fields: '%' and '!' are allowed in the username field. ':', '%', and '!' are allowed in the password field.
-
Run the edited command in a terminal using the Bash shell.
-
Install the Acquisition Unit software.
Proxy Configuration
The Acquisition Unit uses 2-way/mutual authentication to connect to the Data Infrastructure Insights server. The client certificate must be passed to the Data Infrastructure Insights server to be authenticated. To accomplish this, the proxy must be set up to forward the https request to the Data Infrastructure Insights server without decrypting the data.
The simplest way to do this is to specify wildcard configuration in your proxy/firewall to communicate with Data Infrastructure Insights, for example:
*.cloudinsights.netapp.com
|
|
The use of an asterisk (*) for wildcard is common, but your proxy/firewall configuration may use a different format. Check with your proxy documentation to ensure correct wildcard specification in your environment. |
More information on proxy configuration can be found in the NetApp Knowledgbase.
Viewing Proxy URLs
You can view your proxy endpoint URLs by clicking the Proxy Settings link when choosing a data collector during onboarding, or the link under Proxy Settings on the Help > Support page. A table like the following is displayed.
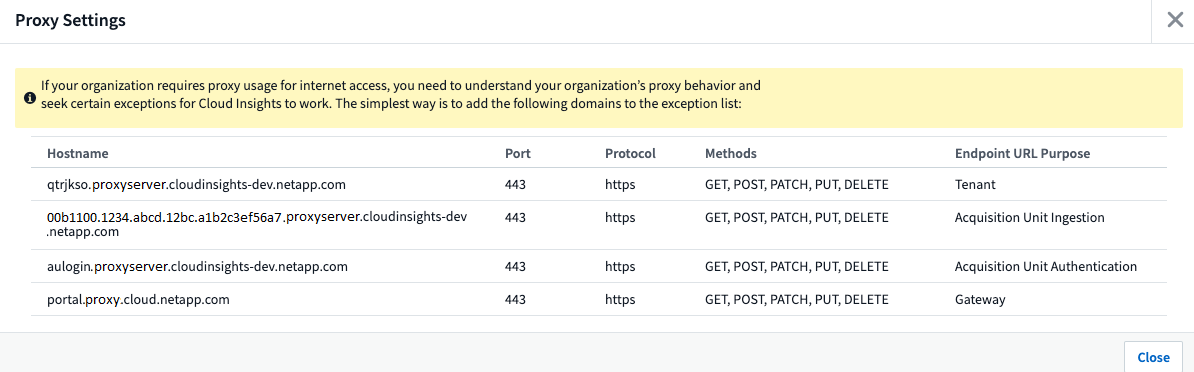
If you have Workload Security on your tenant, the configured endpoint URLs will also be displayed in this list.
Adding a Windows Acquisition Unit
-
Log in to the Acquisition Unit server/VM as a user with Administrator permissions.
-
On that server, open a browser window and log in to your Data Infrastructure Insights environment as Administrator or Account Owner.
-
Click Observability > Collectors > Acquisition Units > +Acquisition Unit .
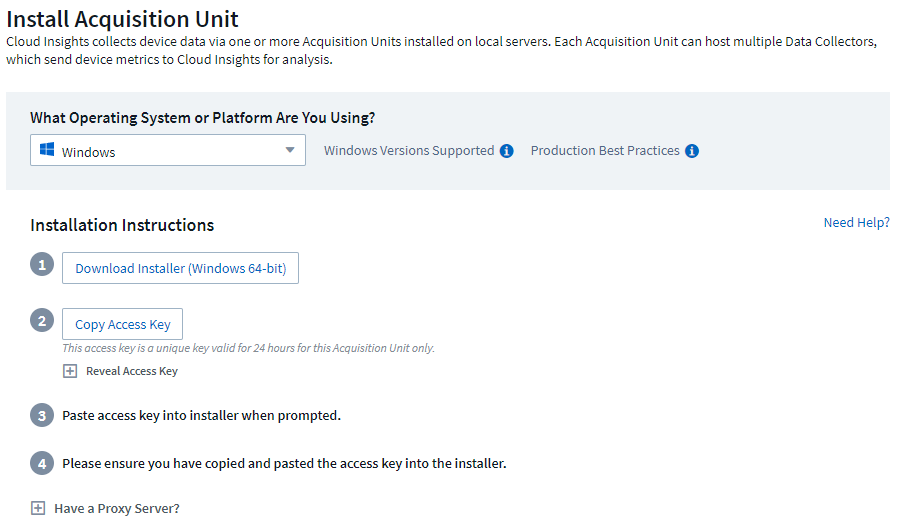
The system displays the Install Acquisition Unit dialog. Choose Windows.
-
Verify that the server or VM hosting the Acquisition Unit meets the recommended system requirements.
-
Verify that the server is running a supported version of Windows. Click OS Versions Supported (i) for a list of supported versions.
-
Click the Download Installer (Windows 64-bit) button.
-
Copy the Access Key. You will need this during the Installation.
-
On the Acquisition Unit server/VM, execute the downloaded installer.
-
Paste the Access Key into the installation wizard when prompted.
-
During installation, you will be presented with the opportunity to provide your proxy server settings.
-
Click * > Observability > Collectors > Acquisition units* to check the status of Acquisition Units.
-
You can access the Acquisition Unit log in <install dir>\Cloud Insights\Acquisition Unit\log\acq.log
-
Use the following script to stop, start, restart, or check the status of the Acquisition Unit:
cloudinsights-service.sh
Proxy Configuration
The Acquisition Unit uses 2-way/mutual authentication to connect to the Data Infrastructure Insights server. The client certificate must be passed to the Data Infrastructure Insights server to be authenticated. To accomplish this, the proxy must be set up to forward the https request to the Data Infrastructure Insights server without decrypting the data.
The simplest way to do this is to specify wildcard configuration in your proxy/firewall to communicate with Data Infrastructure Insights, for example:
*.cloudinsights.netapp.com
|
|
The use of an asterisk (*) for wildcard is common, but your proxy/firewall configuration may use a different format. Check with your proxy documentation to ensure correct wildcard specification in your environment. |
More information on proxy configuration can be found in the NetApp Knowledgbase.
Viewing Proxy URLs
You can view your proxy endpoint URLs by clicking the Proxy Settings link when choosing a data collector during onboarding, or the link under Proxy Settings on the Help > Support page. A table like the following is displayed.
If you have Workload Security on your tenant, the configured endpoint URLs will also be displayed in this list.
Uninstalling an Acquisition Unit
To uninstall the Acquisition Unit software, do the following:
Windows:
If you are uninstalling a Windows acquisition unit:
-
On the Acquisition Unit server/VM, open Control Panel and choose Uninstall a Program. Select the Data Infrastructure Insights Acquisition Unit program for removal.
-
Click Uninstall and follow the prompts.
Linux:
If you are uninstalling a Linux acquisition unit:
-
On the Acquisition Unit server/VM, run the following command:
sudo cloudinsights-uninstall.sh -p
-
For help with uninstall, run:
sudo cloudinsights-uninstall.sh --help
Windows and Linux:
After uninstalling the AU:
-
In Data Infrastructure Insights, go to Observability > Collectors and select the *Acquisition Units tab.
-
Click the Options button to the right of the Acquisition Unit you wish to uninstall, and select Delete. You can delete an Acquisition Unit only if there are no data collectors assigned to it.
|
|
You cannot delete an Acquisition Unit (AU) that has data collectors connected to it. Move all of the AU's data collectors to another AU (edit the collector and simply select a different AU) before deleting the original AU. |
An Acquisition unit with a star next to it is being used for device resolution. Before removing this AU, you must select another AU to use for Device Resolution. Hover over a different AU and open the "three dots" menu to select "Use for Device Resolution".

Reinstalling an Acquisition Unit
To re-install an Acquisition Unit on the same server/VM, you must follow these steps:
You must have a temporary Acquisition Unit configured on a separate server/VM before re-installing an Acquisition Unit.
-
Log in to the Acquisition Unit server/VM and uninstall the AU software.
-
Log into your Data Infrastructure Insights environment and go to Observability > Collectors.
-
For each data collector, click the Options menu on the right and select Edit. Assign the data collector to the temporary Acquisition Unit and click Save.
You can also select multiple data collectors of the same type and click the Bulk Actions button. Choose Edit and assign the data collectors to the temporary Acquisition Unit.
-
After all of the data collectors have been moved to the temporary Acquisition Unit, go to Observability > Collectors and select the Acquisition Units tab.
-
Click the Options button to the right of the Acquisition Unit you wish to re-install, and select Delete. You can delete an Acquisition Unit only if there are no data collectors assigned to it.
-
You can now re-install the Acquisition Unit software on the original server/VM. Click +Acquisition Unit and follow the instructions above to install the Acquisition Unit.
-
Once the Acquisition Unit has been re-installed, assign your data collectors back to the Acquisition Unit.
Viewing AU Details
The Acquisition Unit (AU) detail page provides useful detail for an AU as well as information to help with troubleshooting. The AU detail page contains the following sections:
-
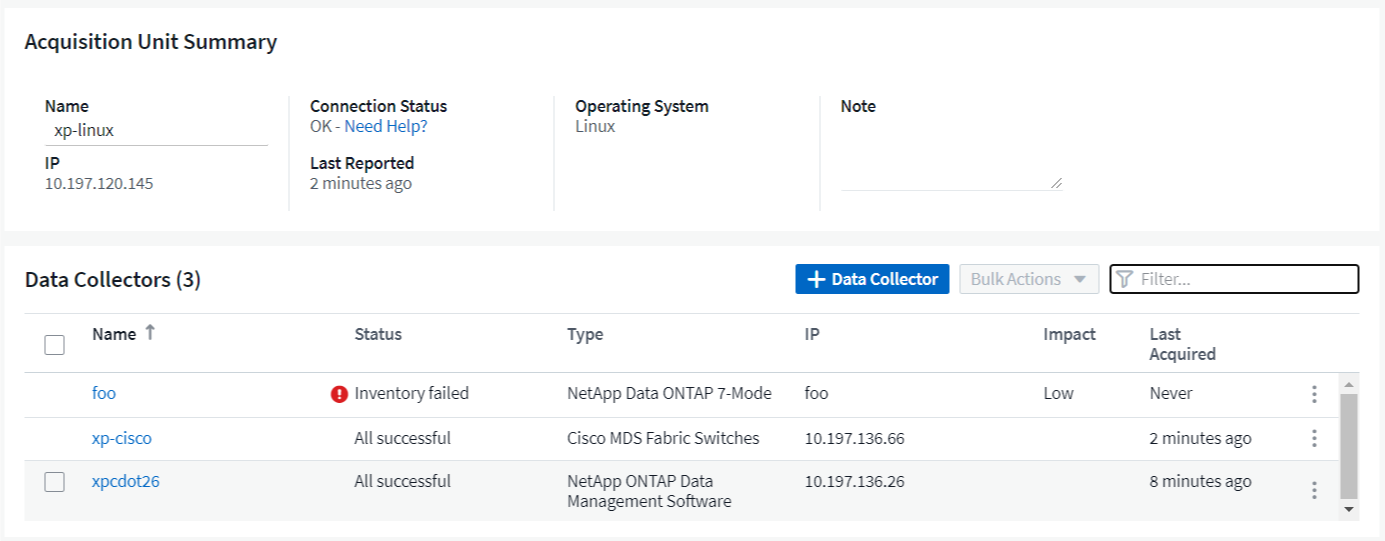
A summary section showing the following:
-
Name and IP of the Acquisition Unit
-
Current connection Status of the AU
-
Last Reported successful data collector poll time
-
The Operating System of the AU machine
-
Any current Note for the AU. Use this field to enter a comment for the AU. The field displays the most recently added note.
-
-
A table of the AU's Data Collectors showing, for each data collector:
-
Name - Click this link to drill down into the data collector's detail page with additional information
-
Status - Success or error information
-
Type - Vendor/model
-
IP address of the data collector
-
Current Impact level
-
Last Acquired time - when the data collector was last successfully polled
-
For each data collector, you can click on the "three dots" menu to Clone, Edit, Poll, or Delete the data collector. You can also select multiple data collectors in this list to perform bulk actions on them.
To restart the Acquisition Unit, click the Restart button at the top of the page. Drop down this button to attempt to Restore Connection to the AU in the event of a connection problem.