

Prepare for deployment in private mode
 Suggest changes
Prepare your environment before you deploy NetApp Console in private mode. You need to review host requirements, prepare networking, set up permissions, and more.

|
To use NetApp Console in the AWS Secret Cloud or the AWS Top Secret Cloud, follow the specific instructions for those environments. Learn how to get started with Cloud Volumes ONTAP in the AWS Secret Cloud or Top Secret Cloud |
Step 1: Understand how private mode works
In private mode, you install a Console agent either on-premises or in the cloud and then use NetApp Console to manage your storage systems (ONTAP on-premises and Cloud Volumes ONTAP). There is no connectivity to the NetApp Console API endpoints or the NetApp Console SaaS application, so you access the Console from the local UI provided by the Console agent.
Step 2: Review installation options
In private mode, you can install the Console agent on-premises or in the cloud by manually installing the agent on your own Linux host.
Where you install the Console agent determines which NetApp Console services and features are available when using private mode. The Console agent must be installed in the cloud if you want to deploy and manage Cloud Volumes ONTAP.
Step 3: Review host requirements
The host must meet specific operating system requirements, RAM requirements, port requirements, and so on to run the Console agent.
- Dedicated host
-
The Console agent requires a dedicated host. Any architecture is supported if it meets these size requirements:
-
CPU: 8 cores or 8 vCPUs
-
RAM: 32 GB
-
Disk space: 165 GB is recommended for the host, with the following partition requirements:
-
/opt: 120 GiB of space must be availableThe agent uses
/optto install the/opt/application/netappdirectory and its contents. -
/var: 40 GiB of space must be availableThe Console agent requires this space in
/varbecause Podman or Docker is architected to create the containers within this directory. Specifically, they will create containers in the/var/lib/containers/storagedirectory and/var/lib/dockerfor Docker. External mounts or symlinks do not work for this space.
-
-
- Operating system and container requirements
-
The Console agent is supported with the following operating systems when using the Console in private mode. A container orchestration tool is required before you install the agent.
Operating system Supported OS versions Supported agent versions Required container tool SELinux Red Hat Enterprise Linux
9.1 to 9.4
8.6 to 8.10
4.0.0 or later with the Console in private mode
Podman version 4.6.1 or 4.9.4
Supported in enforcing mode or permissive mode
Ubuntu
22.04 LTS
4.0.0 or later
Docker Engine 23.0.6 to 26.0.0
26.0.0 is supported with new agent 3.9.44 or later installations
Not supported
Notes:
-
The Console agent is supported on English-language versions of these operating systems.
-
For RHEL, the host must be registered with Red Hat Subscription Management. If it's not registered, the host can't access repositories to update required 3rd-party software during agent installation.
-
- Hypervisor
-
A bare metal or hosted hypervisor that is certified to run a supported operating system is required.
- CPU
-
8 cores or 8 vCPUs
- RAM
-
32 GB
- AWS EC2 instance type
-
An instance type that meets CPU and RAM requirements. NetApp recommends t3.2xlarge.
- Azure VM size
-
An instance type that meets CPU and RAM requirements. NetApp recommends Standard_D8s_v3.
- Google Cloud machine type
-
An instance type that meets CPU and RAM requirements. NetApp recommends n2-standard-8.
The Console agent is supported in Google Cloud on a VM instance with an OS that supports Shielded VM features
- Disk space in /opt
-
100 GiB of space must be available
The agent uses
/optto install the/opt/application/netappdirectory and its contents. - Disk space in /var
-
20 GiB of space must be available
The Console agent requires this space in
/varbecause Docker or Podman is architected to create the containers within this directory. Specifically, they will create containers in the/var/lib/containers/storagedirectory. External mounts or symlinks do not work for this space.
Step 4: Install Podman or Docker Engine
You need to prepare the host for the Console agent by installing Podman or Docker Engine.
Depending on your operating system, either Podman or Docker Engine is required before installing the agent.
-
Podman is required for Red Hat Enterprise Linux 8 and 9.
-
Docker Engine is required for Ubuntu.
Follow these steps to install and configure Podman:
-
Enable and start the podman.socket service
-
Install python3
-
Install the podman-compose package (varies by Red Hat version)
-
Add podman-compose to the PATH environment variable
-
If using Red Hat Enterprise Linux, verify that your Podman version is using Netavark Aardvark DNS instead of CNI
|
|
Adjust the aardvark-dns port (default: 53) after installing the agent to avoid DNS port conflicts. Follow the instructions to configure the port. |
-
Remove the podman-docker package if it's installed on the host.
dnf remove podman-docker rm /var/run/docker.sock -
Install Podman.
You can obtain Podman from official Red Hat Enterprise Linux repositories.
-
For Red Hat Enterprise Linux 9.1 to 9.4:
sudo dnf install podman-4:<version>Where <version> is the supported version of Podman that you're installing. View the supported Podman versions.
-
For Red Hat Enterprise Linux 8:
sudo dnf install podman-4:<version>Where <version> is the supported version of Podman that you're installing. View the supported Podman versions.
-
-
Enable and start the podman.socket service.
sudo systemctl enable --now podman.socket -
Install python3.
sudo dnf install python3 -
Install the EPEL repository package if it's not already available on your system.
This step is required because podman-compose is available from the Extra Packages for Enterprise Linux (EPEL) repository.
-
If using Red Hat Enterprise 9:
-
Install the EPEL repository package.
sudo dnf install https://dl.fedoraproject.org/pub/epel/epel-release-latest-9.noarch.rpm-
Install podman-compose package 1.5.0.
sudo dnf install podman-compose-1.5.0
-
-
If using Red Hat Enterprise Linux 8:
-
Install the EPEL repository package.
sudo dnf install https://dl.fedoraproject.org/pub/epel/epel-release-latest-8.noarch.rpm -
Install podman-compose package 1.0.6.
sudo dnf install podman-compose-1.0.6
Using the dnf installcommand meets the requirement for adding podman-compose to the PATH environment variable. The installation command adds podman-compose to /usr/bin, which is already included in thesecure_pathoption on the host. -
If using Red Hat Enterprise Linux 8, verify that your Podman version is using NetAvark with Aardvark DNS instead of CNI.
-
Check to see if your networkBackend is set to CNI by running the following command:
podman info | grep networkBackend -
If the networkBackend is set to
CNI, you'll need to change it tonetavark. -
Install
netavarkandaardvark-dnsusing the following command:dnf install aardvark-dns netavark -
Open the
/etc/containers/containers.conffile and modify the network_backend option to use "netavark" instead of "cni".If
/etc/containers/containers.confdoesn't exist, make the configuration changes to/usr/share/containers/containers.conf. -
Restart podman.
systemctl restart podman -
Confirm networkBackend is now changed to "netavark" using the following command:
podman info | grep networkBackend
-
-
Follow the documentation from Docker to install Docker Engine.
-
View installation instructions from Docker
Follow the steps to install a supported Docker Engine version. Do not install the latest version, as it is unsupported by the Console.
-
Verify that Docker is enabled and running.
sudo systemctl enable docker && sudo systemctl start docker
Step 5: Prepare networking
Set up networking for the Console agent to manage resources in your public cloud. Other than having a virtual network and subnet for the Console agent, ensure that the following requirements are met.
- Connections to target networks
-
The Console agent must have a network connection to the location where you plan to manage storage. For example, the VPC or VNet where you plan to deploy Cloud Volumes ONTAP, or the data center where your on-premises ONTAP clusters reside.
- Endpoints for day-to-day operations
-
If you are planning to create Cloud Volumes ONTAP systems, the Console agent needs connectivity to endpoints in your cloud provider's publicly available resources.
Endpoints Purpose AWS services (amazonaws.com):
-
CloudFormation
-
Elastic Compute Cloud (EC2)
-
Identity and Access Management (IAM)
-
Key Management Service (KMS)
-
Security Token Service (STS)
-
Simple Storage Service (S3)
To manage AWS resources. The endpoint depends on your AWS region. Refer to AWS documentation for details
Amazon FSx for NetApp ONTAP:
-
api.workloads.netapp.com
The web-based console contacts this endpoint to interact with the Workload Factory APIs to manage and operate FSx for ONTAP-based workloads.
https://management.azure.com
https://login.microsoftonline.com
https://blob.core.windows.net
https://core.windows.netTo manage resources in Azure public regions.
https://management.azure.microsoft.scloud
https://login.microsoftonline.microsoft.scloud
https://blob.core.microsoft.scloud
https://core.microsoft.scloudTo manage resources in the Azure IL6 region.
https://management.chinacloudapi.cn
https://login.chinacloudapi.cn
https://blob.core.chinacloudapi.cn
https://core.chinacloudapi.cnTo manage resources in Azure China regions.
https://www.googleapis.com/compute/v1/
https://compute.googleapis.com/compute/v1
https://cloudresourcemanager.googleapis.com/v1/projects
https://www.googleapis.com/compute/beta
https://storage.googleapis.com/storage/v1
https://www.googleapis.com/storage/v1
https://iam.googleapis.com/v1
https://cloudkms.googleapis.com/v1
https://config.googleapis.com/v1/projectsTo manage resources in Google Cloud.
-
- Public IP address in Azure
-
If you want to use a public IP address with the Console agent VM in Azure, the IP address must use a Basic SKU to ensure that the Console uses this public IP address.
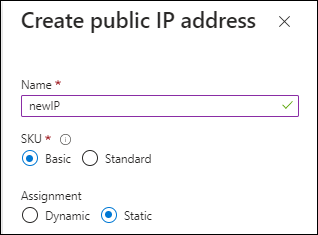
If you use a Standard SKU IP address instead, then the Console uses the private IP address of the Console agent, instead of the public IP. If the machine that you're using to access the Console doesn't have access to that private IP address, then actions from the Console will fail.
- Proxy server
-
NetApp supports both explicit and transparent proxy configurations. If you are using a transparent proxy, you only need to provide the certificate for the proxy server. If you are using an explicit proxy, you'll also need the IP address and credentials.
-
IP address
-
Credentials
-
HTTPS certificate
With private mode, the only time that NetApp Console sends outbound traffic is to your cloud provider to create a Cloud Volumes ONTAP system.
-
- Ports
-
There's no incoming traffic to the Console agent, unless you initiate it.
HTTP (80) and HTTPS (443) provide access to the NetApp Console. SSH (22) is needed if you need to connect to the host for troubleshooting.
- Enable NTP
-
If you're planning to use NetApp Data Classification to scan your corporate data sources, you should enable a Network Time Protocol (NTP) service on both the Console agent and the NetApp Data Classification system so that the time is synchronized between the systems. Learn more about NetApp Data Classification.
Step 6: Prepare cloud permissions
If the Console agent is installed in the cloud and you plan to create Cloud Volumes ONTAP systems, NetApp Console requires cloud provider permissions. You need to set up permissions in your cloud provider and then associate those permissions with the Console agent instance after you install it.
To view the required steps, select the authentication option that you'd like to use for your cloud provider.
Use an IAM role to provide the Console agent with permissions. You'll need to manually attach the role to the EC2 instance for the Console agent.
-
Log in to the AWS console and navigate to the IAM service.
-
Create a policy:
-
Select Policies > Create policy.
-
Select JSON and copy and paste the contents of the IAM policy for the Console agent.
-
Finish the remaining steps to create the policy.
-
-
Create an IAM role:
-
Select Roles > Create role.
-
Select AWS service > EC2.
-
Add permissions by attaching the policy that you just created.
-
Finish the remaining steps to create the role.
-
You now have an IAM role for the Console agent EC2 instance.
Set up permissions and an access key for an IAM user. Provide NetApp Console with the AWS access key after you install the Console agent and set up NetApp Console.
-
Log in to the AWS console and navigate to the IAM service.
-
Create a policy:
-
Select Policies > Create policy.
-
Select JSON and copy and paste the contents of the IAM policy for the Console agent.
-
Finish the remaining steps to create the policy.
Depending on the NetApp Console services that you're planning to use, you might need to create a second policy.
For standard regions, the permissions are spread across two policies. Two policies are required due to a maximum character size limit for managed policies in AWS. Learn more about IAM policies for the Console agent.
-
-
Attach the policies to an IAM user.
-
Ensure that the user has an access key that you can add to the NetApp Console after you install the Console agent.
The account now has the required permissions.
Create an Azure custom role with the required permissions. Assign this role to the Console agent VM.
Note that you can create an Azure custom role using the Azure portal, Azure PowerShell, Azure CLI, or REST API. The following steps show how to create the role using the Azure CLI. If you would prefer to use a different method, refer to Azure documentation.
-
Enable a system-assigned managed identity on the VM where you plan to install the Console agent so that you can provide the required Azure permissions through a custom role.
-
Copy the contents of the custom role permissions for the Console agent and save them in a JSON file.
-
Modify the JSON file by adding Azure subscription IDs to the assignable scope.
You should add the ID for each Azure subscription that you want to use with the NetApp Console.
Example
"AssignableScopes": [ "/subscriptions/d333af45-0d07-4154-943d-c25fbzzzzzzz", "/subscriptions/54b91999-b3e6-4599-908e-416e0zzzzzzz", "/subscriptions/398e471c-3b42-4ae7-9b59-ce5bbzzzzzzz" ] -
Use the JSON file to create a custom role in Azure.
The following steps describe how to create the role by using Bash in Azure Cloud Shell.
-
Start Azure Cloud Shell and choose the Bash environment.
-
Upload the JSON file.
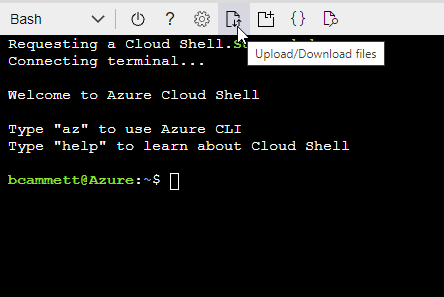
-
Use the Azure CLI to create the custom role:
az role definition create --role-definition agent_Policy.json
-
Create and set up a service principal in Microsoft Entra ID and obtain the Azure credentials that NetApp Console needs. You'll need to provide NetApp Console with these credentials after you install the Console agent and set up NetApp Console.
-
Ensure that you have permissions in Azure to create an Active Directory application and to assign the application to a role.
For details, refer to Microsoft Azure Documentation: Required permissions
-
From the Azure portal, open the Microsoft Entra ID service.

-
In the menu, select App registrations.
-
Select New registration.
-
Specify details about the application:
-
Name: Enter a name for the application.
-
Account type: Select an account type (any will work with the NetApp Console).
-
Redirect URI: You can leave this field blank.
-
-
Select Register.
You've created the AD application and service principal.
-
Create a custom role:
Note that you can create an Azure custom role using the Azure portal, Azure PowerShell, Azure CLI, or REST API. The following steps show how to create the role using the Azure CLI. If you would prefer to use a different method, refer to Azure documentation
-
Copy the contents of the custom role permissions for the Console agent and save them in a JSON file.
-
Modify the JSON file by adding Azure subscription IDs to the assignable scope.
You should add the ID for each Azure subscription from which users will create Cloud Volumes ONTAP systems.
Example
"AssignableScopes": [ "/subscriptions/d333af45-0d07-4154-943d-c25fbzzzzzzz", "/subscriptions/54b91999-b3e6-4599-908e-416e0zzzzzzz", "/subscriptions/398e471c-3b42-4ae7-9b59-ce5bbzzzzzzz" ] -
Use the JSON file to create a custom role in Azure.
The following steps describe how to create the role by using Bash in Azure Cloud Shell.
-
Start Azure Cloud Shell and choose the Bash environment.
-
Upload the JSON file.
-
Use the Azure CLI to create the custom role:
az role definition create --role-definition agent_Policy.jsonYou should now have a custom role called Console Operator that you can assign to the Console agent virtual machine.
-
-
-
Assign the application to the role:
-
From the Azure portal, open the Subscriptions service.
-
Select the subscription.
-
Select Access control (IAM) > Add > Add role assignment.
-
In the Role tab, select the Console Operator role and select Next.
-
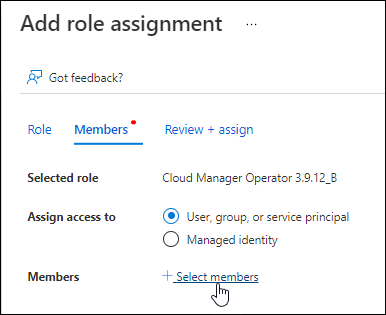
In the Members tab, complete the following steps:
-
Keep User, group, or service principal selected.
-
Select Select members.
-
Search for the name of the application.
Here's an example:
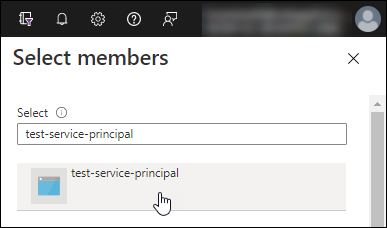
-
Select the application and select Select.
-
Select Next.
-
-
Select Review + assign.
The service principal now has the required Azure permissions to deploy the Console agent.
If you want to deploy Cloud Volumes ONTAP from multiple Azure subscriptions, then you must bind the service principal to each of those subscriptions. In the NetApp Console, you can select the subscription that you want to use when deploying Cloud Volumes ONTAP.
-
-
In the Microsoft Entra ID service, select App registrations and select the application.
-
Select API permissions > Add a permission.
-
Under Microsoft APIs, select Azure Service Management.
-
Select Access Azure Service Management as organization users and then select Add permissions.
-
In the Microsoft Entra ID service, select App registrations and select the application.
-
Copy the Application (client) ID and the Directory (tenant) ID.
When you add the Azure account to the Console, you need to provide the application (client) ID and the directory (tenant) ID for the application. The Console uses the IDs to programmatically sign in.
-
Open the Microsoft Entra ID service.
-
Select App registrations and select your application.
-
Select Certificates & secrets > New client secret.
-
Provide a description of the secret and a duration.
-
Select Add.
-
Copy the value of the client secret.
Your service principal is now set up and you should have copied the application (client) ID, the directory (tenant) ID, and the value of the client secret. Enter this information in NetApp Console when you add an Azure credential.
Create a role and apply it to a service account that you'll use for the Console agent VM instance.
-
Create a custom role in Google Cloud:
-
Create a YAML file that includes the permissions defined in the Console agent policy for Google Cloud.
-
From Google Cloud, activate cloud shell.
-
Upload the YAML file that includes the required permissions for the Console agent.
-
Create a custom role by using the
gcloud iam roles createcommand.The following example creates a role named "agent" at the project level:
gcloud iam roles create agent --project=myproject --file=agent.yaml
-
-
Create a service account in Google Cloud:
-
From the IAM & Admin service, select Service Accounts > Create Service Account.
-
Enter service account details and select Create and Continue.
-
Select the role that you just created.
-
Finish the remaining steps to create the service account.
-
Step 7: Enable Google Cloud APIs
You need to enable several APIs to deploy Cloud Volumes ONTAP in Google Cloud.
-
Enable the following Google Cloud APIs in your project
-
Cloud Build API (required for private mode Cloud Volumes ONTAP deployments using Infrastructure Manager)
-
Cloud Deployment Manager V2 API
-
Cloud Infrastructure Manager API
-
Cloud Logging API
-
Cloud Resource Manager API
-
Compute Engine API
-
Identity and Access Management (IAM) API
-
Cloud Key Management Service (KMS) API (required only if you are planning to use NetApp Backup and Recovery with customer-managed encryption keys (CMEK))
-
Cloud Quotas API (required for Cloud Volumes ONTAP deployments using Infrastructure Manager)
-