Create accounts for FlexPod devices
 Suggest changes


To get started, set up accounts for FlexPod devices:
The agent uses these accounts to collect configuration information from each device.
Create a read-only account for Cisco UCS Manager
-
Log in to Cisco UCS Manager.
-
Create a locally authenticated user named csa-readonly.
All new users are read-only by default.
Create a read-only account for Nexus switches
-
Log in to each Nexus switch using SSH or Telnet.
-
Enter global configuration mode:
 configure terminal
.. Create a new user:
 username [name] password [password] role network-operator
.. Save the configuration:
copy running configuration startup configuration
If you are using a TACACS+ server and you need to grant CSA user privileges, go to Granting CSA user privileges using a TACACS+ server.
Create an admin account for ONTAP
-
Log in to OnCommand System Manager and click the settings icon:
 .
. -
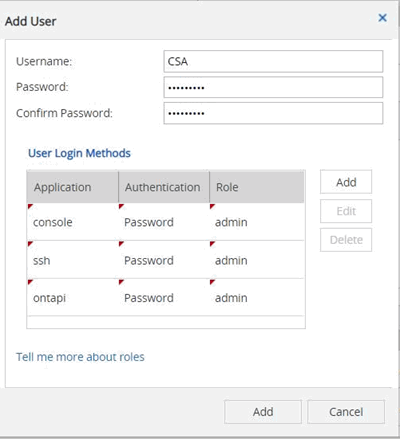
On the Users page, click Add.
-
Enter a user name and password and add ssh, ontapi and console as user login methods with admin access.

Create a read-only account for VMware
-
Log in to vCenter.
-
In the vCenter menu, choose Administration.
-
Under roles, choose Read-only.
-
Click the icon for Clone role action and change the name to CSA.
-
Select the newly created CSA role.
-
Click the Edit role icon.
-
Under Edit role, choose Global and then check Licenses.
-
On the sidebar, select Single sign on→Users and groups→Create a new user.
-
Name the new user CSARO under DOMAIN vpshere.local.
-
On the sidebar, select Global Permissions under Access Control.
-
Choose the user CSARO and assign ROLE CSA.
-
Log in to the Web Client.
Use user ID: CSARO@vsphere.local and previously created password.
Create a read-only account on the APIC
-
Click Admin.
-
Click Create new local users.
-
Under User Identity, enter the user information.
-
Under Security select all security domain options.
-
Click + to add user certificates and SSH keys if needed.
-
Click Next.
-
Click + to add roles for your domain.
-
Select the Role Name from the dropdown menu.
-
Select Read for the Role Privilege Type.
-
Click Finish.
Grant CSA user privileges using a TACACS+ server
If you are using a TACACS+ server and you need to grant CSA user privileges for your switches, you should create a user privilege group and grant the group access to the specific setup commands needed by CSA.
The following commands should be written into the configuration file for your TACACS+ server.
-
Enter the following to create a user privilege group with read-only access:
  group=group_name {
    default service=deny
    service=exec{
      priv-lvl=0
    }
  }
-
Enter the following to grant access to commands needed by CSA:
  cmd=show {
    permit "environment"
    permit "version"
    permit "feature"
    permit "feature-set"
    permit hardware.*
    permit "interface"
    permit "interface"
    permit "interface transceiver"
    permit "inventory"
    permit "license"
    permit "module"
    permit "port-channel database"
    permit "ntp peers"
    permit "license usage"
    permit "port-channel summary"
    permit "running-config"
    permit "startup-config"
    permit "running-config diff"
    permit "switchname"
    permit "int mgmt0"
    permit "cdp neighbors detail"
    permit "vlan"
    permit "vpc"
    permit "vpc peer-keepalive"
    permit "mac address-table"
    permit "lacp port-channel"
    permit "policy-map"
    permit "policy-map system type qos"
    permit "policy-map system type queuing"
    permit "policy-map system type network-qos"
    permit "zoneset active"
    permit "san-port-channel summary"
    permit "flogi database"
    permit "fcns database detail"
    permit "fcns database detail"
    permit "zoneset active"
    permit "vsan"
    permit "vsan usage"
    permit "vsan membership"
    }
-
Enter the following to add your CSA user account to the newly created group:
  user=user_account{
    member=group_name
    login=file/etc/passwd
  }


