

Manually Installing Workload Security Agent and Collector
 Suggest changes
By default, when a new version of a Workload Security agent or collector is available, a pre-upgrade notification is sent, and agents and collectors are updated automatically on your tenant. However, in a secured controlled environment, automatic upgrades might not be desired. In such cases, Workload Security can be configured for manual installation/upgrade of agents and collectors, providing more control over the software installed on your systems.
Before You Begin
-
Verify in swagger that the API categories named “cloudsecure_installers.agent” and “cloudsecure_installers.collector” are available. If not, support for manual agent installation is not enabled. Please reach out to NetApp support to have the feature enabled.

-
Execute all the commands mentioned in this document as ‘root’ user, or, if running with a different user, execute the commands with ‘sudo’.
Installing a New Agent
-
Create a new Workload Security API access token.
-
Navigate to Admin > API Access. Select the “Workload Security Tokens” tab and click “+ API Access Token”.
-
Set a Name and Description that are easy to identify.
-
Under the “What type of APIs will this token be used to call?” dropdown, select Collector Management and Agent & Collector Installation.
-
Select a desired expiry duration.
-
-
Click Save.
-
-
Copy the generated API access token. Please note that once the window is closed the token can no longer be retrieved. In that event you would need to generate a new token.


-
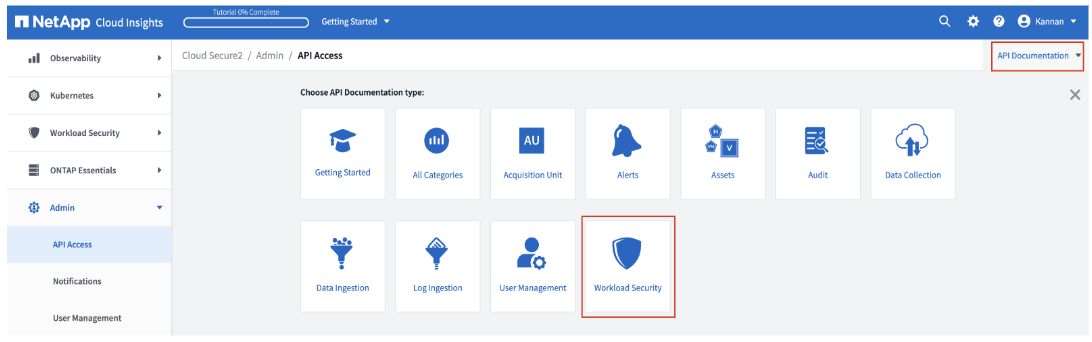
Navigate to Admin > API Access > API Documentation (top right of the page) and select the Workload Security icon. This opens the Swagger documentation for Workload Security APIs.
-
Authorize to access Workload Security APIs.
-
-
Click the Authorize button at the top right of the page.
-
In the Customer ApiKey (apiKey) text field, paste the API token previously copied from Step 1c.
-
Click Authorize and close the window.

-
Download the Agent installer.
-
-
In Swagger, select cloudsecure_installers.agent > /v1/cloudsecure/agents/installers/{platform}/latest (GET) API. Click Try it out.
-
In the platform field, enter linux. Click Execute.


-
Click ‘Download file’ to download the installer.
-
If the installer file is downloaded externally on a different machine other than the system where the agent is to be installed, copy the installer file to that system.
-
Alternatively, you can copy the curl command and run it directly in the system where the agent should be installed.
-
Append the “-o {{file_name}}” argument to the curl command to save the installer file with the desired name. The actual name of the installer file can be found in the swagger response headers section. That name may also be used.

-
Although the file can be downloaded to any location, it is recommended to download it to an empty folder in which the installer .zip can be extracted.
-
Make a new folder (recommended), copy the installer file to this folder, and unzip:
[root@demo-agent /]# mkdir agent_installers
[root@demo-agent /]# cd agent_installers/
[root@demo-agent agent_installers]# pwd
/agent_installers
[root@demo-agent agent_installers]# ll
total 0
[root@demo-agent agent_installers]# curl -X GET "https://netapp-demo.dev.cloudsecure.netapp.com/rest/v1/cloudsecure/agents/installers/linux/latest" -H "accept: application/octet-stream" -H "X-CloudInsights-ApiKey: <<API Access Token>>" -o cloudsecure-linux-agent-installer-1.617.0.zip
[root@demo-agent agent_installers]# ll
total 76012
-rw------- 1 root root 77834705 Apr 26 14:34 cloudsecure-linux-agent-installer-1.617.0.zip
[root@demo-agent agent_installers]# unzip cloudsecure-linux-agent-installer-1.617.0.zip
Archive:  cloudsecure-linux-agent-installer-1.617.0.zip
  inflating: cloudsecure-agent-image.zip
  inflating: cloudsecure-agent-install.sh
  inflating: cloudsecure-agent-upgrade.sh
-
Set execute permission for “cloudsecure-agent-install.sh” file.
[root@demo-agent agent_installers]# chmod +x cloudsecure-agent-install.sh
[root@demo-agent agent_installers]# ll
total 153344
-rw------- 1 root root 79154250 Apr 26 06:37 cloudsecure-agent-image.zip
-rwx------ 1 root root    16574 Apr 26 06:25 cloudsecure-agent-install.sh
-rw------- 1 root root     8586 Apr 26 06:25 cloudsecure-agent-upgrade.sh
-rw------- 1 root root 77834705 Apr 26 14:34 cloudsecure-linux-agent-installer-1.617.0.zip
-
Generate a one-time token for new agent installation.
Note: The one-time token generated in this step is different from the API access token generated at Step 1c .
-
-
-
In Swagger, execute cloudsecure_installers.agent > /v1/cloudsecure/agent/oneTimeToken API and copy the token from the response.
-
Export the one time token as an environment variable.
[root@demo-agent ~]# export TOKEN=<<one time token generated in step 7>>
-
If a proxy server is used, export https_proxy as an environment variable in the format mentioned below.
[root@demo-agent ~]# export HTTPS_PROXY='USER:PASSWORD@PROXY_SERVER:PORT'
-
Optional: By default, agent & collectors will be installed in the path “/opt/netapp”. To install in a different path, set the following environment variable"
[root@demo-agent ~]# export AGENT_INSTALL_PATH=/test_user/apps
Note: If installed in a custom path, data collectors and all other artifacts like agent logs will be created inside the custom path only. Installation logs will still be present in - /var/log/netapp/cloudsecure/install.
-
Go back to the directory where agent installer was downloaded and run “cloudsecure-agent-install.sh”
[root@demo-agent agent_installers]# ./ cloudsecure-agent-install.sh
Note: If user is not running in a “bash” shell, the export command might not work. In that case steps 8 through 11 can be combined and run as below. HTTPS_PROXY and AGENT_INSTALL_PATH are optional and can be ignored if not required.
sudo /bin/bash -c "TOKEN=<<one time token generated in step 7>> HTTPS_PROXY=<<proxy details in the format mentioned in step 9>> AGENT_INSTALL_PATH=<<custom_path_to_install_agent>> ./cloudsecure-agent-install.sh"
At this point, agent should be successfully installed.
-
Sanity check for agent installation:
-
-
Run “systemctl status cloudsecure-agent.service” and verify agent service is in running state.
[root@demo-agent ~]# systemctl status cloudsecure-agent.service cloudsecure-agent.service - Cloud Secure Agent Daemon Service Loaded: loaded (/usr/lib/systemd/system/cloudsecure-agent.service; enabled; vendor preset: disabled) Active: active (running) since Fri 2024-04-26 02:50:37 EDT; 12h ago Main PID: 15887 (java) Tasks: 72 CGroup: /system.slice/cloudsecure-agent.service ├─15887 java -Dconfig.file=/test_user/apps/cloudsecure/agent/conf/application.conf -Dagent.proxy.host= -Dagent.proxy.port= -Dagent.proxy.user= -Dagent.proxy.password= -Dagent.env=prod -Dagent.base.path=/test_user/apps/cloudsecure/agent -... -
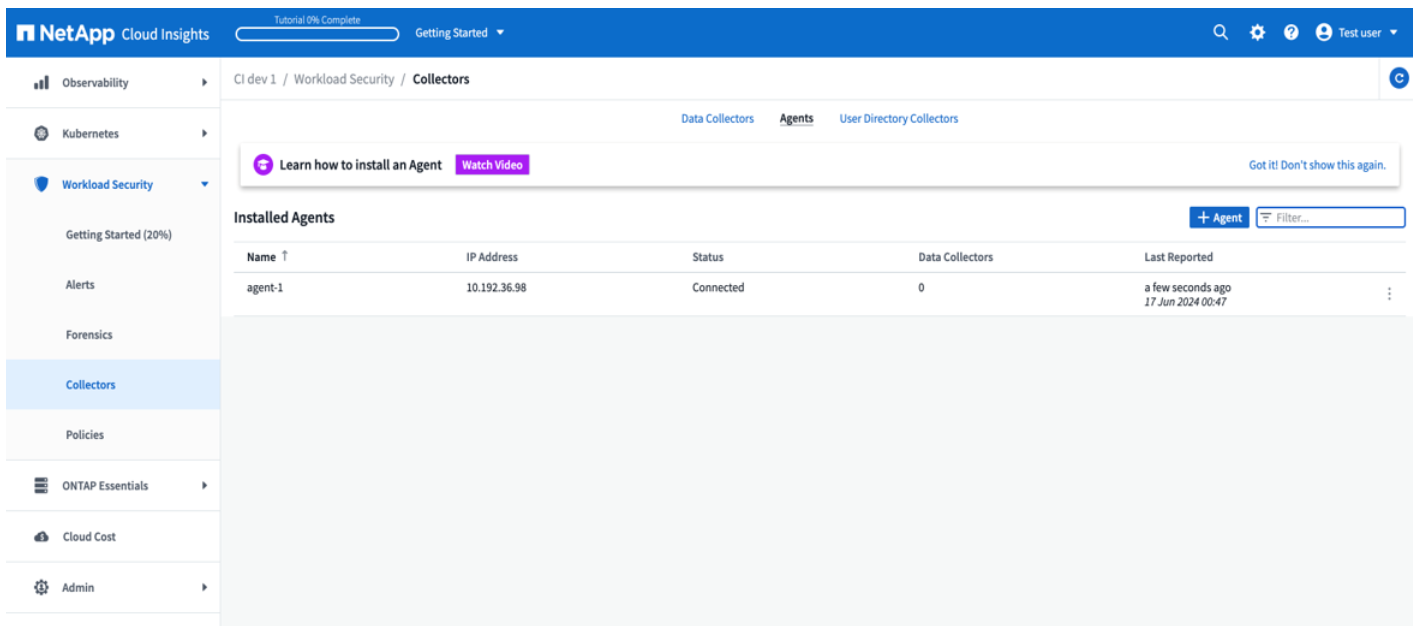
The agent should be visible in the “Agents” page and should be in ‘connected’ state.
-
Post installation cleanup.
-
-
If agent installation is successful, the downloaded agent installer files can be deleted.
Installing a new Data collector.
Note: This document contains instructions for installing “ONTAP SVM data collector”. Same steps applies to “Cloud Volumes ONTAP data collector” and “Amazon FSx for NetApp ONTAP data collector”.
-
Go to the system in which collector needs to be installed and create a directory named ./tmp/collectors under agent installation path directory.
Note: if the agent is installed in /opt/netapp then navigate to /opt/netapp/cloudsecure.
[root@demo-agent ~]# cd {agent-install-path}/cloudsecure [root@demo-agent ~]# mkdir -p ./tmp/collectors -
Recursively change the ownership of tmp directory to cssys:cssys (cssys user and group will be created during agent installation).
[root@demo-agent /]# chown -R cssys:cssys tmp/
[root@demo-agent /]# cd ./tmp
[root@demo-agent tmp]# ll | grep collectors
drwx------ 2 cssys         cssys 4096 Apr 26 15:56 collectors
-
Now we need to fetch collector version and UUID of collector. Navigate to “cloudsecure_config.collector-types” API.
-
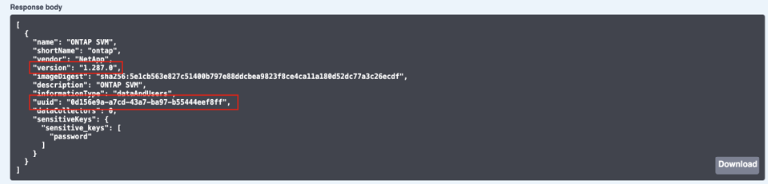
Go to swagger, “cloudsecure_config.collector-types > /v1/cloudsecure/collector-types” (GET) API. In “collectorCategory” dropdown, select collector type as “DATA”. Select “ALL” to fetch all collector type details.
-
Copy the UUID of the required collector type.

-
Download collector installer.
-
Navigate to “cloudsecure_installers.collector > /v1/cloudsecure/collector-types/installers/{collectorTypeUUID}” (GET) API. Enter UUID copied from previous step and download the installer file.

-
If the installer file is downloaded externally in a different machine, copy the installer file to the system where agent is running and place in the directory /{agent-install-path}/cloudsecure/tmp/collectors.
-
Alternatively, you can copy the curl command from the same API and run it directly on the system where the collector is to be installed.
Note that the file name should be the same as present in the response headers of the download collector API. see the screenshot below.
Note: if agent is installed in /opt/netapp then navigate to /opt/netapp/cloudsecure/tmp/collectors.

[root@demo-agent collectors]# cd {agent-install-path}/cloudsecure/tmp/collectors
[root@demo-agent collectors]# pwd
/opt/netapp/cloudsecure/tmp/collectors

[root@demo-agent collectors]# curl -X GET "https://netapp-demo.dev.cloudsecure.netapp.com/rest/v1/cloudsecure/collector-types/installers/1829df8a-c16d-45b1-b72a-ed5707129870" -H "accept: application/octet-stream" -H "X-CloudInsights-ApiKey: <<API Access Token>>" -o cs-ontap-dsc_1.286.0.zip
-
-
Change ownership of collector installer zip file to cssys:cssys.
-rw------- 1 root root 50906252 Apr 26 16:11 cs-ontap-dsc_1.286.0.zip
[root@demo-agent collectors]# chown cssys:cssys cs-ontap-dsc_1.286.0.zip
[root@demo-agent collectors]# ll
total 49716
-rw------- 1 cssys cssys 50906252 Apr 26 16:11 cs-ontap-dsc_1.286.0.zip
-
Navigate to Workload Security > Collectors and select +Collector. Choose the ONTAP SVM collector.
-
Configure the collector details and Save the collector.
-
Upon clicking Save, the agent process will locate the collector installer from /{agent-install-path}/cloudsecure/tmp/collectors/ directory and install the collector.
-
As an alternative option, instead of adding the collector via UI, it can be added via API also.
-
Navigate to “cloudsecure_config.collectors” > “/v1/cloudsecure/collectors” (POST) API.
-
In example dropdown, select “ONTAP SVM data collector json sample”, update collector config details and Execute.

-
-
Collector should be now visible under ‘Data Collectors’ section.

-
Post installation cleanup.
-
If collector installation is successful, all files in the directory /{agent-install-path}/cloudsecure/tmp/collectors can be deleted.
-
Installing a new User Directory Collector
Note: In this document we have mentioned the steps for installing a LDAP collector. The same steps apply for installing an AD collector.
-
1. Go to the system in which collector needs to be installed and create a directory named ./tmp/collectors under agent installation path directory.
Note: if the agent is installed in /opt/netapp then navigate to /opt/netapp/cloudsecure.
[root@demo-agent ~]# cd {agent-install-path}/cloudsecure [root@demo-agent ~]# mkdir -p ./tmp/collectors-
Change the ownership of collectors directory to cssys:cssys
[root@demo-agent /]# chown -R cssys:cssys tmp/
[root@demo-agent /]# cd ./tmp

[root@demo-agent tmp]# ll | grep collectors
drwx------ 2 cssys         cssys 4096 Apr 26 15:56 collectors
-
-
Now we need to fetch version and UUID of the collector. Navigate to “cloudsecure_config.collector-types” API. In collectorCategory dropdown, select collector type as “USER”. Select “ALL” to fetch all collector type details in single request.

-
Copy the UUID of the LDAP collector.

-
Download the collector installer.
-
Navigate to “cloudsecure_installers.collector” > “/v1/cloudsecure/collector-types/installers/{collectorTypeUUID}” (GET) API. Enter UUID copied from previous step and download the installer file.

-
If the installer file is downloaded externally in a different machine, copy the installer file to the system where agent is running and in the directory /{agent-installation-path}/cloudsecure/tmp/collectors.
-
Alternatively, you can copy the curl command from same API and run it directly in the system where collector should be installed.
Note that the file name should be the same as present in the response headers of the download collector API. see the screenshot below.
Also note that if agent is installed in /opt/netapp then navigate to /opt/netapp/cloudsecure/tmp/collectors.
[root@demo-agent collectors]# cd {agent-install-path}/cloudsecure/tmp/collectors [root@demo-agent collectors]# pwd /opt/netapp/cloudsecure/tmp/collectors [root@demo-agent collectors]# curl -X GET "https://netapp-demo.dev.cloudsecure.netapp.com/rest/v1/cloudsecure/collector-types/installers/37fb37bd-6078-4c75-a64f-2b14cb1a1eb1" -H "accept: application/octet-stream" -H "X-CloudInsights-ApiKey: <<API Access Token>>" -o cs-ldap-dsc_1.322.0.zip -
-
Change ownership of collector installer zip file to cssys:cssys.
[root@demo-agent collectors]# ll
total 37156
-rw------- 1 root root 38045966 Apr 29 10:02 cs-ldap-dsc_1.322.0.zip
[root@demo-agent collectors]# chown cssys:cssys cs-ldap-dsc_1.322.0.zip
[root@demo-agent collectors]# ll
total 37156
-rw------- 1 cssys cssys 38045966 Apr 29 10:02 cs-ldap-dsc_1.322.0.zip
-
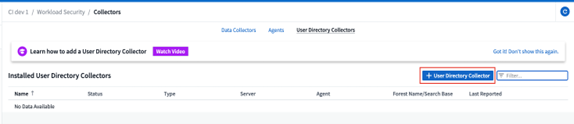
Navigate to ‘User Directory Collectors’ page and click ‘+ User Directory Collector’.
-
Select ‘LDAP Directory Server’.

-
Enter LDAP Directory Server details and click ‘Save’

-
Upon clicking Save, agent service will locate collector installer from /{agent-install-path}/cloudsecure/tmp/collectors/ directory and install the collector.
-
As an alternative option, instead of adding collector via UI, it can be added via API also.
-
Navigate to “cloudsecure_config.collectors” > “/v1/cloudsecure/collectors” (POST) API.
-
In example dropdown, select “LDAP Directory Server user collector json sample’”, update collector config details and click “Execute”.

-
-
The collector should be now visible under “User Directory Collectors” section.

-
Post installation cleanup.
-
If collector installation is successful, all files in the directory /{agent-install-path}/cloudsecure/tmp/collectors can be deleted.
-
Upgrading an agent
An e-mail notification will be sent when a new version of the agent/collector is available.
-
Download latest agent installer.
-
The steps to download the latest installer are similar to those in “Installing a new agent.” In swagger, select “cloudsecure_installers.agent” > “/v1/cloudsecure/agents/installers/{platform}/latest” API, enter platform as “linux” and download the installer zip file. Alternatively, a curl command can also be used. Unzip the installer file.
-
-
Set execute permission for “cloudsecure-agent-upgrade.sh” file.
[root@demo-agent agent_installers]# unzip cloudsecure-linux-agent-installer-1.618.0.zip
Archive:  cloudsecure-linux-agent-installer-1.618.0.zip
  inflating: cloudsecure-agent-image.zip
  inflating: cloudsecure-agent-install.sh
  inflating: cloudsecure-agent-upgrade.sh
[root@demo-agent agent_installers]# ll
total 153344
-rw------- 1 root root 79154230 Apr 26  2024 cloudsecure-agent-image.zip
-rw------- 1 root root    16574 Apr 26  2024 cloudsecure-agent-install.sh
-rw------- 1 root root     8586 Apr 26  2024 cloudsecure-agent-upgrade.sh
-rw------- 1 root root 77834660 Apr 26 17:35 cloudsecure-linux-agent-installer-1.618.0.zip
[root@demo-agent agent_installers]# chmod +x cloudsecure-agent-upgrade.sh
[root@demo-agent agent_installers]# ll
total 153344
-rw------- 1 root root 79154230 Apr 26  2024 cloudsecure-agent-image.zip
-rw------- 1 root root    16574 Apr 26  2024 cloudsecure-agent-install.sh
-rwx------ 1 root root     8586 Apr 26  2024 cloudsecure-agent-upgrade.sh
-rw------- 1 root root 77834660 Apr 26 17:35 cloudsecure-linux-agent-installer-1.618.0.zip
-
Run “cloudsecure-agent-upgrade.sh” script. If the script has ran successfully, it will print the message “Cloudsecure agent has upgraded successfully.” in the output.
-
Run the following command ‘systemctl daemon-reload’
[root@demo-agent ~]# systemctl daemon-reload
-
Restart the agent service.
[root@demo-agent ~]# systemctl restart cloudsecure-agent.service
At this point, the agent should be successfully upgraded.
-
Sanity check post agent upgrade.
-
Navigate to the path where agent is installed (for ex., “/opt/netapp/cloudsecure/”). The symlink “agent” should point to new version of agent.
[root@demo-agent cloudsecure]# pwd
/opt/netapp/cloudsecure
[root@demo-agent cloudsecure]# ll
total 40
lrwxrwxrwx  1 cssys cssys  114 Apr 26 17:38 agent -> /test_user/apps/cloudsecure/cloudsecure-agent-1.618.0
drwxr-xr-x  4 cssys cssys 4096 Apr 25 10:45 agent-certs
drwx------  2 cssys cssys 4096 Apr 25 16:18 agent-logs
drwx------ 11 cssys cssys 4096 Apr 26 02:50 cloudsecure-agent-1.617.0
drwx------ 11 cssys cssys 4096 Apr 26 17:42 cloudsecure-agent-1.618.0
drwxr-xr-x  3 cssys cssys 4096 Apr 26 02:45 collector-image
drwx------  2 cssys cssys 4096 Apr 25 10:45 conf
drwx------  3 cssys cssys 4096 Apr 26 16:39 data-collectors
-rw-r--r--  1 root  root    66 Apr 25 10:45 sysctl.conf.bkp
drwx------  2 root  root  4096 Apr 26 17:38 tmp
-
The agent should be visible in the “Agents” page and should be in 'connected' state.
-
-
Post installation cleanup.
-
If agent installation is successful, the downloaded agent installer files can be deleted.
-
Upgrading collectors
Note: The upgrade steps are the same for all types of collectors. We will demonstrate “ONTAP SVM” collector upgrade in this document.
-
Go to the system in which collectors needs to be upgraded and create the directory ./tmp/collectors under agent installation path directory, if it isn't present already.
Note: if agent is installed in /opt/netapp then navigate to /opt/netapp/cloudsecure directory.
[root@demo-agent ~]# cd {agent-install-path}/cloudsecure [root@demo-agent ~]# mkdir -p ./tmp/collectors -
Make sure the directory “collectors” is owned by cssys:cssys.
[root@demo-agent /]# chown -R cssys:cssys tmp/
[root@demo-agent /]# cd ./tmp
[root@demo-agent tmp]# ll | grep collectors
drwx------ 2 cssys         cssys 4096 Apr 26 15:56 collectors
-
In swagger, navigate to “cloudsecure_config.collector-types” GET API. In “collectorCategory” dropdown, select “DATA” (select “USER” for user directory collector or “ALL”).
Copy UUID and version from response body.
-
Download latest collector installer file.
-
Navigate to cloudsecure_installers.collector > /v1/cloudsecure/collector-types/installers/{collectorTypeUUID} API. Enter collectorTypeUUID copied from previous step. Download the installer to /{agent-install-path}/cloudsecure/tmp/collectors directory.
-
Alternatively, the curl command of the same API can also be used.

Note: the file name should be same as present in the response headers of the download collector API.
-
-
Change ownership of collector installer zip file to cssys:cssys.
[root@demo-agent collectors]# ll
total 55024
-rw------- 1 root root 56343750 Apr 26 19:00 cs-ontap-dsc_1.287.0.zip
[root@demo-agent collectors]# chown cssys:cssys cs-ontap-dsc_1.287.0.zip
[root@demo-agent collectors]# ll
total 55024
-rw------- 1 cssys cssys 56343750 Apr 26 19:00 cs-ontap-dsc_1.287.0.zip
-
Trigger upgrade collector API.
-
In swagger, navigate to “cloudsecure_installers.collector” > “/v1/cloudsecure/collector-types/upgrade” (PUT) API.
-
In “Examples” dropdown, select “ONTAP SVM data collector upgrade json sample” to populate sample payload.
-
Replace version with version copied from Step 3 and click ‘Execute’.

Wait for a few seconds. Collectors will be automatically upgraded.
-
-
Sanity check.
Collectors should be in running state in UI.
-
Post upgrade cleanup:
-
If collector upgrade is successful, all files in the directory /{agent-install-path}/cloudsecure/tmp/collectors can be deleted.
-
Repeat the steps above for upgrading other types of collectors as well.
Commons Issues and fixes.
-
AGENT014 Error
This error will come if collector installer file is not present in /{agent-install-path}/cloudsecure/tmp/collectors directory or it is not accessible. Make sure the installer file is downloaded, and the full directory structure of collectors and installer zip file is owned by cssys:cssys, then restart agent service: systemctl restart cloudsecure-agent.service.

-
Unauthorized error
{
  "errorMessage": "Requested public API is not allowed to be accessed by input API access token.",
  "errorCode": "NOT_AUTHORIZED"
}
This error will be displayed if API access token is generated without selecting all required API categories. Generate a new API access token by selecting all required API categories.