

Restore ONTAP data using Browse & Restore
 Suggest changes
With NetApp Backup and Recovery, restore ONTAP data using Browse & Restore. Before restoring, note the source volume name, source system and storage VM, and backup file date. You can restore ONTAP data from a snapshot, a replicated volume, or from backups stored in object storage.
Restore capabilities depend on your ONTAP version:
-
Folders: Using ONTAP 9.13.0 or greater, you can restore folders with all files and sub-folders; with earlier versions, you can restore only files in the folder.
-
Archival Storage: Restoring from archival storage (available with ONTAP 9.10.1 or greater) is slower and might incur additional costs.
-
Destination Cluster Requirements:
-
Volume restore: ONTAP 9.10.1 or greater
-
File restore: ONTAP 9.11.1 or greater
-
Google Archive and StorageGRID: ONTAP 9.12.1 or greater
-
Folder restore: ONTAP 9.13.1 or greater
-
Learn more about restoring from AWS archival storage.
Learn more about restoring from Azure archival storage.
Learn more about restoring from Google archival storage.

|
The High priority isn't supported when restoring data from Azure archival storage to StorageGRID systems. |
Browse & Restore supported systems and object storage providers
You can restore ONTAP data from a backup file that resides in a secondary system (a replicated volume) or in object storage (a backup file) to the following systems. Snapshots reside on the source system and can be restored only to that same system.
Note: You can restore a volume from any type of backup file, but you can restore a folder or individual files only from a backup file in object storage at this time.
| From Object Store (Backup) | From Primary (Snapshot) | From Secondary System (Replication) | To Destination system |
|---|---|---|---|
Amazon S3 |
Cloud Volumes ONTAP in AWS |
Cloud Volumes ONTAP in AWS |
Azure Blob |
Cloud Volumes ONTAP in Azure |
Cloud Volumes ONTAP in Azure |
Google Cloud Storage |
Cloud Volumes ONTAP in Google |
Cloud Volumes ONTAP in Google |
NetApp StorageGRID |
On-premises ONTAP system |
On-premises ONTAP system |
To on-premises ONTAP system |
ONTAP S3 |
On-premises ONTAP system |
On-premises ONTAP system |
For Browse & Restore, the Console agent can be installed in the following locations:
-
For Amazon S3, the Console agent can be deployed in AWS or in your premises
-
For Azure Blob, the Console agent can be deployed in Azure or in your premises
-
For Google Cloud Storage, the Console agent must be deployed in your Google Cloud Platform VPC
-
For StorageGRID, the Console agent must be deployed in your premises; with or without internet access
-
For ONTAP S3, the Console agent can be deployed in your premises (with or without internet access) or in a cloud provider environment
Note that references to "on-premises ONTAP systems" includes FAS, AFF, and ONTAP Select systems.
|
|
If the ONTAP version on your system is less than 9.13.1, then you can't restore folders or files if the backup file has been configured with DataLock & Ransomware. In this case, you can restore the entire volume from the backup file and then access the files you need. |
Restore volumes using Browse & Restore
When you restore a volume from a backup file, NetApp Backup and Recovery creates a new volume using the data from the backup. When using a backup from object storage, you can restore the data to a volume in the original system, to a different system that's located in the same cloud account as the source system, or to an on-premises ONTAP system.
|
|
When you restore a SnapLock-enabled volume, the restored volume retains SnapLock protection only if the destination storage is WORM-enabled. If you restore to a non-WORM destination, the SnapLock status is removed from the restored volume. |
When restoring a cloud backup to a Cloud Volumes ONTAP system using ONTAP 9.13.0 or greater or to an on-premises ONTAP system running ONTAP 9.14.1, you'll have the option to perform a quick restore operation. The quick restore is ideal for disaster recovery situations where you need to provide access to a volume as soon as possible. A quick restore restores the metadata from the backup file to a volume instead of restoring the entire backup file. Quick restore is not recommended for performance or latency-sensitive applications, and it is not supported with backups in archived storage.
|
|
Quick restore is supported for FlexGroup volumes only if the source system from which the cloud backup was created was running ONTAP 9.12.1 or greater. And it is supported for SnapLock volumes only if the source system was running ONTAP 9.11.0 or greater. |
When restoring from a replicated volume, you can restore the volume to the original system or to a Cloud Volumes ONTAP or on-premises ONTAP system.
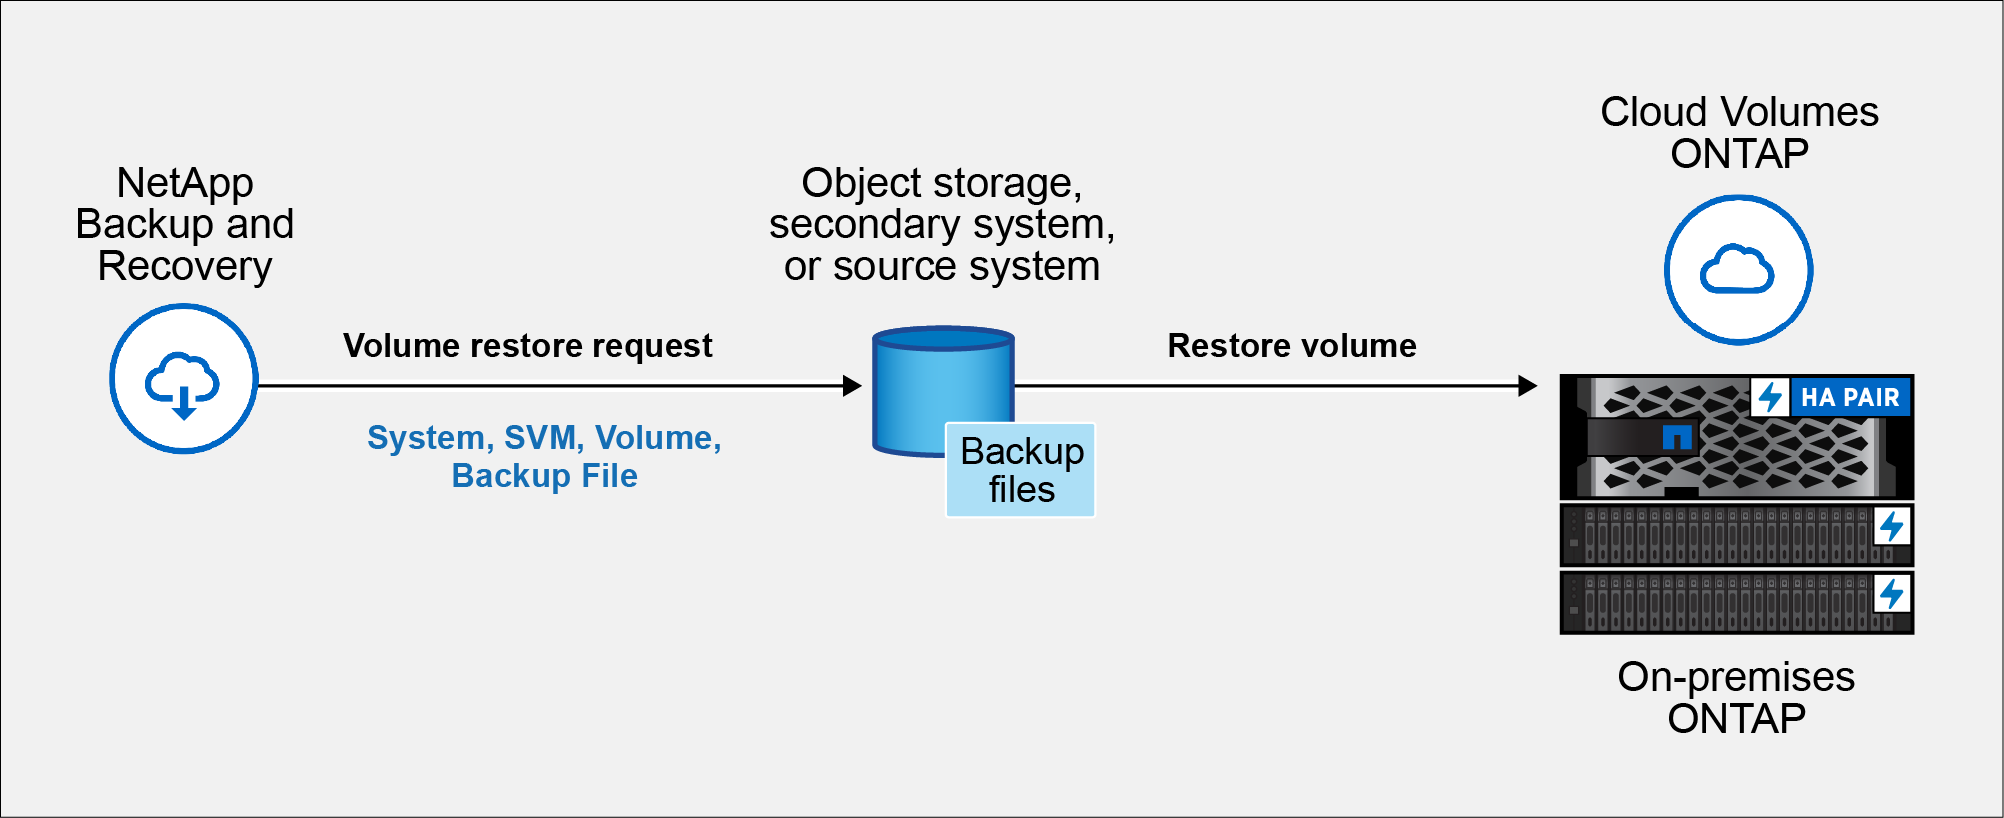
You need the source system name, storage VM, volume name, and backup file date to restore a volume.
-
From the Console menu, select Protection > Backup and recovery.
-
Select the Restore tab and the Restore Dashboard is displayed.
-
From the Browse & Restore section, select Restore Volume.
-
In the Select Source page, navigate to the backup file for the volume you want to restore. Select the system, the Volume, and the Backup file that has the date/time stamp from which you want to restore.
The Location column shows whether the backup file (Snapshot) is Local (a snapshot on the source system), Secondary (a replicated volume on a secondary ONTAP system), or Object Storage (a backup file in object storage). Choose the file that you want to restore.
-
Select Next.
Note that if you select a backup file in object storage, and ransomware protection is active for that backup (if you enabled Datalock and Ransomware protection in the backup policy), then you are prompted to run an additional ransomware scan on the backup file before restoring the data. We recommend that you scan the backup file for ransomware. (You'll incur extra egress costs from your cloud provider to access the contents of the backup file.)
-
In the Select Destination page, select the system where you want to restore the volume.
-
When restoring a backup file from object storage, if you select an on-premises ONTAP system and you haven't already configured the cluster connection to the object storage, you are prompted for additional information:
-
When restoring from Amazon S3, select the IPspace in the ONTAP cluster where the destination volume will reside, enter the access key and secret key for the user you created to give the ONTAP cluster access to the S3 bucket, and optionally choose a private VPC endpoint for secure data transfer.
-
When restoring from Azure Blob, select the IPspace in the ONTAP cluster where the destination volume will reside, select the Azure Subscription to access the object storage, and optionally choose a private endpoint for secure data transfer by selecting the VNet and Subnet.
-
When restoring from Google Cloud Storage, select the Google Cloud Project and the Access Key and Secret Key to access the object storage, the region where the backups are stored, and the IPspace in the ONTAP cluster where the destination volume will reside.
-
When restoring from StorageGRID, enter the FQDN of the StorageGRID server and the port that ONTAP should use for HTTPS communication with StorageGRID, select the Access Key and Secret Key needed to access the object storage, and the IPspace in the ONTAP cluster where the destination volume will reside.
-
When restoring from ONTAP S3, enter the FQDN of the ONTAP S3 server and the port that ONTAP should use for HTTPS communication with ONTAP S3, select the Access Key and Secret Key needed to access the object storage, and the IPspace in the ONTAP cluster where the destination volume will reside.
-
-
Enter the name you want to use for the restored volume, and select the Storage VM and Aggregate where the volume will reside. When restoring a FlexGroup volume you'll need to select multiple aggregates. By default, <source_volume_name>_restore is used as the volume name.
When restoring a backup from object storage to a Cloud Volumes ONTAP system using ONTAP 9.13.0 or greater or to an on-premises ONTAP system running ONTAP 9.14.1, you'll have the option to perform a quick restore operation.
And if you are restoring the volume from a backup file that resides in an archival storage tier (available starting with ONTAP 9.10.1), then you can select the Restore Priority.
Learn more about restoring from AWS archival storage.
Learn more about restoring from Azure archival storage.
Learn more about restoring from Google archival storage. Backup files in the Google Archive storage tier are restored almost immediately, and require no Restore Priority. -
Select Next to choose whether you want to do a Normal restore or a Quick Restore process:
-
Normal restore: Use normal restore on volumes that require high performance. Volumes will not be available until the restore process is complete.
-
Quick restore: Restored volumes and data will be available immediately. Do not use this on volumes that require high performance because during the quick restore process, access to the data might be slower than usual.
-
-
Select Restore and you return to the Restore Dashboard so you can review the progress of the restore operation.
NetApp Backup and Recovery creates a new volume based on the backup you selected.
Note that restoring a volume from a backup file that resides in archival storage can take many minutes or hours depending on the archive tier and the restore priority. You can select the Job Monitoring tab to see the restore progress.
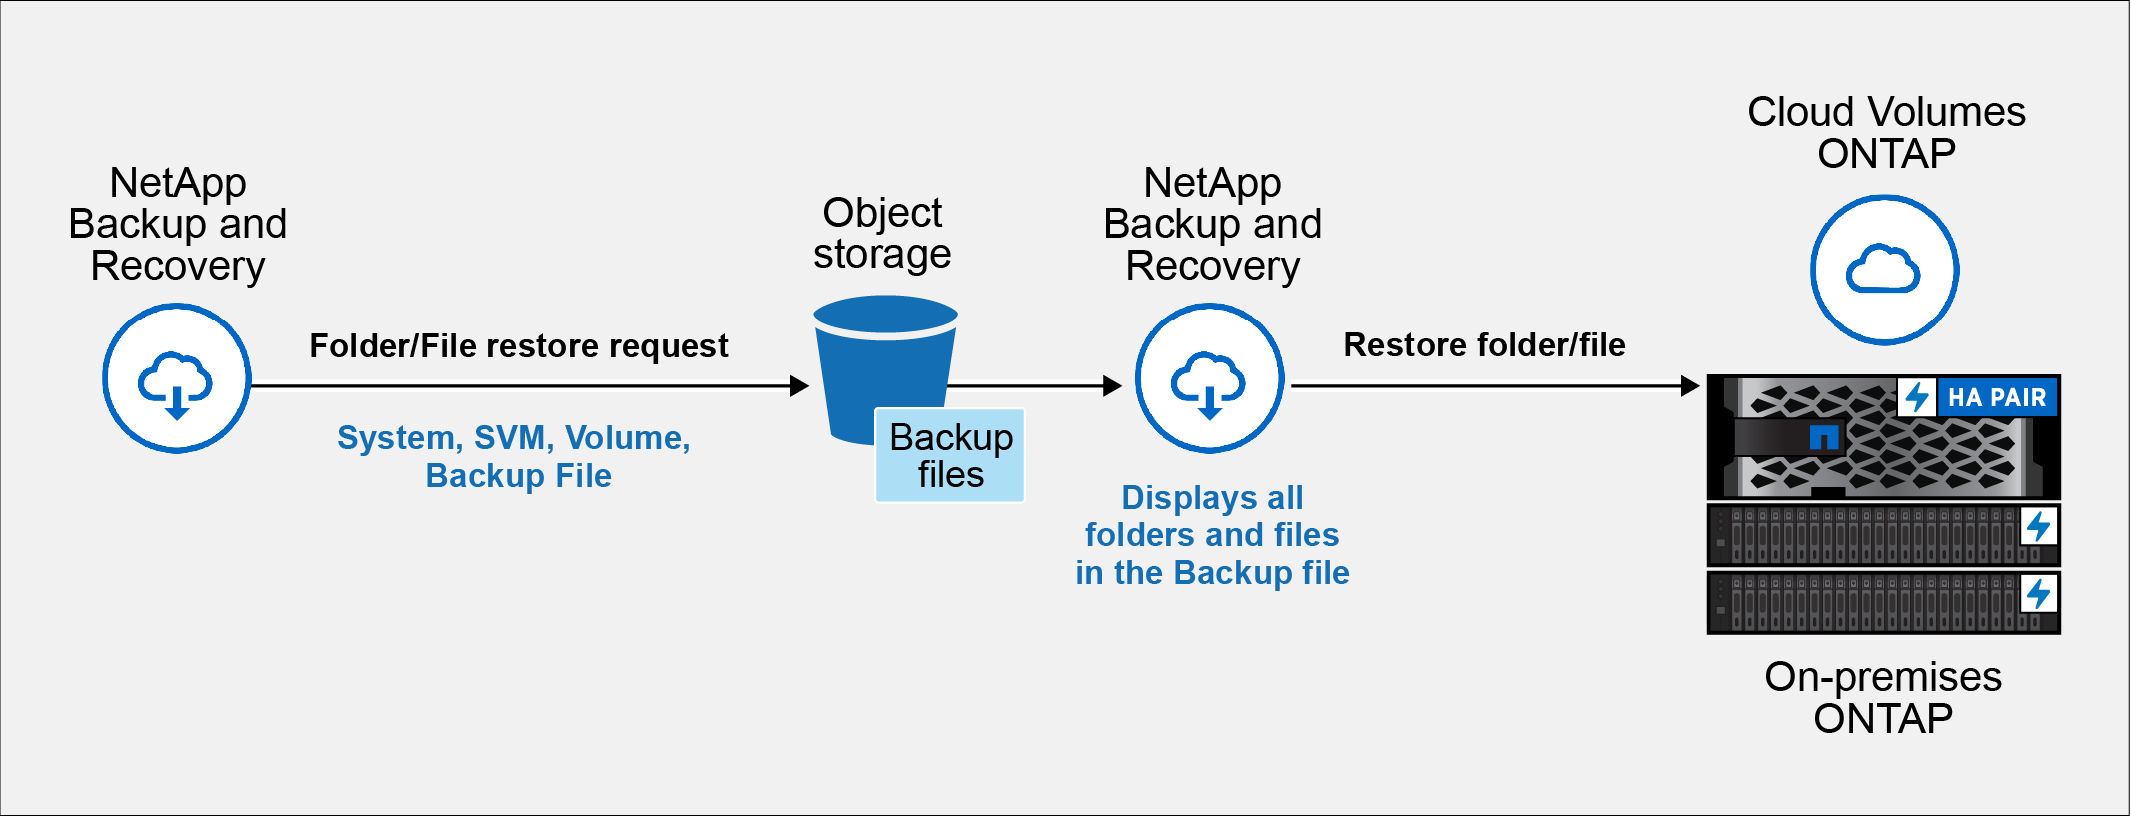
Restore folders and files using Browse & Restore
If you need to restore only a few files from an ONTAP volume backup, you can choose to restore a folder or individual files instead of restoring the entire volume. You can restore folders and files to an existing volume in the original system, or to a different system that's using the same cloud account. You can also restore folders and files to a volume on an on-premises ONTAP system.
|
|
You can restore a folder or individual files only from a backup file in object storage at this time. Restoring files and folders is not currently supported from a local snapshot or from a backup file that resides in a secondary system (a replicated volume). |
If you select multiple files, they are restored to the same destination volume. To restore files to different volumes, run the process multiple times.
When using ONTAP 9.13.0 or greater, you can restore a folder along with all files and sub-folders within it. When using a version of ONTAP before 9.13.0, only files from that folder are restored - no sub-folders, or files in sub-folders, are restored.
|
|
|
Restore folders and files
Follow these steps to restore folders or files to a volume from an ONTAP volume backup. You should know the name of the volume and the date of the backup file that you want to use to restore the folder or file(s). This functionality uses Live Browsing so that you can view the list of directories and files within each backup file.
-
The ONTAP version must be 9.6 or greater to perform file restore operations.
-
The ONTAP version must be 9.11.1 or greater to perform folder restore operations. ONTAP version 9.13.1 is required if the data is in archival storage, or if the backup file is using DataLock and Ransomware protection.
-
The ONTAP version must be 9.15.1 p2 or greater to restore FlexGroup directories using the Browse and restore option.
-
From the Console menu, select Protection > Backup and recovery.
-
Select the Restore tab and the Restore Dashboard is displayed.
-
From the Browse & Restore section, select Restore Files or Folder.
-
In the Select Source page, navigate to the backup file for the volume that contains the folder or files you want to restore. Select the system, the Volume, and the Backup that has the date/time stamp from which you want to restore files.
-
Select Next and the list of folders and files from the volume backup are displayed.
If you are restoring folders or files from a backup file that resides in an archival storage tier, then you can select the Restore Priority.
Learn more about restoring from AWS archival storage.
Learn more about restoring from Azure archival storage.
Learn more about restoring from Google archival storage. Backup files in the Google Archive storage tier are restored almost immediately, and require no Restore Priority.And if ransomware protection is active for the backup file (if you enabled Datalock and Ransomware protection in the backup policy), then you are prompted to run an additional ransomware scan on the backup file before restoring the data. We recommend that you scan the backup file for ransomware. (You'll incur extra egress costs from your cloud provider to access the contents of the backup file.)
-
In the Select Items page, select the folder or file(s) that you want to restore and select Continue. To assist you in finding the item:
-
You can select the folder or file name if you see it.
-
You can select the search icon and enter the name of the folder or file to navigate directly to the item.
-
You can navigate down levels in folders using the Down arrow at the end of the row to find specific files.
As you select files they are added to the left side of the page so you can see the files that you have already chosen. You can remove a file from this list if needed by selecting the x next to the file name.
-
-
In the Select Destination page, select the system where you want to restore the items.
If you select an on-premises cluster and you haven't already configured the cluster connection to the object storage, you are prompted for additional information:
-
When restoring from Amazon S3, enter the IPspace in the ONTAP cluster where the destination volume resides, and the AWS Access Key and Secret Key needed to access the object storage. You can also select a Private Link Configuration for the connection to the cluster.
-
When restoring from Azure Blob, enter the IPspace in the ONTAP cluster where the destination volume resides. You can also select a Private Endpoint Configuration for the connection to the cluster.
-
When restoring from Google Cloud Storage, enter the IPspace in the ONTAP cluster where the destination volumes reside, and the Access Key and Secret Key needed to access the object storage.
-
When restoring from StorageGRID, enter the FQDN of the StorageGRID server and the port that ONTAP should use for HTTPS communication with StorageGRID, enter the Access Key and Secret Key needed to access the object storage, and the IPspace in the ONTAP cluster where the destination volume resides.
-
-
Then select the Volume and the Folder where you want to restore the folder or file(s).
You have a few options for the location when restoring folders and file(s).
-
When you have chosen Select Target Folder, as shown above:
-
You can select any folder.
-
You can hover over a folder and click at the end of the row to drill down into subfolders, and then select a folder.
-
-
If you have selected the same destination system and Volume as where the source folder/file was located, you can select Maintain Source Folder Path to restore the folder, or file(s), to the same folder where they existed in the source structure. All the same folders and sub-folders must already exist; folders are not created. When restoring files to their original location, you can choose to overwrite the source file(s) or to create new file(s).
-
-
Select Restore to return to the Restore Dashboard and review the progress of the restore operation.