

Scan database schemas with NetApp Data Classification
 Suggest changes
Complete a few steps to start scanning your database schemas with NetApp Data Classification.
Review prerequisites
Review the following prerequisites to make sure that you have a supported configuration before you enable Data Classification.
Supported databases
Data Classification can scan schemas from the following databases:
-
Amazon Relational Database Service (Amazon RDS)
-
MongoDB
-
MySQL
-
Oracle
-
PostgreSQL
-
SAP HANA
-
SQL Server (MSSQL)

|
The statistics gathering feature must be enabled in the database. |
Database requirements
Any database with connectivity to the Data Classification instance can be scanned, regardless of where it is hosted. You just need the following information to connect to the database:
-
IP address or host name
-
Port
-
Service name (only for accessing Oracle databases)
-
Credentials that allow read access to the schemas
When choosing a user name and password, it's important to choose one that has full read permissions to all the schemas and tables you want to scan. We recommend that you create a dedicated user for the Data Classification system with all the required permissions.

|
For MongoDB, a read-only admin role is required. |
Deploy the Data Classification instance
Deploy Data Classification if there isn't already an instance deployed.
If you are scanning database schemas that are accessible over the internet, you can deploy Data Classification in the cloud or deploy Data Classification in an on-premises location that has internet access.
If you are scanning database schemas that have been installed in a dark site that has no internet access, you need to deploy Data Classification in the same on-premises location that has no internet access. This also requires that the Console agent is deployed in that same on-premises location.
Add the database server
Add the database server where the schemas reside.
-
From the Data Classification menu, select Configuration.
-
From the Configuration page, select Add System > Add Database Server.
-
Enter the required information to identify the database server.
-
Select the database type.
-
Enter the port and the host name or IP address to connect to the database.
-
For Oracle databases, enter the Service name.
-
Enter the credentials so that Data Classification can access the server.
-
Select Add DB Server.
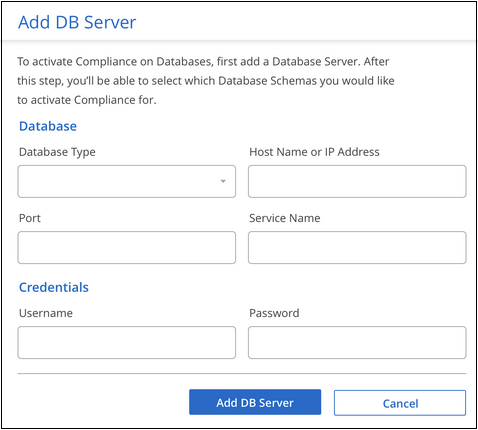
-
The database is added to the list of systems.
Enable and disable scans on database schemas
You can stop or start full scanning of your schemas at any time.

|
There is no option to select map-only scans for database schemas. |
-
From the Configuration page, select the Manage button for the database you want to configure.
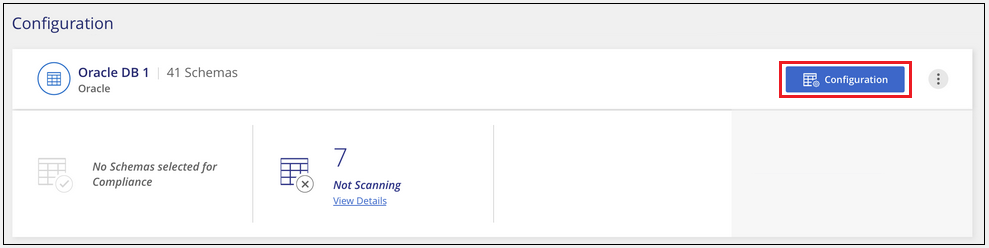
-
For each schema you want to enable scans for, select the Scan type column then set the scan to off or Full scan.
Data Classification starts scanning the database schemas that you enabled. You can track the progress of the initial scan by navigating to the Configuration menu then selecting the System configuration. The progress of each scan is shown as a progress bar. You can also hover over the progress bar to see the number of files scanned relative to the total number of files in the volume. If there are any errors, they'll appear in the Status column, alongside the required actions to fix the error.
Data Classification scans your databases once per day; databases are not continuously scanned like other data sources.