

Scan StorageGRID data with NetApp Data Classification
 Suggest changes
Complete a few steps to start scanning data within StorageGRID directly with NetApp Data Classification.
Review StorageGRID requirements
Review the following prerequisites to make sure that you have a supported configuration before you enable Data Classification.
-
You need to have the endpoint URL to connect with the object storage service.
-
You need to have the Access Key and Secret Key from StorageGRID so that Data Classification can access the buckets.
Deploy the Data Classification instance
Deploy Data Classification if there isn't already an instance deployed.
If you are scanning data from StorageGRID that is accessible over the internet, you can deploy Data Classification in the cloud or deploy Data Classification in an on-premises location that has internet access.
If you are scanning data from StorageGRID that has been installed in a dark site that has no internet access, you need to deploy Data Classification in the same on-premises location that has no internet access. This also requires that the Console agent is deployed in that same on-premises location.
Add the StorageGRID service to Data Classification
Add the StorageGRID service.
-
From the Data Classification menu, select the Configuration option.
-
From the Configuration page, select Add System > Add StorageGRID.
-
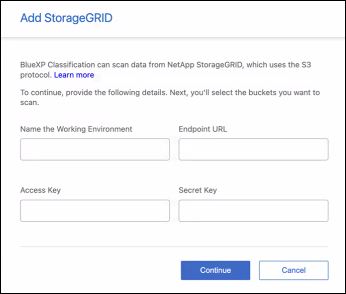
In the Add StorageGRID Service dialog, enter the details for the StorageGRID service and select Continue.
-
Enter the name you want to use for the System. This name should reflect the name of the StorageGRID service to which you are connecting.
-
Enter the Endpoint URL to access the object storage service.
-
Enter the Access Key and Secret Key so that Data Classification can access the buckets in StorageGRID.
-
StorageGRID is added to the list of systems.
Enable and disable scans on StorageGRID buckets
After you enable Data Classification on StorageGRID, the next step is to configure the buckets that you want to scan. Data Classification discovers those buckets and displays them in the system you created.
-
In Data Classification, select Configuration.
-
In the Configuration page, locate the StorageGRID system you want to enable scanning for.
-
Decide how you want to scan the volumes. What's the difference between Mapping and Classification scans?.
-
To enable scanning on all volumes in the system, select Activate scan then select Map only all volumes or Full scan all volumes.
To manage scanning on only select volumes, select Activate scan then Manage. In the system overview, identify the resources you want to scan. Select the scan type for each volume then set it to the scanning type you want: full or mapping-only.
Data Classification starts scanning the buckets that you enabled. You can track the progress of the initial scan by navigating to the Configuration menu. Identify the system then select Manage. The progress of each scan is show as a progress bar. You can also hover over the progress bar to see the number of files scanned relative to the total files in the volume. If there are any errors, they'll appear in the Status column, alongside the required action to fix the error.