


Create replication plans in NetApp Disaster Recovery for Amazon EVS


 Suggest changes

 PDFs
PDFs
After you identify the on-premises vCenters to protect and configure an Amazon EVS site that uses Amazon FSx for NetApp ONTAP as the disaster recovery destination, create a replication plan to protect the VMs on your on-premises vCenter cluster.
Initiate the replication plan wizard
-
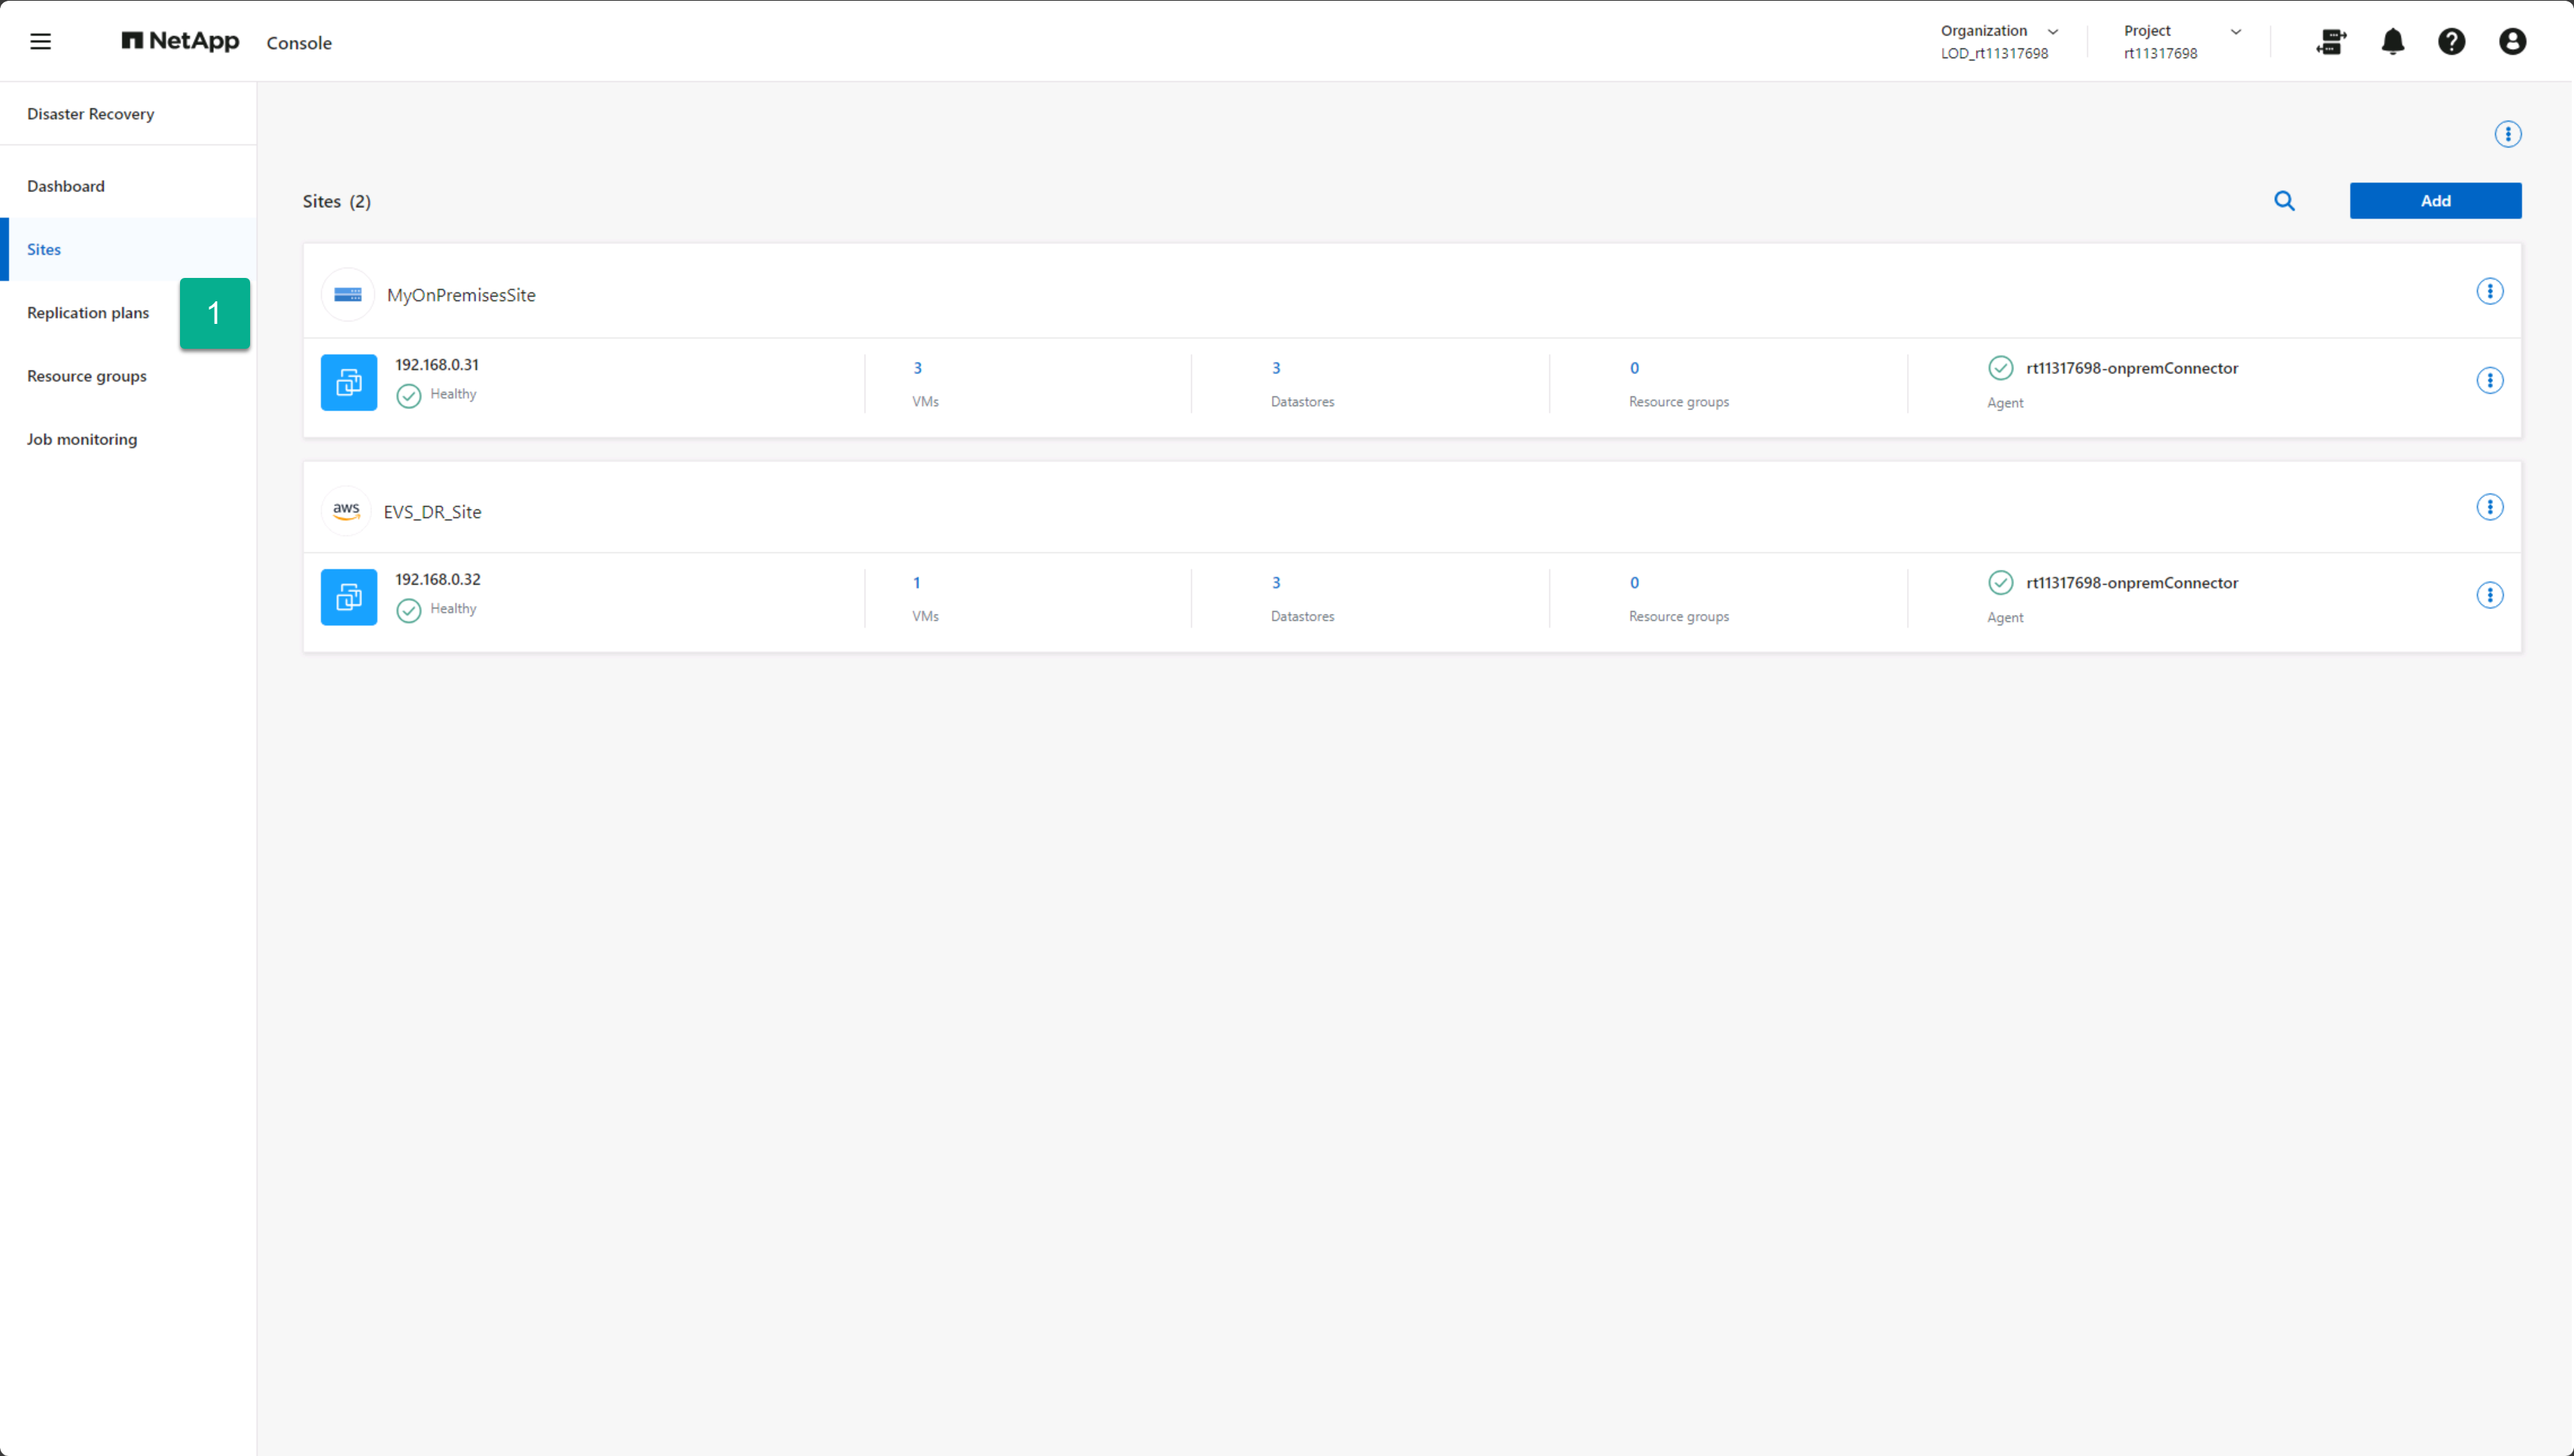
From any NetApp Disaster Recovery screen, select the Replication plans option.
-
From the Replication plans page, select Add.
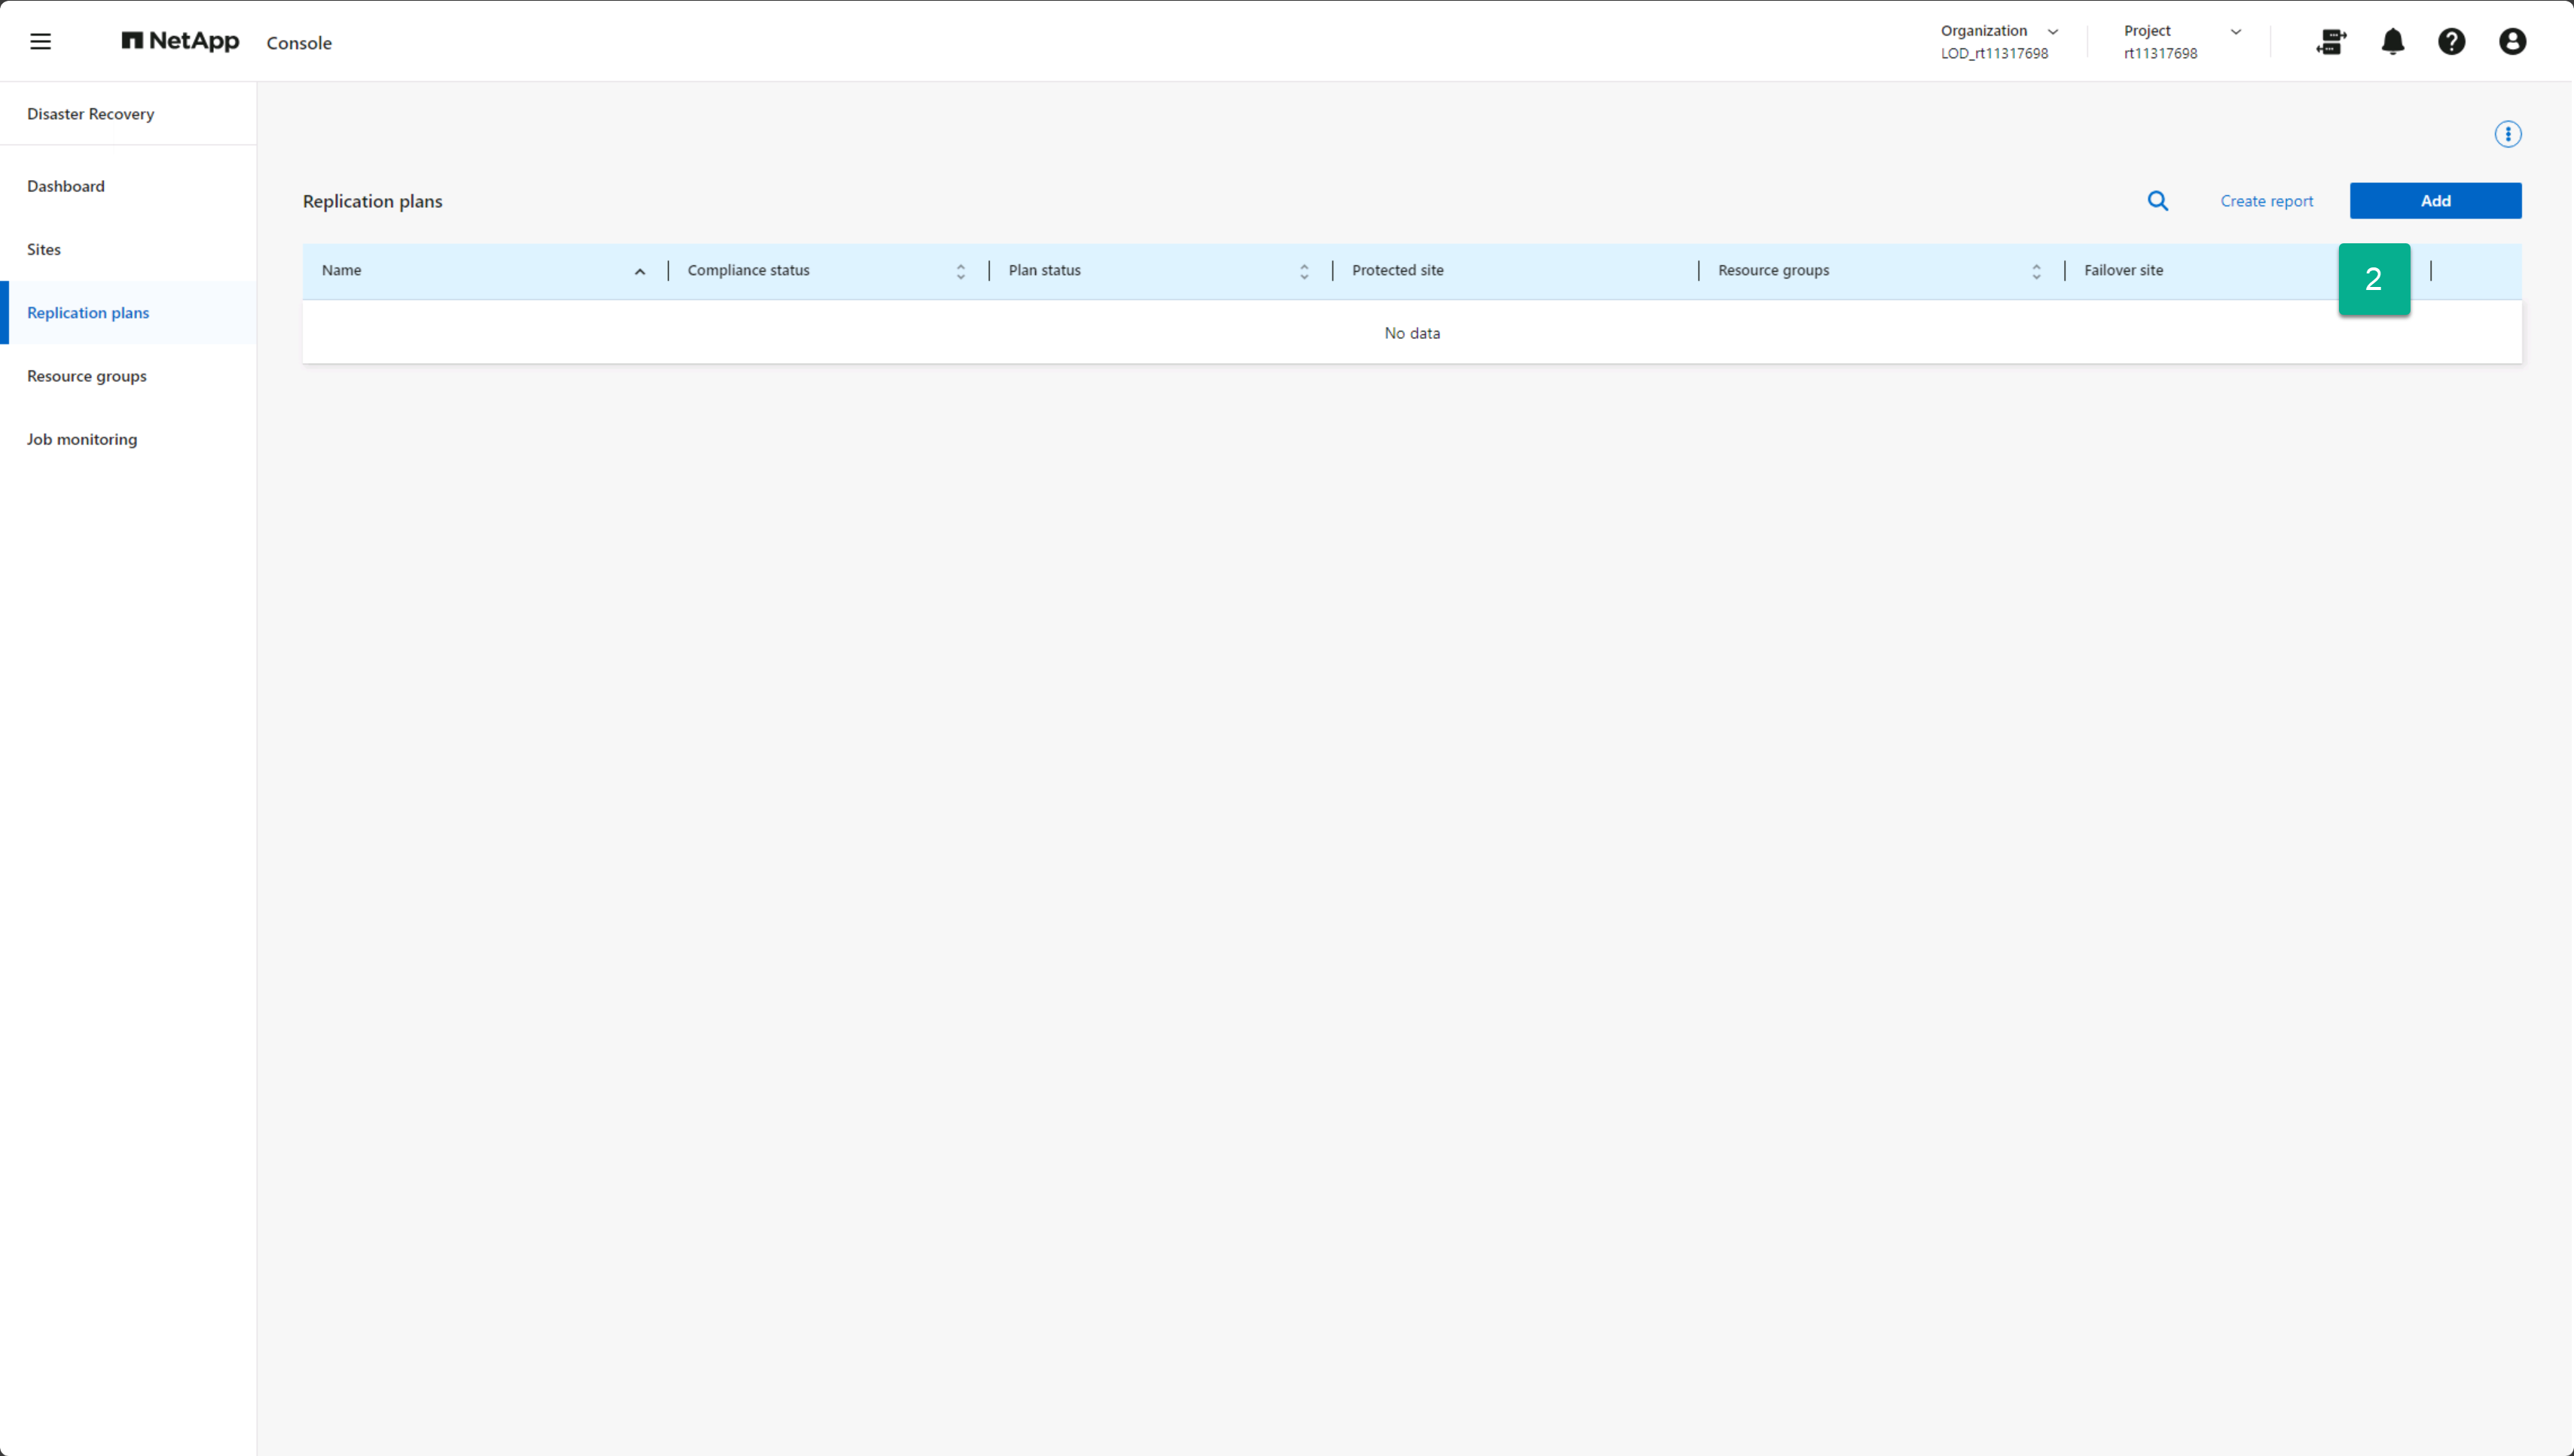
This opens the Create replication plan wizard.
Select vCenters
-
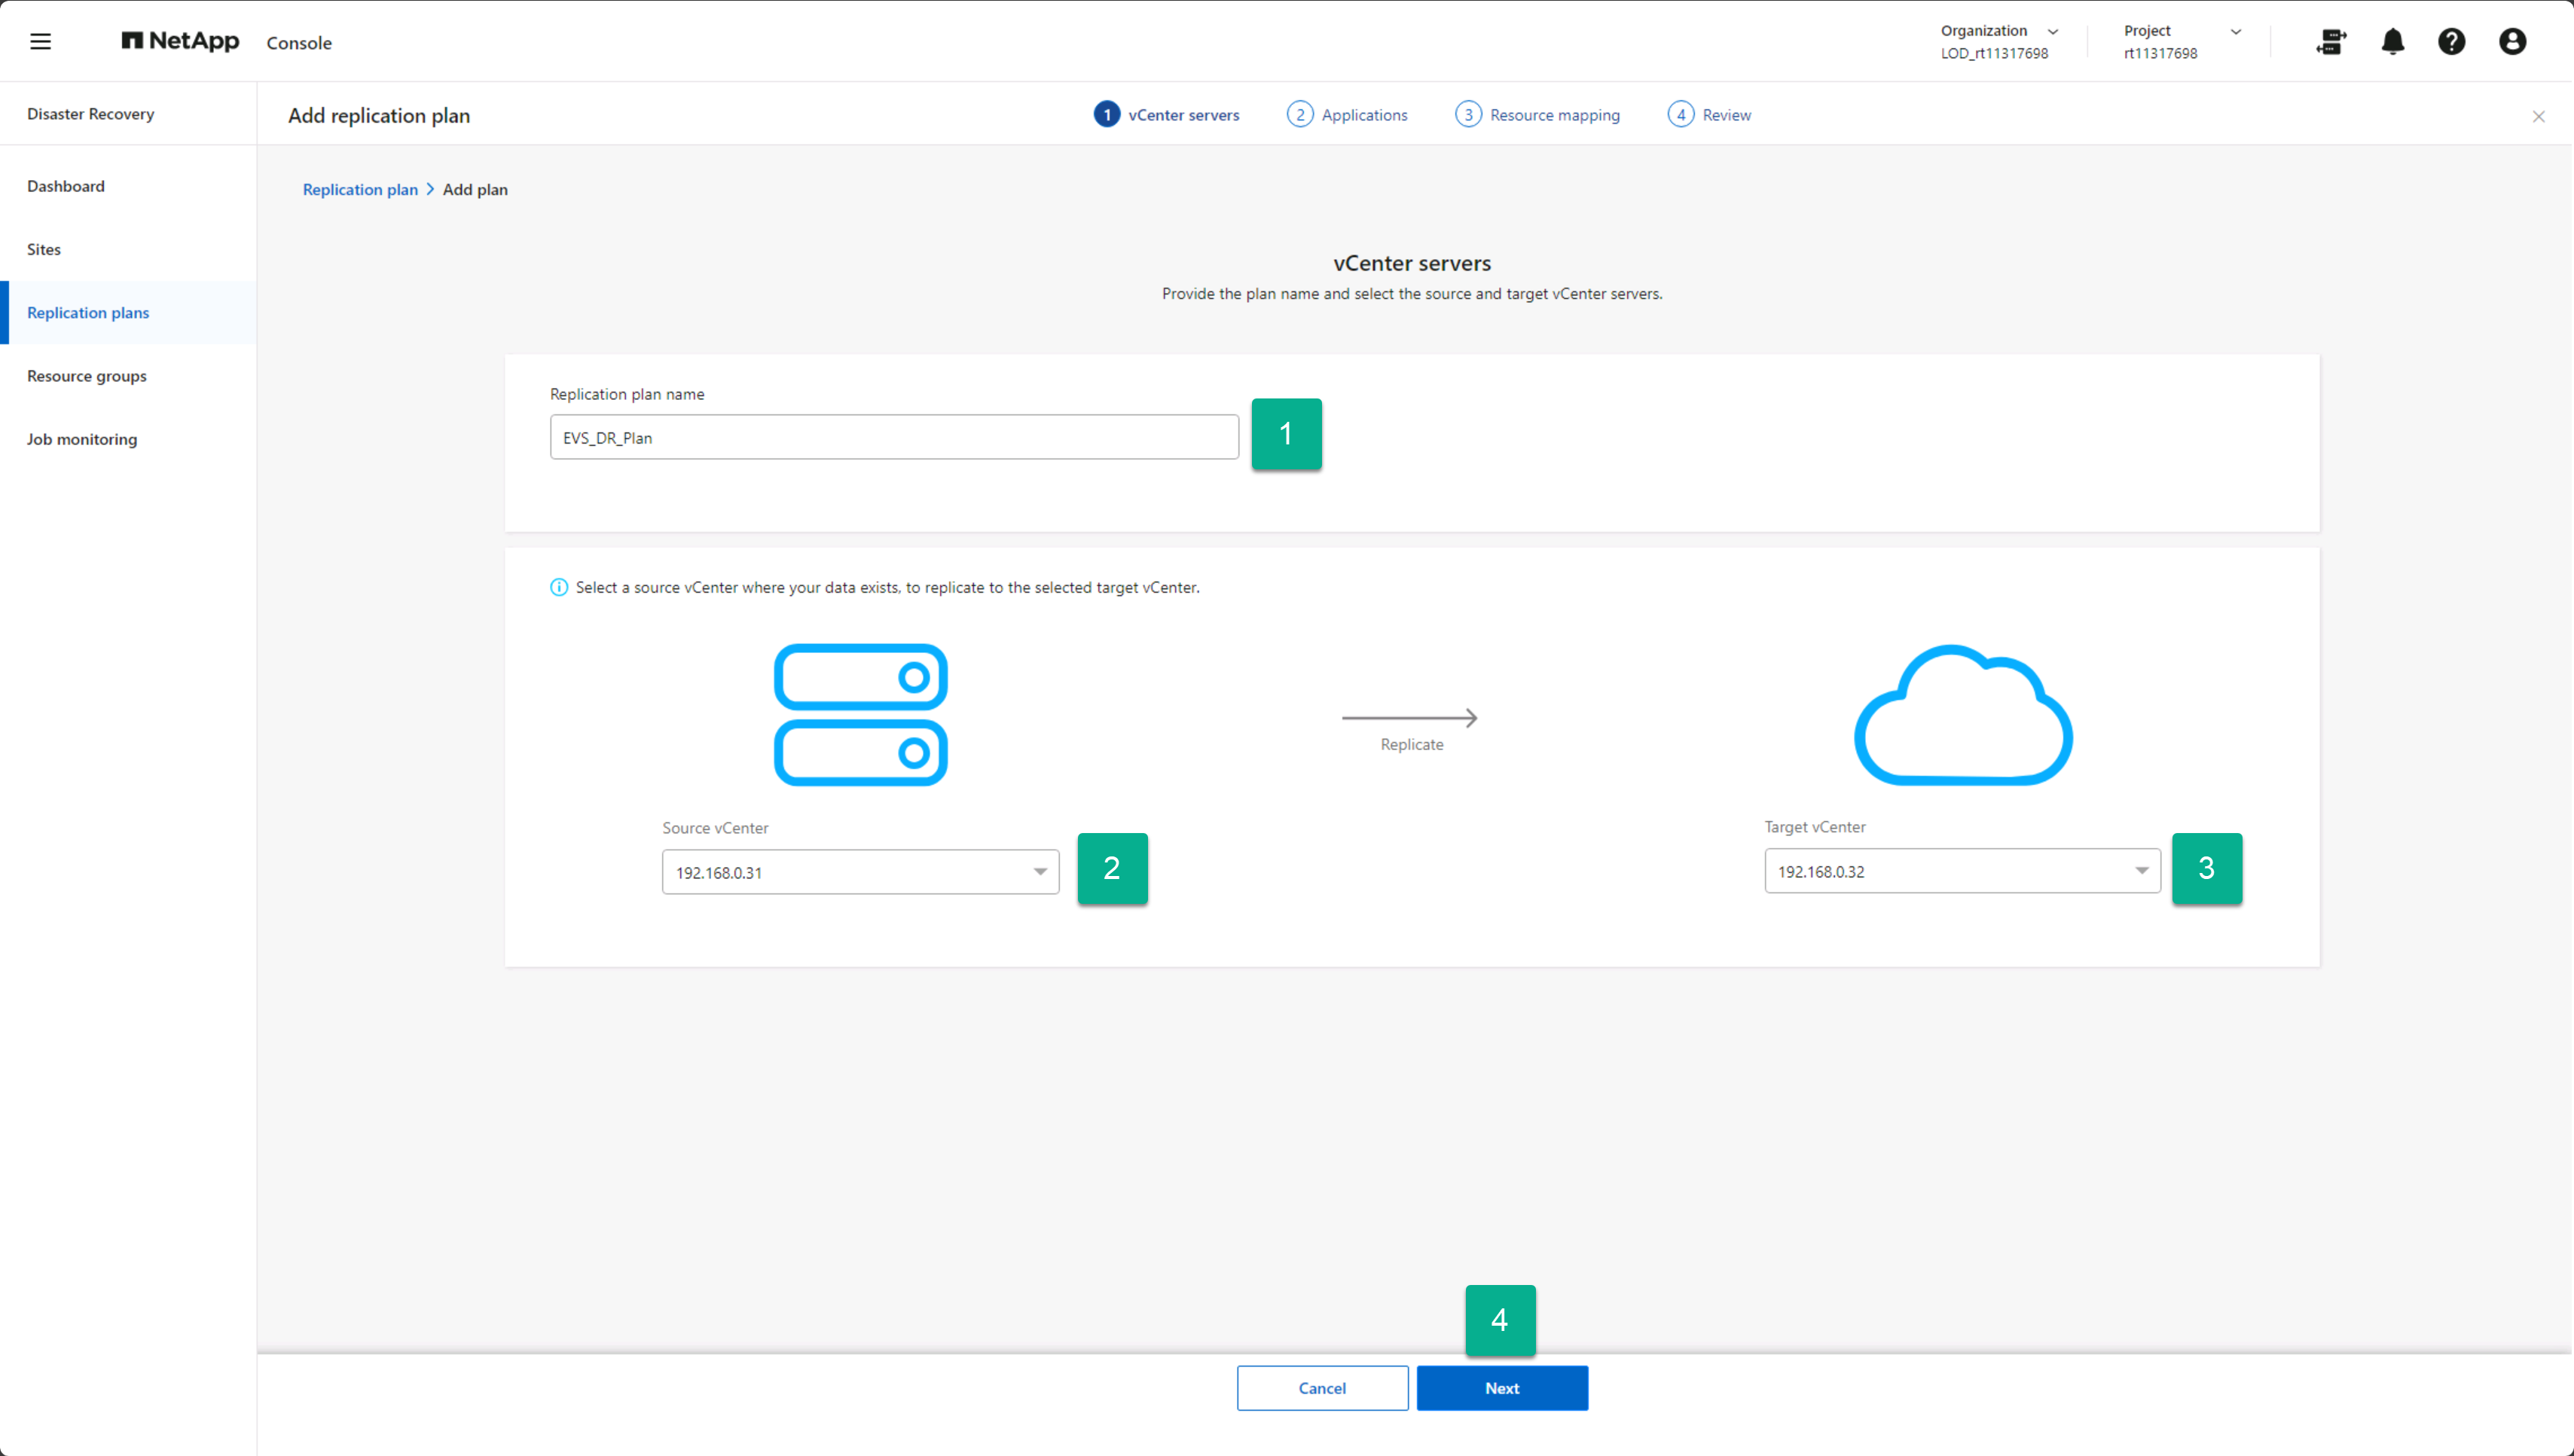
Enter a unique name for the replication plan.
Only alpha-numeric characters and underscores (_) are allowed for replication plan names.
-
Select a source vCenter cluster.
-
Select a destination vCenter cluster.
-
Select Next.
Select VM resources for protection
There are multiple ways to select VMs for protection. The following steps show how to protect the entire vCenter datastores, but you should choose the method that best suits your needs.
-
Select individual VMs: Selecting the Virtual machines button enables you to select individual VMs to protect. As you select each VM, the service adds it to a default resource group located on the right-hand side of the screen.
-
Select previously created resource groups: You can create custom resource groups beforehand using the Resource group option from the Disaster Recovery menu. This is optional because you can use the other two methods to create a resource group during replication plan creation. For details, see Create a replication plan.
-
Select entire vCenter datastores: With this option, all VMs residing on a datastore will be replicated as part of the volume. Use this option if you have multiple VMs to protect with the replication plan to avoid selecting the individual VMs. In most cases, you should have Disaster Recovery protect and restart any VMs located on the datastore. Use this option to tell the service to add any VMs hosted on a selected datastore to the list of protected VMs.
-
From the Replication plan page, continue to the Applications section.
-
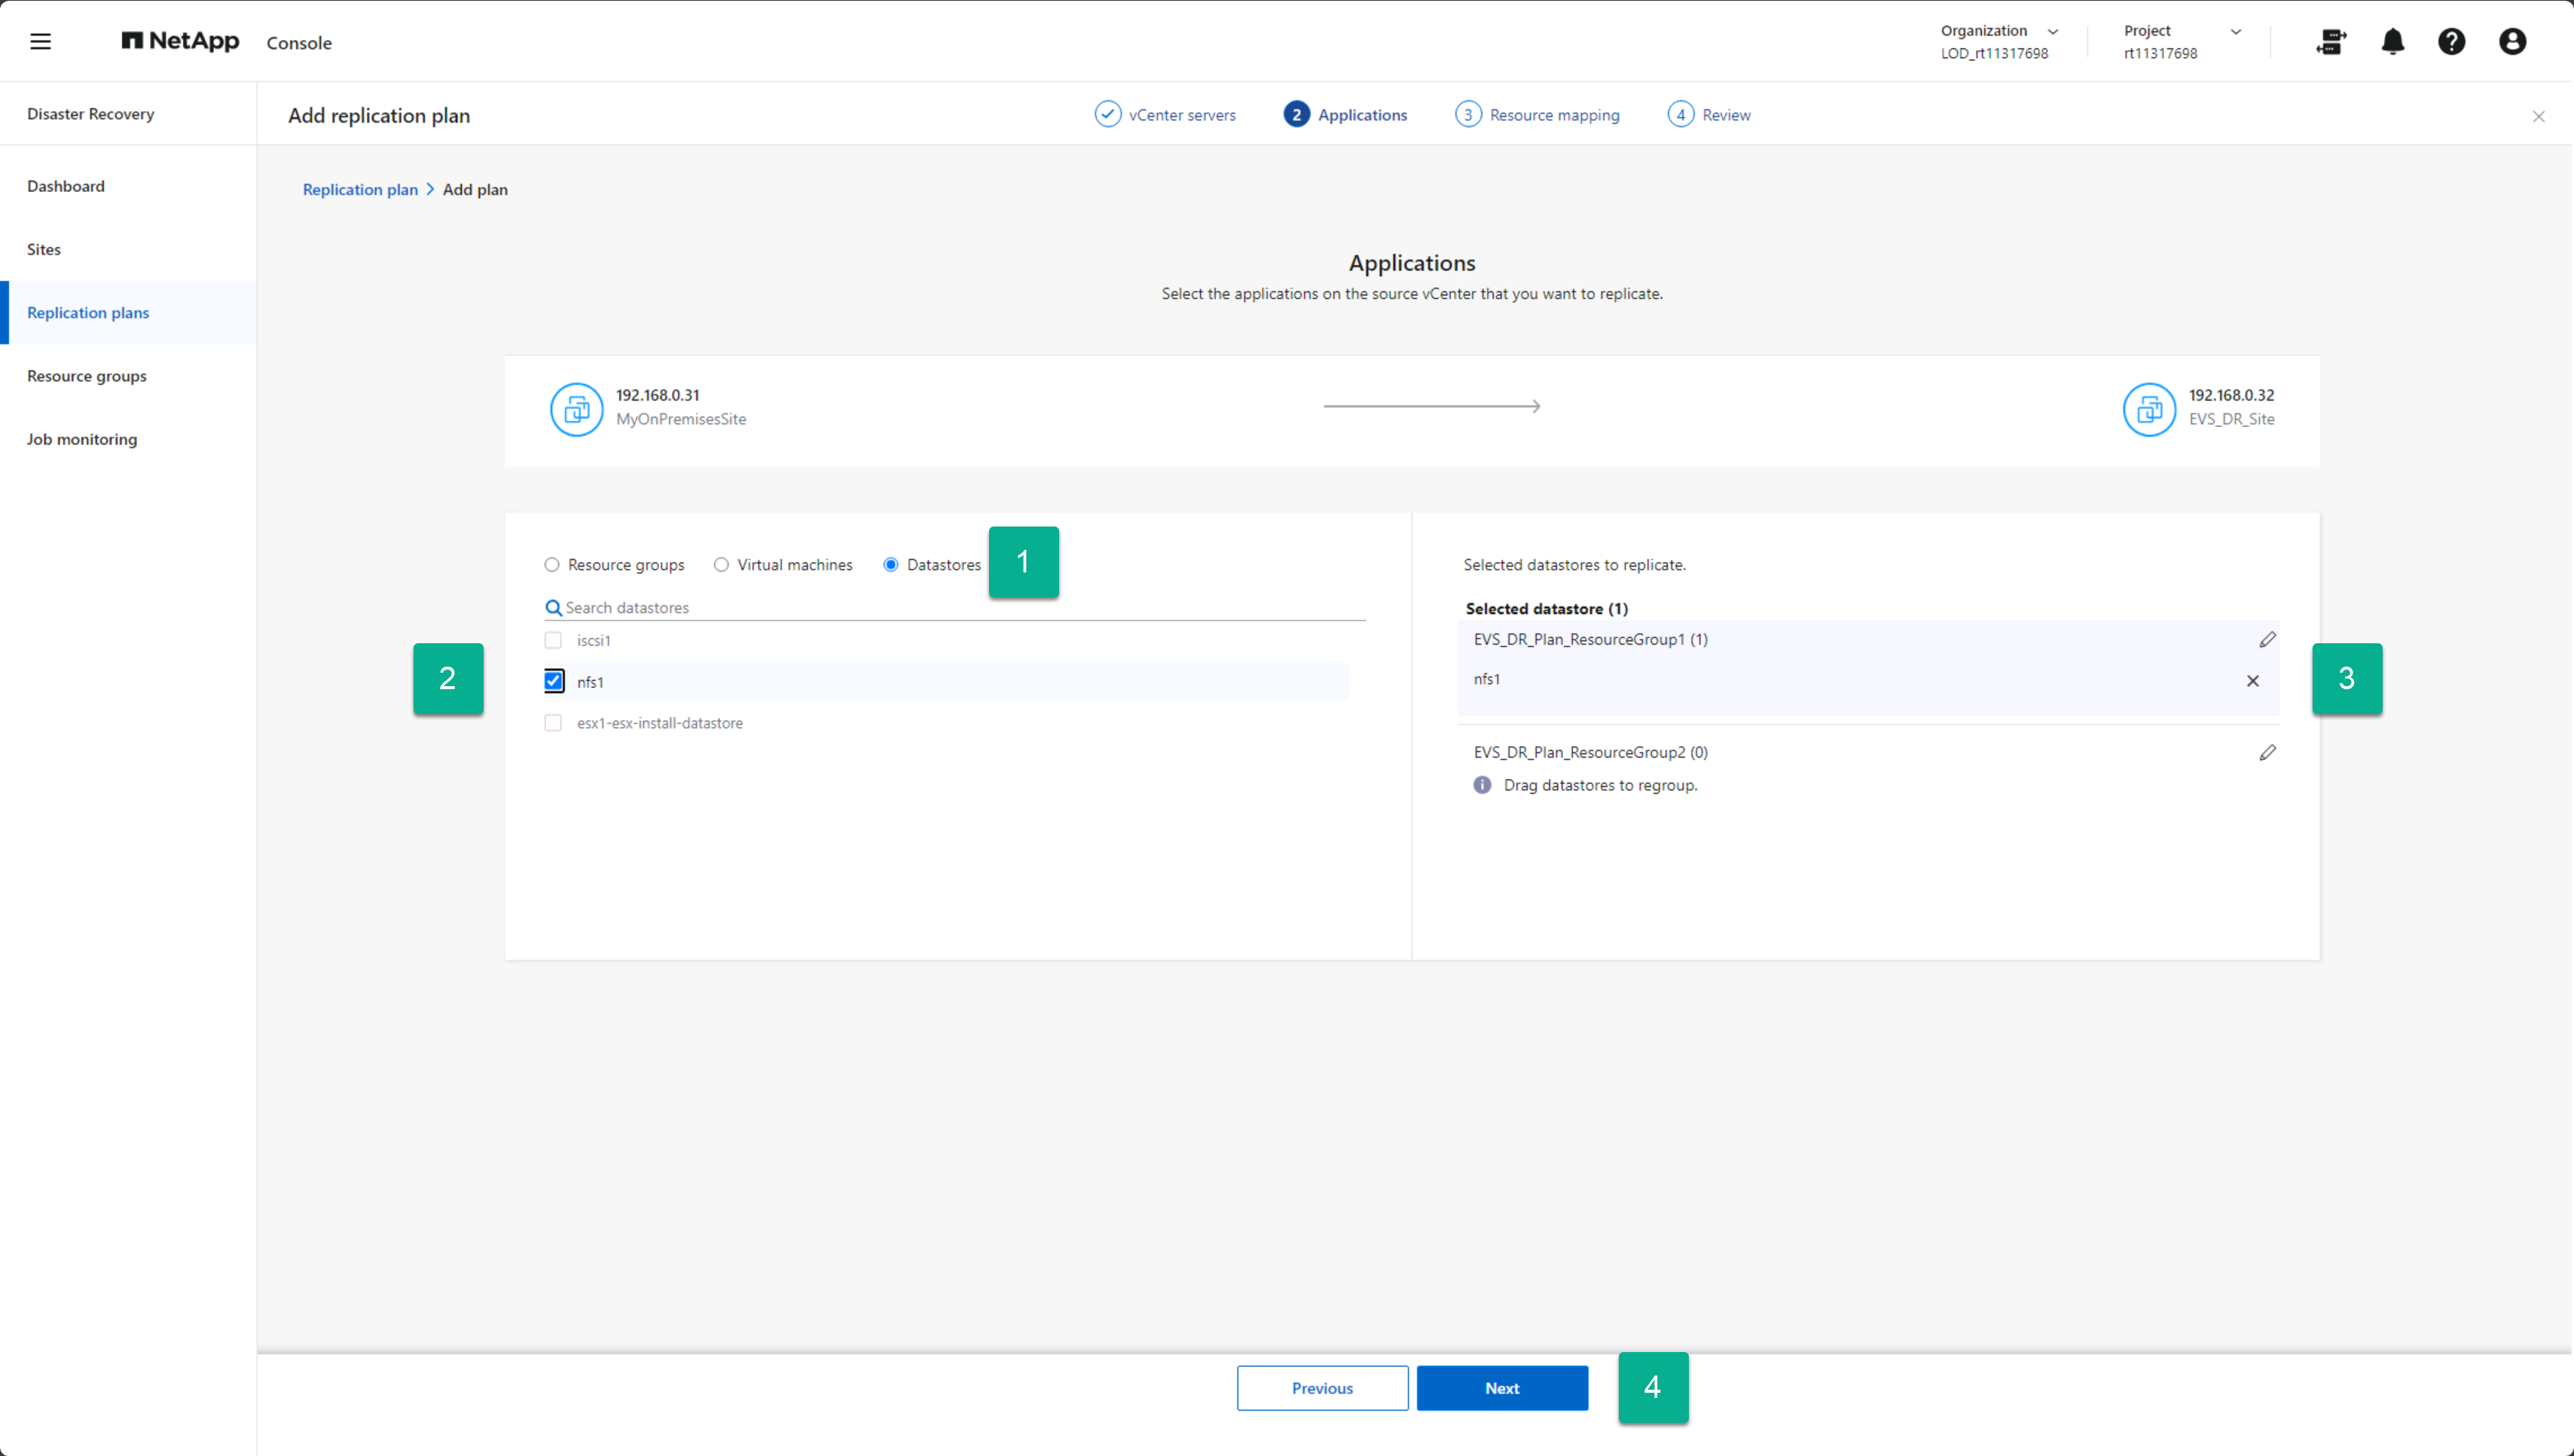
Review the information in the Applications page that opens.
-
Select Datastores.
-
Check the checkboxes beside each datastore you want to protect.
-
Optionally, rename the resource group to a suitable name by selecting the pencil icon next to the resource group name.
-
Select Next.
Map resources
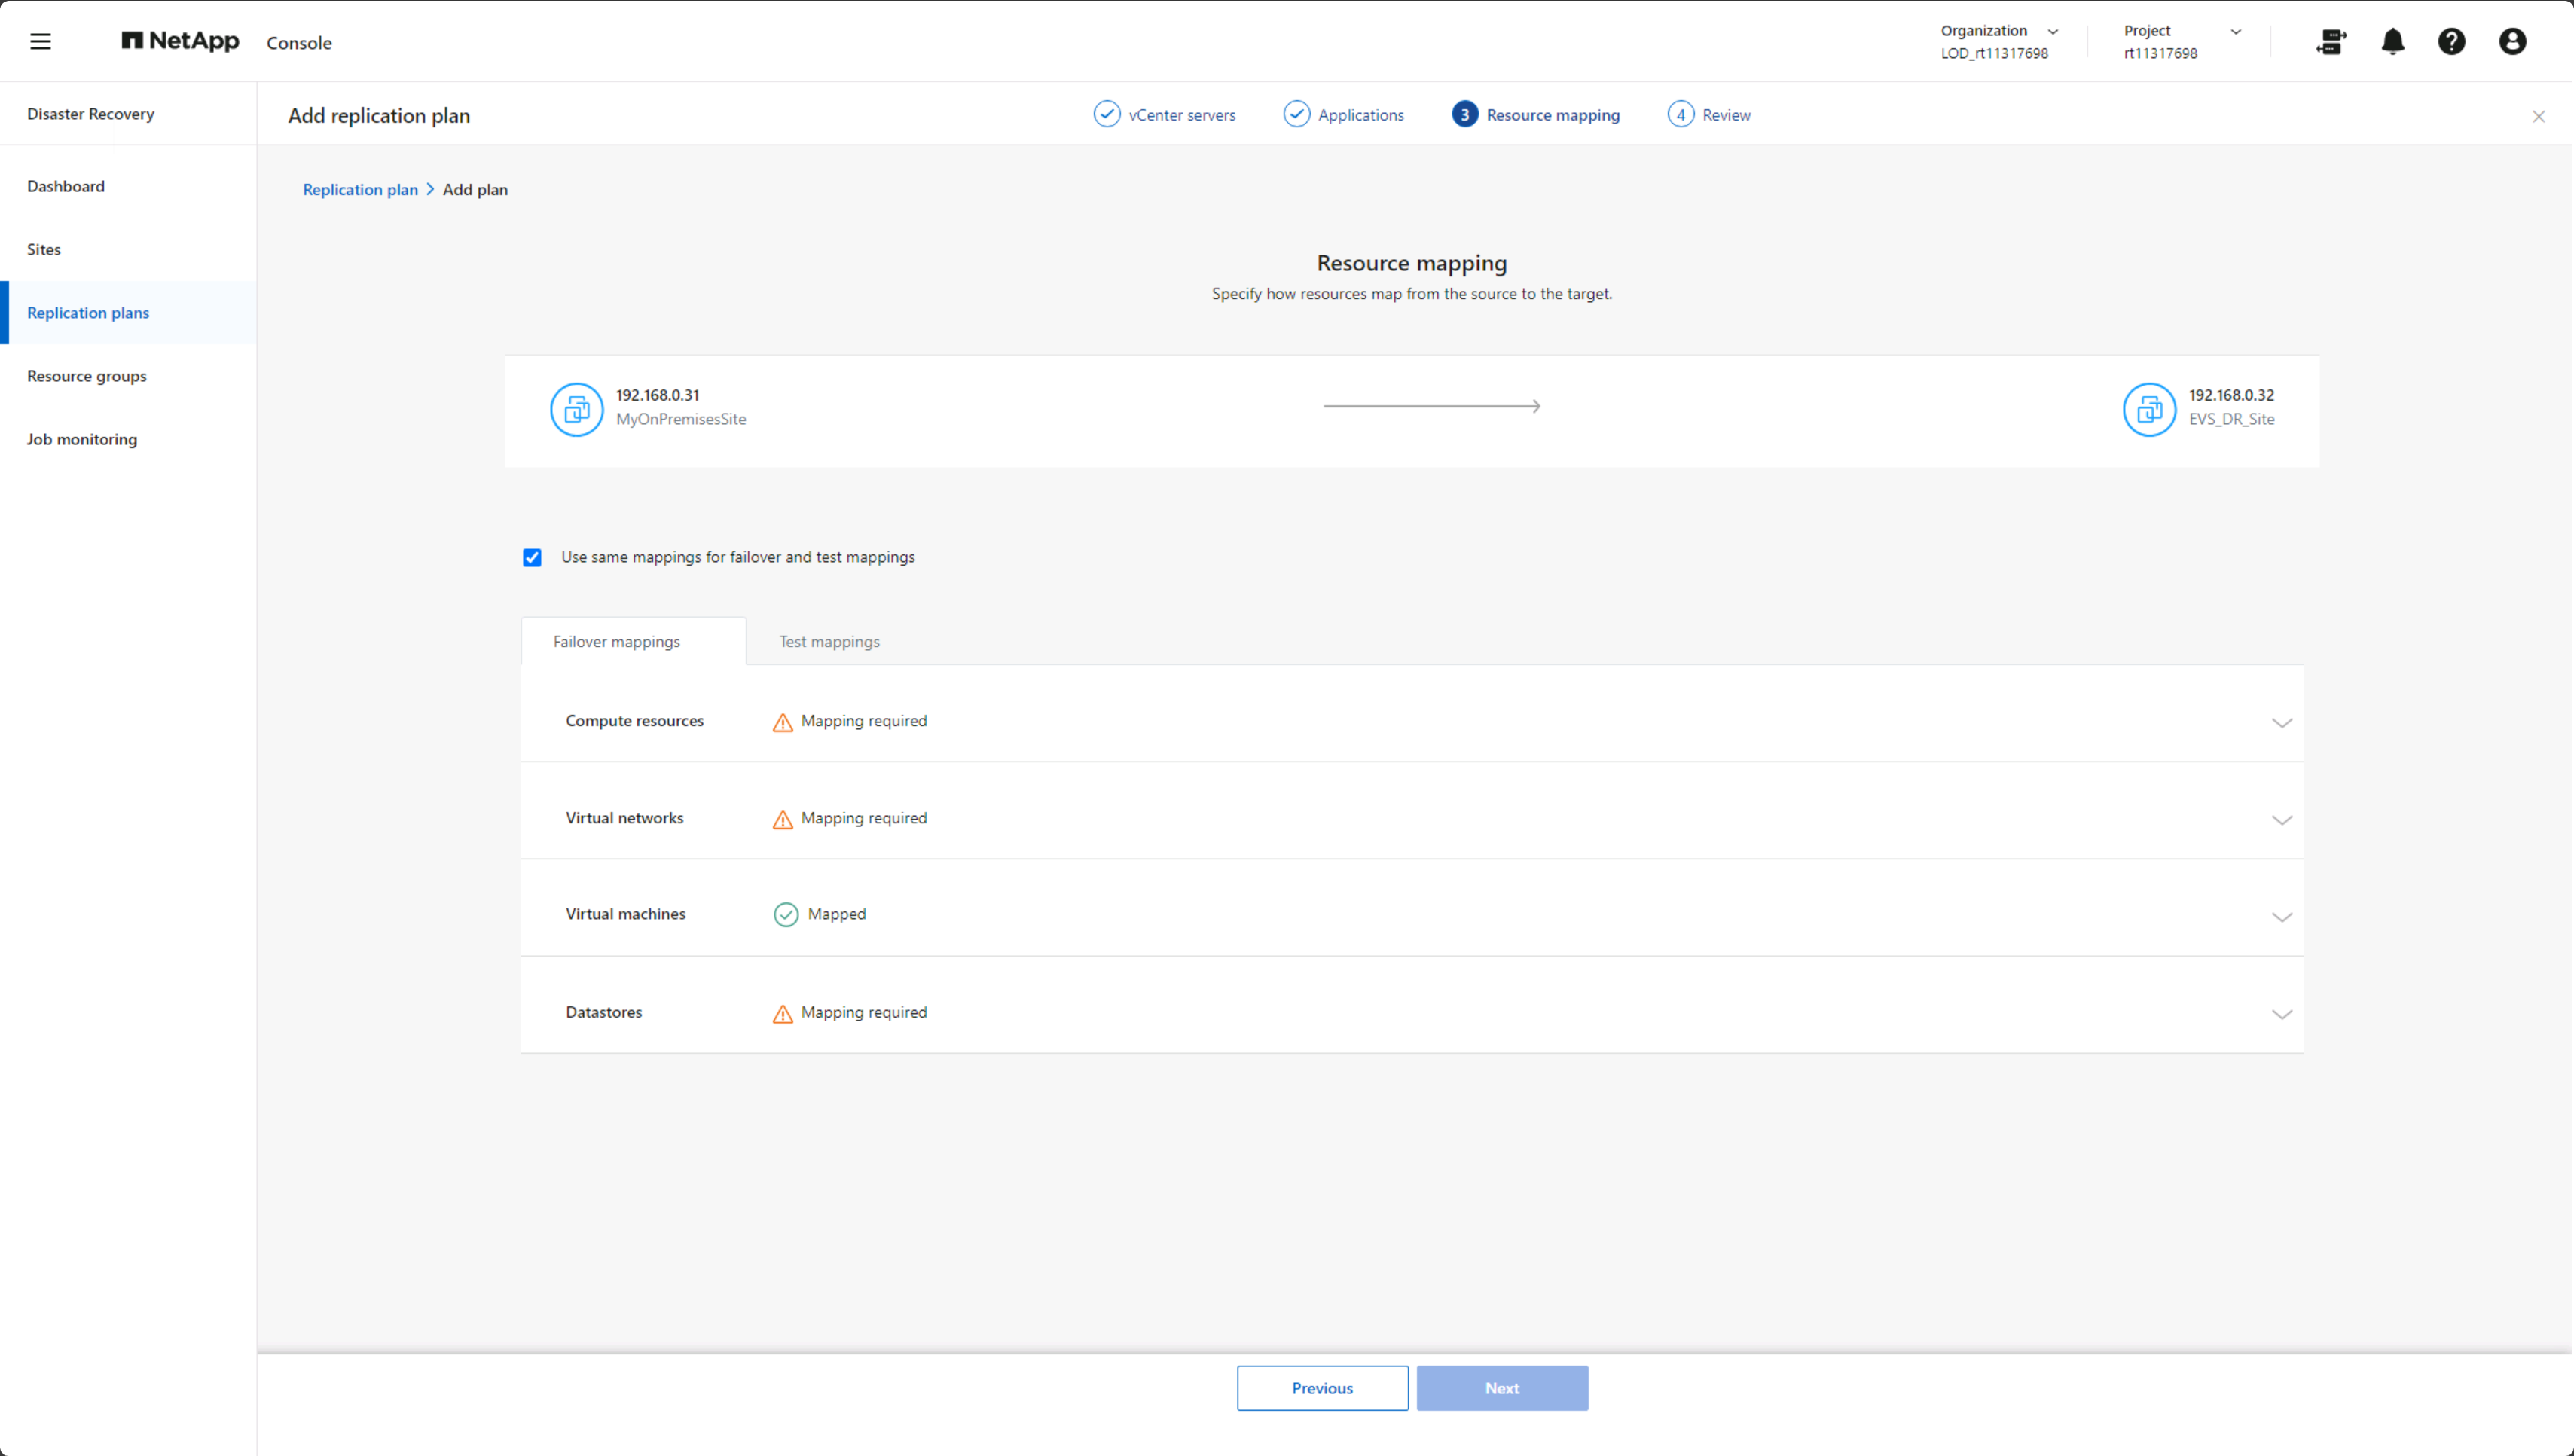
After selecting the VMs for protection, you must perform the network mapping. There are four areas to the network mapping:
-
Compute resources
-
Virtual networks
-
VM reconfiguration
-
Datastore mapping
Each VM requires the first three types of information. Datastore mapping is required for each datastore that hosts VMs to be protected.
-
The sections with the caution icon (
 ) require that you provide mapping information.
 -
The sections marked with the check icon (
 ) either use default mappings or have already been mapped. Review the mappings to ensure the current configuration meets your requirements.
-
From the Replication plan page, continue to the Resource mapping section.
-
Review the information on the Resource mapping page that opens.
-
To open each category of mappings required, select the down arrow (v) beside the section.
Compute resources mapping
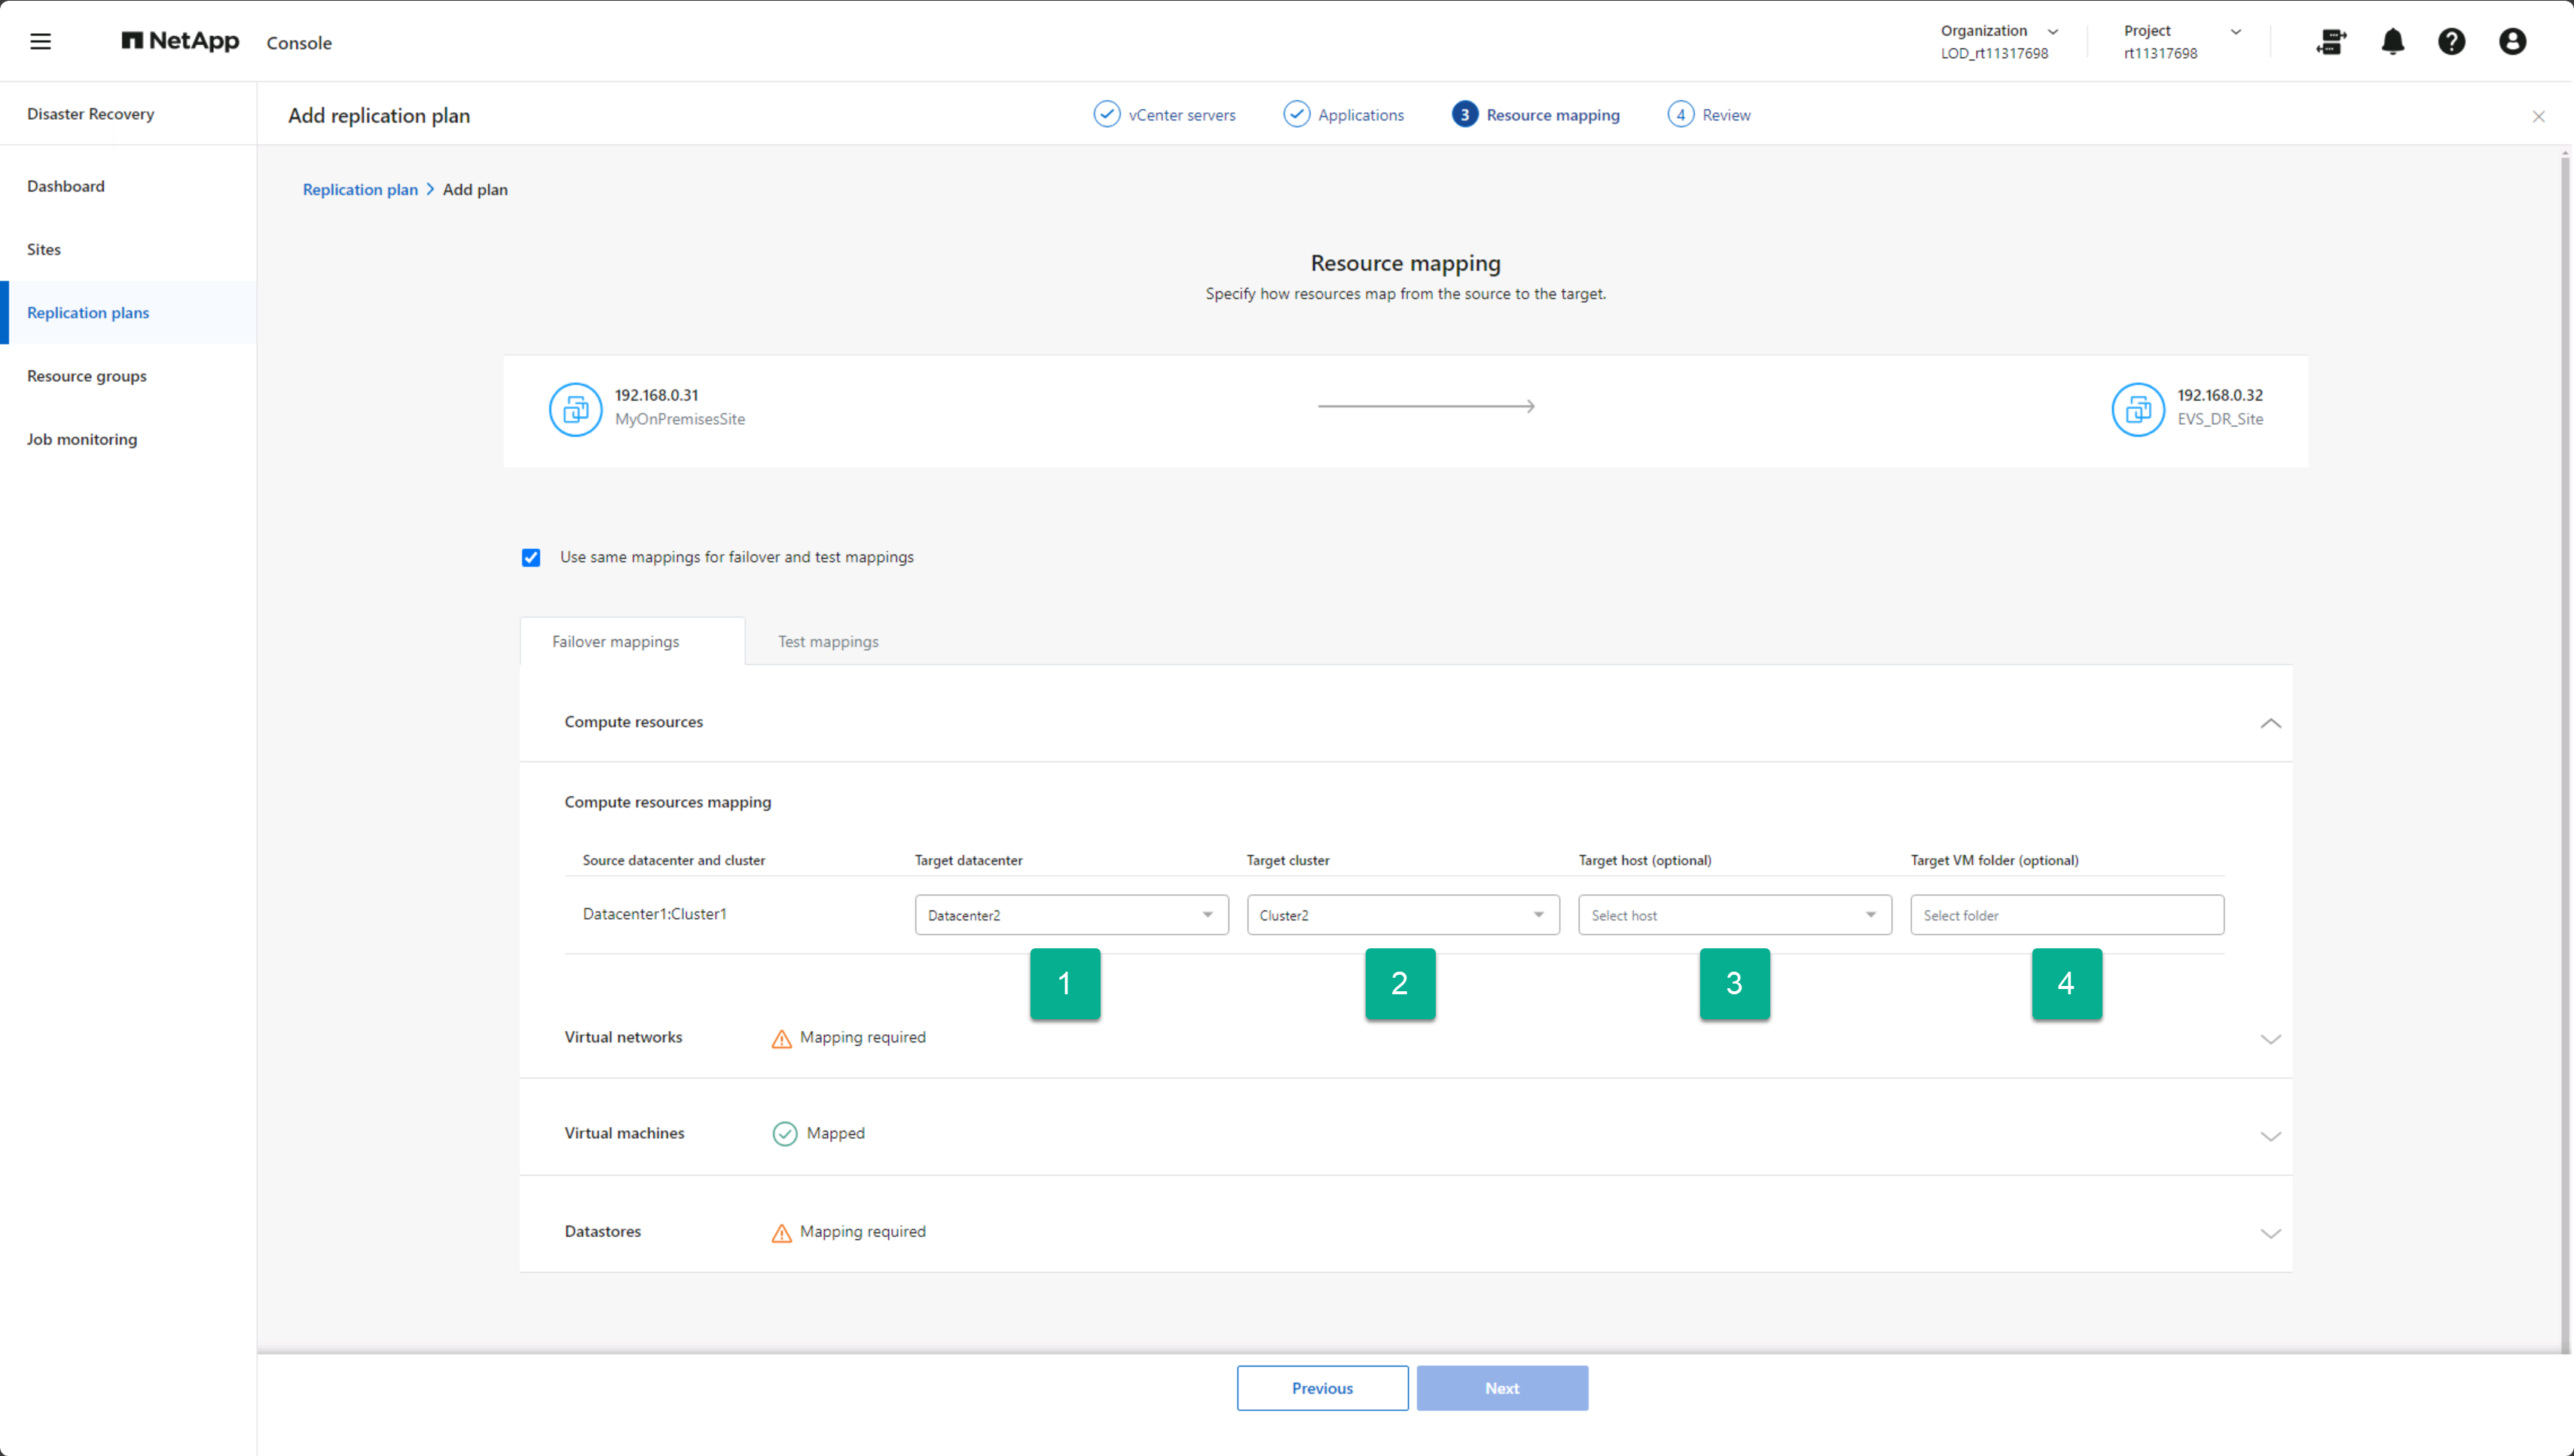
Because a site could host multiple virtual datacenters and multiple vCenter clusters, you need to identify which vCenter cluster to recover VMs to in the event of a failover.
-
Select the virtual datacenter from the list of datacenters located at the DR site.
-
Select the cluster to host the datastores and VMs from the list of clusters within the selected virtual datacenter.
-
Optionally, select a target host in the target cluster.
This step is not required because Disaster Recovery selects the first host added to the cluster in vCenter. The VMs either continue to run on that ESXi host or VMware DRS moves them to another ESXi host based on the configured DRS rules.
-
Optionally, provide the name of a top-level vCenter folder to place the VM registrations into. This step can satisfy organizational needs, but isn't required.
Map virtual network resources
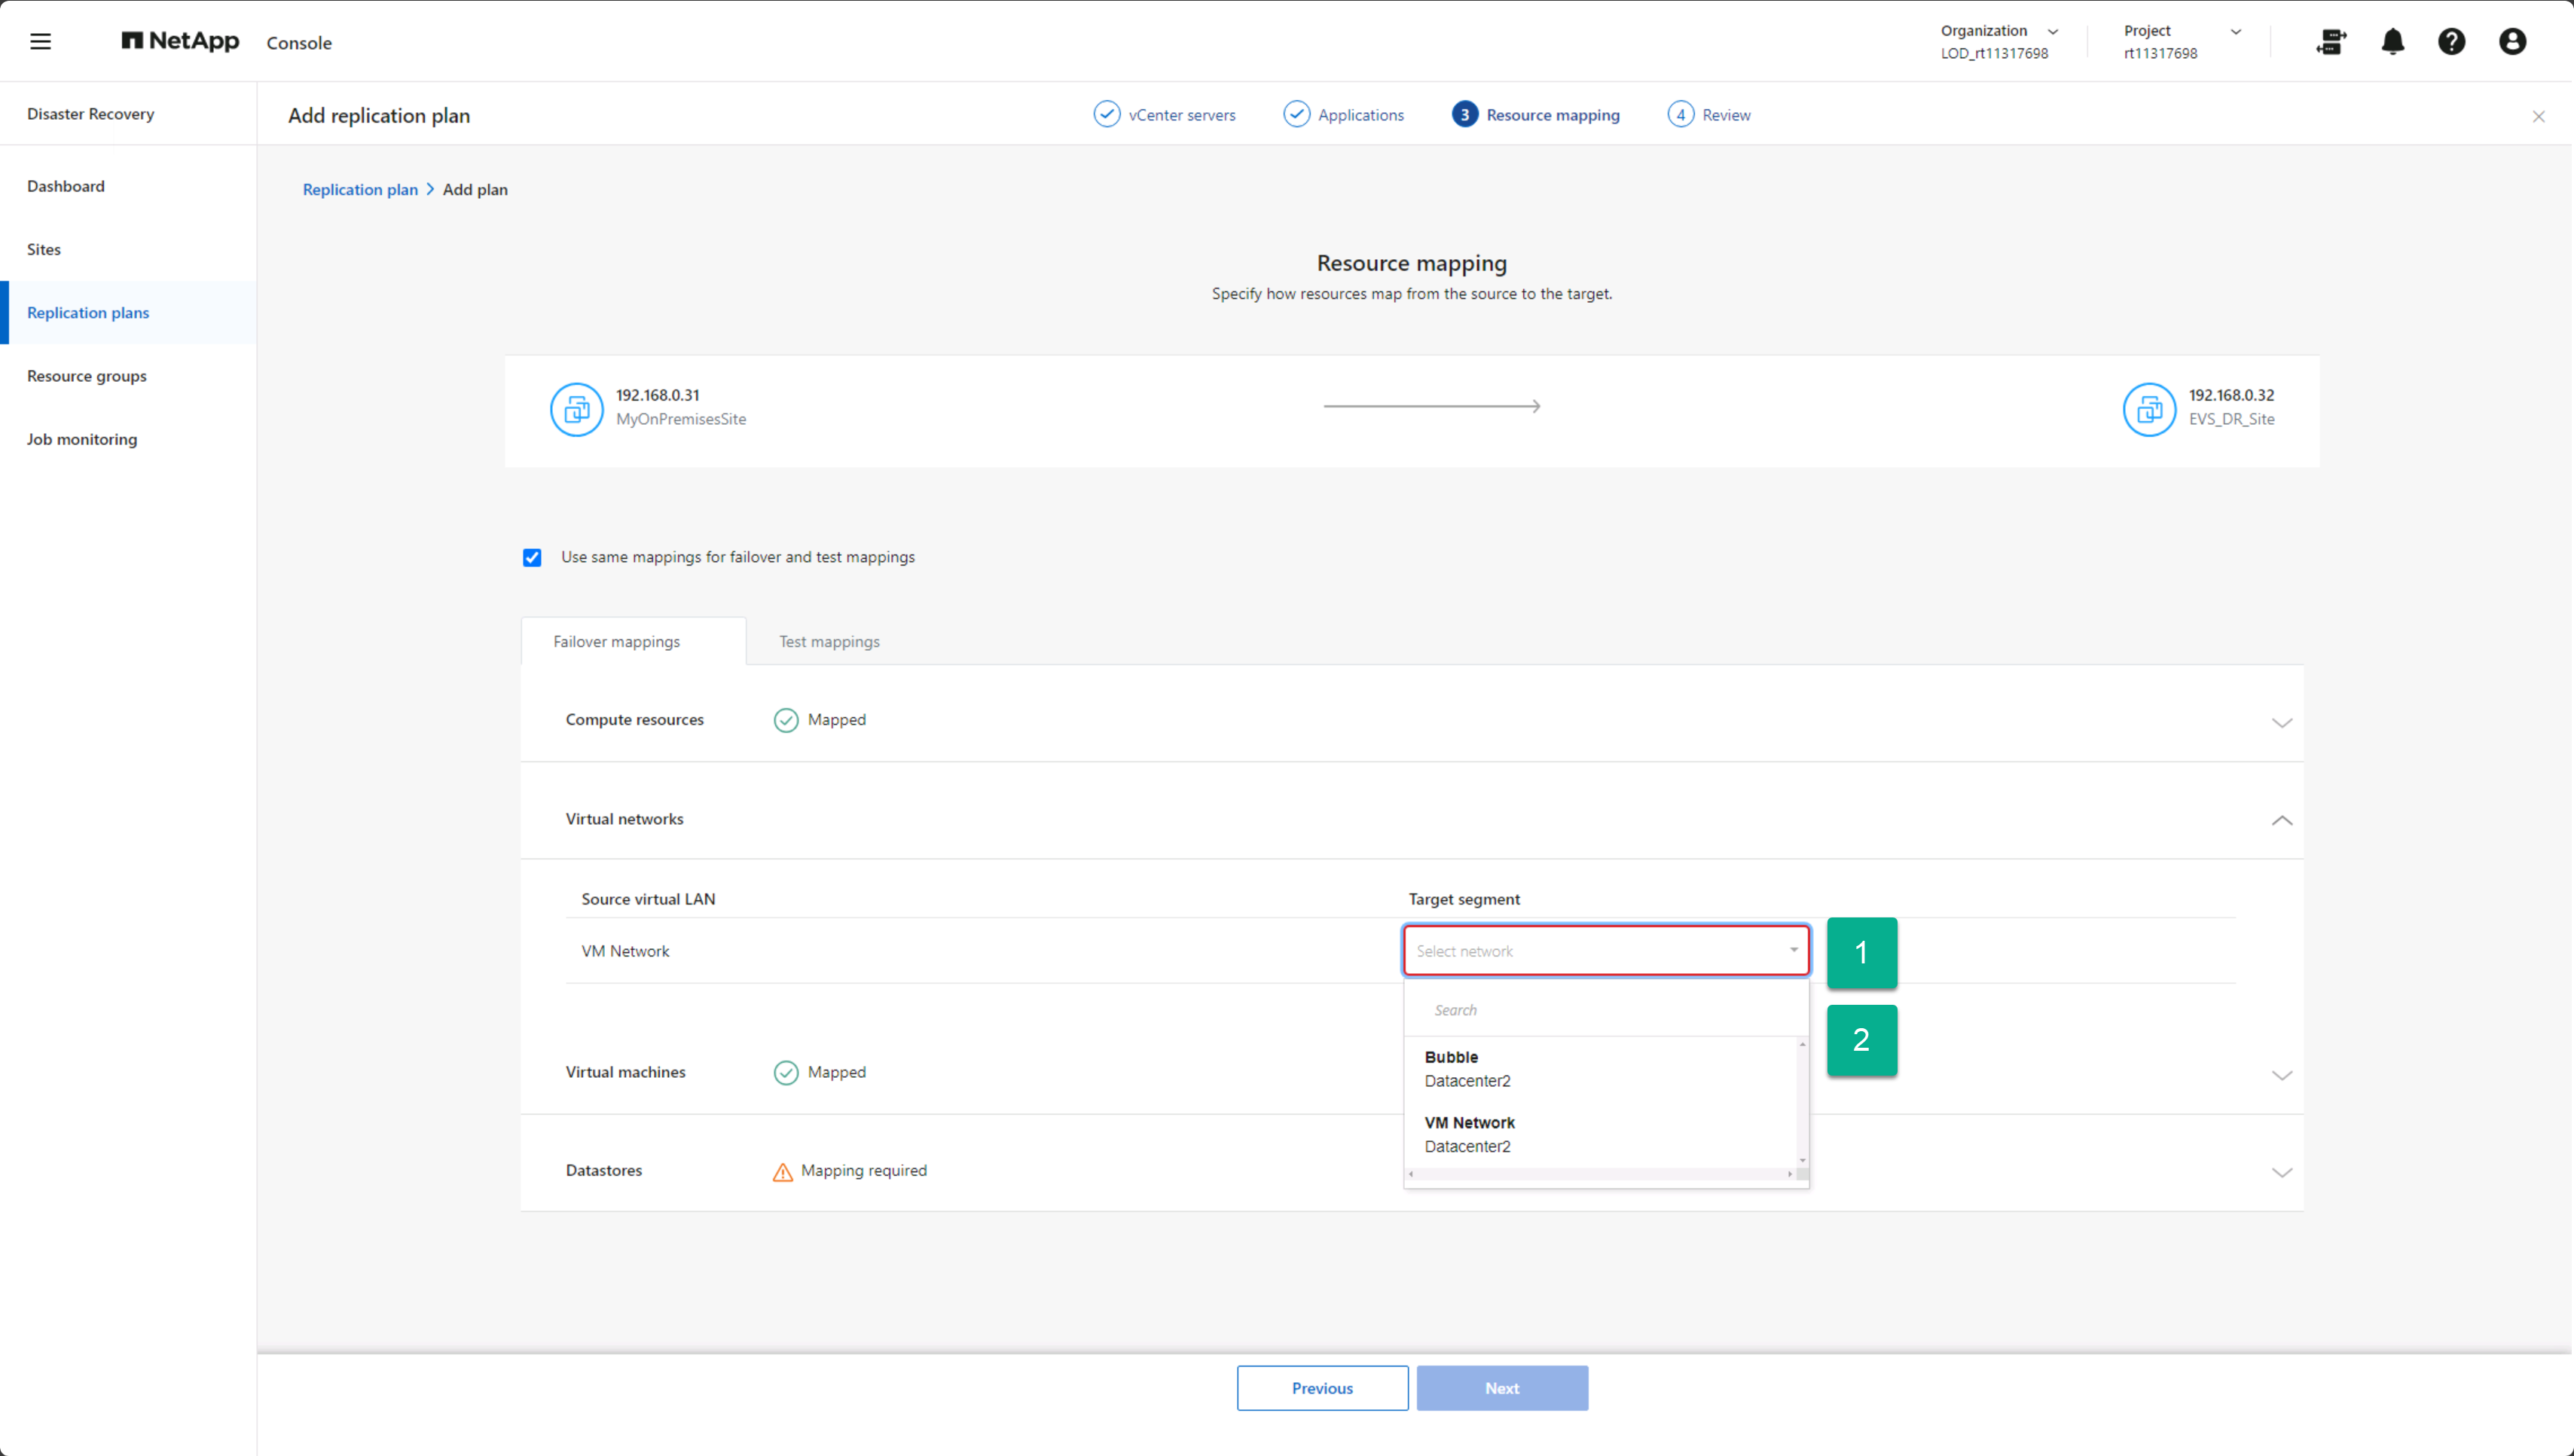
Each VM can have one or more virtual NICs connected to virtual networks within the vCenter network infrastructure. To ensure that each VM is properly connected to the desired networks when they restart at the disaster recovery site, identify which disaster recovery site virtual networks to connect these VMs. Do this by mapping each virtual network in the on-premises site to an associated network on the disaster recovery site.
-
Select the Target segment from the drop-down list.
-
Repeat the previous step for each source virtual network listed.
Define options for VM reconfiguration during failover
Each VM might require modifications to work correctly in the DR vCenter site. The Virtual machines section enables you to provide the necessary changes.
By default, Disaster Recovery uses the same settings for each VM as used on the source on-premises site. This assumes that VMs will use the same IP address, virtual CPU, and virtual DRAM configuration.
Network reconfiguration
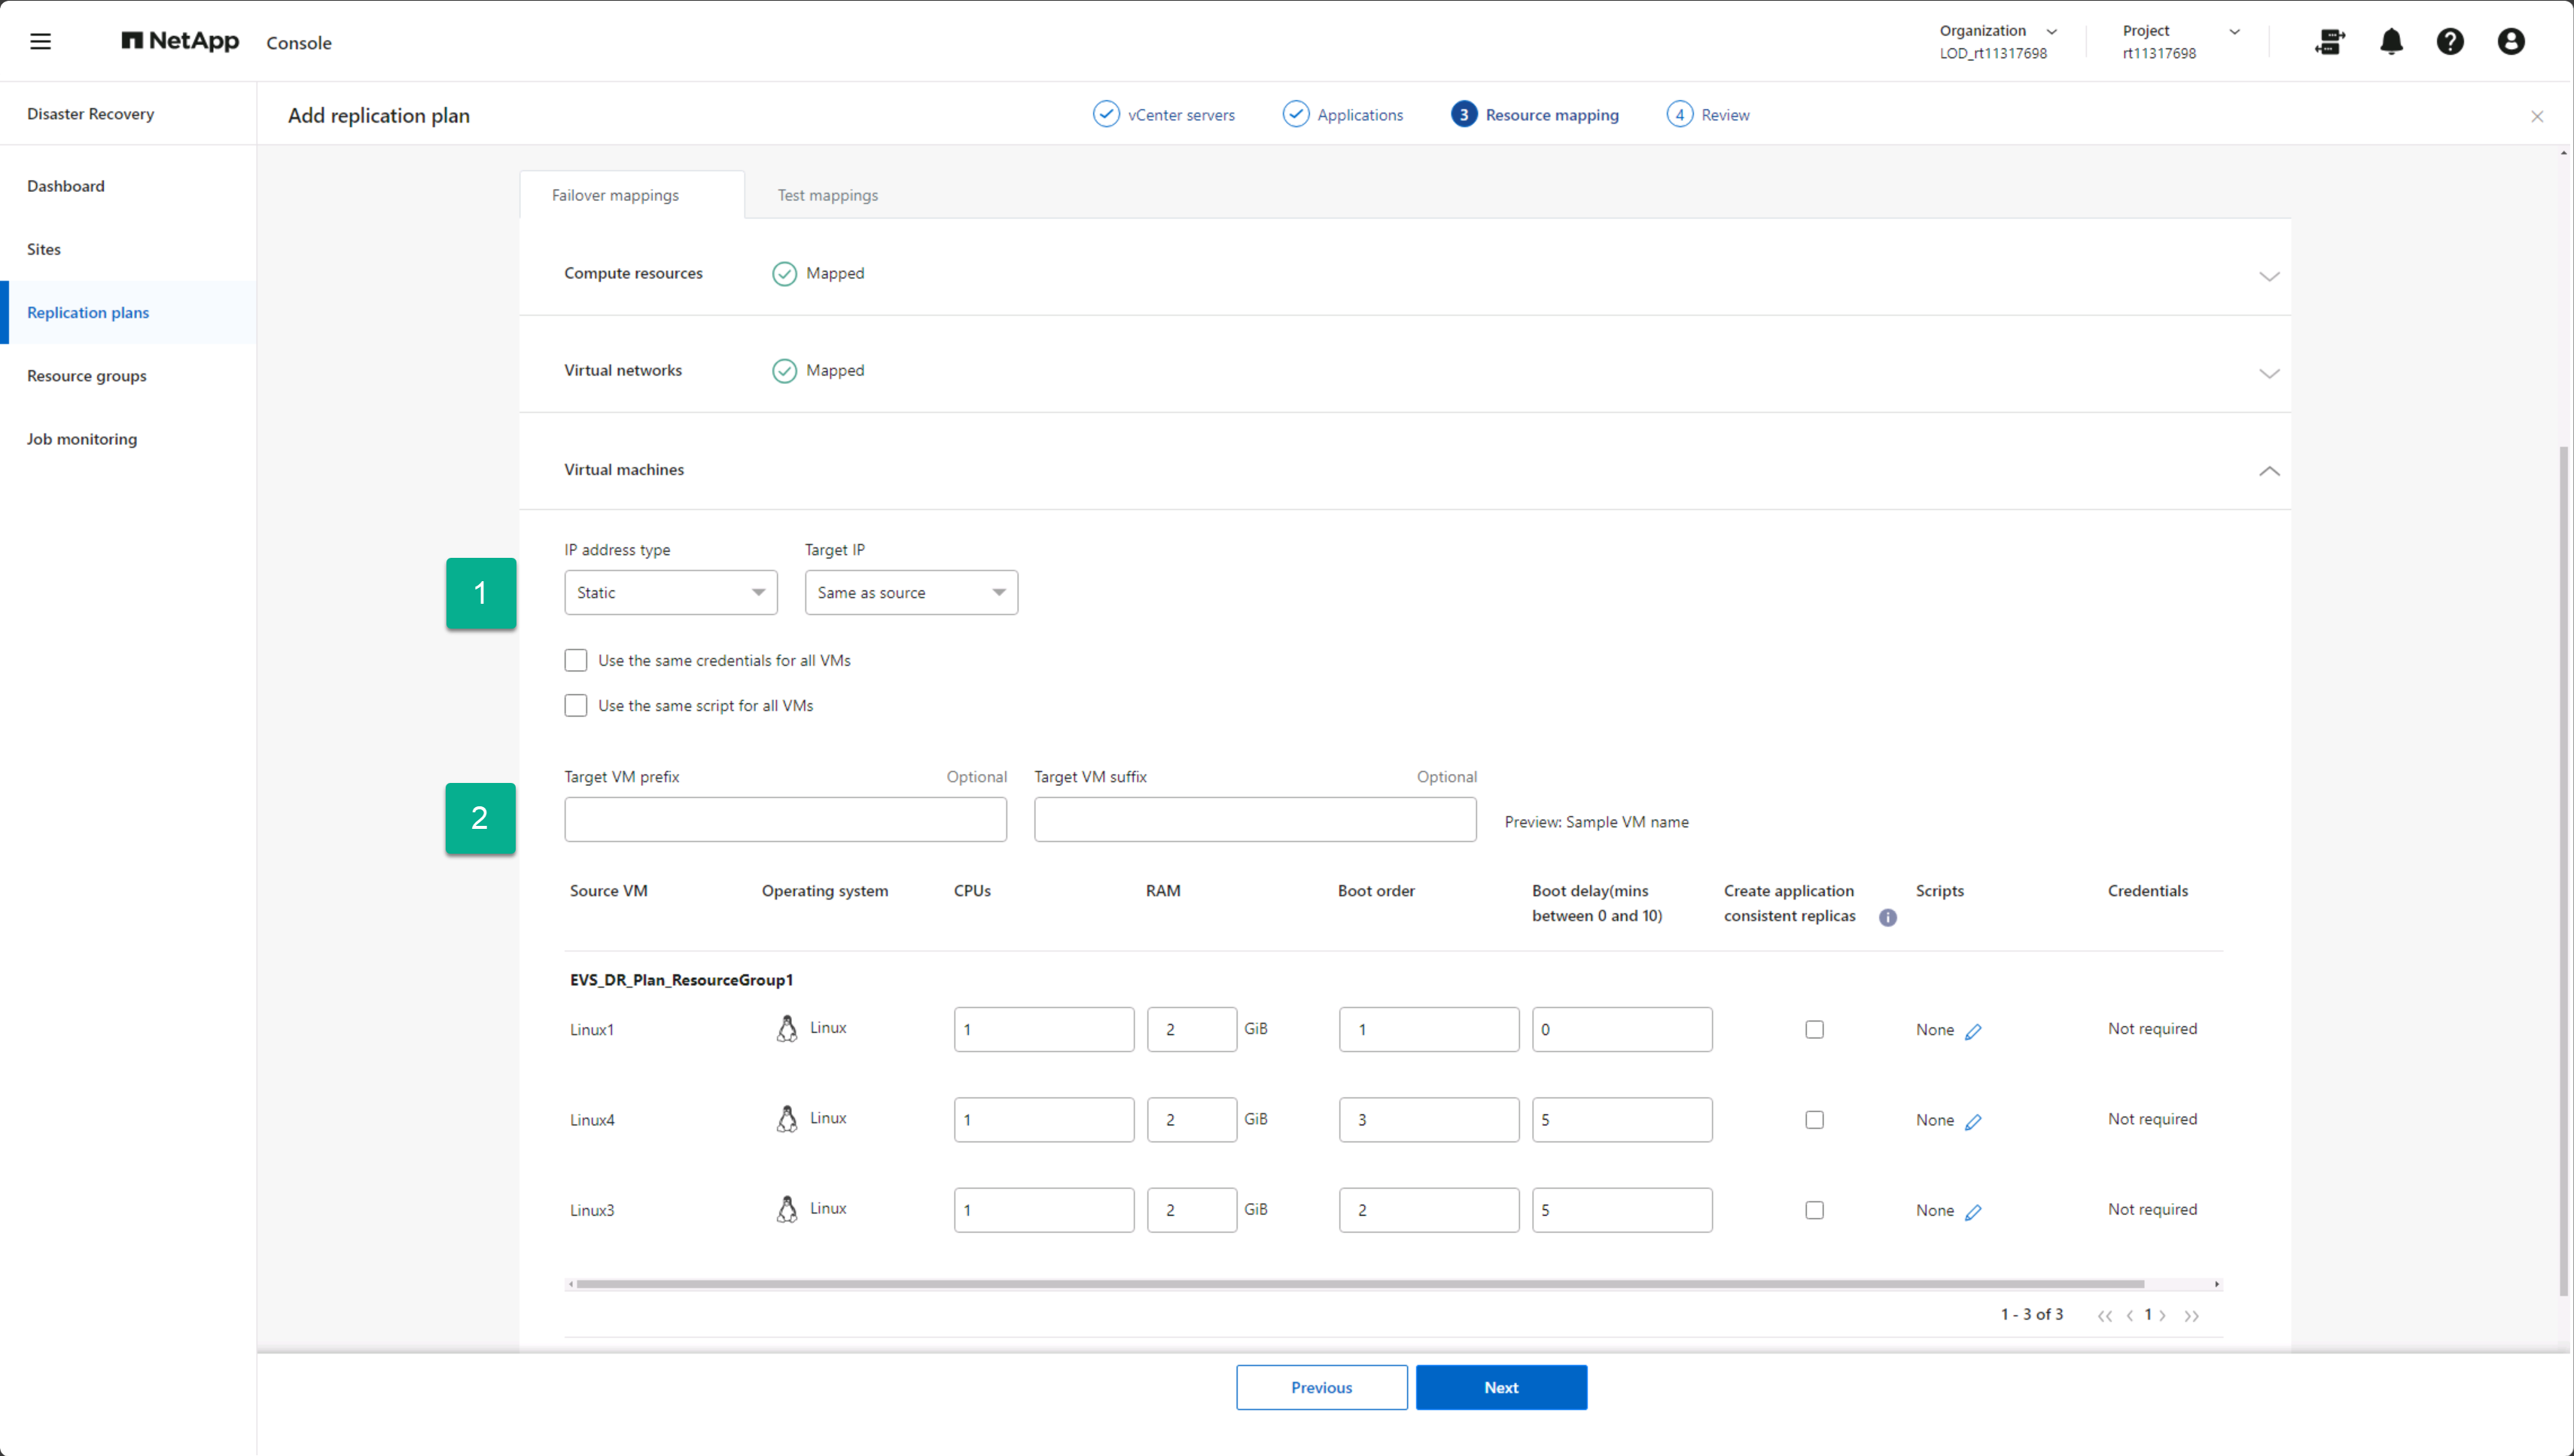
Supported IP address types are static and DHCP. For static IP addresses, you have the following Target IP settings:
-
Same as source: As the name suggests, the service uses the same IP address on the destination VM that was used on the VM at the source site. This requires that you configure the virtual networks that were mapped in the previous step for the same subnet settings.
-
Different from source: The service provides a set of IP address fields for each VM that must be configured for the appropriate subnet used on the destination virtual network, which you mapped in the previous section. For each VM you must provide an IP address, subnet mask, DNS, and default gateway values. Optionally, use the same subnet mask, DNS, and gateway settings for all VMs to simplify the process when all VMs attach to the same subnet.
-
Subnet mapping: This option reconfigures each VM's IP address based on the destination virtual network's CIDR configuration. To use this feature, ensure that each vCenter's virtual networks have a defined CIDR setting within the service, as changed in the vCenter information in the Sites page.
After you configure subnets, Subnet mapping uses the same host portion of the IP address for both source and destination VM configuration, but replaces the subnet component of the IP address based on the provided CIDR information. This feature also requires that both the source and destination virtual networks have the same IP address class (the /xx component of the CIDR). This ensures that there are enough IP addresses available at the destination site to host all of the protected VMs.
For this Amazon EVS setup, we assume that the source and destination IP configurations are the same and do not require any additional reconfiguration.
-
Select the type of IP addressing to use for failed over VMs.
-
Optionally, provide a VM renaming scheme for restarted VMs by providing an optional prefix and suffix value.
VM compute resource reconfiguration
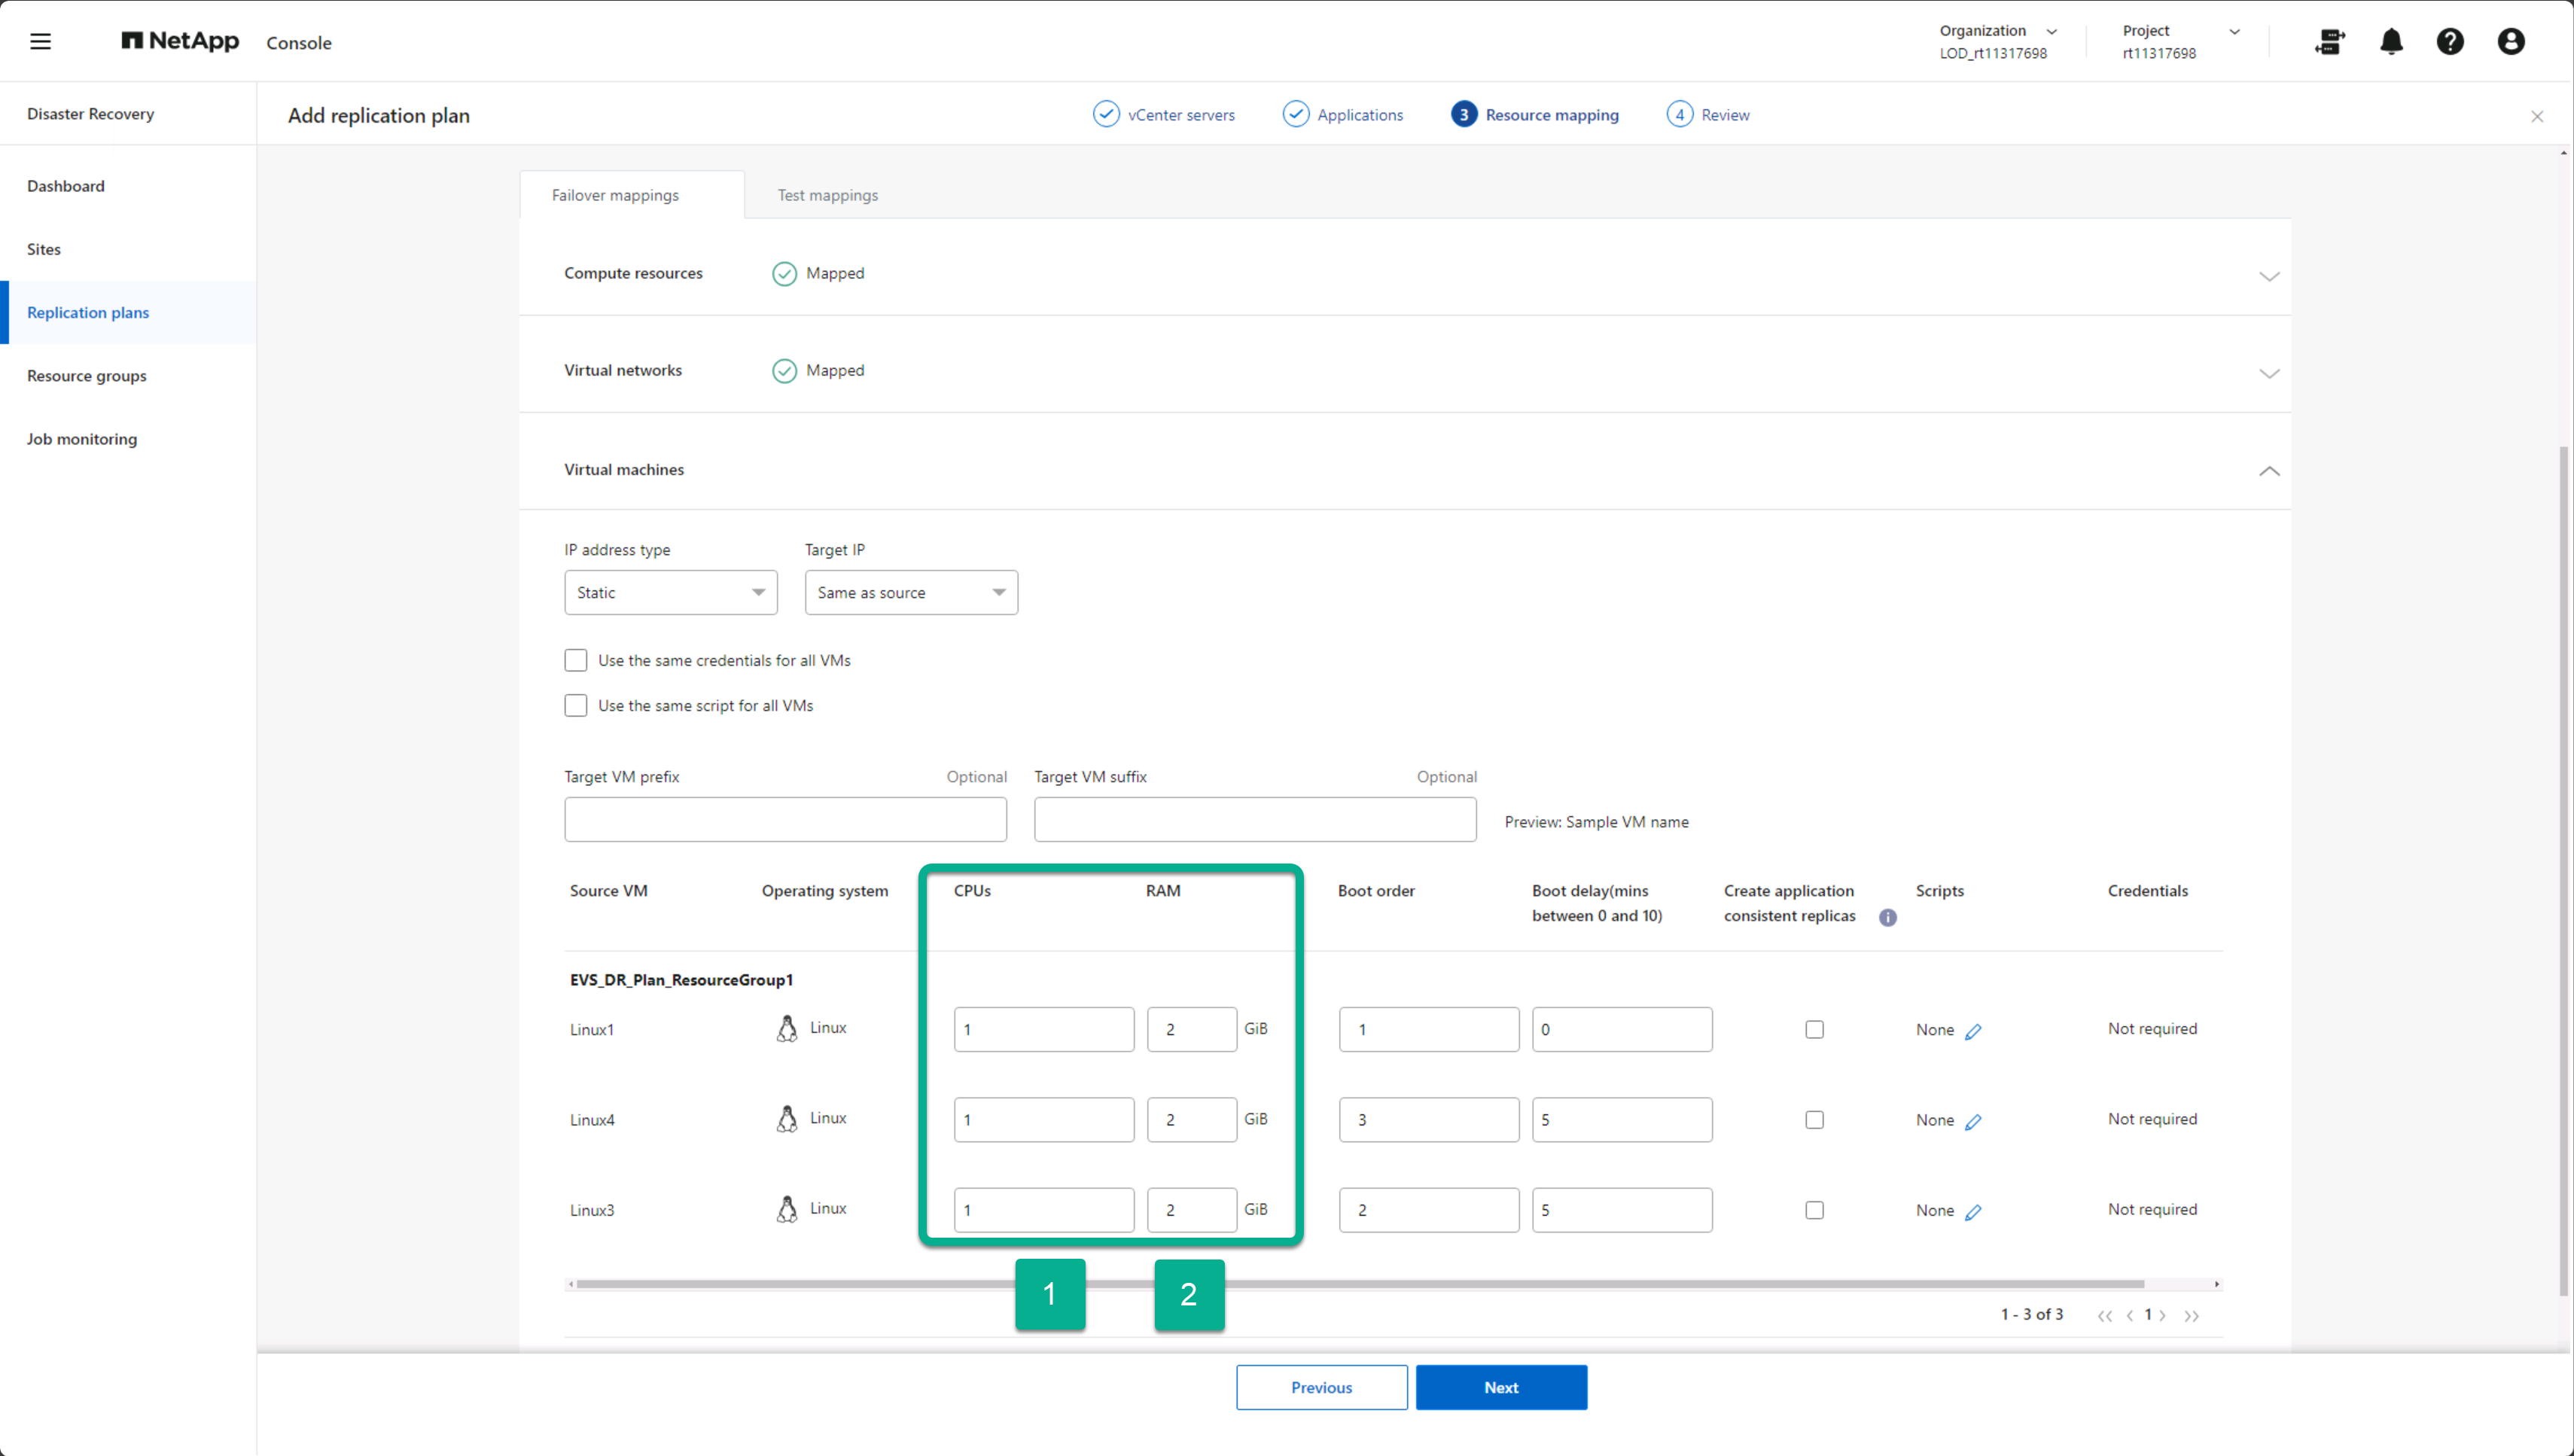
There are several options for reconfiguring VM compute resources. Disaster Recovery supports changing the number of virtual CPUs, the amount of virtual DRAM, and the VM name.

|
These steps are optional. |
-
Optionally, modify the number of virtual CPUs each VM should use. This might be needed if your DR vCenter cluster hosts do not have as many CPU cores as the source vCenter cluster.
-
Optionally, modify the amount of virtual DRAM each VM should use. This might be needed if your DR vCenter cluster hosts do not have as much physical DRAM as the source vCenter cluster hosts.
Boot order
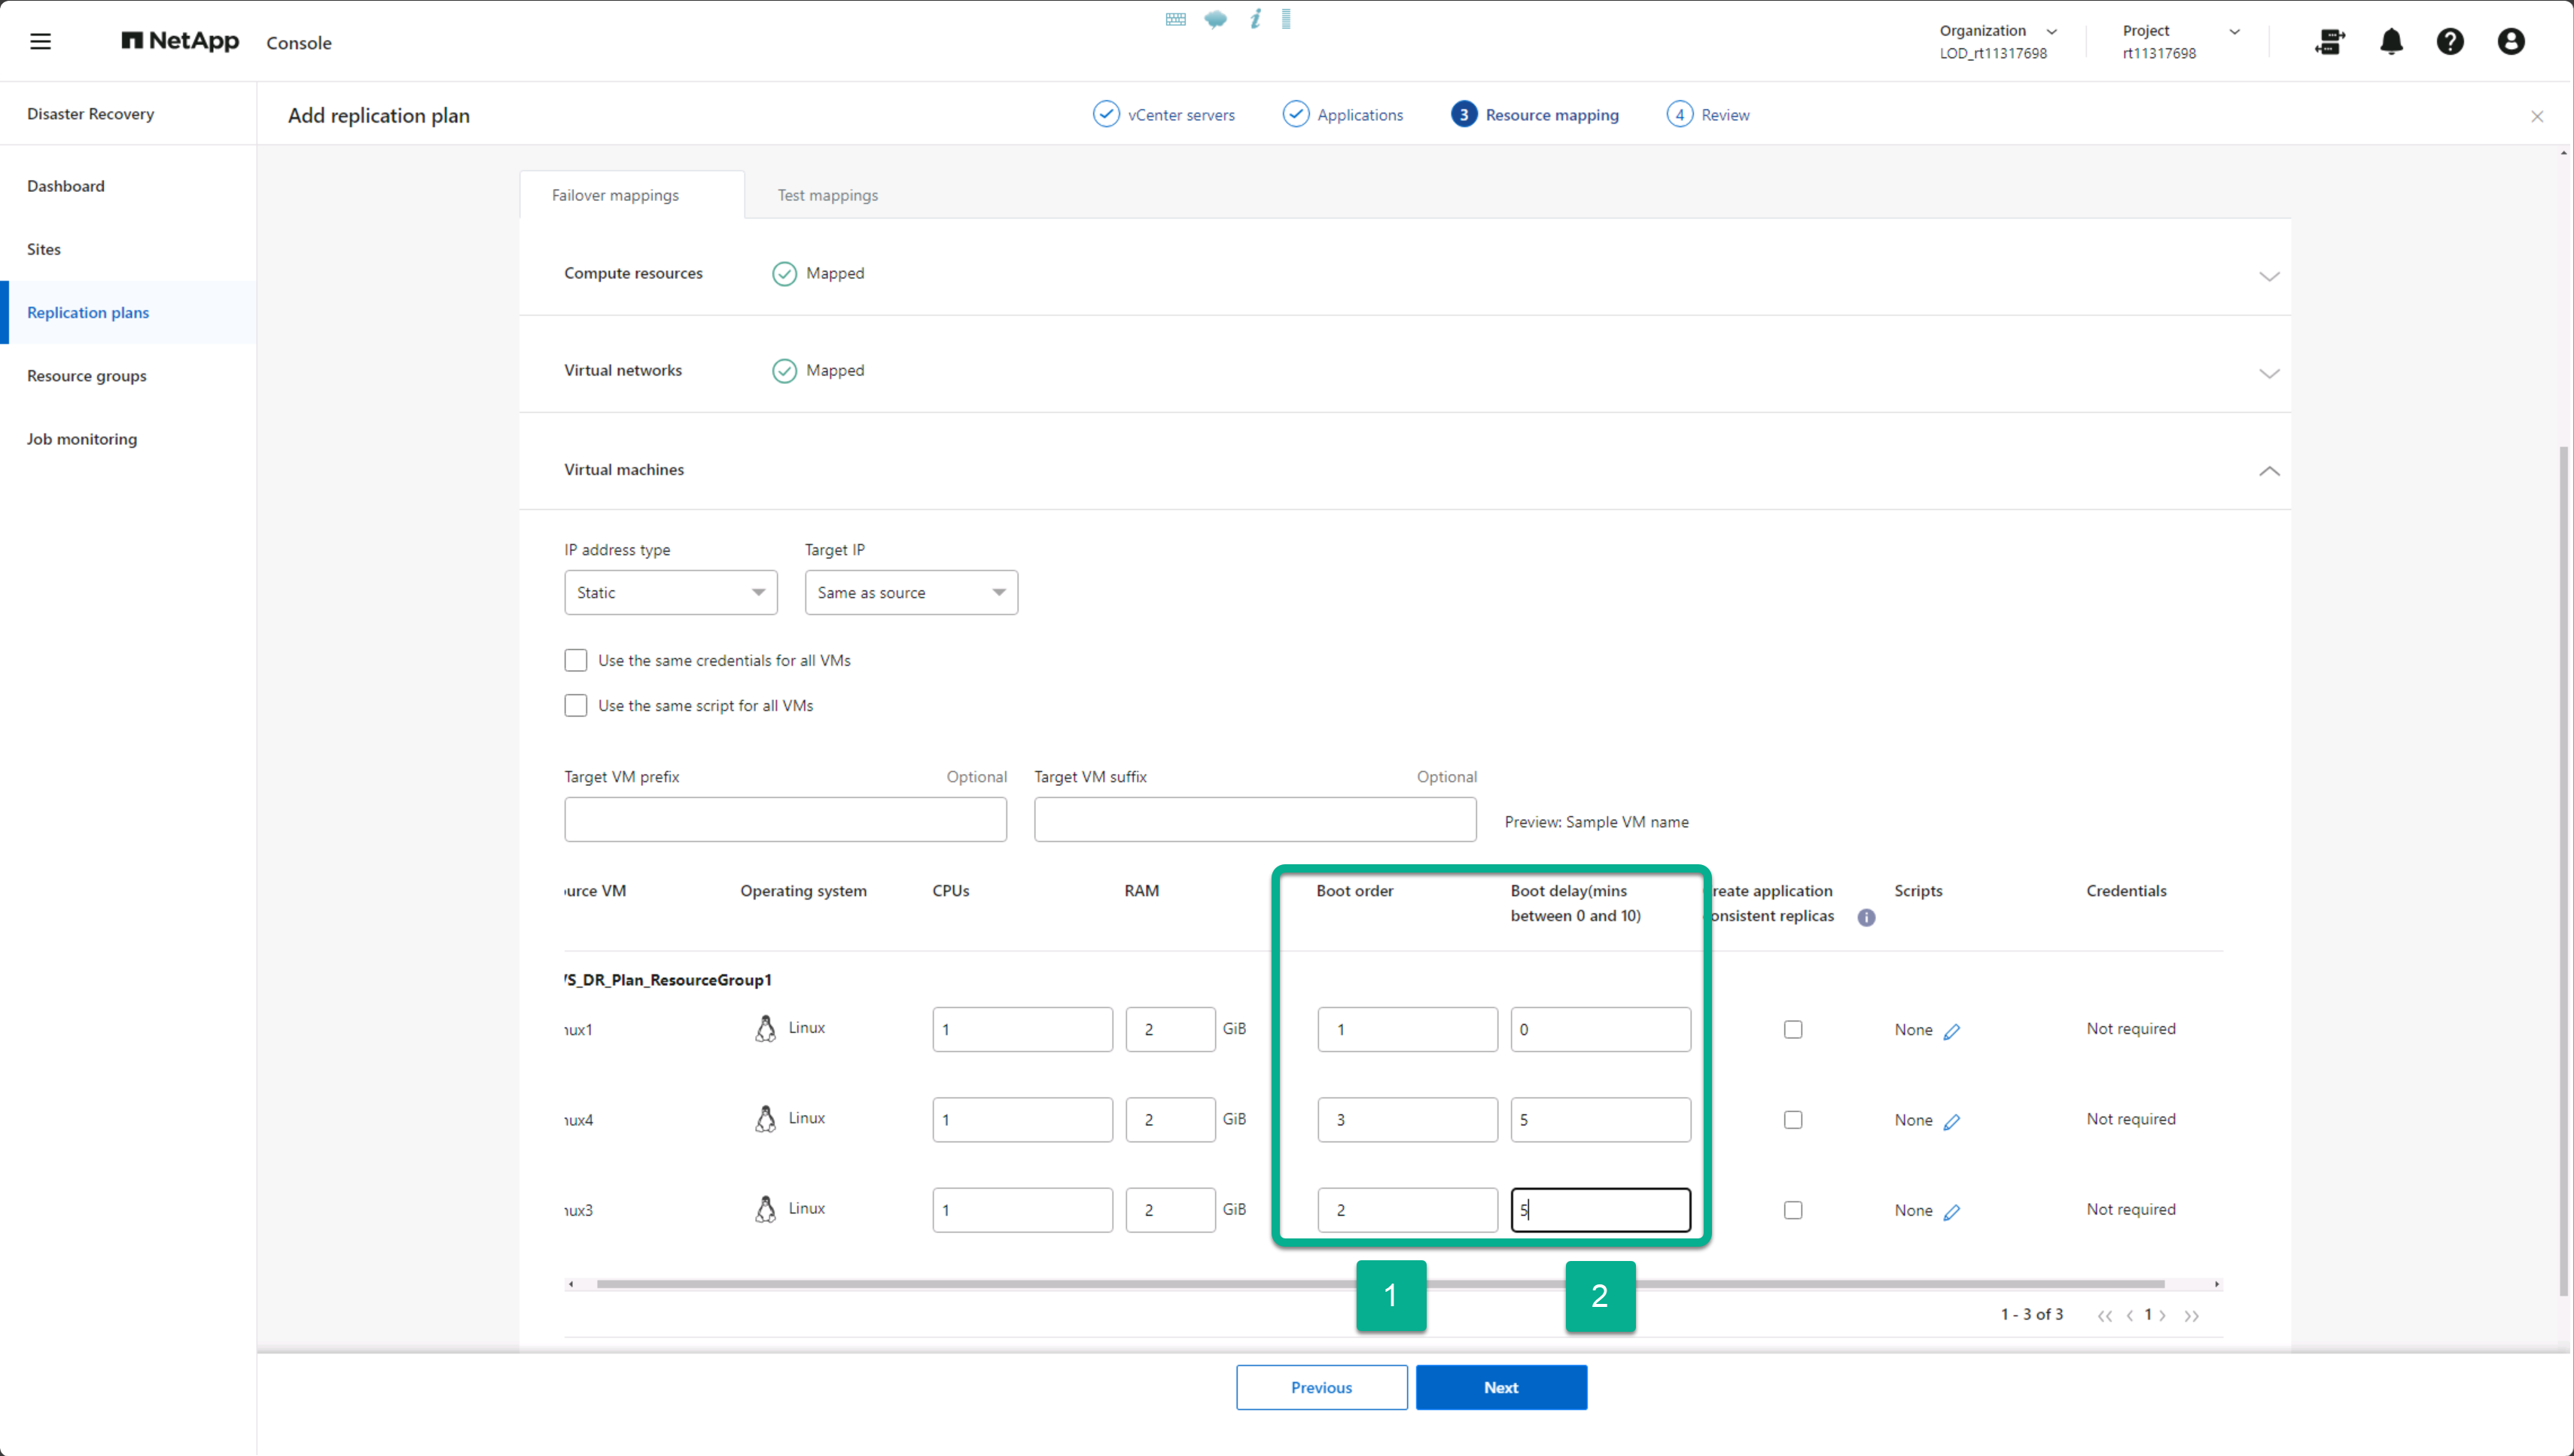
Disaster Recovery supports an ordered restart of VMs based on a boot order field. The boot order field indicates how the VMs in each resource group start. Those VMs with the same value in the boot order field boot in parallel.
|
|
Setting the boot order is optional |
-
Optionally, modify the order you would like your VMs to be restarted. This field takes any numeric value. Disaster Recovery tries to restart VMs that have the same numeric value in parallel.
-
Optionally, provide a delay to be used between each VM restart. The time is injected after this VM's restart has completed and before the VM(s) with the next higher boot order number. This number is in minutes.
Custom guest OS operations
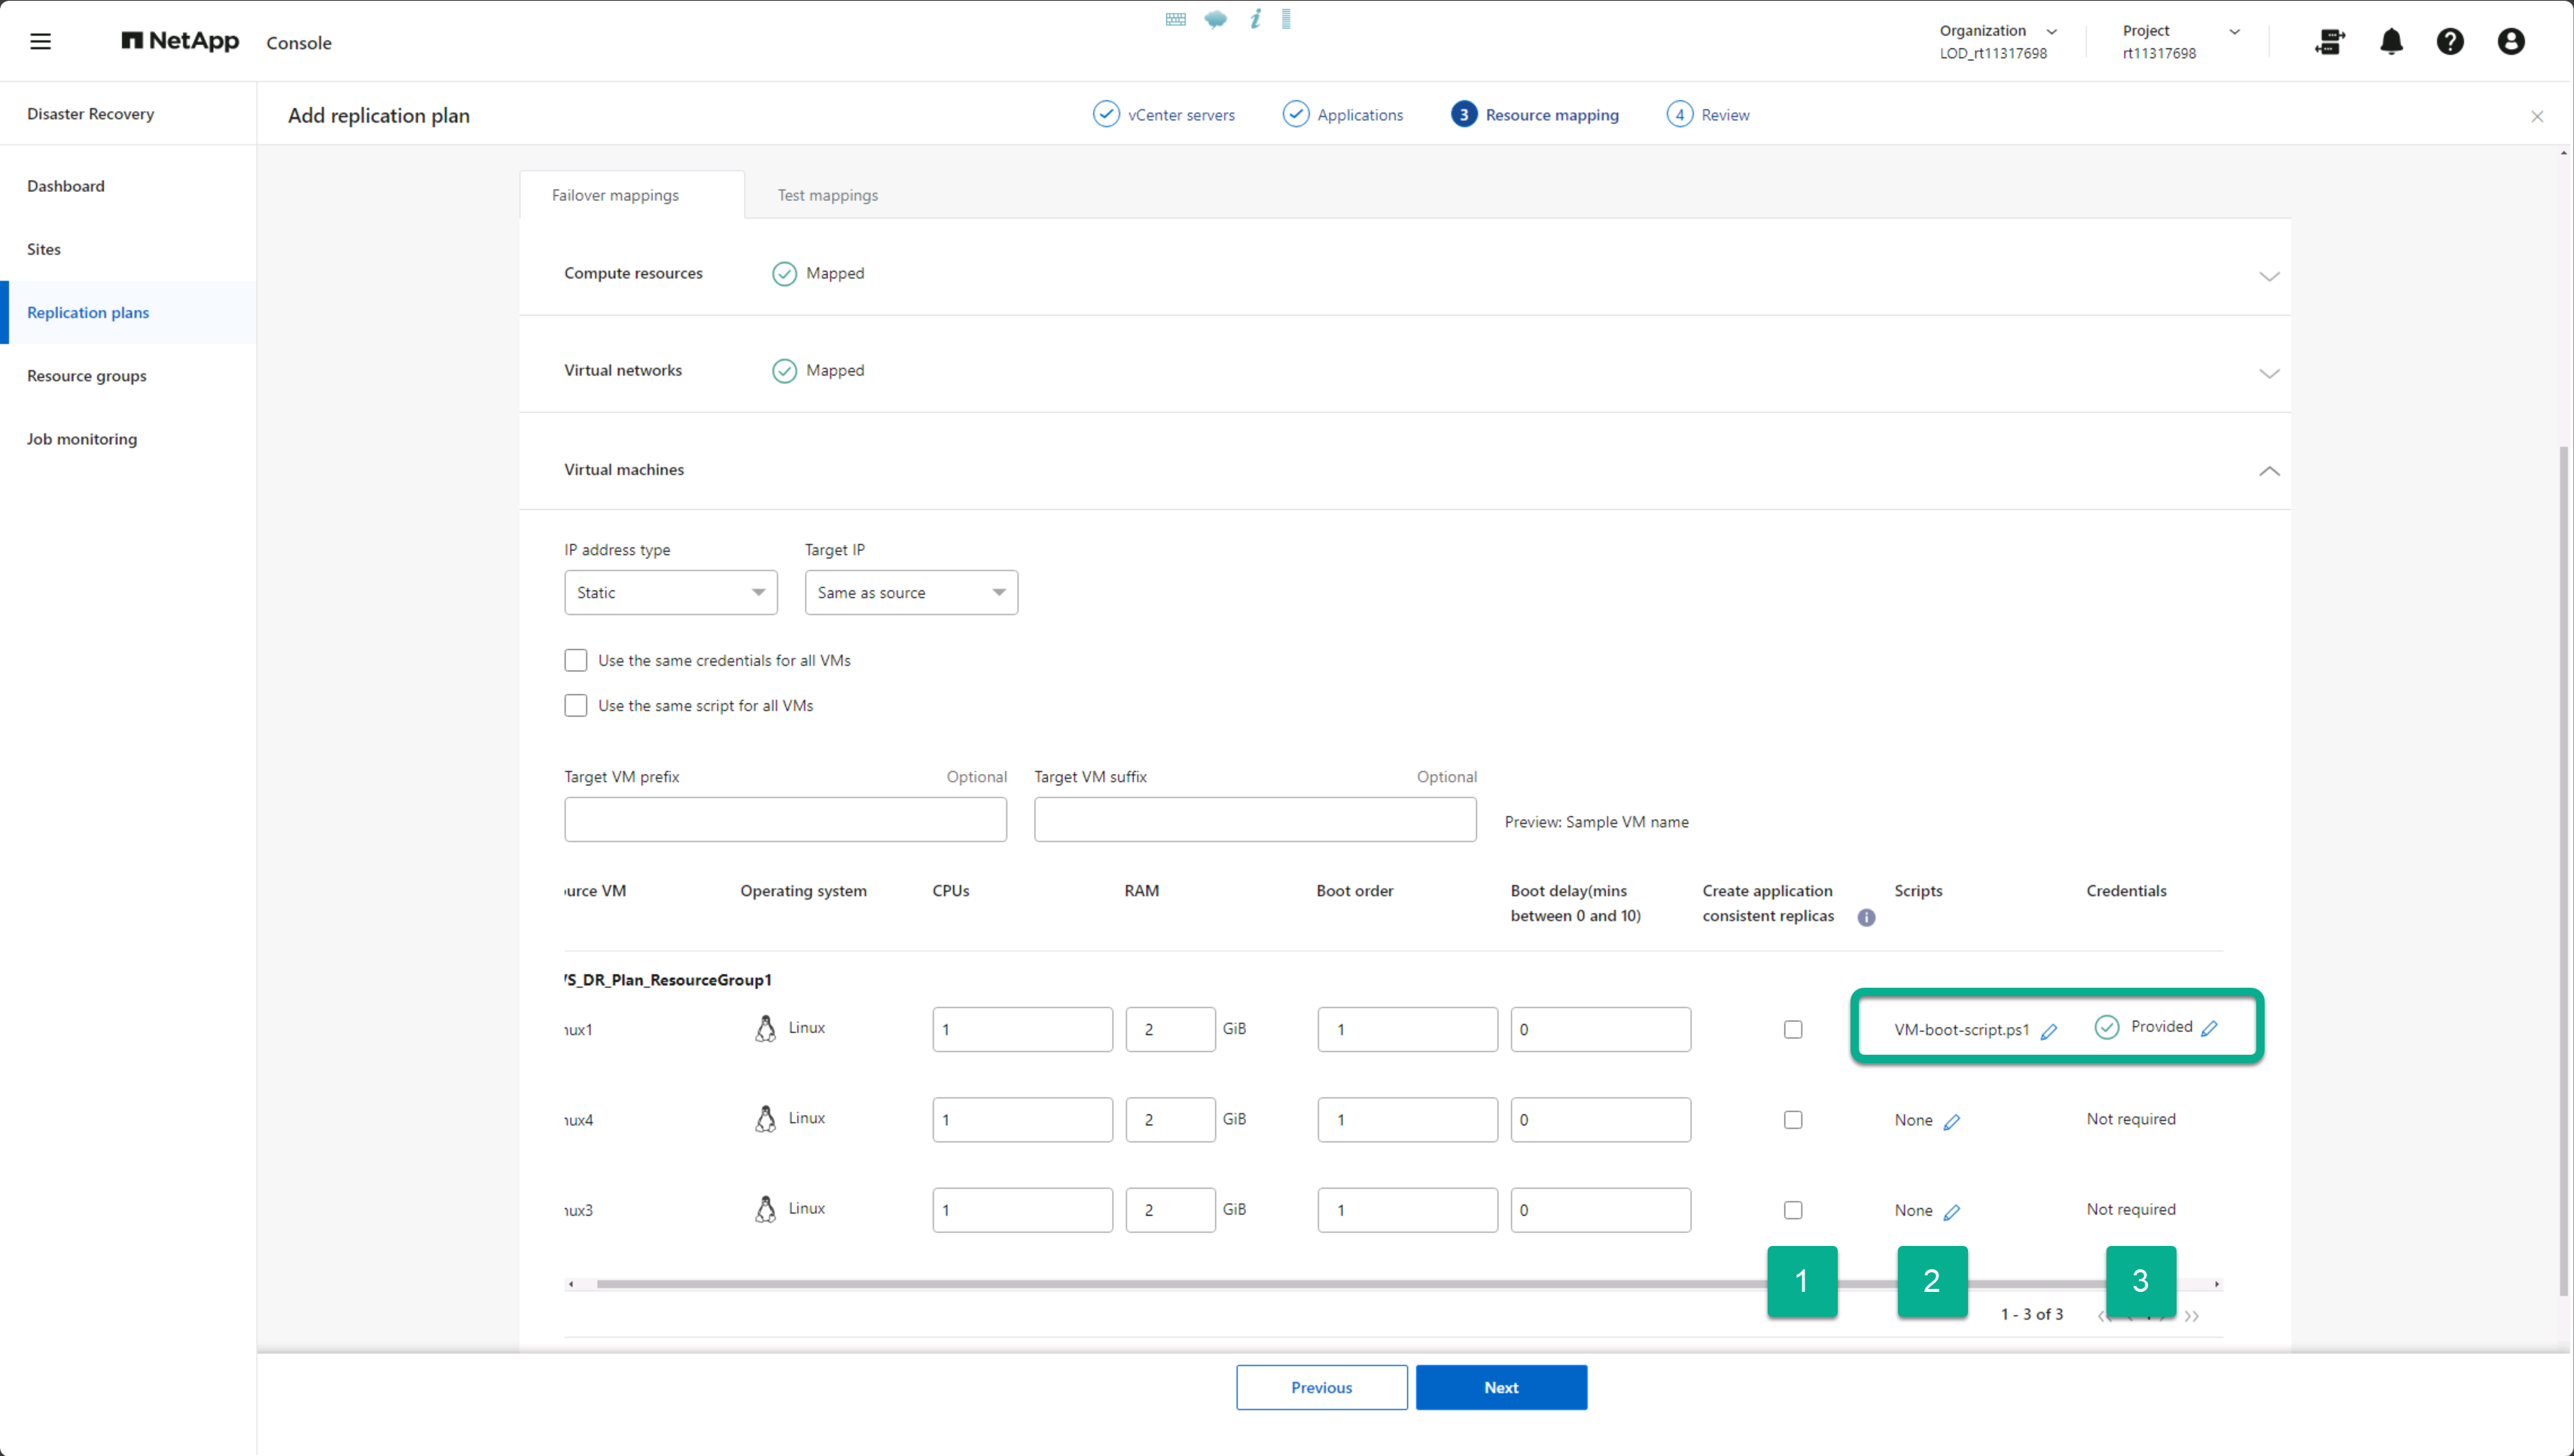
Disaster Recovery supports performing some guest OS operations for each VM:
-
Disaster Recovery can take application-consistent backups of VMs for VMs running Oracle databases and Microsoft SQL Server databases.
-
Disaster Recovery can run custom scripts for the guest OS for each VM. Executing such scripts requires user credentials acceptable to the guest OS with ample privileges to execute the operations listed in the script.
-
Optionally, check the Create application consistent replicas checkbox if the VM is hosting an Oracle or SQL Server database.
-
Optionally, to take custom actions within the guest OS as part of the startup process, upload a script for any VMs. To run a single script in all VMs, use the checkbox highlighted and complete the fields.
-
Certain configuration changes require user credentials with adequate permissions to perform the operations. Provide credentials in the following cases:
-
A script will be executed within the VM by the guest OS.
-
An application-consistent snapshot needs to be performed.
-
Map datastores
The final step in creating a replication plan is identifying how ONTAP should protect the datastores. These settings define the replication plan's recovery point objective (RPO), how many backups should be maintained, and where to replicate each vCenter datastore's hosting ONTAP volumes.
By default, Disaster Recovery manages its own snapshot replication schedule; however, optionally, you can specify that you would like to use the existing SnapMirror replication policy schedule for datastore protection.
In addition, you can optionally customize which data LIFs (logical interfaces) and export policy to use. If you don't provide these settings, Disaster Recovery uses all data LIFs associated with the appropriate protocol (NFS, iSCSI, or FC) and uses the default export policy for NFS volumes.
-
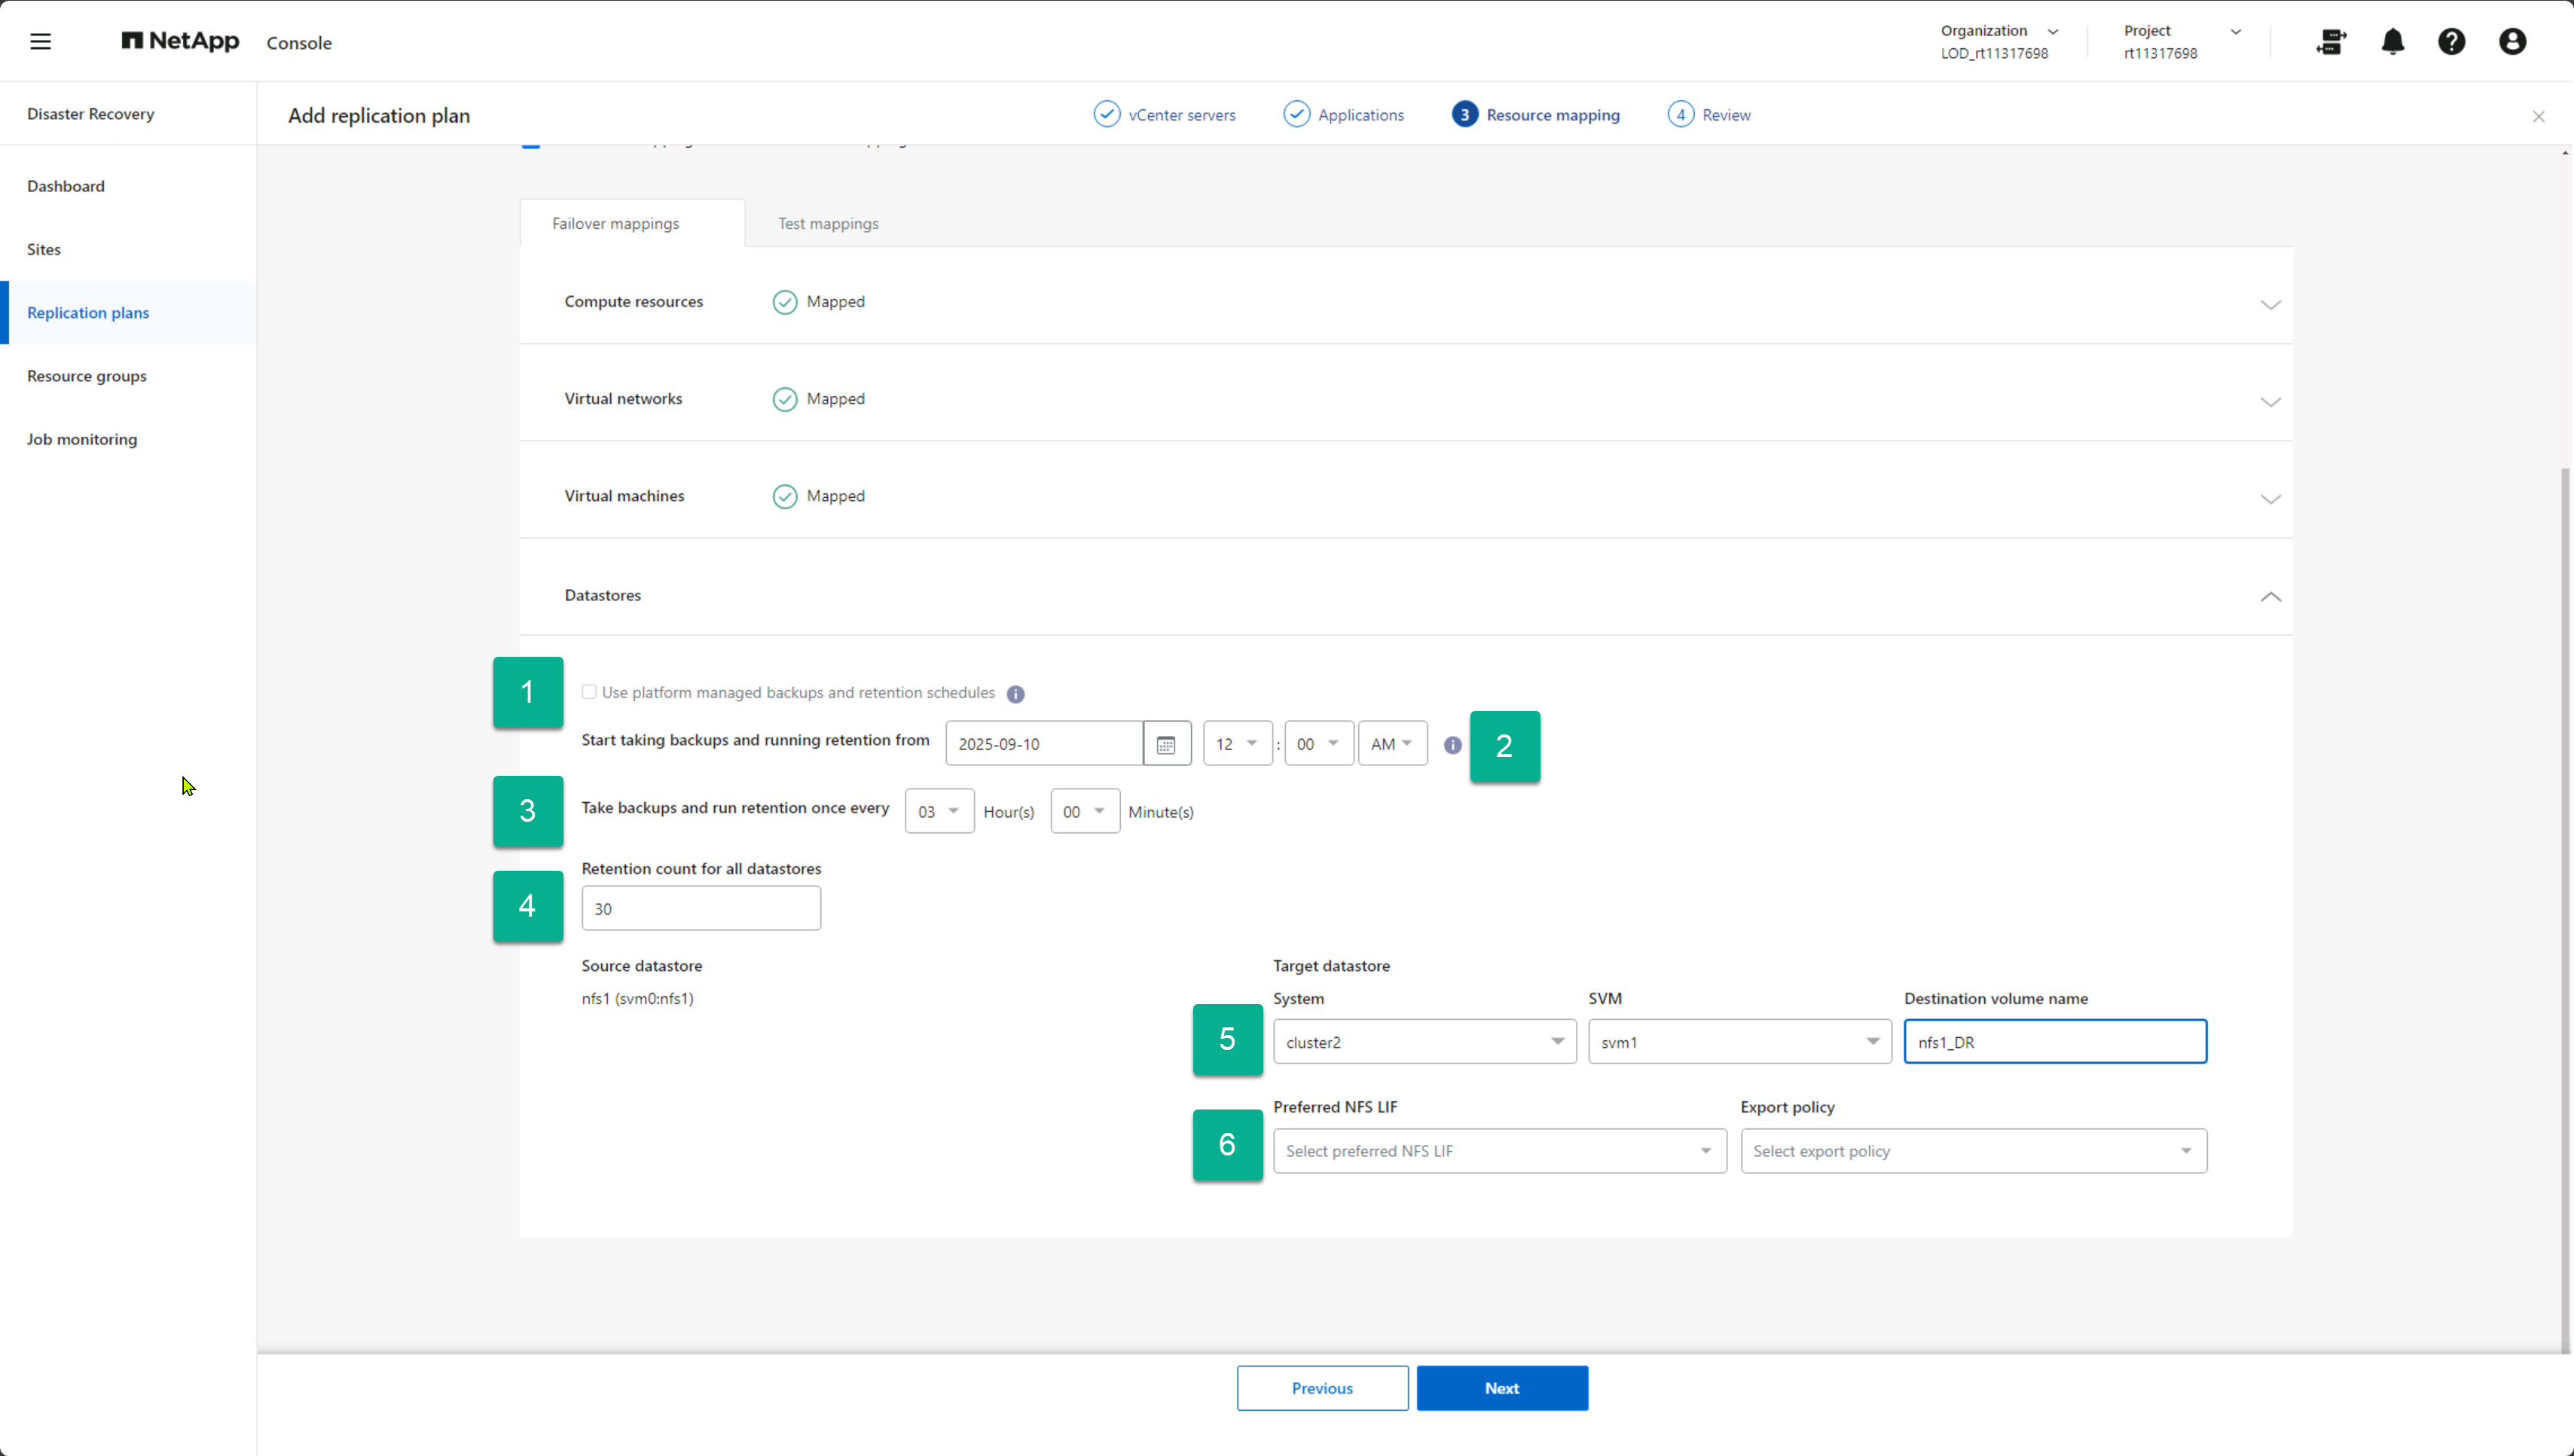
Optionally, decide whether you want to use an existing ONTAP SnapMirror replication schedule or have Disaster Recovery manage protection of your VMs (default).
-
Provide a starting point for when the service should start taking backups.
-
Specify how often the service should take a backup and replicate it to the DR destination Amazon FSx for NetApp ONTAP cluster.
-
Specify how many historical backups should be retained. The service maintains the same number of backups on the source and destination storage cluster.
-
Optionally, select a default logical interface (data LIFs) for each volume. If none is selected, all the data LIFs in the destination SVM that support the volume access protocol are configured.
-
Optionally, select an export policy for any NFS volumes. If not selected, the default export policy is used
Verify settings
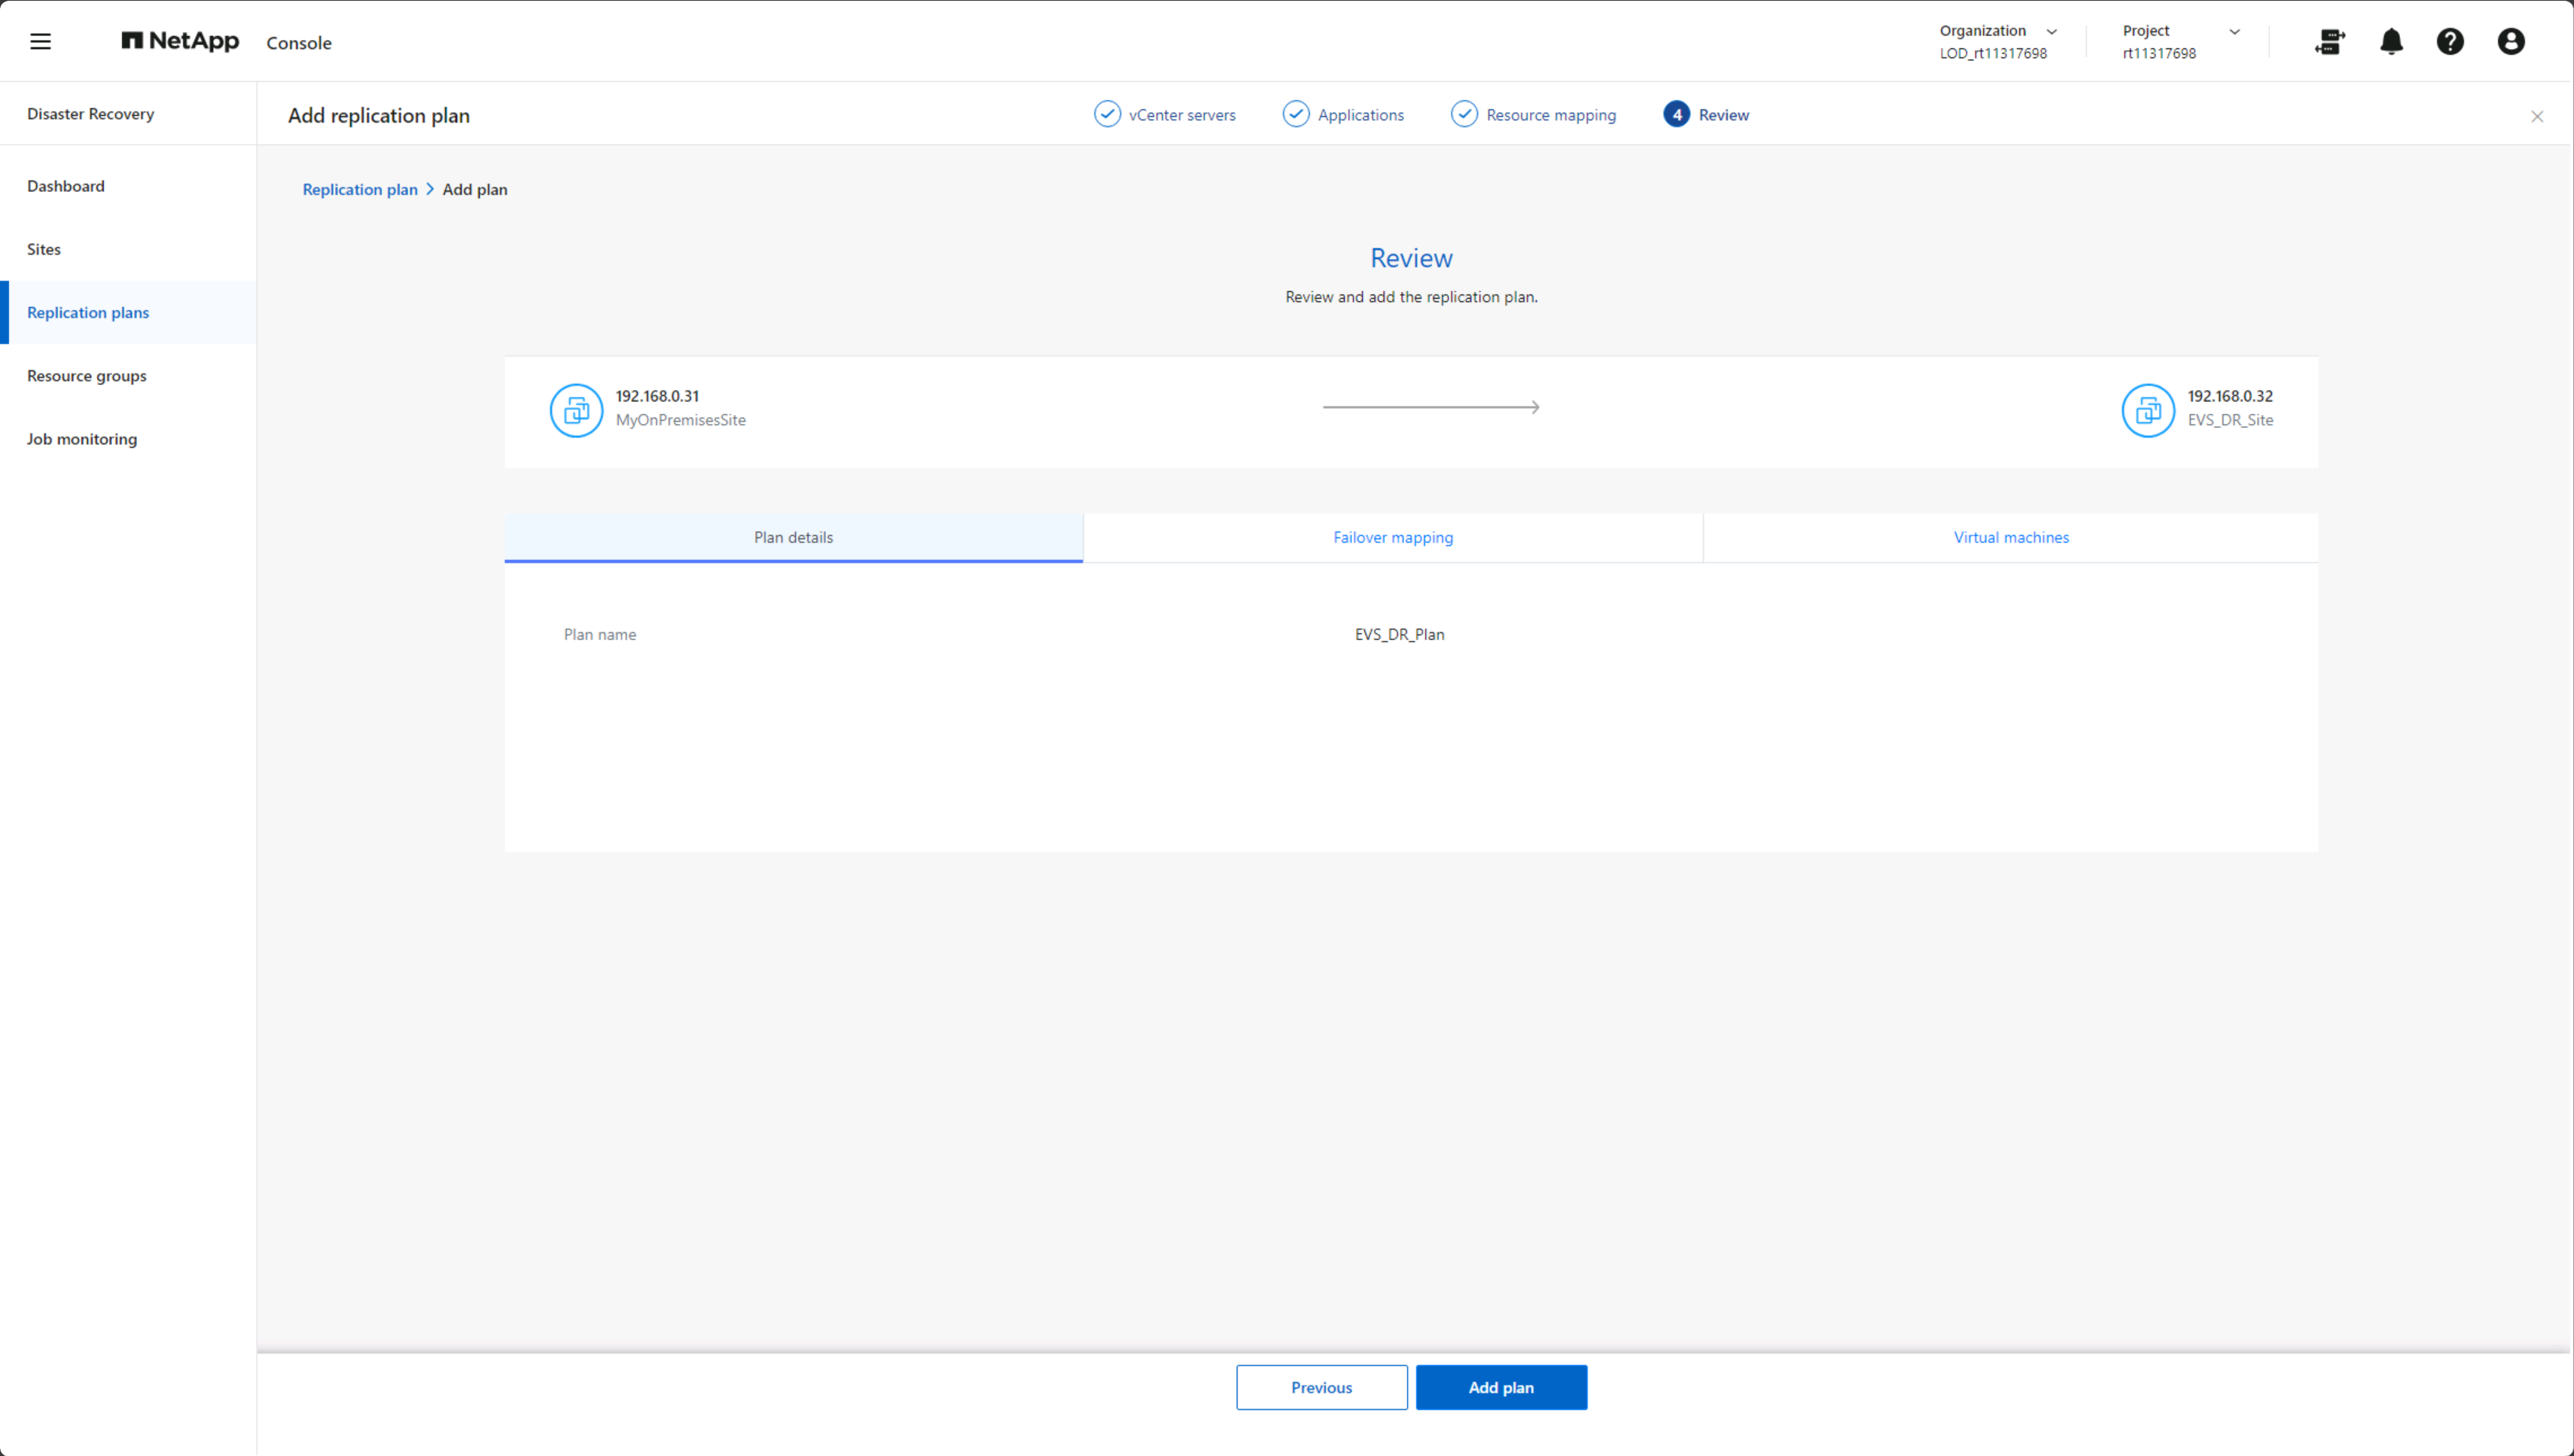
After you add the replication plan information in NetApp Disaster Recovery, verify that the information you entered is correct. This is the final step.
-
Select Save to review your settings before activating the replication plan.
You can select each tab to review the settings and make changes on any tab by selecting the pencil icon.
Replication plan settings review
-
When you are satisfied that all settings are correct, select Add plan.