

Create a replication plan in NetApp Disaster Recovery
 Suggest changes
After you've added resources and sites, create a replication plan to manage data protection. Creating the replication plan involves designating the source and destination sites, selecting the resource groups, and choosing how applications should be restored and powered on. For example, you might group virtual machines (VMs) associated with one application or you might group applications that have similar tiers.
When you create a replication plan, you can also edit schedules for compliance and testing, performing test failovers without impacting your production data.
Required NetApp Console role
The Super admin, Disaster recovery admin, Disaster recovery failover admin, or Disaster recovery application admin role is required to perform this task. Learn about user roles and permissions in NetApp Disaster Recovery. Learn about NetApp Console access roles for all services.
About replication plans
You can protect multiple VMs on multiple datastores. NetApp Disaster Recovery creates ONTAP Consistency Groups for all ONTAP volumes hosting protected VM datastores.
You can only enable protection if the replication plan is in one of the following states:
-
Ready
-
Failback committed
-
Test failover committed
Replication plan snapshots
Disaster Recovery maintains the same number of snapshots on the source and destination clusters. By default, the service performs a snapshot reconciliation process every 24 hours to ensure that the number of snapshots on the source and destination clusters is the same.
The following situations can cause the number of snapshots to differ between the source and destination clusters:
-
Some situations can cause ONTAP operations outside of Disaster Recovery to add or remove snapshots from the volume:
-
If there are missing snapshots on the source site, the corresponding snapshots on the destination site might be deleted, depending on the default SnapMirror policy for the relationship.
-
If there are missing snapshots on the destination site, the service might delete the corresponding snapshots on the source site during the next scheduled snapshot reconcilation process, depending on the default SnapMirror policy for the relationship.
-
-
A reduction of the replication plan's snapshot retention count can cause the service to delete the oldest snapshots on both the source and destination sites to meet the newly reduced retention number.
In these cases, Disaster Recovery removes older snapshots from the source and destination clusters upon the next consistency check. Or, the administrator can perform an immediate snapshot cleanup by selecting the Actions ![]() icon on the replication plan and selecting Clean up snapshots.
icon on the replication plan and selecting Clean up snapshots.
Disaster Recovery performs snapshot symmetry checks every 24 hours.
Before you begin
-
Before creating a SnapMirror relationship, set up the cluster and SVM peering outside of Disaster Recovery.
-
If you configure network mappings at the vCenter level, Disaster Recovery recognizes those mappings when you create the replication plan. If you modify or add the network mapping at the vCenter level after creating the replication plan, Disaster Recovery recognizes those mappings when you manually edit the replication plan.
-
With Google Cloud, you can only add one volume or datastore to a replication plan.

|
Organize your VMs or Kubernetes clusters before deploying NetApp Disaster Recovery to minimize sprawl. Place resources that need protection on a subset of datastores and place resources that are not going to be protected on a different subset of datastores. To organize resource groups before creating the replication plan, see Create a resource group. |
Create the replication plan
A wizard takes you through these steps:
-
Select vCenter servers.
-
Select the resources (VMs, datastore, namespaces) that you want to replicate and assign resource groups.
-
Map how resources from the source environment map to the destination.
-
Set how often the plan runs, run a guest-hosted script, set the boot order, and select the recovery point objective.
-
Review the plan.
When you create the plan, follow these guidelines:
-
Use the same credentials for all VMs or Kubernetes clusters in the plan.
-
Use the same script for all VMs or Kubernetes clusters in the plan.
-
Use the same subnet, DNS, and gateway for all VMs or Kubernetes clusters in the plan.
Select vCenter servers
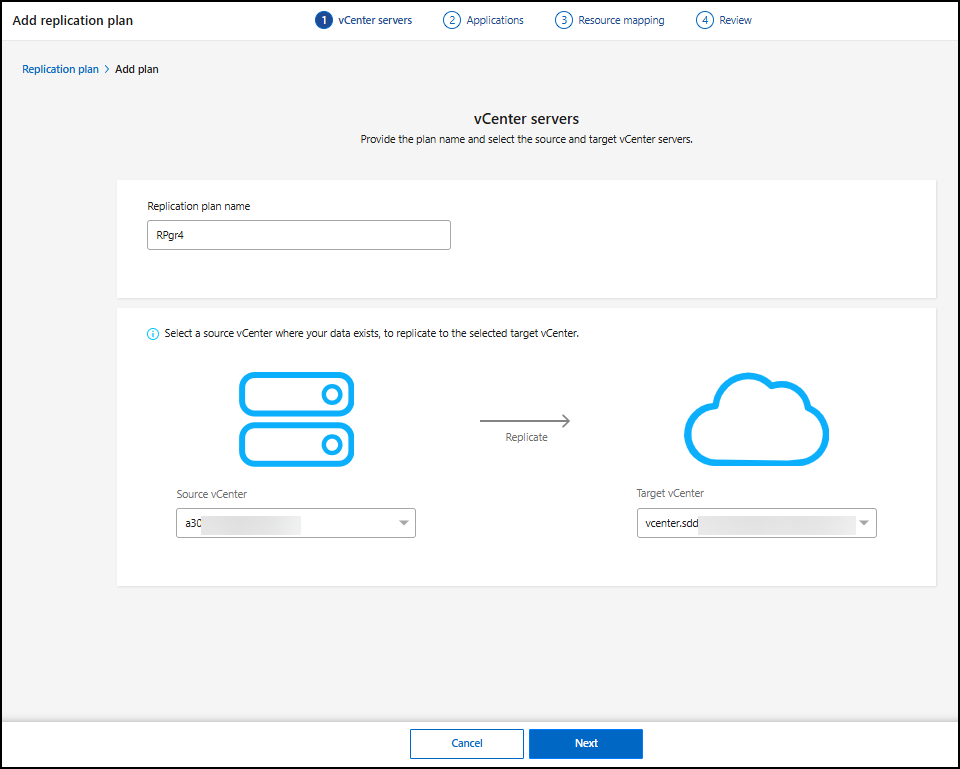
First, you select the source vCenter and then select the destination vCenter.
-
From the NetApp Console left navigation, select Protection > Disaster recovery.
-
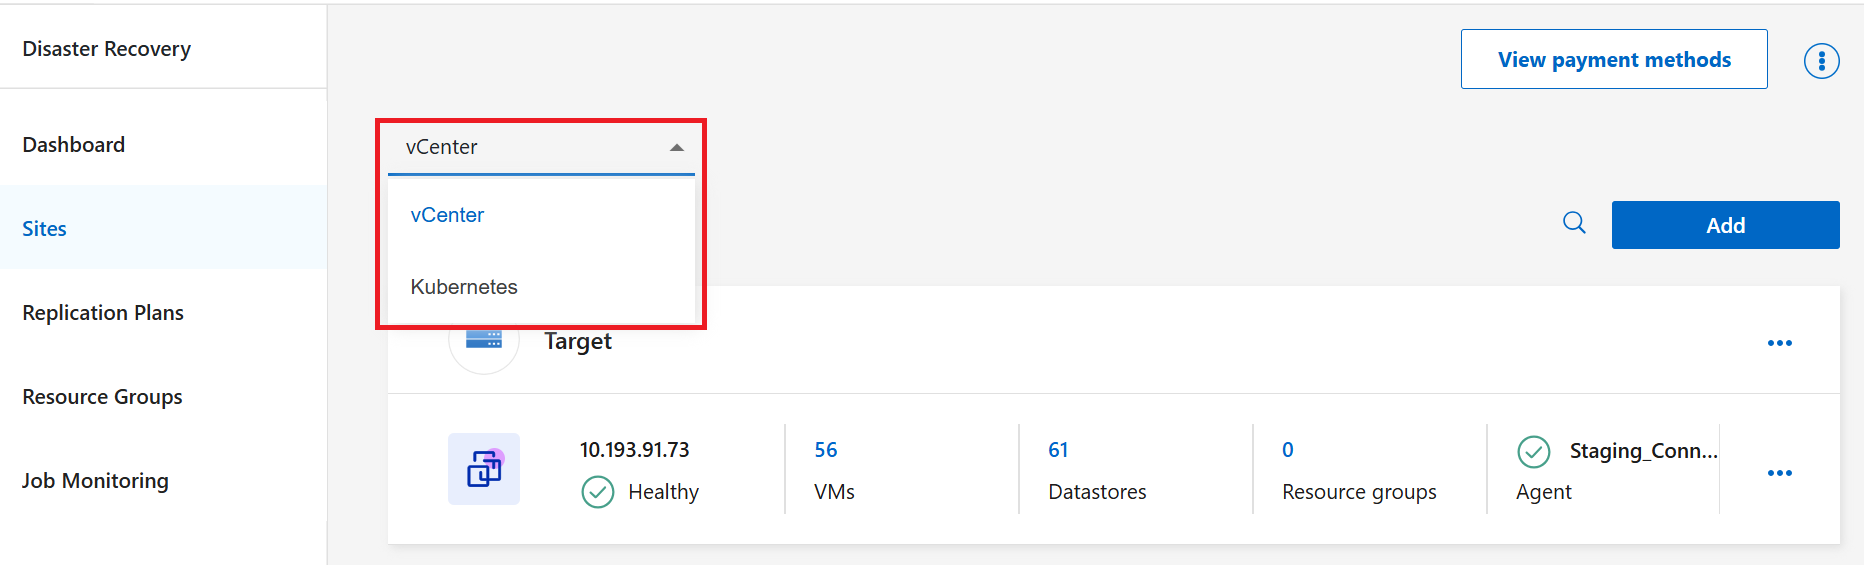
From the NetApp Disaster Recovery menu, select Replication plans.
-
In the dropdown menu, choose the type of resource you want to create replication plan for: Kubernetes or vCenter.
-
Select Add.
-
Enter a name for the replication plan.
-
For Source, select the vCenter or Kubernetes cluster to designate as the source.
-
Under Source vCenter, select the vCenter where the data exists from the dropdown menu. Under Target, select the vCenter or Kubernetes cluster to use as the disaster recovery destination.
-
Select Next.
Select applications to replicate and assign resource groups
The next step is to group the required VMs, datastores, or Kubernetes clusters into functional resource groups. Resource groups enable you to protect a set of resources such as a Kubernetes cluster or VM with a common snapshot.
When you create resource groups, consider the following issues:
-
Before you add resources to resource groups, start a manual discovery or a scheduled discovery first. This ensures that resources are discovered and listed in the resource group.
-
Ensure there's at least one VM in the datastore. If there are no VMs in the datastore, the datastore won't be discovered.
-
A single datastore should not host VMs protected by more than one replication plan.
-
Do not host protected and unprotected resources on the same datastore. If protected and unprotected resource are hosted on the same datastore, you can encounter these issues:
-
The used capacity of that volume can contribute to the licensing calculation because Disaster Recovery uses SnapMirror, meaning the system replicates entire ONTAP volumes. In this case, the volume space consumed by both protected and unprotected resources would be included in this calculation.
-
If the resource group and its associated resources need to be failed over to the disaster recovery site, any unprotected resources will no longer exist on the source site from the failover process, resulting in failure of unprotected resources at the source site. Also, NetApp Disaster Recovery will not start those unprotected resource at the failover site.
-
|
|
Create a separate dedicated set of mappings for your failover tests to prevent resources from being connected to production networks using the same IP addresses. |
-
If you have existing resource groups, select Resource groups, choose the resource group then Next.
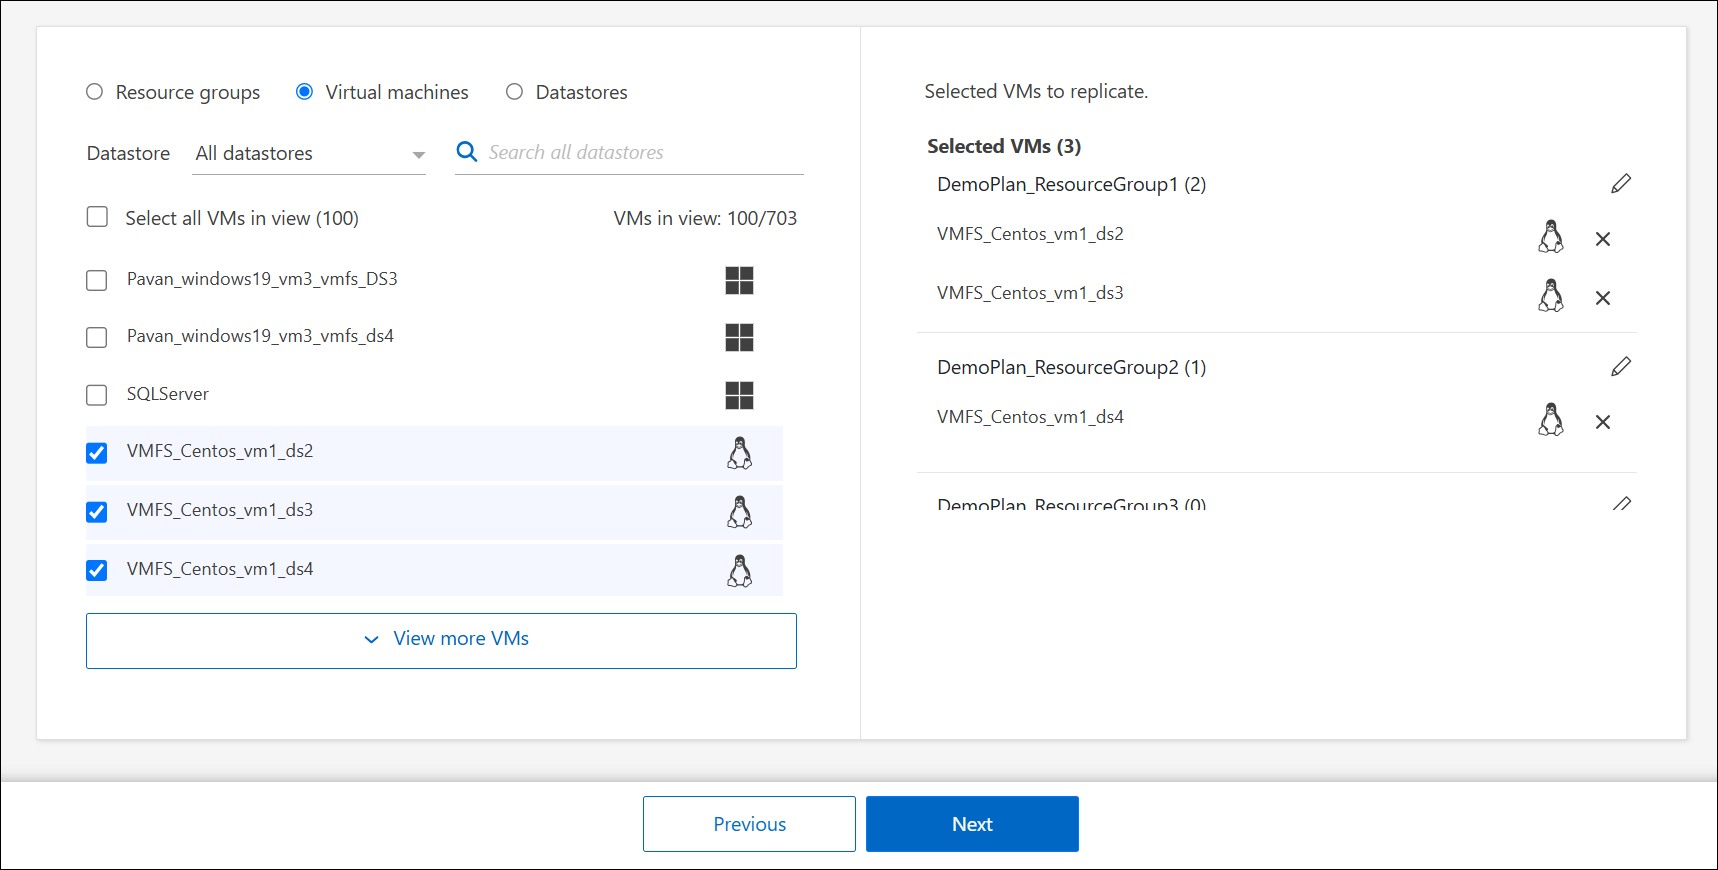
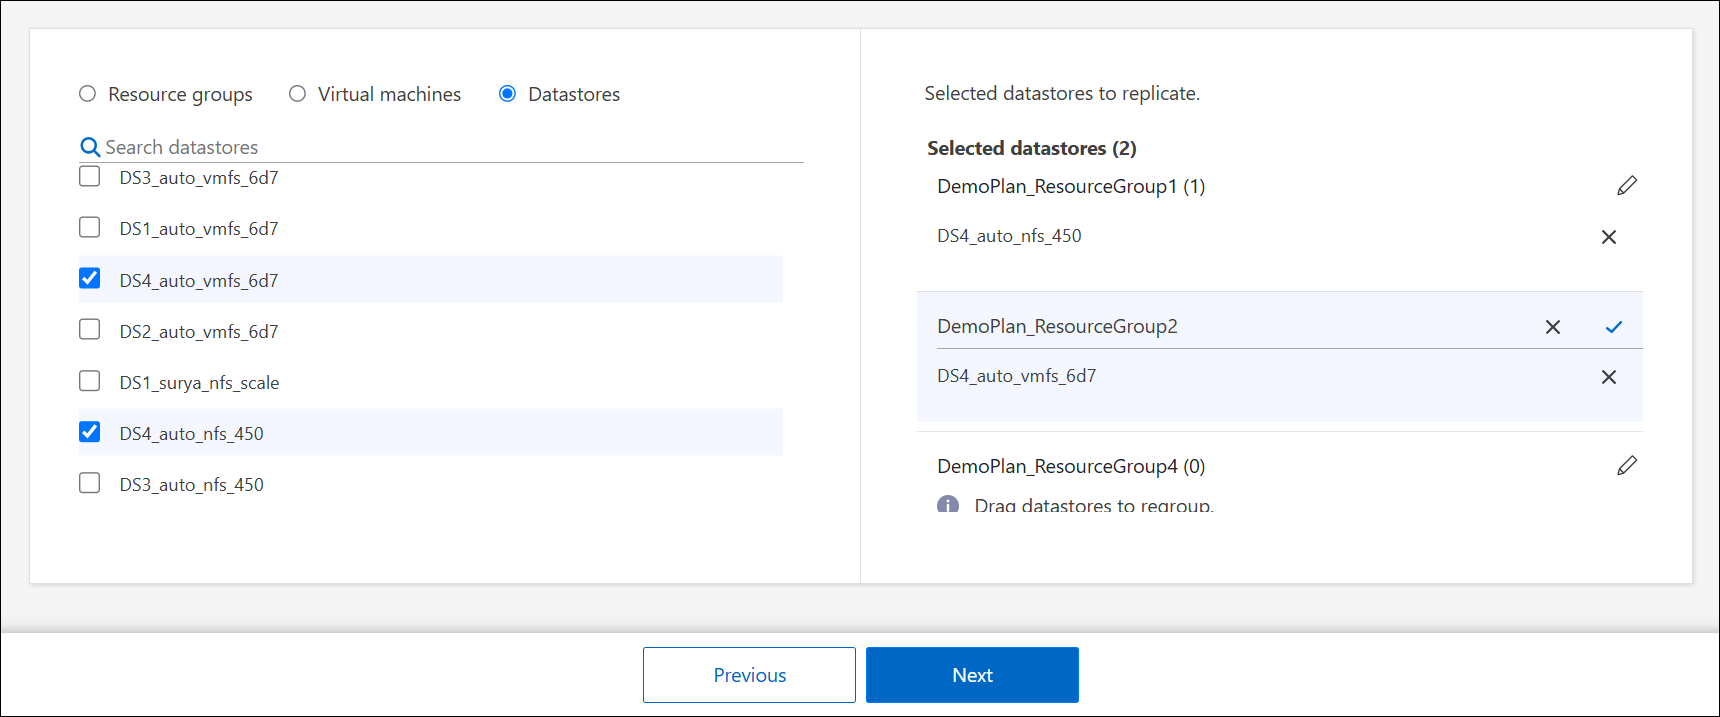
If you don't have existing resource groups or need to add resources to one, select Virtual machines or Datastores.
-
Select the virtual machines or datastores that you want to add to the replication plan from the auto-generated list. For virtual machines, you can filter by the datastore. When you select a datastore or VM, it's automatically added to a resource group.
-
On the right half of the page, review the selected VMs or datastores.
-
To remove a VM or datastore, hover over the name of the data source then select X.
-
To organize the resources into multiple resource groups, select Click to add another resource group. After you've added the resource group, you can drag and drop resources between groups. Select the pencil icon* to edit the name of the resource group.
-
-
Select Next.
When creating a replication plan for Kubernetes clusters, Kubernetes namespaces in a resource group must belong to the same ONTAP cluster.
-
If you have existing resource groups, choose the groups from the list.
If you don't have existing resource groups or need to add resources to one, select + Create new resource group. Follow the instructions to add namespaces to a resource group.
When naming a resource group, the only supported characters are lowercase letters and numbers.
-
In the alternate column, review the selected resource groups.
-
Select Next.
Map source resources to the target
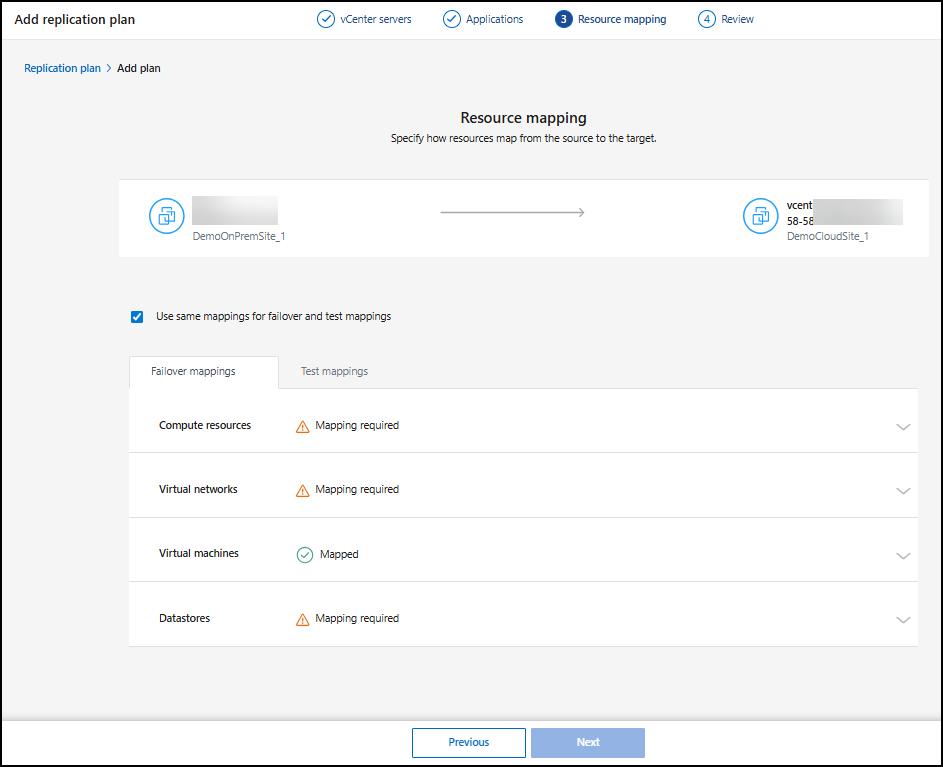
In the Resource mapping step, specify how the resources from the source environment should map to the target. When you create a replication plan, you can set a boot delay and order for each VM in the plan. This enables you to set a sequence for the VMs to start.
If you plan to perform test failovers as part of your DR plan, you should provide a set of test failover mappings to ensure that VMs started during the failover test don't interfere with production VMs. You can accomplish this by either providing test VMs with different IP addresses, or by mapping the virtual NICs of the test VMs to a different network that is isolated from production yet has the same IP configuration (referred to as a bubble or test network).
If you want to create a SnapMirror relationship in this service, the cluster and its SVM peering should have already been set up outside of NetApp Disaster Recovery.
-
In the Resource mapping page, check the box to use the same mappings for both failover and test operations.
-
In the Failover mappings tab, select the down arrow to the right of each resource and map the resources in each section:
-
Compute resources
-
Virtual networks
-
Virtual machines
-
Datastores
-
-
Choose the namespace mappings for each namespace in each resource group. By default, Disaster Recovery selects the target to be the same as source. You can choose a different namespace in the destination cluster.
-
Designate the storage class mapping for each resource group. The storage class must be linked to an ONTAP storage VM peered with the source environment. The default storage class on the cluster is used if you don't designate one.
Run the CLI command kubectl get pvc -n <namespace>on the namespace to see the storage class. -
Set the snapshot schedule:
Choose the Snapshots and retention start time (calendar date and time), the Snapshot and retention frequency (how often snapshots are initiated), and the Snapshot retention count (how many snapshots are saved).
When setting snapshot frequency, the minimum allowed is five minutes.
-
Select Add AppVault to create the AppVault where protection data will be saved.
-
Enter a Name and select the Console agent the AppVault should be connected to.
-
Select the cloud Provider for hosting the AppVault.
-
Based on the provider selection, Disaster Recovery populates existing configured cloud subscriptions. Choose the Subscription, Resource group, and Storage account for the cloud provider.
-
Select Add.

-
-
Select Next.
-
Review the failover mappings then select Add to create the replication plan.
After selecting Add, you can monitor the different jobs in Job monitoring.

|
For Kubernetes, this is the final step for creating a replication. For vCenters, continue to the Compute resources section. |
Compute resources section
The Compute resources section defines where VMs will be restored after a failover. Map the source vCenter data center and cluster to a target data center and cluster.
Optionally, VMs can be restarted on a specific vCenter ESXi host. If VMWare DRS is enabled, you can move the VM to an alternate host automatically if needed to meet the DR configured policy.
Optionally, you can place all VMs in this replication plan into a unique folder with the vCenter. This provides an easy way to quickly organize failed over VMs within the vCenter.
Select the down arrow next to Compute resources.
-
Source and target datacenters
-
Target cluster
-
Target host (optional): After you select the cluster, you can then set this information.
-
Folder (optional)
|
|
If a vCenter has a Distributed Resource Scheduler (DRS) configured to manage multiple hosts in a cluster, you don't need to select a host. If you select a host, NetApp Disaster Recovery will place all the VMs on the selected host. * Target VM folder (optional): Create a new root folder to store the selected VMs. |
Virtual networks
VMs use virtual NICs connected to virtual networks. In the failover process, the service connects these virtual NICs to virtual networks defined in the destination VMware environment. For each source virtual network used by the VMs in the resource group, the service requires a destination virtual network assignment.
|
|
This section is only required for vCenters. You don't need to complete it for Kubernetes. |
|
|
You can assign multiple source virtual networks to the same target virtual network. This might however create IP network configuration conflicts. You can map multiple source networks to a single target network to ensure that all source networks have the same configuration. |
In the Failover mappings tab, select the down arrow next to Virtual networks. Select the source virtual LAN and target virtual LAN.
Select the network mapping to the appropriate virtual LAN. The virtual LANs should already be provisioned, so select the appropriate virtual LAN to map the VM.
Virtual machines
You can configure each VM in the resource group protected by the replication plan to suit the destination vCenter virtual environment by setting any of the following options:
-
The number of virtual CPUs
-
The amount of virtual DRAM
-
The IP address configuration
-
The ability to execute guest-OS shell scripts as part of the failover process
-
The ability to change failed over VM names by using a unique prefix and suffix
-
The ability to set the restart order during VM failover
In the Failover mappings tab, select the down arrow next to Virtual machines.
The default for the VMs is mapped. Default mapping uses the same settings that the VMs use in the production environment (same IP address, subnet mask, and gateway).
If you make any changes from the default settings, you must change the Target IP field to "Different from source."
|
|
If you change settings to "Different from source," you need to provide VM guest OS credentials. |
This section might display different fields depending on your selection.
You can increase or decrease the number of virtual CPUs assigned to each failed over VM. However, each VM requires at least one virtual CPU. You can change the number of virtual CPUs and virtual DRAM assigned to each VM. The most common reason why you might want to change the default virtual CPU and virtual DRAM settings is if the target vCenter cluster nodes do not have as many available resources as the source vCenter cluster.
|
|
Toggle the advance settings to add Scripts and Application consistency settings. |
Network settings
Disaster Recovery supports an extensive set of configuration options for VM networks. Changing these might be required if the target site has virtual networks that use different TCP/IP settings as the production virtual networks on the source site.
At the most basic (and default) level, the settings simply use the same TCP/IP network settings for each VM on the destination site as used on the source site. This requires that you configure the same TCP/IP settings on the source and destination virtual networks.
The service supports network settings of static or Dynamic Host Configuration Protocol (DHCP) IP configuration for VMs. DHCP provides a standards-based method of dynamically configuring the TCP/IP settings of a host network port. DHCP must provide, at a minimum, a TCP/IP address, and can also provide a default gateway address (for routing to an external internet connection), a subnet mask, and a DNS server address. DHCP is commonly used for end-user computing devices such as employee desktop, laptop, and mobile phone connections, while it can also be used for any networking computing device such as servers.
-
Use the same subnet mask, DNS, and gateway settings option: Because these settings are typically the same for all VMs connected to the same virtual networks, you might find it easier to configure these once and let Disaster Recovery use the settings for all VMs in the resource group protected by the replication plan. If some VMs use different settings, you need to uncheck this box and provide those settings for each VM.
-
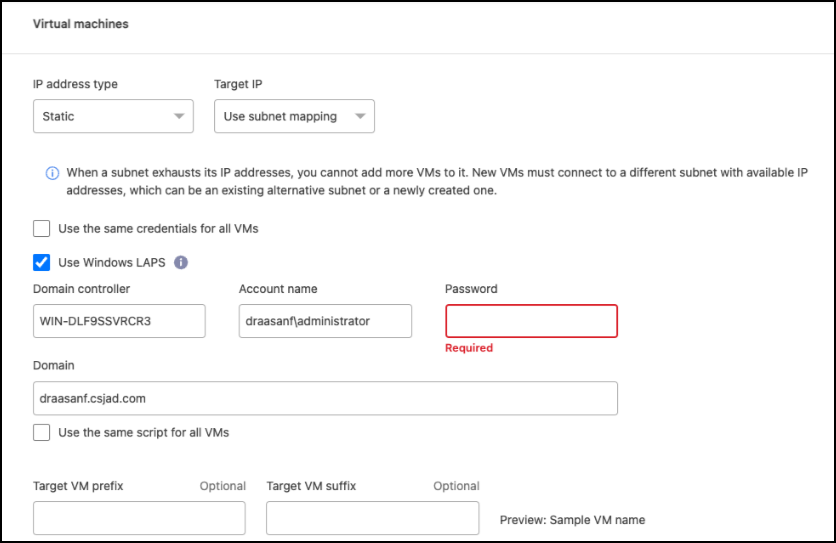
IP address type: Reconfigure the VMs configuration to match the target virtual network requirements. NetApp Disaster Recovery offers two options: DHCP or static IP. For static IPs, configure the subnet mask, gateway, and DNS servers. Additionally, enter credentials for VMs.
-
DHCP: Select this setting if you want your VMs to obtain network configuration information from a DHCP server. If you choose this option, you provide just the credentials for the VM.
-
Static IP: Select this setting if you want to specify IP configuration information manually. You can select one of the following: same as source, different from source, or subnet mapping. If you choose the same as the source, you do not need to enter credentials. On the other hand, if you choose to use different information from the source, you can provide the credentials, IP address of the VM, subnet mask, DNS, and gateway information. VM guest OS credentials should be supplied to either the global level or at each VM level.
This can be very helpful when recovering large environments to smaller target clusters or for conducting disaster recovery tests without having to provision a one-to-one physical VMware infrastructure.
-
-
Scripts: You can include custom guest-OS hosted scripts in .sh, .bat, or .ps1 format as post processes. With custom scripts, Disaster Recovery can run your script after a failover, failback, and migrate processes. For example, you can use a custom script to resume all database transactions after the failover is complete. The service can run scripts within VMs running Microsoft Windows or any supported Linux variant with command-line parameters supported. You can assign a script to individual VMs or to all VMs in the replication plan.
To enable script execution with the VM guest OS, the following conditions must be met:
-
VMware Tools must be installed on the VM.
-
Appropriate user credentials must be provided with adequate guest OS privileges to run the script.
-
Optionally, include a timeout value in seconds for the script.
VMs running Microsoft Windows: can run either Windows batch (.bat) or PowerShell (ps1) scripts. Windows scripts can use command-line arguments. Format each argument in the
arg_name$valueformat, wherearg_nameis the name of the argument and$valueis the value of the argument and a semi-colon separates eachargument$valuepair.VMs running Linux: can run any shell script (.sh) supported by the version of Linux used by the VM. Linux scripts can use command-line arguments. Provide arguments in a list of values separated by semi-colons. Named arguments are not supported. Add each argument to the
Arg[x]argument list and reference each value using a pointer into theArg[x]array, for example,value1;value2;value3.
-
-
Downgrade VM hardware version and register: Select this if the destination ESX host version is earlier than the source so they match during registration.
-
Retain original folder hierarchy: By default, Disaster Recovery retains the VM inventory hierarchy (folder structure) on failover. If the recovery target does not have the original folder hierarchy, Disaster Recovery creates it.
Uncheck this box to disregard the original folder hierarchy.
-
Target VM prefix and suffix: Under the virtual machines details, you can optionally add a prefix and suffix to each failed over VM name. This can be helpful in differentiating the failed over VMs from the production VMs running on the same vCenter cluster. For example, you can add a prefix of "DR-" and a suffix of "-failover" to the VM name. Some people add a second production vCenter to host VMs temporarily at a different site in the event of a disaster. Adding a prefix or suffix can help you quickly identify failed over VMs. You can also use the prefix or suffix in custom scripts.
You can use the alternative method of setting the Target VM folder in the Compute resources section.
-
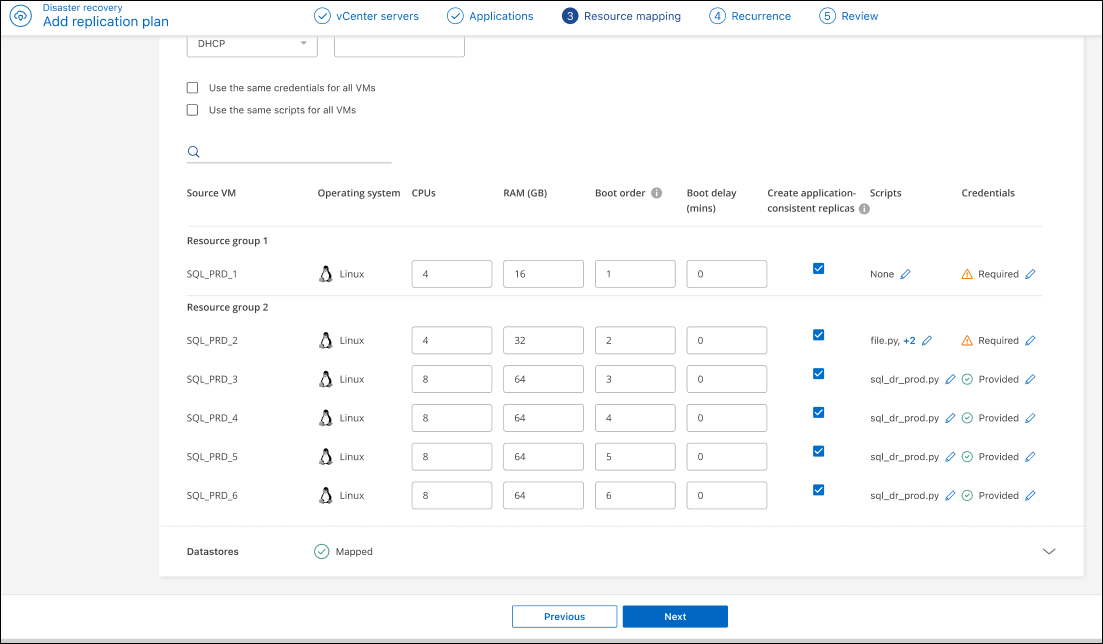
CPU and Memory (GB): Under the virtual machines details, you can optionally resize the VM CPU and memory.
You can configure DRAM either in gigabytes (GiB) or megabytes (MiB). While each VM requires at least one MiB of RAM, the actual amount must ensure that the VM guest OS and any running applications can operate efficiently. -
Boot order: You can modify the boot order after a failover for all the selected virtual machines across the resource groups. By default, all VMs boot together in parallel; however, you can make changes at this stage. This is helpful to ensure that all your priority one VMs are running before subsequent priority VMs are started.
Disaster Recovery boots any VMs with the same boot order number in parallel.
-
Sequential boot: Assign each VM a unique number to boot the in the assigned order, for example, 1,2,3,4,5.
-
Simultaneous boot: Assign the same number to any VMs to boot them at the same time, for example, 1,1,1,1,2,2,3,4,4.
-
-
Boot delay: Adjust the delay in minutes of the boot up action, indicating the amount of time that the VM will wait before it starts the power-on process. Enter a value from 0 to 10 minutes.
-
App consistent: Indicate whether to create application-consistent snapshot copies. The service will quiesce the application and then take a snapshot to get a consistent state of the application. This feature is supported with Oracle running on Windows and Linux and SQL Server running on Windows. See more details next.
You must switch the Advance settings toggle for this option. If you enable application consistency, you must provide credentials in the form of username and password.
Create application-consistent replicas
Many VMs host database servers such as Oracle or Microsoft SQL Server. These database servers require application-consistent snapshots to ensure that the database is in a consistent state when the snapshot is taken.
Application-consistent snapshots ensure that the database is in a consistent state when the snapshot is taken. This is important because it ensures that the database can be restored to a consistent state after a failover or failback operation.
The data managed by the database server might be hosted on the same datastore as the VM hosting the database server, or it might be hosted on a different datastore. The following table shows the supported configurations for application-consistent snapshots in Disaster Recovery:
| Data location | Supported | Notes |
|---|---|---|
Within the same vCenter datastore as the VM |
Yes |
Because the database server and database both reside on the same datastore, both the server and the data will be in sync upon failover. |
Within a different vCenter datastore from the VM |
No |
Disaster Recovery can't identify when a database server's data is on a different vCenter datastore. The service can't replicate the data, but can replicate the database server VM. While the database data cannot be replicated, the service ensures that the database server performs all necessary steps to ensure that the database is quiesced at the time of the VM backup. |
Within an external data source |
No |
If the data resides on a guest-mounted LUN or NFS share, Disaster Recovery can't replicate the data, but can replicate the database server VM. While the database data cannot be replicated, the service ensures that the database server performs all necessary steps to ensure that the database is quiesced at the time of the VM backup. |
During a scheduled backup, Disaster Recovery quiesces the database server and then takes a snapshot of the VM hosting the database server. This ensures that the database is in a consistent state when the snapshot is taken.
-
For Windows VMs, the service uses the Microsoft Volume Shadow Copy Service (VSS) to coordinate with either database server.
-
For Linux VMs, the service uses a set of scripts to place the Oracle server in backup mode.
To enable application-consistent replicas of the VMs and their hosting datastores, check the box next to Create application-consistent replicas for each VM and provide guest login credentials with the appropriate privileges.
Datastores section
VMware datastores are hosted on ONTAP FlexVol volumes, or ONTAP iSCSI or FC LUNs using VMware VMFS. Use the Datastores section to define the target ONTAP cluster, storage virtual machine (SVM), and volume or LUN to replicate the on-disk data to the destination.
Select the down arrow next to Datastores. Based on the selection of VMs, datastore mappings are automatically selected.
This section might be enabled or disabled depending on your selection.
-
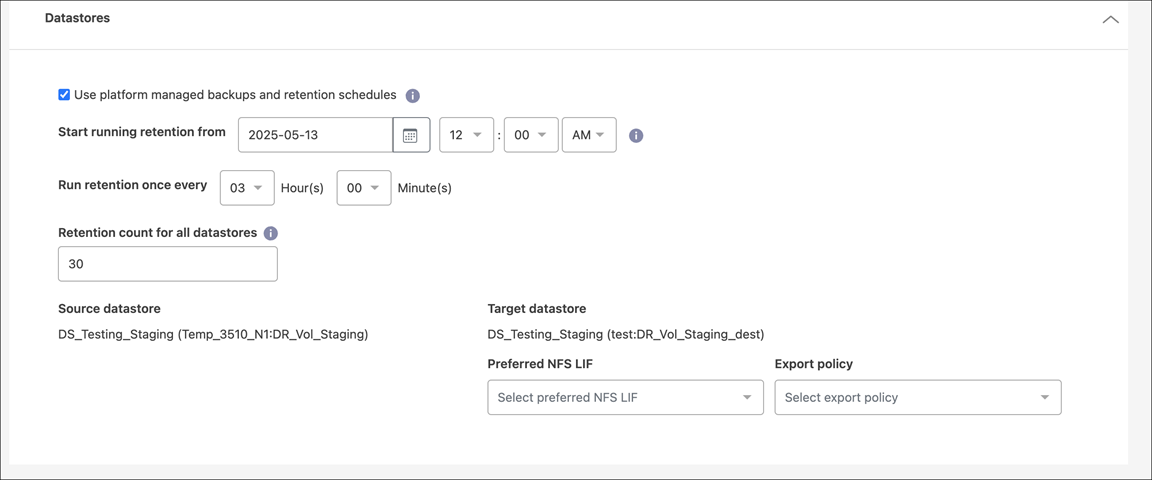
Use platform managed backups and retention schedules: If you are using an external snapshot management solution, check this box. NetApp Disaster Recovery supports the use of external snapshot management solutions such as the native ONTAP SnapMirror policy scheduler or third-party integrations. If every datastore (volume) in the replication plan already has a SnapMirror relationship that is being managed elsewhere, you can use those snapshots as recovery points in NetApp Disaster Recovery.
When this option selected, NetApp Disaster Recovery does not configure a backup schedule. However, you still need to configure a retention schedule because snapshots might still be taken for testing, failover, and failback operations.
After this is configured, the service doesn't take any regularly scheduled snapshots, but instead relies on the external entity to take and update those snapshots.
-
Backups and retention start time: Enter the date and time when you want backups and retention to start running.
-
Backups and retention frequency: Enter the time interval in hours and minutes. For example, if you enter 1 hour, the service will take a snapshot every hour.
-
Retention count for all datastores: Enter the number of snapshots you want to retain.
The number of snapshots retained along with the data change rate between each snapshot determines the amount of storage space consumed on both the source and destination. The more snapshots you retain, the more storage space is consumed. -
Source and Target datastores: If multiple (fan-out) SnapMirror relationships exist, you can select the destination to use. If a volume has a SnapMirror relationship already established, the corresponding source and target datastores appear. If a volume that does not have a SnapMirror relationship, you can create one now by selecting a target cluster, selecting a target SVM, and providing a volume name. The service will create the volume and SnapMirror relationship.
If you want to create a SnapMirror relationship in this service, the cluster and its SVM peering should have already been set up outside of NetApp Disaster Recovery. -
If the VMs are from same volume and same SVM, then the service performs a standard ONTAP snapshot and updates the secondary destinations.
-
If the VMs are from different volume and same SVM, the service creates a consistency group snapshot by including all the volumes and updates the secondary destinations.
-
If the VMs are from different volume and different SVM, the service performs a consistency group start phase and commit phase snapshot by including all the volumes in the same or different cluster and updates the secondary destinations.
-
During the failover, you can select any snapshot. If you select the latest snapshot, the service creates on on-demand backup, updates the destination, and uses that snapshot for the failover.
-
Add test failover mappings
-
To set different mappings for the test environment, uncheck the box and select the Test mappings tab.
-
Go through each tab as before, but this time for the test environment.
On the Test mappings tab, the Virtual machines and Datastores mappings are disabled.
You can later test the entire plan. Right now, you are setting up the mappings for the test environment.
Review the replication plan
Finally, take a few moments to review the replication plan.
|
|
You can later disable or delete the replication plan. |
-
Review information in each tab: Plan Details, Failover Mapping, and VMs.
-
Select Add plan.
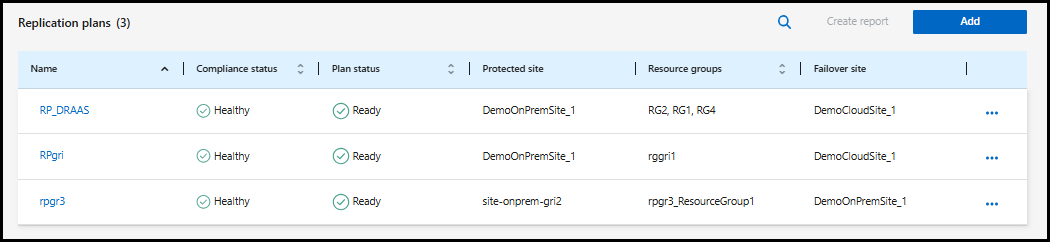
The plan is added to the list of plans.
Modify a replication plan
You can modify a replication plan schedule to test compliance and ensure failover tests complete successfully.
-
Compliance time impact: When a replication plan is created, the service creates a compliance schedule by default. The default compliance time is 30 minutes. To change this time, you can use edit the schedule in the replication plan.
-
Test failover impact: You can test a failover process on demand or by a schedule. This lets you test the failover of virtual machines to a destination that is specified in a replication plan.
A test failover creates a FlexClone volume, mounts the datastore, and moves the workload on that datastore. A test failover operation does not impact production workloads, the SnapMirror relationship used on the test site, and protected workloads that must continue to operate normally.
Based on the schedule, the failover test runs and ensures that workloads are moving to the destination specified by the replication plan.
-
From the NetApp Disaster Recovery menu, select Replication plans.
-
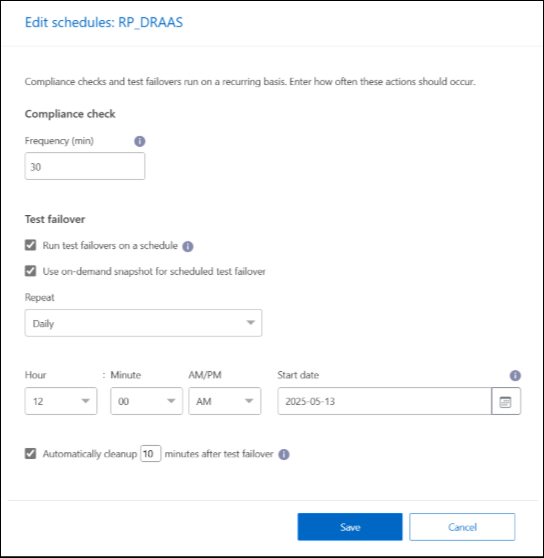
Select the Actions
 icon and select Edit schedules.
 -
Enter how frequently in minutes that you want NetApp Disaster Recovery to check test compliance.
-
To check that your failover tests are healthy, check Run failovers on a monthly schedule.
-
Select the day of the month and time you want these tests to run.
-
Enter the date in yyyy-mm-dd format when you want the test to start.
-
-
Use ondemand snapshot for scheduled test failover: To take a new snapshot before initiating the automated test failover, check this box.
-
To clean up the test environment after the failover test finishes, check Automatically clean up after test failover and enter the number of minutes you want to wait before the cleanup starts.
This process unregisters the temporary VMs from the test location, deletes the FlexClone volume that was created, and unmounts the temporary datastores. -
Select Save.