

Recover from a ransomware attack with a custom restore in NetApp Ransomware Resilience
 Suggest changes
With Ransomware Resilience, storage administrators can determine how best to restore workloads either from the recommended restore point or the preferred restore point.

|
Ransomware Resilience also supports a clean restore option, which provides guided recovery and advanced capabilities to ensure only clean and unencrypted data is recovered. |
Restore a workload
Required Console role
Organization admin, Folder or project admin, or Ransomware protection admin. Learn about Console access roles for all services.
The security storage admin can recover data at different levels:
-
Recover all volumes
-
Recover a file share at the volume level, directory, or file level.
-
Recover from a datastore at a VM level.
The process differs depending on the workload type.
-
From the Ransomware Resilience menu, select Recovery.
-
Review the workload information in the Recovery page.
-
Select a workload that is in the "Restore needed" state.
-
To restore, select Restore.
-
Select Custom restore to proceed without cleaning the files.
-
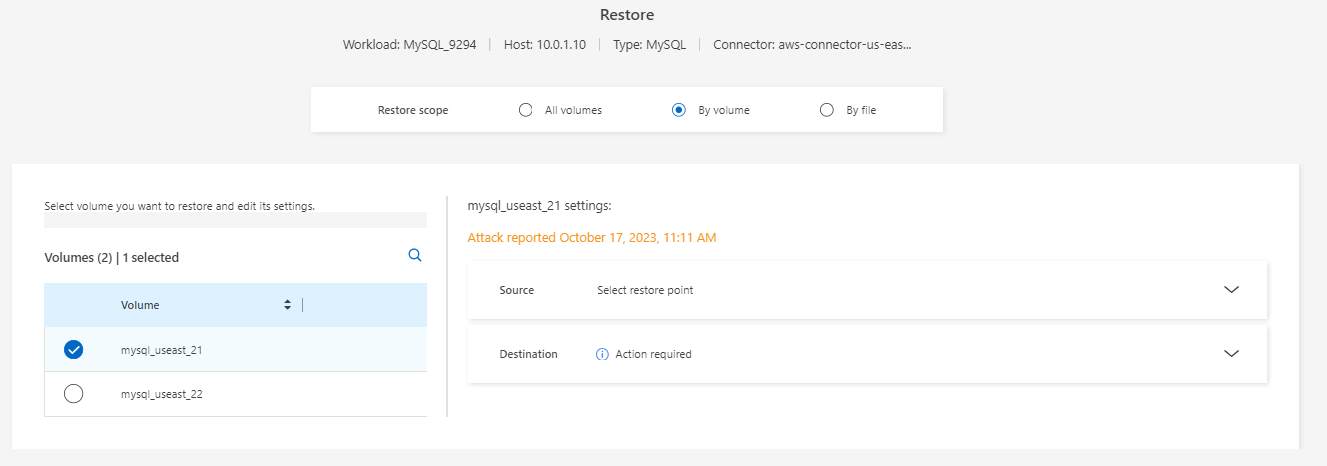
Restore scope: Select the type of restore you want to complete:
-
All volumes
-
By volume
-
By file: You can specify a folder or single files to restore.

For SAN workloads, you can only restore by workload.
You can select up to 100 files or a single folder.
-
-
Continue with one of the following procedures depending on whether you chose volume or file.
Restore all volumes
-
From the Ransomware Resilience menu, select Recovery.
-
Select a workload in the "Restore needed" state.
-
To restore, select Restore.
-
On the Restore page, in the Restore scope, select All volumes.

-
Source: Select the down arrow next to Source to see details.
-
Select the restore point that you want to use to restore the data.
Ransomware Resilience identifies the best restore point as the latest backup just before the incident and shows a "Safest for all volumes" indication. This means that all volumes will be restored to a copy prior to the first attack on the first volume detected.
-
-
Destination: Select the down arrow next to Destination to see details.
-
Select the system.
-
Select the Storage VM.
-
Select the aggregate.
-
Change the volume prefix that will be prepended to all new volumes.
The new volume name appears as prefix + original volume name + backup name + backup date.
-
-
Select Save.
-
Select Next.
-
Review your selections.
-
Select Restore.
-
From the top menu, select Recovery to review the workload on the Recovery page where the status of the operation moves through the states.
Restore a workload at the volume level
-
From the Ransomware Resilience menu, select Recovery.
-
Select a workload in the "Restore needed" state.
-
To restore, select Restore.
-
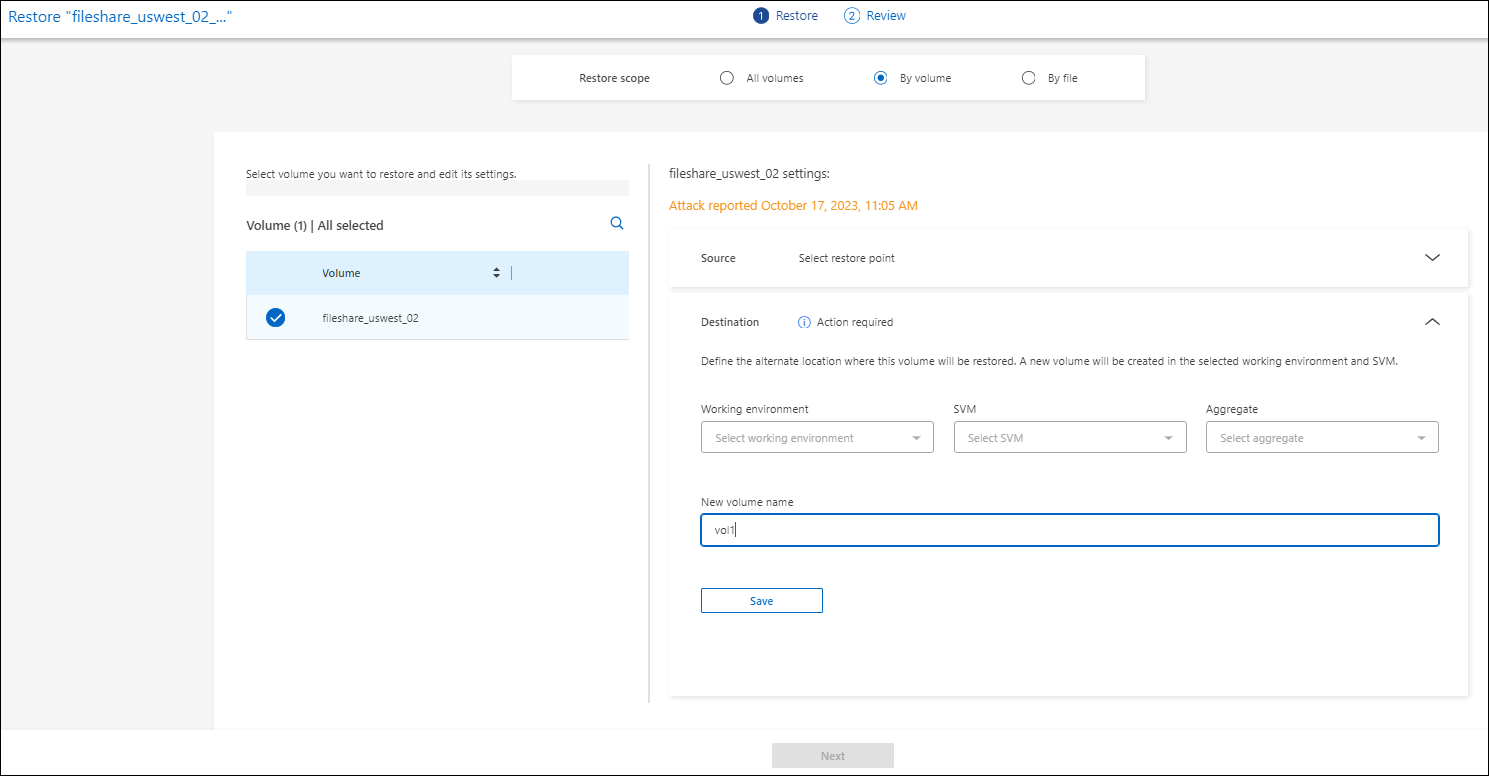
On the Restore page, in the Restore scope, select By volume.
-
On the list of volumes, select the volume you want to restore.
-
Source: Select the down arrow next to Source to see details.
-
Select the restore point that you want to use to restore the data.
Ransomware Resilience identifies the best restore point as the latest backup just before the incident and shows a "Recommended" indication.
-
-
Destination: Select the down arrow next to Destination to see details.
-
Select the system.
-
Select the Storage VM.
-
Select the aggregate.
-
Review the new volume name.
The new volume name appears as the original volume name + backup name + backup date.
-
-
Select Save.
-
Select Next.
-
Review your selections.
-
Select Restore.
-
From the top menu, select Recovery to review the workload on the Recovery page where the status of the operation moves through the states.
Restore a workload at the file level
Before you restore a workload at the file level, you can view a list of impacted files. You can access the Alerts page to download a list of impacted files. Then use the Recovery page to upload the list and choose which files to restore.
You can restore a workload at the file level to the same or different system.
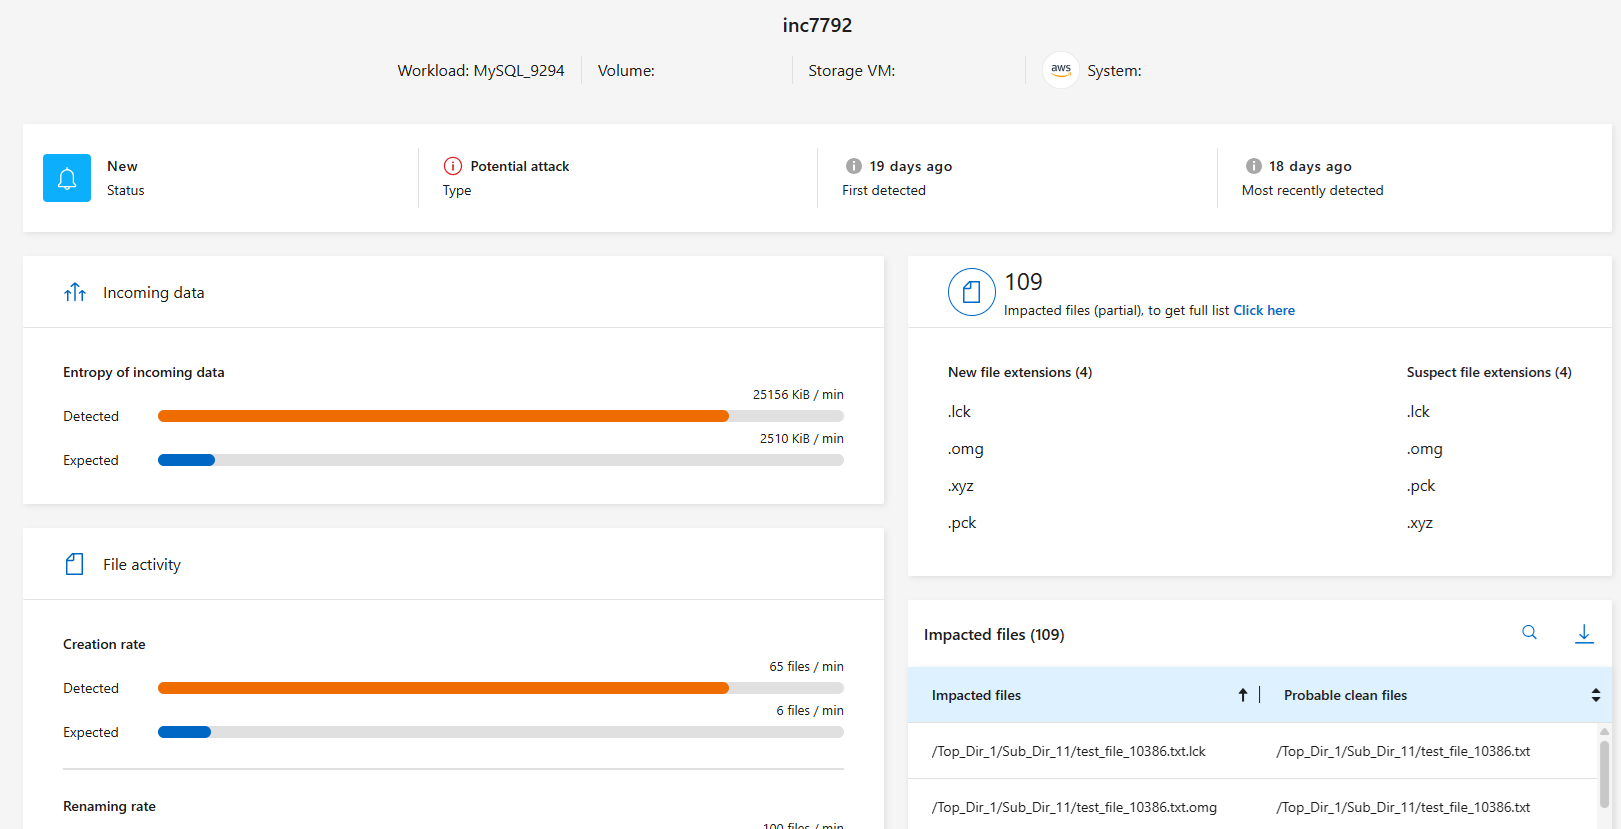
Retrieve a list of impacted files
Use the Alerts page to retrieve the list of impacted files.
|
|
If a volume has multiple alerts, you need to download the CSV list of impacted files for each alert. |
-
From the Ransomware Resilience menu, select Alerts.
-
On the Alerts page, sort the results by workload to show the alerts for the workload that you want to restore.
-
From the list of alerts for that workload, select an alert.
-
For that alert, select a single incident.
-
To see the full list of files, select Click here at the top of the Impacted files pane.
-
For that incident, select the download icon and download the list of impacted files in CSV format.
Restore the files
After assessing the impacted files, you can restore them.
-
From the Ransomware Resilience menu, select Recovery.
-
Select a workload in the "Restore needed" state.
-
Select Restore.
-
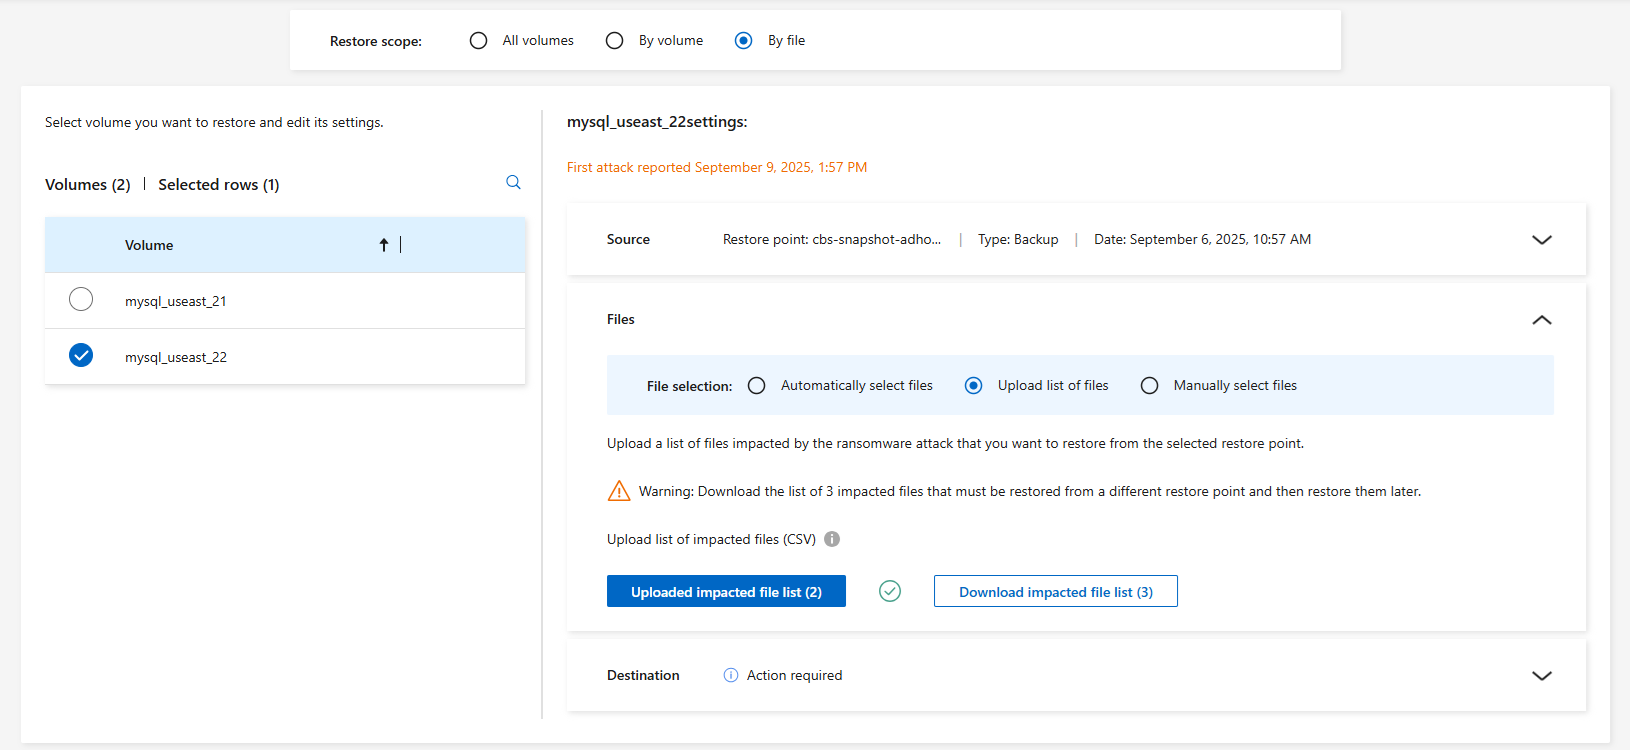
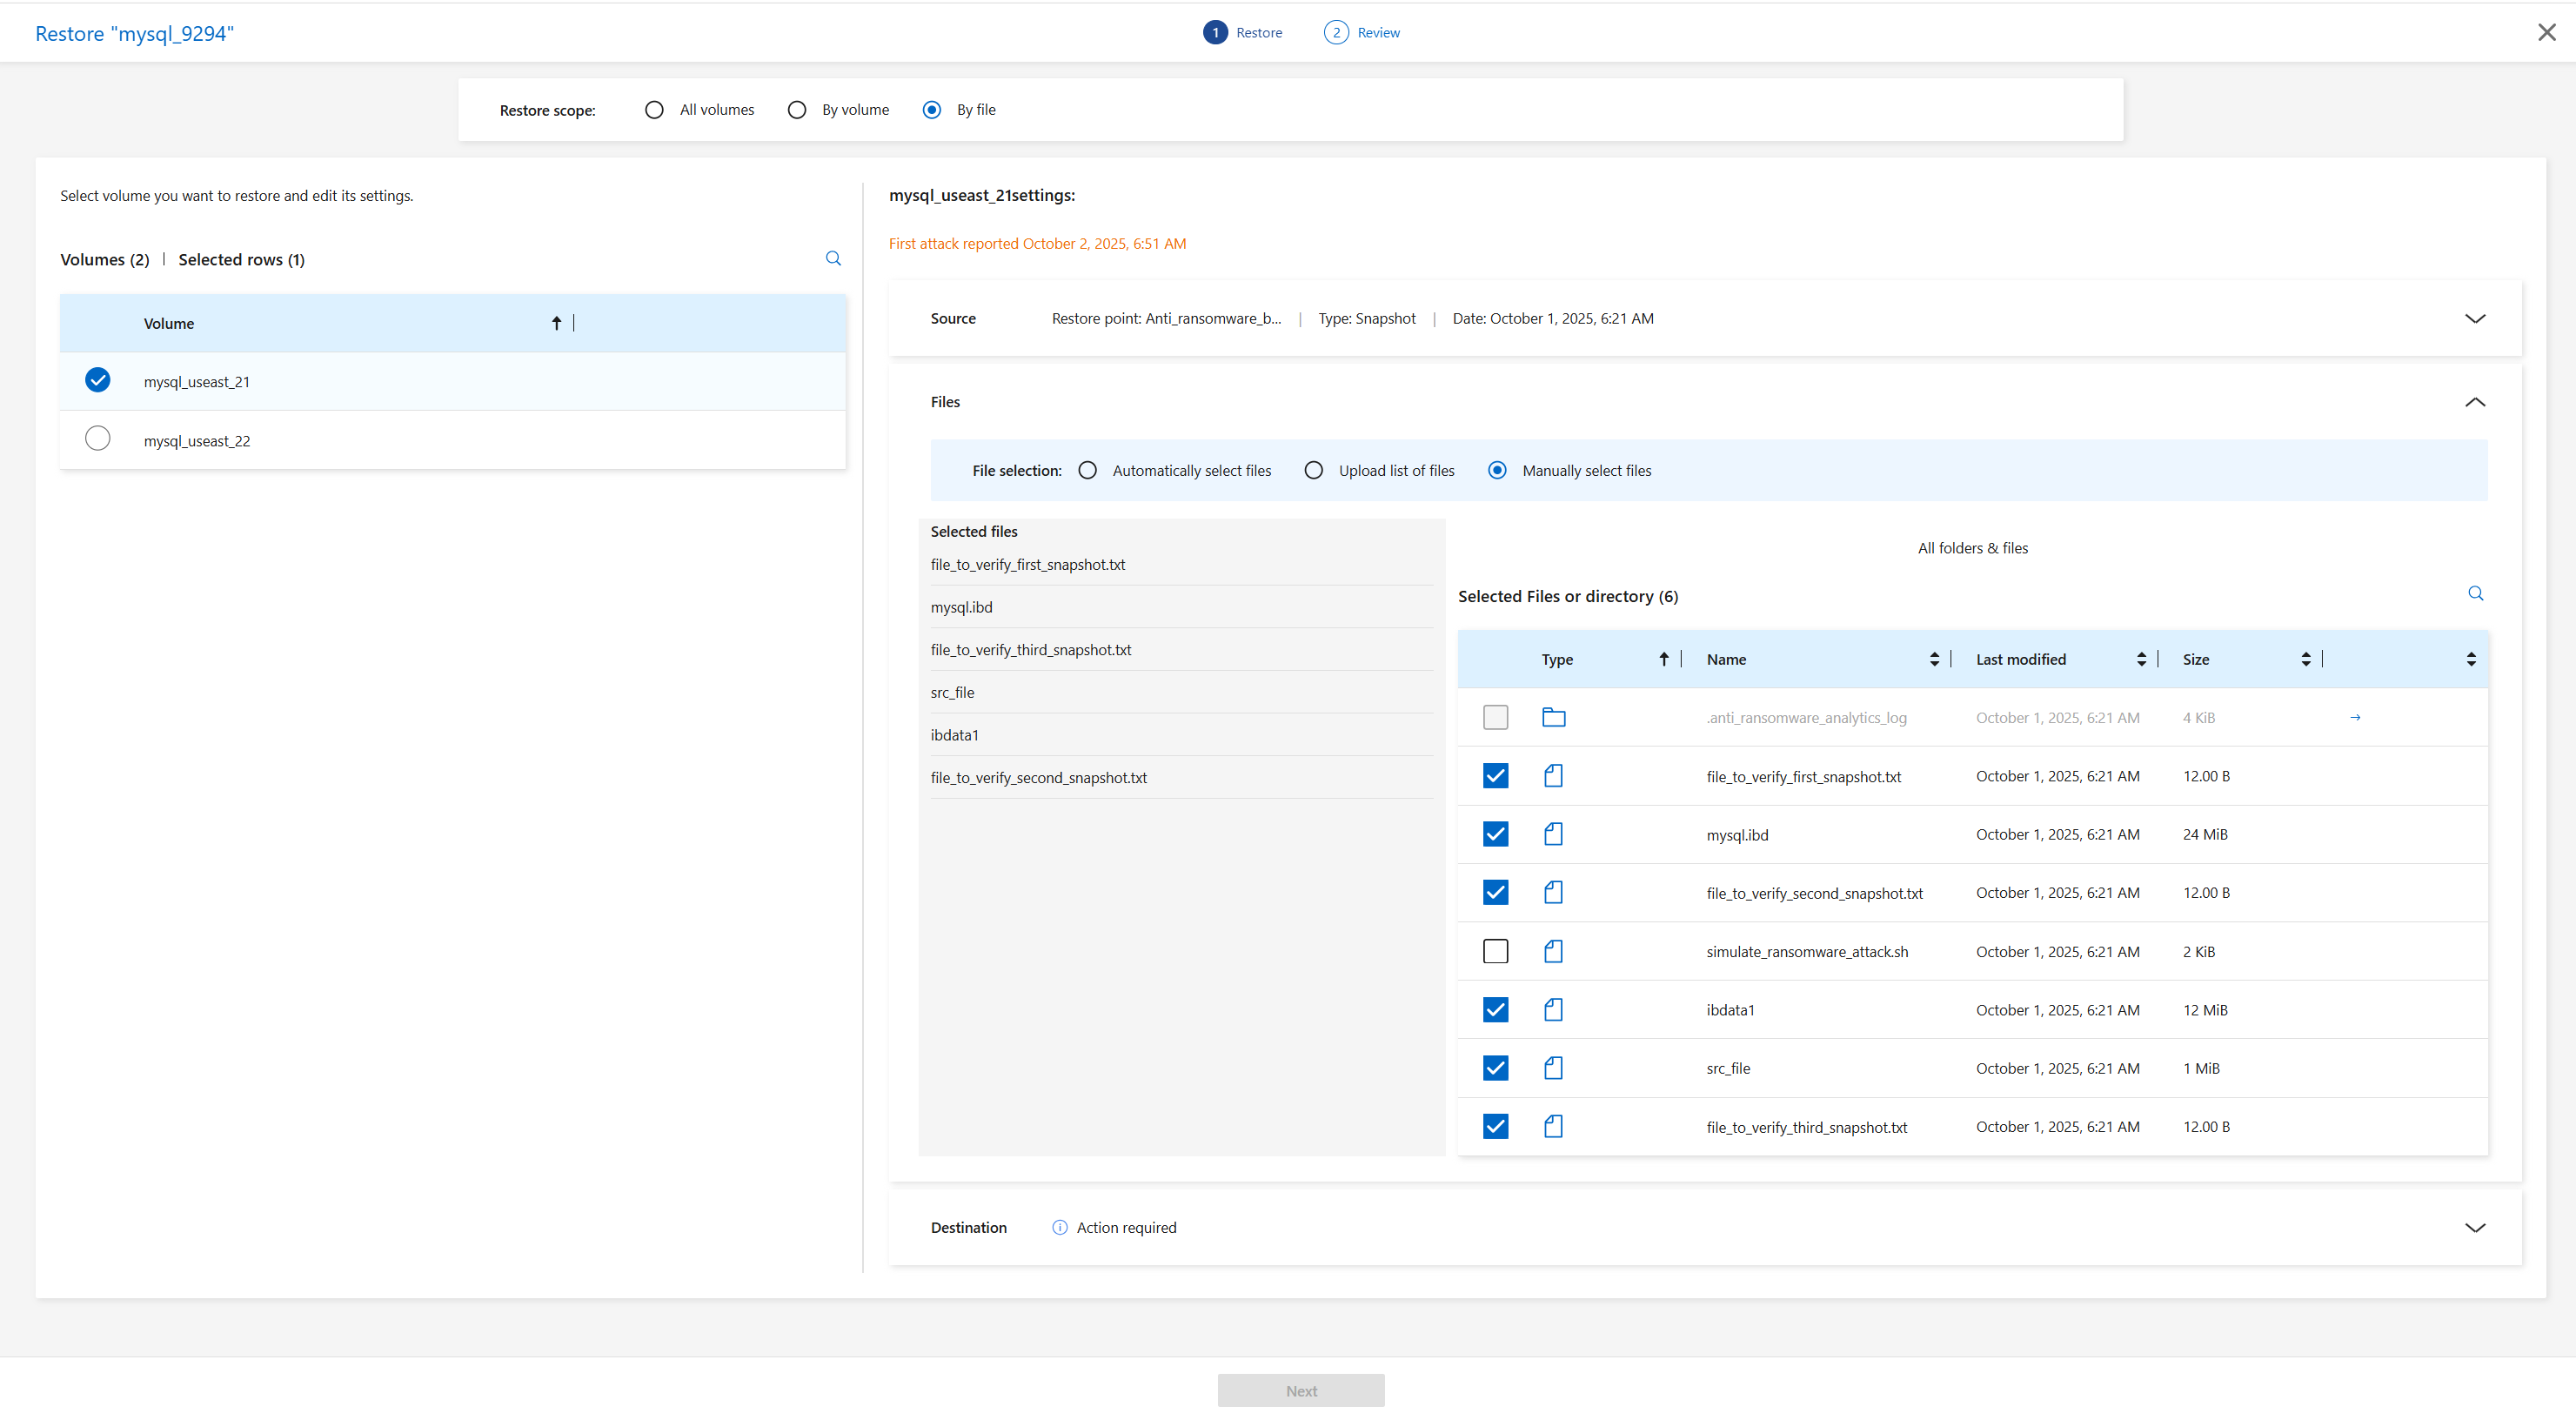
On the Restore page, in the Restore scope, select By file.
-
On the list of volumes, select the volume that contains the files that you want to restore.
-
Restore point: Select the down arrow next to Restore point to see details. Select the restore point that you want to use to restore the data.

The Reason column in the Restore points pane shows the reason for the snapshot or backup as either "Scheduled" or "Automated response to ransomware incident." -
Files:
-
Automatically select files: Let Ransomware Resilience select the files to be restored.
-
Upload list of files: Upload a CSV file that contains the list of impacted files that you got from the Alerts page or that you have. You can restore up to 10,000 files at a time.
-
Manually select files: Select up to 10,000 files or a single folder to restore.
If any files cannot be restored using the selected restore point, a message appears indicating the number of files that cannot be restored and lets you download the list of those files by selecting Download list of impacted files.
-
-
Destination: Select the down arrow next to Destination to see details.
-
Choose where to restore the data: original source location or an alternate location that you can specify.
While the original files or directory will be overwritten by the restored data, the original file and folder names will remain the same unless you specify new names. -
Select the system.
-
Select the Storage VM.
-
Optionally, enter the path.
If you don't specify a path for the restore, the files will be restored to a new volume at the top-level directory. -
Select whether you want the names of the restored files or directory to be the same names as the current location or different names.
-
-
Select Next.
-
Review your selections.
-
Select Restore.
-
From the top menu, select Recovery to review the workload on the Recovery page where the status of the operation moves through the states.
Restore a file share or datastore
-
After selecting a file share or datastore to restore, on the Restore page, in the Restore scope, select By volume.
-
On the list of volumes, select the volume you want to restore.
-
Source: Select the down arrow next to Source to see details.
-
Select the restore point that you want to use to restore the data.
Ransomware Resilience identifies the best restore point as the latest backup just before the incident and shows a "Recommended" indication.
-
-
Destination: Select the down arrow next to Destination to see details.
-
Choose where to restore the data: original source location or an alternate location that you can specify.
While the original files or directory will be overwritten by the restored data, the original file and folder names will remain the same unless you specify new names. -
Select the system.
-
Select the Storage VM.
-
Optionally, enter the path.
If you don't specify a path for the restore, the files will be restored to a new volume at the top-level directory.
-
-
Select Save.
-
Review your selections.
-
Select Restore.
-
From the menu, select Recovery to review the workload on the Recovery page where the status of the operation moves through the states.
Restore a VM file share at the VM level
On the Recovery page after you selected a VM to restore, continue with these steps.
-
Source: Select the down arrow next to Source to see details.
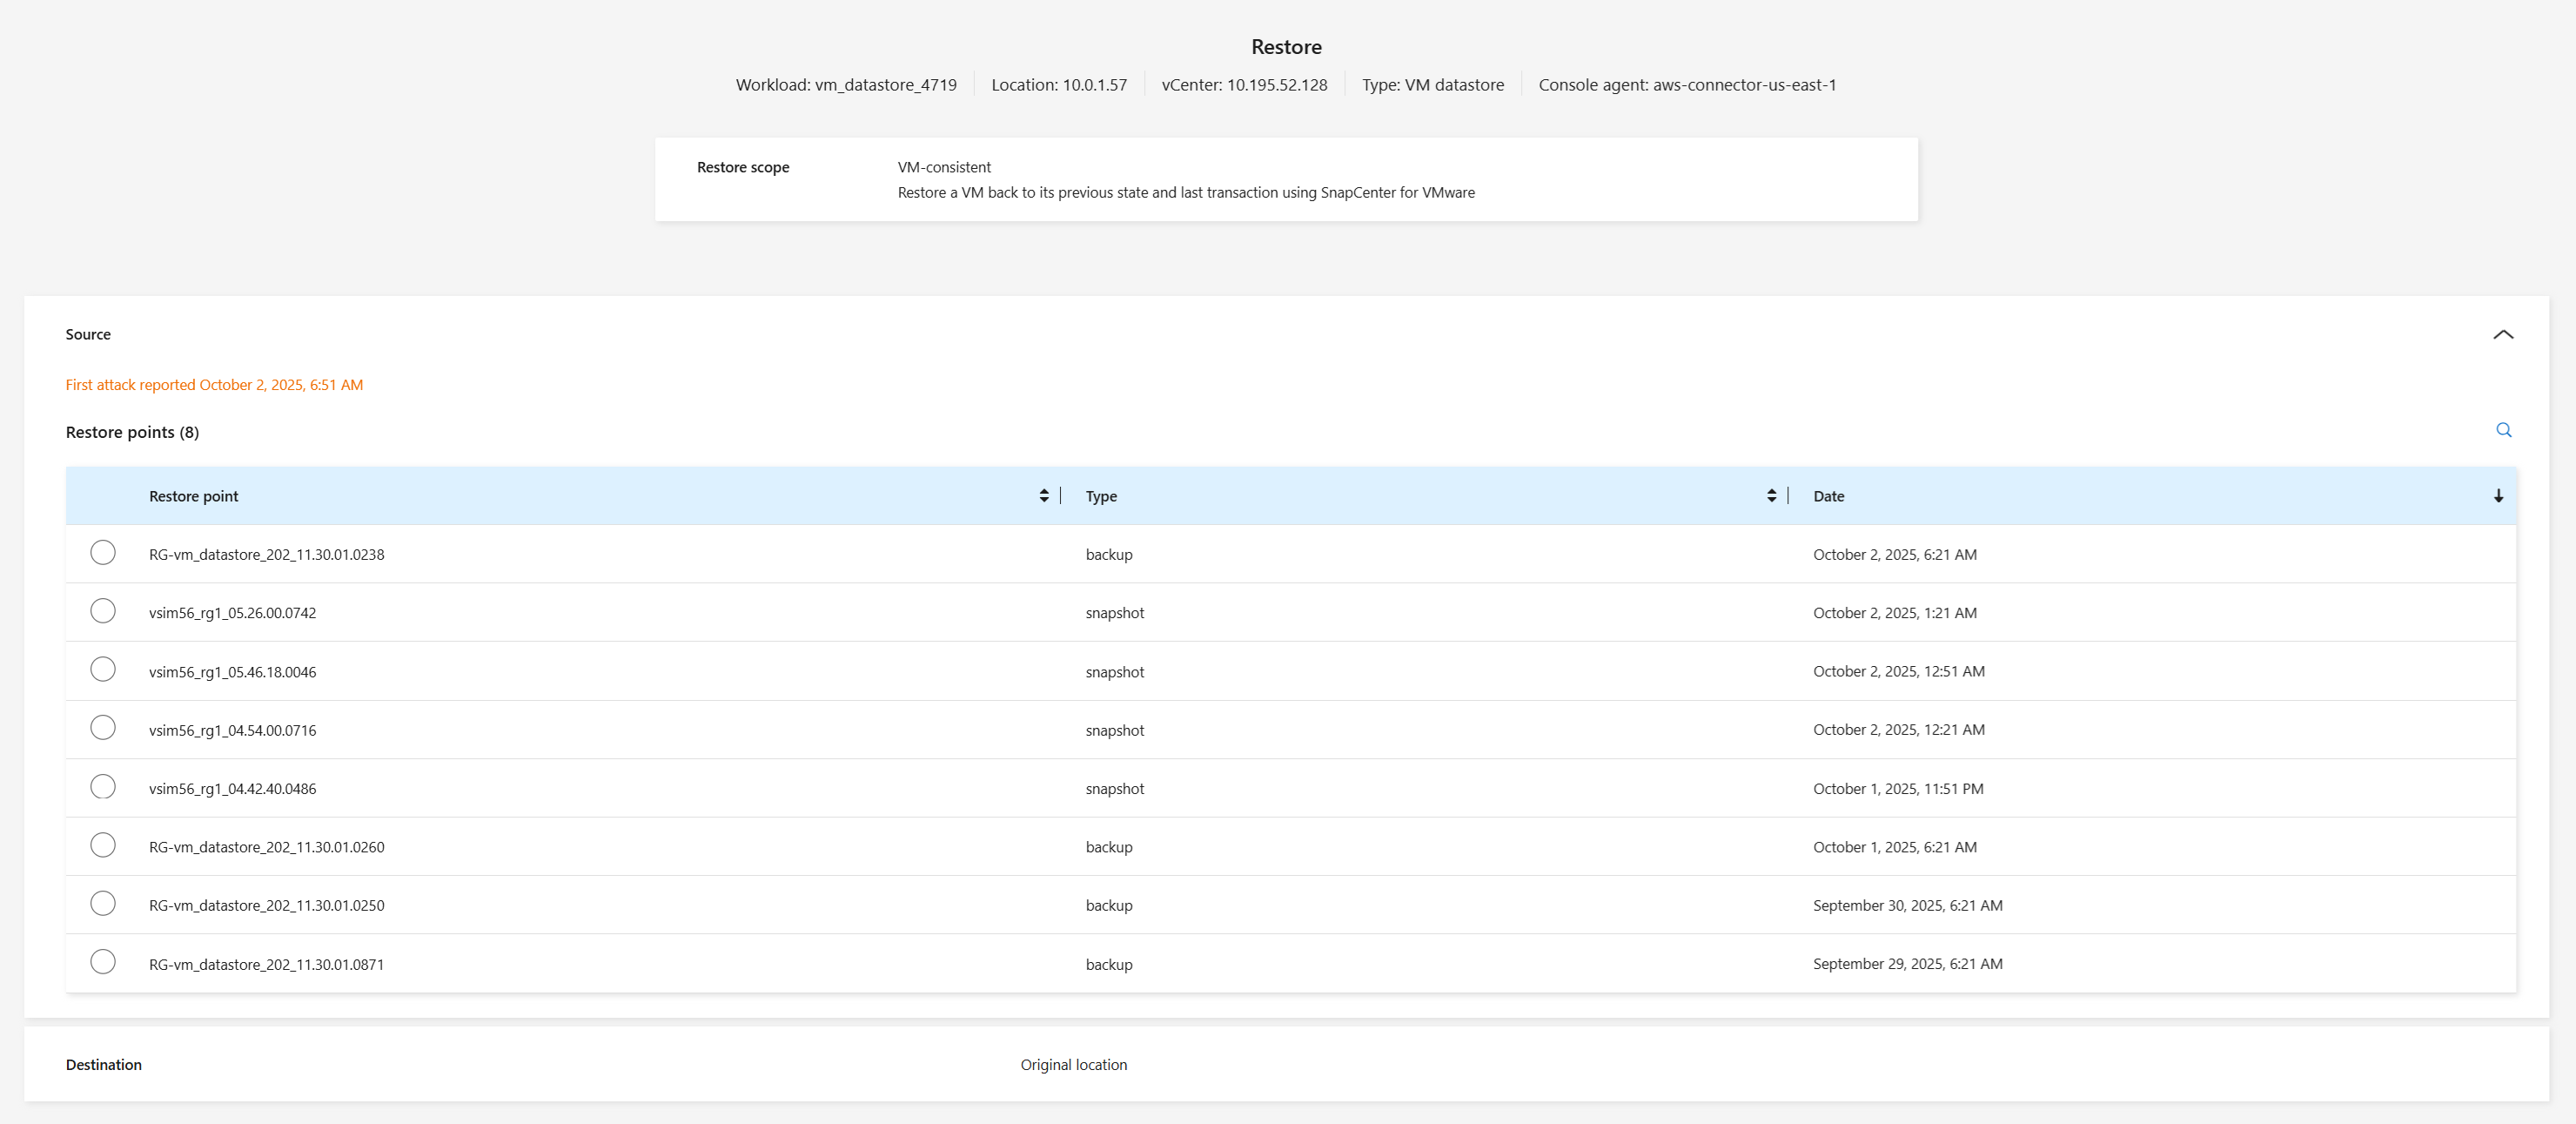
-
Select the restore point that you want to use to restore the data.
-
Destination: To original location.
-
Select Next.
-
Review your selections.
-
Select Restore.
-
From the menu, select Recovery to review the workload on the Recovery page where the status of the operation moves through the states.