Replace a controller in duplex configuration - E2800
 Suggest changes


You can replace a controller canister in a duplex (two-controller) configuration, for the following controller shelves:
-
E2812 controller shelf
-
E2824 controller shelf
-
E2860 controller shelf
-
EF280 flash array
Each controller canister contains a controller card, a battery, and an optional host interface card (HIC). When you replace a controller canister, you must remove the battery and HIC, if one is installed, from the original controller canister, and install them in the replacement controller canister.
Make sure you have the following:
-
A replacement controller canister with the same part number as the controller canister you are replacing. (See step 1 to verify the part number.)
-
An ESD wristband, or you have taken other antistatic precautions.
-
#1 Phillips screwdriver.
-
Labels to identify each cable that is connected to the controller canister.
-
A management station with a browser that can access SANtricity System Manager for the controller. (To open the System Manager interface, point the browser to the controller's domain name or IP address.)
Step 1: Prepare to replace controller (duplex)
Prepare to replace the controller by verifying that the replacement controller canister has the correct FRU part number, backing up the configuration, and collecting support data. If the controller is still online, you must take it offline.
-
Unpack the new controller canister, and set it on a flat, static-free surface.
Save the packing materials to use when shipping the failed controller canister.
-
Locate the MAC address and FRU part number labels on the back of the controller canister.

(1) MAC address: The MAC address for management port 1 (“P1”). If you used DHCP to obtain the original controller's IP address, you need this address to connect to the new controller.
(2) FRU part number: This number must match the replacement part number for the currently installed controller.
-
From SANtricity System Manager, locate the replacement part number for the controller canister you are replacing.
When a controller has a fault and needs to be replaced, the replacement part number is displayed in the Details area of the Recovery Guru. If you need to find this number manually, follow these steps:
-
Select Hardware.
-
Locate the controller shelf, which is marked with the controller icon
 .
. -
Click the controller icon.
-
Select the controller, and click Next.
-
On the Base tab, make a note of the Replacement Part Number for the controller.
-
-
Confirm that the replacement part number for the failed controller is the same as the FRU part number for the replacement controller.
Possible loss of data access — If the two part numbers are not the same, do not attempt this procedure. In addition, if the failed controller canister includes a host interface card (HIC), you must install that HIC into the new controller canister. The presence of mismatched controllers or HICs will cause the new controller to lock down when you bring it online. -
Back up the storage array's configuration database using SANtricity System Manager.
If a problem occurs when you remove a controller, you can use the saved file to restore your configuration. The system will save the current state of the RAID configuration database, which includes all data for volume groups and disk pools on the controller.
-
From System Manager:
-
Select .
-
Select Collect Configuration Data.
-
Click Collect.
The file is saved in the Downloads folder for your browser with the name, configurationData-<arrayName>-<dateTime>.7z.
-
-
Alternatively, you can back up the configuration database by using the following CLI command:
save storageArray dbmDatabase sourceLocation=onboard contentType=all file="filename";
-
-
Collect support data for your storage array using SANtricity System Manager.
If a problem occurs when you remove a controller, you can use the saved file to troubleshoot the issue. The system will save inventory, status, and performance data about your storage array in a single file.
-
Select .
-
Select Collect Support Data.
-
Click Collect.
The file is saved in the Downloads folder for your browser with the name, support-data.7z.
-
-
If the controller is not already offline, take it offline now using SANtricity System Manager.
-
From SANtricity System Manager:
-
Select Hardware.
-
If the graphic shows the drives, select Show back of shelf to show the controllers.
-
Select the controller that you want to place offline.
-
From the context menu, select Place offline, and confirm that you want to perform the operation.
If you are accessing SANtricity System Manager using the controller you are attempting to take offline, a SANtricity System Manager Unavailable message is displayed. Select Connect to an alternate network connection to automatically access SANtricity System Manager using the other controller.
-
-
Alternatively, you can take the controllers offline by using the following CLI commands:
For controller A:
set controller [a] availability=offlineFor controller B:
set controller [b] availability=offline
-
-
Wait for SANtricity System Manager to update the controller's status to offline.
Do not begin any other operations until after the status has been updated. -
Select Recheck from the Recovery Guru, and confirm that the OK to remove field in the Details area displays Yes, indicating that it is safe to remove this component.
Step 2: Remove failed controller (duplex)
Replace the failed canister with a new one.
Step 2a: Remove controller canister (duplex)
Remove the failed controller canister so you can replace it with a new one.
-
Put on an ESD wristband or take other antistatic precautions.
-
Label each cable that is attached to the controller canister.
-
Disconnect all the cables from the controller canister.
To prevent degraded performance, do not twist, fold, pinch, or step on the cables. -
If the controller canister has a HIC that uses SFP+ transceivers, remove the SFPs.
Because you must remove the HIC from the failed controller canister, you must remove any SFPs from the HIC ports. However, you can leave any SFPs installed in the baseboard host ports. When you reconnect the cables, you can move those SFPs to the new controller canister.
-
Confirm that the Cache Active LED on the back of the controller is off.
-
Squeeze the latch on the cam handle until it releases, and then open the cam handle to the right to release the controller canister from the shelf.
The following figure is an example of an E2812 controller shelf, E2824 controller shelf, or EF280 flash array:
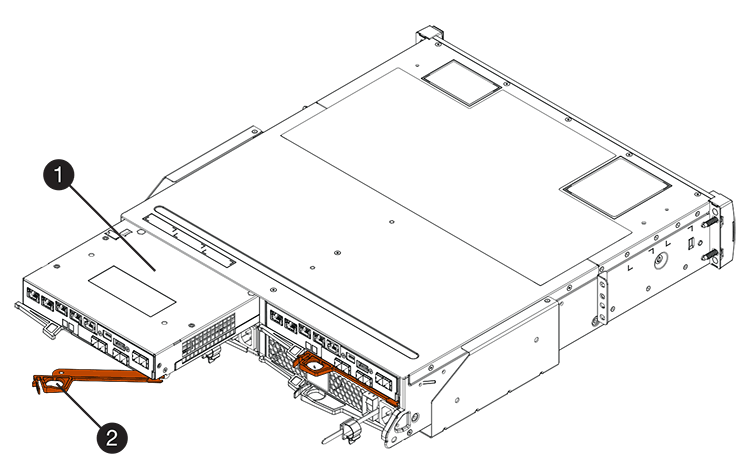
(1) Controller canister
(2) Cam handle
The following figure is an example of an E2860 controller shelf:
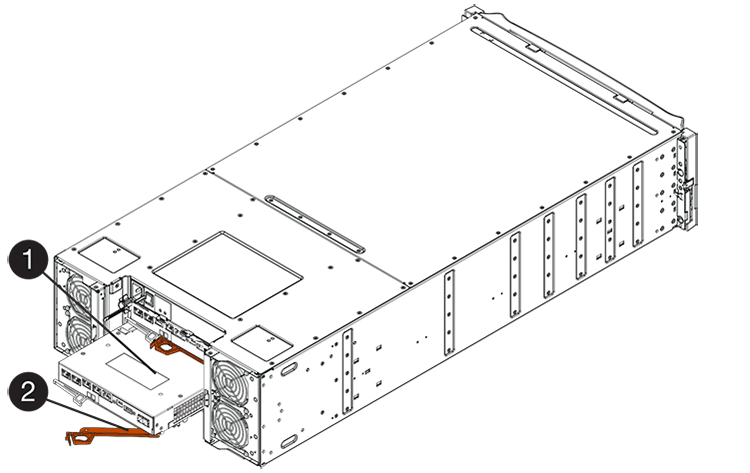
(1) Controller canister
(2) Cam handle
-
Using two hands and the cam handle, slide the controller canister out of the shelf.
Always use two hands to support the weight of a controller canister. If you are removing the controller canister from an E2812 controller shelf, E2824 controller shelf, or EF280 flash array, a flap swings into place to block the empty bay, helping to maintain air flow and cooling.
-
Turn the controller canister over, so that the removable cover faces up.
-
Place the controller canister on a flat, static-free surface.
Step 2b: Remove battery (duplex)
Remove the battery so you can install the new controller.
-
Remove the controller canister's cover by pressing down on the button and sliding the cover off.
-
Confirm that the green LED inside the controller (between the battery and the DIMMs) is off.
If this green LED is on, the controller is still using battery power. You must wait for this LED to go off before removing any components.
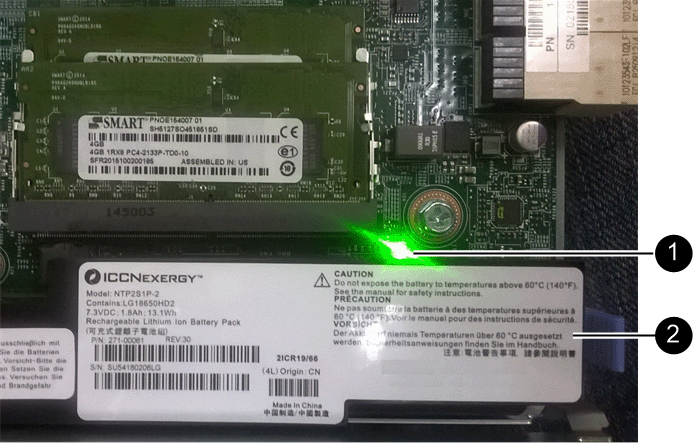
(1) Internal Cache Active LED
(2) Battery
-
Locate the blue release latch for the battery.
-
Unlatch the battery by pushing the release latch down and away from the controller canister.
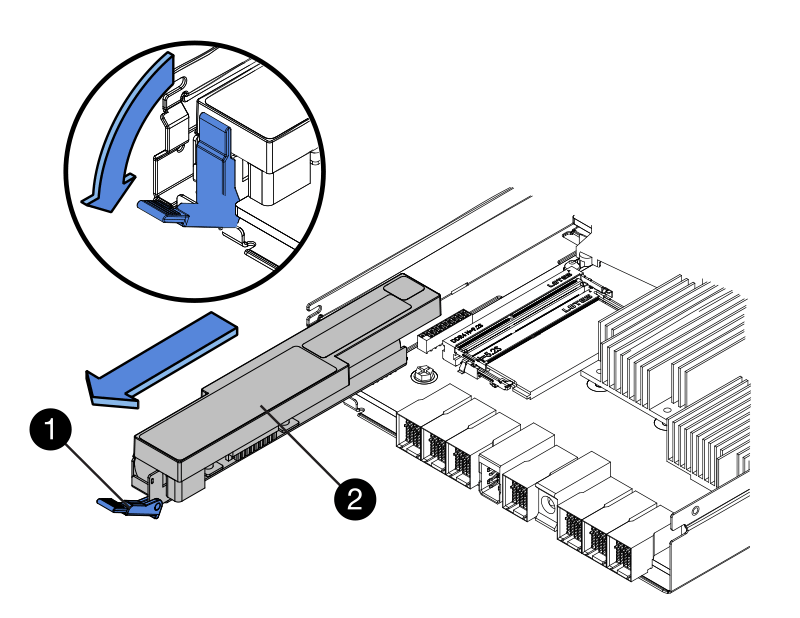
(1) Battery release latch
(2) Battery
-
Lift up on the battery, and slide it out of the controller canister.
Step 2c: Remove host interface card (duplex)
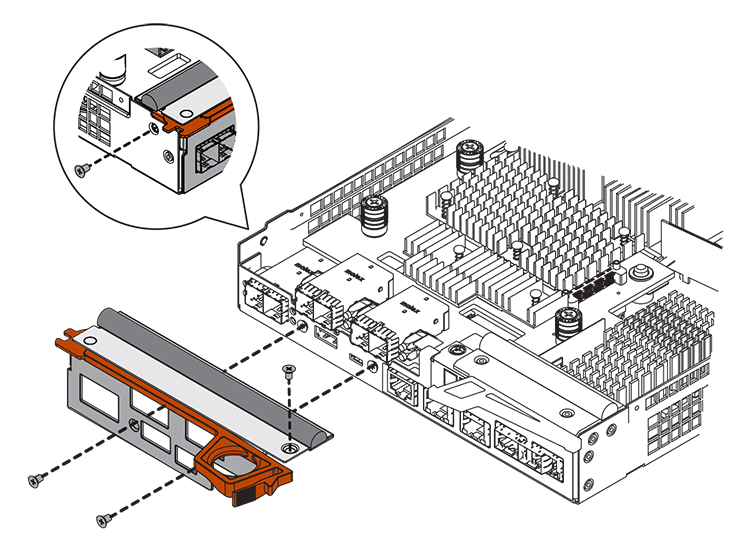
If the controller canister includes a host interface card (HIC), you must remove the HIC from the original controller canister, so you can reuse it in the new controller canister.
-
Using a #1 Phillips screwdriver, remove the screws that attach the HIC faceplate to the controller canister.
There are four screws: one on the top, one on the side, and two on the front.
-
Remove the HIC faceplate.
-
Using your fingers or a Phillips screwdriver, loosen the three thumbscrews that secure the HIC to the controller card.
-
Carefully detach the HIC from the controller card by lifting the card up and sliding it back.
Be careful not to scratch or bump the components on the bottom of the HIC or on the top of the controller card. 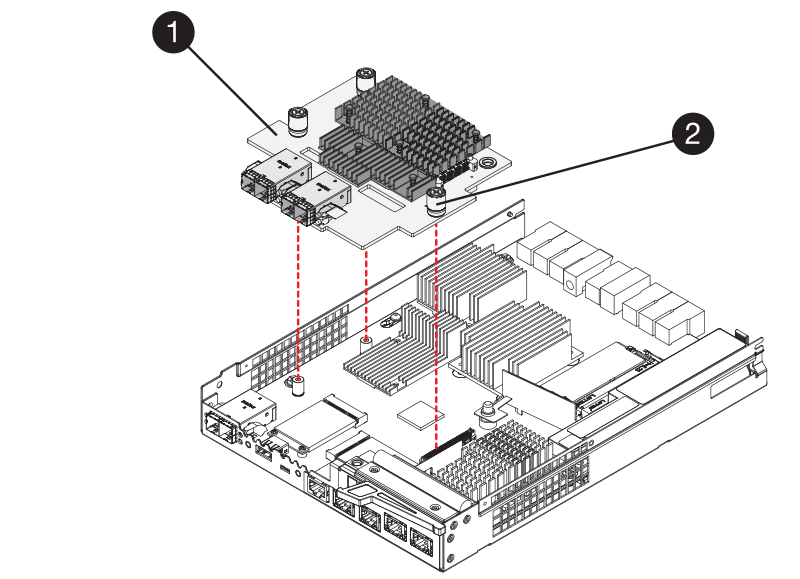
(1) Host interface card (HIC)
(2) Thumbscrews
-
Place the HIC on a static-free surface.
Step 3: Install new controller (duplex)
Install a new controller canister to replace the failed one. Perform this task only if your storage array has two controllers (duplex configuration).
Step 3a: Install battery (duplex)
You must install the battery into the replacement controller canister. You can install the battery that you removed from the original controller canister or install a new battery that you ordered.
-
Turn the replacement controller canister over, so that the removable cover faces up.
-
Press down on the cover button, and slide the cover off.
-
Orient the controller canister so that the slot for the battery faces toward you.
-
Insert the battery into the controller canister at a slight downward angle.
You must insert the metal flange at the front of the battery into the slot on the bottom of the controller canister and slide the top of the battery beneath the small alignment pin on the left side of the canister.
-
Move the battery latch up to secure the battery.
When the latch clicks into place, the bottom of the latch hooks into a metal slot on the chassis.
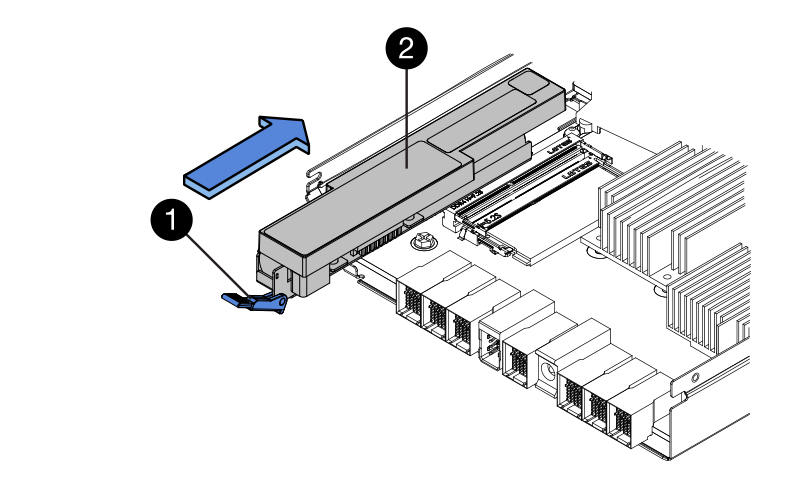
(1) Battery release latch
(2) Battery
-
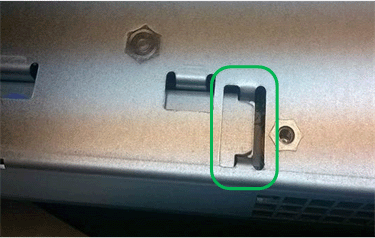
Turn the controller canister over to confirm that the battery is installed correctly.
Possible hardware damage — The metal flange at the front of the battery must be completely inserted into the slot on the controller canister (as shown in the first figure). If the battery is not installed correctly (as shown in the second figure), the metal flange might contact the controller board, causing damage to the controller when you apply power. -
Correct — The battery's metal flange is completely inserted in the slot on the controller:
-
Incorrect — The battery's metal flange is not inserted into the slot on the controller:
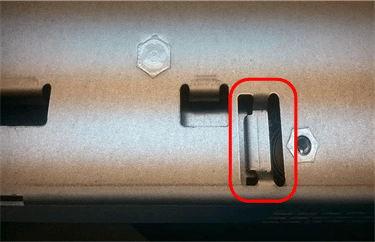
-
Step 3b: Install host interface card (duplex)
If you removed a HIC from the original controller canister, you must install that HIC in the new controller canister.
-
Using a #1 Phillips screwdriver, remove the four screws that attach the blank faceplate to the replacement controller canister, and remove the faceplate.
-
Align the three thumbscrews on the HIC with the corresponding holes on the controller, and align the connector on the bottom of the HIC with the HIC interface connector on the controller card.
Be careful not to scratch or bump the components on the bottom of the HIC or on the top of the controller card.
-
Carefully lower the HIC into place, and seat the HIC connector by pressing gently on the HIC.
Possible equipment damage — Be very careful not to pinch the gold ribbon connector for the controller LEDs between the HIC and the thumbscrews. 
(1) Host interface card (HIC)
(2) Thumbscrews
-
Hand-tighten the HIC thumbscrews.
Do not use a screwdriver, or you might over tighten the screws.
-
Using a #1 Phillips screwdriver, attach the HIC faceplate you removed from the original controller canister to the new controller canister with four screws.

Step 3c: Install new controller canister (duplex)
After installing the battery and the host interface card (HIC), if one was initially installed, you can install the new controller canister into the controller shelf.
-
Reinstall the cover on the controller canister by sliding the cover from back to front until the button clicks.
-
Turn the controller canister over, so that the removable cover faces down.
-
With the cam handle in the open position, slide the controller canister all the way into the controller shelf.

(1) Controller canister
(2) Cam handle

(1) Controller canister
(2) Cam handle
-
Move the cam handle to the left to lock the controller canister in place.
-
Install the SFPs from the original controller in the host ports on the new controller, and reconnect all the cables.
If you are using more than one host protocol, be sure to install the SFPs in the correct host ports.
-
If the original controller used DHCP for the IP address, locate the MAC address on the label on the back of the replacement controller. Ask your network administrator to associate the DNS/network and IP address for the controller you removed with the MAC address for the replacement controller.
If the original controller did not use DHCP for the IP address, the new controller will adopt the IP address of the controller you removed.
Step 4: Complete controller replacement (duplex)
Place the controller online, collect support data, and resume operations.
-
As the controller boots, check the controller LEDs and the seven-segment display.
When communication with the other controller is reestablished:
-
The seven-segment display shows the repeating sequence OS, OL, blank to indicate that the controller is offline.
-
The amber Attention LED remains on.
-
The Host Link LEDs might be on, blinking, or off, depending on the host interface.

(1) Attention LED (amber)
(2) Seven-segment display
(3) Host Link LEDs
-
-
Check the codes on the controller's seven-segment display as it comes back online. If the display shows one of the following repeating sequences, immediately remove the controller.
-
OE, L0, blank (mismatched controllers)
-
OE, L6, blank (unsupported HIC)
Possible loss of data access — If the controller you just installed shows one these codes, and the other controller is reset for any reason, the second controller could also lock down.
-
-
When the controller is back online, check whether an NVSRAM mismatch is reported in Recovery Guru.
-
If an NVSRAM mismatch is reported, upgrade NVSRAM using the following SMcli command:
SMcli <controller A IP> <controller B IP> -u admin -p <password> -k -c "download storageArray NVSRAM file=\"C:\Users\testuser\Downloads\NVSRAM .dlp file>\" forceDownload=TRUE;"
The
-kparameter is needed if the array is not https secure.
If the SMcli command cannot be completed, contact NetApp Technical Support or log in to the NetApp Support Site to create a case. -
-
Confirm the status of the system is Optimal and check the controller shelf's Attention LEDs.
If the status is not Optimal or if any of the Attention LEDs are on, confirm that all cables are correctly seated and the controller canister is installed correctly. If necessary, remove and reinstall the controller canister.
If you cannot resolve the problem, contact technical support. -
If required, redistribute all volumes back to their preferred owner using SANtricity System Manager.
-
Select .
-
Select .
-
-
Click to ensure that the firmware and NVSRAM versions on the system are at the desired levels.
As needed, install the latest version.
-
Collect support data for your storage array using SANtricity System Manager.
-
Select .
-
Select Collect Support Data.
-
Click Collect.
The file is saved in the Downloads folder for your browser with the name, support-data.7z.
-
Your controller replacement is complete. You can resume normal operations.


