Configuration procedure for SnapCenter Plug-in for VMware
 Suggest changes
This section covers the steps to configure SnapCenter Plug-in for VMware. The following sections will detail how to add storage, create a backup policy, and how to create resource groups.
Adding the storage system
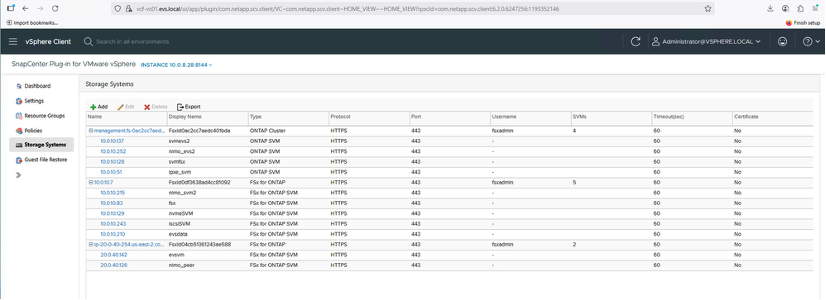
The next step in protecting workloads with SVC is to add the storage system. Adding storage allows SCV to detect and manage back up and restore operations within vCenter. Include the FSx for NetApp ONTAP management endpoint or the storage virtual machine (SVM) administration endpoint IP as a storage system to enable VM backup and restore.
-
From the left navigation menu of the EVS vCenter, select "SnapCenter Plug-in for VMware".
-
Select "Storage System".
-
Select "Add" to add the FSx for ONTAP details.
-
Use the "Credentials as the Authentication" method and enter FSxadmin as the username and password. Then select "Add" to save the settings.

|
All SVMs are automatically added when the file system is added. |
If the SCV version is 6.2, go to the SCV support page and download the SCV 6.2P1 release.
Create a backup policy
A robust backup strategy should define key factors such as the back up schedule, the data to be backed up, and the retention period for backups. Snapshot copies can be scheduled on an hourly or daily basis to protect entire datastores. Scheduling backups this way not only secures the datastores but also supports back up and restore operations for the VMs and VMDKs contained within those datastores.
Before initiating backups for VMs and datastores, create a backup policy and a resource group. The backup policy specifies parameters such as the backup schedule and retention settings.
Here are the steps to create a backup policy:
-
Go to the left-side navigation menu in SCV and select "Policies".
-
On the Policies page, select "Create" to start the wizard.
-
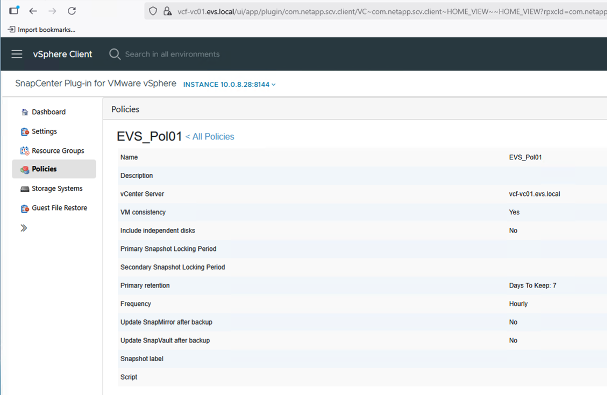
On the "New Backup Policy page", enter a name for the policy.
-
Specify the retention period, the back up frequency, and replication settings.
-
Select the "Locking Period" checkbox to enable Snapshot locking. You can select the primary and secondary Snapshot-locking periods as Days/Months/Years.
|
|
Regardless of the retention value defined in the SnapMirror policy, the secondary Snapshot copy remains intact until the specified secondary snapshot locking period expires. |
|
|
To enable VM-consistent backups, VMware tools must be installed and running. When the VM consistency box is checked, the VMs are first quiesced, then VMware performs a VM-consistent snapshot (excluding memory), and then SCV performs its backup operation, and then VM operations are resumed. |
|
|
To replicate Snapshot copies to a secondary mirror or vault file system, the relationships must be configured beforehand. |

Once the policy is created, the next step is to create the resource group which will define the appropriate NFS or iSCSI datastores and VMs that should be backed up.
Create a resource group
A resource group serves as a container for VMs and datastores that require protection. Resources can be added to or removed from a resource group at any time, providing flexibility in managing backup configurations.
You can create a resource group using the following steps:
-
Go to the left-side navigation pane in SCV and select "Resource Groups".
-
On the Resource Groups page, select "Create" to start the resource group creation wizard.
Another option to create resource groups is by selecting an individual VM or datastore and creating a resource group that contains only that resource. -
On the "Resources" page, select the scope (VMs or datastores) and the data center.
-
On the "Spanning disks" page, select the option for "Virtual Machines with multiple VMDKs across multiple datastores".
-
Next, associate a backup policy. Select an existing policy or create a new back up policy.
-
On the "Schedules" page, configure the backup schedule for each selected policy.
-
Once you make the appropriate selections, select "Finish". This will create a new resource group and add to the resource group list.

Backing up resource groups
Back up operations are executed on all resources defined within a resource group. If a resource group has a policy attached and a schedule configured, back ups occur automatically according to the schedule.
-
In the left navigation of the vCenter web client page, select "SnapCenter Plug-in for VMware" then "Resource Groups".
-
In the Resource Groups page, find the designated resource group and select "Run Now" to start the manual back up.

-
If the resource group has multiple policies configured, select the policy for the back up operation in the "Backup Now" dialog box.
-
Select "OK" to initiate the backup.
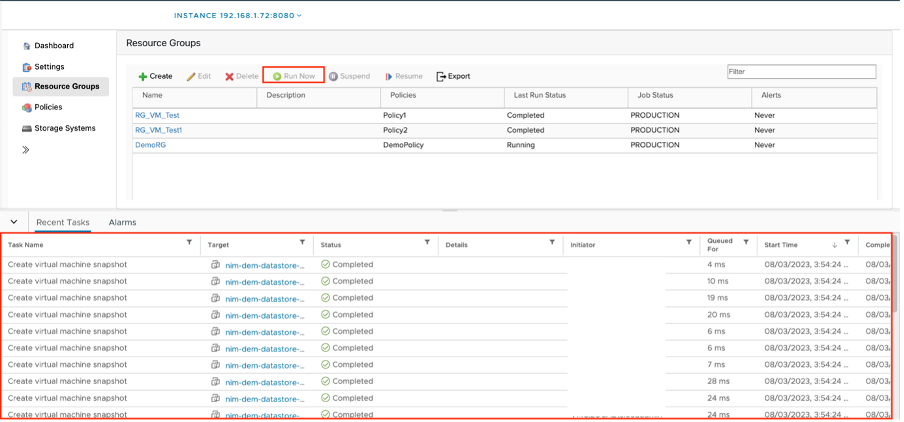
Monitor the operation progress by selecting "Recent Tasks" at the bottom of the window or, for more details, by selecting "Job Monitor" on the dashboard.
|
|
The process for creating back up policies, configuring resource groups, and performing back up operations is consistent across different storage protocols, including NFS and iSCSI. |
|
|
Backups are performed according to the schedule defined in the policy. |
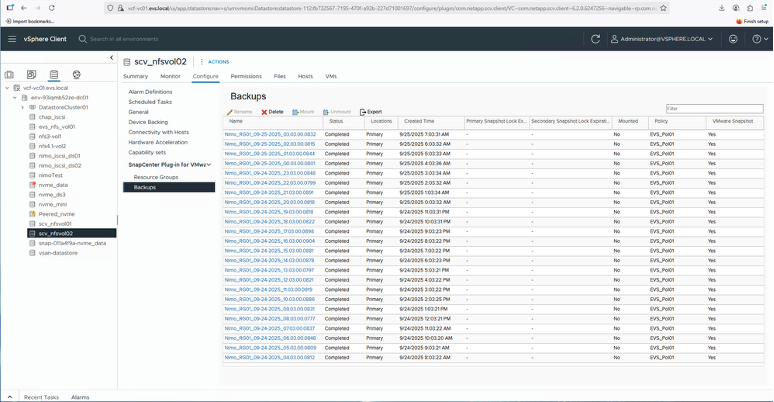
After the back up completes, it can be viewed at the datastore level or for individual VMs by selecting "SnapCenter Plug-in for VMware vSphere" from the drop-down list and then choosing "Restore".