

TR-5002: Oracle Active Data Guard Cost Reduction with Azure NetApp Files
 Suggest changes
The solution provides an overview and details for configuring Oracle Data Guard using Microsoft Azure NetApp Files (ANF) as primary and standby database storage to reduce the licensing and operational cost of the Oracle Data Guard HA/DR solution in the Azure cloud.
Purpose
Oracle Data Guard ensures high availability, data protection, and disaster recovery for enterprise data in a primary database and standby database replication configuration. Oracle Active Data Guard empowers users to access standby databases while data replication is active from the primary database to standby databases. Data Guard is a feature of Oracle Database Enterprise Edition. It does not require separate licensing. On the other hand, Active Data Guard is an Oracle Database Enterprise Edition Option therefore requires separate licensing. Multiple standby databases can receive data replication from a primary database in the Active Data Guard setup. However, each additional standby database requires an Active Data Guard license and extra storage as the size of primary database. The operational costs add up quickly.
If you are keen on cutting back cost of your Oracle database operation and are planning to set up an Active Data Guard in Azure cloud, you should consider an alternative. Instead of Active Data Guard, use Data Guard to replicate from primary database to a single physical standby database on Azure NetApp Files storage. Subsequently, multiple copies of this standby database can be cloned and opened for read/write access to serve many other use cases such as reporting, development, test etc. The net results effectively deliver functionalities of Active Data Guard while eliminating Active Data Guard license. In this documentation, we demonstrate how to setup an Oracle Data Guard with your existing primary database and physical standby database on ANF storage. The standby database is backed up and cloned for read/write access for use cases as desired via NetApp SnapCenter database management tool. NetApp Solutions Engineering team also provides an automation tool kit to refresh clone on user defined schedule for a complete, automated database clone lifecycle management without needs of user intervention.
This solution addresses the following use cases:
-
Implementation of Oracle Data Guard between a primary database and physical standby database on Microsoft Azure NetApp Files storage across Azure regions.
-
Backup and clone the physical standby database to serve use cases such as reporting, dev, test, etc.
-
Oracle database clone refresh lifecycle management via automation.
Audience
This solution is intended for the following people:
-
A DBA who sets up Oracle Active Data Guard in Azure cloud for high availability, data protection, and disaster recovery.
-
A database solution architect interested in Oracle Active Data Guard configuration in the Azure cloud.
-
A storage administrator who manages Azure NetApp Files storage that supports Oracle Data Guard.
-
An application owner who likes to stand up Oracle Data Guard in an Azure cloud environment.
Solution test and validation environment
The testing and validation of this solution was performed in an Azure cloud lab setting that might not match the actual user deployment environment. For more information, see the section Key factors for deployment consideration.
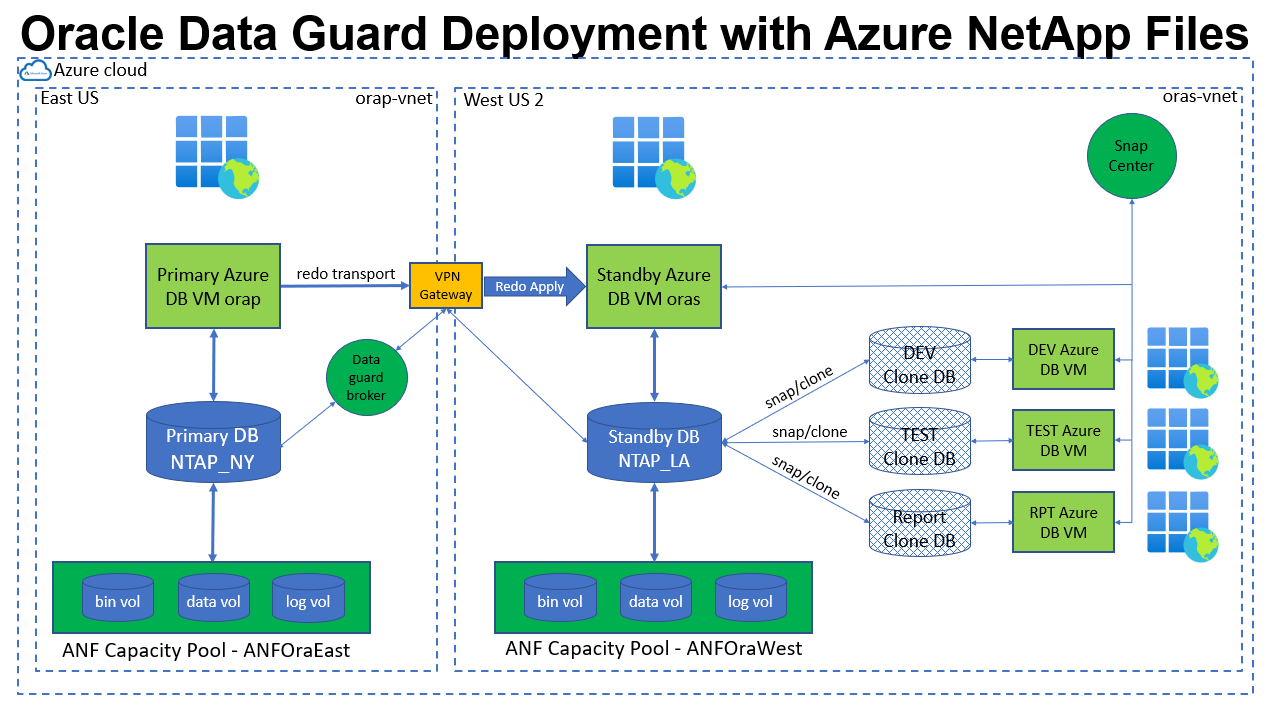
Architecture
Hardware and software components
Hardware |
||
Azure NetApp Files |
Current version offered by Microsoft |
Two 3 TiB Capacity Pools, Standard Service Level, Auto QoS |
Azure VMs for DB Servers |
Standard B4ms (4 vcpus, 16 GiB memory) |
Three DB VMs, one as the primary DB server, one as the standby DB server, and the third as a clone DB server |
Software |
||
RedHat Linux |
Red Hat Enterprise Linux 8.6 (LVM) - x64 Gen2 |
Deployed RedHat subscription for testing |
Oracle Database |
Version 19.18 |
Applied RU patch p34765931_190000_Linux-x86-64.zip |
Oracle OPatch |
Version 12.2.0.1.36 |
Latest patch p6880880_190000_Linux-x86-64.zip |
SnapCenter |
Version 6.0.1 |
Build 6.0.1.4487 |
NFS |
Version 3.0 |
dNFS enabled for Oracle |
Oracle Data Guard configuration with hypothetical NY to LA DR setup
Database |
DB_UNIQUE_NAME |
Oracle Net Service Name |
Primary |
NTAP_NY |
NTAP_NY.internal.cloudapp.net |
Standby |
NTAP_LA |
NTAP_LA.internal.cloudapp.net |
Key factors for deployment consideration
-
Standby Database Clone. While receiving and applying transaction logs from primary database, physical standby database can be cloned and mounted on a DB VM to support other workloads such as DEV, TEST, or Report. The clone can be a thin or thick clone. At this moment, ANF only support thick clone, which is a full copy of standby database. The ANF thin clone option will be released shortly. For a thinly cloned copies of database volumes, it shares the same DB volumes of standby database and utilize copy-on-write technology to service write IOs. Thus, the clone are very storage efficient that can be used for many other use cases with minimal and incremental new storage allocation for new write IOs. This provides tremendous storage cost saving by substantially reducing Active Data Guard storage footprint. NetApp recommends to minimize FlexClone activities in the event of database switching over from primary storage to standby ANF storage in order to maintain Oracle performance at high level.
-
Oracle Software Requirements. In general, a physical standby database must have the same Database Home version as the primary database including Patch Set Exceptions (PSEs), Critical Patch Updates (CPUs), and Patch Set Updates (PSUs), unless an Oracle Data Guard Standby-First Patch Apply process is in progress (as described in My Oracle Support note 1265700.1 at support.oracle.com.
-
Standby Database Directory Structure Considerations. If possible, the data files, log files, and control files on the primary and standby systems should have the same names and path names and use Optimal Flexible Architecture (OFA) naming conventions. The archival directories on the standby database should also be identical between sites, including size and structure. This strategy allows other operations such as backups, switchovers, and failovers to execute the same set of steps, reducing the maintenance complexity.
-
Force Logging Mode. To protect against unlogged direct writes in the primary database that cannot be propagated to the standby database, turn on FORCE LOGGING at the primary database before performing data file backups for standby creation.
-
Azure VM Sizing. In these tests and validations, we used an Azure VM - Standard_B4ms with 4 vCPUs and16 GiB memory. You need to size the Azure DB VM appropriately for the number of vCPUs and the amount of RAM based on actual workload requirements.
-
Azure NetApp Files Configuration. Azure NetApp Files are allocated in the Azure NetApp storage account as
Capacity Pools. In these tests and validations, we deployed a 3 TiB capacity pool to host Oracle primary at the East region and a standby database at the West 2 region. ANF capacity pool has three service levels: Standard, Premium, and Ultra. The IO capacity of ANF capacity pool is based on the size of the capacity pool and its service level. For production deployment, NetApp recommends taking a full assessment of your Oracle database throughput requirement and sizing the database capacity pool accordingly. At a capacity pool creation, you can set QoS to Auto or Manual and data encryption at rest Single or Double. -
dNFS Configuration. By using dNFS, an Oracle database running on an Azure Virtual Machine with ANF storage can drive significantly more I/O than the native NFS client. Automated Oracle deployment using the NetApp automation toolkit automatically configures dNFS on NFSv3.
Solution deployment
It is assumed that you already have your primary Oracle database deployed in an Azure cloud environment within a VNet as the starting point for setting up the Oracle Data Guard. Ideally, the primary database is deployed on ANF storage with NFS mount. Three NFS mount points are created for the Oracle database storage: mount /u01 for the Oracle binary files, mount /u02 for the Oracle data files and a control file, mount /u03 for the Oracle current and archived log files, and a redundant control file.
Your primary Oracle database can also be running on a NetApp ONTAP storage or any other storage of choices either within the Azure ecosystem or a private data center. The following section provides step-by-step deployment procedures for setting up an Oracle Data Guard between a primary Oracle DB in Azure with ANF storage to a physical standby Oracle DB in Azure with ANF storage.
Prerequisites for deployment
Details
Deployment requires the following prerequisites.
-
An Azure cloud account has been set up, and the necessary VNet and network subnets have been created within your Azure account.
-
From the Azure cloud portal console, you need to deploy minimum three Azure Linux VMs, one as the primary Oracle DB server, one as the standby Oracle DB server, and a clone target DB server for reporting, dev, and test etc. See the architecture diagram in the previous section for more details about the environment setup. Also review the Microsoft Azure Virtual Machines for more information.
-
The primary Oracle database should have been installed and configured in the primary Oracle DB server. On the other hand, in the standby Oracle DB server or the clone Oracle DB server, only Oracle software is installed and no Oracle databases are created. Ideally, the Oracle files directories layout should be exactly matching on all Oracle DB servers. For details on NetApp recommendation for automated Oracle deployment in the Azure cloud and ANF, please refer to the following technical reports for help.
-
TR-4987: Simplified, Automated Oracle Deployment on Azure NetApp Files with NFS

Ensure that you have allocated at least 128G in the Azure VMs root volume in order to have sufficient space to stage Oracle installation files.
-
-
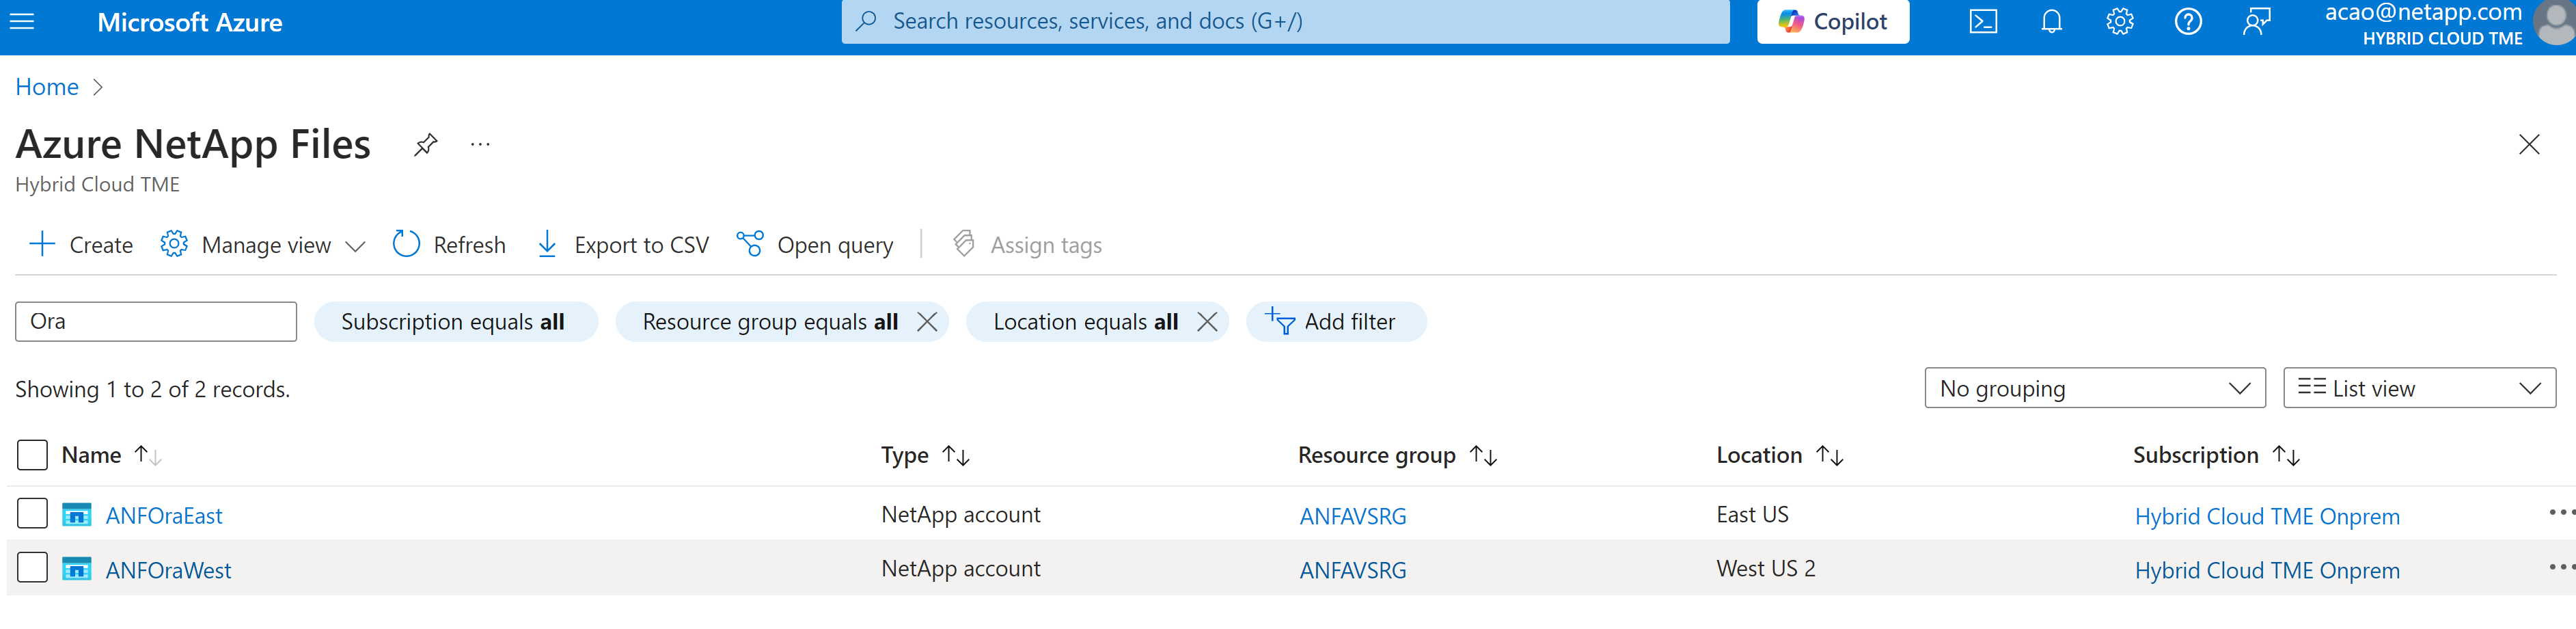
From the Azure cloud portal console, deploy two ANF storage capacity pools to host Oracle database volumes. The ANF storage capacity pools should be situated in different regions to mimic a true DataGuard configuration. If you are not familiar with the deployment of ANF storage, see the documentation Quickstart: Set up Azure NetApp Files and create an NFS volume for step-by-step instructions.
-
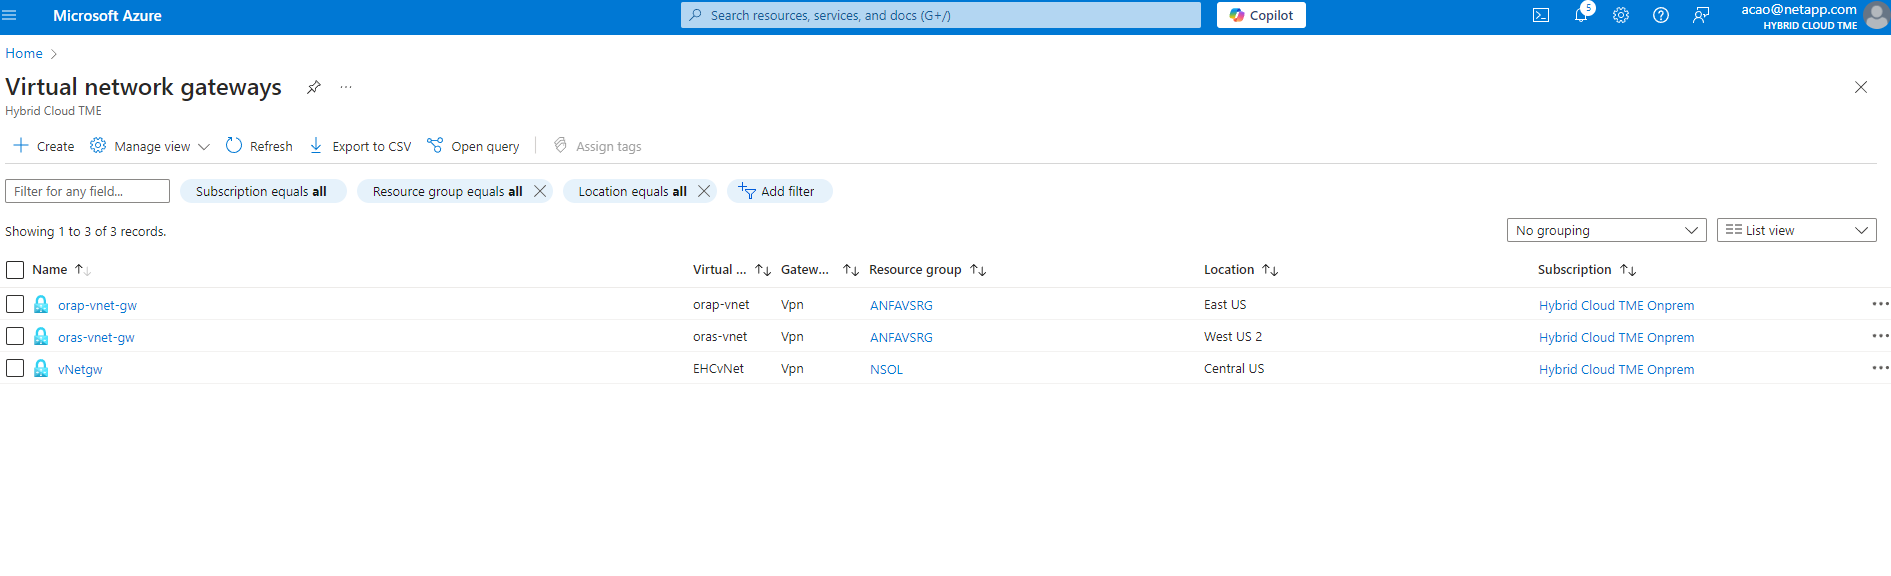
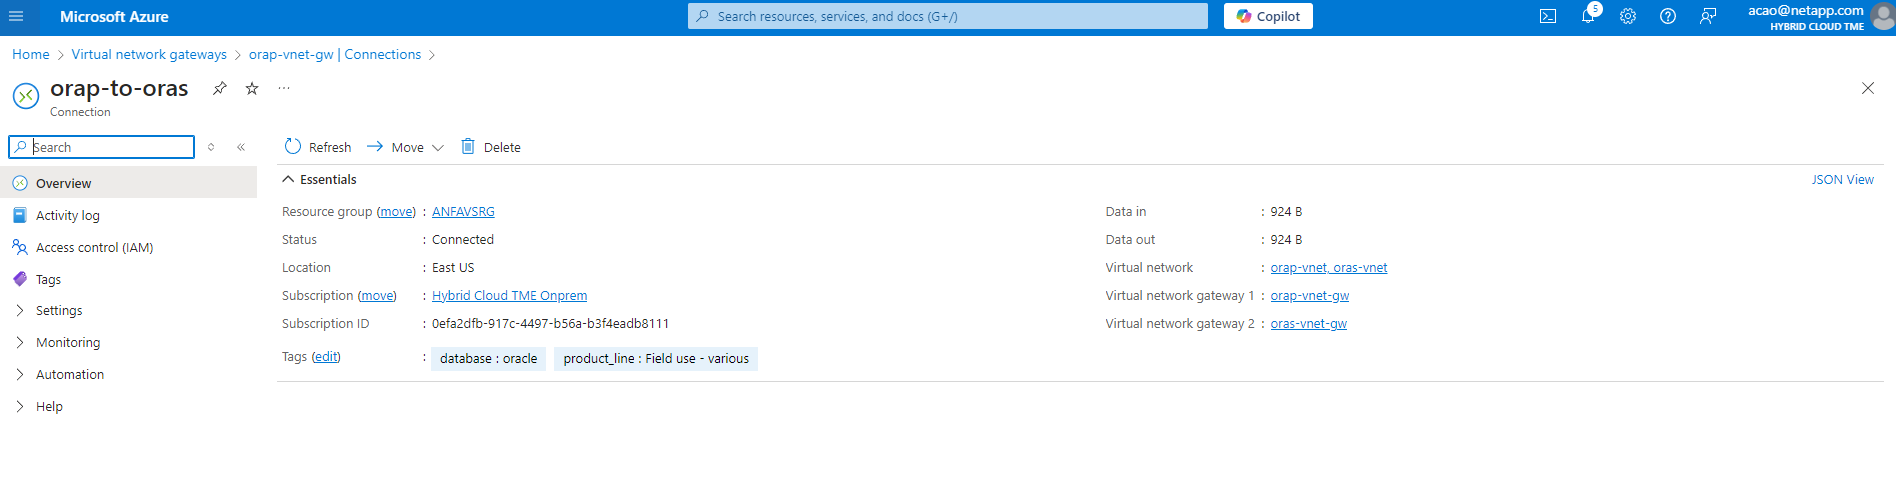
When the primary Oracle database and the standby Oracle database are situated in two different regions, a VPN gateway should be configured to allow data traffic flow between two separate VNets. Detailed networking configuration in Azure is beyond the scope of this document. Following screen shots provides some reference on how the VPN gateways are configured, connected, and the data traffics flow are confirmed in the lab.
Lab VPN gateways:
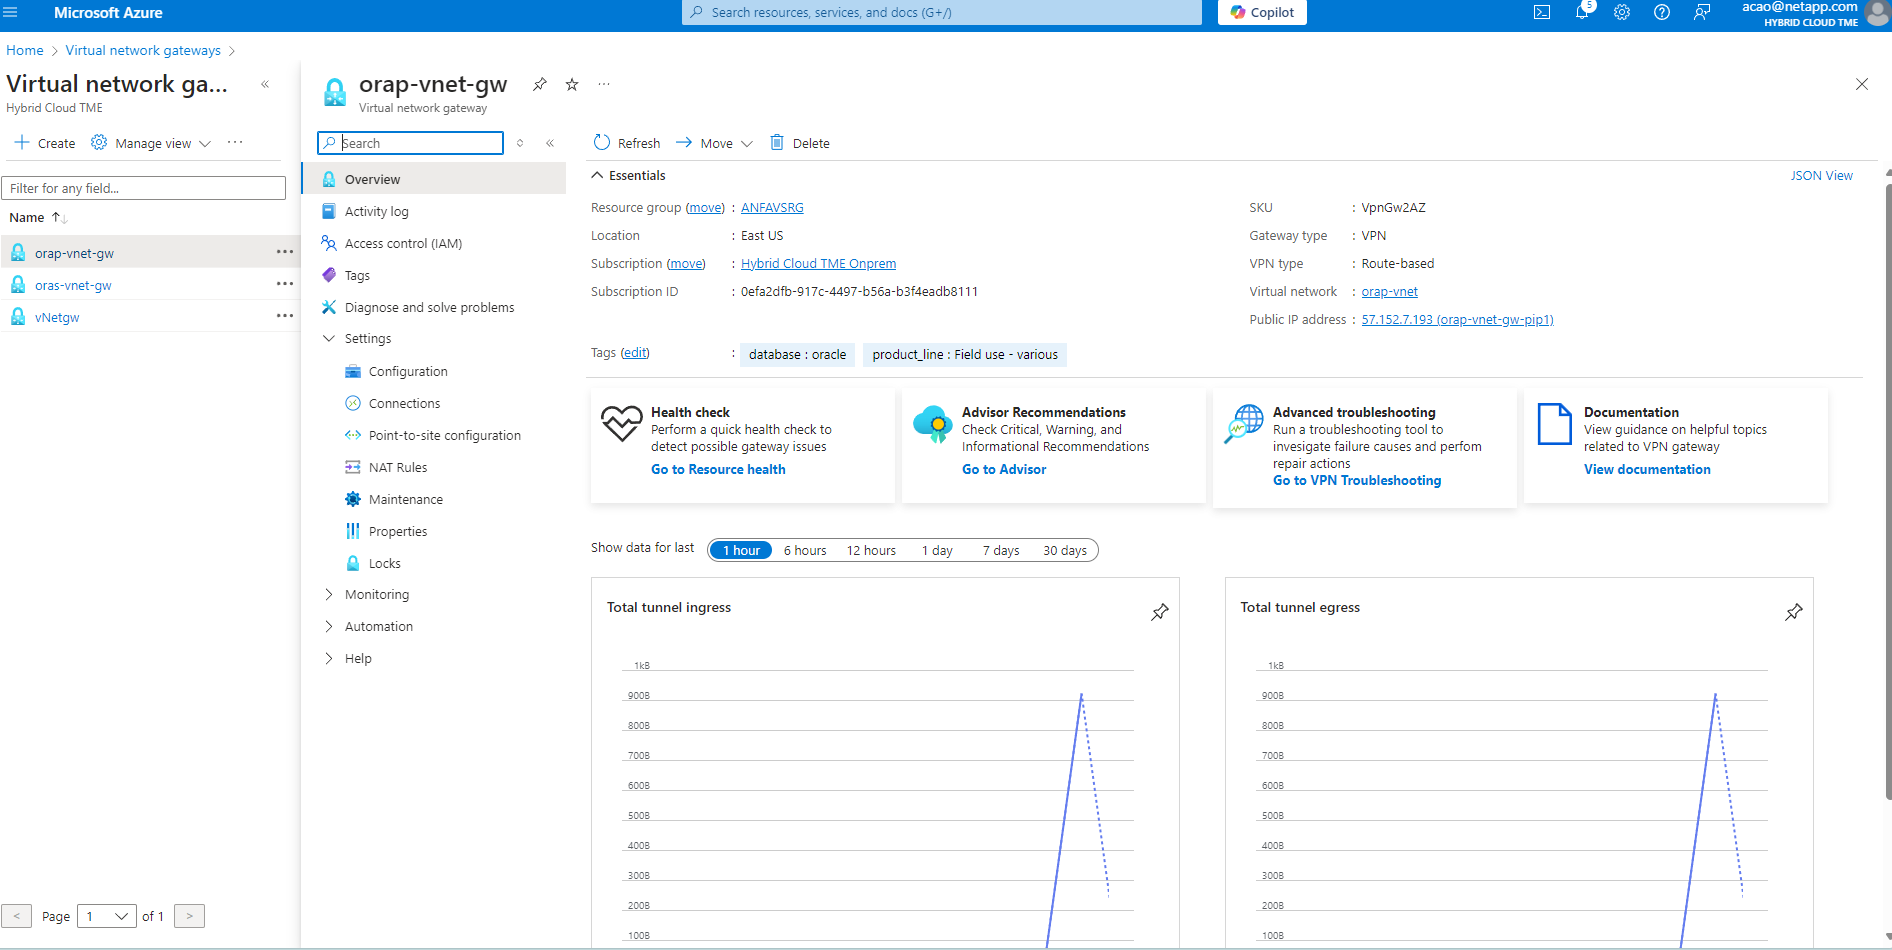
The primary vnet gateway:
Vnet gateway connection status:
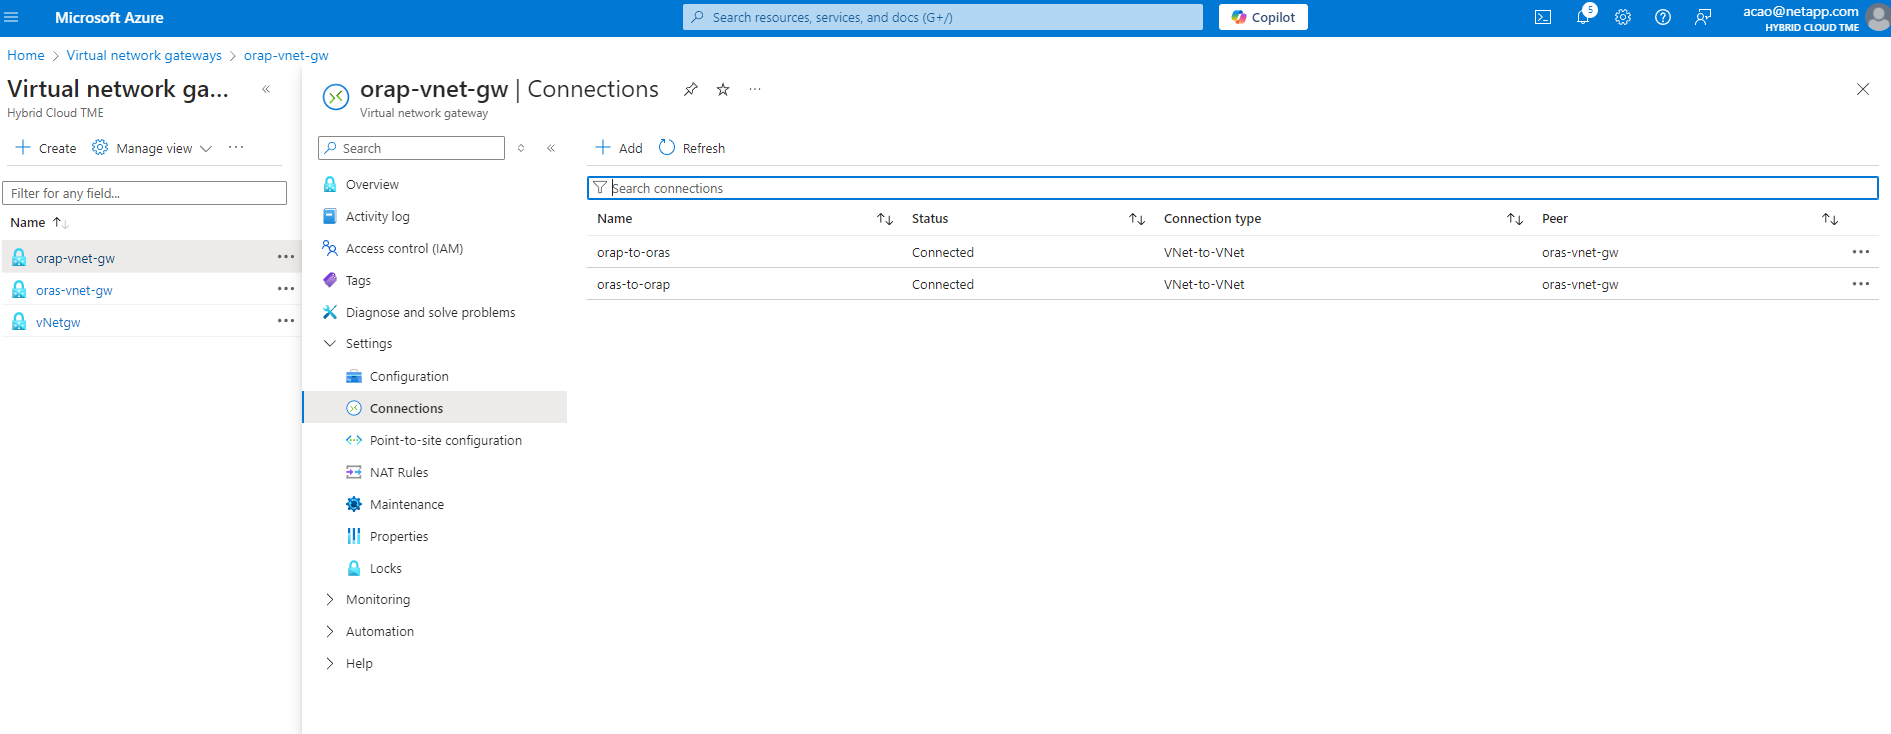
Validate that the traffic flows are established (click on three dots to open the page):
Prepare the primary database for Data Guard
Details
In this demonstration, we have setup a primary Oracle database called NTAP on the primary Azure DB server with three NFS mount points: /u01 for the Oracle binary, /u02 for the Oracle data files, and an Oracle control file, /u03 for the Oracle active logs, archived log files, and a redundant Oracle control file. Following illustrates the detailed procedures for setting up primary database for the Oracle Data Guard protection. All steps should be executed as the Oracle database owner or the default oracle user.
-
The primary database NTAP on the primary Azure DB server orap.internal.cloudapp.net is initially deployed as a standalone database with the ANF as database storage.
orap.internal.cloudapp.net:
resource group: ANFAVSRG
Location: East US
size: Standard B4ms (4 vcpus, 16 GiB memory)
OS: Linux (redhat 8.6)
pub_ip: 172.190.207.231
pri_ip: 10.0.0.4

[oracle@orap ~]$ df -h
Filesystem                 Size  Used Avail Use% Mounted on
devtmpfs                   7.7G  4.0K  7.7G   1% /dev
tmpfs                      7.8G     0  7.8G   0% /dev/shm
tmpfs                      7.8G  209M  7.5G   3% /run
tmpfs                      7.8G     0  7.8G   0% /sys/fs/cgroup
/dev/mapper/rootvg-rootlv   22G  413M   22G   2% /
/dev/mapper/rootvg-usrlv    10G  2.1G  8.0G  21% /usr
/dev/sda1                  496M  181M  315M  37% /boot
/dev/mapper/rootvg-homelv  2.0G   47M  2.0G   3% /home
/dev/sda15                 495M  5.8M  489M   2% /boot/efi
/dev/mapper/rootvg-varlv   8.0G  1.1G  7.0G  13% /var
/dev/mapper/rootvg-tmplv    12G  120M   12G   1% /tmp
/dev/sdb1                   32G   49M   30G   1% /mnt
10.0.2.36:/orap-u02        500G  7.7G  493G   2% /u02
10.0.2.36:/orap-u03        450G  6.1G  444G   2% /u03
10.0.2.36:/orap-u01        100G  9.9G   91G  10% /u01

[oracle@orap ~]$ cat /etc/oratab
#


# This file is used by ORACLE utilities.  It is created by root.sh
# and updated by either Database Configuration Assistant while creating
# a database or ASM Configuration Assistant while creating ASM instance.

# A colon, ':', is used as the field terminator.  A new line terminates
# the entry.  Lines beginning with a pound sign, '#', are comments.
#
# Entries are of the form:
#   $ORACLE_SID:$ORACLE_HOME:<N|Y>:
#
# The first and second fields are the system identifier and home
# directory of the database respectively.  The third field indicates
# to the dbstart utility that the database should , "Y", or should not,
# "N", be brought up at system boot time.
#
# Multiple entries with the same $ORACLE_SID are not allowed.
#
#
NTAP:/u01/app/oracle/product/19.0.0/NTAP:N
-
Login to primary DB server as the oracle user. Login to database via sqlplus, enable forced logging on primary.
alter database force logging;[oracle@orap admin]$ sqlplus / as sysdba SQL*Plus: Release 19.0.0.0.0 - Production on Tue Nov 26 20:12:02 2024 Version 19.18.0.0.0 Copyright (c) 1982, 2022, Oracle. All rights reserved. Connected to: Oracle Database 19c Enterprise Edition Release 19.0.0.0.0 - Production Version 19.18.0.0.0 SQL> alter database force logging; Database altered.
-
From sqlplus, enable flashback on the primary DB. Flashback allows easy reinstate primary database as a standby after a failover.
alter database flashback on;SQL> alter database flashback on; Database altered.
-
Configure redo transport authentication using Oracle password file - create a pwd file on the primary using orapwd utility if it is not set and copy it over to standby database $ORACLE_HOME/dbs directory.
-
Create standby redo logs on the primary DB with same size as current online log file. Log groups are one more than online log file groups. The primary database then can quickly transition to the standby role when a failover happens and begins to receive redo data. Repeat the following command four times to create four standby log files.
alter database add standby logfile thread 1 size 200M;SQL> alter database add standby logfile thread 1 size 200M; Database altered. SQL> / Database altered. SQL> / Database altered. SQL> / Database altered. SQL> set lin 200 SQL> col member for a80 SQL> select group#, type, member from v$logfile; GROUP# TYPE MEMBER ---------- ------- -------------------------------------------------------------------------------- 3 ONLINE /u03/orareco/NTAP/onlinelog/redo03.log 2 ONLINE /u03/orareco/NTAP/onlinelog/redo02.log 1 ONLINE /u03/orareco/NTAP/onlinelog/redo01.log 4 STANDBY /u03/orareco/NTAP/onlinelog/o1_mf_4__2m115vkv_.log 5 STANDBY /u03/orareco/NTAP/onlinelog/o1_mf_5__2m3c5cyd_.log 6 STANDBY /u03/orareco/NTAP/onlinelog/o1_mf_6__2m4d7dhh_.log 7 STANDBY /u03/orareco/NTAP/onlinelog/o1_mf_7__2m5ct7g1_.log -
From the sqlplus, create a pfile from spfile for editing.
create pfile='/home/oracle/initNTAP.ora' from spfile; -
Revise the pfile and add following parameters.
vi /home/oracle/initNTAP.oraUpdate the following parameters if not set: DB_NAME=NTAP DB_UNIQUE_NAME=NTAP_NY LOG_ARCHIVE_CONFIG='DG_CONFIG=(NTAP_NY,NTAP_LA)' LOG_ARCHIVE_DEST_1='LOCATION=USE_DB_RECOVERY_FILE_DEST VALID_FOR=(ALL_LOGFILES,ALL_ROLES) DB_UNIQUE_NAME=NTAP_NY' LOG_ARCHIVE_DEST_2='SERVICE=NTAP_LA ASYNC VALID_FOR=(ONLINE_LOGFILES,PRIMARY_ROLE) DB_UNIQUE_NAME=NTAP_LA' REMOTE_LOGIN_PASSWORDFILE=EXCLUSIVE FAL_SERVER=NTAP_LA STANDBY_FILE_MANAGEMENT=AUTO
-
From sqlplus, recreate spfile from revised pfile to overwrite the existing spfile in $ORACLE_HOME/dbs directory.
create spfile='$ORACLE_HOME/dbs/spfileNTAP.ora' from pfile='/home/oracle/initNTAP.ora'; -
Modify Oracle tnsnames.ora in $ORACLE_HOME/network/admin directory to add db_unique_name for name resolution.
vi $ORACLE_HOME/network/admin/tnsnames.ora# tnsnames.ora Network Configuration File: /u01/app/oracle/product/19.0.0/NTAP/network/admin/tnsnames.ora # Generated by Oracle configuration tools. NTAP_NY = (DESCRIPTION = (ADDRESS = (PROTOCOL = TCP)(HOST = orap.internal.cloudapp.net)(PORT = 1521)) (CONNECT_DATA = (SERVER = DEDICATED) (SID = NTAP) ) ) NTAP_LA = (DESCRIPTION = (ADDRESS = (PROTOCOL = TCP)(HOST = oras.internal.cloudapp.net)(PORT = 1521)) (CONNECT_DATA = (SERVER = DEDICATED) (SID = NTAP) ) ) LISTENER_NTAP = (ADDRESS = (PROTOCOL = TCP)(HOST = orap.internal.cloudapp.net)(PORT = 1521))
If you choose to name your Azure DB server differently than the default, add the names to local host file for host name resolution. -
Add data guard service name NTAP_NY_DGMGRL.internal.cloudapp.net for the primary database to listener.ora file.
vi $ORACLE_HOME/network/admin/listener.ora# listener.ora Network Configuration File: /u01/app/oracle/product/19.0.0/NTAP/network/admin/listener.ora # Generated by Oracle configuration tools. LISTENER.NTAP = (DESCRIPTION_LIST = (DESCRIPTION = (ADDRESS = (PROTOCOL = TCP)(HOST = orap.internal.cloudapp.net)(PORT = 1521)) (ADDRESS = (PROTOCOL = IPC)(KEY = EXTPROC1521)) ) ) SID_LIST_LISTENER.NTAP = (SID_LIST = (SID_DESC = (GLOBAL_DBNAME = NTAP_NY_DGMGRL.internal.cloudapp.net) (ORACLE_HOME = /u01/app/oracle/product/19.0.0/NTAP) (SID_NAME = NTAP) ) ) -
Shutdown and restart database via sqlplus and validate that data guard parameters are now active.
shutdown immediate;startup;SQL> show parameter name NAME TYPE VALUE ------------------------------------ ----------- ------------------------------ cdb_cluster_name string cell_offloadgroup_name string db_file_name_convert string db_name string NTAP db_unique_name string NTAP_NY global_names boolean FALSE instance_name string NTAP lock_name_space string log_file_name_convert string pdb_file_name_convert string processor_group_name string NAME TYPE VALUE ------------------------------------ ----------- ------------------------------ service_names string NTAP_NY.internal.cloudapp.net SQL> sho parameter log_archive_dest NAME TYPE VALUE ------------------------------------ ----------- ------------------------------ log_archive_dest string log_archive_dest_1 string LOCATION=USE_DB_RECOVERY_FILE_ DEST VALID_FOR=(ALL_LOGFILES,A LL_ROLES) DB_UNIQUE_NAME=NTAP_ NY log_archive_dest_10 string log_archive_dest_11 string log_archive_dest_12 string log_archive_dest_13 string log_archive_dest_14 string log_archive_dest_15 string NAME TYPE VALUE ------------------------------------ ----------- ------------------------------ log_archive_dest_16 string log_archive_dest_17 string log_archive_dest_18 string log_archive_dest_19 string log_archive_dest_2 string SERVICE=NTAP_LA ASYNC VALID_FO R=(ONLINE_LOGFILES,PRIMARY_ROL E) DB_UNIQUE_NAME=NTAP_LA log_archive_dest_20 string log_archive_dest_21 string . .
This completes the primary database setup for Data Guard.
Prepare standby database and activate Data Guard
Details
Oracle Data Guard requires OS kernel configuration and Oracle software stacks including patch sets on standby DB server to match with primary DB server. For easy management and simplicity, the database storage configuration of the standby DB server ideally should match with the primary DB server as well, such as the database directory layout and sizes of NFS mount points. Following are detail procedures for setting up the standby Oracle DB server and activating the Oracle DataGuard for HA/DR protection. All commands should be executed as the default Oracle owner user id oracle.
-
First, review the configuration of the primary database on primary Oracle DB server. In this demonstration, we have setup a primary Oracle database called NTAP in the primary DB server with three NFS mounts on ANF storage.
-
If you follow the NetApp documemntation TR-4987 to setup the Oracle standby DB server TR-4987: Simplified, Automated Oracle Deployment on Azure NetApp Files with NFS, use a tag
-t software_only_installin step 2 ofPlaybook executionto run automated Oracle installation. The revised command syntax is listed below. The tag will allow the Oracle software stack installed and configured but stop short of creating a database.ansible-playbook -i hosts 4-oracle_config.yml -u azureuser -e @vars/vars.yml -t software_only_install -
The standby Oracle DB server configuration at standby site in the demo lab.
oras.internal.cloudapp.net:
resource group: ANFAVSRG
Location: West US 2
size: Standard B4ms (4 vcpus, 16 GiB memory)
OS: Linux (redhat 8.6)
pub_ip: 172.179.119.75
pri_ip: 10.0.1.4

[oracle@oras ~]$ df -h
Filesystem                 Size  Used Avail Use% Mounted on
devtmpfs                   7.7G     0  7.7G   0% /dev
tmpfs                      7.8G     0  7.8G   0% /dev/shm
tmpfs                      7.8G  265M  7.5G   4% /run
tmpfs                      7.8G     0  7.8G   0% /sys/fs/cgroup
/dev/mapper/rootvg-rootlv   22G  413M   22G   2% /
/dev/mapper/rootvg-usrlv    10G  2.1G  8.0G  21% /usr
/dev/sda1                  496M  181M  315M  37% /boot
/dev/mapper/rootvg-varlv   8.0G  985M  7.1G  13% /var
/dev/mapper/rootvg-homelv  2.0G   52M  2.0G   3% /home
/dev/mapper/rootvg-tmplv    12G  120M   12G   1% /tmp
/dev/sda15                 495M  5.8M  489M   2% /boot/efi
/dev/sdb1                   32G   49M   30G   1% /mnt
10.0.3.36:/oras-u01        100G  9.5G   91G  10% /u01
10.0.3.36:/oras-u02        500G  8.1G  492G   2% /u02
10.0.3.36:/oras-u03        450G  4.8G  446G   2% /u03
-
Once Oracle software is installed and configured, set oracle home and path. Also, from the standby $ORACLE_HOME dbs directory, copy oracle password from primary database if you have not done so.
export ORACLE_HOME=/u01/app/oracle/product/19.0.0/NTAPexport PATH=$PATH:$ORACLE_HOME/binscp oracle@10.0.0.4:$ORACLE_HOME/dbs/orapwNTAP . -
Update tnsnames.ora file with following entries.
vi $ORACLE_HOME/network/admin/tnsnames.ora# tnsnames.ora Network Configuration File: /u01/app/oracle/product/19.0.0/NTAP/network/admin/tnsnames.ora # Generated by Oracle configuration tools. NTAP_NY = (DESCRIPTION = (ADDRESS = (PROTOCOL = TCP)(HOST = orap.internal.cloudapp.net)(PORT = 1521)) (CONNECT_DATA = (SERVER = DEDICATED) (SID = NTAP) ) ) NTAP_LA = (DESCRIPTION = (ADDRESS = (PROTOCOL = TCP)(HOST = oras.internal.cloudapp.net)(PORT = 1521)) (CONNECT_DATA = (SERVER = DEDICATED) (SID = NTAP) ) ) -
Add DB data guard service name to listener.ora file.
vi $ORACLE_HOME/network/admin/listener.ora# listener.ora Network Configuration File: /u01/app/oracle/product/19.0.0/NTAP/network/admin/listener.ora # Generated by Oracle configuration tools. LISTENER.NTAP = (DESCRIPTION_LIST = (DESCRIPTION = (ADDRESS = (PROTOCOL = TCP)(HOST = oras.internal.cloudapp.net)(PORT = 1521)) (ADDRESS = (PROTOCOL = IPC)(KEY = EXTPROC1521)) ) ) SID_LIST_LISTENER = (SID_LIST = (SID_DESC = (SID_NAME = NTAP) ) ) SID_LIST_LISTENER.NTAP = (SID_LIST = (SID_DESC = (GLOBAL_DBNAME = NTAP_LA_DGMGRL.internal.cloudapp.net) (ORACLE_HOME = /u01/app/oracle/product/19.0.0/NTAP) (SID_NAME = NTAP) ) ) LISTENER = (ADDRESS_LIST = (ADDRESS = (PROTOCOL = TCP)(HOST = oras.internal.cloudapp.net)(PORT = 1521)) ) -
Launch dbca to instantiate the standby database from the primary database NTAP.
dbca -silent -createDuplicateDB -gdbName NTAP -primaryDBConnectionString orap.internal.cloudapp.net:1521/NTAP_NY.internal.cloudapp.net -sid NTAP -initParams fal_server=NTAP_NY -createAsStandby -dbUniqueName NTAP_LA[oracle@oras admin]$ dbca -silent -createDuplicateDB -gdbName NTAP -primaryDBConnectionString orap.internal.cloudapp.net:1521/NTAP_NY.internal.cloudapp.net -sid NTAP -initParams fal_server=NTAP_NY -createAsStandby -dbUniqueName NTAP_LA Enter SYS user password: Prepare for db operation 22% complete Listener config step 44% complete Auxiliary instance creation 67% complete RMAN duplicate 89% complete Post duplicate database operations 100% complete Look at the log file "/u01/app/oracle/cfgtoollogs/dbca/NTAP_LA/NTAP_LA.log" for further details.
-
Validate the duplicated standby database. Newly duplicated standby database open in READ ONLY mode initially.
[oracle@oras admin]$ cat /etc/oratab # # This file is used by ORACLE utilities. It is created by root.sh # and updated by either Database Configuration Assistant while creating # a database or ASM Configuration Assistant while creating ASM instance. # A colon, ':', is used as the field terminator. A new line terminates # the entry. Lines beginning with a pound sign, '#', are comments. # # Entries are of the form: # $ORACLE_SID:$ORACLE_HOME:<N|Y>: # # The first and second fields are the system identifier and home # directory of the database respectively. The third field indicates # to the dbstart utility that the database should , "Y", or should not, # "N", be brought up at system boot time. # # Multiple entries with the same $ORACLE_SID are not allowed. # # NTAP:/u01/app/oracle/product/19.0.0/NTAP:N [oracle@oras admin]$ export ORACLE_SID=NTAP [oracle@oras admin]$ sqlplus / as sysdba SQL*Plus: Release 19.0.0.0.0 - Production on Tue Nov 26 23:04:07 2024 Version 19.18.0.0.0 Copyright (c) 1982, 2022, Oracle. All rights reserved. Connected to: Oracle Database 19c Enterprise Edition Release 19.0.0.0.0 - Production Version 19.18.0.0.0 SQL> select name, open_mode from v$database; NAME OPEN_MODE --------- -------------------- NTAP READ ONLY SQL> show parameter name NAME TYPE VALUE ------------------------------------ ----------- ------------------------------ cdb_cluster_name string cell_offloadgroup_name string db_file_name_convert string db_name string NTAP db_unique_name string NTAP_LA global_names boolean FALSE instance_name string NTAP lock_name_space string log_file_name_convert string pdb_file_name_convert string processor_group_name string NAME TYPE VALUE ------------------------------------ ----------- ------------------------------ service_names string NTAP_LA.internal.cloudapp.net SQL> show parameter log_archive_config NAME TYPE VALUE ------------------------------------ ----------- ------------------------------ log_archive_config string DG_CONFIG=(NTAP_NY,NTAP_LA) SQL> show parameter fal_server NAME TYPE VALUE ------------------------------------ ----------- ------------------------------ fal_server string NTAP_NY SQL> select name from v$datafile; NAME -------------------------------------------------------------------------------- /u02/oradata/NTAP/system01.dbf /u02/oradata/NTAP/sysaux01.dbf /u02/oradata/NTAP/undotbs01.dbf /u02/oradata/NTAP/pdbseed/system01.dbf /u02/oradata/NTAP/pdbseed/sysaux01.dbf /u02/oradata/NTAP/users01.dbf /u02/oradata/NTAP/pdbseed/undotbs01.dbf /u02/oradata/NTAP/NTAP_pdb1/system01.dbf /u02/oradata/NTAP/NTAP_pdb1/sysaux01.dbf /u02/oradata/NTAP/NTAP_pdb1/undotbs01.dbf /u02/oradata/NTAP/NTAP_pdb1/users01.dbf NAME -------------------------------------------------------------------------------- /u02/oradata/NTAP/NTAP_pdb2/system01.dbf /u02/oradata/NTAP/NTAP_pdb2/sysaux01.dbf /u02/oradata/NTAP/NTAP_pdb2/undotbs01.dbf /u02/oradata/NTAP/NTAP_pdb2/users01.dbf /u02/oradata/NTAP/NTAP_pdb3/system01.dbf /u02/oradata/NTAP/NTAP_pdb3/sysaux01.dbf /u02/oradata/NTAP/NTAP_pdb3/undotbs01.dbf /u02/oradata/NTAP/NTAP_pdb3/users01.dbf 19 rows selected. SQL> select name from v$controlfile; NAME -------------------------------------------------------------------------------- /u02/oradata/NTAP/control01.ctl /u03/orareco/NTAP_LA/control02.ctl SQL> col member form a80 SQL> select group#, type, member from v$logfile order by 2, 1; GROUP# TYPE MEMBER ---------- ------- -------------------------------------------------------------------------------- 1 ONLINE /u03/orareco/NTAP_LA/onlinelog/o1_mf_1_mndl6mxh_.log 2 ONLINE /u03/orareco/NTAP_LA/onlinelog/o1_mf_2_mndl7jdb_.log 3 ONLINE /u03/orareco/NTAP_LA/onlinelog/o1_mf_3_mndl8f03_.log 4 STANDBY /u03/orareco/NTAP_LA/onlinelog/o1_mf_4_mndl99m7_.log 5 STANDBY /u03/orareco/NTAP_LA/onlinelog/o1_mf_5_mndlb67d_.log 6 STANDBY /u03/orareco/NTAP_LA/onlinelog/o1_mf_6_mndlc2tw_.log 7 STANDBY /u03/orareco/NTAP_LA/onlinelog/o1_mf_7_mndlczhb_.log 7 rows selected. -
Restart the standby database in
mountstage and execute following command to activate standby database managed recovery.alter database recover managed standby database disconnect from session;SQL> shutdown immediate; Database closed. Database dismounted. ORACLE instance shut down. SQL> startup mount; ORACLE instance started. Total System Global Area 6442449688 bytes Fixed Size 9177880 bytes Variable Size 1090519040 bytes Database Buffers 5335154688 bytes Redo Buffers 7598080 bytes Database mounted. SQL> alter database recover managed standby database disconnect from session; Database altered.
-
Validate the standby database recovery status. Notice the
recovery logmergerinAPPLYING_LOGaction.SELECT ROLE, THREAD#, SEQUENCE#, ACTION FROM V$DATAGUARD_PROCESS;
SQL> SELECT ROLE, THREAD#, SEQUENCE#, ACTION FROM V$DATAGUARD_PROCESS;

ROLE                        THREAD#  SEQUENCE# ACTION
------------------------ ---------- ---------- ------------
post role transition              0          0 IDLE
recovery apply slave              0          0 IDLE
recovery apply slave              0          0 IDLE
recovery apply slave              0          0 IDLE
recovery apply slave              0          0 IDLE
recovery logmerger                1         18 APPLYING_LOG
managed recovery                  0          0 IDLE
RFS async                         1         18 IDLE
RFS ping                          1         18 IDLE
archive redo                      0          0 IDLE
redo transport timer              0          0 IDLE

ROLE                        THREAD#  SEQUENCE# ACTION
------------------------ ---------- ---------- ------------
gap manager                       0          0 IDLE
archive redo                      0          0 IDLE
archive redo                      0          0 IDLE
redo transport monitor            0          0 IDLE
log writer                        0          0 IDLE
archive local                     0          0 IDLE

17 rows selected.

SQL>
This completes the Data Guard protection setup for NTAP from primary to standby with managed standby recovery enabled.
Setup Data Guard Broker
Details
Oracle Data Guard broker is a distributed management framework that automates and centralizes the creation, maintenance, and monitoring of Oracle Data Guard configurations. Following section demonstrate how to setup Data Guard Broker to manage Data Guard environment.
-
Start data guard broker on both the primary and the standby databases with following command via sqlplus.
alter system set dg_broker_start=true scope=both; -
From primary database, connect to Data Guard Borker as SYSDBA.
[oracle@orap ~]$ dgmgrl sys@NTAP_NY
DGMGRL for Linux: Release 19.0.0.0.0 - Production on Wed Dec 11 20:53:20 2024
Version 19.18.0.0.0

Copyright (c) 1982, 2019, Oracle and/or its affiliates.  All rights reserved.

Welcome to DGMGRL, type "help" for information.
Password:
Connected to "NTAP_NY"
Connected as SYSDBA.
DGMGRL>
-
Create and enable Data Guard Broker configuration.
DGMGRL> create configuration dg_config as primary database is NTAP_NY connect identifier is NTAP_NY; Configuration "dg_config" created with primary database "ntap_ny" DGMGRL> add database NTAP_LA as connect identifier is NTAP_LA; Database "ntap_la" added DGMGRL> enable configuration; Enabled. DGMGRL> show configuration; Configuration - dg_config Protection Mode: MaxPerformance Members: ntap_ny - Primary database ntap_la - Physical standby database Fast-Start Failover: Disabled Configuration Status: SUCCESS (status updated 3 seconds ago) -
Validate the database status within the Data Guard Broker management framework.
DGMGRL> show database db1_ny;

Database - db1_ny

  Role:               PRIMARY
  Intended State:     TRANSPORT-ON
  Instance(s):
    db1

Database Status:
SUCCESS

DGMGRL> show database db1_la;

Database - db1_la

  Role:               PHYSICAL STANDBY
  Intended State:     APPLY-ON
  Transport Lag:      0 seconds (computed 1 second ago)
  Apply Lag:          0 seconds (computed 1 second ago)
  Average Apply Rate: 2.00 KByte/s
  Real Time Query:    OFF
  Instance(s):
    db1

Database Status:
SUCCESS

DGMGRL>
In the event of a failure, Data Guard Broker can be used to failover the primary database to the standby instantaniouly. If Fast-Start Failover is enabled, Data Guard Broker can failover the primary database to the standby when a failure is detected without an user intervention.
Clone standby database for other use cases
Details
The key benefit of hosting the Oracle standby database on the ANF in the Oracle Data Guard setup is that it can be quickly cloned to serve many other use cases with minimal additional storage investment if a thin clone is enabled. NetApp recommends to use SnapCenter UI tool to manage your Oracle DataGuard database. In the following section, we demonstrate how to snapshot and clone the mounted and under recovery standby database volumes on the ANF for other purposes, such as DEV, TEST, REPORT, etc., using the NetApp SnapCenter tool.
Below are high level procedures to clone a READ/WRITE database from the managed physical standby database in the Oracle Data Guard using SnapCenter. For detail instructions on how to setup and configure SnapCenter for Oracle on ANF, please refer to TR-4988 Oracle Database Backup, Recovery, and Clone on ANF with SnapCenter for details.
-
We begin the usecase validation by creating a test table and inserting a row into the test table at the primary database. We will then validate that the transaction traverses down to standby and finally the clone.
[oracle@orap ~]$ sqlplus / as sysdba SQL*Plus: Release 19.0.0.0.0 - Production on Wed Dec 11 16:33:17 2024 Version 19.18.0.0.0 Copyright (c) 1982, 2022, Oracle. All rights reserved. Connected to: Oracle Database 19c Enterprise Edition Release 19.0.0.0.0 - Production Version 19.18.0.0.0 SQL> alter session set container=ntap_pdb1; Session altered. SQL> create table test(id integer, dt timestamp, event varchar(100)); Table created. SQL> insert into test values(1, sysdate, 'a test transaction at primary database NTAP on DB server orap.internal.cloudapp.net'); 1 row created. SQL> commit; Commit complete. SQL> select * from test; ID ---------- DT --------------------------------------------------------------------------- EVENT -------------------------------------------------------------------------------- 1 11-DEC-24 04.38.44.000000 PM a test transaction at primary database NTAP on DB server orap.internal.cloudapp. net SQL> select instance_name, host_name from v$instance; INSTANCE_NAME ---------------- HOST_NAME ---------------------------------------------------------------- NTAP orap SQL> -
In SnapCenter configuration, an unix user (azureuser for demo) and an Azure credential (azure_anf for demo) has been added to
CredentialinSettings.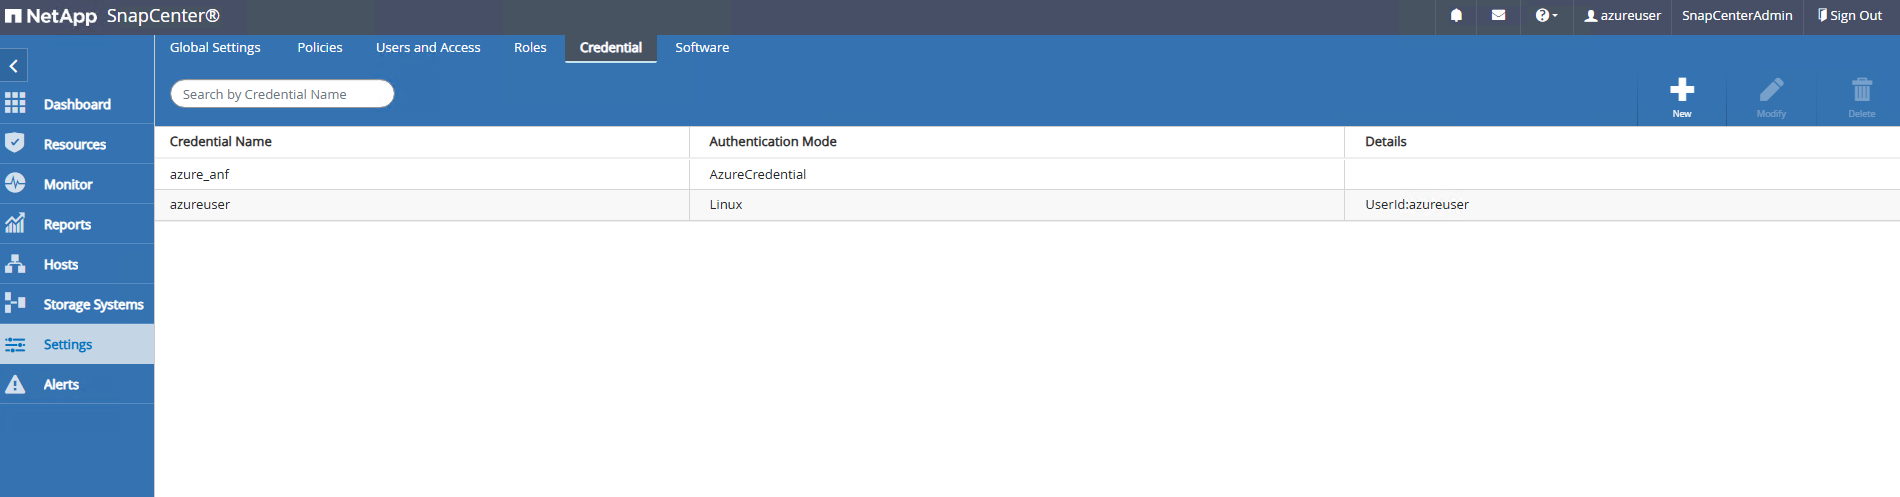
-
Use azure_anf credential to add the ANF storage to
Storage Systems. If you have multiple ANF storage accounts in your Azure subsciption, make sure click the drop down list to choose the right storage account. We have created two dedicated Oracle storage accounts for this demonstration.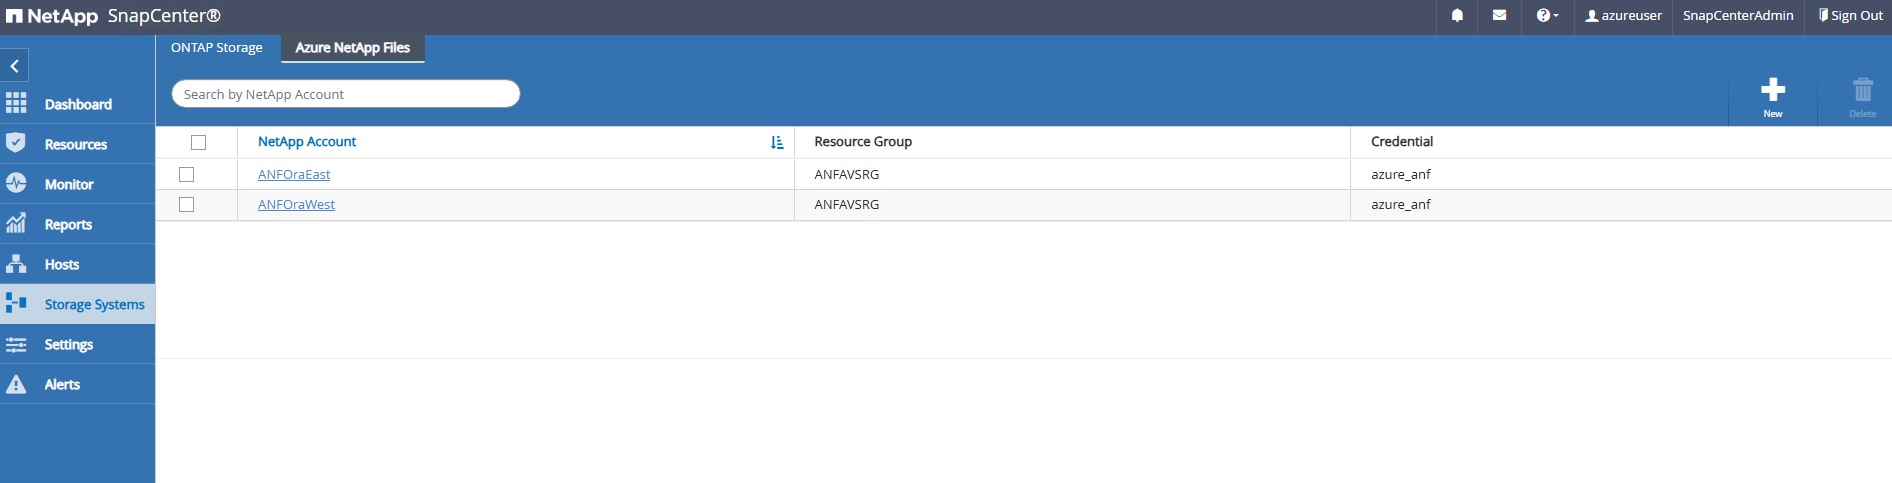
-
All Oracle DB servers have been added to SnapCenter
Hosts.
The clone DB server should have identtical Oracle software stacks installed and configured. In our test case, Oracle 19C software is installed and configured but no database created. -
Create a backup policy that is tailored for offline/mount full database backup.
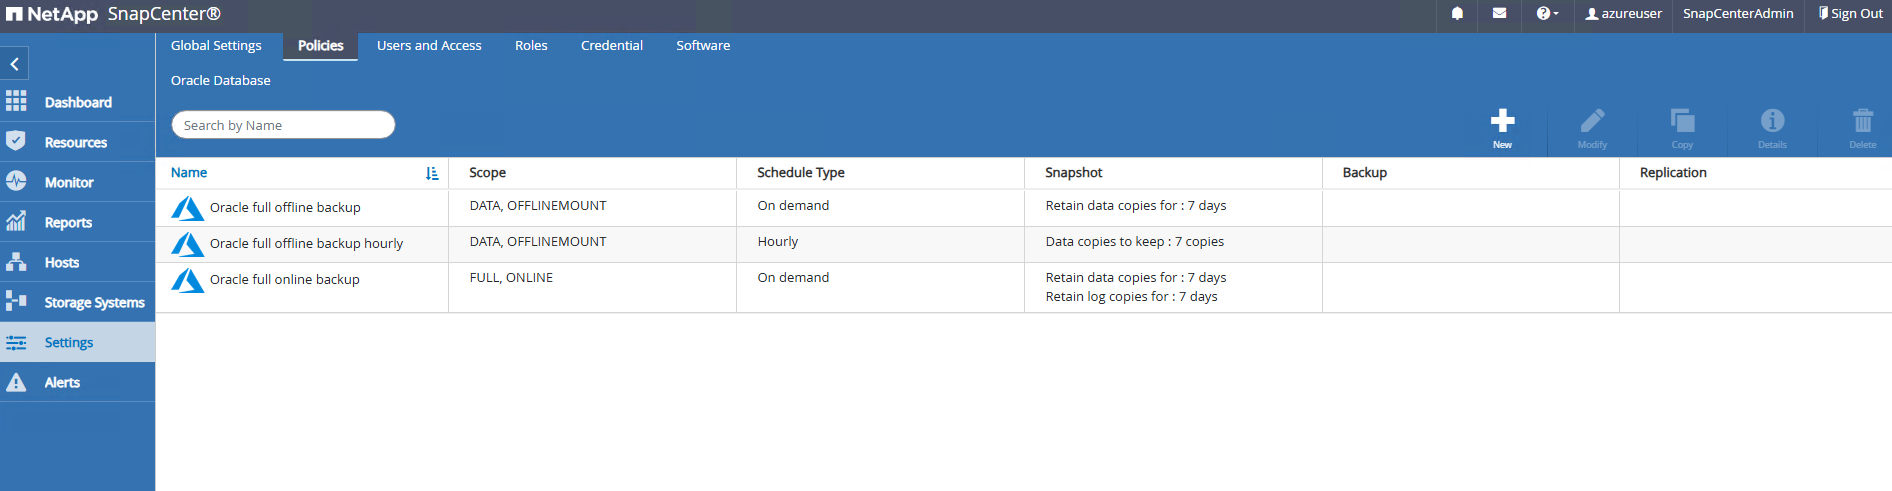
-
Apply backup policy to protect standby database in
Resourcestab. When initially discovered, the database status shows asNot protected.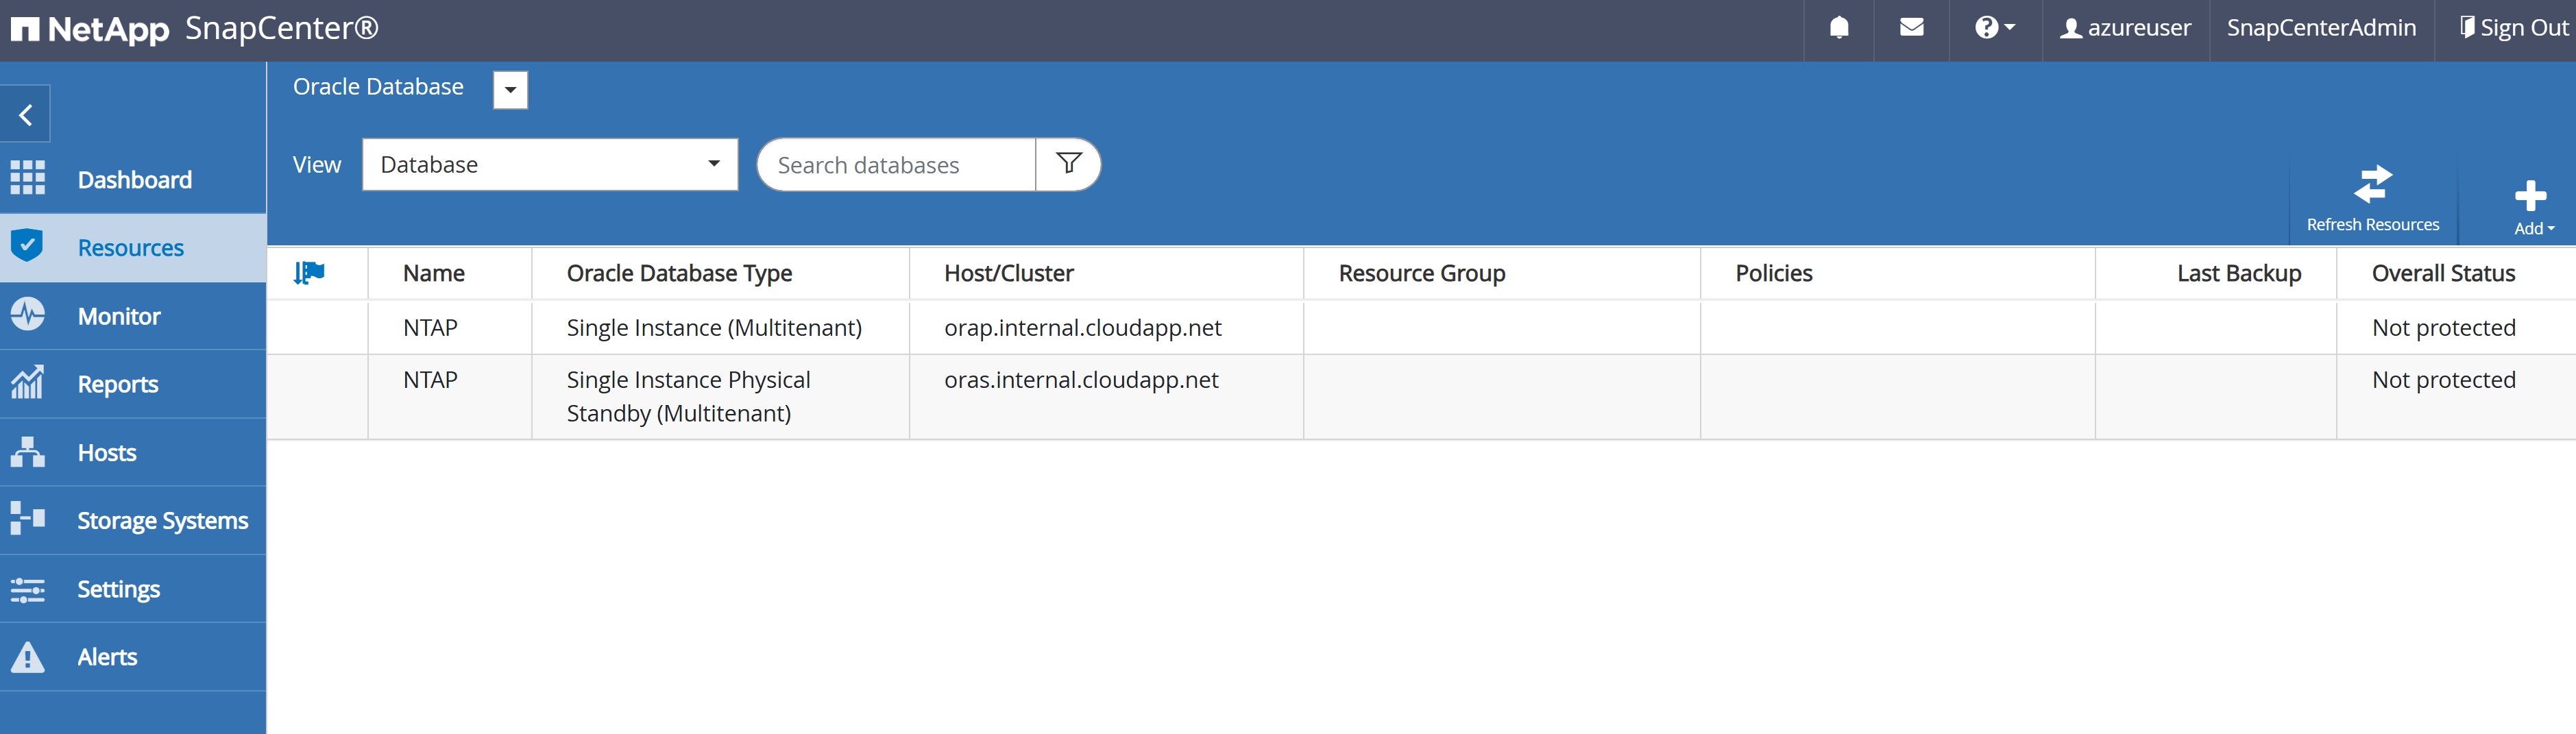
-
You have option to either trigger a backup manually or put it on a schedule at a set time after a backup policy applied.
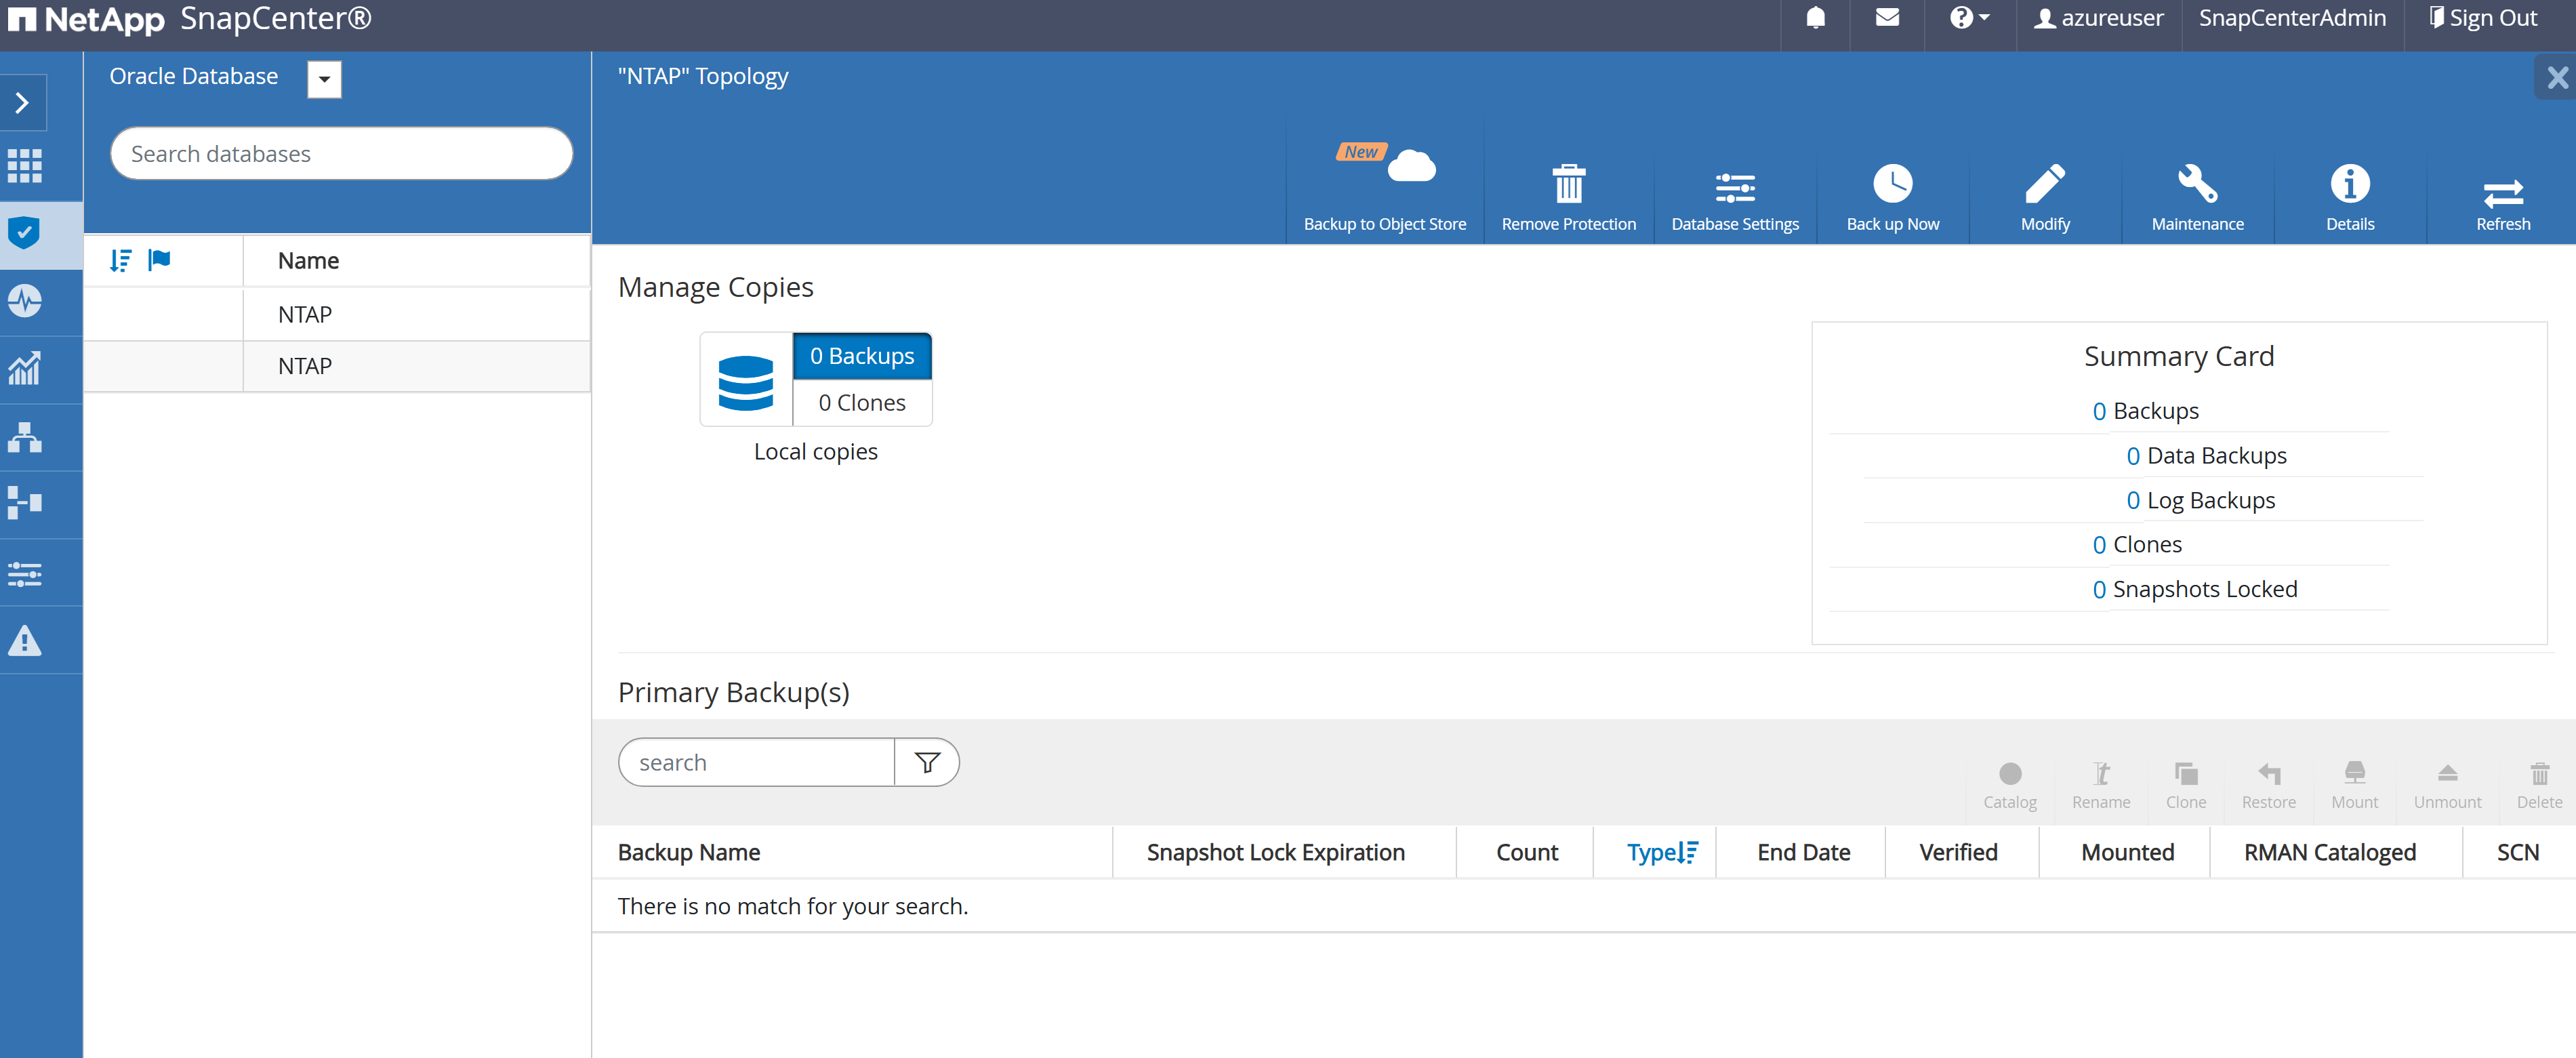
-
After a backup, click on database name to open the database backups page. Select a backup to be used for database clone and click on
Clonebutton to launch clone workflow.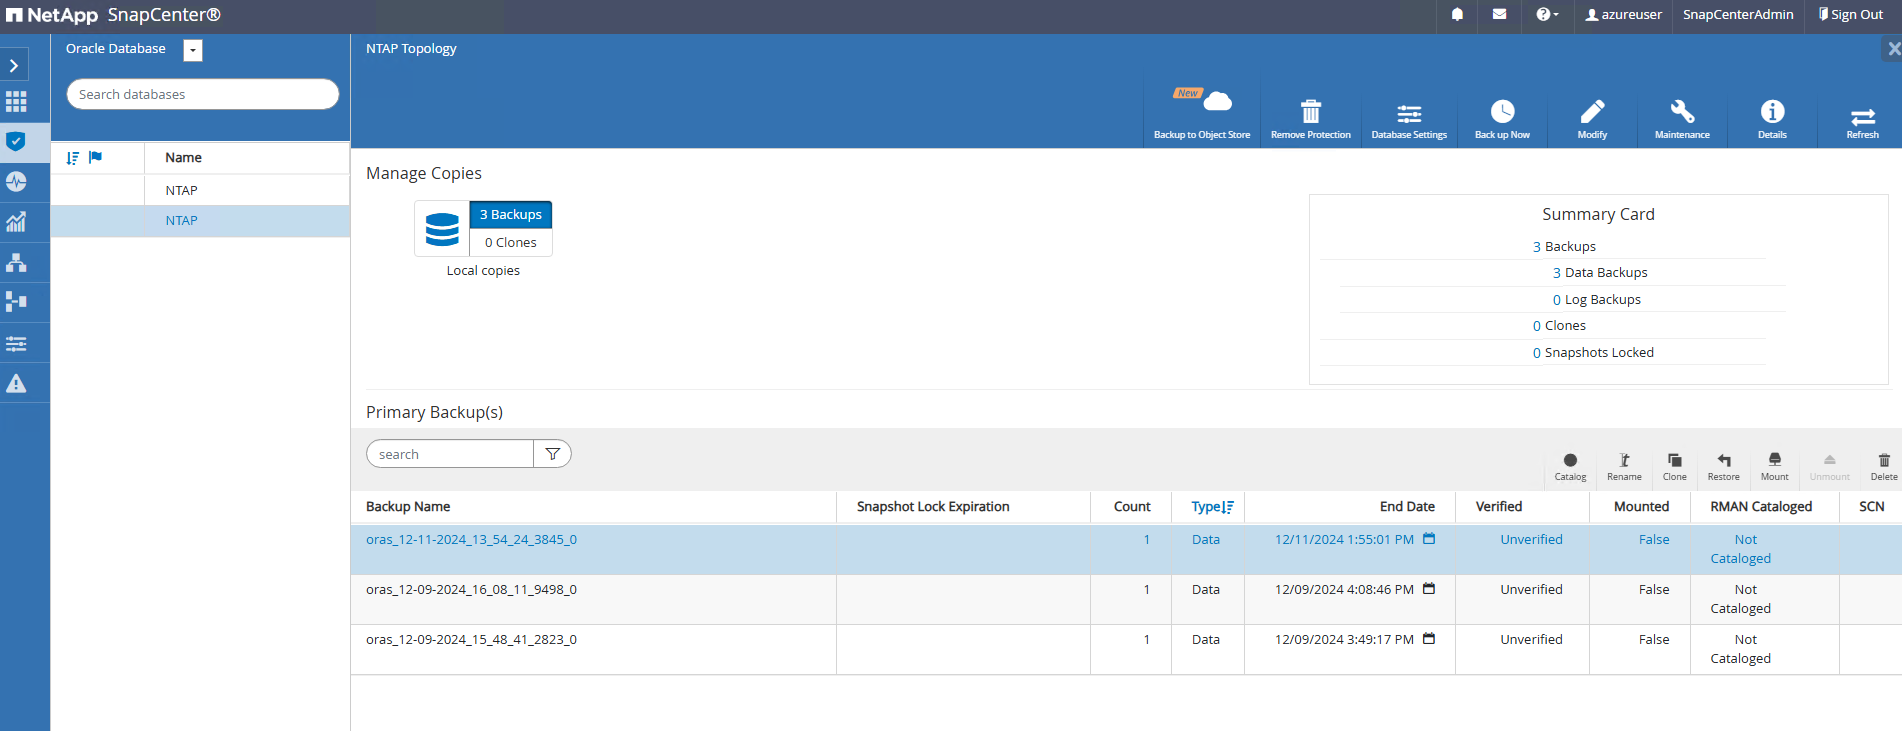
-
Select the
Complete Database Cloneand name the clone instance SID.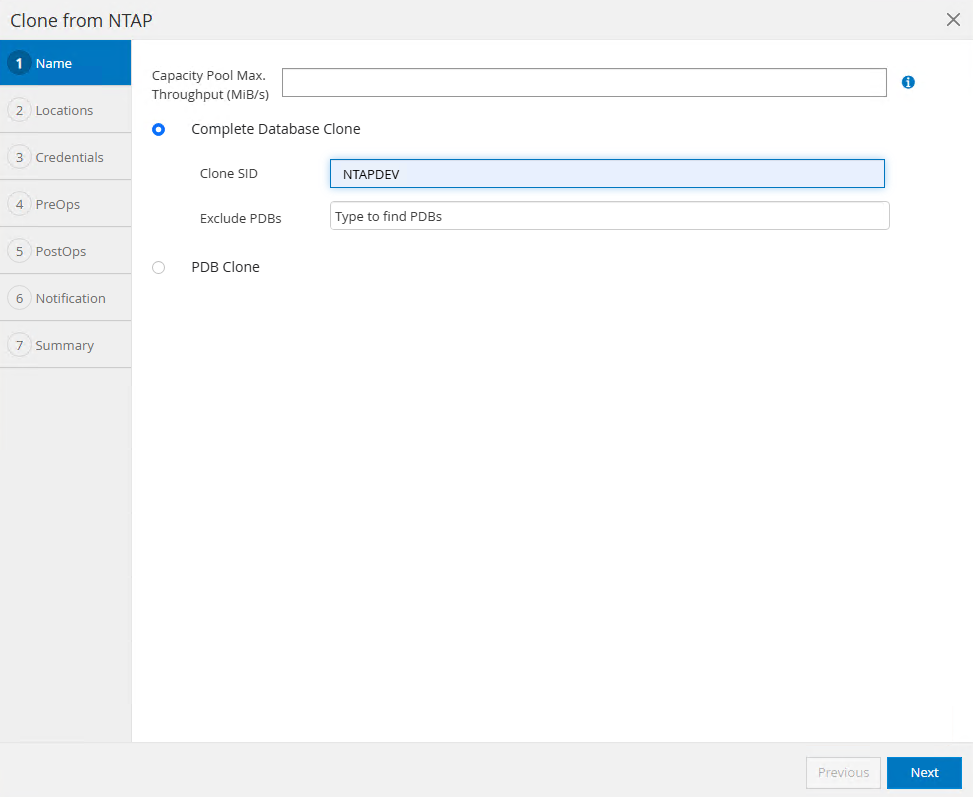
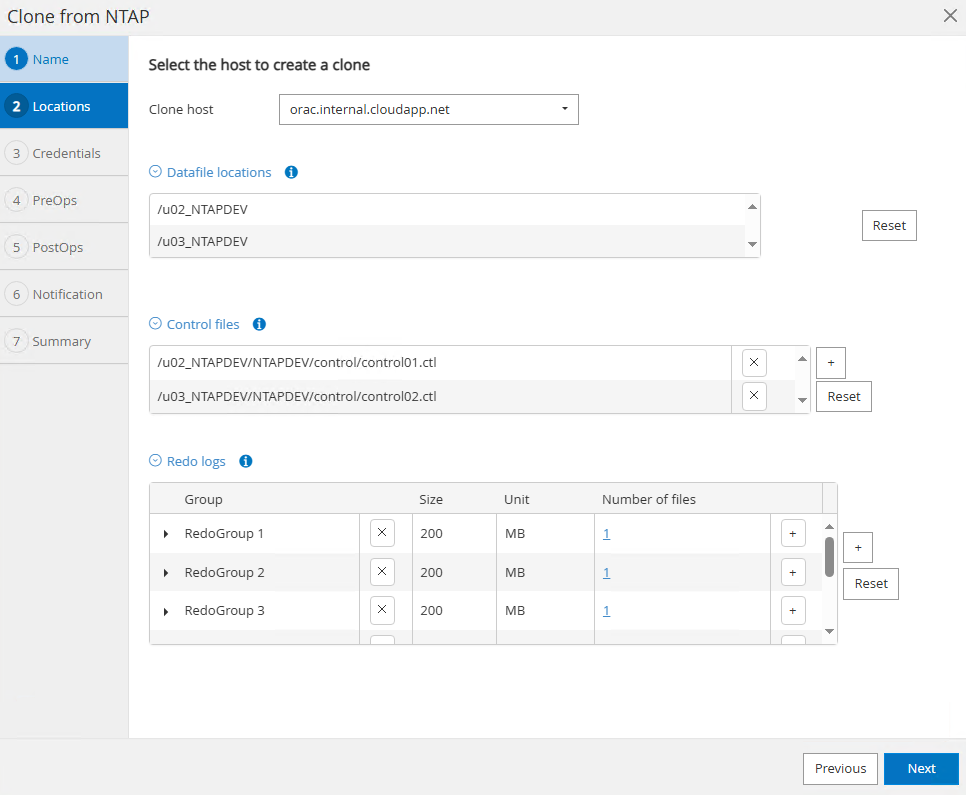
-
Select the clone DB server, which hosts the cloned database from the standby DB. Accept the default for data files, redo logs. Put a controlfile on /u03 mount point.
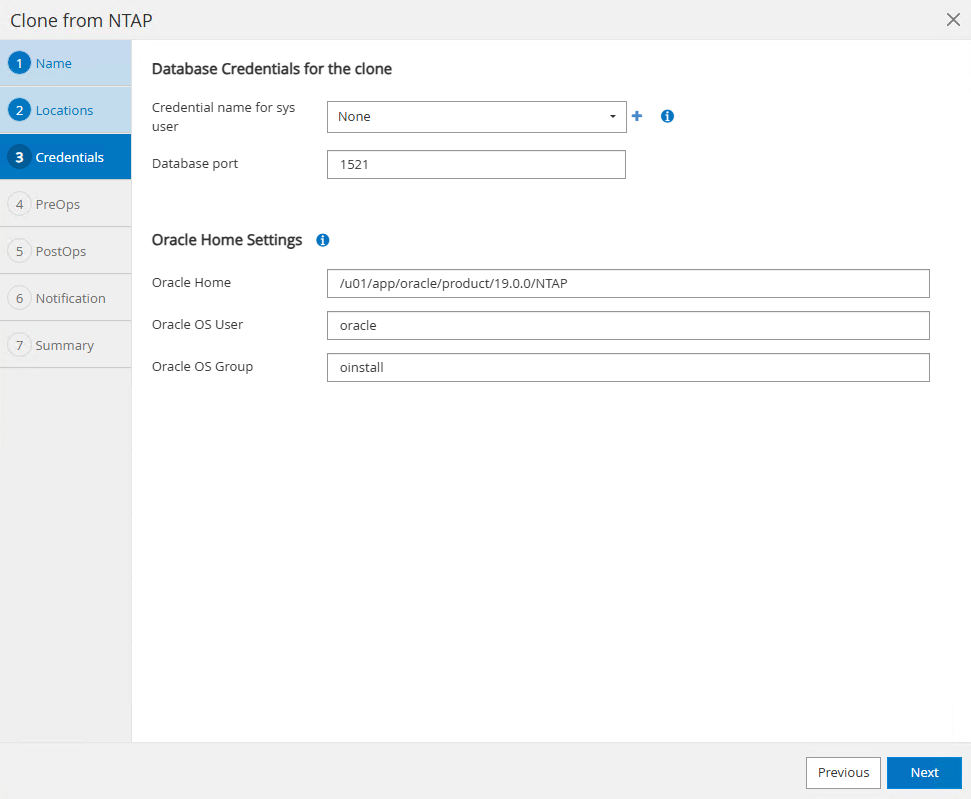
-
No database credentials are needed for OS based authentication. Match Oracle home setting with what is configured on the clone DB server.
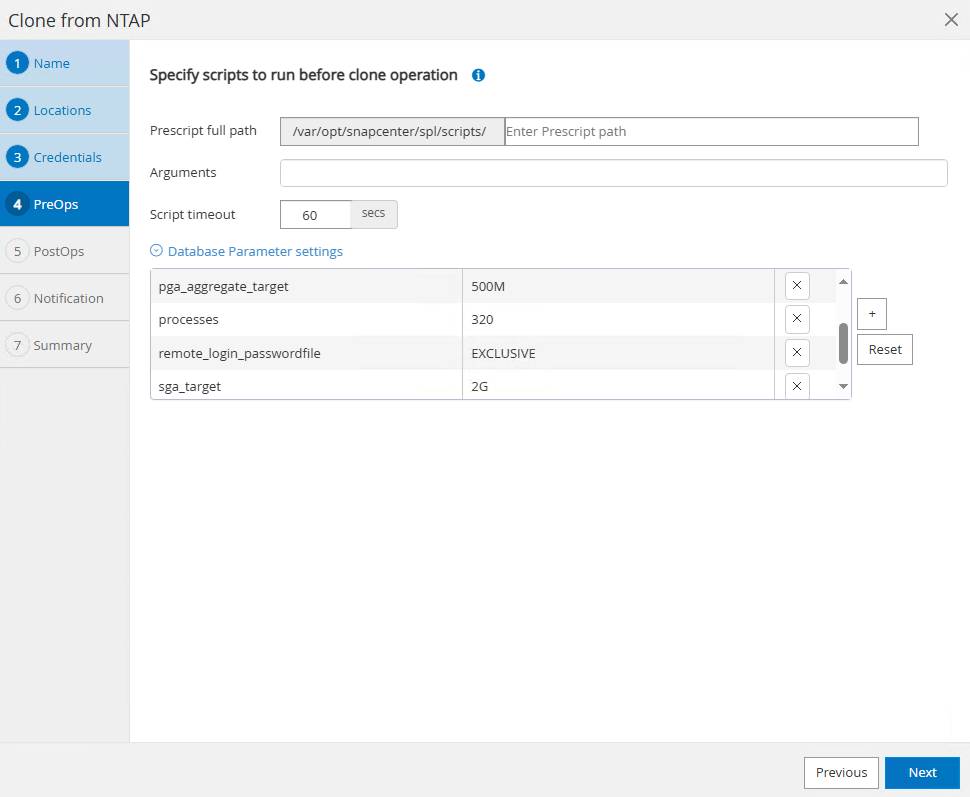
-
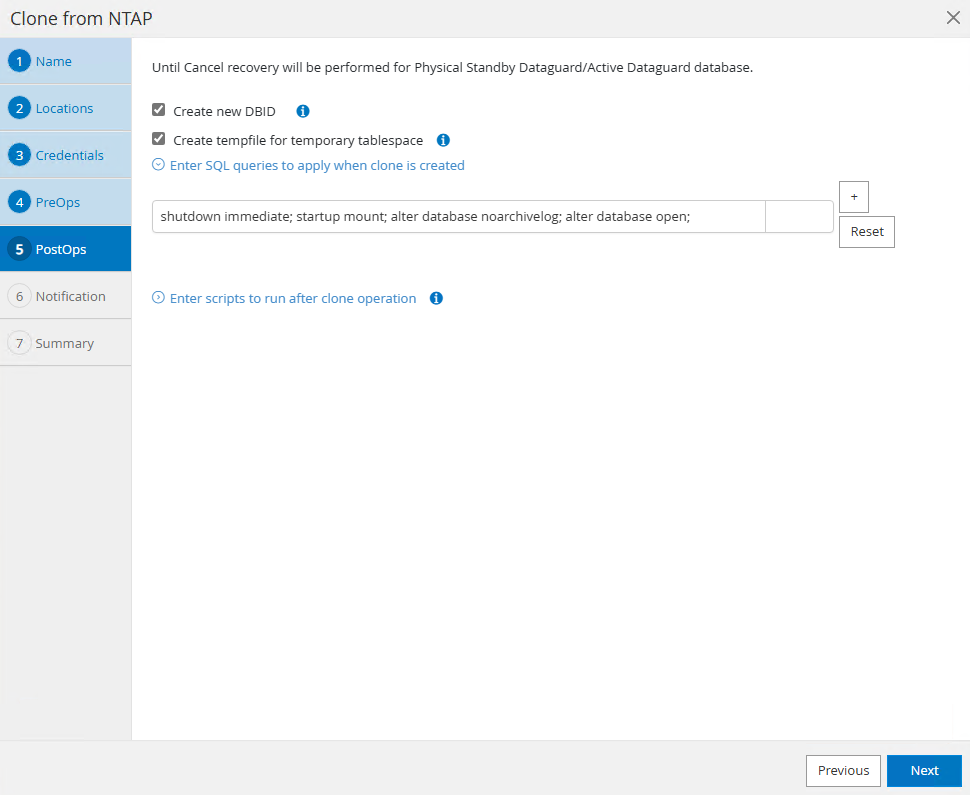
Change clone database parameters if needed such as lowering PGA or SGA size for a clone DB. Specify scripts to run before the clone if any.
-
Enter SQL to run after the clone. In the demo, we executed commands to turn off database archive mode for a dev/test/report database.
-
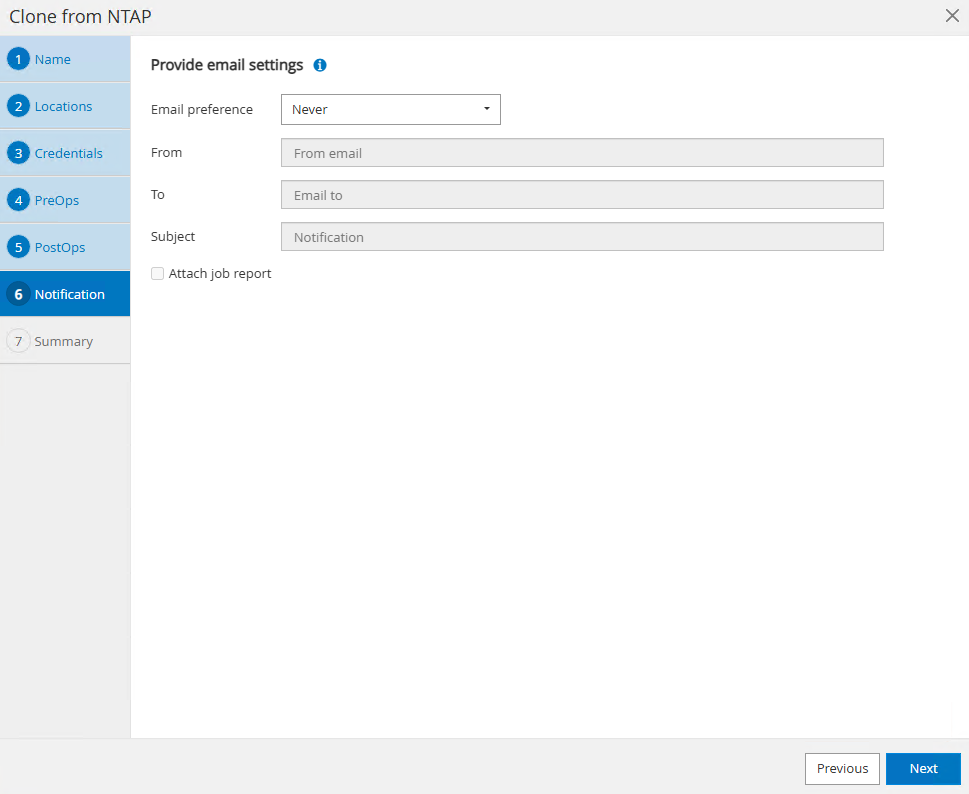
Configure email notification if desired.
-
Review the summary, click
Finishto start the clone.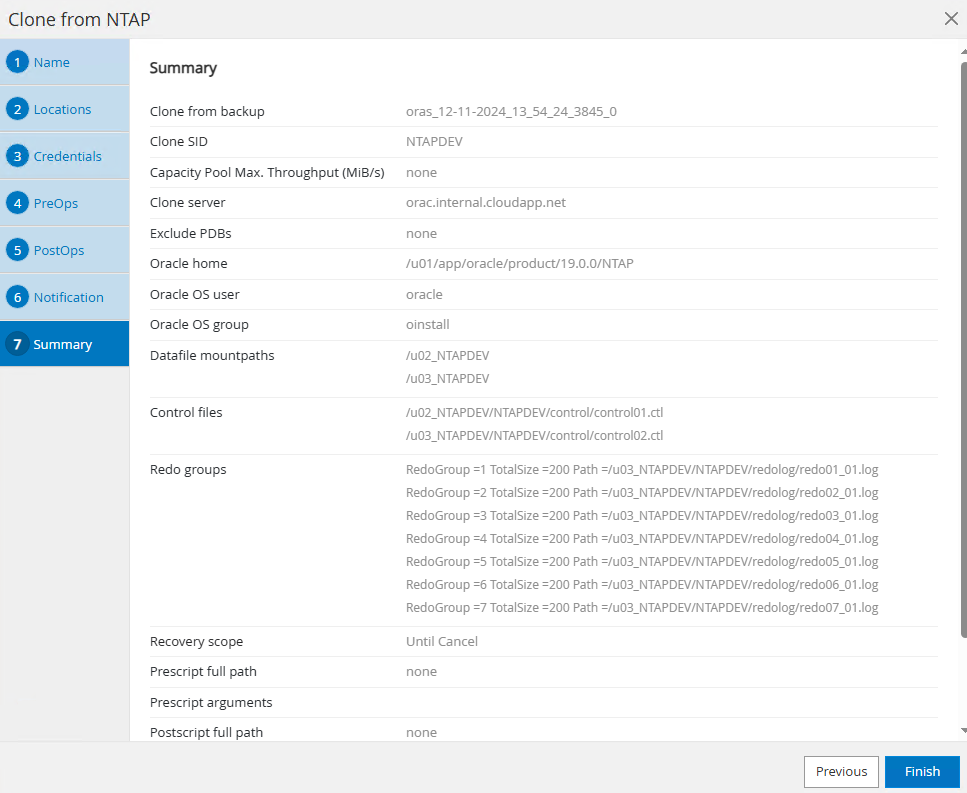
-
Monitor the clone job in
Monitortab. We observed that it took around 14 minutes to clone a database about 950GB in database volume size.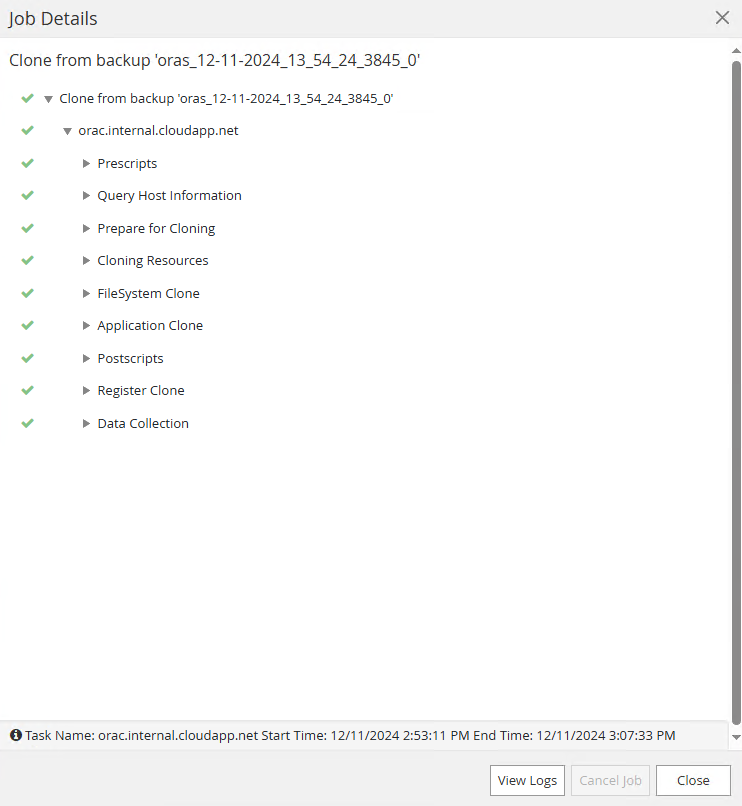
-
Validate the clone database from SnapCenter, which is immediately registered in
Resourcestab right after clone operation.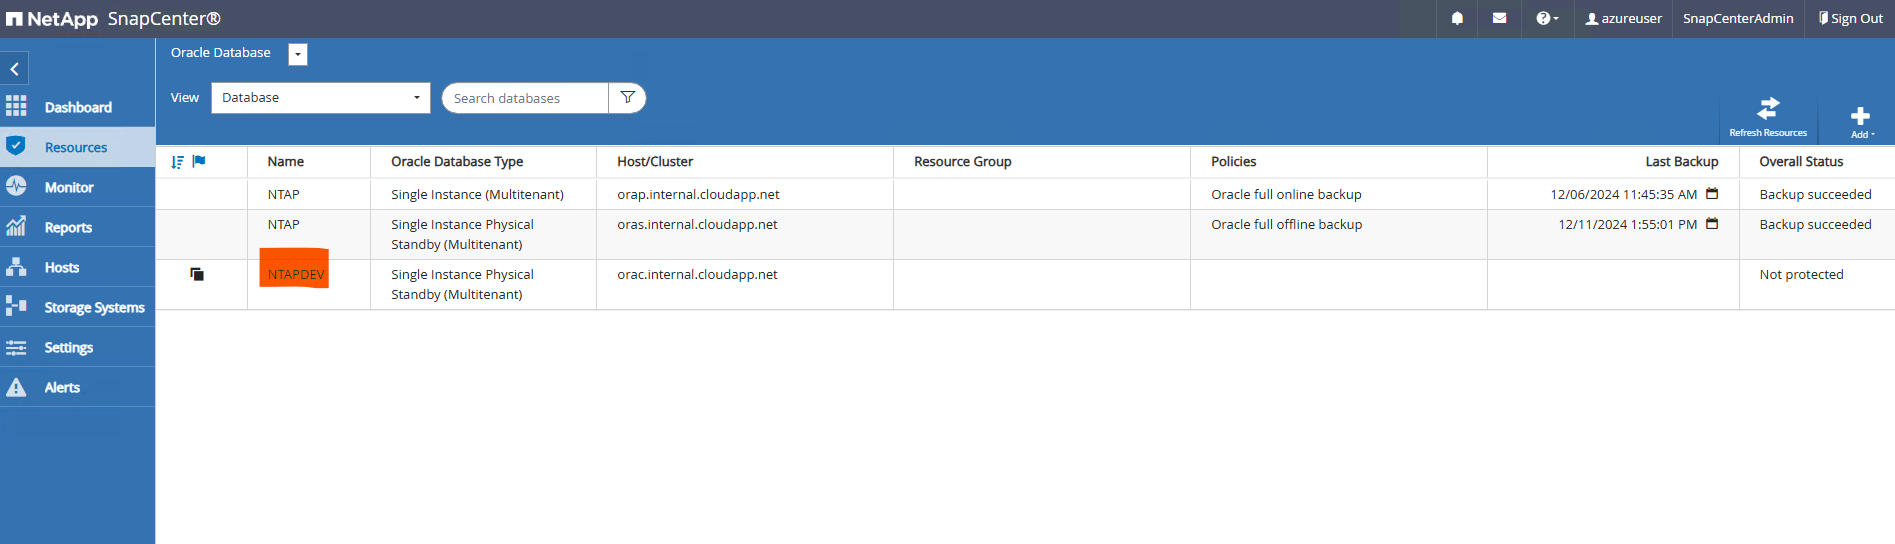
-
Query the clone database from clone DB server. We validated that test transaction that occurred in primary database had traversed down to the clone database.
[oracle@orac ~]$ sqlplus / as sysdba

SQL*Plus: Release 19.0.0.0.0 - Production on Wed Dec 11 20:16:09 2024
Version 19.18.0.0.0

Copyright (c) 1982, 2022, Oracle.  All rights reserved.


Connected to:
Oracle Database 19c Enterprise Edition Release 19.0.0.0.0 - Production
Version 19.18.0.0.0

SQL> select name, open_mode, log_mode from v$database;

NAME      OPEN_MODE            LOG_MODE
--------- -------------------- ------------
NTAPDEV   READ WRITE           NOARCHIVELOG

SQL> select instance_name, host_name from v$instance;

INSTANCE_NAME
----------------
HOST_NAME
----------------------------------------------------------------
NTAPDEV
orac


SQL> alter pluggable database all open;

Pluggable database altered.

SQL> alter pluggable database all save state;

Pluggable database altered.


SQL> alter session set container=ntap_pdb1;

Session altered.

SQL> select * from test;

        ID
----------
DT
---------------------------------------------------------------------------
EVENT
--------------------------------------------------------------------------------
         1
11-DEC-24 04.38.44.000000 PM
a test transaction at primary database NTAP on DB server orap.internal.cloudapp.
net
This completes the demonstration of the Oracle standby database clone in the Oracle Data Guard on Azure ANF storage for DEV, TEST, REPORT, or any other use cases. Multiple Oracle databases can be cloned off the same standby database in the Oracle Data Guard on ANF.
Where to find additional information
To learn more about the information described in this document, review the following documents and/or websites:
-
Azure NetApp Files
-
TR-4988: Oracle Database Backup, Recovery, and Clone on ANF with SnapCenter
-
TR-4987: Simplified, Automated Oracle Deployment on Azure NetApp Files with NFS
-
Oracle Data Guard Concepts and Administration