

Configure SnapCenter resources for individual SAP HANA databases
 Suggest changes
Configure individual SAP HANA databases in SnapCenter by creating backup users and user store keys, setting up storage replication for secondary backups, deploying the HANA plug-in for auto discovery, and configuring resource protection with policies and schedules.
The configuration of a HANA database in SnapCenter is done with the following steps:
-
A SnapCenter backup user must be configured in the HANA system database, and an SAP HANA user store key must be set up at the HANA database host
-
If data replication to a secondary storage is required, the ONTAP storage replication for the HANA data volume must be configured
-
The SnapCenter HANA plug-in must be deployed on the HANA database host
-
Auto discovery process gets started
-
SAP HANA user store key must be configured in SnapCenter
-
Second phase of auto discovery gets started and the HANA resource is added automatically by SnapCenter
-
-
HANA resource protection must be configured for the new added HANA resource
The initial SnapCenter configuration, as described in the previous topic "SnapCenter initial configuration" must be done first, since credentials, storage systems and policies are required during the HANA database resource configuration. The figure below summarizes the steps and dependencies.
The figure below visualizes the different configuration components and dependencies.

The following sections provide a detailed description of the required configuration steps.
SAP HANA backup user and SAP HANA user store configuration
NetApp recommends configuring a dedicated user in the HANA database to run the backup operations with SnapCenter. As a second step, an SAP HANA user store key is configured for this backup user, and the SAP HANA user store key is provided in the SnapCenter configuration.
The following figure shows the SAP HANA Studio through which the backup user, in this example SNAPCENTER can be created.

|
The backup user needs to be configured with the privileges backup admin, catalog read, database backup admin, and database recovery operator. |
|
|
The backup user must be created in the system database because all backup commands for the system and the tenant databases are executed via the system database. |

SAP HANA user store configuration on the HANA database host
SnapCenter uses the <sid>adm user to communicate with the HANA database. Therefore, the SAP HANA user store key must be configured using the <sid>adm user on the database host.
hdbuserstore set <key-name> <host>:<port> <database user> <password>
For an SAP HANA MDC system, the port of the HANA system database is 3<instanceNo>13.
SAP HANA user store configuration examples
The output shows the key SS1KEY which has been configured for the HANA system with instance number = 00.
ss1adm@hana-1:/usr/sap/SS1/HDB00> hdbuserstore list
DATA FILE : /usr/sap/SS1/home/.hdb/hana-1/SSFS_HDB.DAT
KEY FILE : /usr/sap/SS1/home/.hdb/hana-1/SSFS_HDB.KEY
KEY SS1SAPDBCTRL
ENV : hana-1:30013
USER: SAPDBCTRL
KEY SS1KEY
ENV : hana-1:30013
USER: SNAPCENTER
KEY SYSTEMKEY
ENV : hana-1:30013
USER: SYSTEM
ACTIVE RECORDS : 10
DELETED RECORDS : 15
NUMBER OF COMPLETE KEY: 3
Operation succeed.
ss1adm@hana-1:/usr/sap/SS1/HDB00>
The output shows the key SM1KEY which has been configured for the HANA system with instance number = 12.
sm1adm@hana-2:/usr/sap/SM1/HDB12> hdbuserstore list
DATA FILE : /usr/sap/SM1/home/.hdb/hana-2/SSFS_HDB.DAT
KEY FILE : /usr/sap/SM1/home/.hdb/hana-2/SSFS_HDB.KEY
KEY SM1SAPDBCTRL
ENV : hana-2:31213
USER: SAPDBCTRL
KEY SM1KEY
ENV : hana-2:31213
USER: SNAPCENTER
ACTIVE RECORDS : 7
DELETED RECORDS : 9
NUMBER OF COMPLETE KEY: 2
Operation succeed.
sm1adm@hana-2:/usr/sap/SM1/HDB12>
Storage replication configuration
The configuration of the data protection relation as well as the initial data transfer must be executed before replication updates can be managed by SnapCenter.
The following screenshots show a configuration using ONTAP system manager. For FSx for ONTAP systems the replication must be done using the ONTAP CLI as described at Overview - Backup replication with SnapVault.
The following figure shows the configured protection relationship for the data volume of the SAP HANA system SS1. With this example, the source volume SS1_data_mnt00001 at the SVM hana-primary is replicated to the SVM hana-backup and the target volume SS1_data_mnt00001_dst.
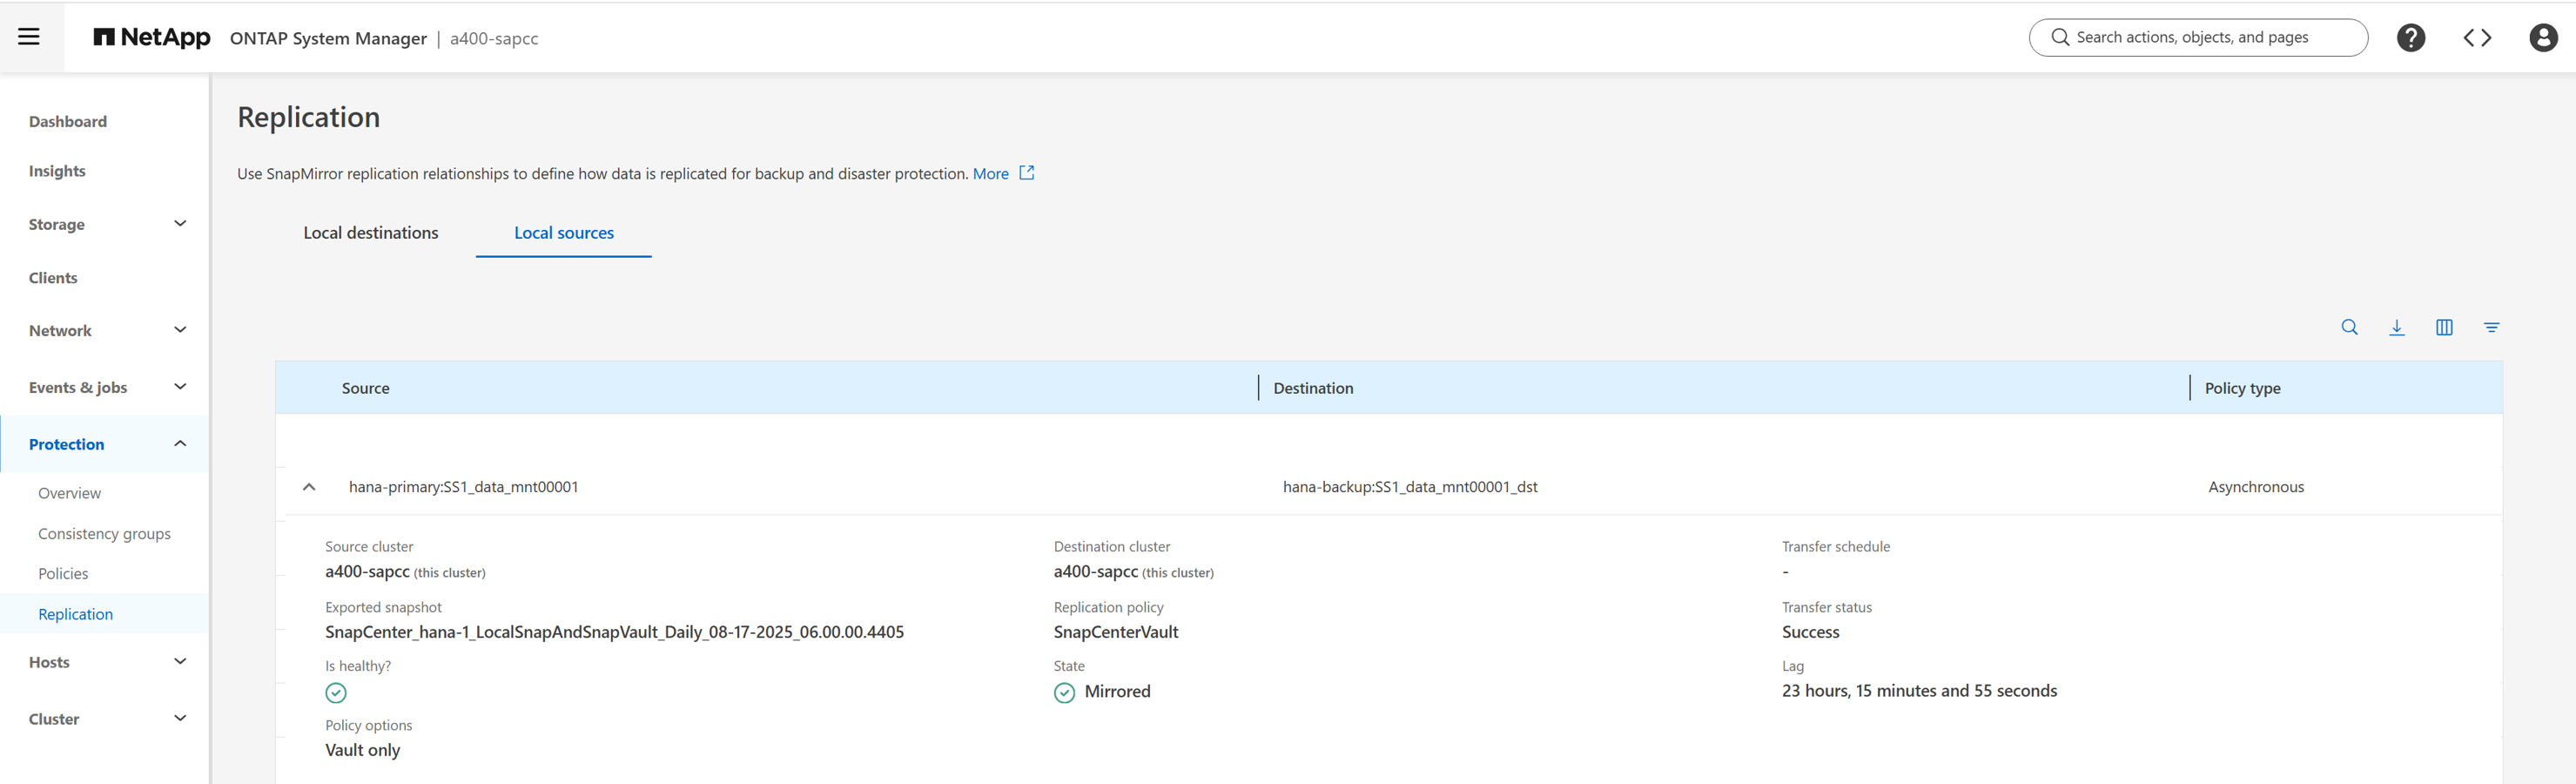
The following figure shows the protection policy, which has been created for this lab setup. The protection policy used for the protection relationship defines the SnapMirror label, as well as the retention of backups at the secondary storage. In this example, the used label is Daily, and the retention is set to 5.
|
|
The SnapMirror label in the replication policy must match the label defined in the SnapCenter policy configuration. |
|
|
The schedule of the relationship must be set to None, because SnapCenter triggers the SnapVault update as part of the backup operation based on the application consistent Snapshot created before. |
|
|
The retention for backups at the secondary backup storage is defined in the policy and controlled by ONTAP. |

ANF backup configuration
For ANF backup no specific preparation is required. As soon as the first backup with enabled ANF backup is executed an Azure backup vault with the name snapcenter-vault is created by SnapCenter. This backup vault is then used by all following ANF backup operations executed by SnapCenter.

Deployment of SnapCenter plug-in for SAP HANA
The host requirements are listed at Host requirements for installing the SnapCenter Plug-ins Package for Linux.
The HANA plug-in deployment is done by clicking the Add button in the Hosts section of the SnapCenter UI.

In the Add host screen, you need to provide the host type and name and the credentials to be used for the deployment process. In addition, the SAP HANA plug-in must be selected. By clicking submit the deployment process starts.
|
|
For this description we didn't add a new host but show the configuration of existing hosts in SnapCenter. |

HANA auto discovery
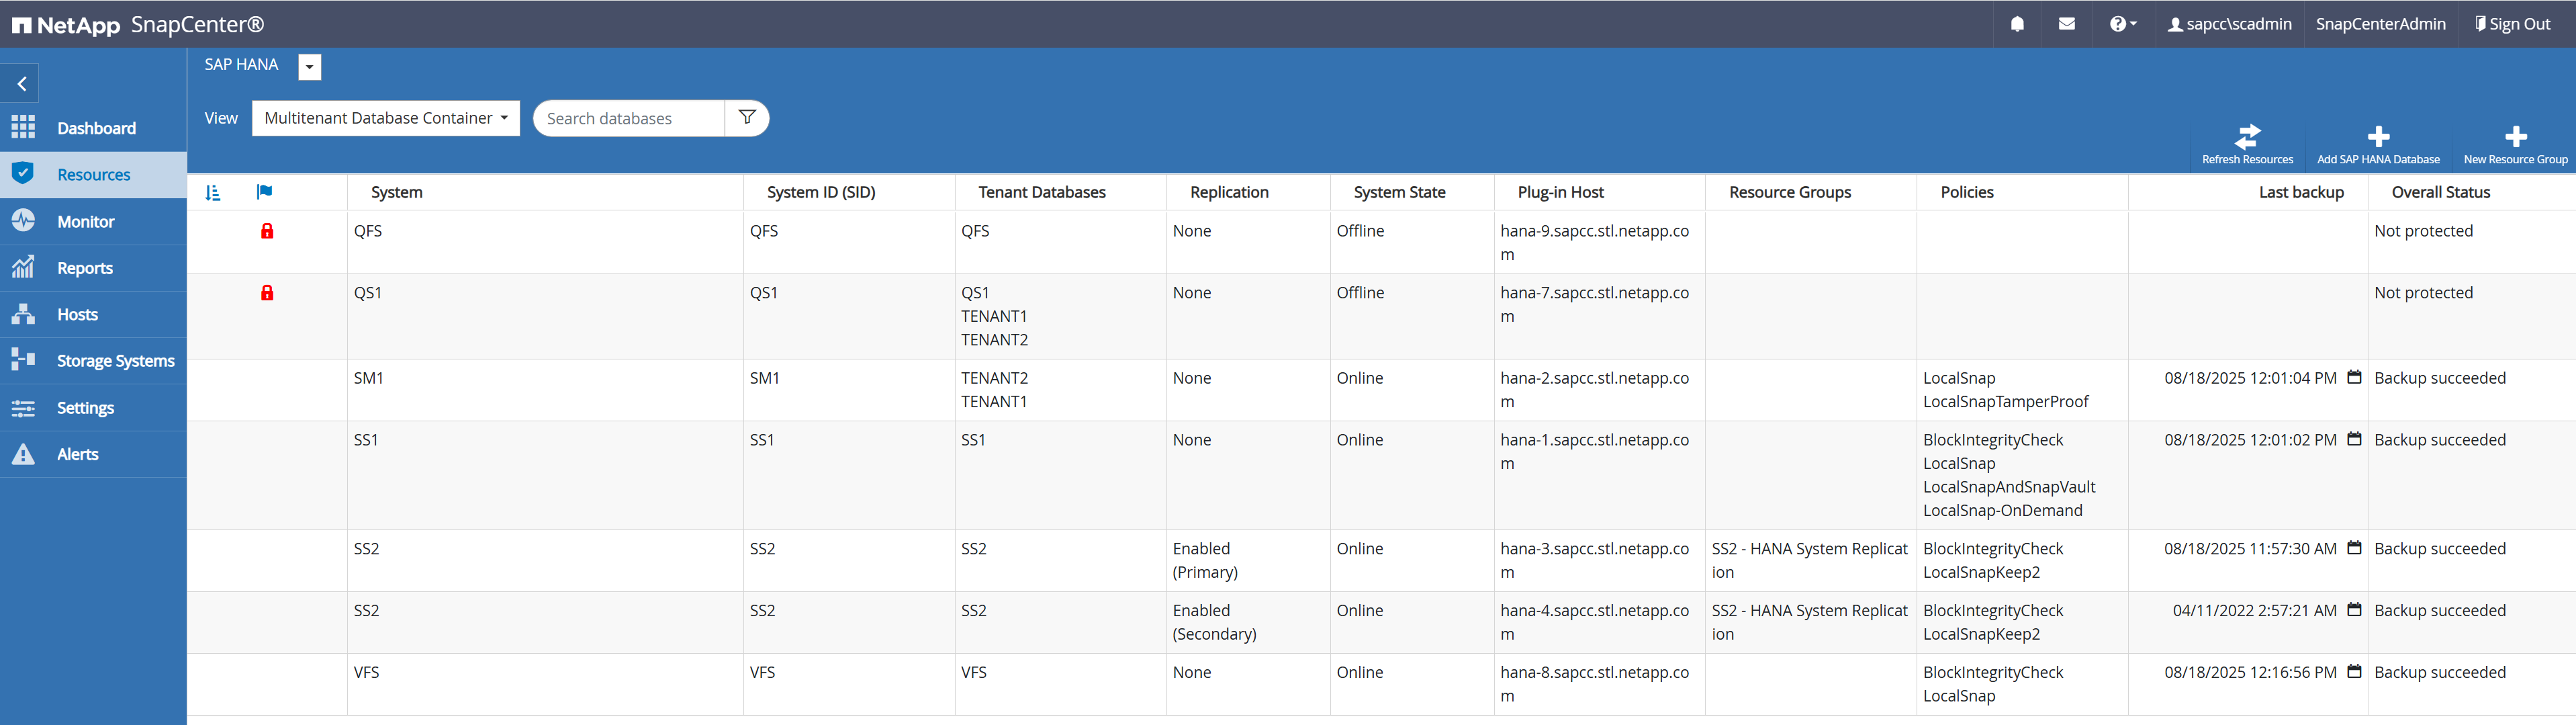
Once the HANA plug-in deployment is finished, the auto discovery process gets started. In the first phase, only basic settings are discovered and SnapCenter creates a new resource which gets listed on the Resources section of the UI marked with a red padlock.
When clicking on the resource, you get asked for the SAP HANA user store key for this HANA database.

After the key has been provided the second phase of the auto discovery process gets started. The auto discovery process detects all tenant databases in the HANA system, log and catalog backup configuration details and HANA system replication roles. In addition, storage footprint details are automatically discovered. These settings can be checked by selecting a resource and clicking on the Details button.
|
|
This auto discovery process is executed with each backup operation, so that any changes made to the HANA system, which are relevant for the backup operation will be automatically detected. |

Resource protection configuration
The resource protection configuration screen is opened by clicking on a resource after the auto discovery process has finished. The screenshots in this documentation show the protection configuration of an existing resource.
Configure a custom name format for the Snapshot. NetApp recommends using a custom Snapshot name to easily identify which backups have been created with which policy and schedule type.
In the configuration shown in the following figure, the backup and Snapshot copy names have the following format:
-
Scheduled hourly backup:
SnapCenter_<host-name>_LocalSnap_Hourly_<time_stamp> -
Scheduled daily backup:
SnapCenter_<host-name>_LocalSnapAndSnapVault_Daily_<time_stamp>

In the next screen, scripts can be configured, which should be executed at various steps of the backup workflow.

Now policies are attached to the resource and schedules are defined.
In this example we have configured
-
A weekly block integrity check, every Sunday
-
A local Snapshot backup, every 4 hours
-
A daily Snapshot backup with SnapVault replication once per day

Email notification can be configured.

When the resource protection configuration is done, scheduled backups will be executed according to the defined settings.