

SnapCenter Integration for SAP ASE Database
 Suggest changes
This document describes the SnapCenter integration specifics for SAP ASE Database used in an SAP environment.
Introduction
The document is not intended to be a step-by-step description of how to setup the complete environment but will cover concepts and relevant details related to:
-
Example configuration overview
-
Sample Layout
-
Protect SAP ASE Instance
-
Restore and Recover SAP ASE Instance
Author: Michael Schlosser, NetApp
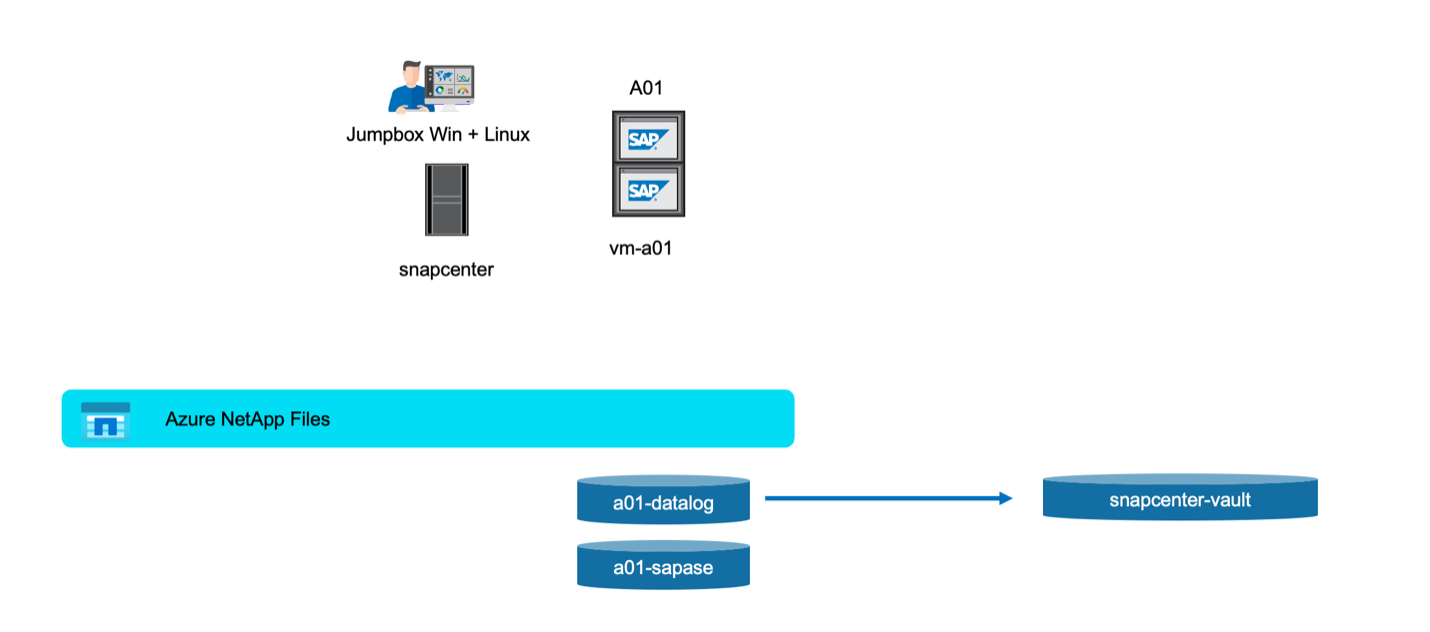
Example configuration overview
Example Implementation for SnapCenter ASE Plugin for an SAP System running on the Azure Platform.

|
This implementation describes the minimal required volume configuration. Data Dump Backups and Log Dump Backups are configured according to SAP Note 1588316. |
Alternatively, the volume structure described in this MS Technical Community Blog could be used.
Demo Environment
Software versions
| Software | Version |
|---|---|
Linux OS |
SLES for SAP 15 SP5 |
SAP |
SAP NetWeaver 7.5 |
SAP ASE |
16.0 SP04 PL06 HF1 |
SnapCenter |
6.1 |
ASE Volume Design
Following least volume Layout must be used to enable backup / recovery and clone use-cases for the SAP ASE database. The example configuration use <SID>: A01.
| Volume Name | Directory (qtree) on Volume | Mount Point on Server | Comment |
|---|---|---|---|
<SID>-sapase |
sybase |
/sybase |
Parent directory for ASE related files |
/sybase/<SID>/backups |
Data Dump Backups (might be placed on a different volume) |
||
/sybase/<SID>/log_archives |
Log Dump Backups (might be placed on a different volume) |
||
<sid>adm |
/home/<sid>adm |
Home directory of user <sid>adm |
|
usrsaptrans |
/usr/sap/trans |
Transport directory |
|
usrsap<SID> |
/usr/sap/<SID> |
Usr sap |
|
sapmnt<SID> |
/sapmnt/<SID> |
SAP GlobalHost Dir |
|
<SID>-datalog |
sapdata_1 |
/sybase/<SID>/sapdata_1 |
DB Data (SID) |
saplog_1 |
/sybase/<SID>/saplog_1 |
DB Log (SID) |
|
saptemp |
/sybase/<SID>/saptemp |
PSAPTEMP |
|
sybsecurity |
/sybase/<SID>/sybsecurity |
Sybase security DB |
|
sybsystem |
/sybase/<SID>/sybsystem |
Sybase system DB |
|
sybtemp |
/sybase/<SID>/sybtemp |
Sybase system DB - Temp |
|
sapdiag |
/sybase/<SID>/sapdiag |
'saptools' database |
Steps to Protect Database A01
-
Check File distribution, according to the sample Layout
-
Check Prerequisites for the Host (vm-a01)
-
Check Prerequisites for the Database (A01)
-
Deploy / Install SnapCenter Agent on Host (vm-a01)
-
Create SnapCenter Instance Resource Configuration
Prerequisites on Host
More current information might be available here.
Before you add a host and install the plug-ins package for Linux, you must complete all the requirements.
-
If you are using iSCSI, the iSCSI service must be running.
-
You can either use the password-based authentication for the root or non-root user or SSH key based authentication.
-
SnapCenter Plug-in for Unix File Systems can be installed by a non-root user. However, you should configure the sudo privileges for the non-root user to install and start the plug-in process. After installing the plug-in, the processes will be running as an effective non-root user.
-
Create credentials with authentication mode as Linux for the install user.
-
You must have installed Java 11 on your Linux host.
-
Ensure that you have installed only the certified edition of JAVA 11 on the Linux host
-
For information to download JAVA, see: Java Downloads for All Operating Systems
-
You should have bash as the default shell for plug-in installation.
Prerequisites for the Database – Enable Logging and Backups
-
Create Directories for backups and log_archives (/sybase/A01/backups, /sybase/A01/log_archives)
-
Connect to database A01 (as OS-user syba01)
-
isql -S A01 -U sapsa -X -w 1024
-
-
Create Dump configuration for DATA (A01DB) according to SAP Note 1588316
-
use master
-
go
-
exec sp_config_dump @config_name='A01DB', @stripe_dir = '/sybase/A01/backups' , @compression = '101' , @verify = 'header'
-
go
-
-
Create Dump configuration for LOG (A01LOG) according to SAP Note 1588316
-
use master
-
go
-
sp_config_dump @config_name='A01LOG', @stripe_dir = '/sybase/A01/log_archives' , @compression = '101' , @verify = 'header'
-
go
-
-
Enable full logging for Database A01
-
sp_dboption A01, 'trunc log on chkpt' , false
-
go
-
sp_dboption A01, 'full logging for all', 'true'
-
go
-
sp_dboption A01, 'enforce dump tran sequence', 'true'
-
go
-
-
Database DUMP Backup to enable Log DUMP Backup
-
dump database A01 using config ='A01DB'
-
go
-
Log Dump
-
dump transaction A01 using config = 'A01LOG'
-
go
-
-
Ensure, that regular Log Backups are configured, according to SAP Note 1588316
Optional – create dedicated database user
For SAP Environments user sapsa could be used.
-
Connect to database A01 (as OS-user syba01)
-
isql -S A01 -U sapsa -X -w 1024
-
-
create user
-
create login backup with password <password>
-
go
-
-
assign permissons / roles to the user
-
grant role sa_role,sso_role,oper_role,sybase_ts_role to backup
-
go
-
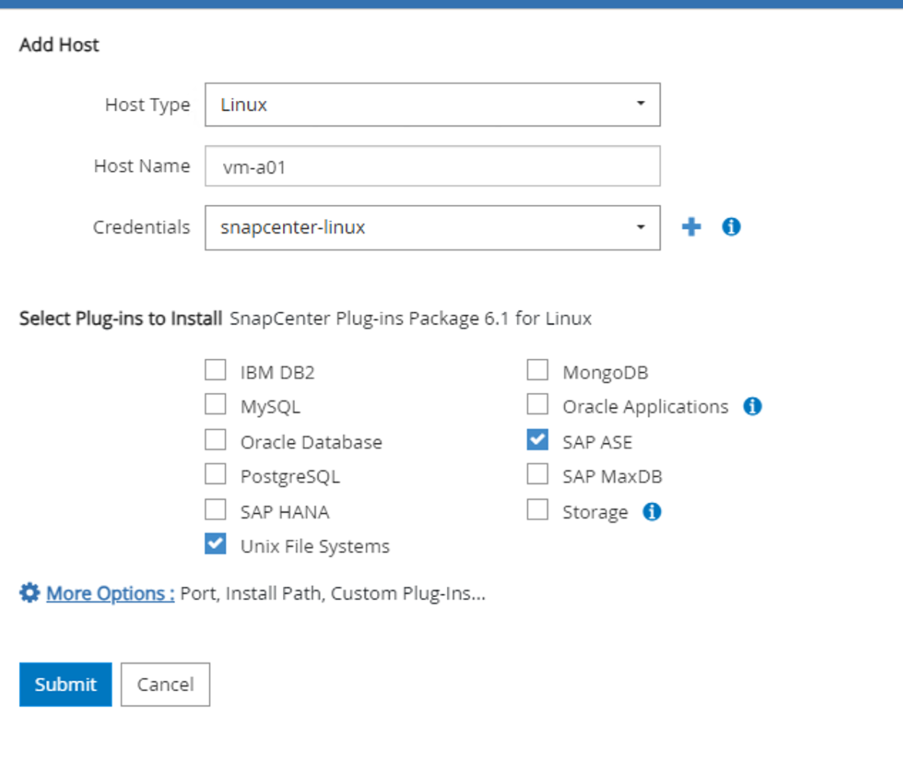
Deploy SnapCenter Agent to Host vm-a01
Further information could be found in the SnapCenter documentation.
Select SAP ASE and Unix File Systems Plugins.
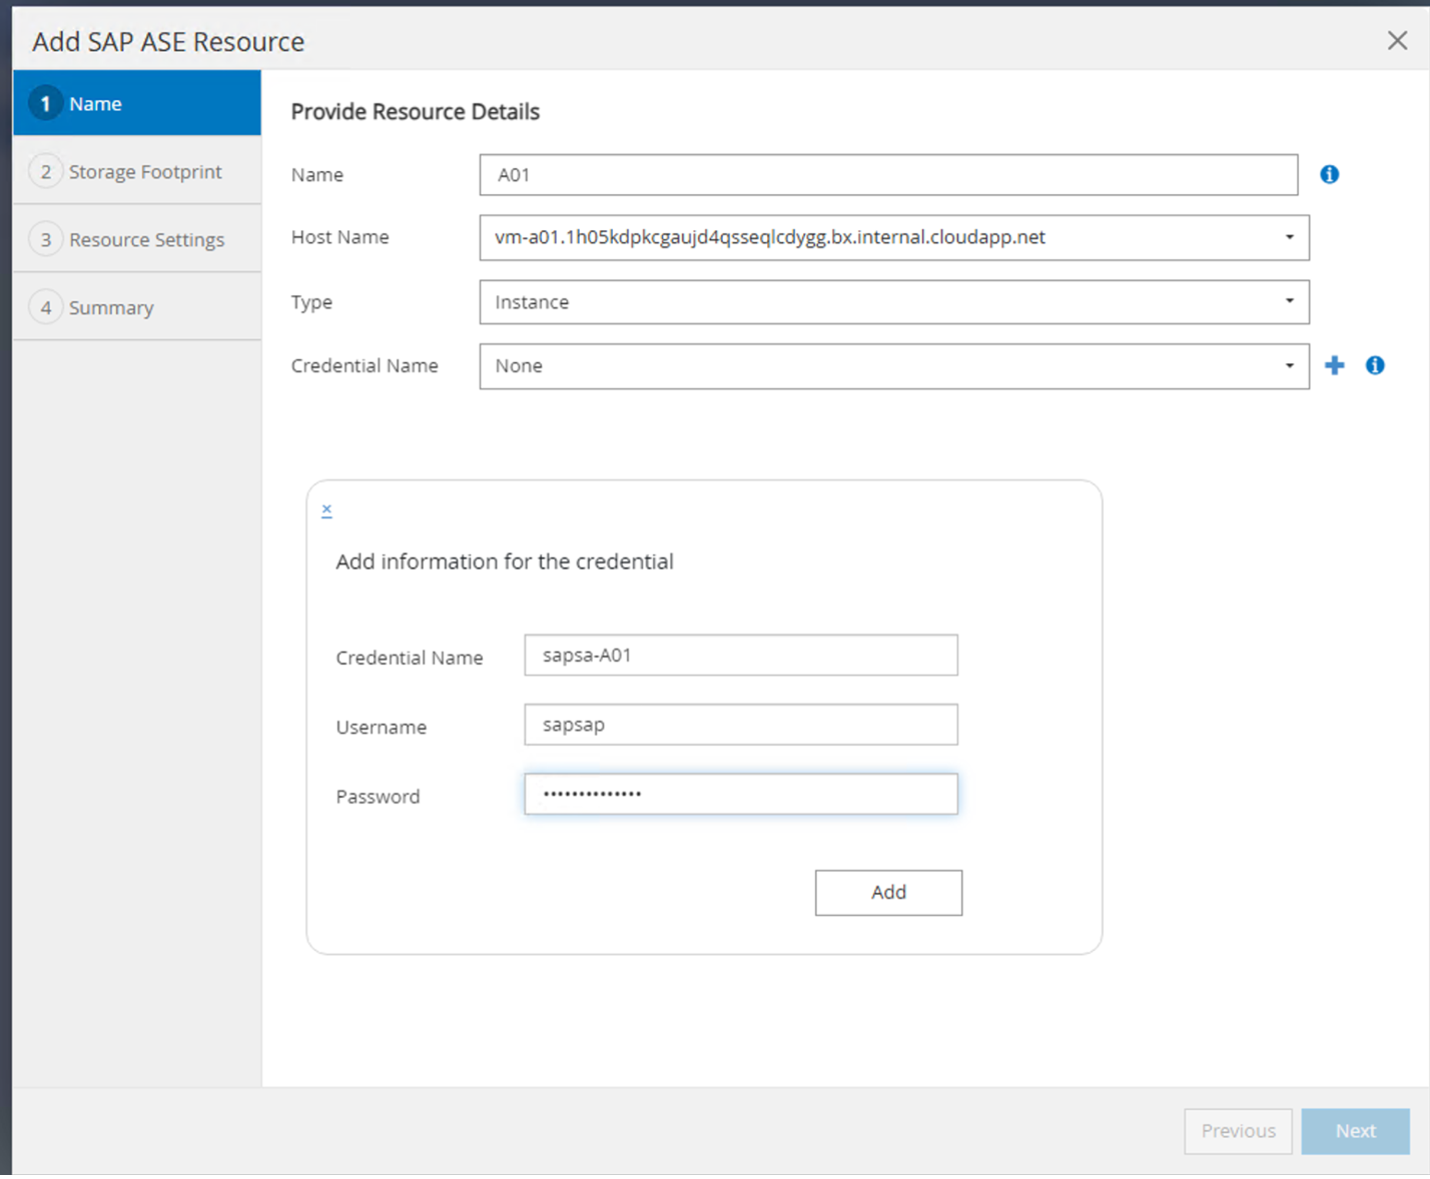
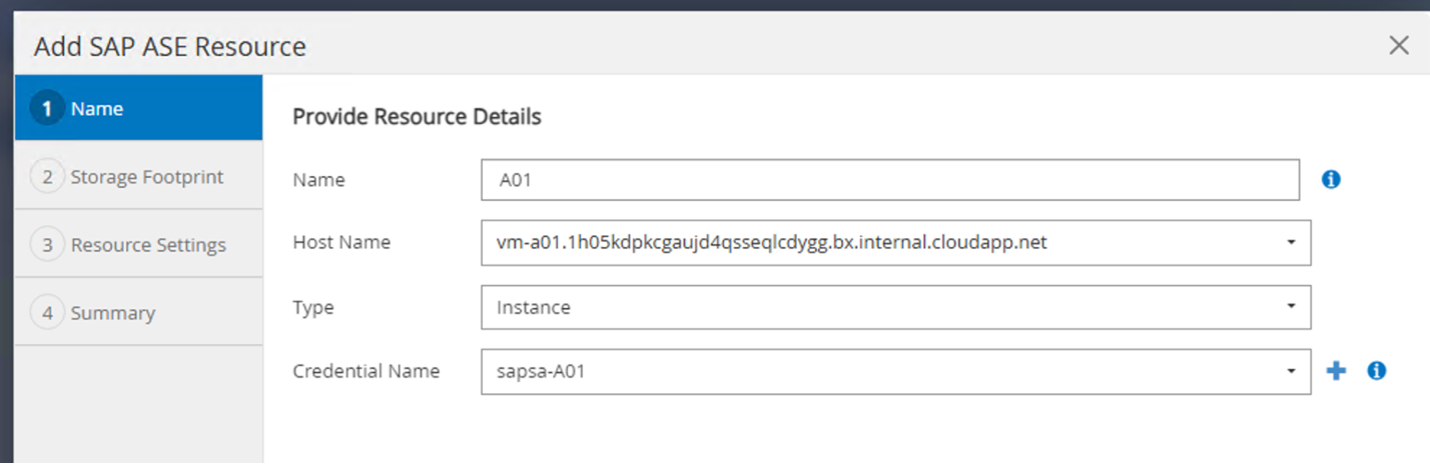
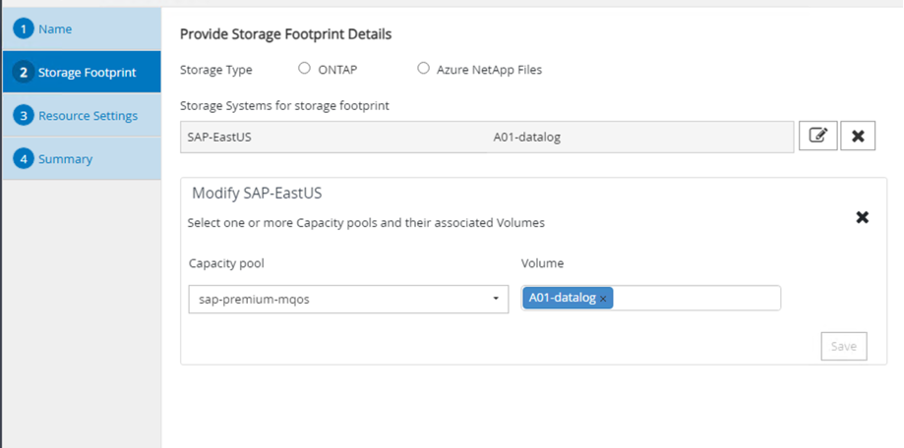
Create SnapCenter Instance Resource Configuration for Database A01
Resources → SAP ASE → Add Resources
|
|
If Password contains Special Characters, they must be masked with a backslash. E.g. Test!123! → Test\!123\! |
|
|
If you are using the volume design out of the MS Technical Community Blog. |
Volumes /vol<SID>sybase, /vol<SID>data, /vol<SID>log has to be configured as Storage Footprint
Following Resource Settings Custom key-value pairs must be made (at least).
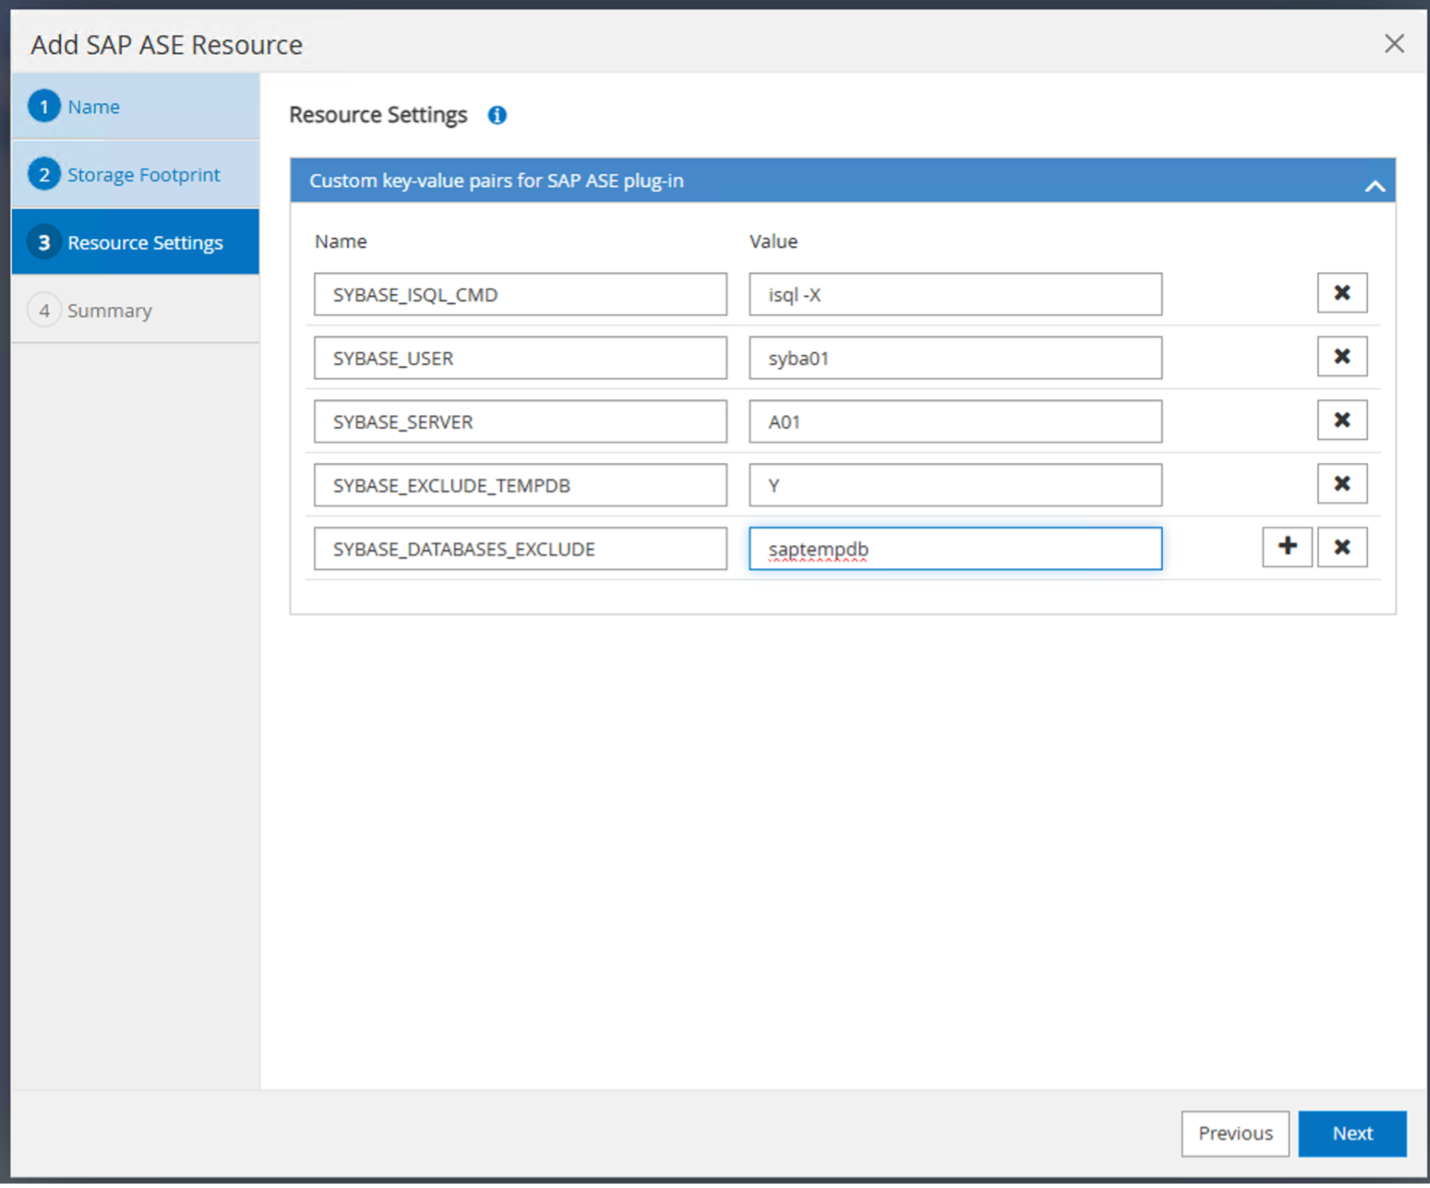
The following table lists the Sybase plug-in parameters, provides their settings, and describes them:
| Parameter | Setting | Description |
|---|---|---|
SYBASE_ISQL_CMD |
Example: /opt/sybase/OCS-15__0/bin/isql -X |
Defines the path to the isql command. Available Options: https://infocenter.sybase.com/help/index.jsp?topic=/com.sybase.infocenter.dc34237.1500/html/mvsinst/CIHHFDGC.htm |
SYBASE_USER |
user_name |
Specifies the operating system user who can run the isql command. This parameter is required for UNIX. This parameter is required if the user running the Snap Creator Agentstart and stop commands (usually the root user) and the user running the isql command are different. |
SYBASE_SERVER |
data_server_name |
Specifies the Sybase data server name (-S option on isql command).For example: A01 |
SYBASE_DATABASES |
db_name:user_name/password |
Lists the databases within the instance to back up. The master database is added; for example: DBAtest2:sa/53616c7404351e.If a database named +ALL is used, then database automatic discovery is used, and the sybsyntax, sybsystemdb, sybsystemprocs, and tempdb databases are excluded. |
SYBASE_DATABASES_EXCLUDE |
db_name |
Allows databases to be excluded if the +ALL construct is used. You can specify multiple databases by using a semicolon-separated list.For example, pubs2;test_db1 |
SYBASE_TRAN_DUMP |
db_name:directory_path |
Enables you to perform a Sybase transaction dump after creating a Snapshot copy.For example: pubs2:/sybasedumps/pubs2 |
SYBASE_TRAN_DUMP_FORMAT |
%S_%D_%T.cmn |
Enables you to specify the dump naming convention. The following keys can be specified: |
SYBASE_TRAN_DUMP_COMPRESS |
(Y / N) |
Enables or disables native Sybase transaction dump compression. |
SYBASE |
Example: /Sybase |
Specifies the location of the Sybase installation. |
SYBASE_MANIFEST |
Example: A01:/sybase/A01/sapdiag |
Specifies the databases for which the manifest file should be created, along with the location where the manifest file should be placed. |
SYBASE_MANIFEST_FORMAT |
%S__%D_.manifest Example: %S_%D_.manifest |
Enables you to specify the manifest file naming convention. The following keys can be specified: |
SYBASE_MANIFEST_DELETE |
(Y / N) |
Allows the manifest to be deleted after the Snapshot copy has been created. The manifest file should be captured in the Snapshot copy so that it is always available with the backup. |
SYBASE_EXCLUDE_TEMPDB |
(Y / N) |
Enables automatic exclusion of user-created temporary databases. |
Sequence to Recover System A01
-
stop SAP System A01 (including database), stop sapinit
-
umount Filesystems
-
restore Volumes A01-datalog (using SnapCenter)
-
mount Filesystems
-
start Database A01 (with option –q, to avoid automatic online and keep database forward recoverable – according to SAP Note 1887068)
-
start BackupServer A01
-
online database saptools, sybsecurity , sybmgmtdb
-
recover Database A01 (using isql)
-
online database A01
-
start sapinit, SAP System A01
Recover Instance A01
-
Stop SAP System + DB A01 on host vm-a01
-
User a01adm: stopsap
-
User root: /etc/init.d/sapinit stop
-
User root: umount -a -t nfs
-
-
Restore Backup
-
SnapCenter GUI: Select required Backup for Restore
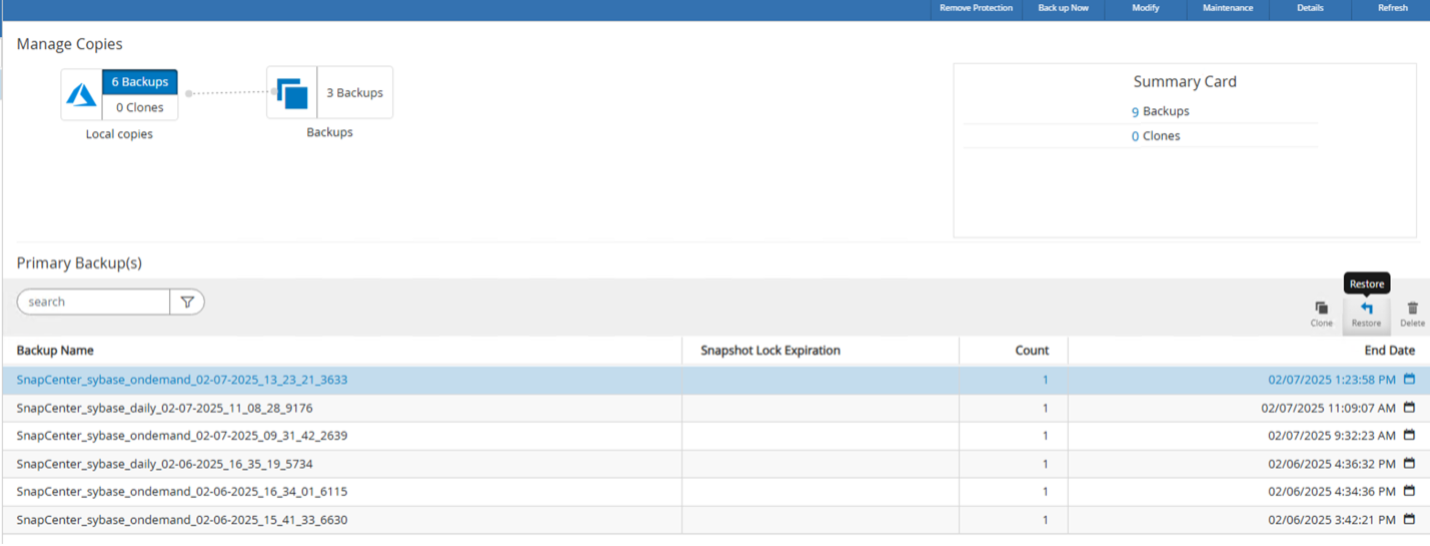
-
For ANF Deployment – only Complete Resource is available

-
|
|
Selecting Complete Resource will trigger a Volume Based Snap Restore (VBSR). Within Azure it is called volume revert. |

|
|
For other deployment Types (e.g. On-Prem ANF) a Single File Snap Restore (SFSR) operation could be orchestrated. Select File Level and the according Volume and Checkmark “All” – see following screenshot. |

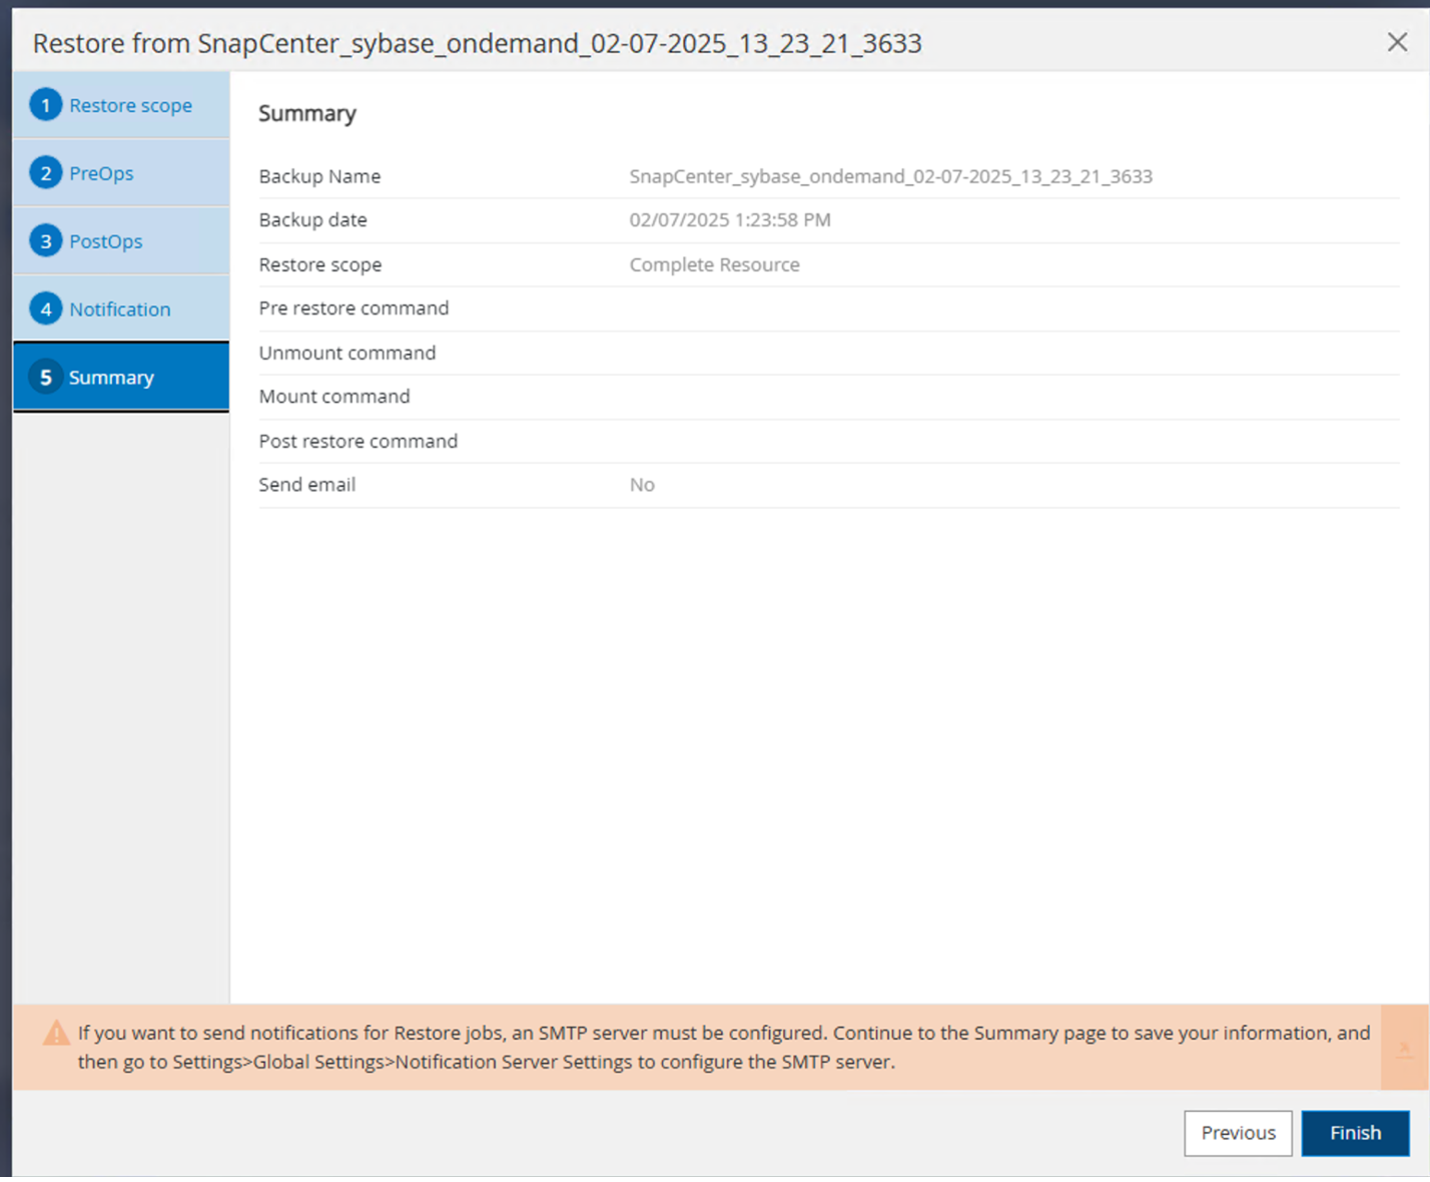
Summary would be displayed and with Finish the actual restore is started.
-
Mount Filesystems (vm-a01)
-
User root: mount -a -t nfs
-
-
Start Database A01 + BackupServer
-
Modify RUN_A01 and add -q \ (according to SAP Note 1887068)
-
User syba01: RUN_A01 &
-
User syba01: RUN_A01_BS&
-
-
Online databases saptools, sybsecurity , sybmgmtdb
-
User syba01: isql -S A01 -U sapsa -X -w 1024
-
online database saptools
-
go
-
online database sybsecurity
-
go
-
online database sybmgmtdb
-
go
-
-
recover Database A01
-
sp_dump_history (to show the transaction log dumps)
-
go
-
Load transaction log dumps according your needs – for more information see documentation: https://infocenter.sybase.com/help/index.jsp?topic=/com.sybase.infocenter.dc36272.1572/html/commands/X75212.htm
-
Example:
LOAD TRAN A01 FROM '/sybase/A01/log_archives/A01.TRAN.20250207.140248.6.000' -
go
-
online database A01
-
go
-
-
remove -q from RUN_A01
-
start SAP System
-
User root: /etc/init.d/sapinit start
-
User a01adm: startsap
-
Additional information and version history
Quiesce vs. prepare
See the documentation on link: SAP help page.
SnapCenter SAP ASE Plugin uses the quiesce database command, however it could be replaced by the prepare command. If required, it must be changed in the SYBASE.pm in line 473, 475, 479, 481, 673, 675
e.g.

Recorded Demos
Following recoded Demos are available to support the documentation.
External Documentation
To learn more about the information that is described in this document, review the following documents and/or websites:
-
SAP Notes (login required)
-
1887068 - SYB: Using external backup and restore with SAP ASE: https://me.sap.com/notes/1887068/E
-
1618817 - SYB: How to restore an SAP ASE database server (UNIX): https://me.sap.com/notes/1618817/E
-
1585981 - SYB: Ensuring Recoverability for SAP ASE: https://me.sap.com/notes/1585981/E
-
1588316 - SYB: Configure automatic database and log backups: https://me.sap.com/notes/1588316/E
-
NetApp Product Documentation: https://www.netapp.com/support-and-training/documentation/
-
NetApp SAP Solutions – Informations about Use-Cases, Best-Practices and Benefits
-
Version history
| Version | Date | Document version history |
|---|---|---|
Version 1.0 |
April 2025 |
Initial version – backup / recovery ASE database |