

Configure SR-IOV network interfaces for SAP HANA on SUSE KVM
 Suggest changes
Configure SR-IOV network interfaces on SUSE KVM for SAP HANA. Set up virtual functions (VFs), assign them to VMs, and configure redundant network connections for optimal performance and storage access.
Bridged networking is supported as well.
Step 1: Setup SR-IOV
Enable and configure SR-IOV functionality in the adapter firmware to allow virtual function creation.
This procedure is based on NVIDIA Enterprise Support Portal | HowTo Configure SR-IOV for ConnectX-4/ConnectX-5/ConnectX-6 with KVM (Ethernet). The SUSE SAP HANA KVM guide describes this based on an INTEL NIC.
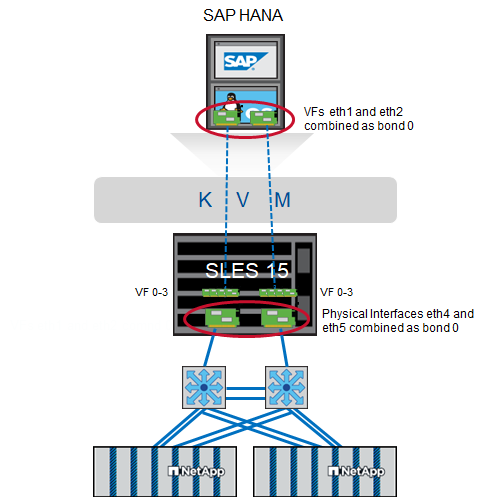
It is recommended to use redundant ethernet connections by combining two physical ports as trunk/bond. The virtual ports (VF) assigned to the VM need to be trunked as well within the VM.
Make sure the following prerequisites are met:
-
KVM is installed
-
SR-IOV is enabled in the servers BIOS
-
PCI Passthrough is enabled by adding “intel_iommu=on” and “iommu=pt” as option at the bootloader
-
Latest MLNX_OFED drivers are installed at KVM hosts and VM.

|
Each VF assigned to a VM requires at least 10 Gbit/s bandwidth. Do not create and assign more than two VFs for a 25GbE physical port. |
-
Run MFT (Mellanox Firmware Tools):
# mst start
Starting MST (Mellanox Software Tools) driver set
Loading MST PCI module – Success
Loading MST PCI configuration module – Success
Create devices
Unloading MST PCI module (unused) – Success
-
Locate the device:
# mst status
MST modules:
------------
MST PCI module is not loaded
MST PCI configuration module loaded

MST devices:

------------

/dev/mst/mt4125_pciconf0 - PCI configuration cycles access.
domain:bus:dev.fn=0000:ab:00.0 addr.reg=88 data.reg=92 cr_bar.gw_offset=-1

Chip revision is: 00
-
Check the status of the device:
mlxconfig -d /dev/mst/mt4125_pciconf0 q |grep -e SRIOV_EN -e NUM_OF_VFS
NUM_OF_VFS 8
SRIOV_EN True(1)_
-
If necessary, enable SR-IOV:
mlxconfig -d /dev/mst/mt4125_pciconf0 set SRIOV_EN=1
-
Set the max amount of VFs:
mlxconfig -d /dev/mst/mt4125_pciconf0 set NUM_OF_VFS=4
-
Reboot the server if the feature needed to be enabled or the amount of max VFs has been changed.
Step 2: Create the virtual interfaces
Create virtual functions (VFs) on the physical network ports to enable SR-IOV functionality. In this step, four VFs are created per physical port.
-
Find the device:
# ibstat

CA 'mlx5_0'
CA type: MT4125
Number of ports: 1
Firmware version: 22.36.1010
Hardware version: 0
Node GUID: 0xa088c20300a6f6fc
System image GUID: 0xa088c20300a6f6fc
Port 1:
State: Active
Physical state: LinkUp
Rate: 100
Base lid: 0
LMC: 0
SM lid: 0
Capability mask: 0x00010000
Port GUID: 0xa288c2fffea6f6fd
Link layer: Ethernet
CA 'mlx5_1'
CA type: MT4125
Number of ports: 1
Firmware version: 22.36.1010
Hardware version: 0
Node GUID: 0xa088c20300a6f6fd
System image GUID: 0xa088c20300a6f6fc
Port 1:
State: Active
Physical state: LinkUp
Rate: 100
Base lid: 0
LMC: 0
SM lid: 0
Capability mask: 0x00010000
Port GUID: 0xa288c2fffea6f6fd
Link layer: Ethernet
If a bond has been created the output would look like the following:
# ibstat
CA 'mlx5_bond_0'
CA type: MT4125
Number of ports: 1
Firmware version: 22.36.1010
Hardware version: 0
Node GUID: 0xa088c20300a6f6fc
System image GUID: 0xa088c20300a6f6fc
Port 1:
State: Active
Physical state: LinkUp
Rate: 100
Base lid: 0
LMC: 0
SM lid: 0
Capability mask: 0x00010000
Port GUID: 0xa288c2fffea6f6fc
Link layer: Ethernet
#:/etc/sysconfig/network # cat /sys/class/infiniband/mlx5_bond_0/device/
aerdevcorrectable iommugroup/ resetmethod
aerdevfatal irq resource
aerdevnonfatal link/ resource0
arienabled localcpulist resource0wc
brokenparitystatus localcpus revision
class maxlinkspeed rom
config maxlinkwidth sriovdriversautoprobe
consistentdmamaskbits mlx5_core.eth.0/ sriovnumvfs
urrentlinkspeed mlx5_core.rdma.0/ sriovoffset
currentlinkwidth modalias sriovstride
d3coldallowed msibus sriovtotalvfs
device msiirqs/ sriovvfdevice
dmamaskbits net/ sriovvftotalmsix
driver/ numanode subsystem/
driveroverride pools subsystemdevice
enable power/ subsystemvendor
firmwarenode/ powerstate uevent
infiniband/ ptp/ vendor
infinibandmad/ remove vpd
infinibandverbs/ rescan
iommu/ reset
# ibdev2netdev
mlx5_0 port 1 ==> eth4 (Up)
mlx5_1 port 1 ==> eth5 (Up)
-
Get the total VFs that are allowed and configured in the firmware:
# cat /sys/class/net/eth4/device/sriov_totalvfs
4
# cat /sys/class/net/eth5/device/sriov_totalvfs
4
-
Get the current number of VFs on this device:
# cat /sys/class/infiniband/mlx5_0/device/sriov_numvfs
0
# cat /sys/class/infiniband/mlx5_1/device/sriov_numvfs
0
-
Set the desired number of VFs:
# echo 4 > /sys/class/infiniband/mlx5_0/device/sriov_numvfs
# echo 4 > /sys/class/infiniband/mlx5_1/device/sriov_numvfs
If you already configured a bond using these two ports the first command needs to be executed against the bond:
# echo 4 > /sys/class/infiniband/mlx5_bond_0/device/sriov_numvfs
-
Check the PCI bus:
# lspci -D | grep Mellanox

0000:ab:00.0 Ethernet controller: Mellanox Technologies MT2892 Family [ConnectX-6 Dx]
0000:ab:00.1 Ethernet controller: Mellanox Technologies MT2892 Family [ConnectX-6 Dx]
0000:ab:00.2 Ethernet controller: Mellanox Technologies ConnectX Family mlx5Gen Virtual Function
0000:ab:00.3 Ethernet controller: Mellanox Technologies ConnectX Family mlx5Gen Virtual Function
0000:ab:00.4 Ethernet controller: Mellanox Technologies ConnectX Family mlx5Gen Virtual Function
0000:ab:00.5 Ethernet controller: Mellanox Technologies ConnectX Family mlx5Gen Virtual Function
0000:ab:01.2 Ethernet controller: Mellanox Technologies ConnectX Family mlx5Gen Virtual Function
0000:ab:01.3 Ethernet controller: Mellanox Technologies ConnectX Family mlx5Gen Virtual Function
0000:ab:01.4 Ethernet controller: Mellanox Technologies ConnectX Family mlx5Gen Virtual Function
0000:ab:01.5 Ethernet controller: Mellanox Technologies ConnectX Family mlx5Gen Virtual Function
# ibdev2netdev -v

0000:ab:00.0 mlx5_0 (MT4125 - 51TF3A5000XV3) Mellanox ConnectX-6 Dx 100GbE QSFP56 2-port PCIe 4 Ethernet Adapter fw 22.36.1010 port 1 (ACTIVE) ==> eth4 (Up)
0000:ab:00.1 mlx5_1 (MT4125 - 51TF3A5000XV3) Mellanox ConnectX-6 Dx 100GbE QSFP56 2-port PCIe 4 Ethernet Adapter fw 22.36.1010 port 1 (ACTIVE) ==> eth6 (Up)
0000:ab:00.2 mlx523 (MT4126 - NA) fw 22.36.1010 port 1 (DOWN ) ==> eth6 (Down)
0000:ab:00.3 mlx5_3 (MT4126 - NA) fw 22.36.1010 port 1 (DOWN ) ==> eth7 (Down)
0000:ab:00.4 mlx5_4 (MT4126 - NA) fw 22.36.1010 port 1 (DOWN ) ==> eth8 (Down)
0000:ab:00.5 mlx5_5 (MT4126 - NA) fw 22.36.1010 port 1 (DOWN ) ==> eth9 (Down)
0000:ab:01.2 mlx5_6 (MT4126 - NA) fw 22.36.1010 port 1 (DOWN ) ==> eth10 (Down)
0000:ab:01.3 mlx5_7 (MT4126 - NA) fw 22.36.1010 port 1 (DOWN ) ==> eth11 (Down)
0000:ab:01.4 mlx5_8 (MT4126 - NA) fw 22.36.1010 port 1 (DOWN ) ==> eth12 (Down)
0000:ab:01.5 mlx5_9 (MT4126 - NA) fw 22.36.1010 port 1 (DOWN ) ==> eth13 (Down)
-
Check the VFs configuration via the IP tool:
# ip link show
…
6: eth4: <BROADCAST,MULTICAST,SLAVE,UP,LOWER_UP> mtu 9000 qdisc mq master bond0 state UP mode DEFAULT group default qlen 1000

link/ether a0:88:c2:a6:f6:fd brd ff:ff:ff:ff:ff:ff permaddr a0:88:c2:a6:f6:fc
vf 0 link/ether 00:00:00:00:00:00 brd ff:ff:ff:ff:ff:ff, spoof checking off, link-state auto, trust off, query_rss off
vf 1 link/ether 00:00:00:00:00:00 brd ff:ff:ff:ff:ff:ff, spoof checking off, link-state auto, trust off, query_rss off
vf 2 link/ether 00:00:00:00:00:00 brd ff:ff:ff:ff:ff:ff, spoof checking off, link-state auto, trust off, query_rss off
vf 3 link/ether 00:00:00:00:00:00 brd ff:ff:ff:ff:ff:ff, spoof checking off, link-state auto, trust off, query_rss off

altname enp171s0f0np0
altname ens3f0np0

7: eth5: <BROADCAST,MULTICAST,SLAVE,UP,LOWER_UP> mtu 9000 qdisc mq master bond0 state UP mode DEFAULT group default qlen 1000

link/ether a0:88:c2:a6:f6:fd brd ff:ff:ff:ff:ff:ff
vf 0 link/ether 00:00:00:00:00:00 brd ff:ff:ff:ff:ff:ff, spoof checking off, link-state auto, trust off, query_rss off
vf 1 link/ether 00:00:00:00:00:00 brd ff:ff:ff:ff:ff:ff, spoof checking off, link-state auto, trust off, query_rss off
vf 2 link/ether 00:00:00:00:00:00 brd ff:ff:ff:ff:ff:ff, spoof checking off, link-state auto, trust off, query_rss off
vf 3 link/ether 00:00:00:00:00:00 brd ff:ff:ff:ff:ff:ff, spoof checking off, link-state auto, trust off, query_rss off

altname enp171s0f1np1
altname ens3f1np1
…
Step 3: Enable VFs during boot
Configure the VF settings to persist across system reboots by creating systemd services and startup scripts.
-
Create a systemd unit file
/etc/systemd/system/after.localwith the following content:[Unit] Description=/etc/init.d/after.local Compatibility After=libvirtd.service Requires=libvirtd.service [Service] Type=oneshot ExecStart=/etc/init.d/after.local RemainAfterExit=true [Install] WantedBy=multi-user.target
-
Create the script /etc/init.d/after.local:
#! /bin/sh
#
#
# ...
echo 4 > /sys/class/infiniband/mlx5_bond_0/device/sriov_numvfs
echo 4 > /sys/class/infiniband/mlx5_1/device/sriov_numvfs
-
Ensure that the file can be executed:
# cd /etc/init.d/
# chmod 750 after.local
Step 4: Assign the virtual interfaces to the VM
Assign the created virtual functions to the SAP HANA VM as PCI host devices using virt-manager
-
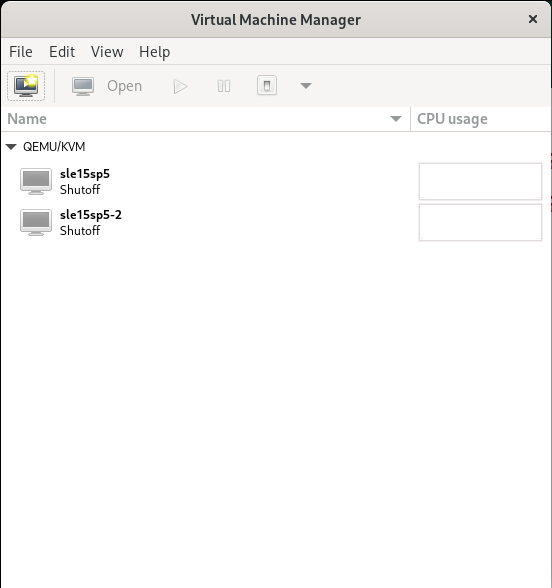
Start virt-manager.
-
Open the desired VM.
-
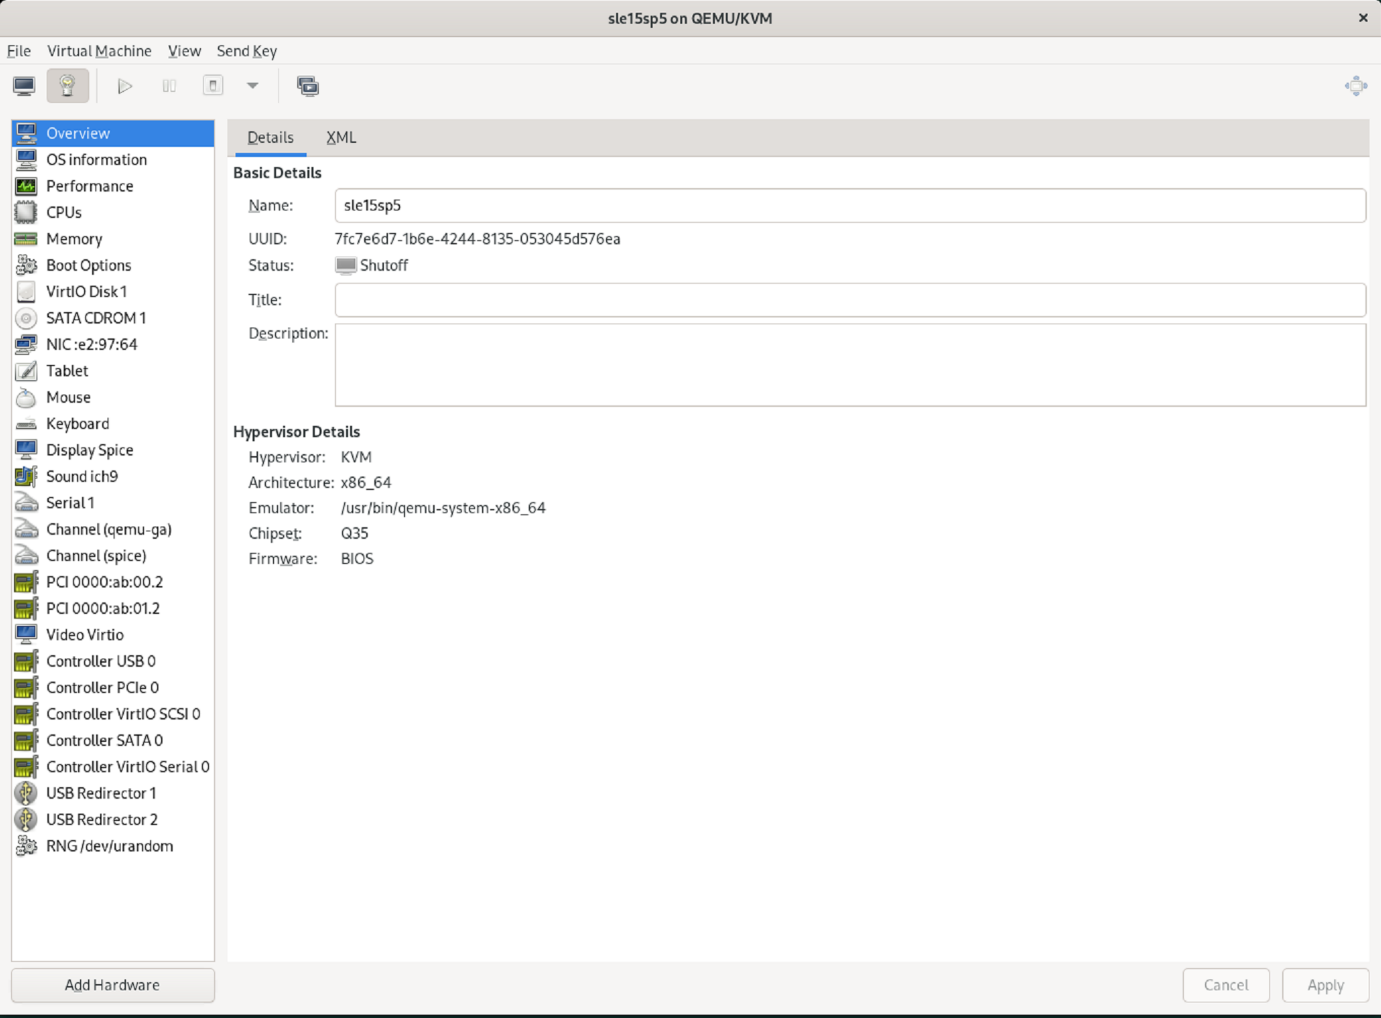
Select Add Hardware.
-
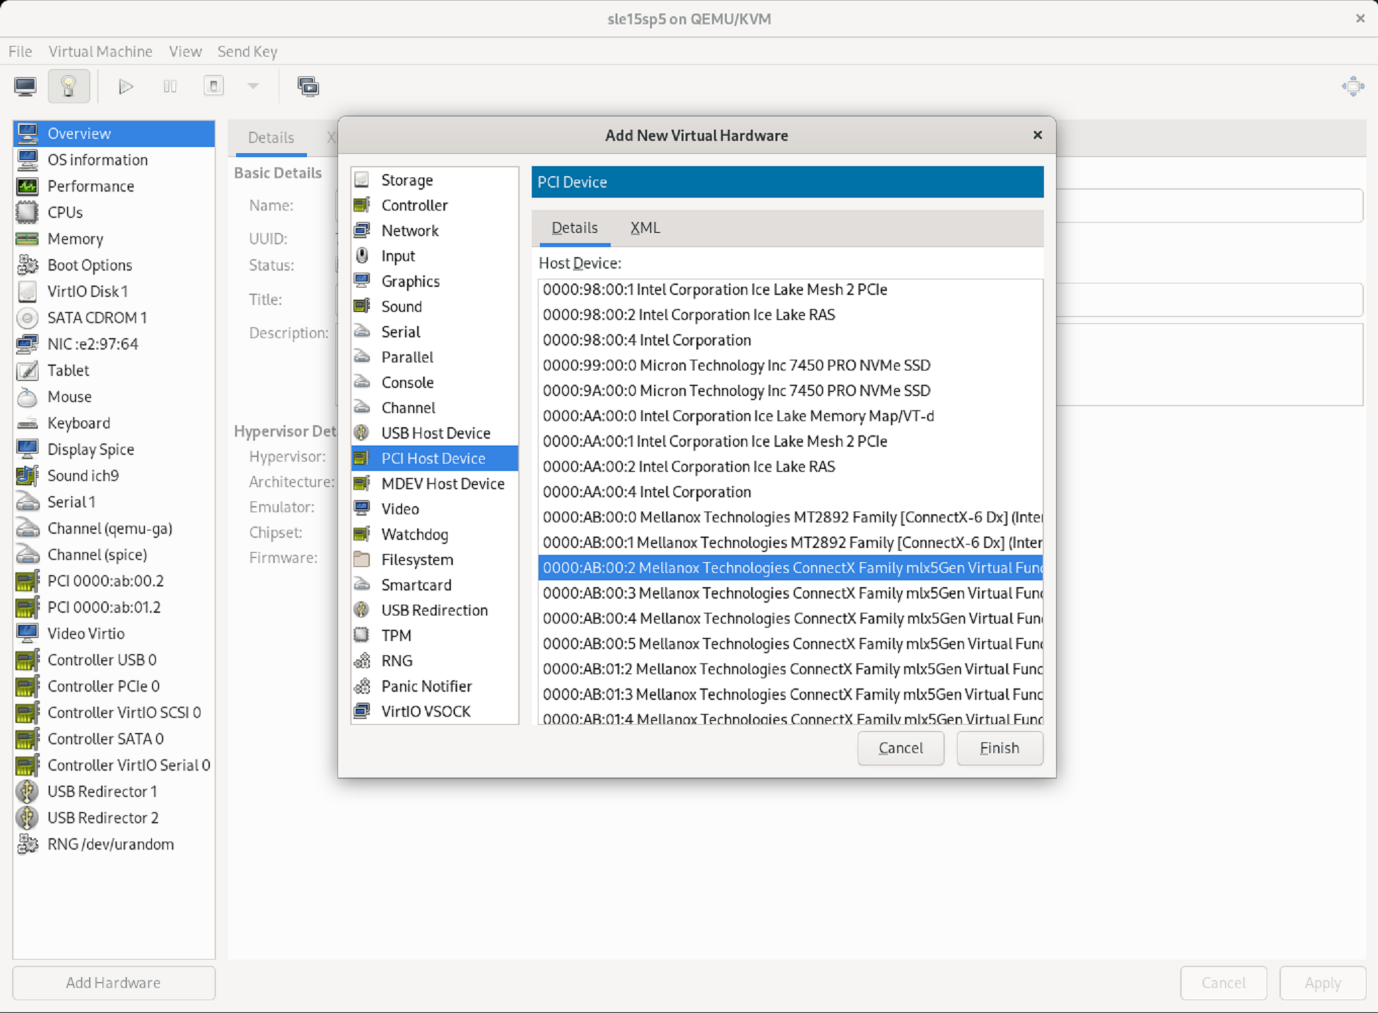
Choose the desired virtual NIC from the first physical port from the list of PCI Host Device and press finish.
In this example 0000.AB:00:2 - 0000.AB:00:4 belong to the first physical port and 0000.AB:01:2 - 0000.AB:01:4 belong to the second physical port.
-
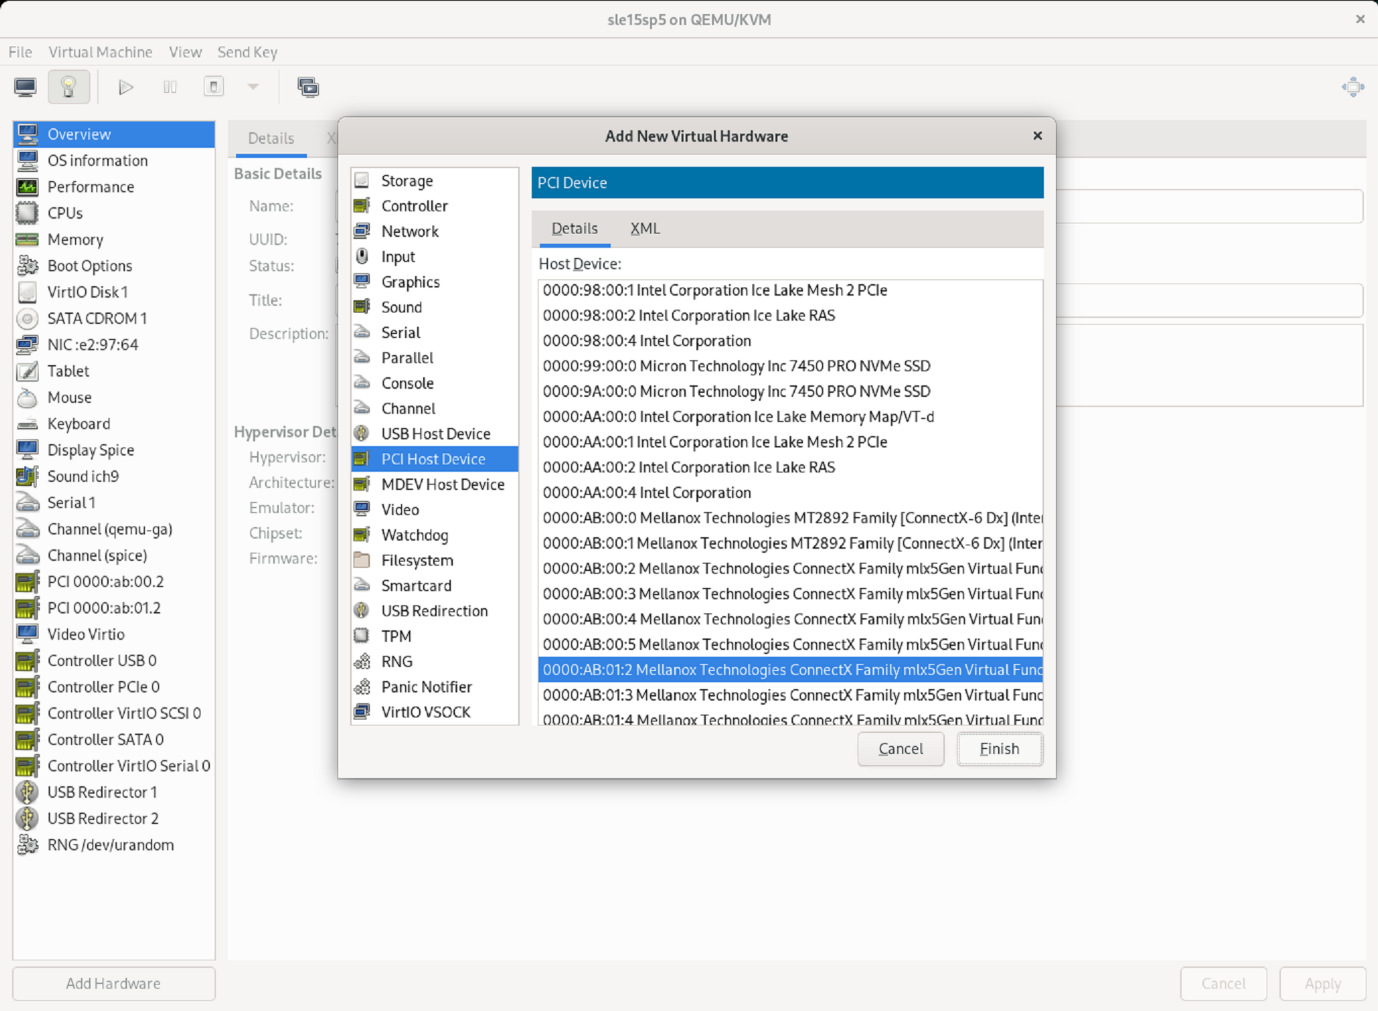
Choose the next virtual NIC port from the list of PCI Host Device, use a virtual port from the second physical port and select Finish.
-
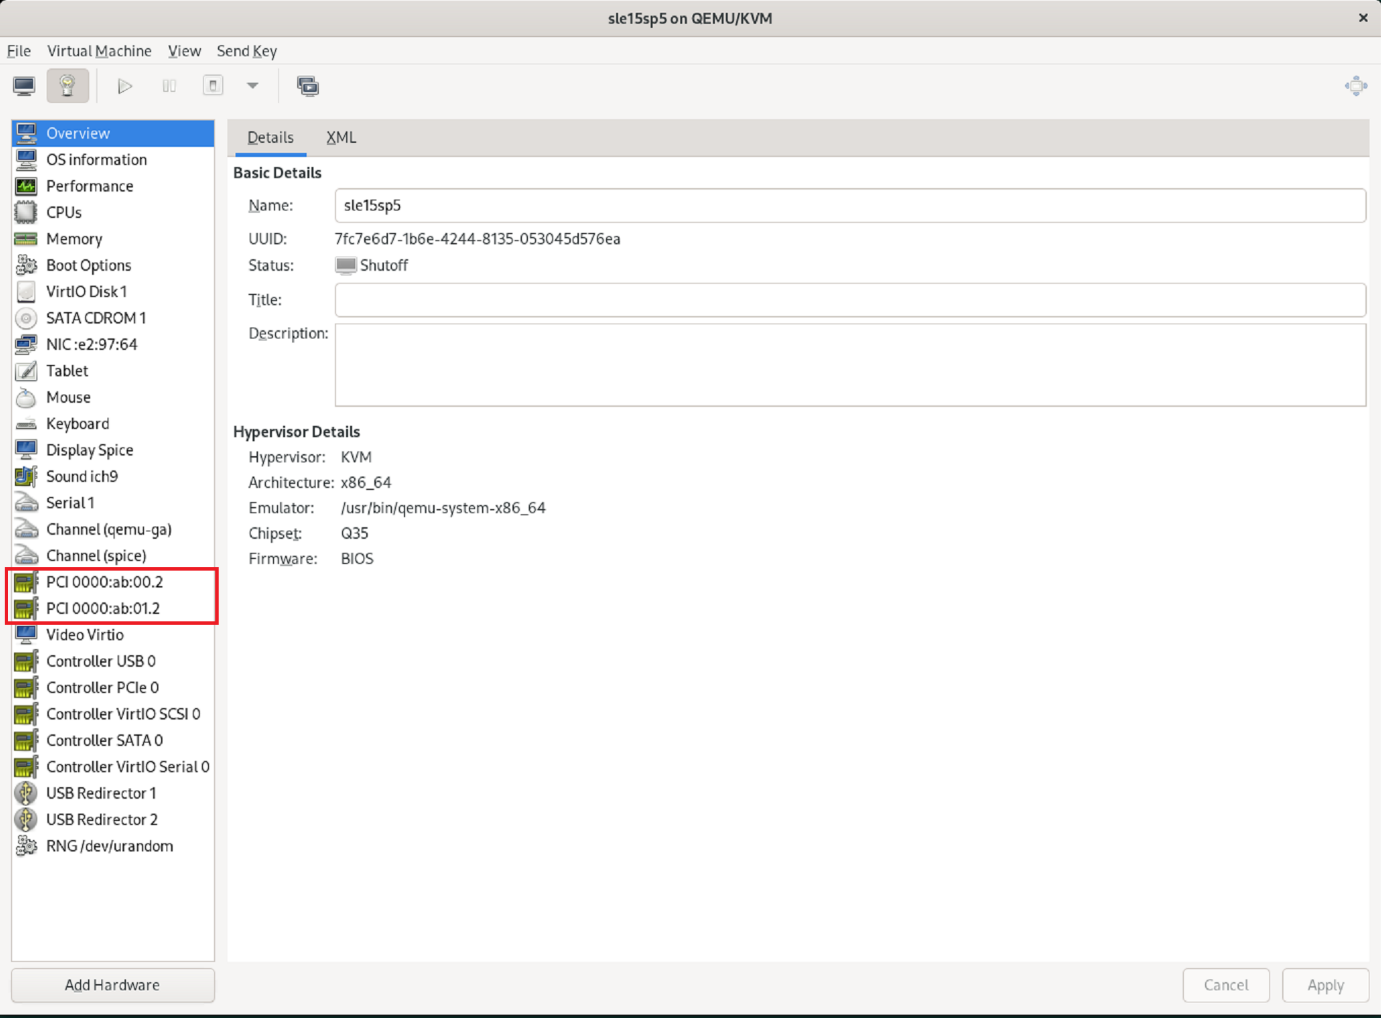
Afterwards the virtual interfaces are assigned to the VM and the VM can be started.
Step 5: Configure network interfaces within the VM
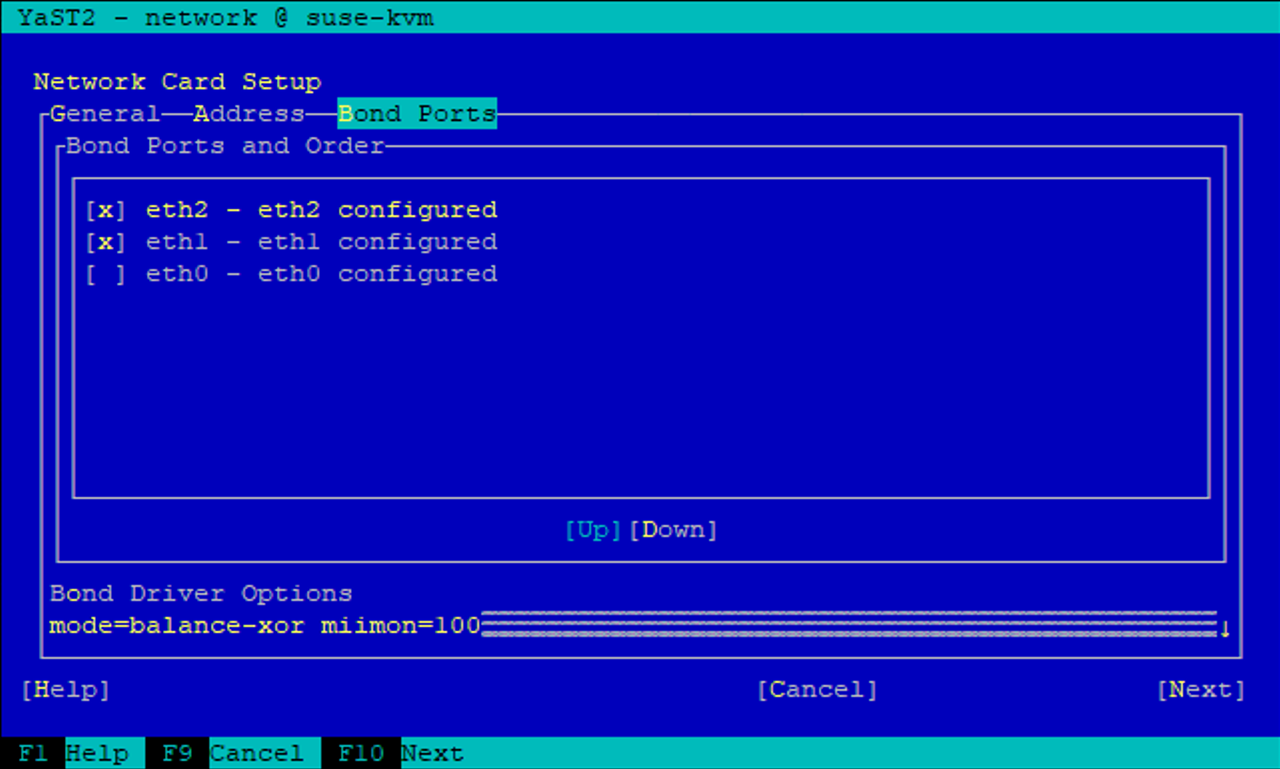
Log in to the VM and configure the two VFs as bond. Choose either mode 0 or mode 2. Do not use LACP as LACP can only be used on physical ports. The figure below shows a mode 2 configuration using YAST.
What's next?
After you've configured SR-IOV network interfaces, configure Fibre Channel networking if FCP shall be used as storage protocoll.