

Migrate VMs from VMware ESXi to Oracle Linux Virtualization Manager
 Suggest changes
Migrate VMs from VMware ESXi to Oracle Linux Virtualization Manager (OLVM) using the Shift Toolkit by preparing VMs, converting disk formats, and configuring the target environment.
The Shift Toolkit enables VM migration between virtualization platforms through disk format conversion and network reconfiguration on the destination environment.
Before you begin
Verify that the following prerequisites are met before starting the migration.
-
Oracle Linux Virtualization Manager with Oracle Linux KVM hosts added to the datacenter
-
ONTAP NFS storage added as storage domain
-
Administrator level privileges on the cluster
-
Oracle Linux Virtualization Manager and VDSM releases are >= 4.5
-
Oracle Linux Virtualization Manager (destination) hosts are network reachable
-
NFSv3 Storage domain configured with the appropriate volume and qtree
-
Ensure read-write access to the vdsm user (UID 36) and kvm group (GID 36) is allowed
-
-
Networks configured with the appropriate VLANs
-
VM VMDKs are placed on NFSv3 volume (all VMDKs for a given VM should be part of the same volume)
-
VMware tools are running on guest VMs
-
VMs to be migrated are in a RUNNING state for preparation
-
VMs must be powered off before triggering migration
-
VMware tools removal happens on the destination hypervisor once VMs are powered on
-
For Windows VMs: Use local administrator credentials
-
For Linux VMs: Use a user with permissions to execute sudo commands without password prompt
-
For Windows VMs: Mount the VirtIO ISO to the VM (download from here)

The preparation script uses the .msi package to install drivers and qemu-guest-agents.
Step 1: Add the destination site (OLVM)
Add the destination Oracle Linux Virtualization Manager environment to the Shift Toolkit.
-
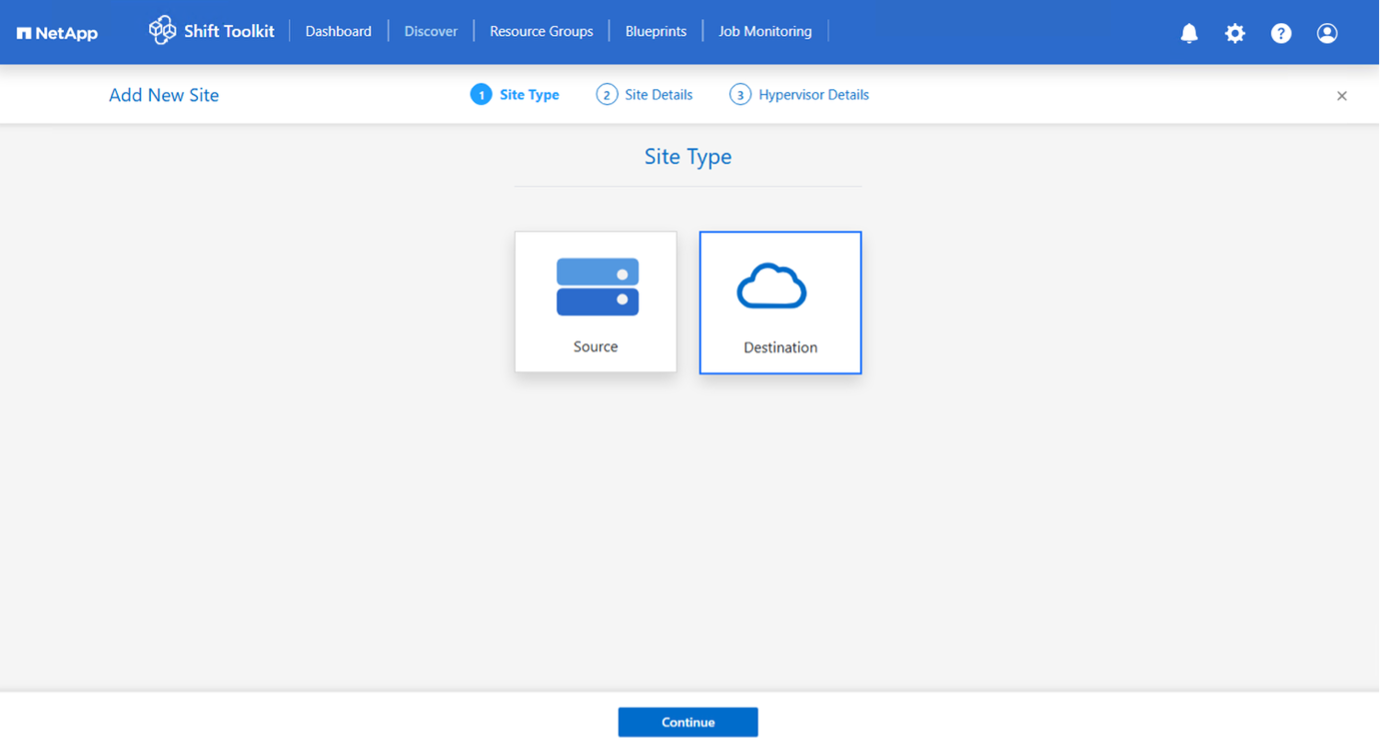
Click Add New Site and select Destination.
Show example
-
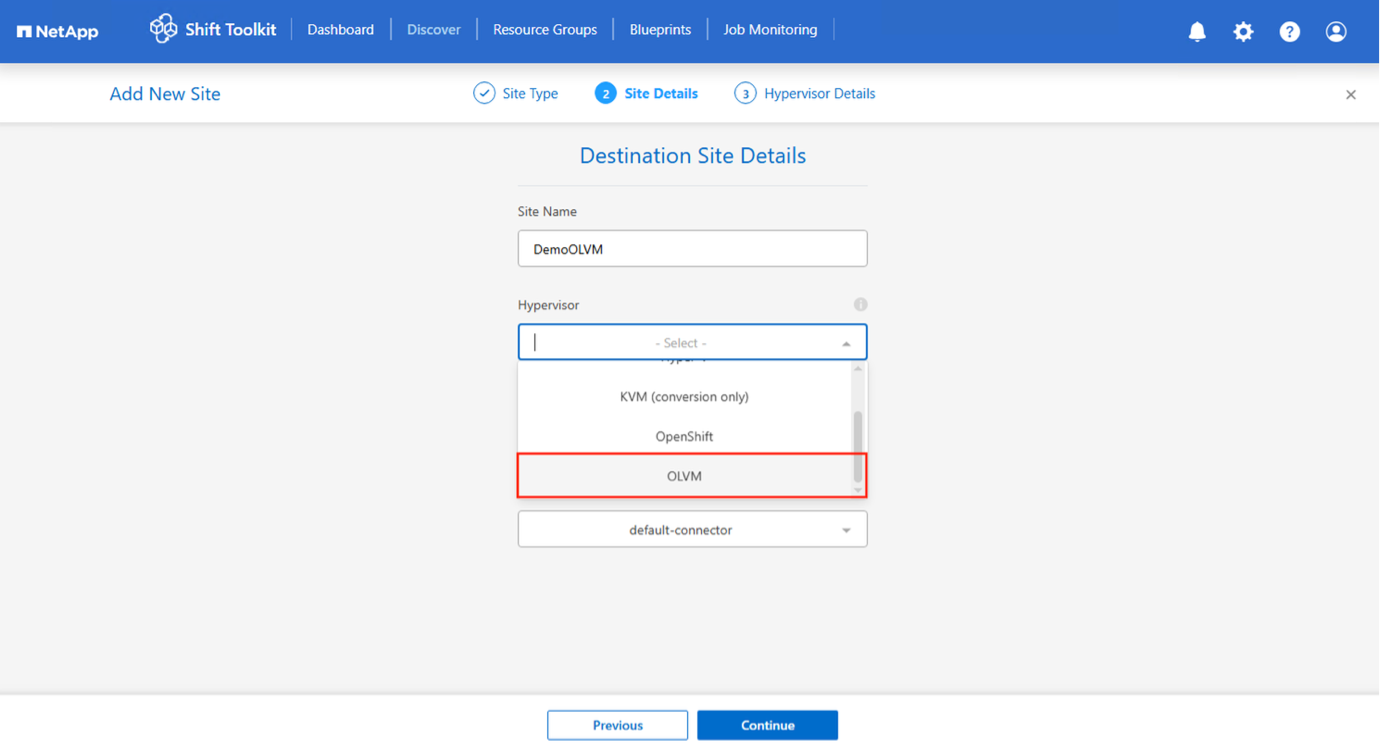
Enter the destination site details:
-
Site Name: Provide a name for the site
-
Hypervisor: Select OLVM
-
Site Location: Select the default option
-
Connector: Select the default selection
-
-
Click Continue.
Show example
-
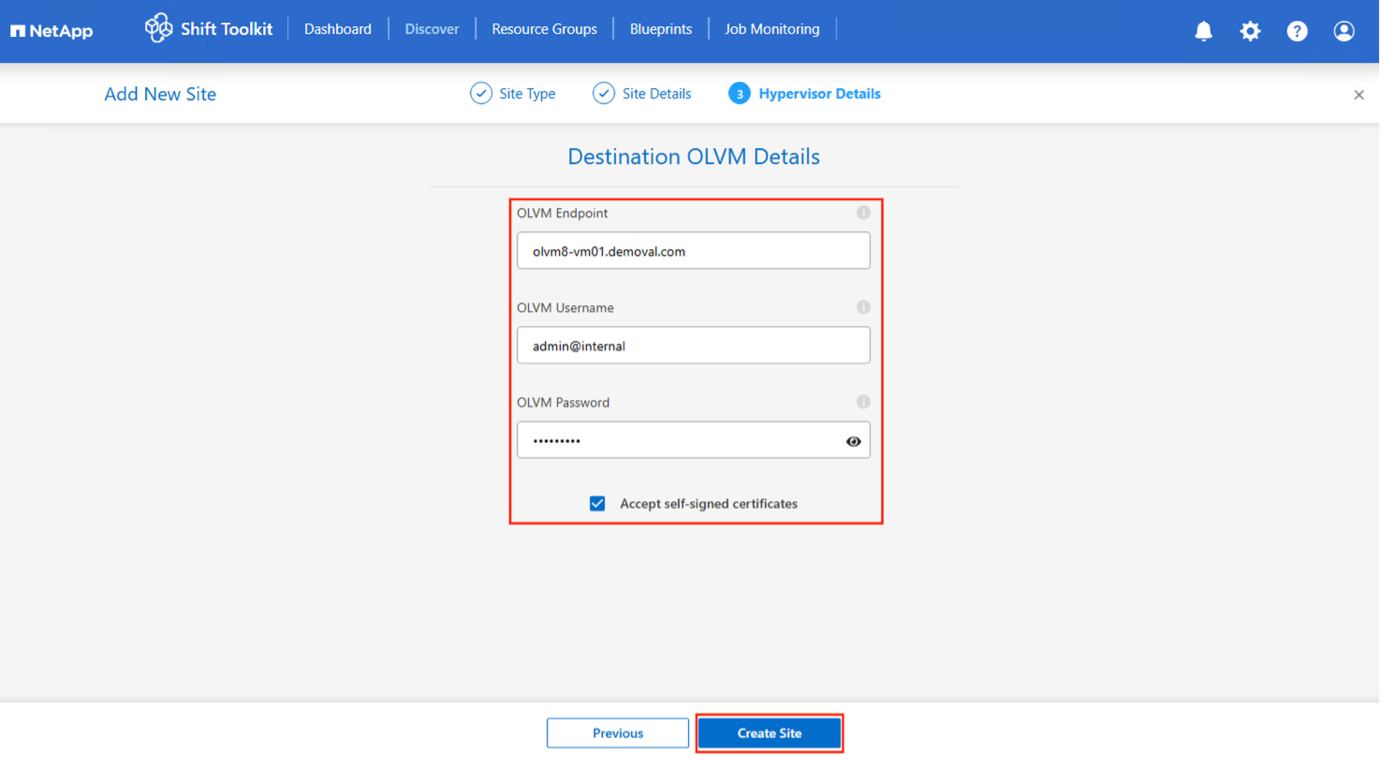
Enter the OLVM details:
-
Endpoint: IP address or FQDN of Virtualization Manager
-
Username: Username in format username@profile (for example, admin@internal)
-
Password: Password to access Virtualization Manager
-
-
Select Accept Self signed certificate and click Continue.
Show example
-
Click Create Site.
Show example
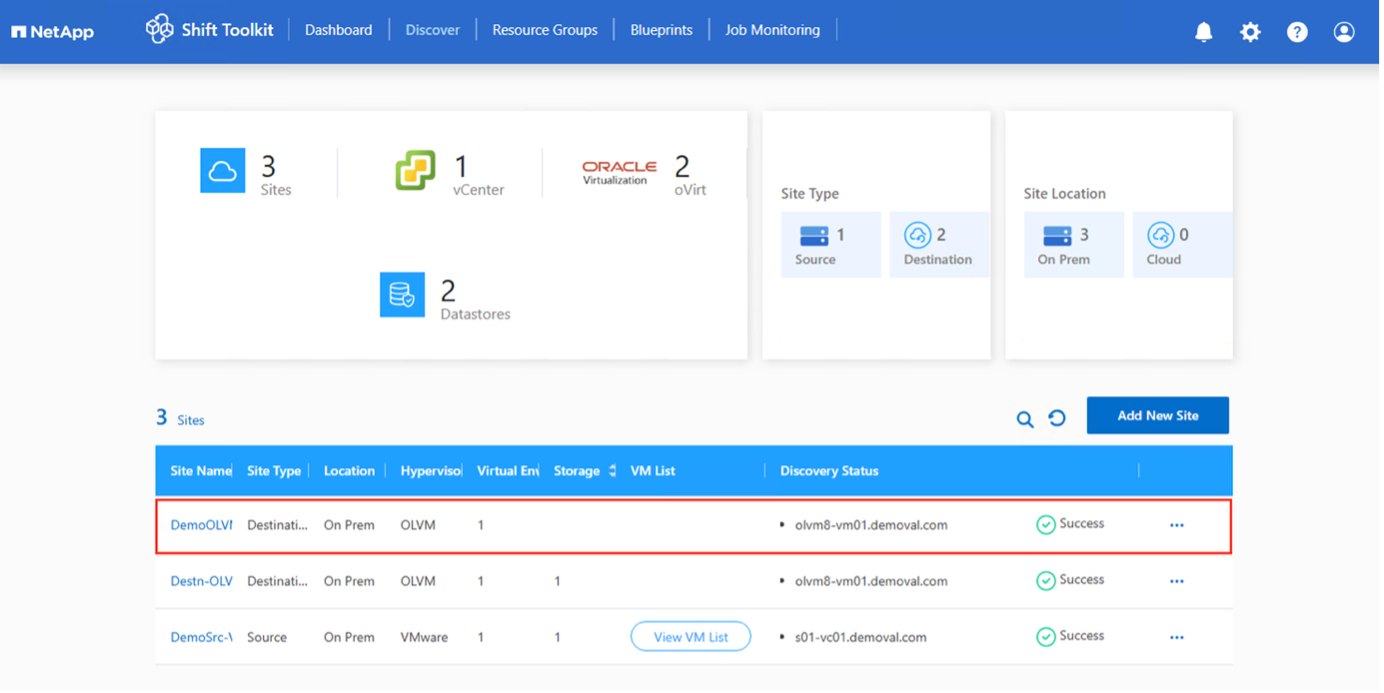
The source and destination volume will be the same as the disk format conversion happens at the volume level within the same volume.
Step 2: Create resource groups
Organize VMs into resource groups to preserve boot order and boot delay configurations.
-
Ensure qtrees are provisioned as specified in the prerequisites
-
Move VMs to a designated datastore on a newly created ONTAP SVM before conversion to isolate production NFS datastores from the staging area
-
Navigate to Resource Groups and click Create New Resource Group.
-
Select the source site from the dropdown and click Create.
-
Provide resource group details and select the workflow:
-
Clone based Migration: Performs end-to-end migration from source to destination hypervisor
-
Clone based Conversion: Converts disk format to the selected hypervisor type
-
-
Click Continue.
-
Select VMs using the search option (default filter is "Datastore").
The datastore dropdown only shows NFSv3 datastores. NFSv4 datastores are not displayed. -
Update migration details:
-
Select Destination Site
-
Select Destination OLVM entry
-
Configure Datastore to Qtree mapping
Show example
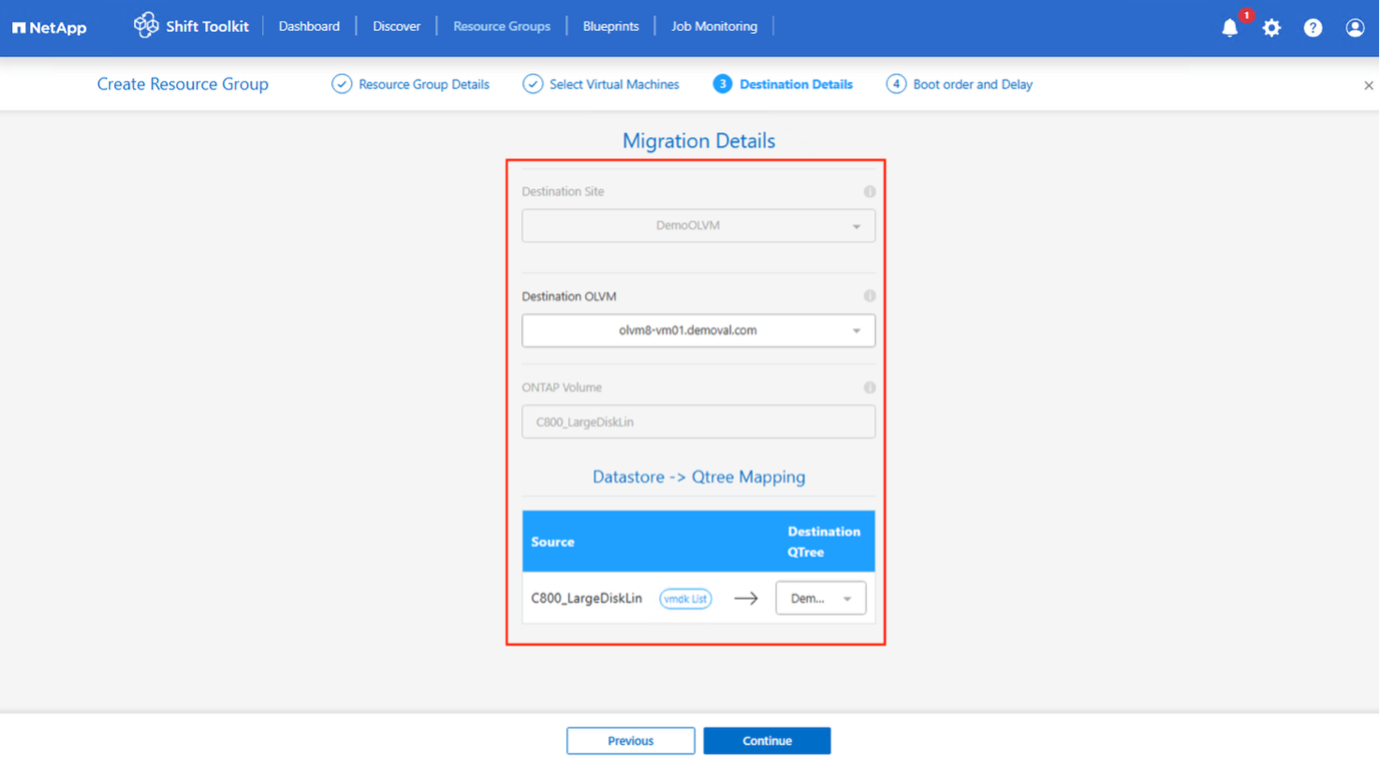
Ensure the destination path (where the converted VMs are stored) is set to a qtree when converting VMs from ESXi to OLVM. Also ensure this qtree is added to the storage domain. Multiple qtrees can be created and used for storing converted VM disks.
-
-
Configure boot order and boot delay for all selected VMs:
-
1: First VM to power on
-
3: Default
-
5: Last VM to power on
-
-
Click Create Resource Group.
Show example

The resource group is created and ready for blueprint configuration.
Step 3: Create a migration blueprint
Create a blueprint to define the migration plan, including platform mappings, network configuration, and VM settings.
-
Navigate to Blueprints and click Create New Blueprint.
-
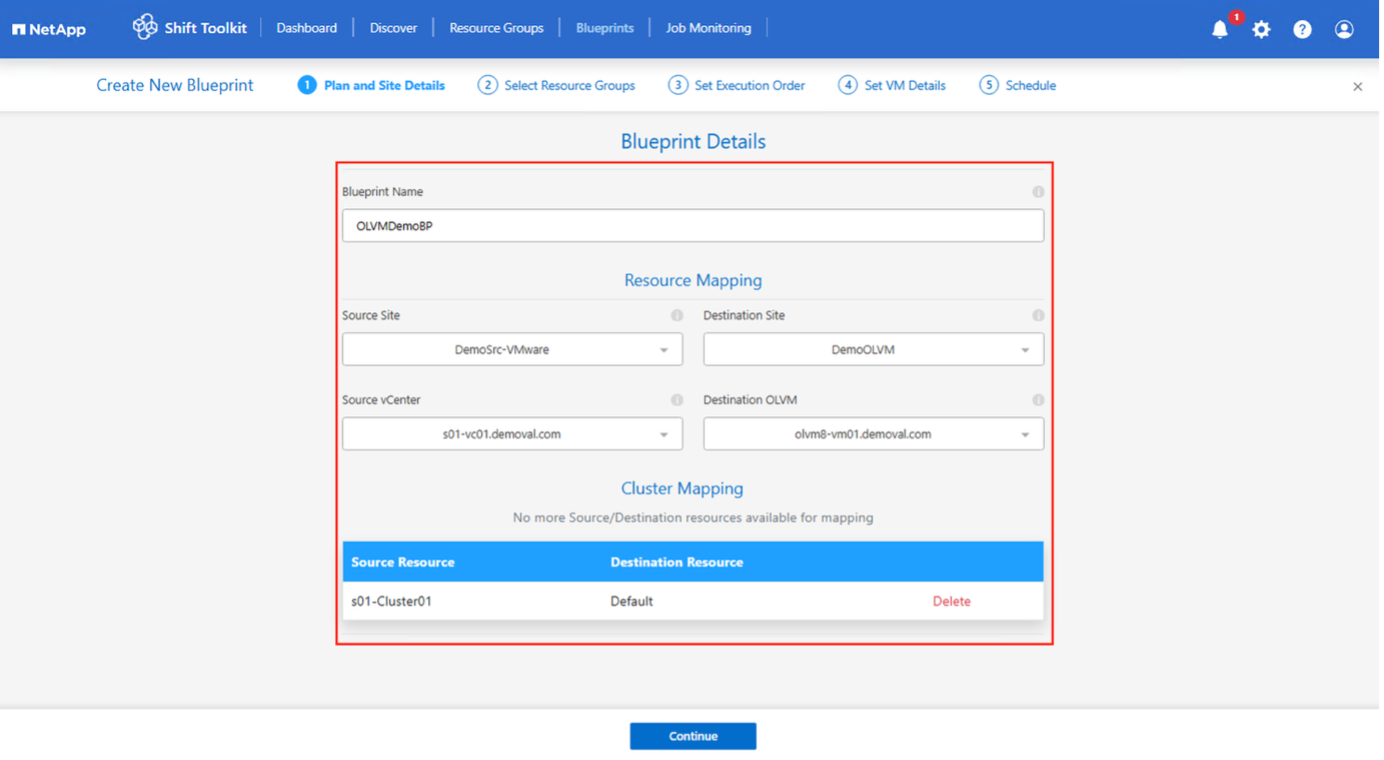
Provide a name for the blueprint and configure host mappings:
-
Select Source Site and associated vCenter
-
Select Destination Site and associated OLVM target
-
Configure cluster and host mapping
Show example
-
-
Select resource group details and click Continue.
-
Set execution order for resource groups if multiple groups exist.
-
Configure network mapping to appropriate logical networks.
Networks should already be provisioned within OLVM with the appropriate VLAN tagging. For test migration, select "Do not configure Network" to avoid production network conflicts; manually assign network settings after conversion. Show example
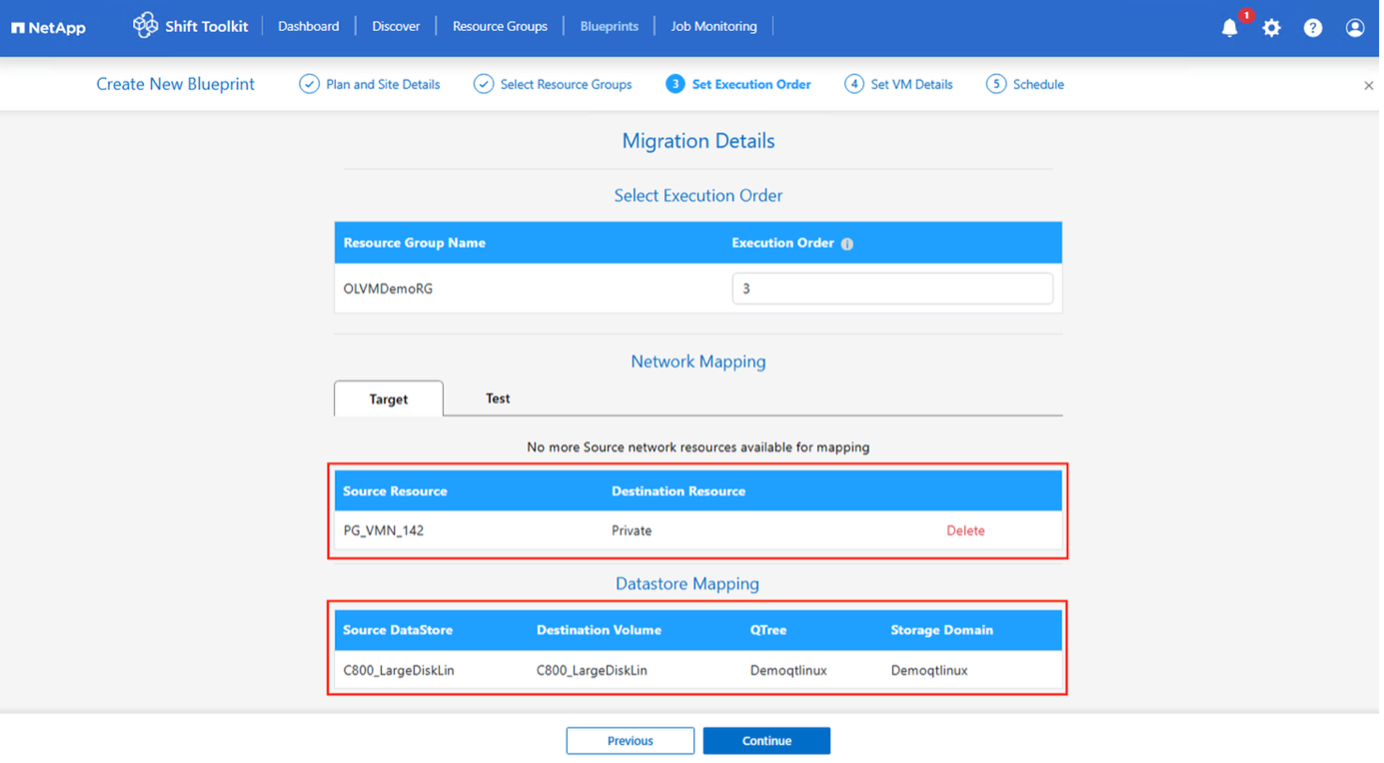
-
Review storage mappings (automatically selected based on VM selection).
Ensure the qtree is provisioned beforehand and necessary permissions are assigned so the virtual machine can be created and powered on from NFS volume. -
Under VM details, select configuration details and provide service account credentials for each OS type:
-
Windows: Use a user with local administrator privileges (domain credentials can also be used)
-
Linux: Use a user that can execute sudo commands without password prompt
Show example
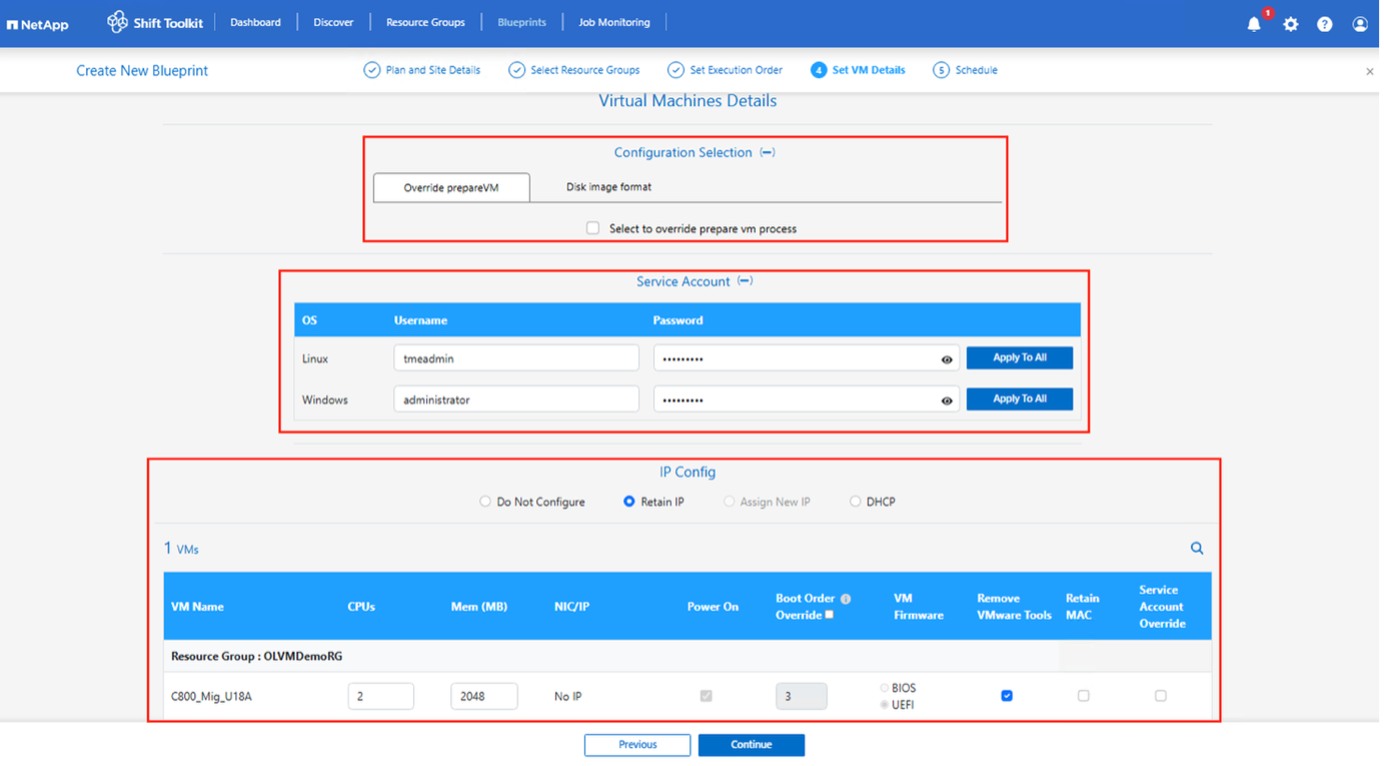
The configuration selection allows you to select the disk image format and skip override prepareVM. The workflow defaults to QCOW2 format, but RAW format can be selected if required. The override prepareVM option allows administrators to skip VM preparation and run custom scripts.
-
-
Configure IP settings:
-
Do not configure: Default option
-
Retain IP: Keep same IPs from source system
-
DHCP: Assign DHCP on target VMs
Ensure VMs are powered on during prepareVM phase and VMware Tools are installed.
-
-
Configure VM settings:
-
Resize CPU/RAM parameters (optional)
-
Modify boot order and boot delay
-
Power ON: Select to power on VMs after migration (default: ON)
-
Remove VMware tools: Remove VMware Tools after conversion (default: selected)
-
VM Firmware: BIOS > BIOS and EFI > EFI (automatic)
-
Retain MAC: Keep MAC addresses for licensing requirements
-
Service Account override: Specify separate service account if needed
-
-
Click Continue.
-
Schedule the migration by selecting a date and time.
Schedule migrations at least 30 minutes ahead to allow time for VM preparation. -
Click Create Blueprint.
The Shift Toolkit initiates a prepareVM job that runs scripts on source VMs to prepare them for migration.
Show example
The preparation process:
-
Injects scripts to update VirtIO drivers, install qemu-agent, remove VMware tools, backup IP details, and update fstab
-
Uses PowerCLI to connect to guest VMs (Linux or Windows) and update VirtIO drivers
-
For Windows VMs: Stores scripts in
C:\NetApp -
For Linux VMs: Stores scripts in
/NetAppand/opt
|
|
For any supported VM OSes, the Shift Toolkit automatically installs necessary VirtIO drivers before disk conversion to ensure successful boot after conversion. |
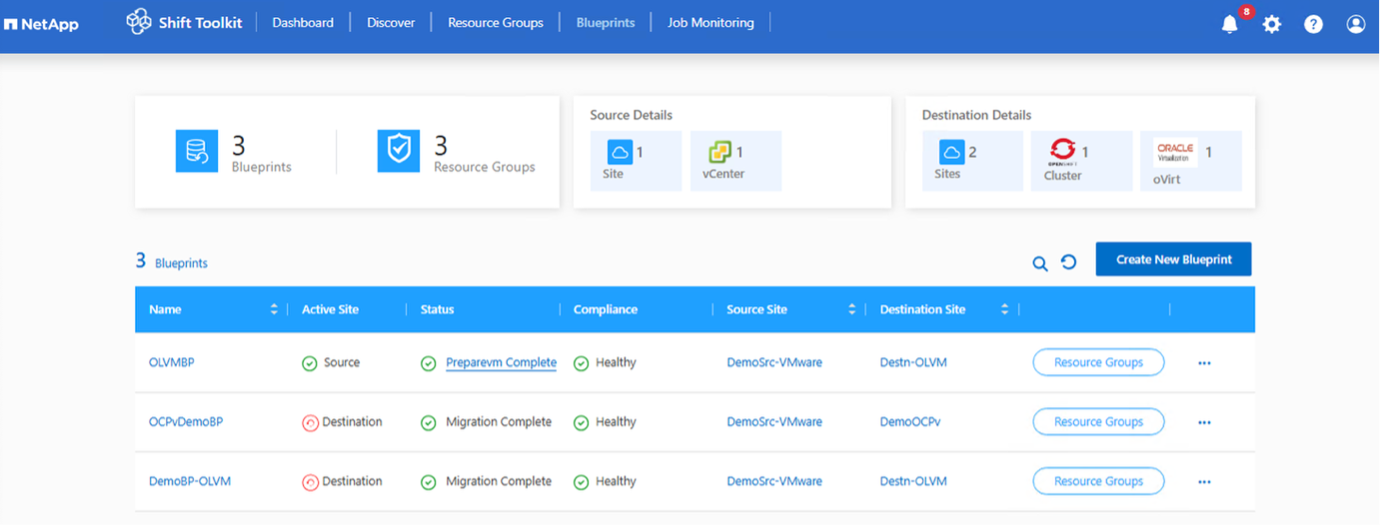
When prepareVM completes successfully, the blueprint status updates to "PrepareVM Complete." Migration will now happen at the scheduled time or can be started manually by clicking the Migrate option.
Show example
Step 4: Execute the migration
Trigger the migration workflow to convert VMs from VMware ESXi to Oracle Linux Virtualization Manager.
All VMs are gracefully powered off according to the planned maintenance schedule.
-
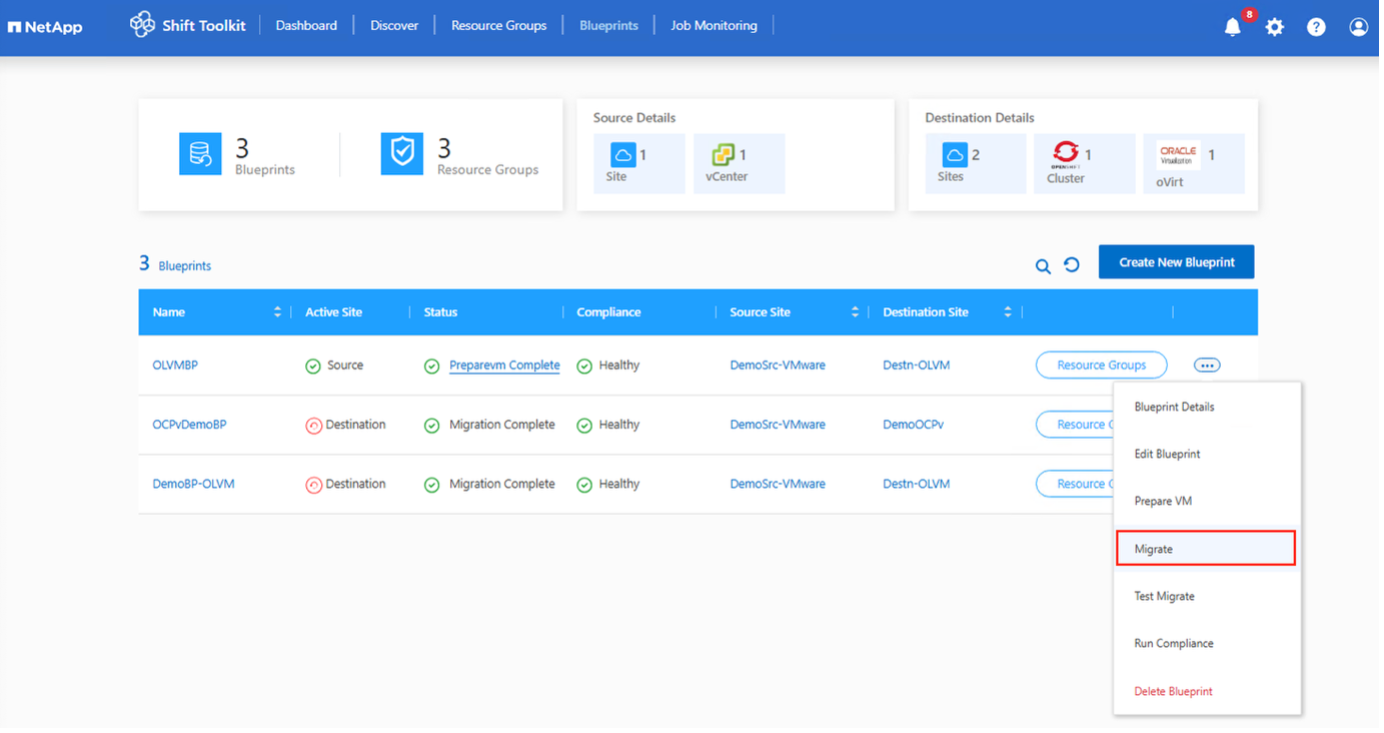
On the blueprint, click Migrate.
Show example
-
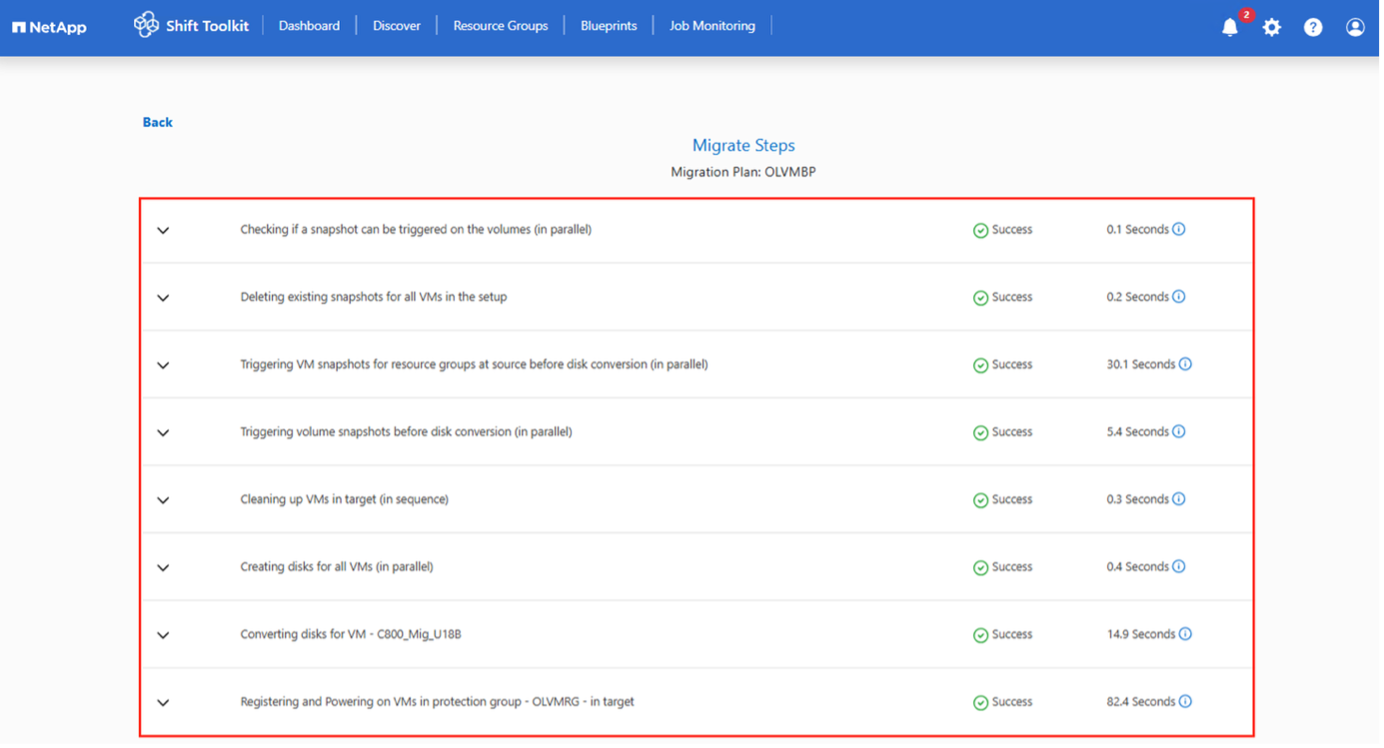
The Shift Toolkit takes the following actions:
-
Deletes existing snapshots for all VMs in the blueprint
-
Triggers VM snapshots at the source
-
Triggers volume snapshot before disk conversion
-
Converts VMDK to QCOW2 or RAW format for all VMs
The Shift Toolkit automatically finds all VMDKs associated with each VM, including the primary boot disk.
If there are multiple VMDK files, each VMDK will be converted. -
Uploads the QCOW2 or RAW image to OLVM storage domain
With the virtual machine disk image converted to QCOW2 or RAW format, the Shift Toolkit uploads the file to the appropriate storage domain and adds each disk.
-
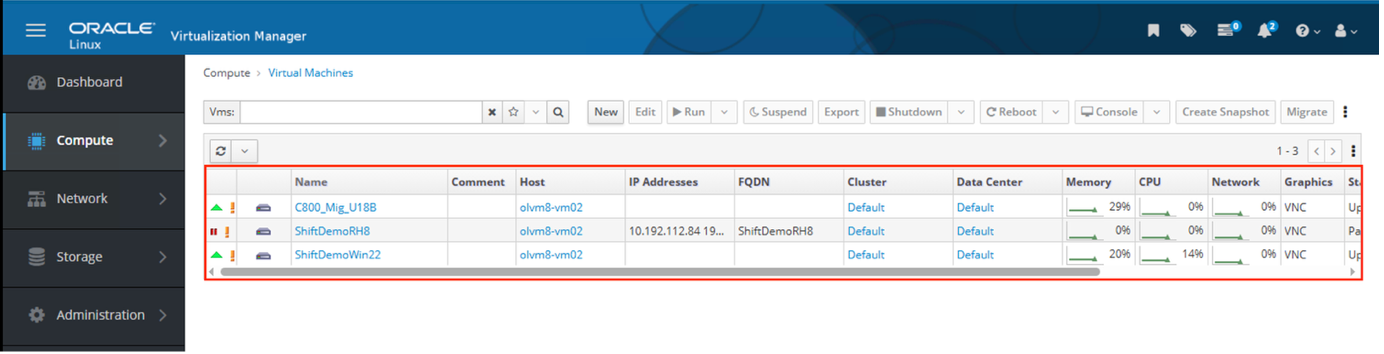
Creates virtual machines
The Shift Toolkit makes REST API calls to create each VM depending on the OS.
VMs are created under the "Default" cluster. -
Powers on VMs at the target
Depending on the VM OS, the Shift Toolkit auto-assigns the VM boot option along with storage controller interfaces. For Linux distributions, VirtIO or VirtIO SCSI is used. For Windows, the VM powers on with SATA interface, then the scheduled script auto-installs VirtIO drivers and changes the interface to VirtIO.
-
Registers networks on each VM
Networks are assigned based on the blueprint selection.
-
Removes VMware tools and assigns IP addresses using trigger scripts or cron jobs
-
Show example
Video demonstration
The following video demonstrates the process outlined in this solution.