

Migrate VMs from Microsoft Hyper-V to VMware ESXi using the Shift Toolkit
 Suggest changes
Migrate VMs from Microsoft Hyper-V to VMware ESXi using the Shift Toolkit by configuring source and destination sites, creating resource groups and blueprints, and executing the migration workflow.
The Shift Toolkit enables direct VM conversion between hypervisors without creating additional disk copies, delivering copy-less migration with minimal downtime for both Windows and Linux virtual machines.
Before you begin
Verify that the following prerequisites are met before starting the migration.
-
vCenter and ESXi hosts are configured
-
vCenter server account (RBAC user) with minimum required privileges
-
vCenter and ESXi hosts are reachable from the Shift Toolkit and DNS entries are current
-
Distributed port groups are configured with appropriate VLAN IDs (standard port groups are not supported)
-
NFS share (for storing migrated VMs) and source share (for VMs to be migrated) reside on the same volume
-
VM VHDx files are placed on an SMB share
-
If VMs are on a Cluster Shared Volume (CSV), perform a live migration to an SMB share
-
-
Hyper-V integration services are enabled and running on guest VMs
-
VMs to be migrated are in a RUNNING state for preparation
-
VMs must be powered off before triggering migration
-
For Windows VMs: Use local administrator credentials or domain credentials with an existing user profile on the VM
-
For Linux VMs: Use a user with permissions to execute sudo commands without password prompt
-
Shift Toolkit uses PowerShell Direct for Windows VMs and SSH for Linux VMs
Step 1: Add the source site (Hyper-V)
Add the source Hyper-V environment to the Shift Toolkit.
-
Open the Shift Toolkit in a supported browser and log in with the default credentials.
-
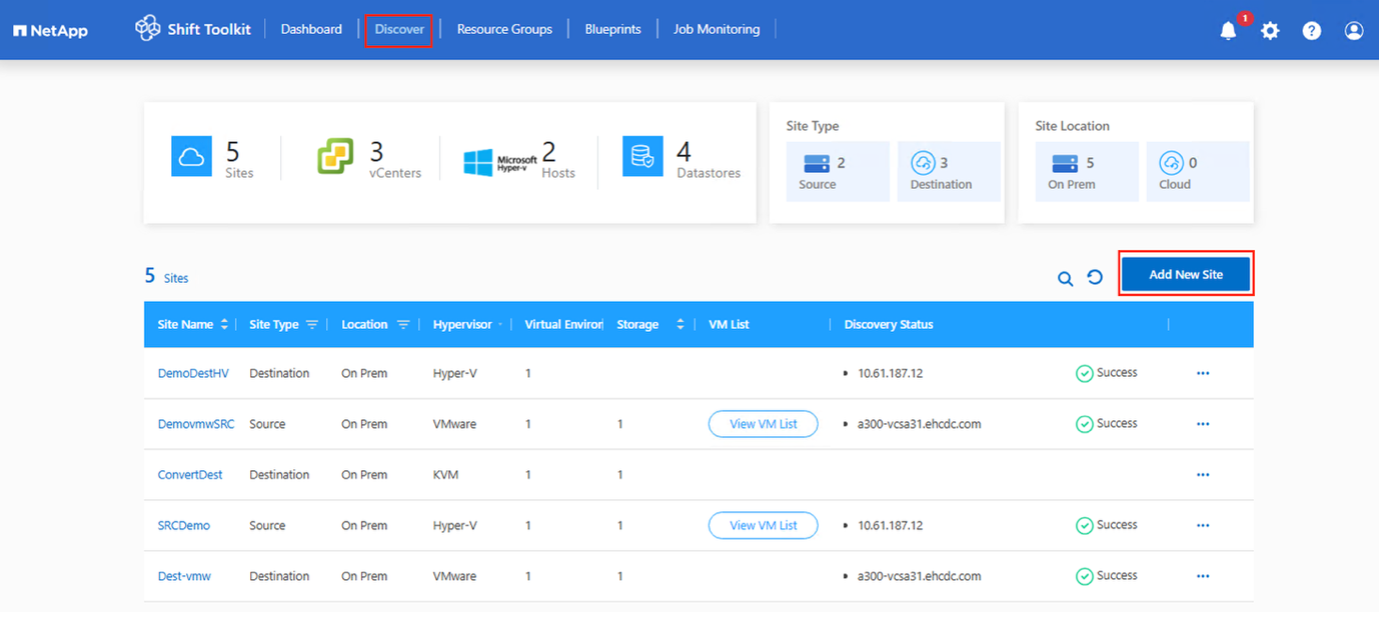
Navigate to Discover > Add Sites.
Show example
-
Click Add New Site and select Source.
-
Enter the source site details:
-
Site Name: Provide a name for the site
-
Hypervisor: Select Hyper-V
-
Site Location: Select the default option
-
Connector: Select the default selection
-
-
Click Continue.
Show example

-
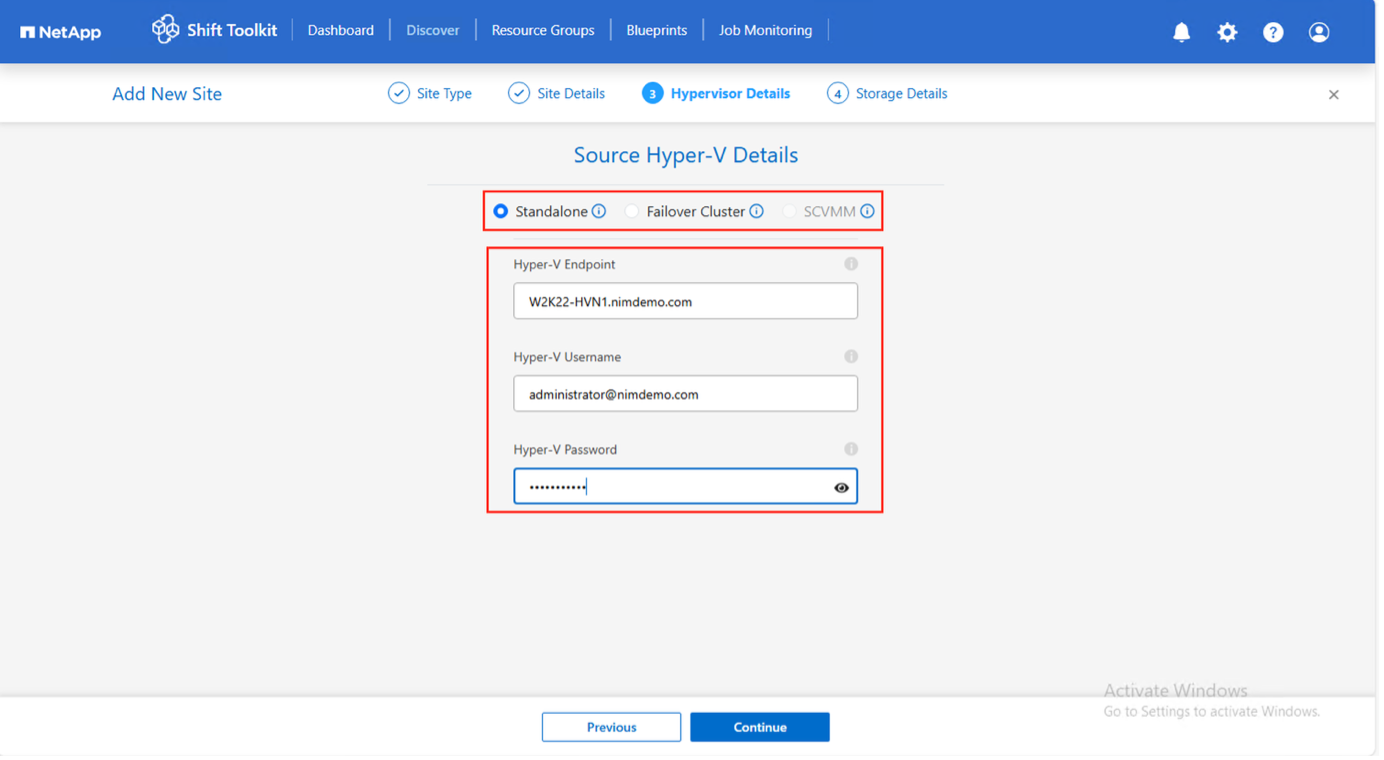
Enter the Hyper-V details:
-
Hyper-V standalone or failover cluster manager: IP address or FQDN
-
Username: Username in UPN format (username@domain.com or domain\administrator)
-
Password: Password to access Hyper-V host or FCI instance
-
-
Click Continue.
Show example

The Hyper-V FCI and host discovery relies on DNS resolution. If resolution fails, update the host file (C:\Windows\System32\drivers\etc\hosts) and retry the discovery operation. -
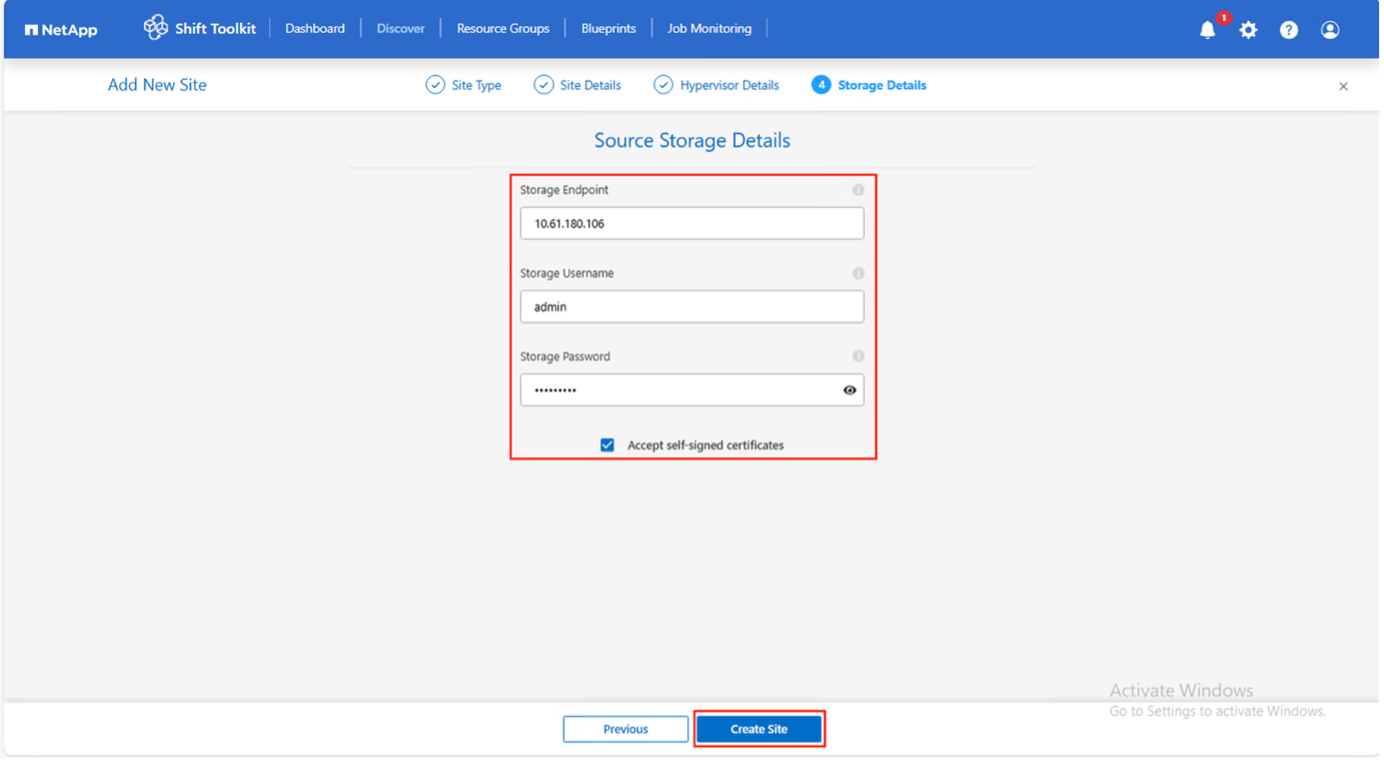
Enter the ONTAP storage system credentials.
Show example
-
Click Create Site.
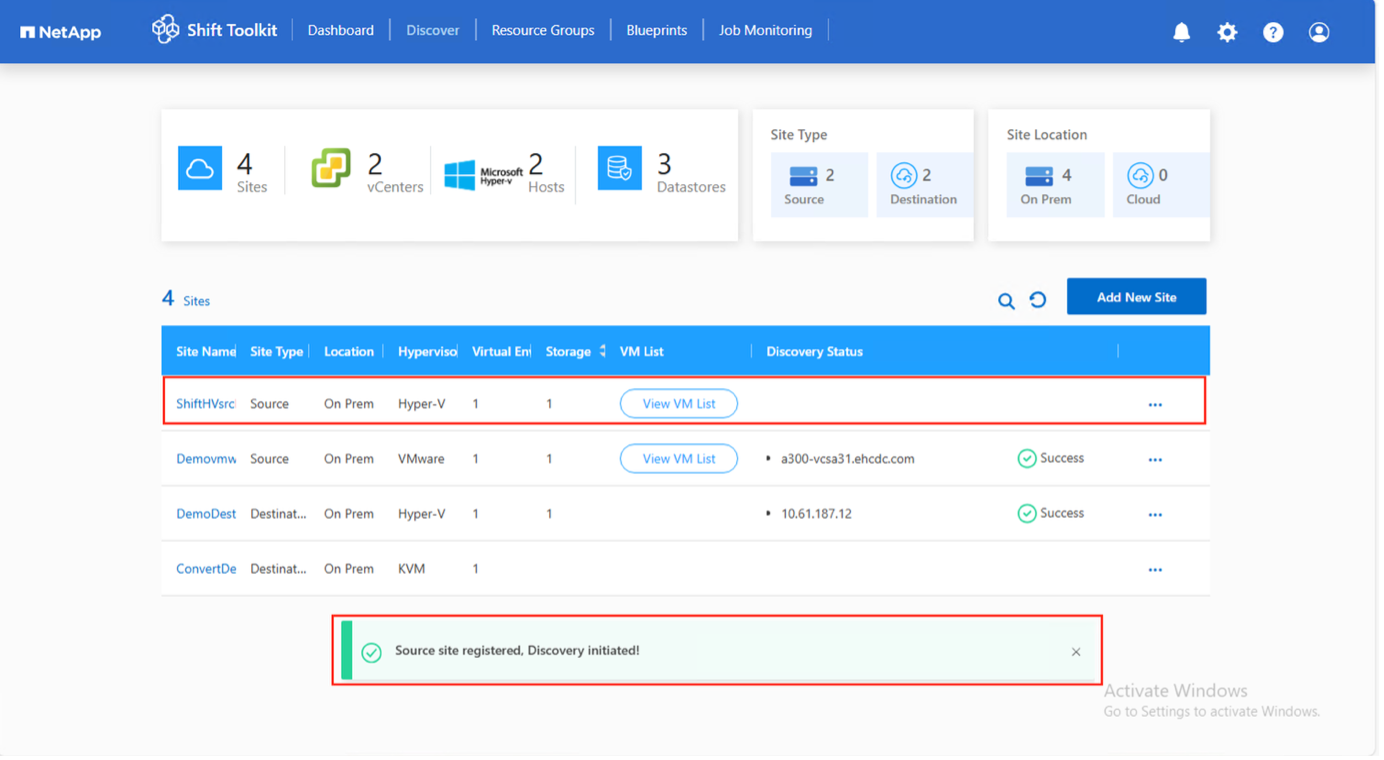
The Shift Toolkit performs automatic discovery and displays VMs with metadata information, including networks, virtual switches, and VLAN IDs.
Show example
|
|
VM inventory auto-refreshes every 24 hours. To manually refresh after modifications, click the three dots next to the site name and select Discover Site. |
Step 2: Add the destination site (VMware ESXi)
Add the destination VMware environment to the Shift Toolkit.
-
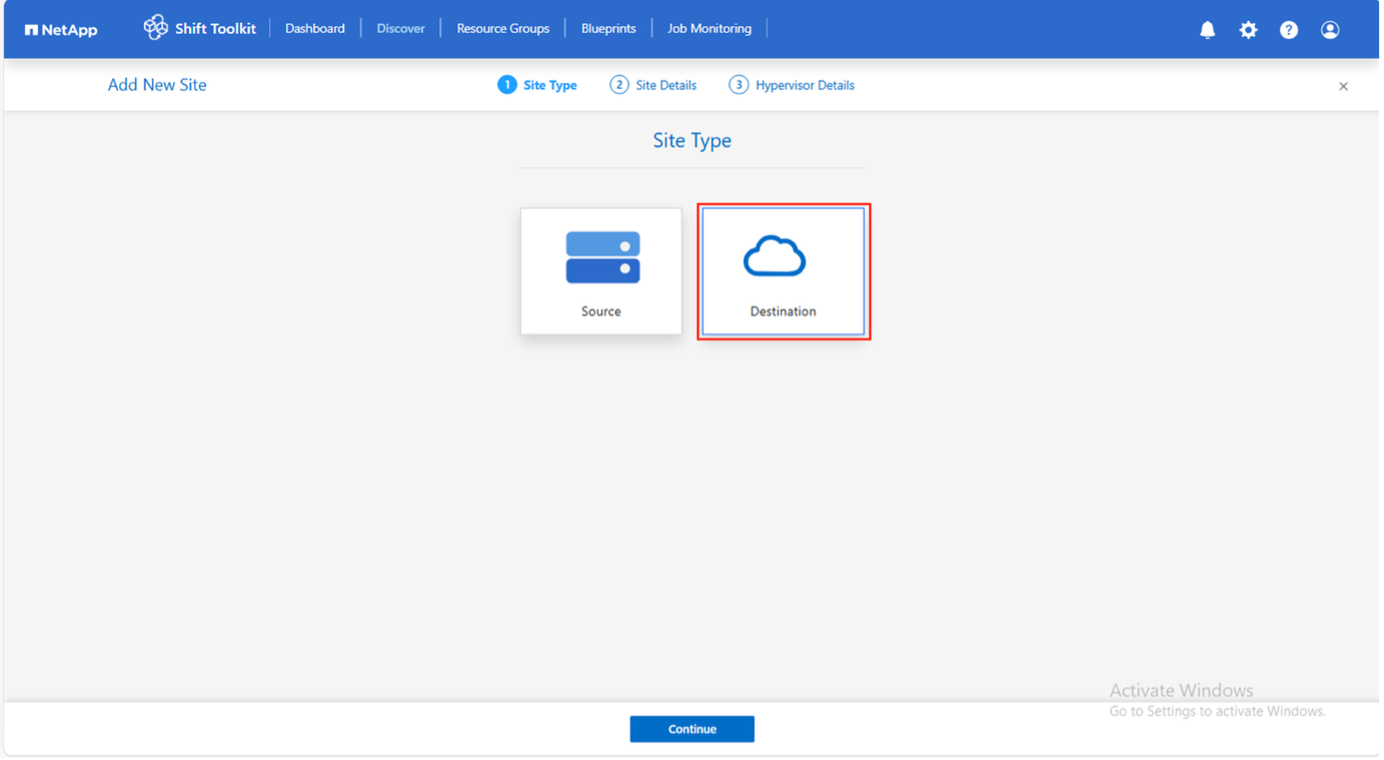
Click Add New Site and select Destination.
Show example
-
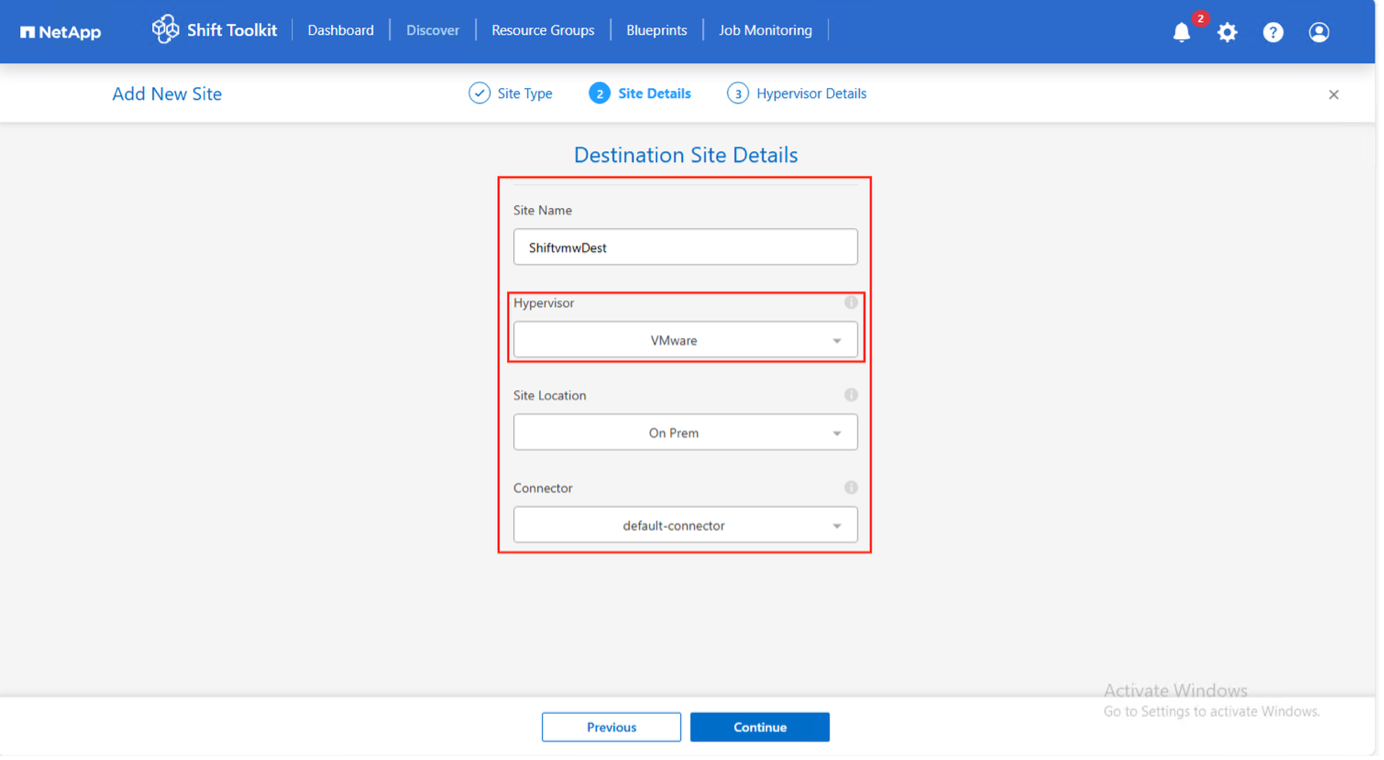
Enter the destination site details:
-
Site Name: Provide a name for the site
-
Hypervisor: Select VMware
-
Site Location: Select the default option
-
Connector: Select the default selection
-
-
Click Continue.
Show example
-
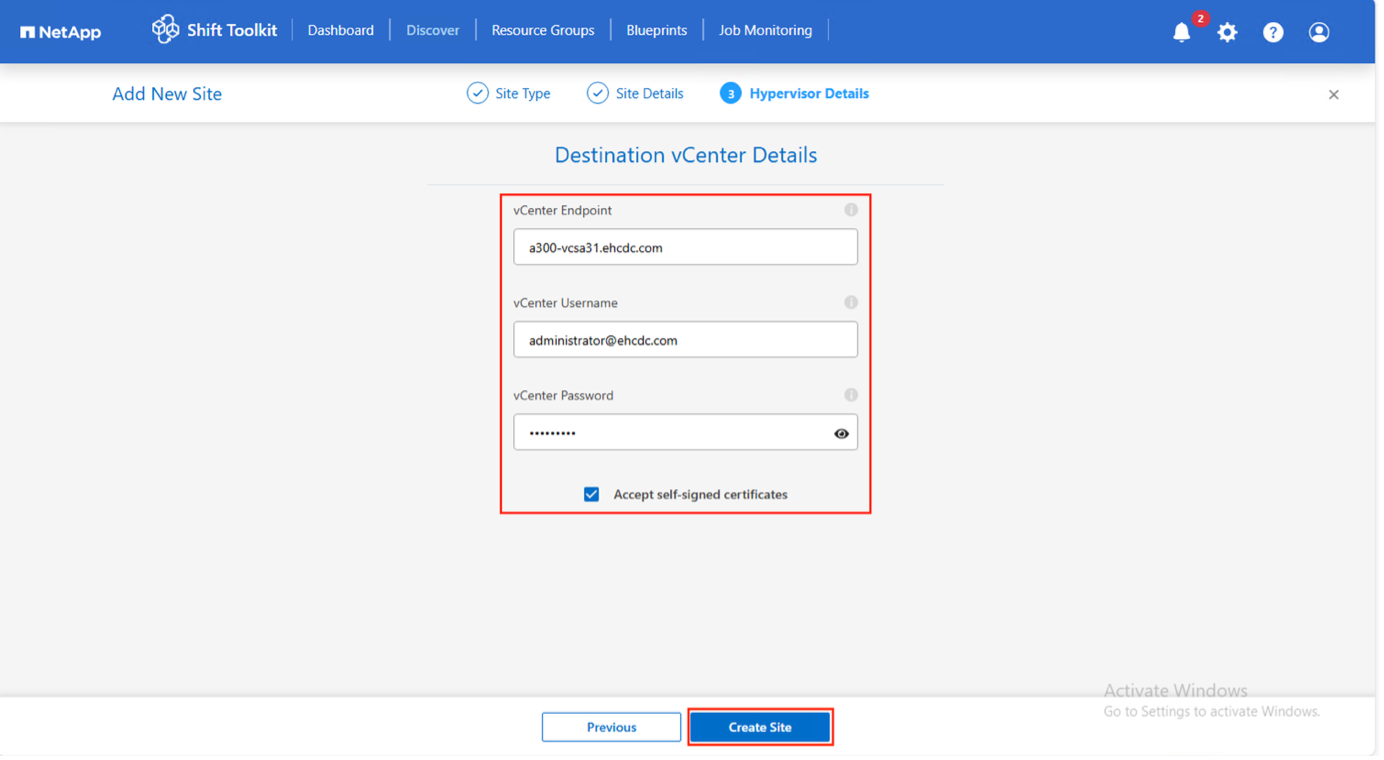
Enter the VMware vCenter details:
-
Endpoint: IP address or FQDN of the vCenter server
-
Username: Username in UPN format (username@domain.com)
-
vCenter Password: Password to access vCenter
-
vCenter SSL Thumbprint (optional)
-
-
Select Accept Self signed certificate and click Continue.
Show example
-
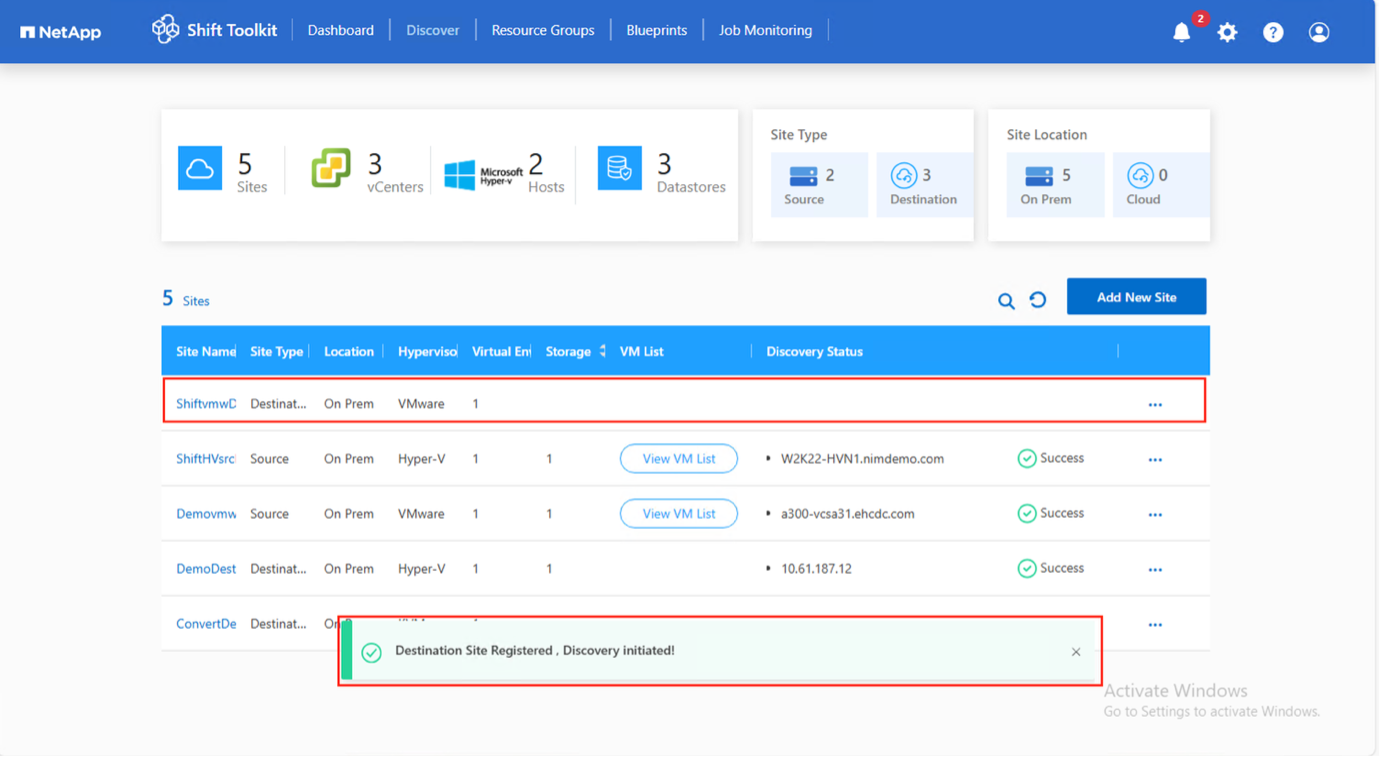
Click Create Site.
Show example
The source and destination storage system must be the same, as disk format conversion occurs at the volume level within the same volume.
Step 3: Create resource groups
Organize VMs into resource groups to preserve boot order and boot delay configurations.
Ensure qtrees are provisioned as specified in the prerequisites.
-
Navigate to Resource Groups and click Create New Resource Group.
-
Select the source site from the dropdown and click Create.
-
Provide resource group details and select the workflow:
-
Clone based Migration: Performs end-to-end migration from source to destination hypervisor
-
Clone based Conversion: Converts disk format to the selected hypervisor type
Show example

-
-
Click Continue.
-
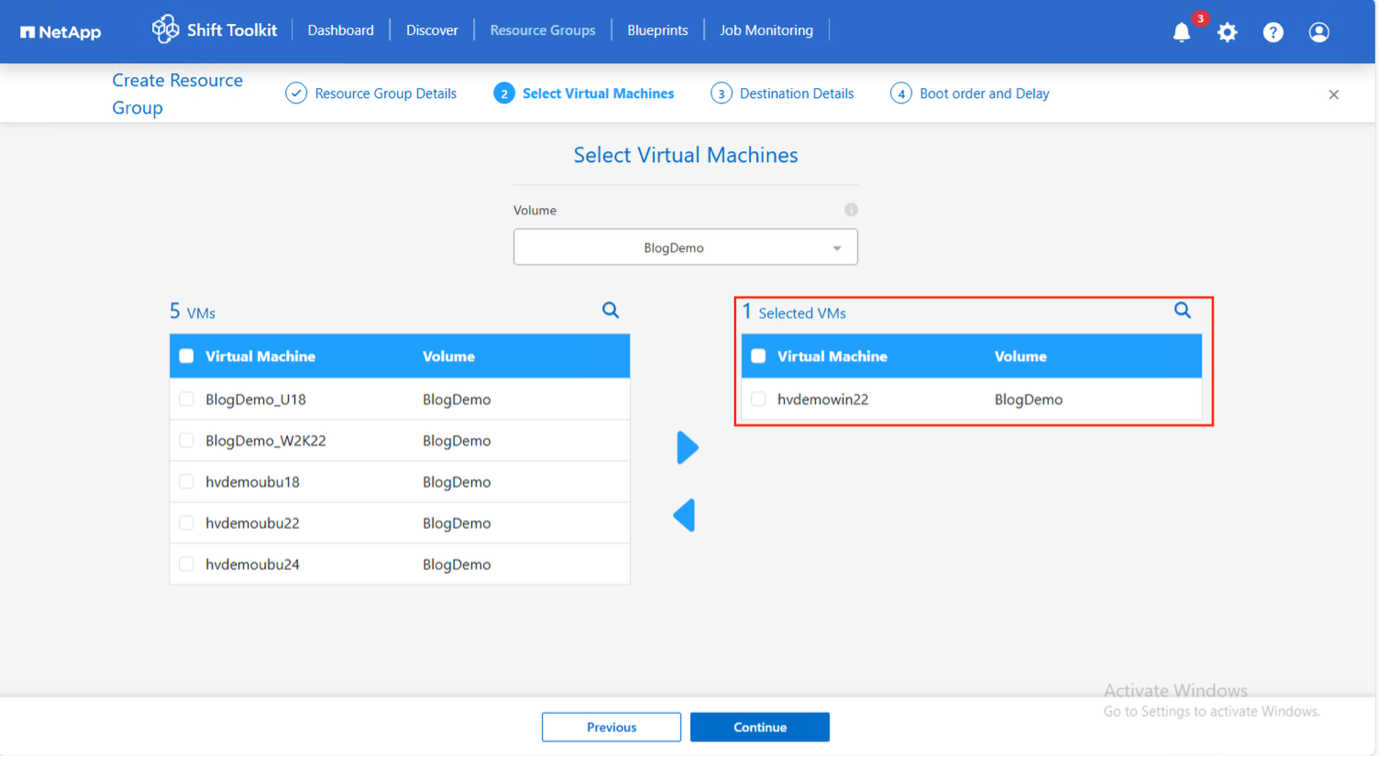
Select VMs using the search option (default filter is "Datastore").
Show example
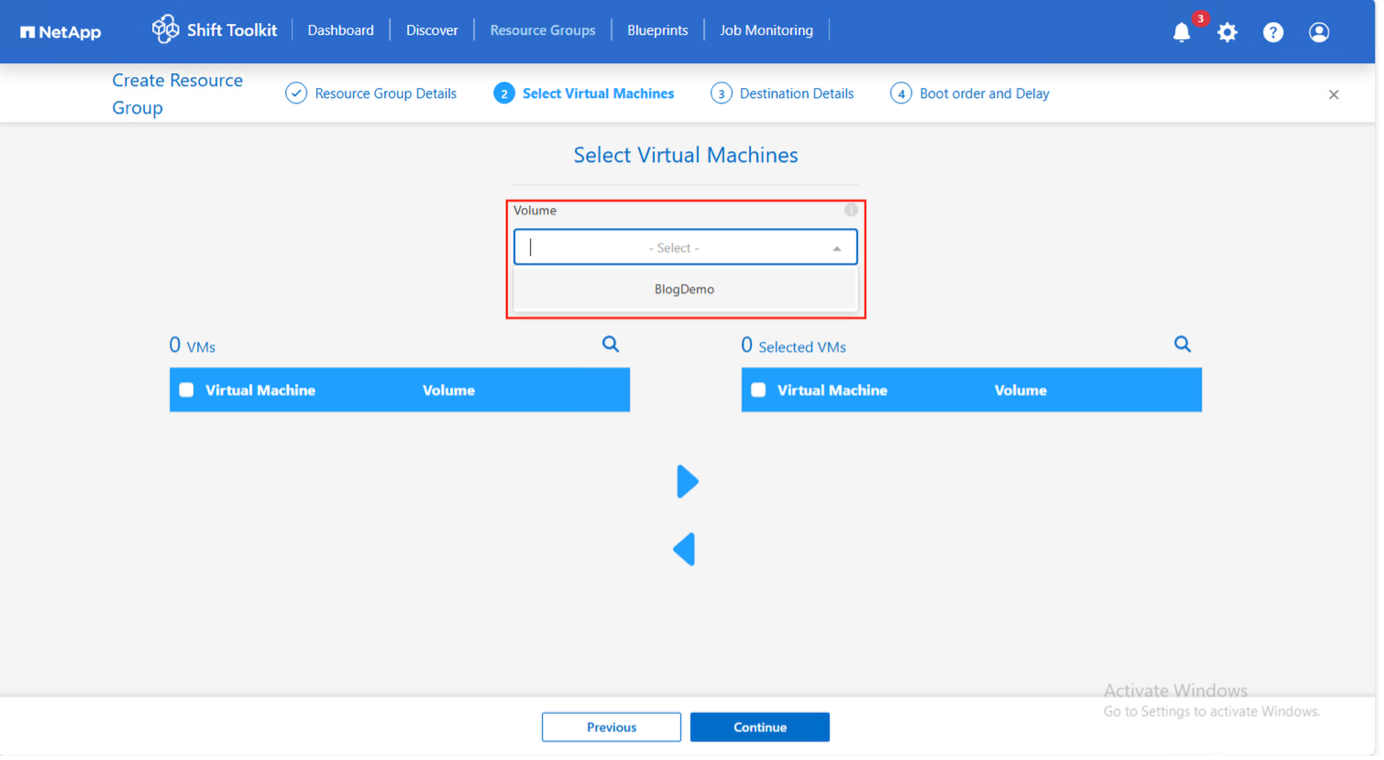
Move VMs to a designated SMB share on a newly created ONTAP SVM before conversion to isolate production shares from the staging area. The datastore dropdown only shows SMB shares; CSVs are not displayed. Show example
-
Update migration details:
-
Select Destination Site
-
Select Destination VMware entry
-
Configure volume to qtree mapping
Show example
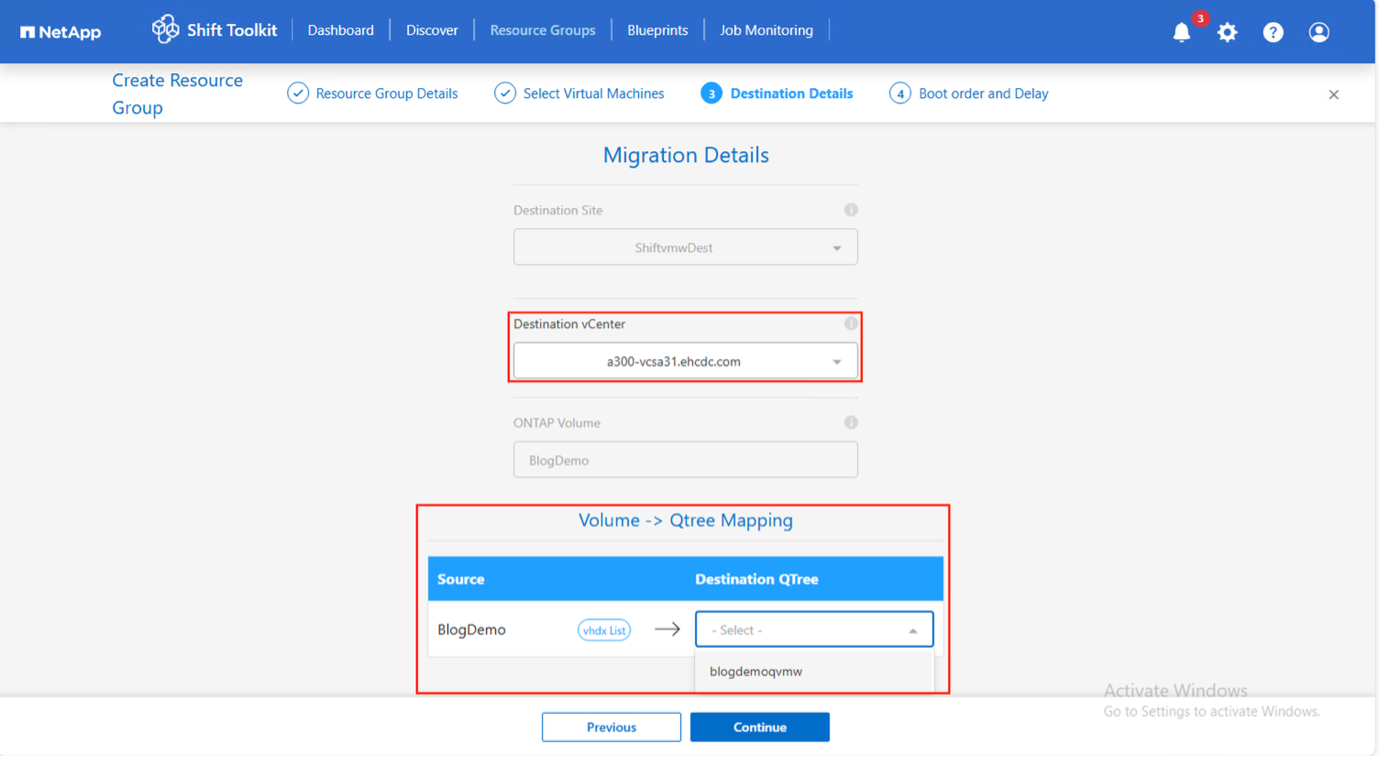
Set the destination path to the appropriate qtree when converting VMs from Hyper-V to ESXi.
-
-
Configure boot order and boot delay for all selected VMs:
-
1: First VM to power on
-
3: Default
-
5: Last VM to power on
-
-
Click Create Resource Group.
Show example
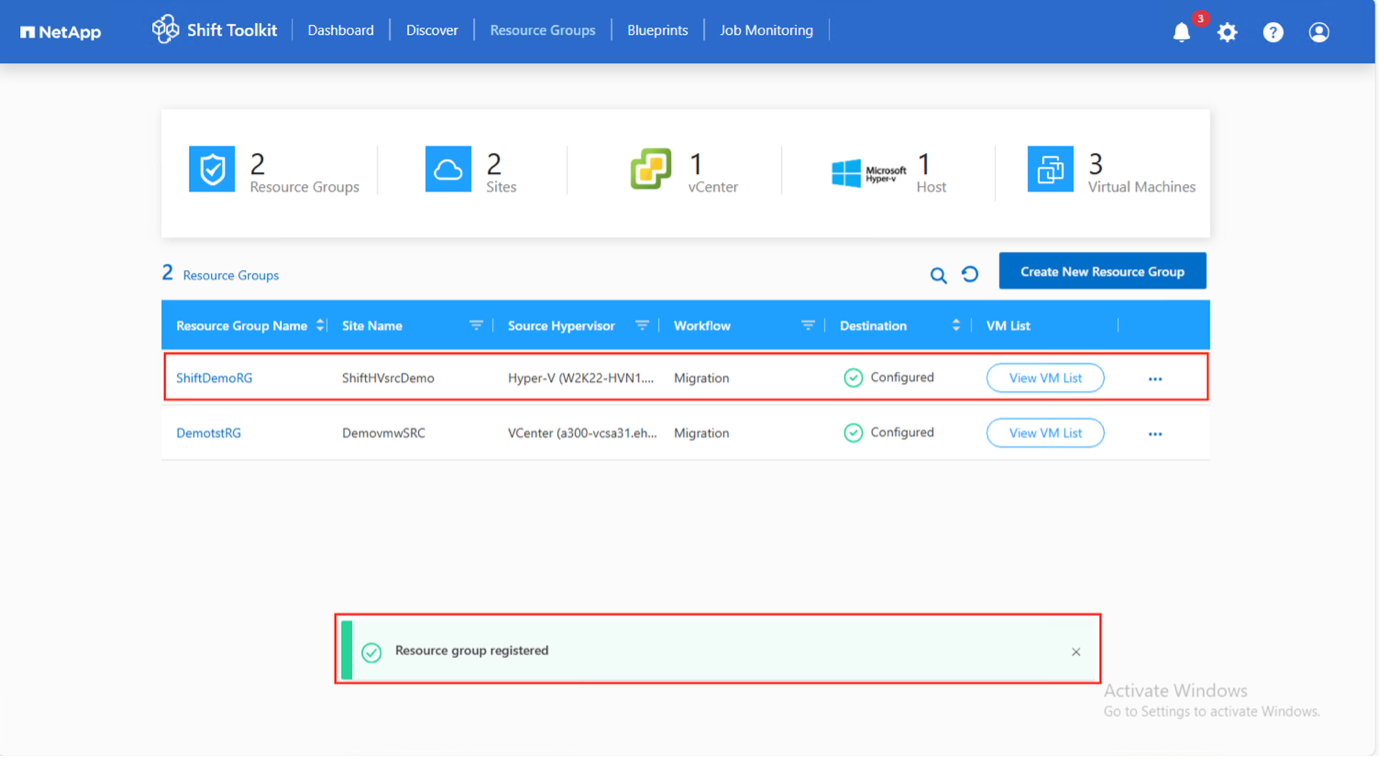
The resource group is created and ready for blueprint configuration.
Step 4: Create a migration blueprint
Create a blueprint to define the migration plan, including platform mappings, network configuration, and VM settings.
-
Navigate to Blueprints and click Create New Blueprint.
-
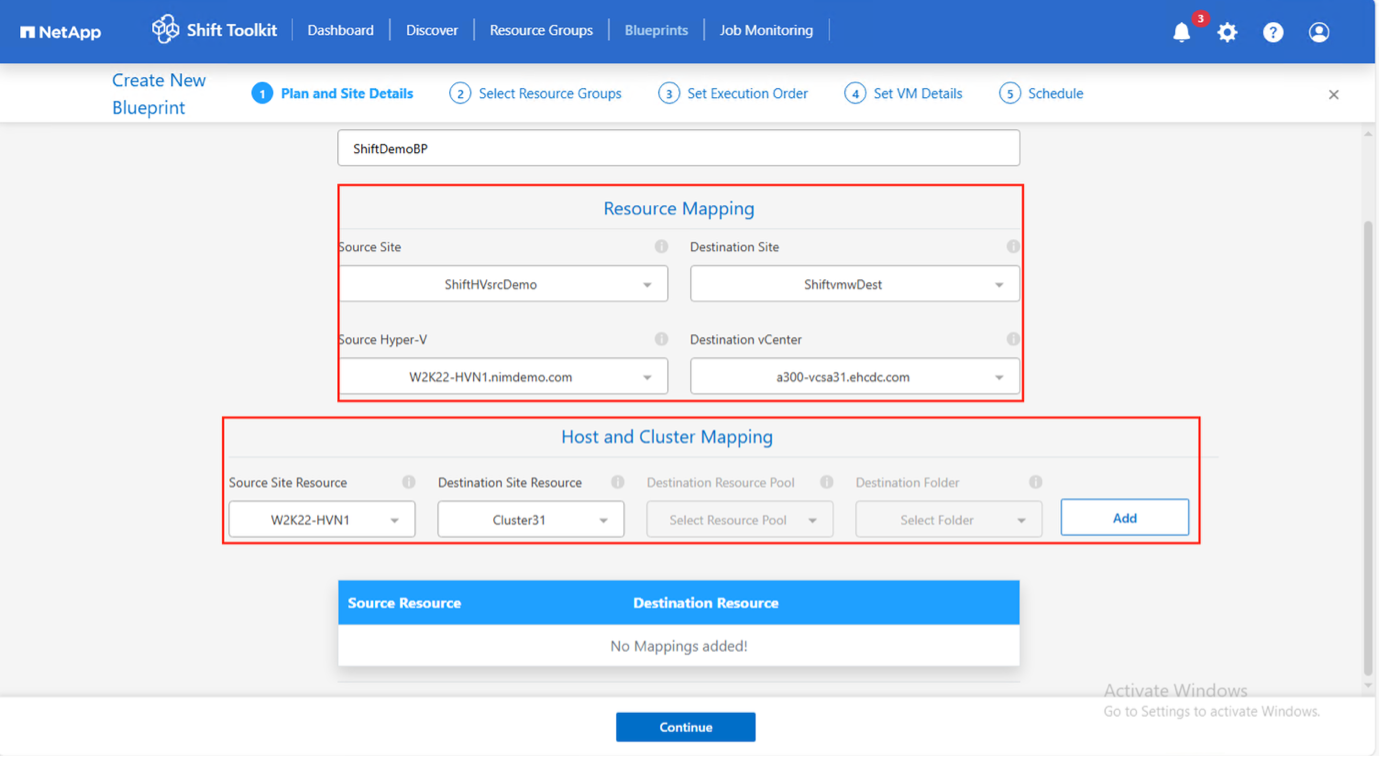
Provide a name for the blueprint and configure host mappings:
-
Select Source Site and associated Hyper-V hypervisor
-
Select Destination Site and associated vCenter
-
Configure host and cluster mapping
Show example
-
-
Select resource group details and click Continue.
-
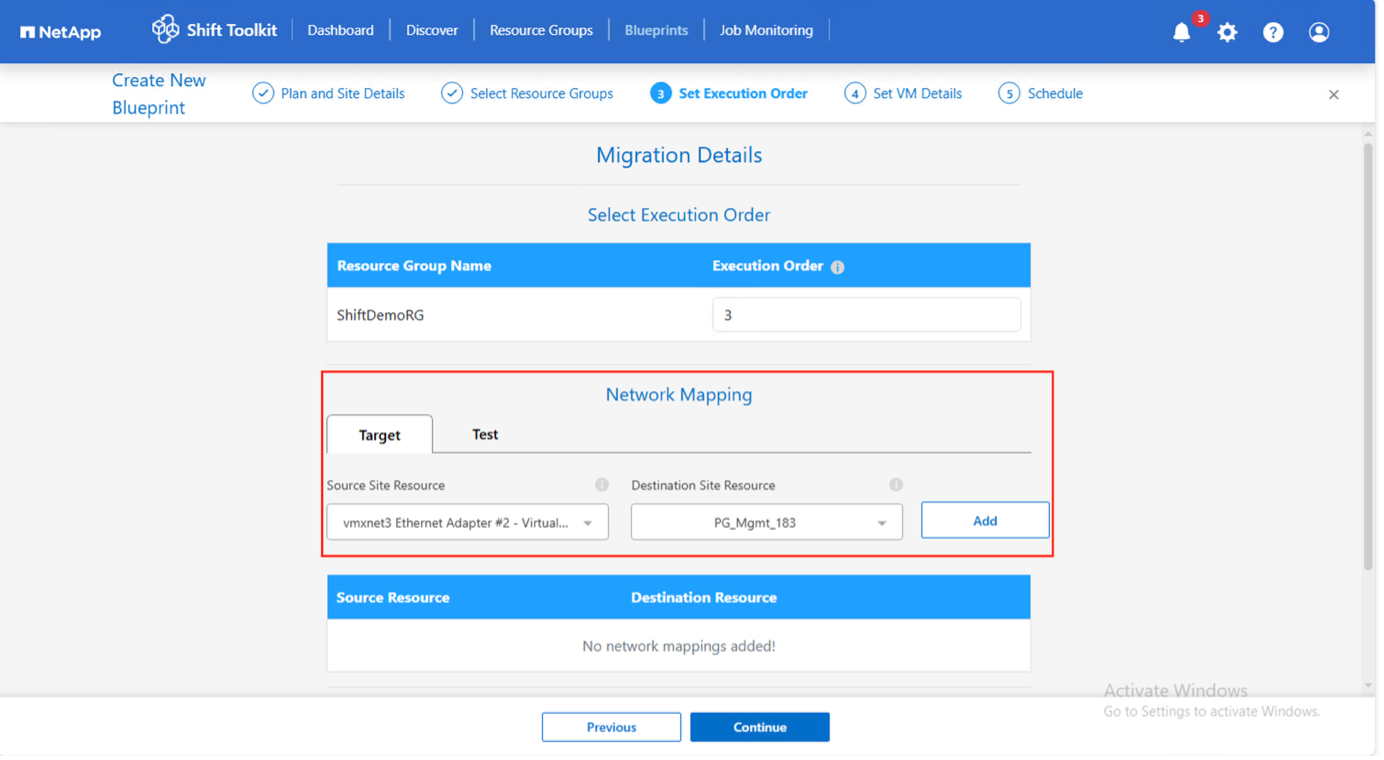
Set execution order for resource groups if multiple groups exist.
-
Configure network mapping to appropriate port groups.
Show example
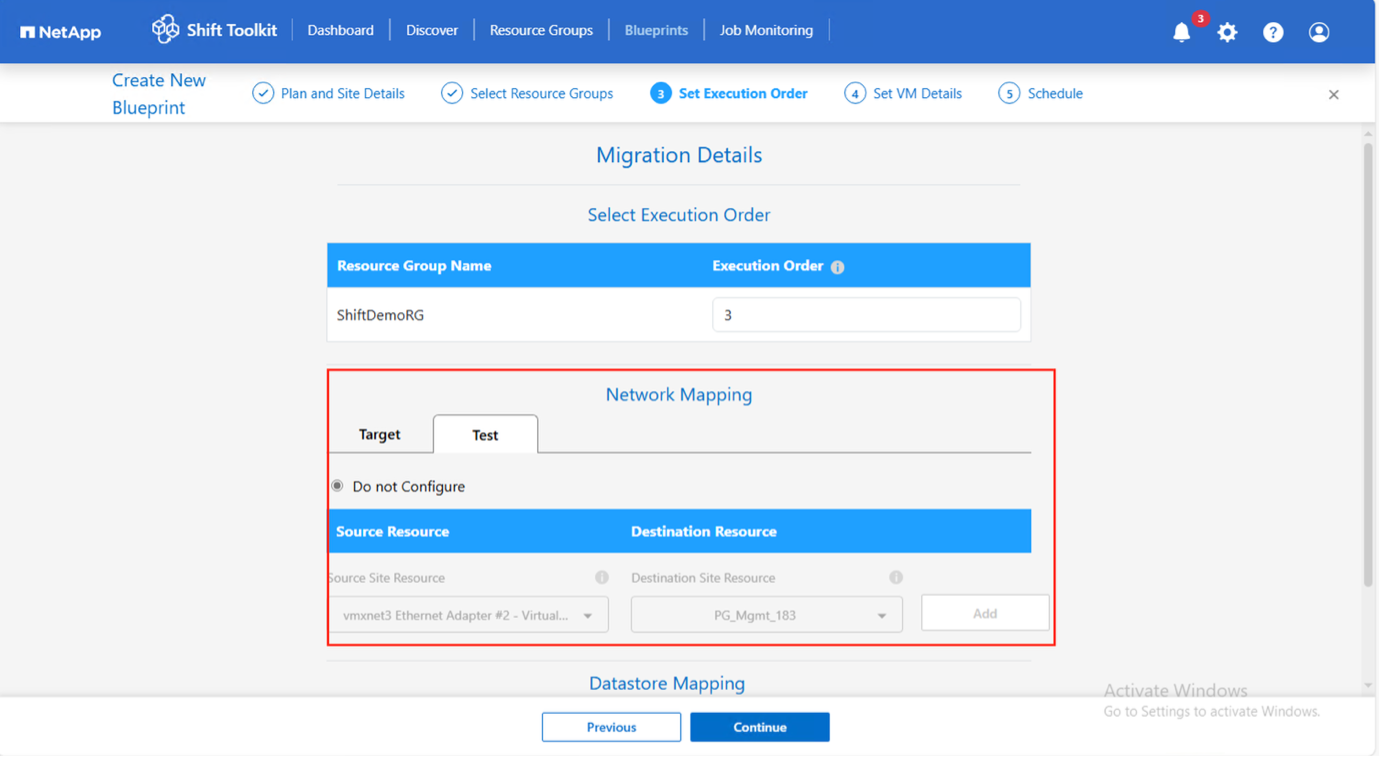
On VMware, Distributed Port Group is the only supported option. For test migration, select "Do not configure Network" to avoid production network conflicts; manually assign network settings after conversion. Show example
-
Review storage mappings (automatically selected based on VM selection).
Ensure qtrees are provisioned beforehand with necessary permissions. -
Configure VM preparation override if needed for custom scripts or IP address customization.
Show example

-
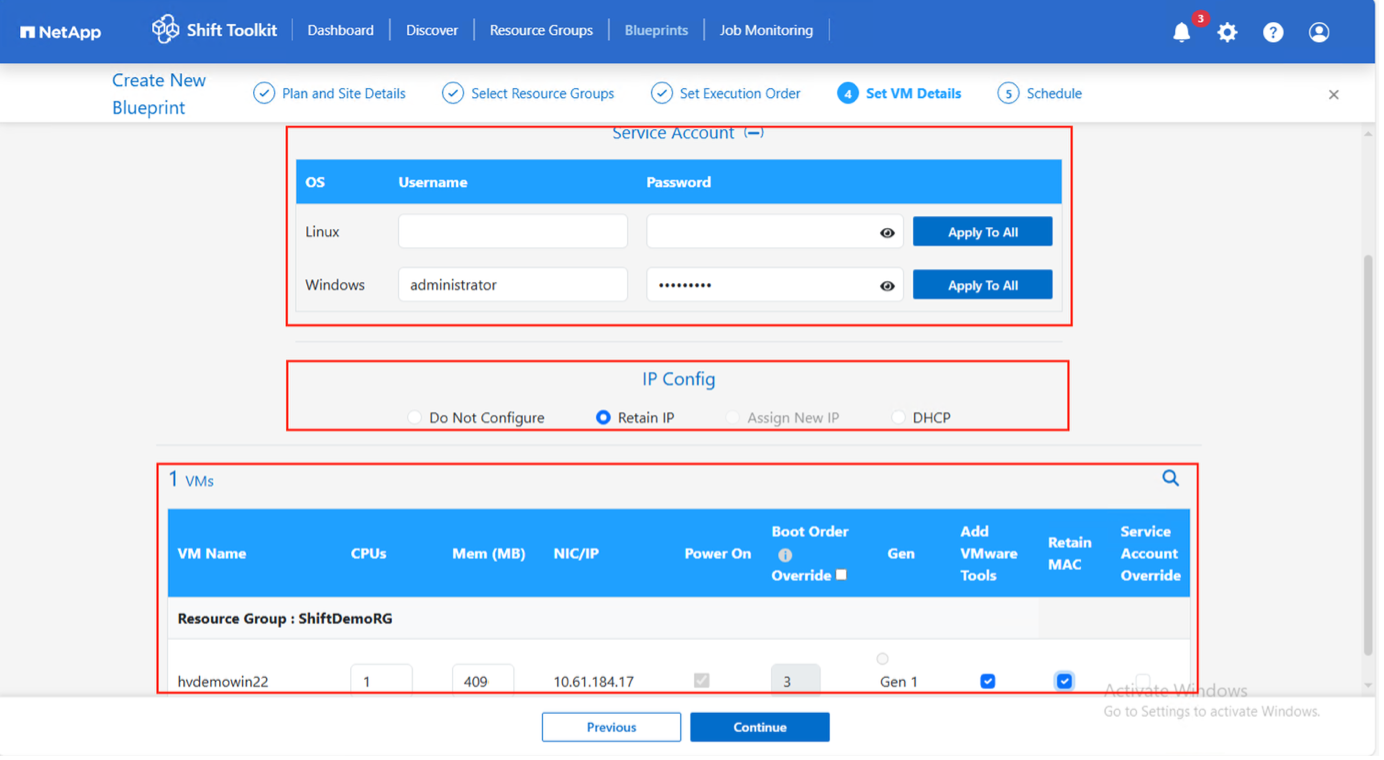
Under VM details, provide service account and credentials for each OS type:
-
Windows: Local administrator or domain credentials (ensure user profile exists on VM)
-
Linux: User with sudo privileges without password prompt
Show example
-
-
Configure IP settings:
-
Do not configure: Default option
-
Retain IP: Keep same IPs from source system
-
DHCP: Assign DHCP on target VMs
Ensure VMs are powered on during prepareVM phase and integration services are enabled.
-
-
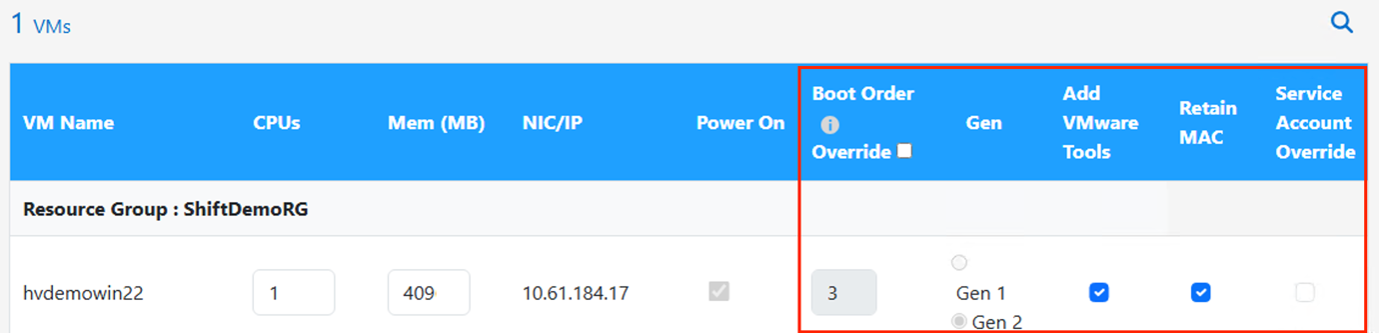
Configure VM settings:
-
Resize CPU/RAM parameters (optional)
-
Modify boot order and boot delay
-
Power ON: Select to power on VMs after migration (default: ON)
-
Add VMware tools: Install VMware Tools after conversion (default: selected)
-
Retain MAC: Keep MAC addresses for licensing requirements
-
Service Account override: Specify separate service account if needed
Show example
-
-
Click Continue.
-
(Optional) Schedule the migration by selecting a date and time.
Show example
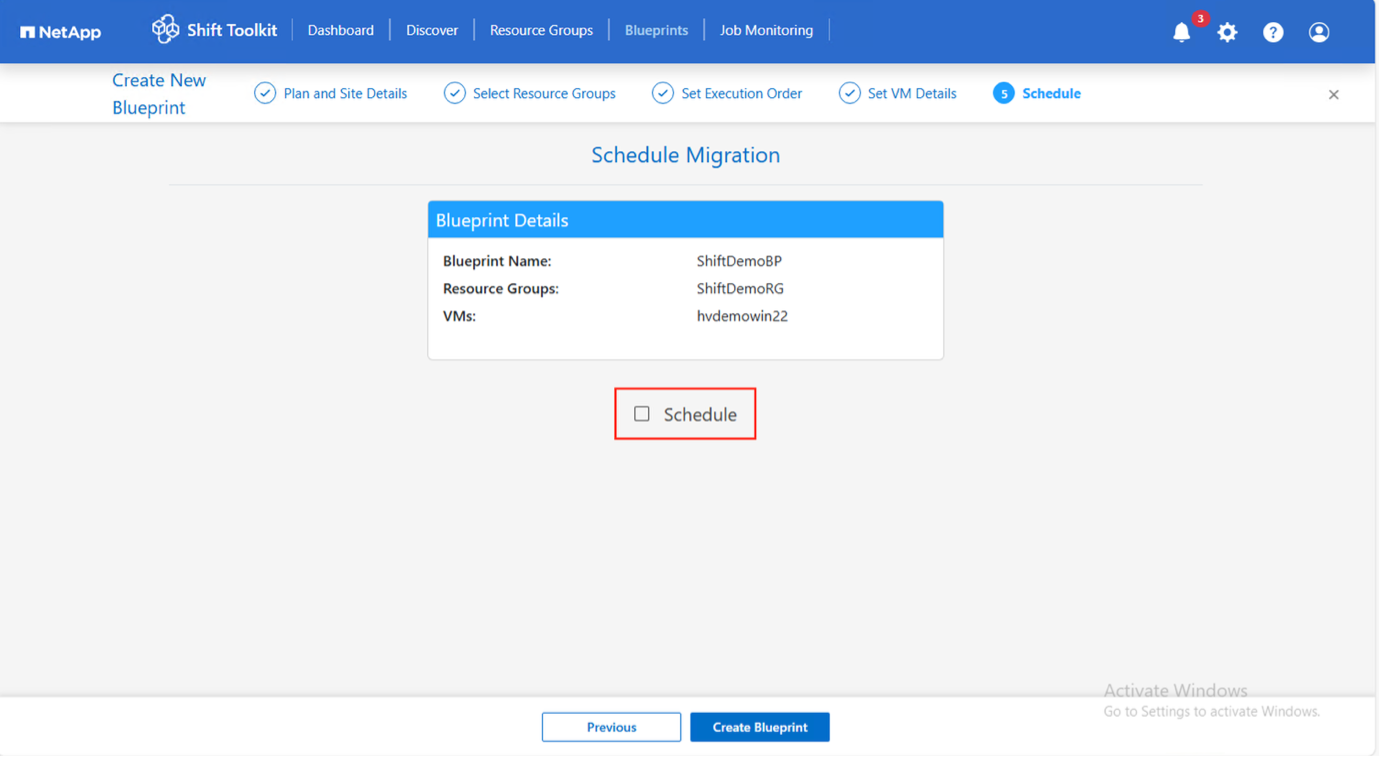
Schedule migrations at least 30 minutes ahead to allow time for VM preparation. -
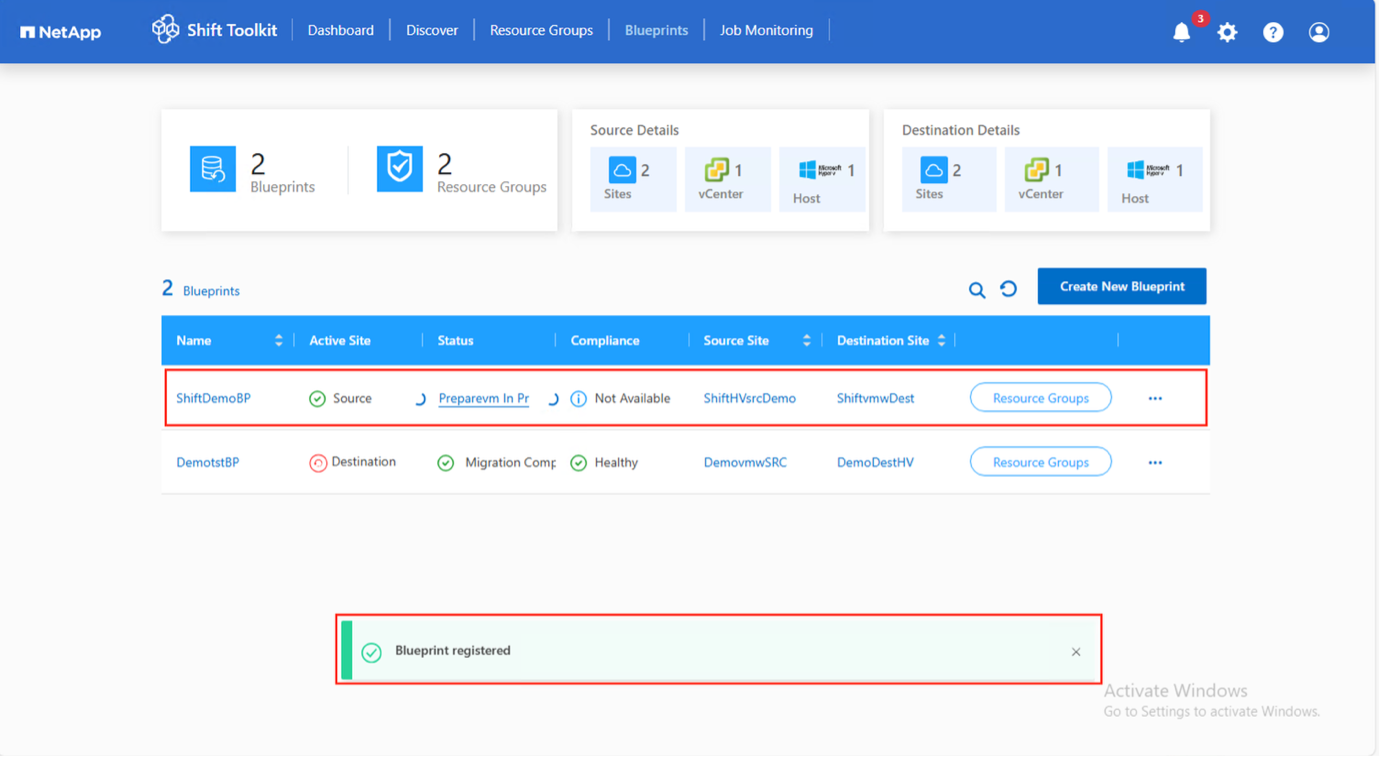
Click Create Blueprint.
The Shift Toolkit initiates a prepareVM job that runs scripts on source VMs to prepare them for migration.
Show example
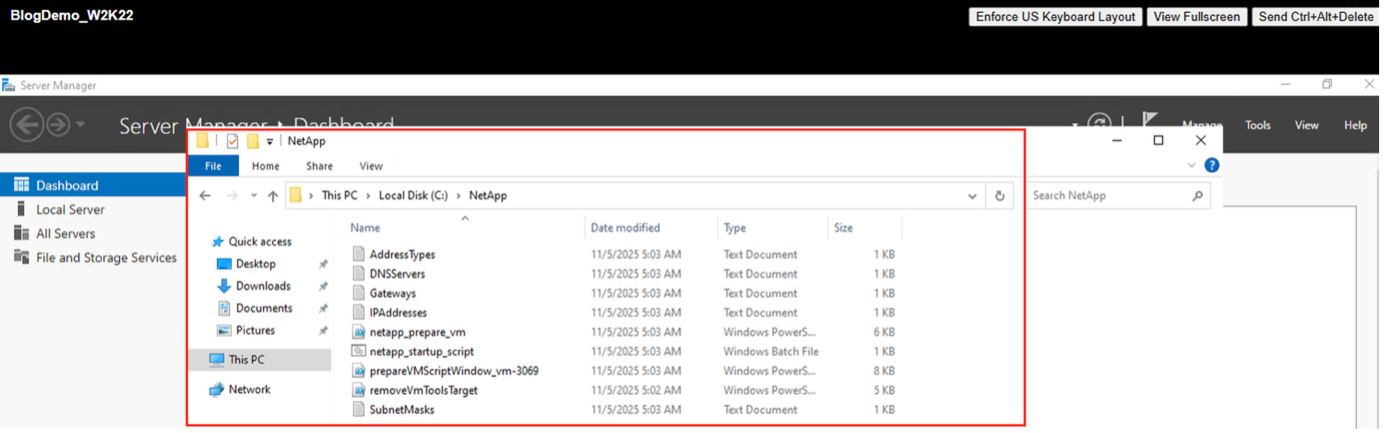
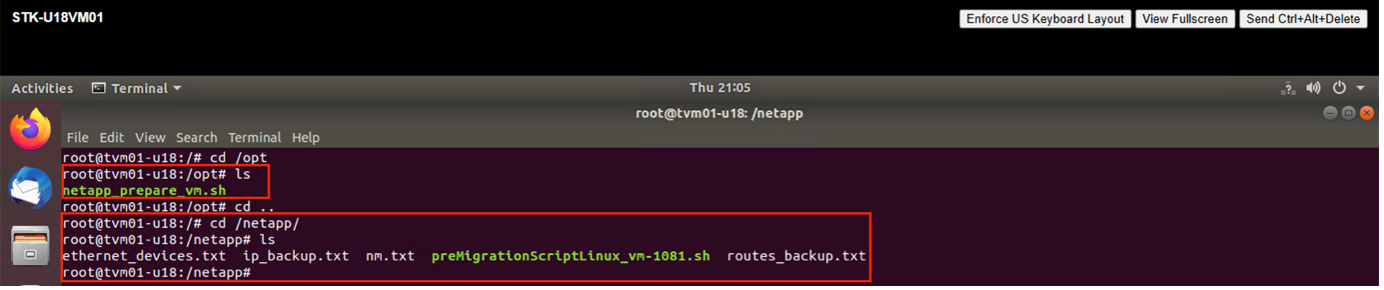
The preparation process:
-
For Windows VMs: Stores scripts in
C:\NetAppShow example
-
For Linux VMs: Stores scripts in
/NetAppand/optShow example
For CentOS or Red Hat VMs, the Shift Toolkit automatically installs necessary drivers before disk conversion to ensure successful boot after conversion.
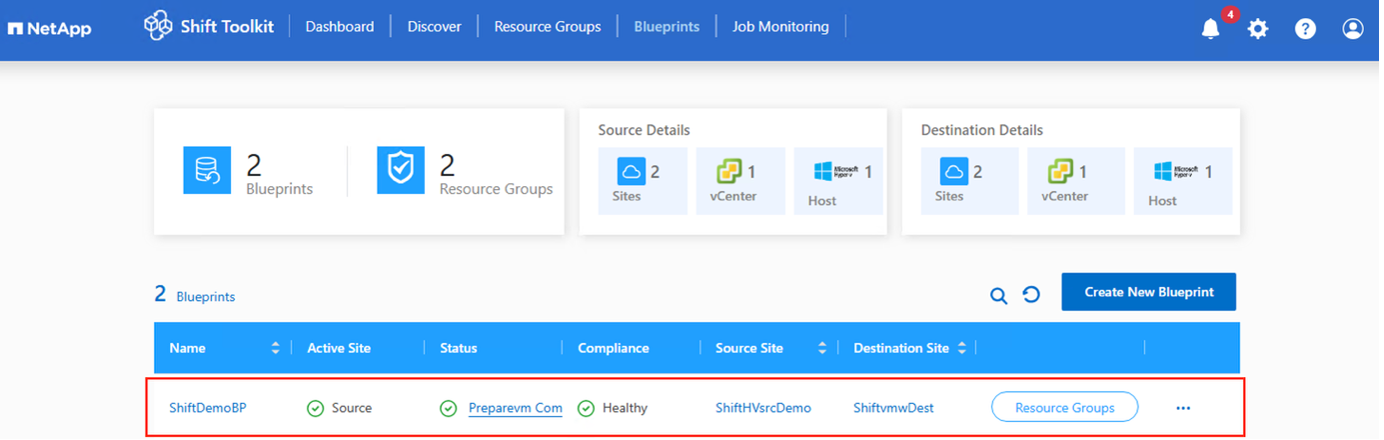
When prepareVM completes successfully, the blueprint status updates to "Active."
Show example
Step 5: Execute the migration
Trigger the migration workflow to convert VMs from Hyper-V to VMware ESXi.
-
All VMs are gracefully powered off according to the planned maintenance schedule
-
The Shift Toolkit VM is part of the domain
-
CIFS share is configured with appropriate permissions
-
Qtrees have the correct security style
-
Integration Services are enabled on all guest VMs
-
SSH is enabled on Linux-based guest VMs
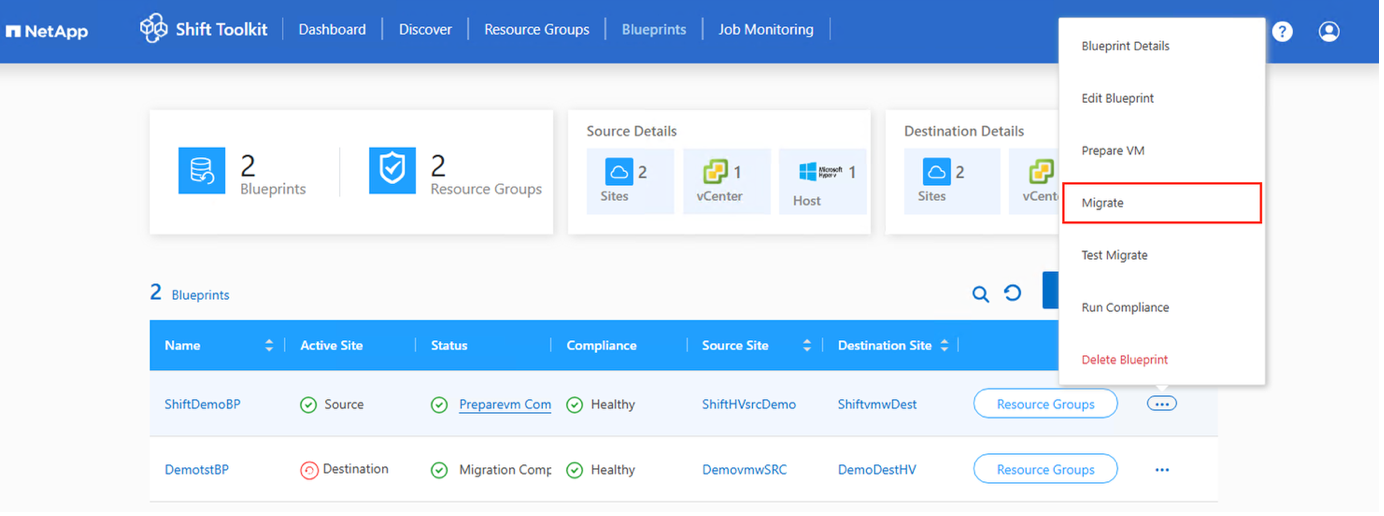
-
On the blueprint, click Migrate.
Show example
-
If VMs remain powered on, respond to the graceful shutdown prompt.
Show example
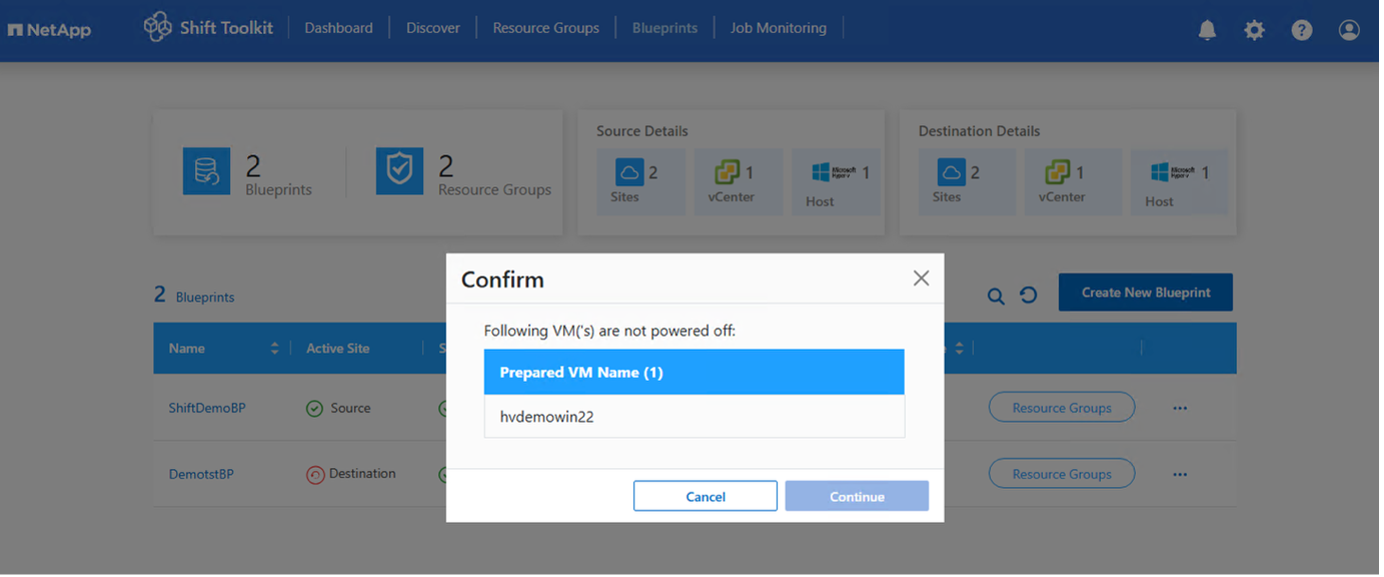
Show example
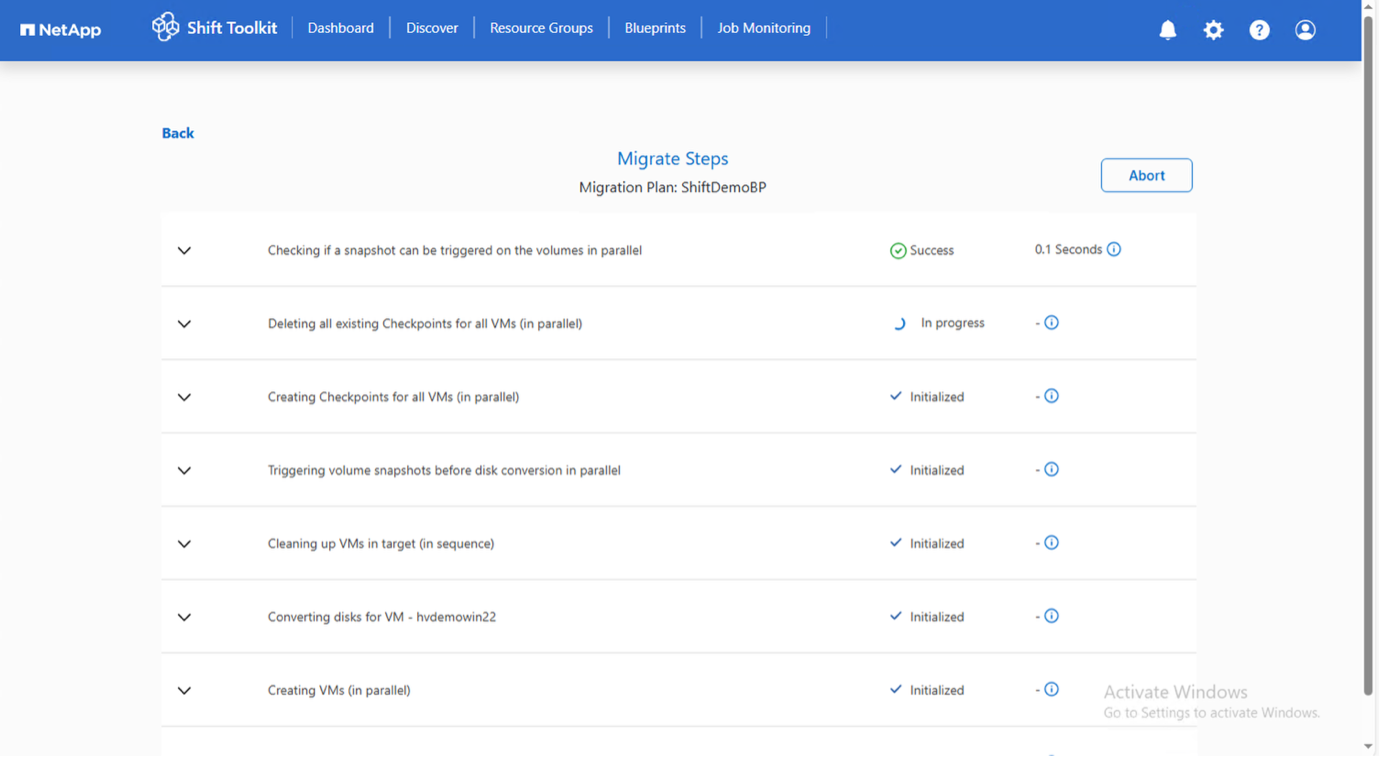
The Shift Toolkit performs the following steps:
-
Powers off source VMs
-
Deletes existing checkpoints
-
Triggers VM checkpoints at the source
-
Triggers volume snapshot before disk conversion
-
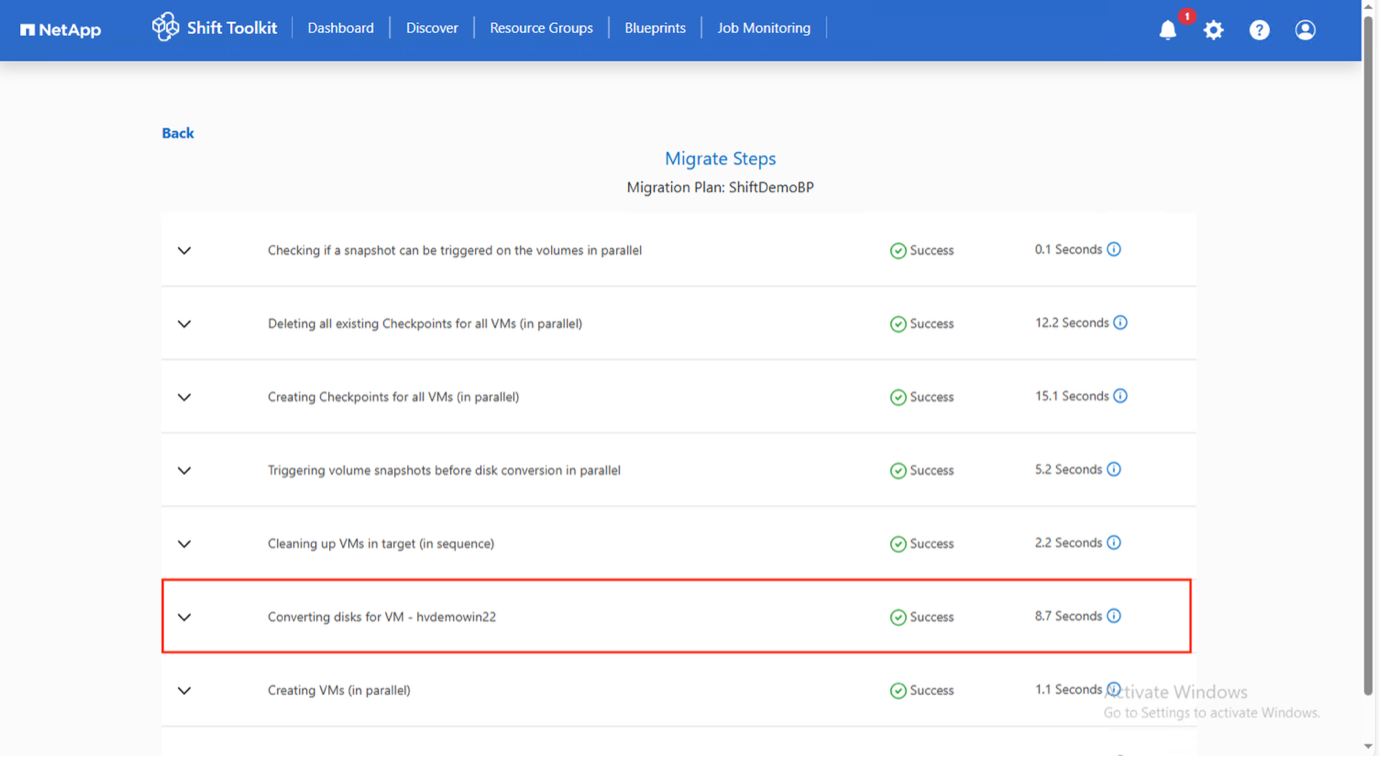
Clones and converts VHDx files to VMDK format
-
Powers on VMs at the target site
-
Registers network settings
-
Adds VMware Tools and assigns IP addresses
The conversion completes in seconds, minimizing VM downtime.
Show example
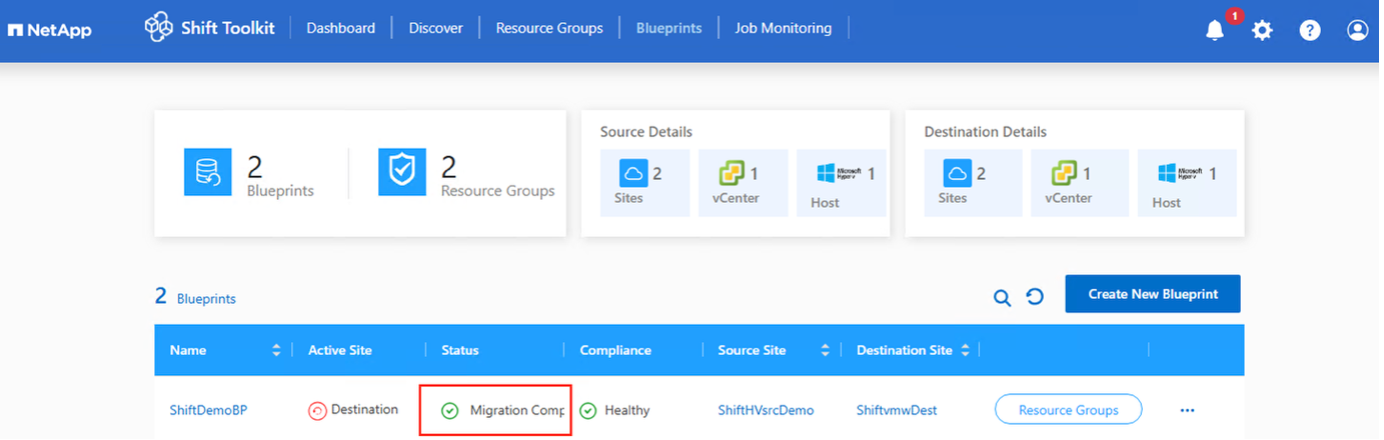
When migration completes, the blueprint status changes to "Migration Complete."
Show example
Step 6: Validate the migration
Verify that VMs are running successfully on the VMware ESXi host.
-
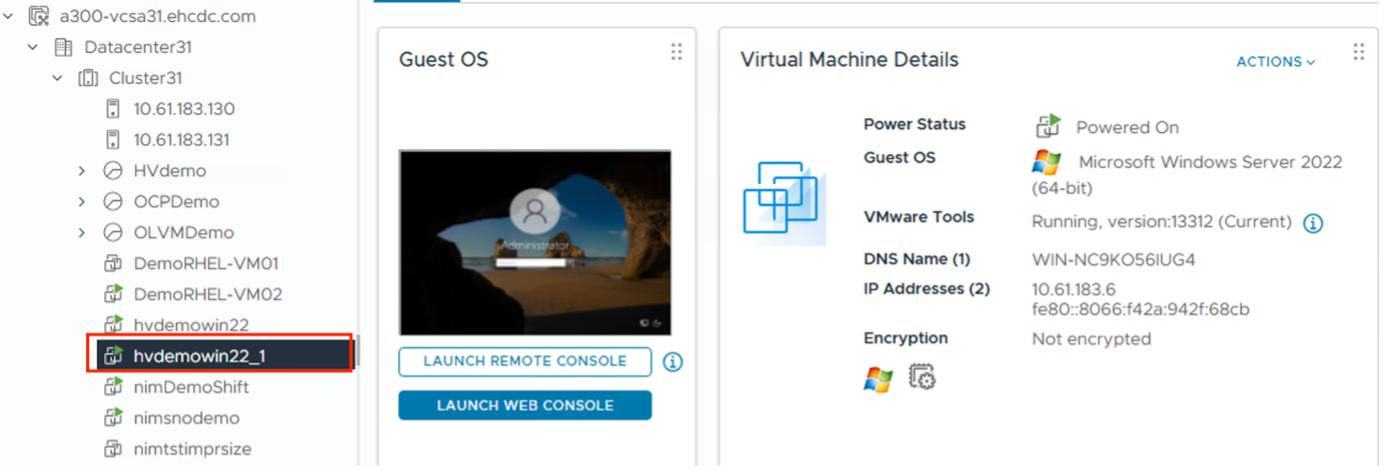
Log in to vCenter or the ESXi host.
-
Verify that VMs are running on the specified ESXi host.
Show example
-
Verify VM connectivity and application functionality.
-
(Windows VMs only) Bring offline disks online if needed:
Set-StorageSetting -NewDiskPolicy OnlineAll
After conversion, all VM disks on Windows OS except the OS disk will be offline due to the default Microsoft Windows SAN policy (offlineALL). This prevents data corruption when LUNs are accessed by multiple servers.
The migration from Hyper-V to VMware ESXi is complete.
|
|
The Shift Toolkit uses cron jobs (Linux) and scheduled tasks (Windows) for post-migration operations. No SSH connections or equivalent are created after VMs are running on ESXi hosts. |