

Install Trident on a Red Hat OpenShift cluster and create storage objects
 Suggest changes
Install Trident with the Red Hat Certified Trident Operator and create storage objects for ONTAP and Amazon FSx for NetApp ONTAP to enable dynamic volume provisioning for containers and VMs. Prepare worker nodes for block access when required.
-
Complete the procedures on this page before you install OpenShift Virtualization. OpenShift Virtualization requires a default Trident-backed StorageClass and VolumeSnapshotClass to create golden images for VM templates.
-
If you already installed OpenShift Virtualization before configuring Trident, delete any golden images created with a different storage class. After you set Trident as the default, OpenShift Virtualization recreates the golden images using Trident storage.
oc delete dv,VolumeSnapshot -n openshift-virtualization-os-images --selector=cdi.kubevirt.io/dataImportCron
Step 1: Install Trident
The Red Hat Certified Trident Operator is supported by NetApp for OpenShift on-premises, in public clouds, and in managed services such as ROSA. Starting with Trident 25.02, the operator can also prepare worker nodes for iSCSI when you use Amazon FSx for NetApp ONTAP and plan to run OpenShift Virtualization VM workloads.
For other installation options, see the Trident documentation.
-
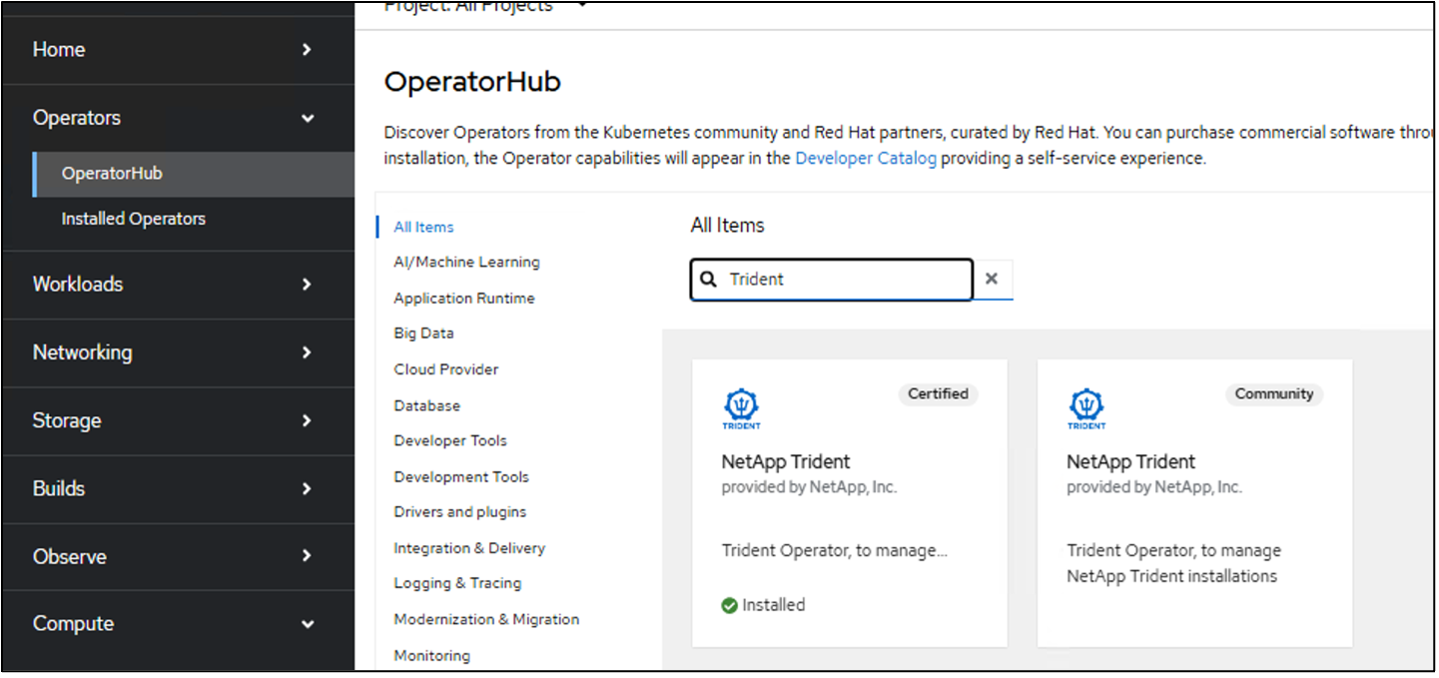
In OperatorHub, select Certified NetApp Trident.
Show example
-
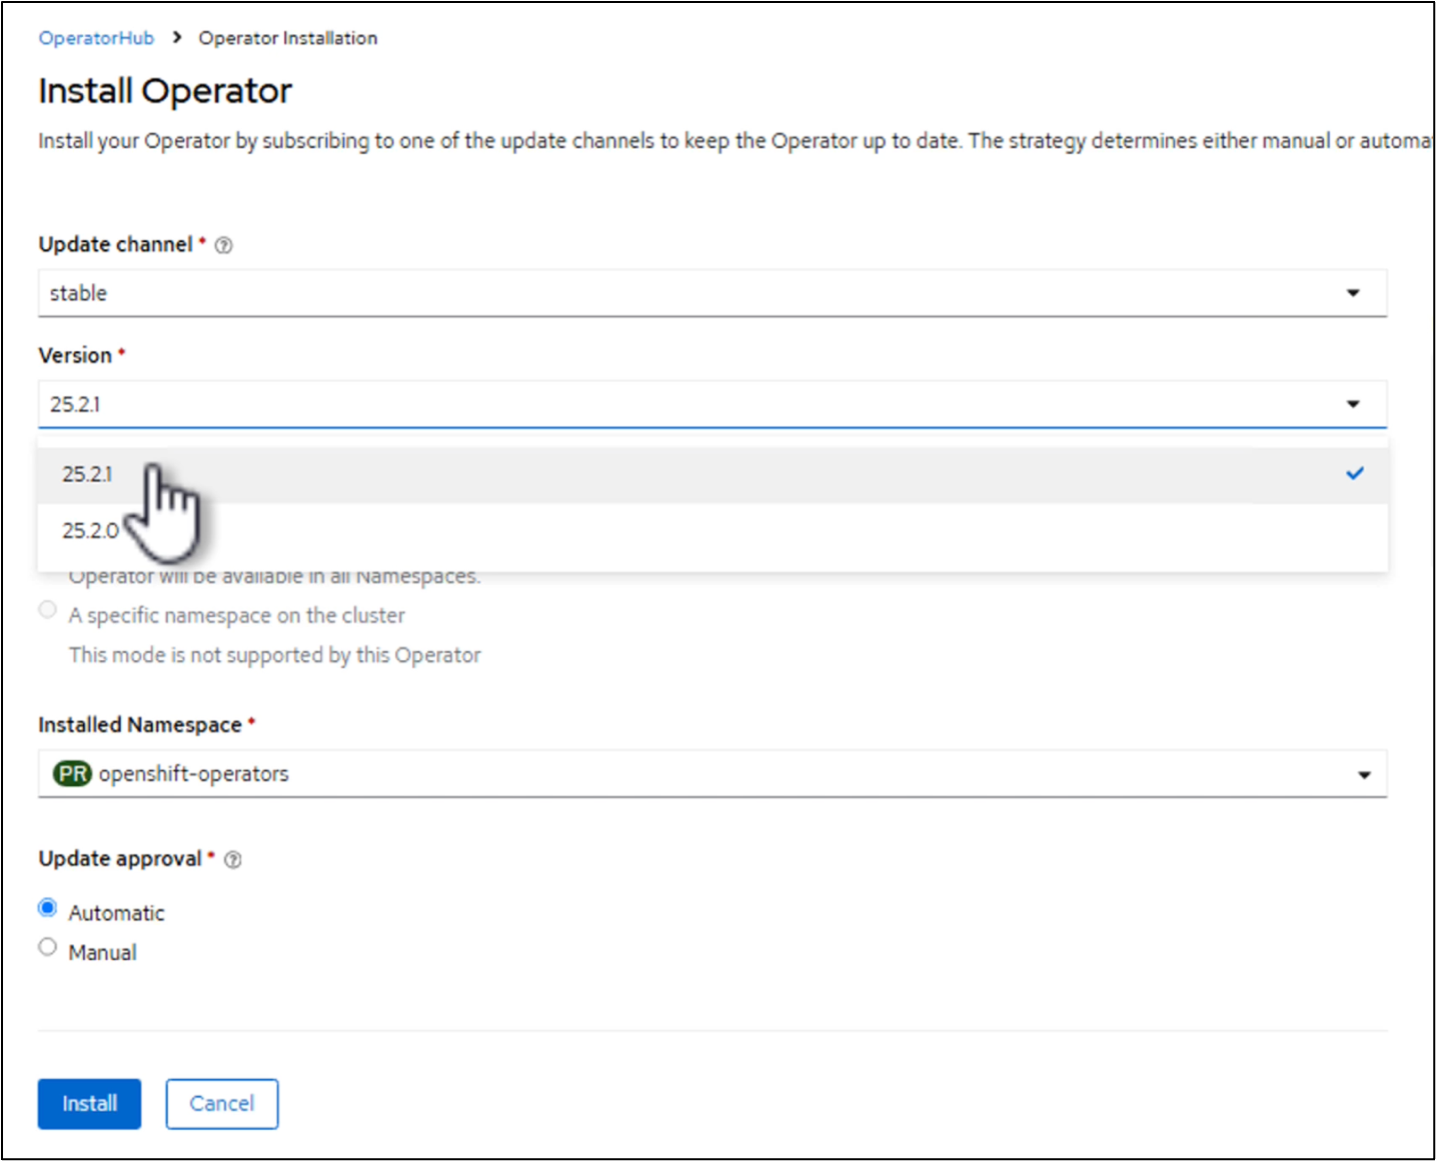
On the Install page, keep the latest version and select Install.
Show example
-
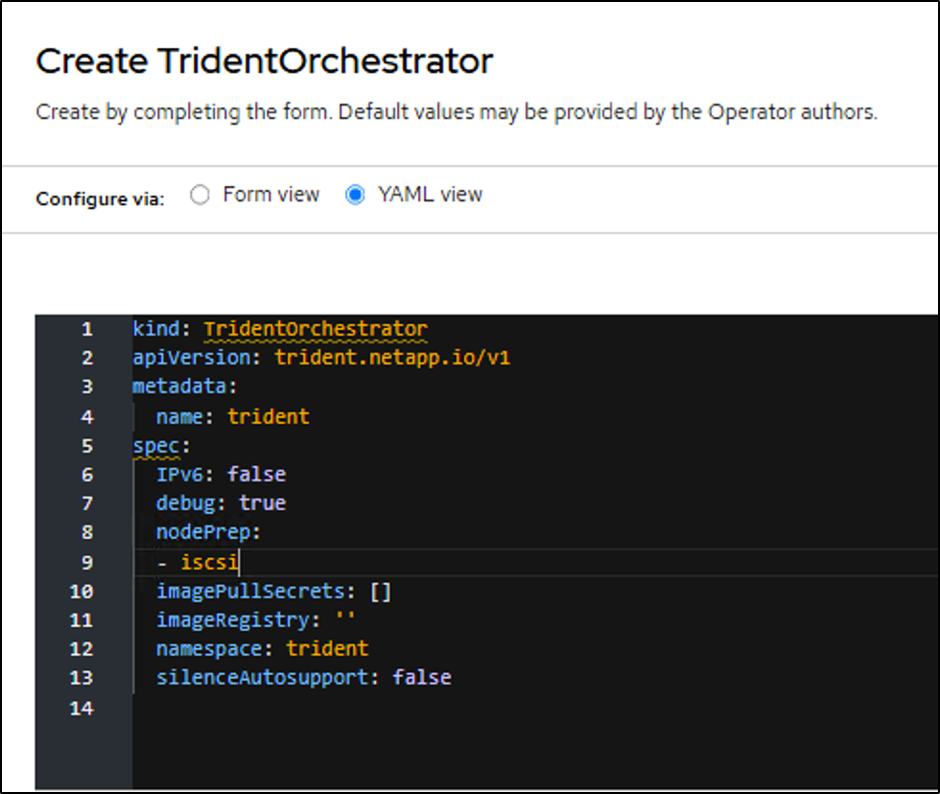
After the operator installs, select View operator and create an instance of the Trident Orchestrator.
If you want to prepare worker nodes for iSCSI, switch to YAML view and add
iscsitonodePrep.Show example
-
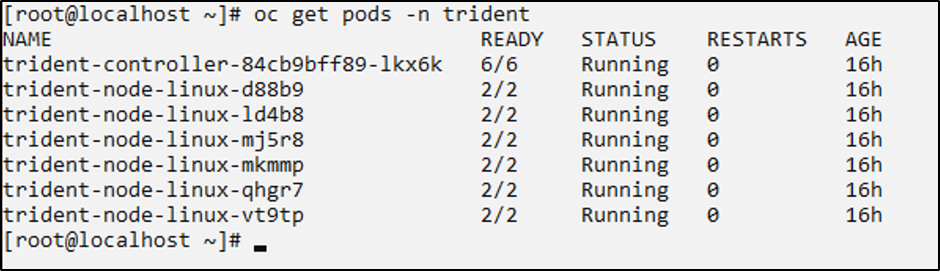
Confirm that all Trident pods are running in the cluster.
Show example
-
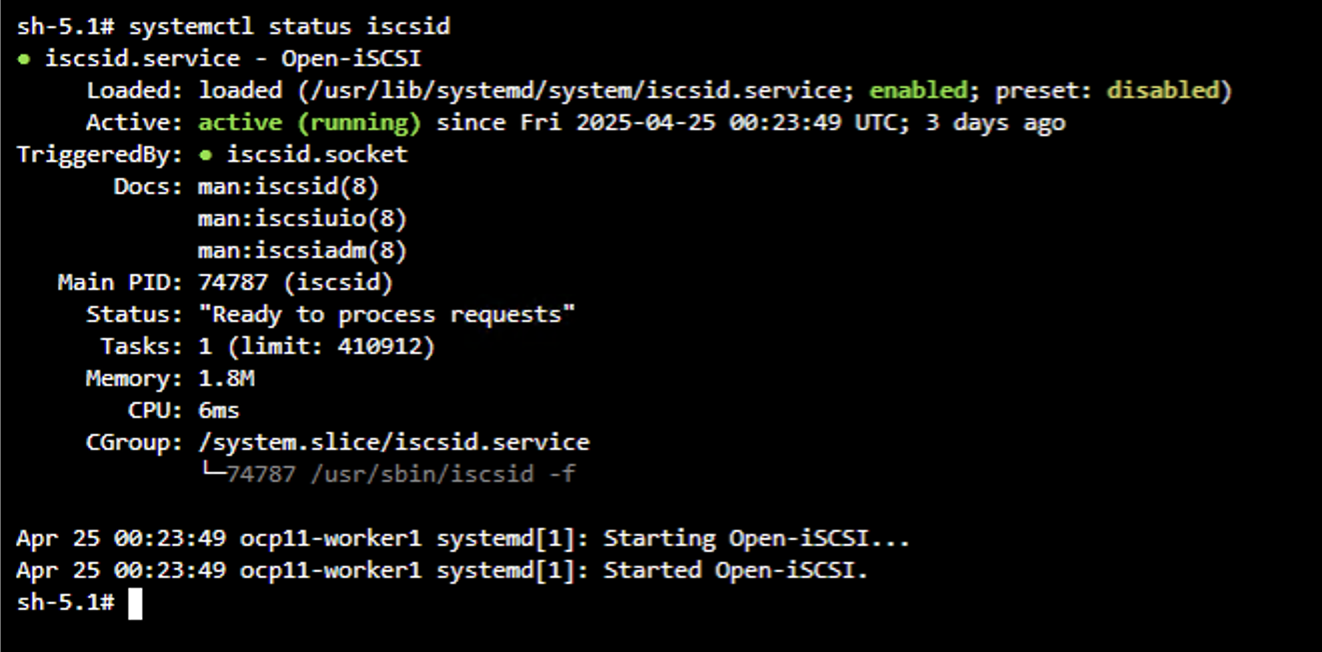
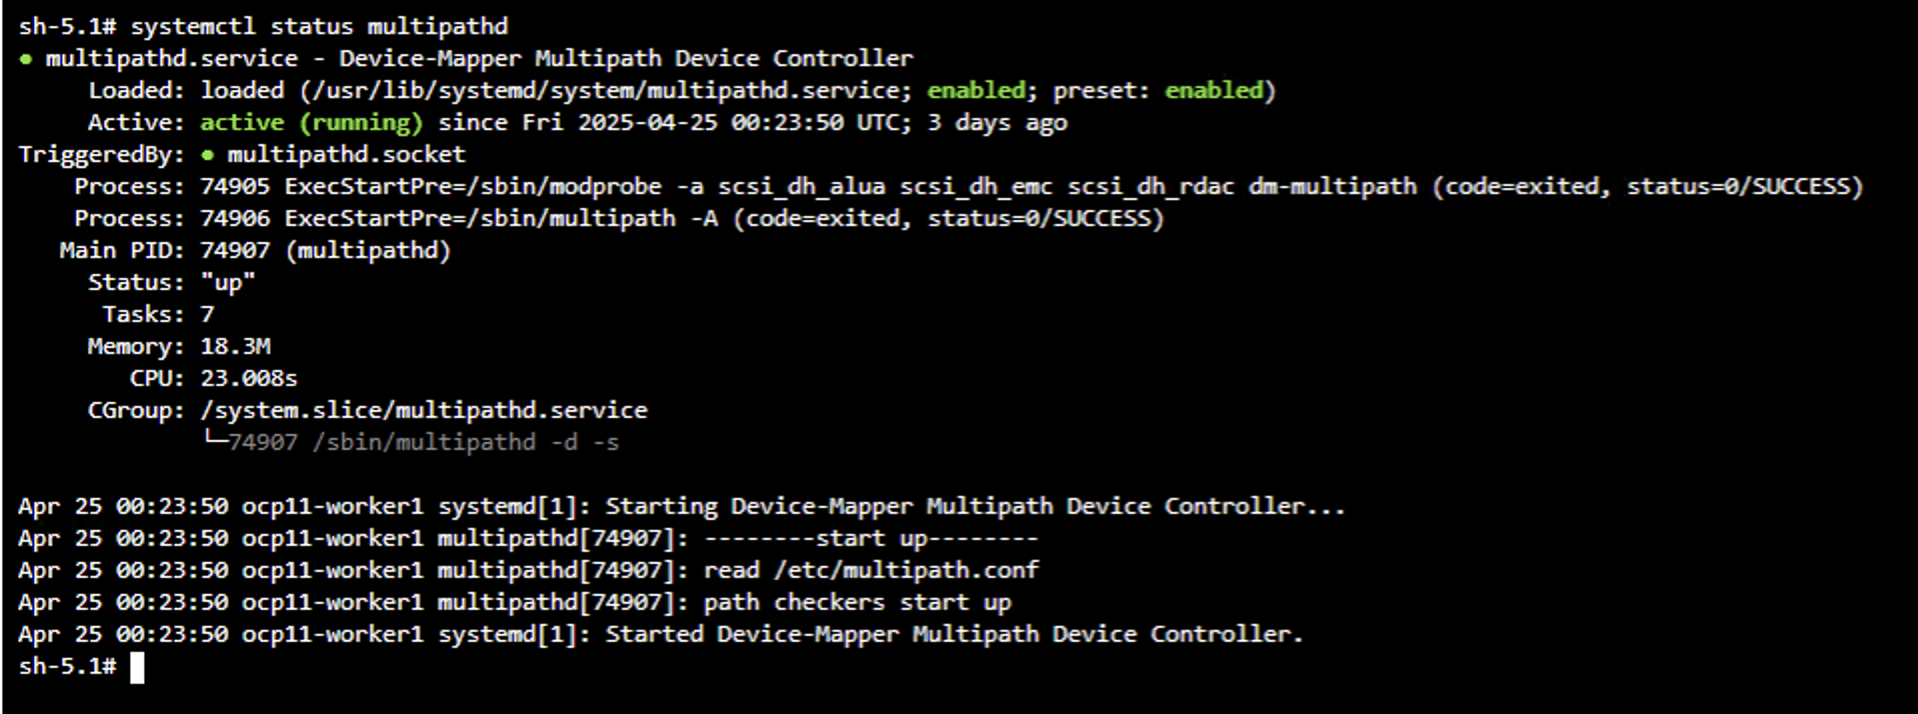
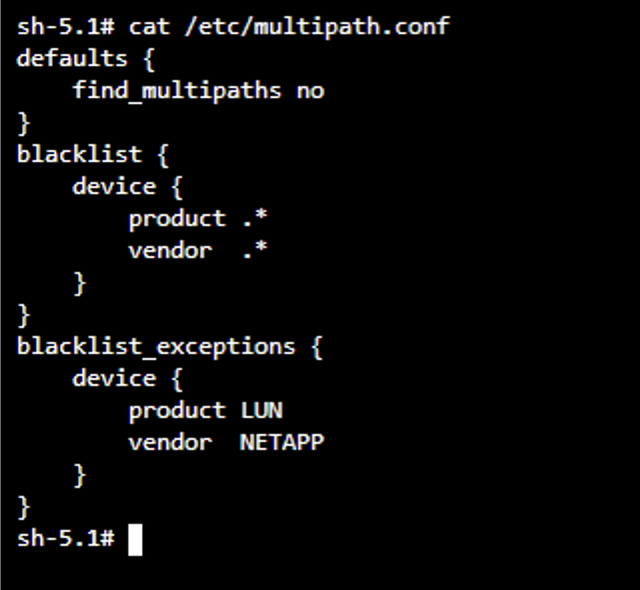
If you enabled iSCSI node preparation, log in to worker nodes and verify that
iscsidandmultipathdare active and thatmultipath.confhas entries.Show example
Show example
Show example
The following video shows a demonstration of installing Trident using the Red Hat Certified Trident Operator.
Step 2: Prepare storage backend and StorageClass configuration files for your environment
Create TridentBackendConfig and StorageClass definitions for your environment. You can configure multiple storage protocols within your environment. Create YAML files for each protocol you want to use, and replace the placeholder values with your specific configuration details.

|
Complete either the on-premises or ROSA section below based on your environment, then proceed to Step 3. |
On-premises OpenShift clusters
Create YAML files for each protocol you want to configure. You can configure one or more of the following protocols: NAS for NFS-based file storage, iSCSI for iSCSI block storage, NVMe/TCP for high-performance NVMe over TCP block storage, or FC for Fibre Channel block storage.
Create a TridentBackendConfig and StorageClass for ONTAP NAS to enable NFS-based persistent storage provisioning. The backend configuration includes credentials stored in a Kubernetes Secret and references your ONTAP SVM and management LIF.
Backend secret and backend configuration file (save as tbc-nas.yaml):
# tbc-nas.yaml
apiVersion: v1
kind: Secret
metadata:
  name: tbc-nas-secret
type: Opaque
stringData:
  username: <cluster admin username>
  password: <cluster admin password>
---
apiVersion: trident.netapp.io/v1
kind: TridentBackendConfig
metadata:
  name: tbc-nas
spec:
  version: 1
  storageDriverName: ontap-nas
  managementLIF: <ONTAP management LIF>
  backendName: tbc-nas
  svm: zoneb #<replace with your SVM name>
  storagePrefix: testzoneb #<replace with your prefix>
  defaults:
    nameTemplate: "{{ .config.StoragePrefix }}_{{ .volume.Namespace }}_{{ .volume.RequestName }}"
  credentials:
    name: tbc-nas-secret
StorageClass definition (save as sc-nas.yaml):
# sc-nas.yaml
apiVersion: storage.k8s.io/v1
kind: StorageClass
metadata:
  name: sc-nas
provisioner: csi.trident.netapp.io
parameters:
  backendType: "ontap-nas"
  media: "ssd"
  provisioningType: "thin"
  snapshots: "true"
allowVolumeExpansion: trueCreate a TridentBackendConfig and StorageClass for ONTAP SAN to enable iSCSI-based block storage provisioning. The backend configuration uses the ontap-san driver and includes credentials stored in a Kubernetes Secret.
Backend secret and backend configuration file (save as tbc-iscsi.yaml):
# tbc-iscsi.yaml
apiVersion: v1
kind: Secret
metadata:
  name: backend-tbc-ontap-iscsi-secret
type: Opaque
stringData:
  username: <cluster admin username>
  password: <cluster admin password>
---
apiVersion: trident.netapp.io/v1
kind: TridentBackendConfig
metadata:
  name: ontap-iscsi
spec:
  version: 1
  storageDriverName: ontap-san
  managementLIF: <management LIF>
  backendName: ontap-iscsi
  svm: <SVM name>
  credentials:
    name: backend-tbc-ontap-iscsi-secret
StorageClass definition (save as sc-iscsi.yaml):
# sc-iscsi.yaml
apiVersion: storage.k8s.io/v1
kind: StorageClass
metadata:
  name: sc-iscsi
provisioner: csi.trident.netapp.io
parameters:
  backendType: "ontap-san"
  media: "ssd"
  provisioningType: "thin"
  fsType: ext4
  snapshots: "true"
allowVolumeExpansion: trueCreate a TridentBackendConfig and StorageClass for ONTAP SAN with NVMe over TCP to enable high-performance block storage provisioning. The backend configuration uses the ontap-san driver optimized for NVMe/TCP transport and includes credentials stored in a Kubernetes Secret.
Backend secret and backend configuration file (save as tbc-nvme.yaml):
# tbc-nvme.yaml
apiVersion: v1
kind: Secret
metadata:
  name: backend-tbc-ontap-nvme-secret
type: Opaque
stringData:
  username: <cluster admin username>
  password: <cluster admin password>
---
apiVersion: trident.netapp.io/v1
kind: TridentBackendConfig
metadata:
  name: backend-tbc-ontap-nvme
spec:
  version: 1
  storageDriverName: ontap-san
  sanType: nvme
  managementLIF: <ONTAP management LIF>
  backendName: backend-tbc-ontap-nvme
  svm: <SVM name>
  credentials:
    name: backend-tbc-ontap-nvme-secret
StorageClass definition (save as sc-nvme.yaml):
# sc-nvme.yaml
apiVersion: storage.k8s.io/v1
kind: StorageClass
metadata:
  name: sc-nvme
provisioner: csi.trident.netapp.io
parameters:
  backendType: "ontap-san"
  media: "ssd"
  provisioningType: "thin"
  fsType: ext4
  snapshots: "true"
allowVolumeExpansion: trueCreate a TridentBackendConfig and StorageClass for ONTAP SAN with Fibre Channel to enable FC-based block storage provisioning. The backend configuration uses the ontap-san driver with the FCP protocol specified and includes credentials stored in a Kubernetes Secret.
Backend secret and backend configuration file (save as tbc-fc.yaml):
# tbc-fc.yaml
apiVersion: v1
kind: Secret
metadata:
  name: tbc-fc-secret
type: Opaque
stringData:
  username: <cluster admin username>
  password: <cluster admin password>
---
apiVersion: trident.netapp.io/v1
kind: TridentBackendConfig
metadata:
  name: tbc-fc
spec:
  version: 1
  storageDriverName: ontap-san
  managementLIF: <ONTAP management LIF>
  backendName: tbc-fc
  svm: openshift-fc #<replace with your SVM name>
  sanType: fcp
  storagePrefix: demofc #<replace with your prefix>
  defaults:
    nameTemplate: "{{ .config.StoragePrefix }}_{{ .volume.Namespace }}_{{ .volume.RequestName }}"
  credentials:
    name: tbc-fc-secret
StorageClass definition (save as sc-fc.yaml):
# sc-fc.yaml
apiVersion: storage.k8s.io/v1
kind: StorageClass
metadata:
  name: sc-fc
provisioner: csi.trident.netapp.io
parameters:
  backendType: "ontap-san"
  media: "ssd"
  provisioningType: "thin"
  fsType: ext4
  snapshots: "true"
allowVolumeExpansion: true
ROSA clusters with Amazon FSx for NetApp ONTAP
Create YAML files for each protocol you want to configure. You can configure one or both of the following protocols: NAS for NFS-based file storage or iSCSI for block storage.
Create a TridentBackendConfig and StorageClass for Amazon FSx for NetApp ONTAP with ONTAP NAS to enable NFS-based persistent storage provisioning on ROSA clusters. The backend configuration uses Amazon FSx for NetApp ONTAP DNS names for management and data LIFs, and includes credentials stored in a Kubernetes Secret in the trident namespace.
Backend secret and backend configuration file (save as tbc-fsx-nas.yaml):
# tbc-fsx-nas.yaml
apiVersion: v1
kind: Secret
metadata:
  name: backend-fsx-ontap-nas-secret
type: Opaque
stringData:
  username: <FSx for ONTAP, for example fsxadmin>
  password: <FSx for ONTAP password>
---
apiVersion: trident.netapp.io/v1
kind: TridentBackendConfig
metadata:
  name: backend-fsx-ontap-nas
spec:
  version: 1
  backendName: fsx-ontap
  storageDriverName: ontap-nas
  managementLIF: <Management DNS name>
  dataLIF: <NFS DNS name>
  svm: <SVM NAME>
  credentials:
    name: backend-fsx-ontap-nas-secret
StorageClass definition (save as sc-fsx-nas.yaml):
# sc-fsx-nas.yaml (storage class name is trident-csi)
apiVersion: storage.k8s.io/v1
kind: StorageClass
metadata:
  name: trident-csi
provisioner: csi.trident.netapp.io
parameters:
  backendType: "ontap-nas"
  fsType: "ext4"
allowVolumeExpansion: true
reclaimPolicy: RetainCreate a TridentBackendConfig and StorageClass for Amazon FSx for NetApp ONTAP with ONTAP SAN to enable iSCSI-based block storage provisioning on ROSA clusters. The backend configuration uses the ontap-san driver and includes credentials stored in a Kubernetes Secret. Ensure that worker nodes are prepared for iSCSI access.
Backend secret and backend configuration file (save as tbc-fsx-iscsi.yaml):
# tbc-fsx-iscsi.yaml
apiVersion: v1
kind: Secret
metadata:
  name: backend-tbc-fsx-iscsi-secret
type: Opaque
stringData:
  username: <FSx for ONTAP, for example fsxadmin>
  password: <FSx for ONTAP password>
---
apiVersion: trident.netapp.io/v1
kind: TridentBackendConfig
metadata:
  name: fsx-iscsi
spec:
  version: 1
  storageDriverName: ontap-san
  managementLIF: <Management DNS name>
  backendName: fsx-iscsi
  svm: <SVM name>
  credentials:
    name: backend-tbc-fsx-iscsi-secret
StorageClass definition (save as sc-fsx-iscsi.yaml):
# sc-fsx-iscsi.yaml
apiVersion: storage.k8s.io/v1
kind: StorageClass
metadata:
  name: sc-fsx-iscsi
provisioner: csi.trident.netapp.io
parameters:
  backendType: "ontap-san"
  media: "ssd"
  provisioningType: "thin"
  fsType: ext4
  snapshots: "true"
allowVolumeExpansion: true
Step 3: Create a VolumeSnapshotClass configuration file
Create a VolumeSnapshotClass definition for both on-premises and ROSA deployments. This configuration enables snapshot-based operations for persistent volumes.
VolumeSnapshotClass definition (save as snapshot-class.yaml):
# snapshot-class.yaml
apiVersion: snapshot.storage.k8s.io/v1
kind: VolumeSnapshotClass
metadata:
  name: trident-snapshotclass
driver: csi.trident.netapp.io
deletionPolicy: Retain
Step 4: Apply the configuration files to your cluster
Apply the configuration files you created in the previous steps to your OpenShift cluster.
-
Apply the TridentBackendConfig and StorageClass files for each protocol you configured.
For on-premises clusters:
oc create -f tbc-nas.yaml -n trident
oc create -f sc-nas.yaml

oc create -f tbc-iscsi.yaml -n trident
oc create -f sc-iscsi.yaml

oc create -f tbc-nvme.yaml -n trident
oc create -f sc-nvme.yaml

oc create -f tbc-fc.yaml -n trident
oc create -f sc-fc.yaml
For ROSA clusters:
oc create -f tbc-fsx-nas.yaml -n trident oc create -f sc-fsx-nas.yaml oc create -f tbc-fsx-iscsi.yaml -n trident oc create -f sc-fsx-iscsi.yaml -
Apply the VolumeSnapshotClass configuration.
oc create -f snapshot-class.yaml -
Verify that the resources were created successfully.
Check TridentBackendConfig objects:
oc get tbc -n tridentCheck StorageClass objects:
oc get storageclassCheck VolumeSnapshotClass:
oc get volumesnapshotclass
Step 5: Set the default Trident storage and snapshot classes
Set the Trident StorageClass and VolumeSnapshotClass as the defaults in the OpenShift cluster. This is required for OpenShift Virtualization to create golden image sources for VM templates.
-
Set the default Trident StorageClass.
Set a Trident-backed StorageClass as the cluster default so that PersistentVolumeClaims automatically use it when no storage class is specified. You need to configure two annotations: one for the cluster-wide default and one specific to OpenShift Virtualization.
-
Set the cluster-wide default StorageClass annotation.
Ensure that only one StorageClass is set as default. If another StorageClass is already set to default, set its annotation to false.
In the console, edit the annotation:
storageclass.kubernetes.io/is-default-class: "true"From the CLI:
kubectl patch storageclass <storage class name> -p '{"metadata": {"annotations":{"storageclass.kubernetes.io/is-default-class":"true"}}}' -
Set the OpenShift Virtualization-specific default annotation.
OpenShift Virtualization uses a specific annotation that takes precedence over the cluster's general
is-default-classannotation. If another StorageClass is already set to default, set its annotation to false.In the console, edit the annotation:
storageclass.kubevirt.io/is-default-virt-class: "true"From the CLI:
kubectl patch storageclass <storage class name> -p '{"metadata": {"annotations":{"storageclass.kubevirt.io/is-default-virt-class": "true"}}}'
-
-
Set the default Trident VolumeSnapshotClass.
Set a Trident-backed VolumeSnapshotClass as the cluster default to enable snapshot-based operations for persistent volumes. This ensures that VolumeSnapshots automatically use the Trident CSI driver when no snapshot class is specified and allows OpenShift Virtualization to create snapshots of golden images.
Ensure that only one VolumeSnapshotClass is set as default. If another VolumeSnapshotClass is already set to default, set its annotation to false.
In the console, edit the annotation:
snapshot.storage.kubernetes.io/is-default-class: "true"From the CLI:
oc patch volumesnapshotclass <snapshot class name> --type=merge -p '{"metadata":{"annotations":{"snapshot.storage.kubernetes.io/is-default-class":"true"}}}'