

Protect VMs in Red Hat OpenShift Virtualization using Trident Protect
 Suggest changes
Protect VMs in OpenShift Virtualization using snapshots and backup. This procedure includes creating an AppVault using ONTAP S3 object storage, configuring Trident Protect to capture VM data, including Kubernetes resource objects, persistent volumes, and internal images, and restoring the data when necessary.
Virtual machines in the OpenShift Virtualization environment are containerized applications that run in the worker nodes of your OpenShift Container platform. It is important to protect the VM metadata as well as the persistent disks of the VMs, so that when they are lost or corrupted, you can recover them.
The persistent disks of the OpenShift Virtualization VMs can be backed by ONTAP storage integrated to the OpenShift Cluster using Trident CSI. In this section we use Trident Protect to create snapshots and backups of VMs including its data volumes to ONTAP Object Storage.
We then restore from a snapshot or a backup when needed.
Trident Protect enables snapshots, backups, restore, and disaster recovery of applications and VMs on an OpenShift cluster. For OpenShift Virtualization VMs, data that can be protected with Trident Protect include Kubernetes resource objects associated with the VMs, persistent volumes, and internal images.
The following are the versions of the various components used for the examples in this section
Create App Vault for Object Storage
Create AppVault
Prior to creating the snapshots and backups for an application or a VM, an Object Storage must be configured in Trident Protect to store the snapshots and backups. This is done using the bucket CR. Only administrators can create a bucket CR and configure it.
The bucket CR is known as AppVault in Trident Protect. AppVault objects are the declarative Kubernetes workflow representation of a storage bucket. An AppVault CR contains the configurations necessary for a bucket to be used in protection operations, such as backups, snapshots, restore operations, and SnapMirror replication.
In this example, we will show the use of ONTAP S3 as Object storage.
Here is the workflow for creating AppVault CR for ONTAP S3:
1. Create S3 object store server in the SVM in ONTAP Cluster.
2. Create a bucket in the Object Store Server.
3. Create an S3 user in the SVM. Keep the access Key and the Secret Key in a safe location.
4. In OpenShift, create a secret to store the ONTAP S3 credentials.
5. Create an AppVault Object for ONTAP S3
Configure Trident Protect AppVault for ONTAP S3
# alias tp='tridentctl-protect'

# cat appvault-secret.yaml
apiVersion: v1
stringData:
  accessKeyID: "<access key of S3>"
  secretAccessKey: "<secret access key of S3>"
# you can also provide base 64 encoded values instead of string values
#data:
# base 64 encoded values
#  accessKeyID: < base 64 encoded access key>
#  secretAccessKey: <base 64 encoded secretAccess key>
kind: Secret
metadata:
  name: appvault-secret
  namespace: trident-protect
type: Opaque

# cat appvault.yaml
apiVersion: protect.trident.netapp.io/v1
kind: AppVault
metadata:
  name: ontap-s3-appvault
  namespace: trident-protect
spec:
  providerConfig:
    azure:
      accountName: ""
      bucketName: ""
      endpoint: ""
    gcp:
      bucketName: ""
      projectID: ""
    s3:
      bucketName: trident-protect
      endpoint: <lif for S3 access>
      secure: "false"
      skipCertValidation: "true"
  providerCredentials:
    accessKeyID:
      valueFromSecret:
        key: accessKeyID
        name: appvault-secret
    secretAccessKey:
      valueFromSecret:
        key: secretAccessKey
        name: appvault-secret
  providerType: OntapS3

# oc create -f appvault-secret.yaml -n trident-protect
# oc create -f appvault.yaml -n trident-protect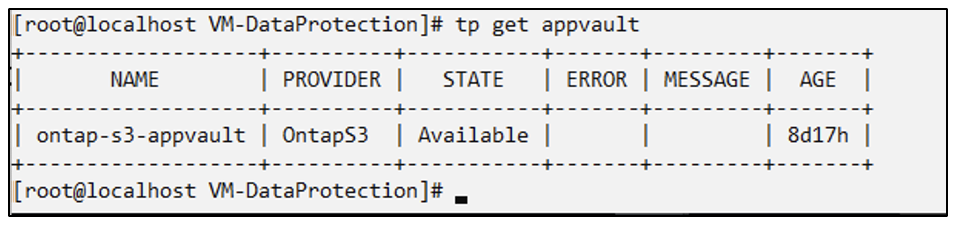
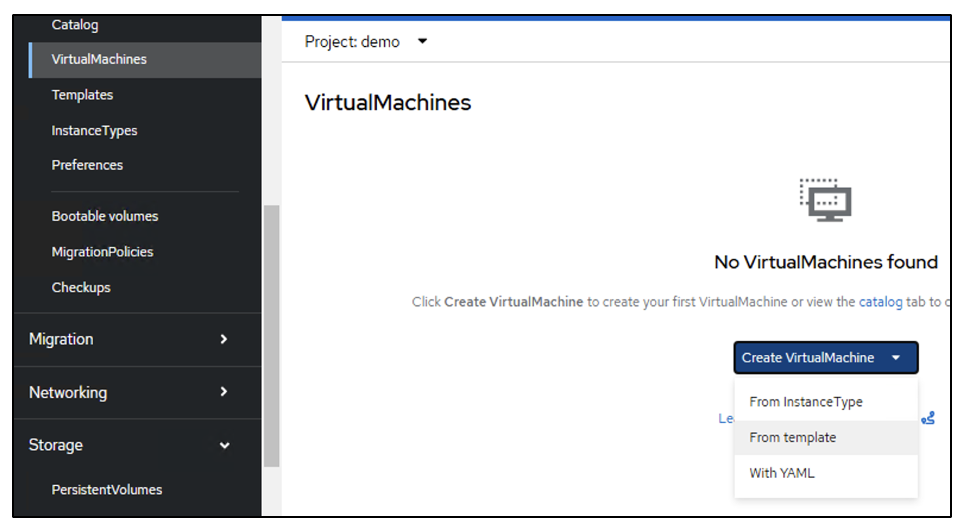
Create a VM in OpenShift Virtualization
Create a VM in OpenShift Virtualization
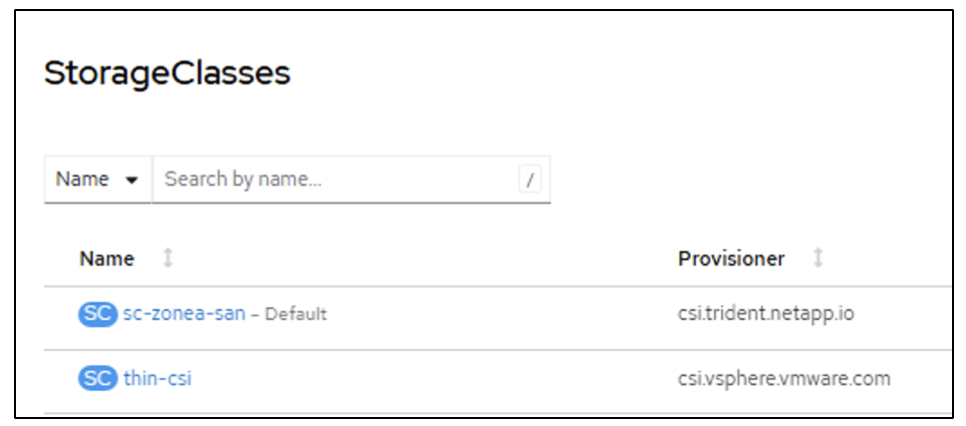
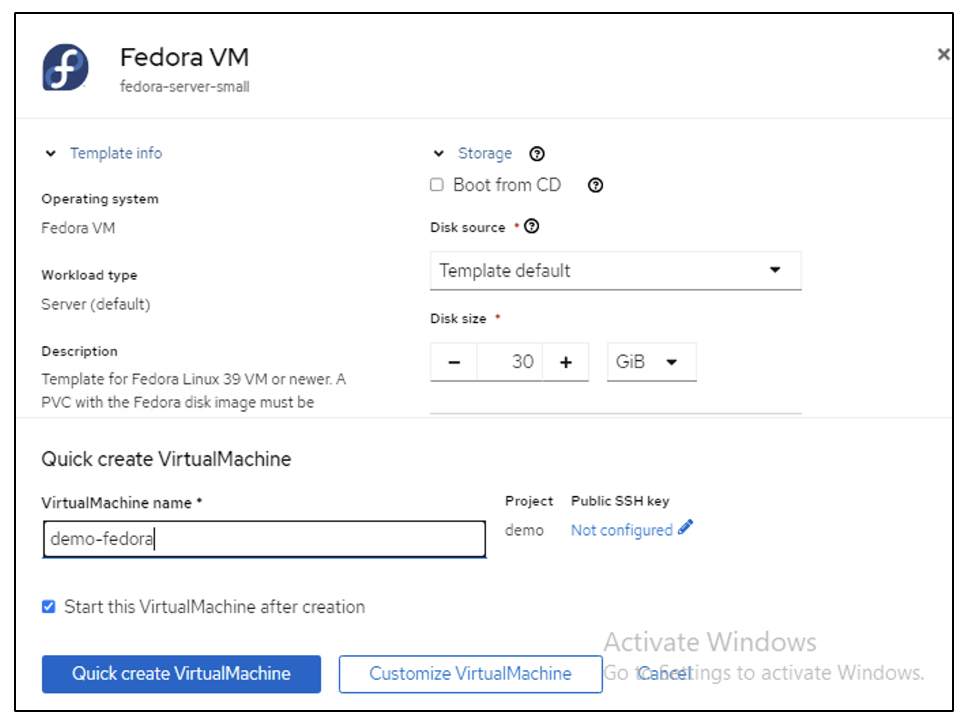
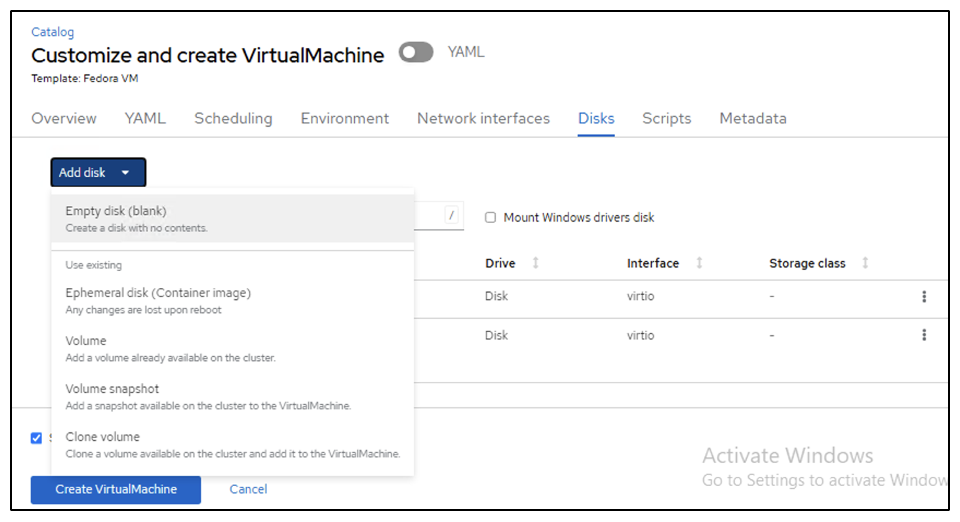
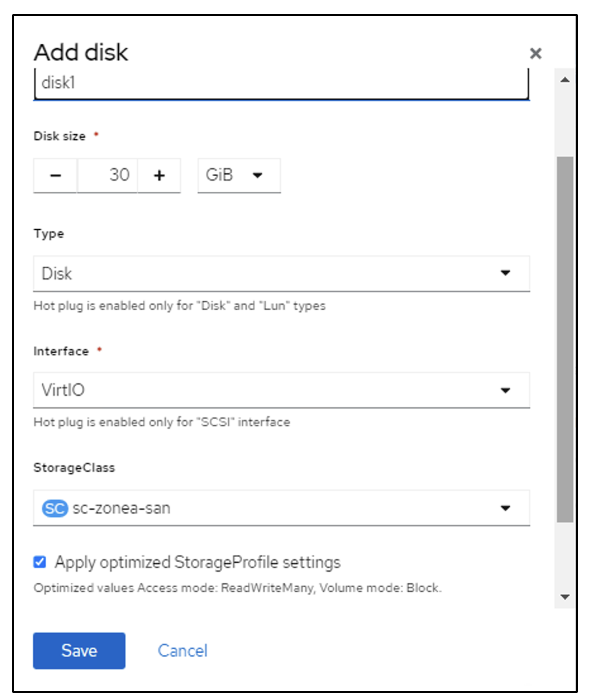
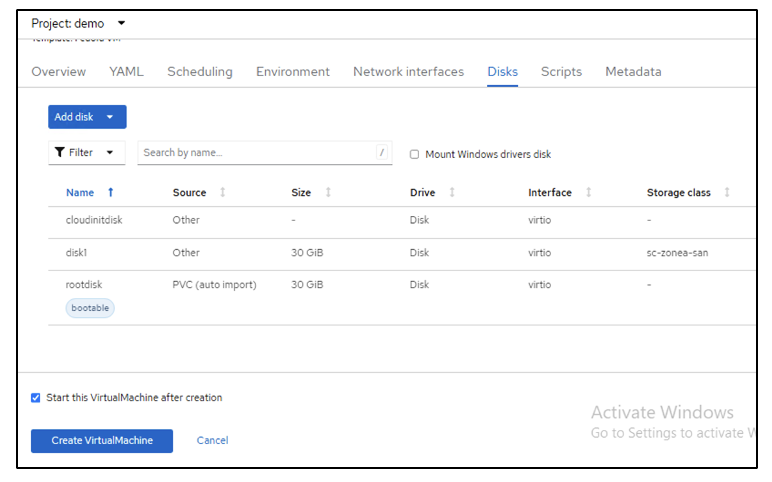
The following screen shots show the creation of the VM (demo-fedora in namespace demo) from the console using the template. The root disk chooses the default storage class automatically, so, verify that the default storage class is set appropriately. In this setup, the default storage class is sc-zonea-san. Ensure that when you create the additional disk, you choose the storage class sc-zonea-san and check the "Apply optimized storage settings" checkbox. This will set the Access modes to RWX and Volume Mode to Block.

|
Trident supports RWX access mode in Block Volume mode for SAN (iSCSI, NVMe/TCP and FC). (It is the default access mode for NAS). RWX Access mode is required if you need to do Live migration of the VMs at a later point. |

Create an app
Create App
Create a trident protect app for the VM
In the example, the demo namespace has one VM and all resources of the namespace is included when creating the app.
# alias tp='tridentctl-protect'
# tp create app demo-vm --namespaces demo -n demo --dry-run > app.yaml

# cat app.yaml
apiVersion: protect.trident.netapp.io/v1
kind: Application
metadata:
  creationTimestamp: null
  name: demo-vm
  namespace: demo
spec:
  includedNamespaces:
  - namespace: demo
# oc create -f app.yaml -n demo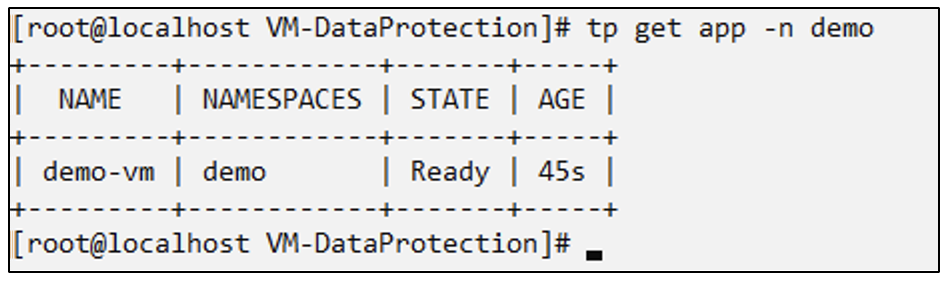
Protect the app by creating a backup
Create Backups
Create an On-demand Backup
Create a backup for the app (demo-vm) created previously that includes all resources in the demo namespace. Provide the appvault name where the backups will be stored.
# tp create backup demo-vm-backup-on-demand --app demo-vm --appvault ontap-s3-appvault -n demo
Backup "demo-vm-backup-on-demand" created.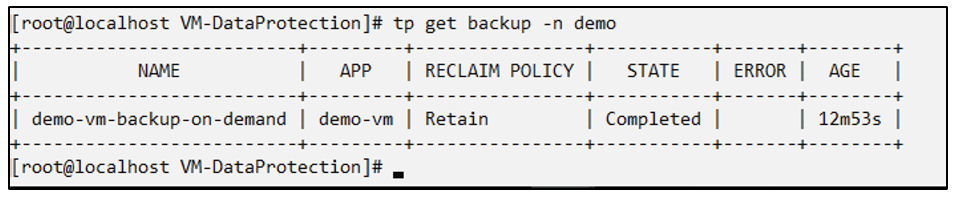
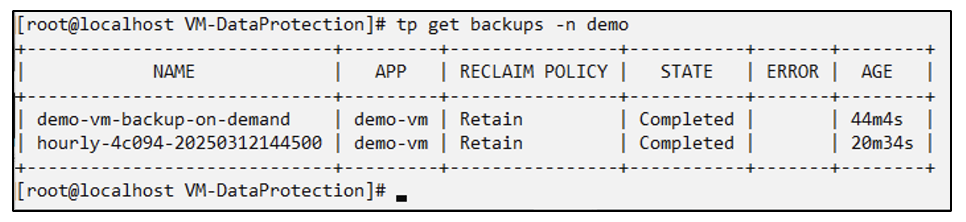
Create Backups on a Schedule
Create a schedule for the backups specifying the granularity and the number of backups to retain.
# tp create schedule backup-schedule1 --app demo-vm --appvault ontap-s3-appvault --granularity Hourly --minute 45 --backup-retention 1 -n demo --dry-run>backup-schedule-demo-vm.yaml
schedule.protect.trident.netapp.io/backup-schedule1 created

#cat backup-schedule-demo-vm.yaml
apiVersion: protect.trident.netapp.io/v1
kind: Schedule
metadata:
  creationTimestamp: null
  name: backup-schedule1
  namespace: demo
spec:
  appVaultRef: ontap-s3-appvault
  applicationRef: demo-vm
  backupRetention: "1"
  dayOfMonth: ""
  dayOfWeek: ""
  enabled: true
  granularity: Hourly
  hour: ""
  minute: "45"
  recurrenceRule: ""
  snapshotRetention: "0"
status: {}
# oc create -f backup-schedule-demo-vm.yaml -n demo
Restore from Backup
Restore from Backups
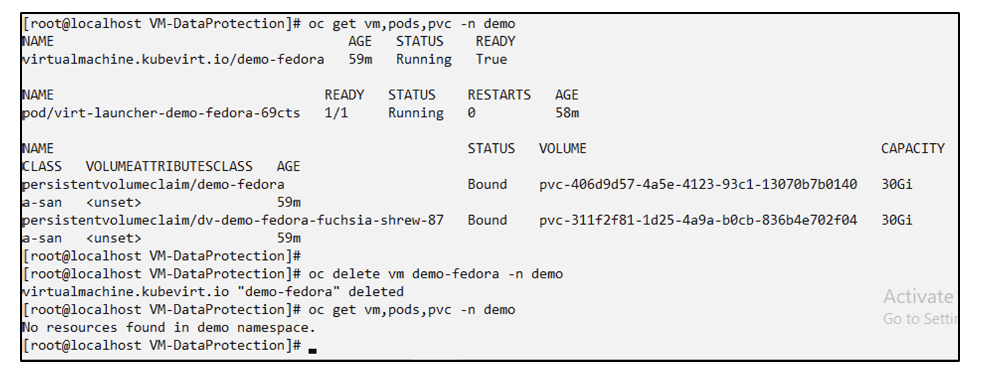
Restore the VM to the same namespace
In the example the backup demo-vm-backup-on-demand contains the backup with the demo-app for the fedora VM.
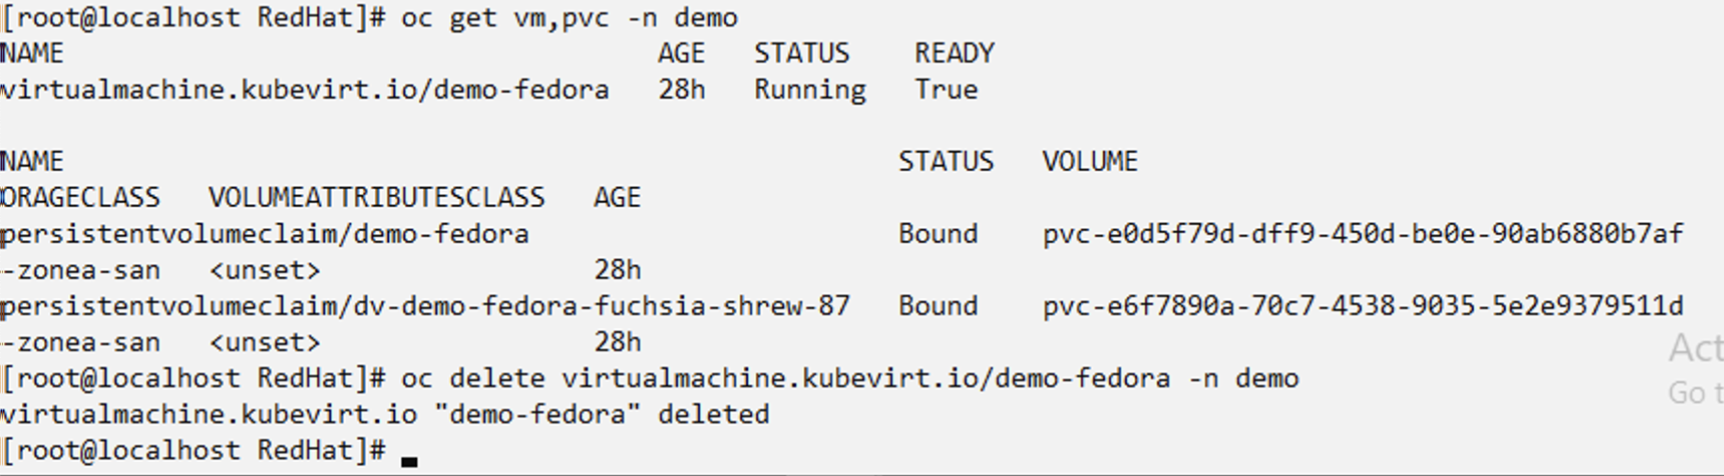
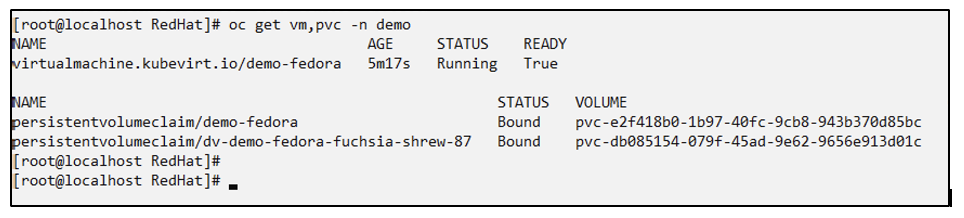
First, delete the VM and ensure that the PVCs, pod and the VM objects are deleted from the namespace "demo"
Now, create a backup-in-place restore object.
# tp create bir demo-fedora-restore --backup demo/demo-vm-backup-on-demand -n demo --dry-run>vm-demo-bir.yaml

# cat vm-demo-bir.yaml
apiVersion: protect.trident.netapp.io/v1
kind: BackupInplaceRestore
metadata:
  annotations:
    protect.trident.netapp.io/max-parallel-restore-jobs: "25"
  creationTimestamp: null
  name: demo-fedora-restore
  namespace: demo
spec:
  appArchivePath: demo-vm_cc8adc7a-0c28-460b-a32f-0a7b3d353e13/backups/demo-vm-backup-on-demand_f6af3513-9739-480e-88c7-4cca45808a80
  appVaultRef: ontap-s3-appvault
  resourceFilter: {}
status:
  postRestoreExecHooksRunResults: null
  state: ""

# oc create -f vm-demo-bir.yaml -n demo
backupinplacerestore.protect.trident.netapp.io/demo-fedora-restore created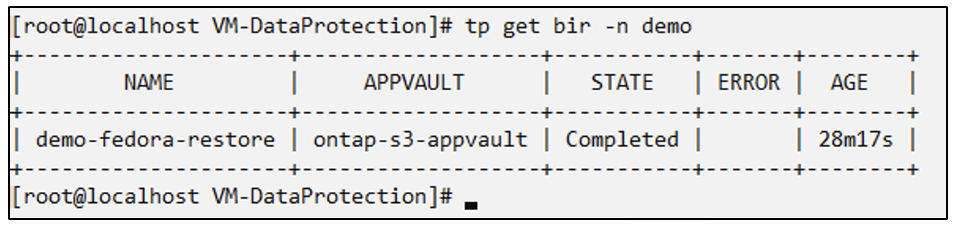
Verify that the VM, pods and PVCs are restored

Restore the VM to a different namespace
First create a new namespace to which you want to restore the app to, in this example demo2. Then create a backup restore object
# tp create br demo2-fedora-restore --backup demo/hourly-4c094-20250312154500 --namespace-mapping demo:demo2 -n demo2 --dry-run>vm-demo2-br.yaml

# cat vm-demo2-br.yaml
apiVersion: protect.trident.netapp.io/v1
kind: BackupRestore
metadata:
  annotations:
    protect.trident.netapp.io/max-parallel-restore-jobs: "25"
  creationTimestamp: null
  name: demo2-fedora-restore
  namespace: demo2
spec:
  appArchivePath: demo-vm_cc8adc7a-0c28-460b-a32f-0a7b3d353e13/backups/hourly-4c094-20250312154500_aaa14543-a3fa-41f1-a04c-44b1664d0f81
  appVaultRef: ontap-s3-appvault
  namespaceMapping:
  - destination: demo2
    source: demo
  resourceFilter: {}
status:
  conditions: null
  postRestoreExecHooksRunResults: null
  state: ""
# oc create -f vm-demo2-br.yaml -n demo2
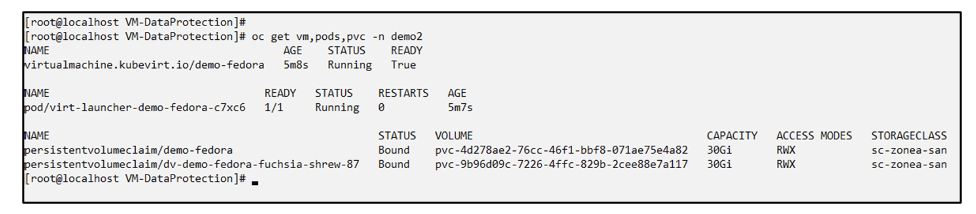
Verify that the VM, pods and pvcs are created in the new namespace demo2.
Protect the app using Snapshots
Create Snapshots
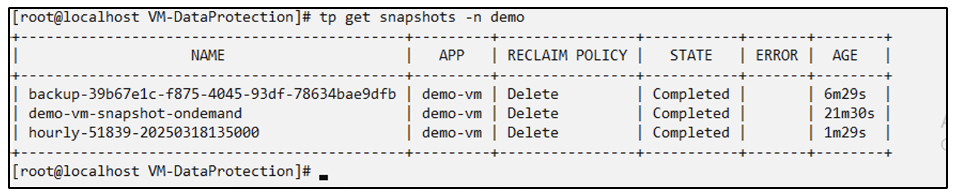
Create an on-demand snapshot
Create a snapshot for the app and specify the appvault where it needs to be stored.
# tp create snapshot demo-vm-snapshot-ondemand --app demo-vm --appvault ontap-s3-appvault -n demo --dry-run
# cat demo-vm-snapshot-on-demand.yaml
apiVersion: protect.trident.netapp.io/v1
kind: Snapshot
metadata:
  creationTimestamp: null
  name: demo-vm-snapshot-ondemand
  namespace: demo
spec:
  appVaultRef: ontap-s3-appvault
  applicationRef: demo-vm
  completionTimeout: 0s
  volumeSnapshotsCreatedTimeout: 0s
  volumeSnapshotsReadyToUseTimeout: 0s
status:
  conditions: null
  postSnapshotExecHooksRunResults: null
  preSnapshotExecHooksRunResults: null
  state: ""

# oc create -f demo-vm-snapshot-on-demand.yaml
snapshot.protect.trident.netapp.io/demo-vm-snapshot-ondemand created
Create a schedule for snapshots
Create schedule for the snapshots. Specify the granularity and the number of snapshots to be retained.
# tp create Schedule snapshot-schedule1 --app demo-vm --appvault ontap-s3-appvault --granularity Hourly --minute 50 --snapshot-retention 1 -n demo --dry-run>snapshot-schedule-demo-vm.yaml

# cat snapshot-schedule-demo-vm.yaml
apiVersion: protect.trident.netapp.io/v1
kind: Schedule
metadata:
  creationTimestamp: null
  name: snapshot-schedule1
  namespace: demo
spec:
  appVaultRef: ontap-s3-appvault
  applicationRef: demo-vm
  backupRetention: "0"
  dayOfMonth: ""
  dayOfWeek: ""
  enabled: true
  granularity: Hourly
  hour: ""
  minute: "50"
  recurrenceRule: ""
  snapshotRetention: "1"
status: {}

# oc create -f snapshot-schedule-demo-vm.yaml
schedule.protect.trident.netapp.io/snapshot-schedule1 created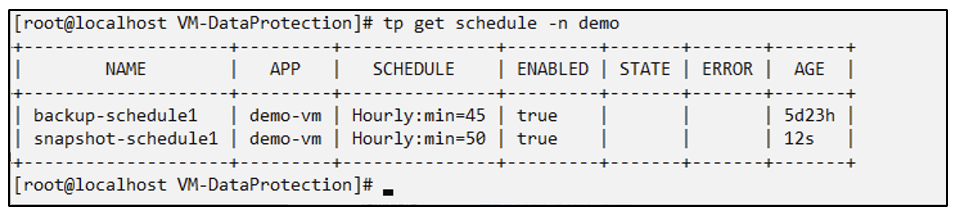
Restore from Snapshot
Restore from Snapshot
Restore the VM from the snapshot to the same namespace
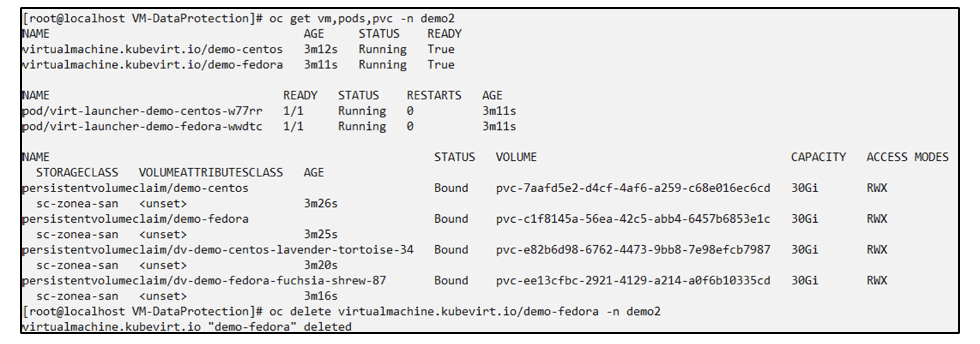
Delete the VM demo-fedora from the demo2 namespace.
Create a snapshot-in-place-restore object from the snapshot of the VM.
# tp create sir demo-fedora-restore-from-snapshot --snapshot demo/demo-vm-snapshot-ondemand -n demo --dry-run>vm-demo-sir.yaml

# cat vm-demo-sir.yaml
apiVersion: protect.trident.netapp.io/v1
kind: SnapshotInplaceRestore
metadata:
  creationTimestamp: null
  name: demo-fedora-restore-from-snapshot
  namespace: demo
spec:
  appArchivePath: demo-vm_cc8adc7a-0c28-460b-a32f-0a7b3d353e13/snapshots/20250318132959_demo-vm-snapshot-ondemand_e3025972-30c0-4940-828a-47c276d7b034
  appVaultRef: ontap-s3-appvault
  resourceFilter: {}
status:
  conditions: null
  postRestoreExecHooksRunResults: null
  state: ""

# oc create -f vm-demo-sir.yaml
snapshotinplacerestore.protect.trident.netapp.io/demo-fedora-restore-from-snapshot created
Verify that the VM and its PVCs are created in the demo namespace.
Restore the VM from the snapshot to a different namespace
Delete the VM in the demo2 namespace previously restored from the backup.
Create the snapshot restore object from the snapshot and provide the namespace mapping.
# tp create sr demo2-fedora-restore-from-snapshot --snapshot demo/demo-vm-snapshot-ondemand --namespace-mapping demo:demo2 -n demo2 --dry-run>vm-demo2-sr.yaml

# cat vm-demo2-sr.yaml
apiVersion: protect.trident.netapp.io/v1
kind: SnapshotRestore
metadata:
  creationTimestamp: null
  name: demo2-fedora-restore-from-snapshot
  namespace: demo2
spec:
  appArchivePath: demo-vm_cc8adc7a-0c28-460b-a32f-0a7b3d353e13/snapshots/20250318132959_demo-vm-snapshot-ondemand_e3025972-30c0-4940-828a-47c276d7b034
  appVaultRef: ontap-s3-appvault
  namespaceMapping:
  - destination: demo2
    source: demo
  resourceFilter: {}
status:
  postRestoreExecHooksRunResults: null
  state: ""

# oc create -f vm-demo2-sr.yaml
snapshotrestore.protect.trident.netapp.io/demo2-fedora-restore-from-snapshot created
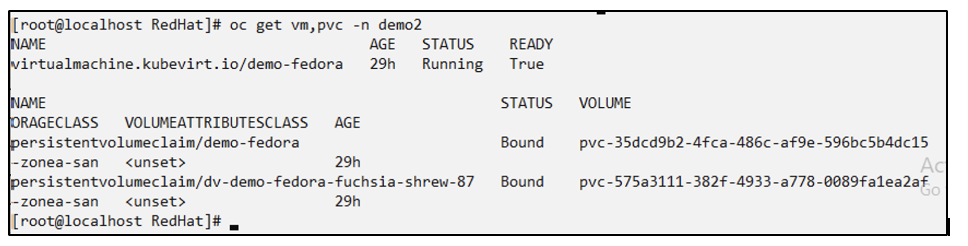
Verify that the VM and its PVCs are restored in the new namespace demo2.
Restore a Specific VM
Selecting specific VMs in a namespace to create snapshots/backups and restore
In the previous example, we had a single VM within a namespace. By including the entire namespace in the backup, all resources associated with that VM were captured. In the following example, we add another VM to the same namespace and create an app just for this new VM by using a label selector.
Create a new VM (demo-centos vm) in the demo namespace
Label the demo-centos vm and its associated resources

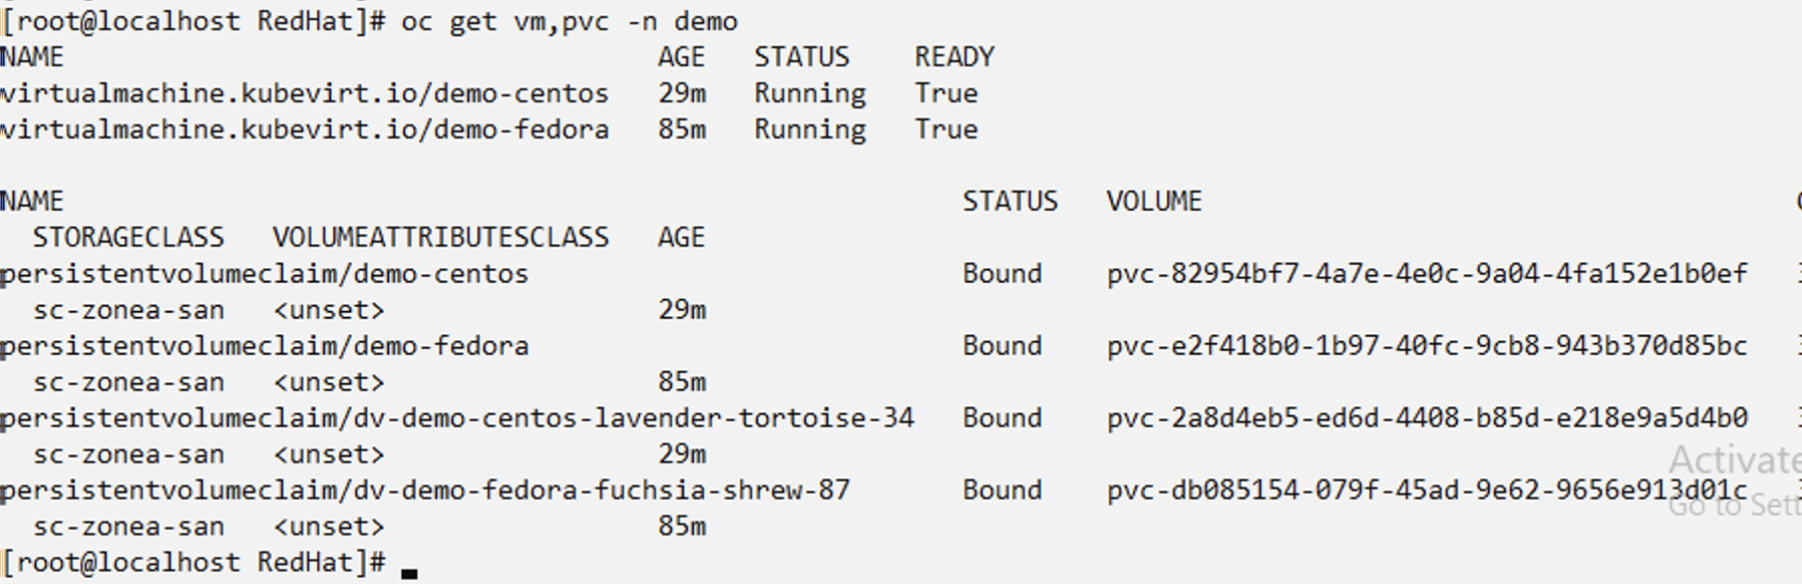
Verify that the demo-centos vm and pvcs got the labels


Create an app for only a specific VM (demo-centos) using the label selector
# tp create app demo-centos-app --namespaces 'demo(category=protect-demo-centos)' -n demo --dry-run>demo-centos-app.yaml

# cat demo-centos-app.yaml

apiVersion: protect.trident.netapp.io/v1
kind: Application
metadata:
  creationTimestamp: null
  name: demo-centos-app
  namespace: demo
spec:
  includedNamespaces:
  - labelSelector:
      matchLabels:
        category: protect-demo-centos
    namespace: demo
status:
  conditions: null

# oc create -f demo-centos-app.yaml -n demo
application.protect.trident.netapp.io/demo-centos-app created
The method of creating backups and snapshots on-demand and on a schedule is the same as shown previously.
Since the trident-protect app that is being used to create the snapshots or backups only contains the specific VM from the namespace, restoring from them only restores a specific VM.
A sample backup/restore operation is shown as an example below.
Create a backup of a specific VM in a namespace by using its corresponding app
In the previous steps, an app was created using label selectors to include only the centos vm in the demo namespace. Create a backup (on-demand backup, in this example) for this app.
# tp create backup demo-centos-backup-on-demand --app demo-centos-app --appvault ontap-s3-appvault -n demo
Backup "demo-centos-backup-on-demand" created.
Restore a specific VM to the same namespace
The backup of a specific VM (centos) was created using the corresponding app.
If a backup-in-place-restore or a backup-restore is created from this, only this specific VM is restored.
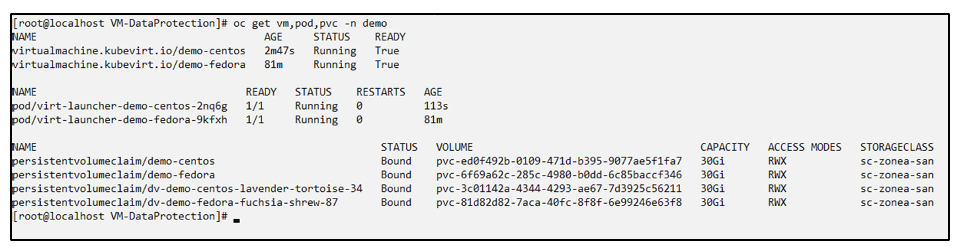
Delete the Centos VM.
Create a backup in-place restore from demo-centos-backup-on-demand and verify that the centos VM has been recreated.
#tp create bir demo-centos-restore --backup demo/demo-centos-backup-on-demand -n demo
BackupInplaceRestore "demo-centos-restore" created.
Restore a specific VM to a different namespace
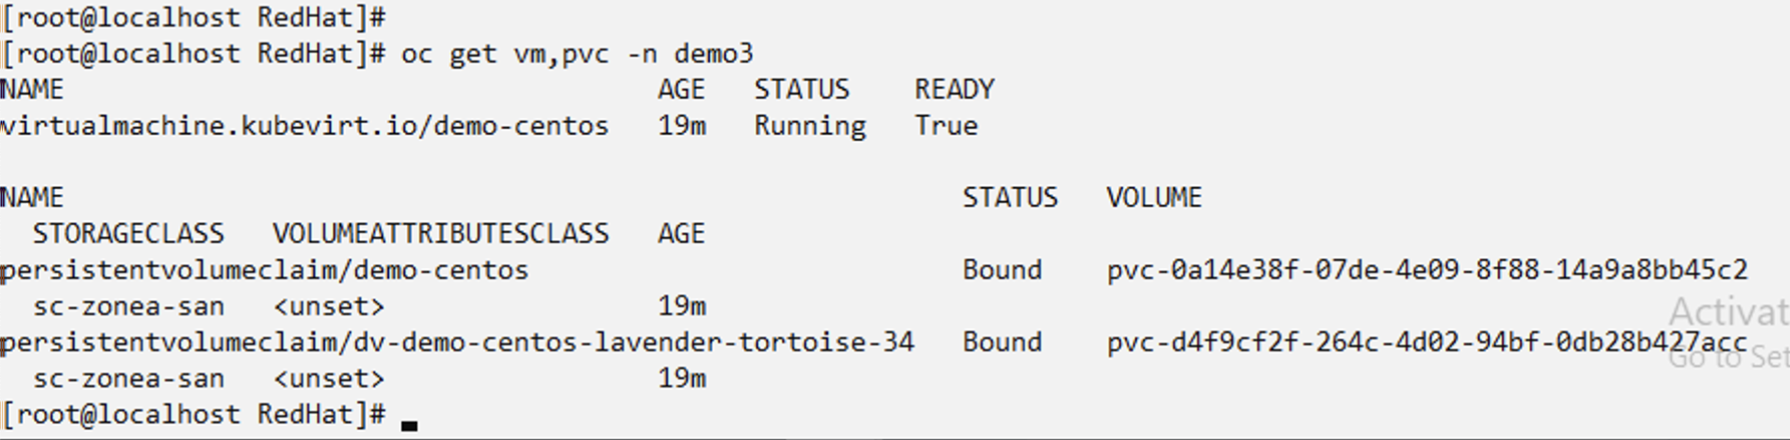
Create a backup restore to a different namespace (demo3) from demo-centos-backup-on-demand and verify that the centos VM has been recreated.
# tp create br demo2-centos-restore --backup demo/demo-centos-backup-on-demand --namespace-mapping demo:demo3 -n demo3
BackupRestore "demo2-centos-restore" created.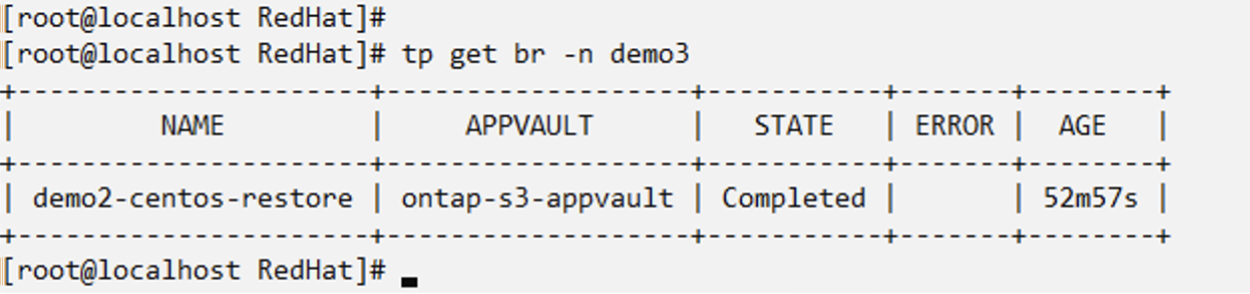
Video Demonstration
The following video shows a demonstration of protecting a VM using Snapshots