

Provisioning in SAN environments
 Suggest changes
ONTAP SVMs support the block protocols iSCSI and FC. When an SVM is created with block protocol iSCSI or FC, the SVM gets either an iSCSI Qualified Name (IQN) or an FC worldwide name (WWN), respectively. This identifier presents a SCSI target to hosts that access NetApp block storage.
Provisioning NetApp LUN on Windows Server
Prerequisites
Using NetApp storage in SAN environments in Windows Server has the following requirements:
-
A NetApp cluster is configured with one or more NetApp storage controllers.
-
The NetApp cluster or storage controllers have a valid iSCSI license.
-
iSCSI and/or FC configured ports are available.
-
FC zoning is performed on an FC switch for FC.
-
At least one aggregate is created.
-
An SVM should have one LIF per Ethernet network or Fibre Channel fabric on every storage controller that is going to serve data using iSCSI or Fibre Channel.
Deployment
-
Create a new SVM with block protocol iSCSI and/or FC enabled. A new SVM can be created with any of the following methods:
-
CLI commands on NetApp storage
-
ONTAP System Manager
-
NetApp PowerShell Toolkit
-
-
Configure the iSCSI and/or FC protocol.
-
Assign the SVM with LIFs on each cluster node.
-
Start the iSCSI and/or FC service on the SVM.
.
-
Create iSCSI and/or FC port sets using the SVM LIFs.
-
Create an iSCSI and/or FC initiator group for Windows using the port set created.
-
Add an initiator to the initiator group. The initiator is the IQN for iSCSI and WWPN for FC. They can be queried from Windows Server by running the PowerShell cmdlet Get-InitiatorPort.
# Get the IQN for iSCSI
Get-InitiatorPort | Where \{$_.ConnectionType -eq 'iSCSI'} | Select-Object -Property NodeAddress
# Get the WWPN for FC Get-InitiatorPort | Where \{$_.ConnectionType -eq 'Fibre Channel'} | Select-Object -Property PortAddress# While adding initiator to the initiator group in case of FC, make sure to provide the initiator(PortAddress) in the standard WWPN format
The IQN for iSCSI on Windows Server can also be checked in the configuration of the iSCSI initiator properties.
-
Create a LUN using Create LUN wizard and associate it with the initiator group created.
Host integration
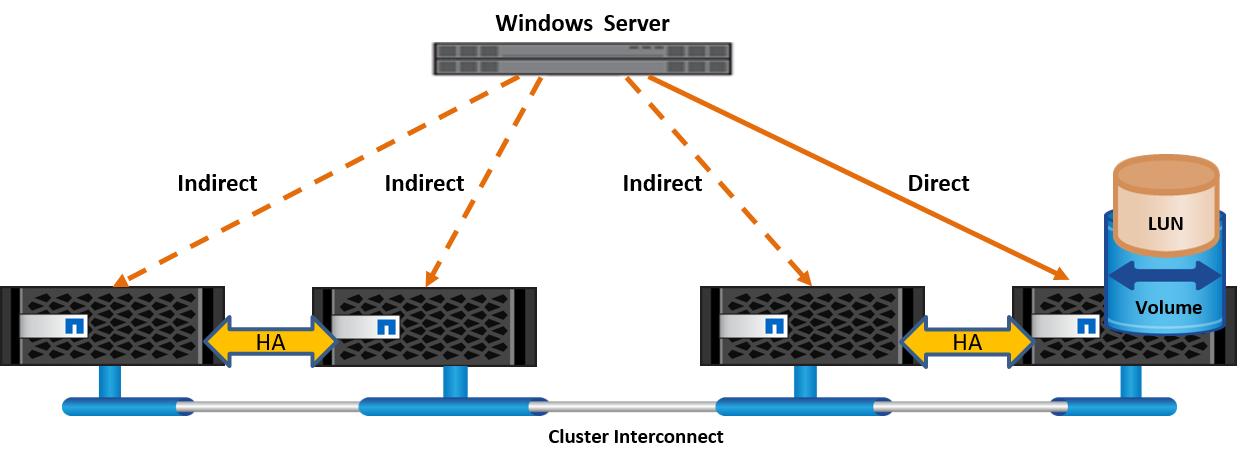
Windows Server uses Asymmetrical Logical Unit Access (ALUA) extension MPIO to determine direct and indirect paths to LUNs. Even though every LIF owned by an SVM accepts read/write requests for its LUNs, only one of the cluster nodes actually owns the disks backing that LUN at any given moment. This divides available paths to a LUN into two types, direct or indirect, as shown in the following figure.
A direct path for a LUN is a path on which an SVM's LIFs and the LUN being accessed reside on the same node. To go from a physical target port to disk, it is not necessary to traverse the cluster interconnect.
Indirect paths are data paths on which an SVM's LIFs and the LUN being accessed reside on different nodes. Data must traverse the cluster interconnect to go from a physical target port to disk.
MPIO
ONTAP provides highly available storage in which multiple paths from the storage controller to the Windows Server can exist. Multipathing is the ability to have multiple data paths from a server to a storage array. Multipathing protects against hardware failures (cable cuts, switch and host bus adapter [HBA] failure, and so on), and it can provide higher performance limits by using the aggregate performance of multiple connections. When one path or connection becomes unavailable, the multipathing software automatically shifts the load to one of the other available paths. The MPIO feature combines the multiple physical paths to the storage as a single logical path that is used for data access to provide storage resiliency and load balancing. To use this feature, the MPIO feature must be enabled on Windows Server.
Enable MPIO
To enable MPIO on Windows Server, complete the following steps:
-
Log in to Windows Server as a member of the administrator group.
-
Start Server Manager.
-
In the Manage section, click Add Roles and Features.
-
In the Select Features page, select Multipath I/O.
Configure MPIO
When using the iSCSI protocol, you must tell Windows Server to apply multipath support to iSCSI devices in the MPIO properties.
To configure MPIO on Windows Server, complete the following steps:
-
Log on to Windows Server as a member of the administrator group.
-
Start Server Manager.
-
In the Tools section, click MPIO.
-
In MPIO Properties on Discover Multi-Paths, select Add Support for iSCSI Devices and click Add. A prompt then asks you to restart the computer.
-
Reboot Windows Server to see the MPIO device listed in the MPIO Devices section of MPIO Properties.
Configure iSCSI
To detect iSCSI block storage on Windows Server, complete the following steps:
-
Log on to Windows Server as a member of the administrator group.
-
Start Server Manager.
-
In the Tools section, click iSCSI Initiator.
-
Under the Discovery tab, click Discover Portal.
-
Provide the IP address of the LIFs associated with the SVM created for the NetApp storage for SAN protocol. Click Advanced, configure the information in the General tab, and click OK.
-
The iSCSI initiator automatically detects the iSCSI target and lists it in the Targets tab.
-
Select the iSCSI target in Discovered Targets. Click Connect to open the Connect To Target window.
-
You must create multiple sessions from the Windows Server host to the target iSCSI LIFs on the NetApp storage cluster. To do so, complete the following steps:
-
In the Connect to Target window, select Enable MPIO and click Advanced.
-
In Advanced Settings under the General tab, select the local adapter as the Microsoft iSCSI initiator and select the Initiator IP and Target Portal IP.
-
You must also connect using the second path. Therefore, repeat step 5 through step 8, but this time select the Initiator IP and Target Portal IP for the second path.
-
Select the iSCSI target in Discovered Targets on the iSCSI Properties main window and click Properties.
-
The Properties window shows that multiple sessions have been detected. Select the session, click Devices, and then click the MPIO to configure the load balancing policy. All the paths configured for the device are displayed and all load balancing policies are supported. NetApp generally recommends round robin with subset, and this setting is the default for arrays with ALUA enabled. Round robin is the default for active-active arrays that do not support ALUA.
Detect block storage
To detect iSCSI or FC block storage on Windows Server, complete the following steps:
-
Click Computer Management in the Tools section of the Server Manager.
-
In Computer Management, click the Disk Management in Storage section and then click More Actions and Rescan Disks. Doing so displays the raw iSCSI LUNs.
-
Click the discovered LUN and make it online. Then select Initialize Disk using the MBR or GPT partition. Create a new simple volume by providing the volume size and drive letter and format it using FAT, FAT32, NTFS, or the Resilient File System (ReFS).
Best practices
-
NetApp recommends enabling thin provisioning on the volumes hosting the LUNs.
-
To avoid multipathing problems, NetApp recommends using either all 10Gb sessions or all 1Gb sessions to a given LUN.
-
NetApp recommends that you confirm that ALUA is enabled on the storage system. ALUA is enabled by default on ONTAP.
-
On the Windows Server host to where the NetApp LUN is mapped, enable iSCSI Service (TCP-In) for Inbound and iSCSI Service (TCP-Out) for Outbound in the firewall settings. These settings allow iSCSI traffic to pass to and from the Hyper-V host and NetApp controller.
Provisioning NetApp LUNs on Nano Server
Prerequisites
In addition to the prerequisites mentioned in the previous section, the storage role must be enabled from the Nano Server side. For example, Nano Server must be deployed using the -Storage option. To deploy Nano Server, see the section "Deploy Nano Server."
Deployment
To provision NetApp LUNs on a Nano Server, complete the following steps:
-
Connect to the Nano Server remotely using instructions in the section "Connect to Nano Server."
-
To configure iSCSI, run the following PowerShell cmdlets on the Nano Server:
# Start iSCSI service, if it is not already running
Start-Service msiscsi
# Create a new iSCSI target portal
New-IscsiTargetPortal -TargetPortalAddress <SVM LIF>
# View the available iSCSI targets and their node address
Get-IscsiTarget
# Connect to iSCSI target
Connect-IscsiTarget -NodeAddress <NodeAddress>
# NodeAddress is retrived in above cmdlet Get-IscsiTarget
# OR
Get-IscsiTarget | Connect-IscsiTarget
# View the established iSCSI session
Get-IscsiSession
# Note the InitiatorNodeAddress retrieved in the above cmdlet Get-IscsiSession. This is the IQN for Nano server and this needs to be added in the Initiator group on NetApp Storage
# Rescan the disks
Update-HostStorageCache
-
Add an initiator to the initiator group.
Add the InitiatorNodeAddress retrieved from the cmdlet Get-IscsiSession to the Initiator Group on NetApp Controller
-
Configure MPIO.
# Enable MPIO Feature
Enable-WindowsOptionalFeature -Online -FeatureName MultipathIo
# Get the Network adapters and their IPs
Get-NetIPAddress -AddressFamily IPv4 -PrefixOrigin <Dhcp or Manual>
# Create one MPIO-enabled iSCSI connection per network adapter
Connect-IscsiTarget -NodeAddress <NodeAddress> -IsPersistent $True -IsMultipathEnabled $True -InitiatorPortalAddress <IP Address of ethernet adapter>
# NodeAddress is retrieved from the cmdlet Get-IscsiTarget
# IPs are retrieved in above cmdlet Get-NetIPAddress
# View the connections
Get-IscsiConnection
-
Detect block storage.
# Rescan disks
Update-HostStorageCache
# Get details of disks
Get-Disk
# Initialize disk
Initialize-Disk -Number <DiskNumber> -PartitionStyle <GPT or MBR>
# DiskNumber is retrived in the above cmdlet Get-Disk
# Bring the disk online
Set-Disk -Number <DiskNumber> -IsOffline $false
# Create a volume with maximum size and default drive letter
New-Partition -DiskNumber <DiskNumber> -UseMaximumSize -AssignDriveLetter
# To choose the size and drive letter use -Size and -DriveLetter parameters
# Format the volume
Format-Volume -DriveLetter <DriveLetter> -FileSystem <FAT32 or NTFS or REFS>
Boot from SAN
A physical host (server) or a Hyper-V VM can boot the Windows Server OS directly from a NetApp LUN instead of its internal hard disk. In the boot-from-SAN approach, the OS image to boot from resides on a NetApp LUN that is attached to a physical host or VM. For a physical host, the HBA of the physical host is configured to use the NetApp LUN for booting. For a VM, the NetApp LUN is attached as a pass-through disk for booting.
NetApp FlexClone approach
Using NetApp FlexClone technology, boot LUNs with an OS image can be cloned instantly and attached to the servers and VMs to rapidly provide clean OS images, as show in the following figure.

Boot from SAN for physical host
Prerequisites
-
The physical host (server) has a proper iSCSI or FC HBA.
-
You have downloaded a suitable HBA device driver for the server supporting Windows Server.
-
The server has a suitable CD/DVD drive or virtual media to insert the Windows Server ISO image and the HBA device driver has been downloaded.
-
A NetApp iSCSI or FC LUN is provisioned on the NetApp storage controller.
Deployment
To configure booting from SAN for a physical host, complete the following steps:
-
Enable BootBIOS on the server HBA.
-
For iSCSI HBAs, configure the Initiator IP, iSCSI node name, and adapter boot mode in the boot BIOS settings.
-
When creating an initiator group for iSCSI and/or FC on a NetApp storage controller, add the server HBA initiator to the group. The HBA initiator of the server is the WWPN for the FC HBA or iSCSI node name for iSCSI HBA.
-
Create a LUN on the NetApp storage controller with a LUN ID of 0 and associate it with the initiator group created in the previous step. This LUN serves as a boot LUN.
-
Restrict the HBA to a single path to the boot LUN. Additional paths can be added after Windows Server is installed on the boot LUN to exploit the multipathing feature.
-
Use the HBA's BootBIOS utility to configure the LUN as a boot device.
-
Reboot the host and enter the host BIOS utility.
-
Configure the host BIOS to make the boot LUN the first device in the boot order.
-
From the Windows Server ISO, launch the installation setup.
-
When the installation asks, "Where Do You Want to Install Windows?," click Load Driver at the bottom of the installation screen to launch the Select Driver to Install page. Provide the path of the HBA device driver downloaded earlier and finish the installation of the driver.
-
Now the boot LUN created previously must be visible on the Windows installation page. Select the boot LUN for installation of Windows Server on the boot LUN and finish the installation.
Boot from SAN for virtual machine
To configure booting from SAN for a VM, complete the following steps:
Deployment
-
When creating an initiator group for iSCSI or FC on a NetApp storage controller, add the IQN for iSCSI or the WWN for FC of the Hyper-V server to the controller.
-
Create LUNs or LUN clones on the NetApp storage controller and associate them with the initiator group created in the previous step. These LUNs serve as boot LUNs for the VMs.
-
Detect the LUNs on the Hyper-V server, bring them online, and initialize them.
-
Bring the LUNs offline.
-
Create VMs with the option Attach a Virtual Hard Disk Later on the Connect Virtual Hard Disk page.
-
Add a LUN as a pass-through disk to a VM.
-
Open the VM settings.
-
Click IDE Controller 0, select Hard Drive, and click Add. Selecting IDE Controller 0 makes this disk the first boot device for the VM.
-
Select Physical Hard Disk in the Hard Disk options and select a disk from the list as a pass-through disk. The disks are the LUNs configured in the previous steps.
-
-
Install Windows Server on the pass-through disk.
Best practices
-
Make sure that the LUNs are offline. Otherwise, the disk cannot be added as a pass-through disk to a VM.
-
When multiple LUNs exist, be sure to note the disk number of the LUN in disk management. Doing so is necessary because disks listed for the VM are listed with the disk number. Also, the selection of the disk as a pass-through disk for the VM is based on this disk number.
-
NetApp recommends avoiding NIC teaming for iSCSI NICs.
-
NetApp recommends using ONTAP MPIO configured on the host for storage purposes.