

Operational best practices
 Suggest changes
The following sections outline the operational best practices for VMware SRM and ONTAP storage.
Datastores and protocols
-
If possible, always use ONTAP tools to provision datastores and volumes. This makes sure that volumes, junction paths, LUNs, igroups, export policies, and other settings are configured in a compatible manner.
-
SRM supports iSCSI, Fibre Channel, and NFS version 3 with ONTAP 9 when using array-based replication through SRA. SRM does not support array-based replication for NFS version 4.1 with either traditional or vVols datastores.
-
To confirm connectivity, always verify that you can mount and unmount a new test datastore at the DR site from the destination ONTAP cluster. Test each protocol you intend to use for datastore connectivity. A best practice is to use ONTAP tools to create your test datastore, since it is doing all the datastore automation as directed by SRM.
-
SAN protocols should be homogeneous for each site. You can mix NFS and SAN, but the SAN protocols should not be mixed within a site. For example, you can use FCP in site A, and iSCSI in site B. You should not use both FCP and iSCSI at site A.
-
Previous guides advised creating LIF to data locality. That is to say, always mount a datastore using a LIF located on the node that physically owns the volume. While that is still the best practice, it is no longer a requirement in modern versions of ONTAP 9. Whenever possible, and if given cluster-scoped credentials, ONTAP tools will still choose to load balance across LIFs local to the data, but it is not a requirement for high availability or performance.
-
ONTAP 9 can be configured to automatically remove snapshots to preserve uptime in the event of an out-of-space condition when autosize is not able to supply sufficient emergency capacity. The default setting for this capability does not automatically delete the snapshots that are created by SnapMirror. If SnapMirror snapshots are deleted, then the NetApp SRA cannot reverse and resynchronize replication for the affected volume. To prevent ONTAP from deleting SnapMirror snapshots, configure the snapshot autodelete capability to 'try'.
snap autodelete modify -volume -commitment try
-
Volume autosize should be set to
growfor volumes containing SAN datastores andgrow_shrinkfor NFS datastores. Learn more about this topic at Configure volumes to automatically grow and shrink their size. -
SRM performs best when the number of datastores and thus protection groups is minimized in your recovery plans. Therefore you should consider optimizing for VM density in SRM-protected environments where RTO is of key importance.
-
Use Distributed Resource Scheduler (DRS) to help balance the load on your protected and recovery ESXi clusters. Remember that if you plan to failback, when you run a reprotect the previously protected clusters will become the new recovery clusters. DRS will help balance placement going in both directions.
-
Where possible, avoid using IP customization with SRM as this can increase your RTO.
About array pairs
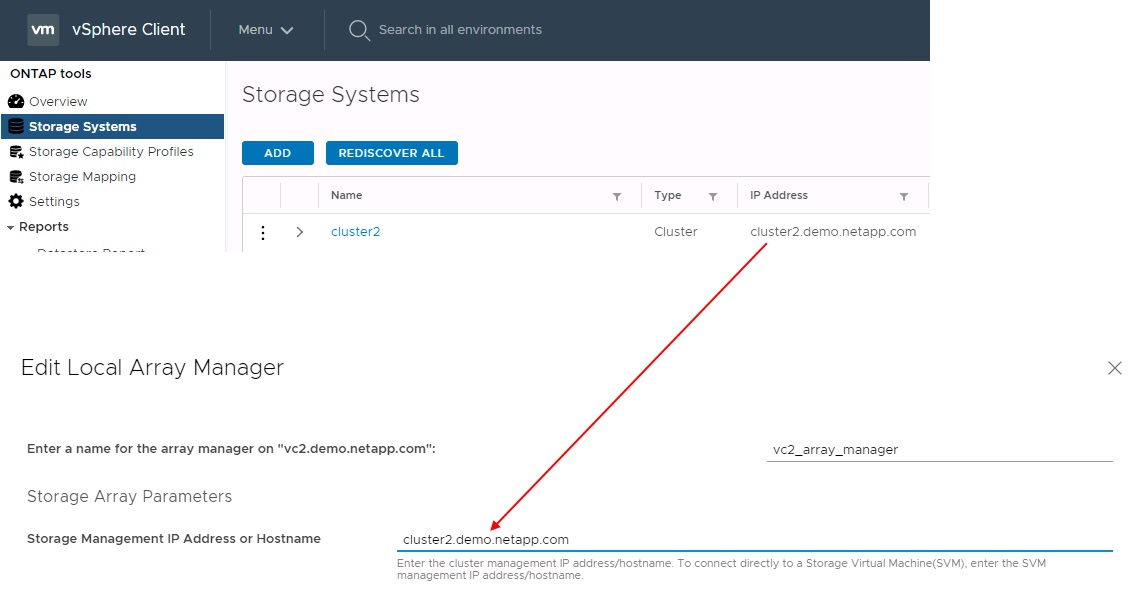
An array manager is created for each array pair. With SRM and ONTAP tools, each array pairing is done with the scope of an SVM, even if you are using cluster credentials. This allows you to segment DR workflows between tenants based on which SVMs they have been assigned to manage. You can create multiple array managers for a given cluster, and they can be asymmetric. You can fan out or fan in between different ONTAP 9 clusters. For example, you can have SVM-A and SVM-B on Cluster-1 replicating to SVM-C on Cluster-2, SVM-D on Cluster-3, or vice-versa.
When configuring array pairs in SRM, you should always add them in SRM the same way as you added them to ONTAP Tools, meaning, they must use the same username, password, and management LIF. This requirement ensures that SRA communicates properly with the array. The following screenshot illustrates how a cluster might appear in ONTAP Tools and how it might be added to an array manager.
About replication groups
Replication groups contain logical collections of virtual machines that are recovered together. Because ONTAP SnapMirror replication occurs at the volume level, all VMs in a volume are in the same replication group.
There are several factors to consider with replication groups and how you distribute VMs across FlexVol volumes. Grouping similar VMs in the same volume can increase storage efficiency with older ONTAP systems that lack aggregate-level deduplication, but grouping increases the size of the volume and reduces volume I/O concurrency. The best balance of performance and storage efficiency can be achieved in modern ONTAP systems by distributing VMs across FlexVol volumes in the same aggregate, thereby leveraging aggregate-level deduplication and gaining greater I/O parallelization across multiple volumes. You can recover VMs in the volumes together because a protection group (discussed below) can contain multiple replication groups. The downside to this layout is that blocks might be transmitted over the wire multiple times because SnapMirror doesn't take aggregate deduplication into account.
One final consideration for replication groups is that each one is by its nature a logical consistency group (not to be confused with SRM consistency groups). This is because all VMs in the volume are transferred together using the same snapshot. So if you have VMs that must be consistent with each other, consider storing them in the same FlexVol.
About protection groups
Protection groups define VMs and datastores in groups that are recovered together from the protected site. The protected site is where the VMs that are configured in a protection group exist during normal steady-state operations. It is important to note that even though SRM might display multiple array managers for a protection group, a protection group cannot span multiple array managers. For this reason, you should not span VM files across datastores on different SVMs.
About recovery plans
Recovery plans define which protection groups are recovered in the same process. Multiple protection groups can be configured in the same recovery plan. Also, to enable more options for the execution of recovery plans, a single protection group can be included in multiple recovery plans.
Recovery plans allow SRM administrators to define recovery workflows by assigning VMs to a priority group from 1 (highest) to 5 (lowest), with 3 (medium) being the default. Within a priority group, VMs can be configured for dependencies.
For example, your company could have a tier-1 business-critical application that relies on a Microsoft SQL server for its database. So, you decide to place your VMs in priority group 1. Within priority group 1, you begin planning the order to bring up services. You probably want your Microsoft Windows domain controller to boot before your Microsoft SQL server, which would need to be online before your application server, and so on. You would add all these VMs to the priority group and then set the dependencies because dependencies only apply within a given priority group.
NetApp strongly recommends working with your application teams to understand the order of operations required in a failover scenario and to construct your recovery plans accordingly.
Test failover
As a best practice, always perform a test failover whenever a change is made to the configuration of protected VM storage. This ensures that, in the event of a disaster, you can trust that Site Recovery Manager can restore services within the expected RTO target.
NetApp also recommends confirming in-guest application functionality occasionally, especially after reconfiguring VM storage.
When a test recovery operation is performed, a private test bubble network is created on the ESXi host for the VMs. However, this network is not automatically connected to any physical network adapters and therefore does not provide connectivity between the ESXi hosts. To allow communication among VMs that are running on different ESXi hosts during DR testing, a physical private network is created between the ESXi hosts at the DR site. To verify that the test network is private, the test bubble network can be separated physically or by using VLANs or VLAN tagging. This network must be segregated from the production network because as the VMs are recovered, they cannot be placed on the production network with IP addresses that could conflict with actual production systems. When a recovery plan is created in SRM, the test network that was created can be selected as the private network to connect the VMs to during the test.
After the test has been validated and is no longer required, perform a cleanup operation. Running cleanup returns the protected VMs to their initial state and resets the recovery plan to the Ready state.
Failover considerations
There are several other considerations when it comes to failing over a site in addition to the order of operations mentioned in this guide.
One issue you might have to contend with is networking differences between sites. Some environments might be able to use the same network IP addresses at both the primary site and the DR site. This ability is referred to as a stretched virtual LAN (VLAN) or stretched network setup. Other environments might have a requirement to use different network IP addresses (for example, in different VLANs) at the primary site relative to the DR site.
VMware offers several ways to solve this problem. For one, network virtualization technologies like VMware NSX-T Data Center abstract the entire networking stack from layers 2 through 7 from the operating environment, allowing for more portable solutions. Learn more about NSX-T options with SRM.
SRM also gives you the ability to change the network configuration of a VM as it is recovered. This reconfiguration includes settings such as IP addresses, gateway addresses, and DNS server settings. Different network settings, which are applied to individual VMs as they are recovered, can be specified in the property's settings of a VM in the recovery plan.
To configure SRM to apply different network settings to multiple VMs without having to edit the properties of each one in the recovery plan, VMware provides a tool called the dr-ip-customizer. Learn how to use this utility, refer to VMware's documentation.
Reprotect
After a recovery, the recovery site becomes the new production site. Because the recovery operation broke the SnapMirror replication, the new production site is not protected from any future disaster. A best practice is to protect the new production site to another site immediately after a recovery. If the original production site is operational, the VMware administrator can use the original production site as a new recovery site to protect the new production site, effectively reversing the direction of protection. Reprotection is available only in non-catastrophic failures. Therefore, the original vCenter Servers, ESXi servers, SRM servers, and corresponding databases must be eventually recoverable. If they are not available, a new protection group and a new recovery plan must be created.
Failback
A failback operation is fundamentally a failover in a different direction than before. As a best practice, you verify that the original site is back to acceptable levels of functionality before attempting to failback, or, in other words, failover to the original site. If the original site is still compromised, you should delay failback until the failure is sufficiently remediated.
Another failback best practice is to always perform a test failover after completing reprotect and before doing your final failback. This verifies that the systems in place at the original site can complete the operation.
Reprotecting the original site
After failback, you should confirm with all stakeholders that their services have been returned to normal before running reprotect again,
Running reprotect after failback essentially puts the environment back in the state it was in at the beginning, with SnapMirror replication again running from the production site to the recovery site.