

Test migration example using Hitachi AMS2100
 Suggest changes
The following is an example test migration using a Hitachi AMS2100 as the foreign array. Depending on the arrays involved, host operating systems, and other variables, your steps may be different.
You can use the following example as a general guide to the steps required to perform test migrations. NetApp recommends performing test migrations as early as possible in order to find and have as much time as possible to resolve any issues brought to light by the tests. A test migration should be performed on all combinations of source and destination arrays before proceeding with the production migrations.
To perform a test migration, complete the following steps:
-
Create a 2 GB test LUN on the source array.
-
Log in to Hitachi Storage Navigator Modular as system.
-
Select AMS 2100 array.
-
Click Show and Configure Array.
-
Log in using root.
-
Expand Groups and select Logical Units.
-
Select Create LU to create the test LUN.
-
Create a test LUN of 2 GB.
-
Click OK.
-
Skip the LUN assignment here and proceed by clicking Close.
-
Verify LUN 0026 is created.
-
Expand Groupsand select Logical Units.
-
Select Host Groups to map the test LUN to the cDOT_FLI host group.
-
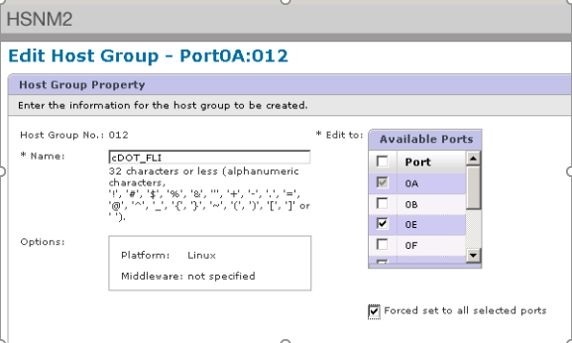
Select host group cDOT_FLI created in the previous step and click Edit Host Group.
-
Choose the ports for the host group. In this example we choose 0a, 0e, 1a, 1e. Select the Forced Set to All Selected Ports option.
-
Click Logical Units and add the test LUN LUN0026.
-
Click OK to map the LUN.
-
Select Yes, I Have Read the Above Warning and Want to Edit Host Group and click Confirm.
-
Verify host group creation and click Close.
-
Verify the test LUN and mapping from the source storage to destination storage and perform Foreign LUN Import (FLI) import.
-
Log in to the ONTAP storage through SSH using admin user.
-
Change the mode to Advanced.
DataMig-cmode::> set -privilege advanced -
Enter y when asked if you want to continue with advanced commands.
-
Discover the source array on ONTAP. Wait for a few minutes and retry to detect the source array.
storage array show-
When the storage array is discovered for the first time, ONTAP might not show the array by discovering automatically. Use the following instructions to reset the switch port where ONTAP initiator ports are connected.
For example, the DataMig-cmode cluster initiator ports 0a and 0b of ONTAP are connected to Cisco ports 4/9 and 4/11. To reset port 4/9 on the Cisco switch:
conf t
interface fc4/9
shutdown
no shutdown
exit
exit
Resetting one port is usually enough. Check the array list and LUN paths after resetting one port.
-
-
Verify the source array is discovered through all the initiator ports:
storage array config show -array-name HITACHI_DF600F_1LUN LUN Node Group Count Array Name Array Target Port Initiator ------------ ----- ----- ---------------------------- ----------------------- DataMig-cmode-01 0 1 HITACHI_DF600F_1 50060e801046b960 0a 50060e801046b964 0b 50060e801046b968 0a 50060e801046b96c 0b DataMig-cmode-02 0 1 HITACHI_DF600F_1 50060e801046b960 0a 50060e801046b964 0b 50060e801046b968 0a 50060e801046b96c 0b -
List the test LUN mapped from Hitachi storage and verify the disk properties and paths:
storage disk show -array-name HITACHI_DF600F_1 -instanceDisk: HIT-1.1 Container Type: unassigned Owner/Home: - / - DR Home: - Stack ID/Shelf/Bay: - / - / - LUN: 0 Array: HITACHI_DF600F_1 Vendor: HITACHI Model: DF600F Serial Number: 83017542001A UID: 48495441:43484920:38333031:37353432:30303236:00000000:00000000:00000000:00000000:00000000 BPS: 512 Physical Size: - Position: present Checksum Compatibility: block Aggregate: - Plex: - Paths: LUN Initiator Side Target Side Link Controller Initiator ID Switch Port Switch Port Acc Use Target Port TPGN Speed I/O KB/s IOPS ------------------ --------- ----- -------------------- -------------------- --- --- ----------------------- ------ ------- ------------ ------------ DataMig-cmode-01 0a 0 DM-Cisco9506-1:4-9 DM-Cisco9506-1:2-24 AO INU 50060e801046b968 2 2 Gb/S 0 0 DataMig-cmode-01 0b 0 DM-Cisco9506-2:4-9 DM-Cisco9506-2:2-24 AO INU 50060e801046b96c 2 2 Gb/S 0 0 DataMig-cmode-01 0b 0 DM-Cisco9506-2:4-9 DM-Cisco9506-2:1-14 AO INU 50060e801046b964 1 2 Gb/S 0 0 DataMig-cmode-01 0a 0 DM-Cisco9506-1:4-9 DM-Cisco9506-1:1-14 AO INU 50060e801046b960 1 2 Gb/S 0 0 DataMig-cmode-02 0a 0 DM-Cisco9506-1:4-11 DM-Cisco9506-1:2-24 AO INU 50060e801046b968 2 2 Gb/S 0 0 DataMig-cmode-02 0b 0 DM-Cisco9506-2:4-11 DM-Cisco9506-2:2-24 AO INU 50060e801046b96c 2 2 Gb/S 0 0 DataMig-cmode-02 0b 0 DM-Cisco9506-2:4-11 DM-Cisco9506-2:1-14 AO INU 50060e801046b964 1 2 Gb/S 0 0 DataMig-cmode-02 0a 0 DM-Cisco9506-1:4-11 DM-Cisco9506-1:1-14 AO INU 50060e801046b960 1 2 Gb/S 0 0 Errors: - DataMig-cmode::*> -
Mark the source LUN as foreign using the serial number:
storage disk set-foreign-lun { -serial-number 83017542001A } -is-foreign true -
Verify the source LUN is marked as foreign:
storage disk show -array-name HITACHI_DF600F_1 -
List all foreign arrays and their serial numbers:
storage disk show -container-type foreign -fields serial-number
The LUN create command detects the size and alignment based on partition offset and creates the LUN accordingly with the foreign-disk argument.
-
Create a destination volume:
vol create -vserver datamig flivol aggr1 -size 10g -
Create a test LUN using a foreign LUN:
lun create -vserver datamig -path /vol/flivol/testlun1 -ostype linux -foreign-disk 83017542001A -
List the test LUN and verify the size of the LUN with the source LUN:
lun show
For FLI offline migration, the LUN must be online to map it to an igroup and then must be offline before creating the LUN import relationship.
-
Create test igroup of protocol FCP without adding any initiators:
lun igroup create -vserver datamig -igroup testig1 -protocol fcp -ostype linux -
Map the test LUN to the test igroup:
lun map -vserver datamig -path /vol/flivol/testlun1 -igroup testig1 -
Offline the test LUN:
lun offline -vserver datamig -path /vol/flivol/testlun1 -
Create import relationship with test LUN and foreign LUN:
lun import create -vserver datamig -path /vol/flivol/testlun1 -foreign-disk 83017542001A -
Start the migration (import):
lun import start -vserver datamig -path /vol/flivol/testlun1 -
Monitor the import progress:
lun import show -vserver datamig -path /vol/flivol/testlun1 -
Check the import job is completed successfully:
lun import show -vserver datamig -path /vol/flivol/testlun1vserver foreign-disk path operation admin operational percent in progress state state complete ------------------------------------------------------------------------------- datamig 83017542001A /vol/flivol/testlun1 import started completed 100 -
Start the verify job to compare source and destination LUNs. Monitor the verify progress:
lun import verify start -vserver datamig -path /vol/flivol/testlun1DataMig-cmode::*> lun import show -vserver datamig -path /vol/flivol/testlun1 vserver foreign-disk path operation admin operational percent in progress state state complete ------------------------------------------------------------------------------- datamig 83017542001A /vol/flivol/testlun1 verify started in_progress 44 -
Check the verify job is complete without any errors:
lun import show -vserver datamig -path /vol/flivol/testlun1vserver foreign-disk path operation admin operational percent in progress state state complete ------------------------------------------------------------------------------- datamig 83017542001A /vol/flivol/testlun1 verify started completed 100 -
Delete the import relationship to remove the migration job:
lun import delete -vserver datamig -path /vol/flivol/testlun1``lun import show -vserver datamig -path /vol/flivol/testlun1 -
Unmap the test LUN from the test igroup:
lun unmap -vserver datamig -path /vol/flivol/testlun1 -igroup testig1 -
Online the test LUN:
lun online -vserver datamig -path /vol/flivol/testlun1 -
Mark the foreign LUN attribute to false:
storage disk modify { -serial-number 83017542001A } -is-foreign false
Do not remove the host group created on source storage with ONTAP initiator ports. The same host group is reused during migrations from that source array.
-
Remove test LUN from source storage.
-
Log in to Hitachi Storage Navigator Modular as a system.
-
Select AMS 2100 array and click Show and Configure Array.
-
Log in using root.
-
Select Groups, then select Host Groups.
-
Select cDOT_FLI Igroup and click Edit Host Group.
-
In the Edit Host Group window, select all target ports chosen to map the test LUN and select Forced Set to All Selected Ports.
-
Select the Logical Units tab.
-
Select the test LUN from the Assigned Logical Units window.
-
Select Remove to remove the LUN mapping.
-
Click OK.
-
Do not remove the host group and continue deleting the test LUN.
-
Select Logical Units.
-
Select the test LUN created in the previous step (LUN0026).
-
Click Delete LUN.
-
Click Confirm to delete the test LUN.
-
-
Delete the test LUN on the destination storage.
-
Log in to the ONTAP storage through SSH using admin user.
-
Offline the test LUN on the NetApp storage system:
lun offline -vserver datamig -path /vol/flivol/testlun1
Make sure you do not select another host LUN.
-
Destroy the test LUN on the NetApp storage system:
lun destroy -vserver datamig -path /vol/flivol/testlun1 -
Offline the test volume on the NetApp storage system:
vol offline -vserver datamig -volume flivol -
Destroy the test volume on the NetApp storage system:
vol destroy -vserver datamig -volume flivol
-