


Prepare a Hyper-V host for ONTAP Select

 Suggest changes

 PDFs

Prepare each Hyper-V hypervisor host where an ONTAP Select node is deployed. Ensure the hosts are correctly configured and ready to support the deployment of an ONTAP Select cluster.

|
The ONTAP Select Deploy administration utility doesn't perform the required network and storage configuration of the hypervisor hosts. You must manually prepare each host before deploying an ONTAP Select cluster. |
Step 1: Prepare the Hyper-V hypervisor host
Prepare each of the Windows Hyper-V servers where an ONTAP Select node is deployed.
Refer to the Windows documentation for more information on how to perform these steps.
-
Install a supported Windows Server release and enable the Hyper-V role using Server Manager, Windows Admin Center, or PowerShell.
-
Install Windows to the local boot disk. Do not install Windows to a disk you intend to give to ONTAP Select.
-
Verify that the configuration meets the following requirements:
-
The Windows Server release is listed as supported. The Deploy utility reads the product name during host registration and reports an unsupported release.
-
The Hyper-V role is enabled. The Deploy utility verifies this during host registration, and registration fails if the role is not enabled.
-
Host CPU and memory have capacity for Windows Server. The Deploy utility reserves 2 CPU cores and 8 GB of memory for the host when it sizes a node.
-
Step 2: Provide remote management access for Deploy
The Deploy utility administers the host over Windows Remote Management (WinRM) using HTTPS and the PowerShell remoting configuration. You need to configure the WinRM HTTPS listener, the associated certificate, and the firewall rule.
-
Enable WinRM HTTP:
Enable-PSRemoting -Force -
Verify WinRM configuration:
winrm enumerate winrm/config/listener -
Create a firewall inbound rule to accept network connections on HTTPS port 5986:
New-NetFirewallRule -DisplayName "WinRM HTTPS" -Direction Inbound -Action Allow -Protocol TCP -LocalPort 5986 -
Configure the associated certificate:
Certificate is availableIf you already have a valid certificate in the local machine certificate store:
-
Configure Powershell remoting for the certificate:
Enable-PSRemoting -Force -
Configure WinRM for remote administration:
winrm quickconfig -q -
Verify the WinRM HTTPS listener configuration:
winrm e winrm/config/listener
Certificate is not available-
Generate the self-signed certificate:
$cert = New-SelfSignedCertificate -DnsName $env:COMPUTERNAME -CertStoreLocation Cert:\LocalMachine\My -
Bind the certificate to the WinRM listener:
New-WSManInstance -ResourceURI winrm/config/Listener -SelectorSet @{Transport='HTTPS';Address='*'} -ValueSet @{CertificateThumbprint=$cert.Thumbprint}
-
-
Configure the Group Policy by selecting Computer Configuration > Administrative Templates > Windows Components > Windows Remote Management (WinRM) > WinRM Service.
-
Verify that the configuration meets the following requirements:
-
The Deploy virtual machine (VM) can reach the WinRM HTTPS listener on TCP port 5986. The Deploy utility does not use HTTP or TCP port 5985.
-
There is a self-signed certificate. The Deploy utility does not validate the certificate against a certificate authority.
-
The account used to register the host has administrator rights on the host. The Deploy utility authenticates with Kerberos. If the Deploy utility cannot use Kerberos, it falls back to NTLM.
-
You have registered the Hyper-V host using a unique name that answers on TCP port 5986. The Deploy utility retrieves the certificate using the registered name.
The Deploy utility records the certificate and validates it on every later connection. If the certificate is replaced, connections to the host fail and you must delete the host from the Deploy utility and register it again.
-
Step 3: Prepare the host storage
A storage pool on a Hyper-V host is a local volume that holds the ONTAP Select VM and its virtual disks.
-
Create a local volume using Disk Management, Server Manager, or Windows Admin Center. Refer to the Microsoft documentation for more information.
-
Create at least one storage pool for each ONTAP Select node. Refer to the Microsoft documentation for more information.
-
You need to create a storage pool when you are using software RAID.
-
To remove a storage pool, first delete the ONTAP Select cluster or node that is using the storage pool, then delete the volume using the standard Windows tools.
-
-
Verify that the volume is formatted as NTFS or ReFS and has a drive letter assigned. The Deploy utility identifies the storage pool by its drive letter.
-
The Deploy utility reserves two percent of the volume as overhead and can allocate a maximum of 64 TB from a single storage pool.
-
You cannot use Cluster Shared Volumes and SMB 3.0 file shares as ONTAP Select storage pools.
-
ONTAP Select cannot discover a volume that is mounted only to a folder path because it has no drive letter.
-
-
If you are using software RAID, you need to reserve physical disks for ONTAP Select. PCI passthrough is not supported on Hyper-V, so the disks are presented to the VM as passthrough physical disks. The physical disks must meet the following requirements:
-
They are SSD or NVMe disks with at least 200 GB of storage each.
-
They are raw disks without partitions, volumes, and drive letters.
-
The disks are not members of a Storage Spaces pool.
-
The disks are left online. The Deploy utility takes each disk offline when it attaches it to the VM.
-
-
A single-node cluster requires a minimum of three disks for software RAID and four or five disks for software RAID-DP. A two-node cluster requires six disks for software RAID or ten disks for software RAID-DP. ONTAP Select supports a maximum of 60 passthrough disks per node.
Confirm that the reserved disks are eligible before you register the host:
Get-PhysicalDisk | Select-Object FriendlyName, MediaType, BusType, Size
The disks that appear as members of a Storage Spaces pool in the Get-StoragePooloutput are excluded by the Deploy utility and are not available for software RAID.
Step 4: Review the ONTAP Select cluster configuration
You can deploy ONTAP Select as either a two-node or four-node cluster or a single-node cluster. In many cases, a multi-node cluster is preferable because of the additional storage capacity and high-availability (HA) capability.
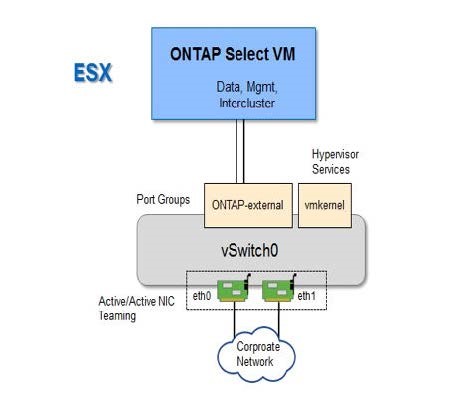
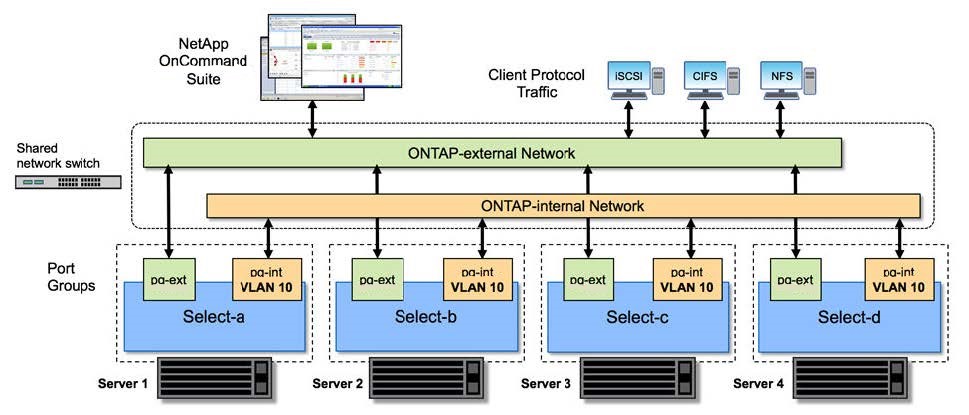
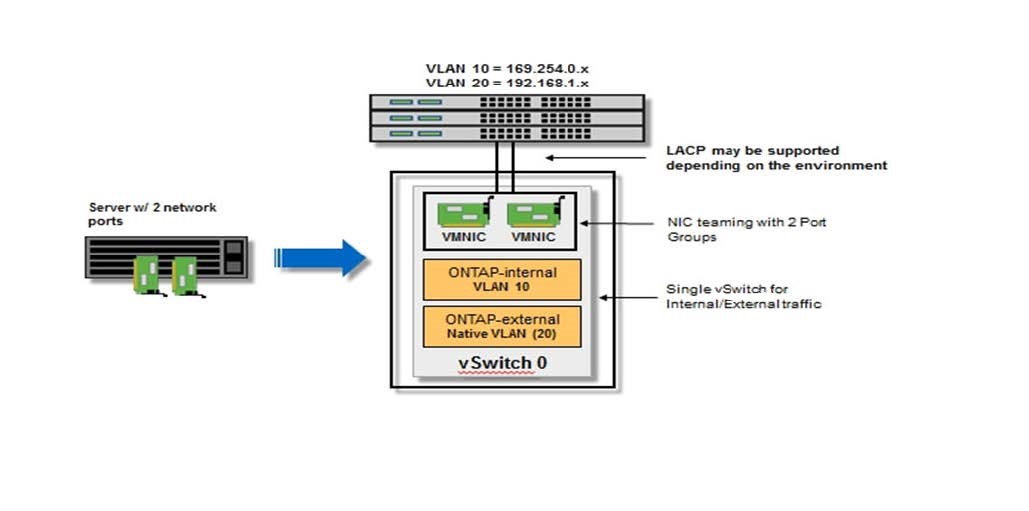
The following figures illustrate the ONTAP Select networks used with a single-node cluster and four-node cluster for an ESXi host.
The following figure illustrates a single-node cluster. The external network carries client, management, and cross-cluster replication traffic (SnapMirror/SnapVault).
The following figure illustrates a four-node cluster showing two networks. The internal network enables communication among the nodes in support of the ONTAP cluster network services. The external network carries client, management, and cross-cluster replication traffic (SnapMirror/SnapVault).
The following figure illustrates the typical network configuration for a single ONTAP Select VM within a four-node cluster. There are two separate networks: ONTAP-internal and ONTAP-external.
Step 5: Prepare the networks
ONTAP Select Deploy connects to the physical network through Hyper-V virtual switches. You need to create the virtual switches before you register the host.
Refer to the Windows documentation for more information on how to perform these steps.
-
Create the switches by using Virtual Switch Manager in Hyper-V Manager, Windows Admin Center, or PowerShell.
Create an external virtual switch for each physical adapter used by ONTAP Select. A single-node cluster requires at least one adapter and a two-node cluster requires at least two adapters.
-
Set jumbo frames in the advanced properties of the physical adapter.
-
Bind one physical adapter to each virtual switch.
NIC teaming and Switch Embedded Teaming are not supported. -
Verify that each uplink is
up.
An external virtual switch whose uplink is downis reported as unavailable. -
Configure VLAN tagging on the physical switch port or on the management operating system adapter. The Deploy utility reads the VLAN that is in use, it doesn't assign a VLAN.
-
The internal network of a two-node cluster requires a Maximum Transmission Unit (MTU) of 7500 to 9000 bytes. Enable jumbo frames on the adapter that carries the internal network.
Windows Server reports the jumbo frame size including the Ethernet header, so an adapter set to 9014 bytes provides an MTU of 9000 bytes. This is how the Deploy utility interprets the MTU value for the adapter setting. When a virtual switch is shared with the management operating system, the IP MTU of the corresponding host adapter also limits the MTU that the Deploy utility reports.