

Prepare for the upgrade when moving storage
 Suggest changes
Before upgrading by moving storage, you must gather license information from the original nodes, plan network configuration, record the system IDs, and prepare the files needed for netboot.
-
Display and record license information from the original nodes, node1 and node2:
system license show -
If you use Storage Encryption on the node1/node2 HA pair and the new nodes have encryption-enabled disks, make sure that the original nodes' disks are correctly keyed:
-
Display information about self-encrypting disks (SEDs)
storage encryption disk show -
If any disks are associated with a non-manufacture secure ID (non-MSID) key, rekey them to an MSID key
storage encryption disk modify
-
-
Record port and LIF configuration information on the node1/node2 HA pair:
To display information about… Enter… Shelves, numbers of disks in each shelf, flash storage details, memory, NVRAM, and network cards
system node run -node node_name sysconfigCluster network and node management LIFs
network interface show -role cluster,node-mgmtPhysical ports
network port show -node node_name -type physicalFailover groups
network interface failover-groups show -vserver vserver_nameRecord the names and ports of failover groups that are not clusterwide.
VLAN configuration
network port vlan show -node node_nameRecord each network port and VLAN ID pairing.
Interface group configuration
network port ifgrp show -node node_name -instanceRecord the names of the interface groups and the ports assigned to them.
Broadcast domains
network port broadcast-domain showIPspace information
network ipspace show -
Obtain information about the default cluster ports, data ports, and node management ports for each new node that you are upgrading to: NetApp Hardware Universe
-
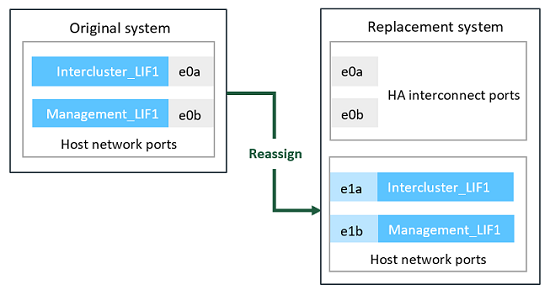
Certain systems, for example, FAS8300, AFF A400, or FAS8700 systems, use ports "e0a" and "e0b" as high availability (HA) interconnect ports. If you are upgrading from a system, such as a FAS8200 or an AFF A300, to a system that uses ports "e0a" and "e0b" as HA interconnect ports, you must reassign the management and intercluster LIFs that are configured on these ports on the original system to alternative ports on the replacement system.

When ports "e0a" and "e0b" are being used as HA interconnect ports on the replacement system, any management or intercluster LIFs that are configured on these ports might lead to an upgrade failure by preventing the HA configuration from using ports "e0a" and "e0b" to boot onto the replacement system. -
Verify if your replacement system uses ports "e0a" and "e0b" as HA ports: NetApp Hardware Universe
-
If required, identify the management or intercluster LIFs configured on ports "e0a" and "e0b" on your original system:
network interface show -home-port port_name -
If required, reassign only the affected management or intercluster LIFs to network ports that are not being used as HA ports on the replacement system:
network interface modify -vserver vserver_name -lif LIF_name -home-port new_port_namenetwork interface revert -vserver vserver_name -lif LIF_nameIn the following example, the management and intercluster LIFs on network ports "e0a" and "e0b" are reassigned to network ports "e1a" and "e1b". Your nodes might be using different network ports because they vary by system.
-
-
Download and prepare the files used for performing netboot.
After you install the new nodes, you might need to netboot to confirm that the new nodes are running the same version of ONTAP as the original nodes. The term netboot means you are booting from an ONTAP image stored on a remote server. When preparing for netboot, you must put a copy of the ONTAP 9 boot image onto a web server that the system can access.
-
Access the NetApp Support Site to download the files used for performing the netboot of the system.
-
Download the appropriate ONTAP software from the software download section of the NetApp Support Site and store the
<ontap_version>_image.tgzfile on a web-accessible directory. -
Change to the web-accessible directory and verify that the files you need are available.
For… Then… FAS2200, FAS2500, FAS3200, FAS6200, FAS/AFF8000 series systems
Extract the contents of the
<ontap_version>_image.tgzfile to the target directory:tar -zxvf <ontap_version>_image.tgzNote: If you are extracting the contents on Windows, use 7-Zip or WinRAR to extract the netboot image.
Your directory listing should contain a netboot folder with a kernel file:
netboot/kernelAll other systems
Your directory listing should contain the following file:
<ontap_version>_image.tgz
You do not need to extract the contents of the <ontap_version>_image.tgzfile. -
You will use information in the directory to set up the new nodes.